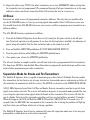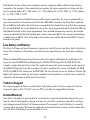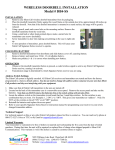
1
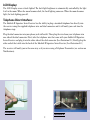
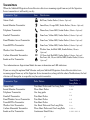
www.silentcall.com
Sidekick II™
Receiver
Model # SK2-SS
418MHz
Signature Series
Sidekick II Signature Series
Model # SK2-SS
(418 MHz Receiver)
Setup and Operation:
1. Plug the power supply pin jack into the connector located next to the Power ON/OFF switch on the
back of the receiver. (see page 6 for diagram) Plug power supply into a wall electrical outlet.
Battery Back-up Installation Instructions
Your Sidekick II Signature Series Receiver comes with the battery back-up pre-installed at the factory. In the event that you need to re-install the battery pack, follow the instructions below.
The battery compartment door is secured by one screw. To gain access to the battery compartment remove the screw (pg 6). Plug the female connector from the battery pack onto the male
connector pin in the battery compartment. Be sure to line up the pins with the holes in the connector. It will only fit one way. Replace the battery compartment door and secure the screw.
You will notice and On/Off switch on the right hand bottom corner of the battery compartment
door (see pg 6). With the battery back-up installed and the back-up switch turn to the “ON” position, the Sidekick II’s blue light (AC power indicator) will turn to an amber color when the unit
goes into battery back-up mode because of a power failure. Turning the battery back-up power
switch to “OFF” will turn off the battery back-up to the receiver and the clock. It is important
that the battery back-up feature be turned “ON” for proper operation.
The Ni-Cad battery is intended to keep the Sidekick II operational during a short term power
outage for several hours without the strobe or vibrator operating. If both strobe and vibrator are
operating, the battery back-up will operate the system for approximately 10 minutes. The battery
back-up is automatically being charged when the Sidekick II power supply is plugged into a standard electrical wall outlet.
The BATTERY ICON will display itself on the LCD screen once the battery back-up level has
reached 2/3 of its discharge. However, the BATTERY ICON will not be displayed until this condition is reached. When the Amber LED is on but the BATTERY ICON is not displayed on the
screen, this means that the battery is at a full or close to full charge.
2. Turn the Power ON by sliding the ON/OFF SWITCH on the back of the receiver to the ON position.
The front panel display will show the time 11:59AM. A blue light will be visible from the Strobe lens.
The blue light indicates that the unit’s AC power is on. An amber light will appear if the unit is in battery backup mode. (If your unit is equipped with a battery back-up.)
3
3. Set Clock Time: Press and release the MODE pushbutton (the large button located at the lower right
hand side on the unit). The Orange LED will light up to let you know that you are in “Set Clock
Time” mode.
4. Press and release the minute button to set the minutes. Press and release the hour button to set the
hour.
5. When you are finished setting the minutes and hours, press and release the MODE pushbutton three
times to exit the Setup Mode.
Note: Any time you unplug your Sidekick II Receiver from the wall outlet or turn the power off,
the next time you turn your Sidekick II Receiver on again, you will need to reset the clock. If you
are using the Battery Backup feature, you will not need to do this.
6. All of your Signature Series transmitters come pre-programmed from the factory to work with your
Sidekick II Signature Series Receiver. If you need to set your transmitters to a different address, please
refer to the section in this manual on programming transmitters. The only reason you would need
to do this is if someone in your area is using Silent Call products and they are interfering with your
products or if you want to use the Supervision Capability with your Silent Call Smoke Detectors or
Fire Transmitters.
Setting Alarm Clock:
1. Press and release the MODE push button twice.
2. The Green LED will light up indicating that you are in the “SET UP” mode. The display will show the
present Alarm Clock Time setting.
3. Press and release the MINUTES button to set minutes and press and release the HOURS button to set
the hours.
4. Once the Alarm Clock Time has been set, press the MODE button 2 times to exit the “SET UP”
mode.
5. When your alarm is activated the strobe light and bell icon will flash and the bed vibrator (optional)
will shake.
6. To turn the ALARM on or off, press and release the “Alarm Clock” button. When the alarm is turned
ON the BELL ICON will appear on the screen.
4
LCD Display:
The LCD Display screen is back lighted. The back light brightness is automatically controlled by the light
level in the room. When the room becomes dark, the back lighting comes on. When the room becomes
light, the back lighting goes off.
Telephone Direct Interface:
The Sidekick II Signature Series Receiver has the ability to plug a standard telephone line directly into
the receiver using the supplied telephone wire and dual connector and it will notify you each time the
telephone rings.
Plug the dual connector into your phone jack wall outlet. Then plug the wire from your telephone into
one side of the dual connector. Next, take the telephone wire that came with your Sidekick II Signature
Series Receiver and plug it into the other side of the dual connector (See illustration #1.) Finally, plug the
other end of that cable into the back of the Sidekick II Signature Series Receiver (See illustration #2.)
The receiver will notify you in the same way as if you were using a Telephone Transmitter (see section on
Notifications).
Illustration #1
Illustration #2
5
Remove screw to gain
access to battery backup
compartment.
2 AAA Batteries
Clock Battery
Backup
Accessory Battery Backup
12V NI-CAD 300mA
Compartment & Connector
Battery Backup
On/Off Switch
On/Off
Switch
Power Supply
Terminal
Telephone
Interface Input
6
Vibrator Jack
Antenna
Transmitters
When the Sidekick II Signature Series Receiver detects an incoming signal from any of the Signature
Series transmitters it will notify you by:
Transmitter Type
Icon
Notification
Alarm Clock
Bell Icon, Strobe flashes (Vibrator Optional)
Sound Monitor Transmitter
Sound Icon, Orange LED, Strobe flashes (Vibrator Optional)
Telephone Transmitter
Phone Icon, Green LED, Strobe flashes (Vibrator Optional)
Doorbell Transmitter
Door Icon, Yellow LED, Strobe flashes (Vibrator Optional)
Door/Window Access Transmitter
Door Icon, Yellow LED, Strobe flashes (Vibrator Optional)
TransMATTer Transmitter
Door Icon, Yellow LED, Strobe flashes (Vibrator Optional)
Weather Icon, 2nd Red LED, Strobe flashes (Vibrator
Weather Alert Transmitter
Carbon Monoxide Transmitter
Smoke or Fire Transmitter
CO
Optional)
CO Icon, 2nd Red LED, Strobe flashes (Vibrator Optional)
Fire Icon, 4th, 5th, or 6th Red LED, Strobe flashes (Vibrator
Optional)*
*See information on Supervision Mode for more information on LED indicators.
If you are using the optional Bed Vibrator and your Sidekick II Signature Series Receiver detects an
incoming signal from any of the Signature Series transmitters, along with the above Notifications, the bed
vibrator will also pulse in a specific way for each transmitter.
Transmitter Type
Alarm Clock
Sound Monitor Transmitter
Telephone Transmitter
Doorbell Transmitter
Door/Window Access Transmitter
TransMATTer Transmitter
Weather Alert Transmitter
Carbon Monoxide Transmitter
Smoke or Fire Transmitter
Pulse Pattern
Short Pulse •
Long Pulse —
Two Short Pulses and One Long Pulse
Three Short Pulses
One long pulse
Two Short Pulses
Two Short Pulses
Two Short Pulses
One Short Pulse and One Long Pulse
Three Short Pulses and One Long Pulse
Continuous Short Pulses
••—
•••
—
••
••
••
•—
•••—
••••••••
7
Transmission Range:
Transmission range refers to the distance a Silent Call Transmitter can communicate with the Sidekick II
Signature Series Receiver. Range is measured in an outdoor environment without obstructions from metal
objects or buildings. The range for the Sidekick II Signature Series Receiver is up to 2000 feet. The actual
range inside a building will vary depending on many factors outside of one’s control.
Cancelling An Incoming Alert
To cancel an alert, press and release the mode button once.
Programming the transmitters:
All Signature Series Transmitters come pre-programmed at the factory. You do NOT need this step unless
you need to change the address due to someone in your area that has Silent Call products and they are
interfering with your equipment OR if you want to use the Supervision Mode with your smoke detectors.
1. Make sure that all Silent Call transmitters in the area are turned off.
2. Perform the ALL ERASE function (see pg 9)
3. Select the transmitter you wish to program with the Sidekick II Signature Series
Receiver. It is important to program the Smoke Detector and Fire transmitters
first because of the supervision capability.
4. Located on the back of the transmitter case is a removable access panel. Remove
the access panel and take out the batteries.
5. Locate the switch on the transmitter circuit board that has 5 small dip switches.
6. Set the switches to any combination that you want. For Example: 1, 2 On 3, 4, 5
OFF. (Do not set them to all ON or all OFF as this can cause interference). This
gives your transmitter an “address”. Note that you MUST remove the batteries first or the switch setting will not take effect.
7. Reinstall batteries and replace the access panel.
8. Make sure that the transmitter is near the Sidekick II Signature Series Receiver.
9. On the Sidekick II Signature Series Receiver, press and release the MODE pushbutton until the Yellow
LED lights up and “PPP” is displayed on the screen. This means you are now in program mode.
10.Press the test button on the transmitter so that it sends a signal to the Sidekick II Signature Series
Receiver. The unit will flash its strobe, turn on the appropriate LED and display Icon for the transmitter that you used. Your transmitter is now programmed to work with your receiver.
8
11.Repeat the above steps ONLY if the other transmitters are set to a DIFFERENT address setting than
the transmitter you just programmed. We recommend keeping all of your transmitters set to the same
address to reduce interference from other Silent Call systems that may be in your area.
All Erase:
Provisions are made to erase all programmed transmitter addresses. The only time you would need to
use the ALL ERASE feature is if you are receiving signals from another Silent Call System in your area.
You would then do the ALL ERASE feature on your receiver and then re-program your transmitters to a
different address.
The ALL ERASE function is performed as follows:
1. Turn off the Sidekick II Signature Series Receiver by turning the AC power switch to the off position. Turn back-up battery to off position (if you have the backup battery installed). An indication of
power being off would be that the blue and amber light on the strobe lens is off.
2. Press and hold the MINUTES pushbutton DO NOT RELEASE THE BUTTON
3. Turn the power back on while holding the MINUTES pushbutton in.
4. Once power is on, release the MINUTES pushbutton.
The all erase function is complete and the unit will now need to be re-programmed with its transmitters.
The Supervisor MODE is also disabled. Please Remember to program the smoke detectors and fire transmitters before programming any other transmitters.
Supervision Mode for Smoke and Fire Transmitters:
The Sidekick II Signature Series is capable of monitoring up to three Silent Call Smoke Detectors and/or
Fire transmitters for low battery, out of range, interference from outside sources, and missing or failure of
the transmitter to communicate with the receiver. The MODE is referred to as the SUPERVISOR MODE.
All 418 MHz Signature Series Silent Call Fire and Smoke Detector transmitters send out a special alarm
signal at two minute intervals. The receiver will continue to operate in its normal mode provided the unit
is receiving the supervisory alarm signals from the Smoke or Fire transmitter. The receiver will alert the
user if a Smoke Detector or Fire transmitter signal has not been received within a period of 10 minutes.
When this happens, the LCD will flash the FIRE ICON and the CHK ICON for 10 seconds every 30
seconds. Also, the RED LED that corresponds to the transmitter that is having the problem will light up
and that is how you will know which unit is having a problem.
The Sidekick II Signature Series Receiver automatically enters the supervisor mode once it has been programmed for a smoke detector or fire alarm transmitter.
9
Each Smoke Detector or Fire alarm transmitter must be assigned an address different from all other
transmitters. For example, if two smoke detectors and one fire alarm transmitters are being used, they
may be assigned address #1 (1 OFF and 2, 3, 4, 5 ON); address #2 (1 ON, 2 OFF, 3, 4, 5 ON); address
#3 (1, 2 ON, 3 OFF, 4, 5 ON).
Once programmed for the Smoke Detectors and Fire alarm transmitters, the receiver automatically assigns each transmitter a location on one of the three RED LED’s located on the Front Panel, right side.
The red LED located furthest left of the three is assigned the first Smoke Detector or Fire alarm program.
The second Red LED, the second Smoke Detector or Fire alarm programmed and the third Red LED, the
third Smoke Detector or Fire alarm programmed. Once installed and operating correctly, the transmitters can be identified by location. For Example, a smoke alarm on LED # 1 may represent the bedroom,
a smoke alarm on LED # 2 may be located in the basement and a smoke alarm on the LED # 3 may be
located in the garage.
Low battery notification:
The Silent Call Signature Series Transmitters, operates on two AA batteries and has a built in low battery
sensor. The transmitters will send out a special low battery signal whenever the low battery condition
exists.
When the Sidekick II Signature Series Receiver detects the signal it will display the condition by turning on the units ALARM LED and displaying the ALARM ICON along with the CHK ICON. For
example, a smoke detector battery is low. The smoke detector or fire alarm transmitter sends a signal to
the Sidekick II Signature Series Receiver about its battery condition. The receiver will display the FIRE
ICON, the CHK ICON, and turn on the FIRE LED. The unit will not turn on the Strobe or Vibrator. The
display will continue to show the low battery condition until the problem is resolved. Once resolved, the
transmitter will no longer send the low battery alarm.
Technical Support
For technical support on this or any other Silent Call product, please feel free to contact us. You can
reach us by phone at 800-572-5227 (voice or TTY) or by Email at [email protected]
Limited Warranty
Your Silent Call product is warranted to be free of defects in material and workmanship for five years
from the date of initial purchase. During that time, the unit will be repaired or replaced free of charge
when shipped prepaid to Silent Call Communications. This warranty is void if the defect is caused by
customer abuse or neglect. We honor the smoke detector manufacturer’s warranty for their smoke detector. Only Silent Call products are warranted for 5 years.
10
11
5095 Williams Lake Road
Waterford, MI 48329
Phone 800-572-5227 v/tty
www.silentcall.com