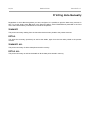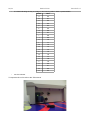
1
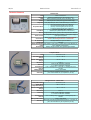
Radio Printer
e
Radio Printer USB
User Manual
Version date 25/02/2009
Receiving unit for
TempStick Radio and
Intelligent Sensors + Radio Nodes
Firmware version 2.5
2/24
Tecnosoft s.r.l.
Via delle Regioni, 34, 20090 Segrate (Milano)
telephone +39 02 26922888 - fax +39 02 26922875
e-mail: [email protected] - web: www.tecnosoft.net
Radio Printer
TecnoSoft s.r.l.
TecnoSoft s.r.l.
Radio Printer
3/24
Index
LICENSE AGREEMENT......................................................................................................................5
INTRODUCTION...............................................................................................................................6
RADIO PRINTER USB.............................................................................................................................6
BASIC OPERATIONS........................................................................................................................7
SCROLLING THROUGH THE MENUS AND USING THE KEYBOARD...............................................................................7
APPLYING CHANGES..............................................................................................................................7
THE RECEIVING MENU...........................................................................................................................7
CONFIGURING THE DATE AND TIME..............................................................................................................7
CHECK THE UNIT STATUS..........................................................................................................................7
HOW TO QUERY THE ACQUISITION MODE CURRENTLY SET ON THE UNIT......................................................................7
ADJUSTING THE CONTRAST.......................................................................................................................8
THE LEDS..........................................................................................................................................8
FEED PAPER........................................................................................................................................8
CONFIGURE THE UNIT.....................................................................................................................9
SET UNIT NAME, TYPE AND TEMPERATURE UNITS (C° OR F°).................................................................................9
PAIRING AND THRESHOLDS SETTING..............................................................................................................9
IMPORTANT TIMING INFORMATION...............................................................................................................9
THE ALARMS.....................................................................................................................................10
PRINTING MODES..........................................................................................................................11
SUMMARY........................................................................................................................................11
DETAIL............................................................................................................................................11
SUMMARY + DETAIL............................................................................................................................11
THE REPORT PRINTED............................................................................................................................11
MONITORING MODES...................................................................................................................12
PRINT ON DEMAND..............................................................................................................................12
PRINT AT FIXED STEP.............................................................................................................................12
PRINT AT FIXED TIME.............................................................................................................................12
TRANSPORT.......................................................................................................................................13
PRINTING DATA MANUALLY.........................................................................................................14
SUMMARY...................................................................................................................................14
DETAIL.........................................................................................................................................14
SUMMARY ALL............................................................................................................................14
DETAIL ALL..................................................................................................................................14
ACQUISITIONS MANAGEMENT....................................................................................................15
SHOW..........................................................................................................................................15
ERASE..........................................................................................................................................15
USB (FOR RADIO PRINTER USB ONLY)....................................................................................................15
STAND BY.......................................................................................................................................17
LOGO............................................................................................................................................18
RADIO PRINTER MENUS.................................................................................................................19
RECEIVING MENU...............................................................................................................................19
MAIN MENU....................................................................................................................................19
STATUS............................................................................................................................................19
PRINTER...........................................................................................................................................19
4/24
Radio Printer
TecnoSoft s.r.l.
ACQUISITIONS...................................................................................................................................19
CONFIGURATION................................................................................................................................19
MODE............................................................................................................................................19
HARDWARE MANUAL....................................................................................................................20
THE RADIO PRINTER.............................................................................................................................20
THE SENSORS.....................................................................................................................................20
CHARACTERS ORDER....................................................................................................................23
TecnoSoft s.r.l.
Radio Printer
5/24
License agreement
Read this license agreement thoroughly before using the System. Using this System is subject to the acceptance of this
agreement.
If you choose to refuse the following conditions, please return this System to the point of purchase for a complete refund.
This agreement involves Tecnosoft srl, Redecesio di Segrate, Milano, Italy (henceforth called Tecnosoft) and the User (be it
a physical or juridical person) for the following Radio Printer System products firmware (henceforth called Firmware): "Radio
Printer" and any product accompanying it (“TempStick Radio, “Intelligent Sensor”, “Radio Node”).
Tecnosoft grants the user a non-exclusive right to use a copy of the software on a single computer provided that the user
accepts the following conditions.
1. User license. The Firmware is property of Tecnosoft and cannot be copied nor sold without the prior written
authorization of Tecnosoft. The Firmware is protected by Italian and European Laws and by International Treaties
concerning intellectual properties.
2. Exclusion of liabilities. Except for what stated by applicable laws, in no case can Tecnosoft be considered liable for
damages or losses, direct or indirect, including, but not limited to, loss or missing income, suspension of activities, loss of
information or any other monetary or economical damage, deriving from proper or improper use of the Firmware even
if Tecnosoft has been advised of the possibility of such damages. In any case, the responsibility of Tecnosoft for such
damages will be limited to the price paid for the Firmware. This clause is applied even if the User does not accept the
Firmware.
3. Use of Firmware results. It is User's responsibility to check that results given by the Firmware are correct and appropriate.
In no case the Firmware should be used if such use can be threatening to the health or life of human beings. This
clause is applied even if the User does not accept the Firmware.
4. Updates. If the Firmware is an update of a previous version, the license is transferred from the old version to the update.
Only the update can be used, unless the update is destroyed.
5. Separation of components. The Firmware is licensed as a single product. Components cannot be separated.
6. Limitations. The User cannot convert, decode, decompile or disassemble the Firmware, except for what is explicitly
requested by applicable laws.
6/24
Radio Printer
TecnoSoft s.r.l.
Introduction
The Radio Printer is a wireless receiving unit for the TempStick Radio sensor/transmitter and the Intelligent
Sensor + Radio Node transmitter. The main options and functions will be described here. The Radio Printer
receives data from the sensors/transmitters (that send data at fixed intervals) and saves them according to its
own acquisition interval. This unit also generates alarms when the readings exceed preset thresholds and
thanks to its on board printer, it is able to print the data acquired as instructed by the type of monitoring it is
carrying out (either continuous monitoring or transport monitoring).
Radio Printer USB
This is a special version of the Radio Printer: it has a USB connection where a USB pen-drive can be
connected to save the acquisition data from the Radio Printer memory. Then it is possible to import these
data into the TSR software where they can be analysed in graph, table, printed in report and exported in MS
Excel (SLK format).
To know how to use this function read the Acquisitions management chapter (p. 15)
TecnoSoft s.r.l.
Radio Printer
7/24
Basic operations
Scrolling through the menus and using the Keyboard
The RadioPrinter panel has 8 keys: OK, ESC, 4 directional keys, PRN (Print) and Feed Paper.
The 4 directional keys are used to select functions. Use the up and down buttons to move from one item to
another in the Menu being displayed. Use the left and right buttons to set special options or configure
numbers and names (name of the sensor, date, time, thresholds and so on).
OK is used to accept the selected function.
ESC is used to exit from the menu currently being displayed and return to the previous one. This is true for
most cases, however in special cases this works differently, for example when configuring the Monitoring
Process, pressing ESC makes you advance in the configuration, disabling the option displayed when you
pressed the key (p. 12).
PRN is used to print acquired data (Note that this function has to be enabled in the selected monitoring mode
> see p. 12).
Feed Paper is used to feed the printer with new paper as well as to unroll a small amount of paper such that
it is easier to cut the printout from the rest of the roll.
Applying changes
When particular changes are being applied the following message may appear: “ANY CHANGES WILL
DESTROY ALL DATA”. When this message appears the keyboard is disabled: please wait a few seconds to
advance to the next menu.
The Receiving Menu
The Receiving Menu of the Radio Printer holds a list of all the data that has been received by the unit. These
are stored in the order they have been received. The top header holds the following information: [hh:mm
Sensors °C] or [hh:mm Sensors °F], where hh (hours) and mm (minutes) display the time at which the data
has been logged. This is the default menu displayed on the Radio Printer. The bottom bar in this page
displays the acquisition mode currently set. The unit will automatically return to this menu after a few
minutes if left idle in another menu.
Configuring the date and time
If the Radio Printer is reset or turned off, or if the battery runs flat, you will need to re-input the date and time.
Simply step through the digits using the left and right buttons, and use up and down to change the value.
Press OK to confirm the changes. If you need to change the unit's date and time, for any other reason,
please follow these steps: from the Receiving Menu press the OK key to enter the Main Menu. Here choose
CONFIGURATION to enter the Configuration menu, then select CLOCK. Press OK to confirm the changes.
Check the unit status
To display the current status of the Radio Printer, press OK when in the Receiving Menu, then select Status
and OK again. The window will display the Actual Time as well as the date and time of the Next Acquisition (if
the unit is acquiring). If you are in the Fixed Time or Fixed Step monitoring mode (p. 12) you will also see the
Printing at date and time. Press ESC to exit.
How to query the acquisition mode currently set on the unit
To find out in which mode the Radio Printer is currently working simply look in the bottom left corner of the
Receiving Menu screen. The actual mode is displayed in brackets: to identify the codes of each different
mode, refer to the chapters below.
8/24
Radio Printer
TecnoSoft s.r.l.
Adjusting the contrast
You can adjust the display contrast by keeping the ESC button pressed, and pressing the up or down arrow
to increase or decrease the contrast.
The LEDs
The Radio Printer has four LEDs.
Printer
This LED indicates the printer status. If is turned off, the printer is also turned off. If it is on, the printer is on
(not necessarily printing). If it is blinking slowly then the printer is out of paper. If it is blinking fast the head of
the printer has over heated: in this case wait for the unit to cool down, at which point the blinking stops.
Alarm
This is the LED for alarm status. If it is off, there is no alarm. If an alarm occurs, it will start blinking. Please
refer to the alarms behaviour described below for more details.
Main Power
The LED is on when the main power is connected.
Battery
This indicates the battery status: when the battery voltage drops too low it will go on.
Feed Paper
Press this key to let some paper come out of the printer. This key is usually disabled, because it works only
when the printer is on. To turn on the printer, press OK from the Receiving Menu, select CONFIGURATION
and press OK and then press the down arrow till the LOGO item is displayed. Select it and press OK: the
printer is turned on and the Feed Paper key is enabled.
TecnoSoft s.r.l.
Radio Printer
9/24
Configure the unit
Set unit name, type and temperature units (C° or F°)
You can assign a name to your Radio Printer unit by entering the Main Menu and selecting
CONFIGURATION and then UNIT. Use the directional keys to set the name of the unit in the Unit Name
menu and then press OK; next choose the UNIT TYPE and select PRINTER and press OK and finally the
TEMPERATURE MODE, choosing between °C and °F and press OK to save the new configuration in the
unit's memory.
Pairing and thresholds setting
Before being able to receive data from a transmitter you will need to pair it with the RadioPrinter. From the
Receiving Menu press OK and then select CONFIGURATION and SENSORS. If no transmitter has ever
been paired, you will see the text “No Item. Press > To Add”: press the right key to access the Pairing menu.
A list of the radio serial numbers (not the sensor numbers) that the unit is receiving is shown. When the radio
you wish to pair is displayed, press OK. In the Set Descr. menu assign a name to this sensor and press OK;
next set the Minimum threshold for the alarms and press OK and do the same for the Maximum threshold.
You can set any number consisting of up to three digits and one decimal digit, and you can also change the +
or - sign. To do this press left until the second block to the left of the number is selected; press up or down to
change the sign. Press up or down once again to display the hundreds digit. Then press right to select the
tens digit and then right again for the physical units and the decimal digit. If you press ESC on one or both of
the thresholds, you will disable that threshold for the alarm feature. After setting these parameters you will be
asked to set the Hysteresis for the alarms, after which press OK.
After this operation you will see that the sensor has now been paired; press ESC to go back or right to add
another sensor.
Removing a sensor from the pairing list
To remove a sensor from the pairing list simply select it and press the left key.
Important timing information
It is very important to understand the timing parameters (acquisition step, transmission rate, etc.) used by the
unit.
Transmission rate
Every transmitter (TempStick Radio or Intelligent Sensor + Radio Node) transmits according to a time step
that is programmed directly into the transmitter using a separate program and the accompanying serial
interface (Radio Configuration Interface): the software may be downloaded free of charge from the Tecnosoft
website. As an example, the transmission rate could be set such that the transmitter sends data every
minute.
Acquisition rate
The Radio Printer receives data from each of the paired transmitters, and stores the most recent data in
memory according to the acquisition rate.
Example
Let's suppose you want the RadioPrinter to log data every 5 minutes. To do this you must set the acquisition
rate to 5 minutes. Even if the transmitters are programmed to send every minute, the Radio Printer will
receive all the data transmitted by the sensors, but will, on the fifth minute, only store the most recent value in
its memory. For this reason the effective timestamp for the stored data is slightly different to the 5 minute
step. The difference between the acquiring time step and the actual sample time can range, in this example,
from zero to something less than 5 minutes: the limiting cases occur when the last sample is received exactly
in conjunction with the acquisition time step (practically a zero difference) or when the last valid sample was
received exactly after the previous acquisition time step (e.g. For our 1 minute transmission example, if the
10/24
Radio Printer
TecnoSoft s.r.l.
other four transmissions got lost). This method, whereby the unit logs at a slower rate with respect to the
transmissions, results in maximum reliability of the wireless system.
More frequent transmissions (i.e. shorter transmitting rate) means there is a higher probability that data is
received (unfortunately it also results in a shorter transmitter battery life). We suggest that the transmission
rate on the sensors is set to about 5 times the acquisition rate on the RadioPrinter.
Printing rate
Printing rate should be greater or equal to the acquisition rate. In our example above, if the printing rate is set
to 30 minutes, you will get 6 printed values per sensor each time.
The Alarms
Alarms work as follows: when the temperature exceeds the thresholds, an audible sound is played for one
minute, and an led blinks until the temperature returns within the thresholds. To disable the audible sound
you must press the ESC key, within the first minute. The led will remain blinking. If the LED is already blinking
due to a particular sensor, and another sensor results in an alarm condition, the audible sound will again be
played for one minute.
TecnoSoft s.r.l.
Radio Printer
11/24
Printing Modes
The Radio Printer can print data based upon two types of report. You will be able to choose among these
modes when configuring a Monitoring Mode (p. 12). In some modes you will not be able to choose the
Printing Mode.
Summary
In this type of report only the Minimum (MIN), Average (AVG) and Maximum (MAX) values for the data
acquired for each sensor are printed. There is also the sensor serial number and its calibration expiry date: if
the calibration is expired this will be indicated by an asterisk (*), if the calibration is about to expire, within a
month, a question mark will be printed (?).
Detail
In this mode all the data, ordered sensor by sensor, will be printed.
Summary + Detail
In this mode the report will first contain the information as for the Summary report, followed by all the
information as for the Detail report.
The Report printed
The report is divided into the following sections:
– Logo: holding an image or the name of the company;
– Header: that holds the unit name, the date and time of printing, date and time of the acquisitions printed
(From and To);
– Summary (if enabled): as described above;
– Detail (if enabled): as described above.
If any data value exceeds the thresholds, you will see a star printed next to it (*).
12/24
Radio Printer
TecnoSoft s.r.l.
Monitoring Modes
The Radio Printer may be configured in one of four monitoring modes. To do this access the Configuration
menu and select ACQUISITIONS. When any one of these modes is selected, with the exception of the
Transport mode, the Radio Printer will start acquiring data according to its configuration (for example, if you
set a delayed starting time, it will not record data until that time has elapsed). Please note that changing
mode will delete all the data from memory; please ensure you have a hardcopy of the data before
carrying out this operation.
Note: The unit must have acquired at least two data points in order to be able to print a report, otherwise
even if the unit actually acquired one data point, a NO DATA message will appear.
When the Radio Printer is acquiring data (in any of the monitoring modes), it will beep once the acquisition
interval elapses; that is every time it saves the most recent data from each of the paired sensors.
Print on demand
In this mode, when the PRN button is pressed, the Radio Printer will immediately print all the data starting
from the last value printed to the most recent value acquired. To select this mode click OK on this item and
set the Acquire Start time and date (set a past date or the present time and date to make the unit start
acquiring immediately). In the next window set the Acquire step (i.e. acquisition rate, expressed in hours and
minutes). After this, once the Receiving Menu is displayed, you can press the PRN key to print the acquired
data (of course allow some time for the data to be collected). The unit will print all the data it has acquired
starting from the last time the PRN button was pressed, up to the present moment. Older data, which has
already been printed, is still stored in the memory and may be reprinted by accessing the PRINTER menu (p.
14). In this case you will not be asked to select a Printing Mode, as the default Printing Mode for this
Monitoring Mode is Detail (p. 11).
In the Receiving Menu, this mode is indicated with the code: [RQT].
Print at fixed step
In this mode the Radio Printer will periodically print all the data acquired since the last data point printed. The
period is specified as a fixed step (every hour, for example) starting from a preset date and time. Click OK on
this mode and set the Print Step (expressed in hours and minutes), this is the rate at which Radio Printer will
print a report. Next you will be asked to choose a Printing Mode (SUMMARY, DETAIL, SUMMARY + DETAIL)
and the Acquire Start date and time, and after this the Acquire step (acquisition rate, expressed in hours and
minutes). After this, whenever the period set under Print Step elapses, a report is automatically printed; the
PRN key is disabled in this mode. The unit will print all data that has been acquired starting from the last time
a report was printed to the present moment. Older data, which has already been printed, is still stored in the
memory and may be reprinted by accessing the PRINTER menu (p. 14)
In the Receiving Menu this mode is indicated with the code: [FXS].
Print at fixed time
In this mode the unit will, at fixed times (e.g 8:00, 12:00, 16:00, 20:00), print the data starting from the last
data point printed to the most recent data acquired. It will start this process from a preset date and time. Click
OK on this item and set the Print Time: the time within a day (up to a maximum of 5) at which the Radio
Printer will print a report. If you would like to set less than 5 preset times, press the ESC button to skip the
subsequent fields: for example, if you just want just two reports in a day, set the first two, clicking OK after
which press ESC to disable the last three positions). Next you will be asked to select the Printing Mode
(SUMMARY, DETAIL, SUMMARY + DETAIL), the Acquire Start date and time, and the Acquire step
(acquisition rate, expressed in hours and minutes). Whenever the unit time matches any of the times set
under Print Time, a report is automatically printed; note that the PRN key is disabled in this mode. The unit
will always print the data acquired since the last report was printed. Older data, which has already been
printed, is still stored in the memory and may be reprinted by accessing the PRINTER menu (p. 14).
In the Receiving Menu this mode is indicated with the code: [FXT].
TecnoSoft s.r.l.
Radio Printer
13/24
Transport
In the transport mode the Radio Printer will print all the data acquired from the start of the monitoring mission
to the most recent value whenever the PRN key is pressed. Click OK on this item and choose the Printing
Mode (SUMMARY, DETAIL, SUMMARY + DETAIL) and the Acquire step (acquisition rate, expressed in
hours and minutes). To start the monitoring mission in this mode press the up key and then the down key
from the Receiving Menu. Existing data will be erased after which the acquisition will start.
Typical Application: A distributor's delivery van is about to start delivering goods in the morning. The Radio
Printer has already been configured in the Transport Mode. The monitoring mission is started and the van
starts the delivery route. Upon arrival at the first delivery point, the operator presses the PRN button in order
to produce a printout of temperature readings from the start of the mission to the present moment. This
report is simply handed to the customer. The same procedure is repeated for each subsequent delivery point.
At the end of the day, the van returns to base, and again presses the PRN button to produce a report that
contains all the data from the start of the mission to the end. This report is then stored by the distributor for
traceability.
In the Receiving Menu this mode is indicated with the code: [TRP].
14/24
Radio Printer
TecnoSoft s.r.l.
Printing data Manually
Regardless of which Monitoring Mode you have configured, it is possible to print the data at any moment in
time. To do this simply press OK when in the Receiving Menu, select PRINTER and press OK. In the Print
menu select which items you would like to include in the printout.
SUMMARY
This prints a summary starting from the last value that has been printed to the present moment.
DETAIL
This prints the summary (as above) as well as the details, again from the last value printed to the present
moment.
SUMMARY ALL
This prints a summary of all the data points stored in memory.
DETAIL ALL
This prints a summary as well as the details of all the data points stored in memory.
TecnoSoft s.r.l.
Radio Printer
15/24
Acquisitions management
In the Acquisitions menu (select ACQUISITIONS from the Main Menu) you are given two options to manage
the data stored in the Radio Printer memory.
SHOW
By selecting this item you will see all the acquired data since the last erase operation.
ERASE
Select this item to erase all the data stored in memory.
USB (for Radio Printer USB only)
To save data from the Radio Printer memory on a USB pen-drive, insert the pen-drive in the USB connector if
the Radio Printer itself. Select the USB option in the Acquisitions menu and wait for the display to return to
this screen (i.e.; wait for the indication WRITING USB to be removed) and that the LED above the connector
is turned off. Don't extract the pen-drive before the LED turns off.
The Radio Printer USB works with most of the available pen-drives provided they are formatted with FAT 16
or FAT 32 format. If an error should occur and the data are not saved on the pen-drive, repeat the
operation and if the error still occurs, try with another pen-drive.
Saved data format
The Radio Printer USB creates a folder in the USB pen-drive with the same name of the Radio Printer itself
(the one set in configuration). In this folder one or more files are saved, according to the number of mission
exported in the pen-drive (each monitoring mission creates one file that is eventually overwritten if the
exported data refers to the same mission).
Those files have the following format, where the starting date and time of the mission are expressed:
YYMDDHmm.PRN
where:
•
•
•
YY: last two digits of the year;
M: a letter indicating a month, according the following table:
Letter
Month
DD: digits of the day;
A
Janaury
B
February
C
March
D
April
E
May
F
June
G
July
H
August
I
September
J
October
K
November
L
December
16/24
•
•
Radio Printer
H: a letter indicating the day, accordign to the following table:in base a questa tabella
Letter
Hour
A
00
B
01
C
02
D
03
E
04
F
05
G
06
H
07
I
08
J
09
K
10
L
11
M
12
N
13
O
14
P
15
Q
16
R
17
S
18
T
19
U
20
V
21
W
22
X
23
mm: the minutes.
To import the file on PC refer to the TSR manual.
TecnoSoft s.r.l.
TecnoSoft s.r.l.
Radio Printer
17/24
Stand By
If you are not going to use the Radio Printer for a long time, you can turn the unit off by placing it in Standby.
To do this access the Configuration menu, select the STAND BY option and press OK.
The Radio Printer will be turned off: press any key to turn it on again.
Remember that the internal batteries of the Radio Printer are for backup only and the device is not
intended to work without external power constantly.
18/24
Radio Printer
TecnoSoft s.r.l.
LOGO
The logo menu, accessible from the Configuration menu, just below STAND BY, is used by the installers of
the unit (Tecnosoft or your local dealer) when commissioning the unit. You can select this item only to turn on
the printer and enable the Feed Paper button.
TecnoSoft s.r.l.
Radio Printer
19/24
Radio Printer menus
The list of the menus of the Radio Printer will follow. For commands and functions, please refer to the User's
manual.
Receiving Menu
hh:mm Sensors °C/°F
15:26 SNS00 +20.6
[TRP] OK Menu
Main Menu
STATUS
PRINTER
ACQUISITIONS
CONFIGURATION
Status
Actual Time
24/02/09 15:30:02
Next Acquisition
24/02/09 15:31:09
Printer
SUMMARY
DETAIL
SUMMARY ALL
DEATAIL ALL
Acquisitions
SHOW
ERASE
USB
Configuration
CLOCK
UNIT
SENSORS
ACQUISITIONS [> Mode]
STAND BY
LOGO
Mode
PRINT ON DEMAND
FIXED STEP
FIXED TIME
TRANSPORT MODE
20/24
Radio Printer
TecnoSoft s.r.l.
Hardware Manual
The Radio Printer
The Radio Printer device is the wireless receiver of the entire system. It is equipped with a display, an 8 key
keyboard and an embedded thermal printer. It also provides a connector for external power, a connector for a
serial cable used by the installer/dealer when setting up the unit, and a connector for an external antenna
(ask your dealer if you wish to purchase an external antenna).
Power management
The unit is supplied with an internal rechargeable battery and a mains power supply that also recharges the
battery.
The internal battery pack can provide backup power to the unit for a number of hours, however the unit
should preferably be used with the external power supply. The unit may also be supplied with an external
battery (e.g. that used in the delivery vehicle): in this case the external battery will be used to recharge the
internal battery.
The unit does not have an ON/OFF switch: use the Stand By option to turn off the unit.
The following power status modes can be defined:
a) the unit is operating and is supplied by the primary power supply (this is the unit's normal mode);
b) the unit is operating and is supplied by the internal battery (this occurs when the main power is off;
the battery is being used as backup power);
c) the unit is in the stand by mode. This is a power saving mode where the unit is not acquiring data.
When any key is pressed the unit exits this mode. The unit date and time settings are maintained.
d) No main power source is available, and the internal battery is flat. In this case the date and time
settings are lost. To exit this mode it is necessary to connect a primary power supply, thereby
causing a reset. The unit reboots and waits for the user to enter the current date and time. In
particular cases, it may be noted that the display remains blank, even though the keyboard is active;
to resolve this unplug the connector of the power supply and short circuit two pins on the power
connector using a metallic object (screwdriver, clip, etc.; short the central top pin with one of the two
adjacent pins, as shown below)). This will causes a reset. This operation should be carried out only if
absolutely necessary. The unit will automatically enter this mode when the battery voltage is
dangerously low, in order to preserve the batteries. When the batteries are completely flat (e.g. After
months of self discharging) it will be necessary to leave the power supply connected for a couple of
hours before carrying out the reset procedure by shorting the pins. A complete recharge of the
internal batteries will take around 48 hours to complete. Again note that the unit's normal mode of
operation is by means of the external power supply.
Changing the printer paper
To change the printer paper you need to open the printer cover. Since this locks tightly you will need to use
both thumbs to prise it open. Lift the small central flap so that the main cover will open. At this point simply
insert the new paper roll inside, with the external side facing the PRN button and guide the free paper end to
exit the printer paper slot.
The sensors
The unit can work with both TempStick radio or Radio Nodes + Intelligent Sensors. To configure the sensor
transmission rate you will need the Radio Configuration Interface and the Radio Starter software (this is a free
download from the Tecnosoft website) or the TSR software, necessary if you have the Radio Printer USB..
Each sensor is identified by two serial numbers: the sensor serial number and the radio node number.
TecnoSoft s.r.l.
Radio Printer
21/24
Recalibration
To recalibrate TempStick Radio sensors you need the return the entire unit to Tecnosoft, who will recalibrate
it and send it back. To recalibrate Intelligent Sensors, simply contact Tecnosoft who will supply you with a
recalibrated sensor. When you receive this simply unplug the existing one from the Radio Node and return it
to Tecnosoft. Plug the new Intelligent Sensor to the Radio Node; the system will automatically recognize the
new sensor and continue working seamlessly.
22/24
Radio Printer
TecnoSoft s.r.l.
Technical Features
Radio Printer
20 X 17,6 X 8,6 cm
Size
Display
LED
Printer
Keyboard
Acquisition Mode
Print Mode
Alarms
Graphic and alphanumeric with selection menu
Status indicators (external power, low battery, etc.)
Thermal printer for data printing (customizable logo)
6 key keyboard (OK, ESC, 4 directional keys) + Print button
–
–
–
–
Non-stop monitoring with print on demand
Non-stop monitoring with print at intervals
Non-stop monitoring with print at set times
Transport monitoring with print on demand
– Summary print (Max, Min, Average)
– Detailed print (all data points for each sensor)
Programmable alarms against preset temperature thresholds
Re-chargeable internal back-up battery, mains power supply or
cigar lighter receptacle
Radio connections for communication with the TempStick
Connections
Radio or the Intelligent Sensor + Radio Node
Manages data from up to 32 sensors
N. of sensors
Power source
Radio type
433 MHz
Radio transmission 250 meters in open space; in closed environment depends on
many variables and obstacles
range
Accessories
Battery charger included, with cigarette lighter adaptor
TempStick Radio
Size
6,5 X 5 X 4,5 cm
Unit Temperature
Range
-20 °C ÷ +60 °C
Sensor Temperature
Range
-40 °C ÷ +90 °C
Resolution
Accuracy
Transmission
interval
Battery (Radio)
Autonomy
0,03 °C
±0,25 °C with calibration certificate
±1 °C without calibration certificate
From 1 reading every 3 seconds to 1 reading every 255
minutes
Factory replaceable
More than 500.000 acquisitions/transmissions - more than 10
years with standard use (24 acquisitions per day)
Intelligent Sensor + Radio Node
Size (Radio Node)
6,5 X 5 X 4,5 cm
Radio Node
Temperature Range
-20 °C ÷ +60 °C
Sensor Temperature
Range
-40 °C ÷ +90 °C
Resolution
Accuracy
Transmission
interval
Battery (Radio Node)
Autonomy
0,03 °C
±0,25 °C with calibration certificate
±1 °C without calibration certificate
From 1 reading every 3 seconds to 1 reading every 255
minutes
Factory replaceable
More than 500.000 acquisitions/transmissions - more than 10
years with standard use (24 acquisitions per day)
TecnoSoft s.r.l.
Radio Printer
23/24
Characters order
When you need to input characters, you will cycle through the possible options in the order shown below
(first, second and third column):
[space]
!
"
#
$
%
&
'
(
)
*
+
,
.
/
0
1
2
3
4
5
6
7
8
9
:
;
<
=
>
?
@
A
B
C
D
E
F
G
H
I
J
K
L
M
N
O
P
Q
R
S
T
U
V
W
X
Y
Z
[
\
]
^
_
`
a
b
c
d
e
f
g
h
I
j
k
l
m
n
o
p
q
r
s
t
u
w
x
y
z
24/24
Radio Printer
Tecnosoft s.r.l.
Via delle Regioni, 34 - 20090 Segrate (Milano) - phone +39 02 26922888 - fax +39 02 26922875
e-mail: [email protected] - web: www.tecnosoft.net
UNI EN ISO 9001:2000 certified for Firmware and Software development
TecnoSoft s.r.l.