1
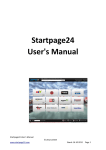
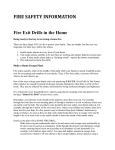
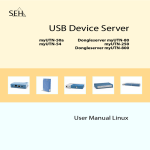
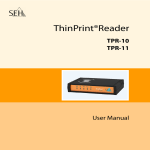
Memo
Aero_M_Omnipage16_2009-01-07.doc
Date: 2009-01-07
From:
To:
Daniel Schiktanz
HAW Hamburg
[email protected]
Kolja Seeckt
HAW Hamburg
[email protected]
OmniPage 16
In Aero a huge amount of photo-scanned documents is available for research purposes.
Scanning these documents via full text search is essential for an effective work. Unfortunately
a lot of documents are photo-scanned and not ready for full text search. That is why it is
necessary to find a way of converting these photo-scanned documents into editable formats
which can be scanned by full text search programs. This memorandum describes an effective
way of converting these documents with the help of OmniPage 16.
Introduction
OmniPage 16 is a quite popular OCR-program (Optical Character Recognition) developed by
Nuance Communications, Inc. The full version costs €119. Its purpose is converting photoscanned documents into editable formats, like DOC or PDF. A professional version is available as well (OmniPage 16 Pro) and costs about €350.
The following instructions relate to the English user interface and only present a way of converting photo-scanned documents into editable PDF-files as economically as possible. Further
functions of OnmiPage 16 will not be discussed.
For more information, read the user’s manual of the program.
1
Installation
The installation procedure starts by opening the setup file on the CD. Just follow the steps
which are shown there. Normally, the installation window appears after inserting the CD.
Starting OmniPage 16
When starting OmniPage 16, a window appears where
you can choose between three view options for the
menu arrangement (figure 1).
Choose the classic view option. The OmniPage Desktop
will then appear (figure 2).
Figure 1
Menu View Option Window
2
The OmniPage Desktop
The OmniPage Desktop is shown in figure 2.
Figure 2
OmniPage Desktop
On top of the OmniPage Desktop there is the main menu bar (figure 3).
Figure 3
Main Menu Bar (Standard View)
It has the following options:
File:
Edit:
View:
Format:
Here you can open and save OPDs (OmniPage 16 Documents).
Here you find functions like Copy, Paste or Find & Replace
The view options do not need to be changed.
Here you find all options concerning the character format when editing
OCR scanned text.
3
Tools:
Process:
Window:
Help
Here you find possibilities for optimizing the work with OmniPage 16.
In this memorandum the Workflow Assistant will be discussed.
Here you can start workflows and find options to edit your OPD.
Choose the menus which are displayed or change the main menu view.
The symbols on the bottom of figure 2 are for quick access of often used commands.
Below the main menu bar, there is the workflow display (number 1 in figure 2) which shows
the process chain of the current workflow. On the left side, you find the thumbnail view of the
pages which are loaded and ready for an OCR process (2 in figure 2). Next to the thumbnail
view, there is the page image where you can see the page which shall be processed next (3).
There you can split the page into different areas (pictures, text, tables, etc.) and even define
areas which shall not be scanned by OCR. However, this action is not really necessary since
OmniPage knows how to differentiate between normal text, tables and pictures quite well and
does it automatically. In field 4, there is the Text Editor where the processed text is displayed.
The Text Editor works like a normal text program and allows you to correct mistakes caused
by a bad resolution of the scanned document or words which are unknown to OmniPage for
example. On the bottom you find the Document Manager (5) which shows the current status
of the OCR process, the number of processed or unknown words and other data for each processed page.
Using the Workflow Function for Document Conversion
In this memorandum the focus is on converting photo-scanned documents into editable formats. This can be achieved in an economical way with the OmniPage workflows. The workflow used for the conversion is defined by three steps:
1 Load the document to be processed
2 Perform the OCR process
3 Save the document in an editable format
Normally there is an additional step after step 2 where the processed text has to be checked
for mistakes because of words unknown to OmniPage or a bad resolution of the photoscanned document. However, this step can be skipped since the purpose of this memorandum
is not producing flawless documents with OmniPage but making photo-scanned documents
available for full text search in an economical way.
4
Defining the Workflow
Click on Tools in the
main menu bar and
choose Workflow Assistant. The window shown
in figure 4 will appear.
Select Fresh Start for
defining a new workflow.
Enter
the
workflow name and then
click on Next. Now the
Load Files window will
appear (figure 5).
Figure 4
Create New Workflow Window
Figure 5
Load Files Window For Workflow Definition
5
Here you have to choose the files to be processed. There are two possibilities. Either you
choose the files to be processed every time you start the workflow (activate the field “Select files for loading each time this workflow is started”, located in the blue box in figure 5) or
all files will be loaded automatically when the workflow is started. The last option will be
activated when the field “Select files for loading each time this workflow is started” is deactivated. When choosing the first option, it is possible to define the folder where the files to be
processed are located. When you have to select these files after starting the workflow, the file
browser will open this folder automatically. Of course it is possible to switch to other folders.
When choosing the second option, you have to define all files which shall be processed (click
on Browse, located in the red box in figure 5). Here it is also possible to define a folder, upon
which all files in this folder will be processed.
All other options (Preprocessing, PDF) do not need to be changed. After all options are set,
click on Next.
Figure 6 shows the window which appears next.
Figure 6
Recognize Images Window For Workflow Definition
The Recognize Images window does not only concern images but also characters of the pages
to be processed. On top (blue box in figure 6) you can define the layout description. This setting should be left on Automatic. On the right you can choose whether the OCR process shall
be optimized for speed or accuracy. For Aero purposes Speed would be the right choice. In
the red box in figure 6, choose the languages contained in the pages to be processed. If neces6
sary you can activate the utilization of a professional dictionary (only legal or medical ones).
In the green box in figure 6, there are all options concerning characters. In the Font Matching
menu you can choose the fonts used in your processed text. When you want to have Greek
formula symbols for example, you need to activate the symbol font within the menu. Moreover it is possible to define characters which shall not be used in the processed text or which
shall be used additionally (e.g. the German characters ä, ö, ü or ß).
The other options on the bottom of figure 6 may remain unchanged. After clicking Next, the
Correct Recognition Results window appears. As stated before, the correction shall be
skipped. However, this step has to be defined somehow in order to create a valid workflow.
Before the workflow is completely finished, you can delete this step again, which will be
shown later. Just ignore the settings for the Correct Recognition Results window and click on
Next.
The next window is the Save window, which is shown in figure 7.
Figure 7
Save Window For Workflow Definition
Select Save as Text on top of the window. Below you find the Output file options (blue box in
figure 7). When your photo-scanned documents consist of several photo-scanned pages compiled in one respective file, choose Create a new file for each image file in the file options
menu. Under naming options, choose Use input file names. In the File type menu, there is a
huge amount of possible formats the processed document can be saved in. Below some important PDF options are explained.
7
PDF Formatted – True Page
This format is a compromise between file size and correctness of the document. The text will
be completely saved in normal characters besides images, so that the overall layout is comparable to that found in typical PDF documents.
PDF Formatted – Plain Text
This format needs the least disk space (about one fifth of the True page PDF). The whole text
is saved in normal characters besides images. All characters have the same format and there
are no blank lines.
Keep in mind that produced mistakes by unknown words stay unchanged in the processed document for the just two mentioned formats.
PDF With Image Substitutes
This format resembles the TruePage PDF. However, unknown words are saved as images in
the PDF document which look like the original photo-scanned word, so that the user can
check the original word. Although saved as an image in the PDF document, the unknown
words will be considered during a full text search (but in their processed version, which might
be error-prone). A PDF document with image substitutes is a very safe way of converting,
since mistakes of the conversion can be found. Yet, the processed files need about three times
as much disk space as the files processed to a True Page formatted PDF.
PDF Searchable Image
Here the PDF does not contain any processed characters but only the original photo-scanned
images. Because of the conversion, the file is now ready for a full text search and text can be
copied from the searchable image. The file size is the same as for a PDF document with image substitutes.
Once the output file options are set, it is possible to enable the prompting option (brown box
in figure 7). When activated, you have to define the saving options for each processed document after the OCR process. This option is not recommended when a fully automatic conversion process shall be done.
8
In the red box in figure 7 you can specify the output location of the processed files. Since it
was selected to use the input file names for the processed files, the output folder must be
different from the input folder!
Now all options for the saving process are set. You can add and define another saving process
by clicking on Next. This could be useful when you want to save your processed documents in
different formats or different locations.
Finally delete step 3 of the workflow (Correct Recognition Results, green box in figure 7) in
order to make the workflow fully automatic.
Now you can click on Finish. The workflow has been successfully created and saved. It can
be edited any time with the workflow assistant.
Automatic Document Conversion with the defined Workflow
Take a look at the workflow display (number 1 in figure 2). At the very left there is a drop
down menu with all available workflows. Select the one you just created. All steps of your
workflow will then be shown in the workflow display. By clicking on a step, the workflow
assistant will automatically appear and show all options of the selected step which can be edited if necessary. By clicking on
, the workflow will be started. Once it is
running, a Pause symbol will be displayed instead of the symbol which was used to start the
workflow. By clicking on it, you can pause the workflow any time. Just save the current OPD
and reopen it when you want to continue the conversion with the workflow at a later time.
Other OCR Software in Comparison with OmniPage 16
There are two main competitors next to OmniPage 16, Readiris Pro 11 by I.R.I.S. and FineReader 9 by Abbyy.
After studying reviews about these three programs, it became clear quite quickly that Readiris
Pro 11 is no option because of its bad relation of price to performance (PC-Welt 2007). So
the decision had to be made between OmniPage 16 and FineReader 9.
According to CHIP 2008, OmniPage 16 works much faster than FineReader 9. c’t 2007
stated that there are no big differences between both programs. However, OmniPage 16 is
better for converting images with low resolution and a lot of graphics and is also cheaper than
FineReader 9, which has a better auto correction and produces better results for images of
9
high resolution. PCMag 2008 concludes that „FineReader is far easier to use than OmniPage.
Corporate users who work with highly complex documents—and those who need automatic
handling—will find that OmniPage provides features that FineReader doesn't”. FineReader is
well-suited for work with lots of proofreading and manual interaction whereas OmniPage is
more fitted for automatic processes.
Taking into account the purpose of an OCR program for Aero, it appears that OmniPage 16 is
the best choice.
References
CHIP 2008
Chip Online de: Test: Abbyy FineReader 9.0, CHIP Xonio Online GmbH, München, 2008,
URL: http://www.chip.de/artikel/Abbyy-FineReader-9.0-OCR-Programm_30524314.html,
2009-01-04
c’t 2007
Nr. 25/2007, Magazin für Computertechnik: Test: FineReader 9 vs. OmniPage 16, Hannover,
2007, URL: http://news.idealo.de/news/11366-ct-test-finereader-omnipage.html, 2009-01-04
OmniPage 16 User’s Manual (German Edition)
Nuance Communications, Inc., Burlington, 2007
PCMag 2008
PCMag.com – The Independent Guide To Technology: OmniPage Professional 16 Review,
Ziff Davis Publishing Holdings Inc., New York, San Francisco, 2008,
URL: http://www.pcmag.com/article2/0,2817,2305590,00.asp, 2009-01-04
PC-Welt 2007
PC-Welt - …das Portal für Computer & Technik, Digital Lifestyle, Business IT: Test: Readiris Pro 11, IDG Magazine Media GmbH, München, 2007,
URL: http://www.pcwelt.de/start/software_os/office/tests/92689/readiris_pro_11/, 2009-01-04
10