1
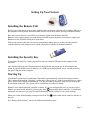
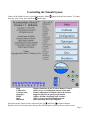
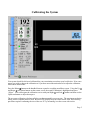
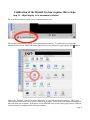
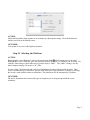
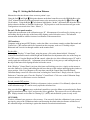
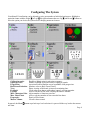
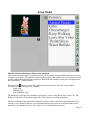
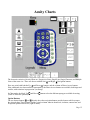
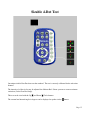
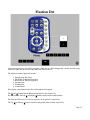
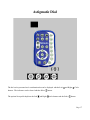
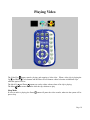
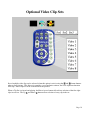
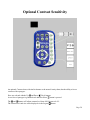
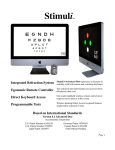
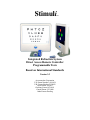
Stimuli
TM
Integrated Refraction System
Direct Access Remote Controller
Programmable Tests
Based on International Standards
Version 3.5
Accommodata Corporation
U.S. Patent Number 6,108,634
U.K. Patent Number 2329992
Japan Patent 3302697
Germany Patent 19781691
Canada Patent 2,251,080
Other Patents Pending
Setting Up Your System
Installing the Remote Unit
Simply connect the remote receiver to the supplied cable and plug the cable into any available USB port on
the computer or the keyboard. Extension cables for the receiver are available for long examination rooms.
Place the receiver where it is most likely to pick up the signals from the hand controller.
Batteries last for approximately 6 months and are available at most drugstores or electronics supply store.
Batteries are also available directly from your dealer.
In the event you notice the unit is not always responding to button presses, or that you must point the
controller directly at the remote receiver, install a fresh pair of batteries in the hand controller.
Installing the Security Key
To install the Security Key, simply plug the Key into any available USB port on the computer or the
keyboard.
Once finished setting up and calibrating the unit, the Keyboard and mouse may be disconnected and
stored. If you had installed your Security Key in a USB port on the keyboard, it now must be moved to
the spare USB port on the computer.
Starting Up
Your Stimuli system from Accommodata Corporation can automatically turn on and off at preset times.
This is adjusted through the “Schedule” option under “Energy Saver” of the System Preferences control
panel. Please refer to Apple documentation. You may also start up manually at any time by pressing the
Power button on the unit. The system will be available for use in about a minute.
Stimuli is set to launch when the computer is started. If it is not configured this way, or you have exited
Stimuli, you may launch Stimuli by pressing the “Star” button on the hand controller. (If a keyboard
and mouse are connected, you may also launch Stimuli by double-clicking its icon on the desktop.)
When you see the Stimuli startup screen press the Next Test
the tests.
button on the remote control to advance to
See “Setting Up the System” (above) for additional installation notes.
Page 1
The Stimuli Remote
Designed for ease of use, the lightweight Stimuli Remote allows wireless control of all functions without
the need for a bulky wired controller, keyboard or mouse. The buttons are luminescent for use in low
light, while the geometric layout allows the practitioner to make selections without looking at the remote.
Logical groupings of functions make control of each test intuitive. The column of Direct Access Size
buttons are also useful for directly accessing all major test suites as described below.
Its range is over 7.6M (30 feet) with a wide dispersion angle.
A “Help “ Screen and all Stimuli setup screens are available through the “Menu” button on the bottom
center of the wireless remote. The Help option will show which buttons affect each particular test.
Page 2
Controlling the Stimuli System
Control of the Stimuli System is reached through the Menu
from any setup screen, press the Menu button again.
Help
Calibration
Configuration
Optotypes
Media
Quit
Shutdown
button on the wireless remote. To return
Displays functions of the Wireless Remote Control .
Allows access to Calibration controls of the unit.
Permits adjustment of Stimuli options & features.
Supports selection of optotypes presented.
Adjusts all film clip display and volumes.
Allows you to leave the Stimuli program.
Quits and shuts down the computer.
Navigation of the control screen is affected by the Up and Down navigation buttons.
Simply scroll to the desired feature and press the Select button to enter the chosen control screen.
Page 3
The Help Screen
The help screen provides explanations of the different tests and the buttons used to control test features.
The graphical help for each test is adjusted to the features which are included with the system. For
example, here is a help screen for a DuoChrome test.
Page 4
Calibrating the System
Your system should be delivered calibrated for your examination room from your local dealer. If for some
reason you wish to change the calibration or if you have moved the unit and need to adjust the calibration,
follow these instructions:
Press the Menu button on the handheld remote control to reach the man Menu screen. Using the Up
and Down navigation buttons on the remote, scroll down until Calibration is highlighted and press
“Select”. You can navigate the calibration screen with your Right and Left buttons and then use the
Up/Down buttons to adjust that aspect.
The on-screen calibration calculator tells the user the measurable on-screen size. The maximum resolution
setting for the computer must be used. Because CRT displays may have their rasters sized, the following
procedure requires confirming the size of the test “E” by measuring it on the screen with a ruler.
Page 5
Calibration of the Stimuli System requires three steps.
Step #1. Adjust display to its maximum resolution.
The maximum resolution setting for the computer must be used.
The computer should arrive already set to its maximum resolution. To confirm this or to adjust the
resolution of the screen, launch the System Preferences on top of Stimuli by pressing the Star button.
Choose the “Displays” function in under “Hardware” to set to the maximum resolution. This is also
where the size of the raster can be adjusted when using an eMac. Please refer to the Apple documentation
that came with your computer. If the mouse is not connected to the system simply plug it into a USB port
on the keyboard or computer and it will begin working.
Page 6
ACTION:
Adjust the Resolution of the monitor to its maximum by choosing the setting. Close the Preferences
window and click on the Stimuli screen.
OUTCOME:
Your system is now set for the highest resolution.
Step #2. Selecting the Platform.
ACTION:
Ensure that the correct Platform is selected by pressing the Right Circle button to move the white
Highlight Box to the “Platform” pane and select the correct “Platform” or computer you are using. For
example, when using a typical eMac-based systems choose “eMac”. The “Other” setting is for any
other computer display size such as a 20” iMac.
If using “Other” the horizontal and vertical resolutions must be entered in the fields provided. Then
screen’s resolution may be entered as: dots-per-inch (DPI); pixels-per-millimeter; or simply by entering
the screen’s actual width in inches or millimeters. The other terms will be automatically calculated.
OUTCOME:
The above adjustments have selected the type of computer you are using and provided the screen
resolution.
Page 7
Step #3. Setting the Refraction Distance
Measure the refraction distance from screen to patient’s eyes.
Using the Left and Right Navigation buttons on the hand controller, move the Highlight Box to the
“Foot” adjustment and select the refraction distance to the nearest foot using the Up and Down
Circle buttons. Using the Right Circle button, highlight the “Inches” adjustment and adjust the inches
for the refraction distance as measured in the room. (If you prefer to work in meters then navigate to the
Configuration screen and select Units: “Metric”).
For an LCD flat-panel monitor:
Confirm the measurement of the calibration target “E”. Measurement is best effected by closing one eye
and looking directly at the edge of the letter while aligning a ruler laid on the screen. The indicated
measurement should be within a fraction of a millimeter of the measured size.
CRT monitors:
Computers with an integral CRT display, such as the eMac, use software controls to adjust Horizontal and
Vertical size. CRT monitors which are separate from the computer, such as a G5 desktop, adjust
Horizontal and Vertical size through controls on the monitor itself.
For the eMac
In the Apple “Displays” Control Panel, using the mouse, click on the button labeled “Geometry”.
Vertical and horizontal controls called Height and Width allow fine adjustment of the size of the image on
the CRT screen. Using the Height and Width controls, adjust the size of the calibration target “E” until it
exactly equals the calculated size. Adjustment is best effected by closing one eye and looking directly at
the edge of the letter while aligning the ruler laid on the screen.
If the “Displays” Control Panel is in front of the letter and blocking your view, simply use the mouse to
move the window by clicking and holding the title bar at the top of the window and dragging the window to
a new position. Note: If you happen to click anywhere outside the Control Panel, then the Stimuli
Calibration Setup screen will come to the front, occluding the Control Panel. Simply select the “System
Preferences” function again. Close the “Displays” Control Panel. Click once on the Calibration Setup
screen to ensure it is in the front to receive commands.
For and external CRT monitor
Using the monitor’s Height and Width size adjustments (refer to monitor’s User Manual), adjust the size
of the calibration target “E” until it exactly equals the calculated size.
Now press the Menu button once on the hand controller to get to the Menu screen and using the Down
Navigation button select “Quit” and press the Select button. The system will save all settings then
quit. Simply relaunch as described in “Starting Up” (above) and the Stimuli system is ready to use.
OUTCOME:
You have calibrated your system to a fine accuracy. You can easily check the calibration of your system at
any time by going to the Calibration window and measuring the actual refraction distance and the size of
the calibration target, and checking it against the denoted size and refraction distance.
Page 8
Configuring The System
Your Stimuli Vision Station can be adjusted to suit a great number of individual preferences. Highlight a
particular feature with the Right or Left Navigation buttons then use Up and Down buttons to
select the option you desire, the system allows changing numerous features.
Calibration units
Optotype Units
Progression
Red/Green Extinction
View
Feedback
Legends
Max. Characters/Line
Max. Lines/Chart
Progressive
Master Volume
In general, the Menu
test chart.
English or Metric units for refraction computer.
Snellen, logMAR or Decimal units for optotype legends.
American modified Snellen or true logarithmic chart progression.
Matches colors to Red/ Green Glasses.
Direct viewing or Reflected, (mirrored) examination lane.
Clicks when tests change with volume control, or Silent operation.
Allows selection of Far, Near , Desktop Readout or Audible.
Adjust number of characters on a line.
Allows selection number of lines on multi-line charts.
Equal or Filled charts.
Overall volume control.
button steps back up a level each time it is pressed all the way back to the current
Page 9
Setup Optotypes
Many optotypes are available. Some are options, others are included and may be turned on or off at the
clinician’s preference.
Highlight an optotype using the Up
and Down
Activate or deactivate optotypes with the Select
buttons.
button.
The system is configured to allow customizing of all optotype sets.
The Right
Navigation button moves to a customization screen for each hi-lighted optotype.
Choices include: “All optotypes ”, “Standard Selection”, or three “Custom” sets.
To make a custom set, use the black Up and Down
buttons to select “Custom 1, 2 or 3”
Use the Left and Right Navigation buttons to make the cursor square traverse the full list of
Optotypes, and the button to select the optotypes desired.
Page 10
Setup Media
Stimuli’s fixation/educational videos set the standard.
Our exclusive Animal Parade is a pediatric favorite with interesting motorized animals that don’t wear out
or require replacement. The automatic sequencing feature moves the system on to a new Animal every few
seconds without intervention by the practitioner. Both child and examiner can stay focused on the task at
hand with Stimuli™ Animal Parade.
The Video Play button is used to Play and Pause the selected video clip in the review window.
A number of Video Clip options are available:
Single Clip
Multiple Clips
Sets of Multiple Clips
The Multiple Clip option is for practitioners who desire a greater variety than a single Video Clip. The
Pediatric video clips will be played sequentially. This allows for a continuous program.
The Sets of Multiple Clips option allows different varieties of video clips to be kept in different sets, for
example, a set of pediatric cartoons, a set of Patient Education clips, and a set of advertisements for the
dispensary. Any number of sets of video clips may be customized for the practice.
Page 11
Acuity Charts
The four main varieties of Acuity Chart are: Progressive Lines, Single Line, Single Character, and Multiple
Lines of the same size. These are chosen with the Left and Right Navigation buttons.
Sizes are varied with both the Up and Down
buttons, and the column of Direct Access buttons.
Note: additional sizes between those represented by the Direct Access buttons are available, both larger and
smaller, with variations in progression (see Setup).
In Chart mode, the black Up
(some of which are optional).
and Down
buttons select the different optotypes available for testing
Option Buttons
The two feature buttons and directly above the navigation buttons provide features which act upon
the selected chart. These features include a single column when in chart mode, isolation, contour bars, and
an optional pointer and inverse (light on dark).
Page 12
Pointer Option
A pointer is optionally available when in Line mode. This helps with many younger, older and foreign
speaking patients. It is easily controlled by the and buttons along with other test features. The
pointer is used to indicate the desired test object in a given line of characters. The pointer automatically
sizes to be easily viewable to the patient.
Isolation / Contour Bars
When operating in the Line or Single Character mode, isolation is available. The two feature buttons
directly above the navigation buttons and selectively provide an isolation box along with the other
features. When in “single character” mode, contour bars are also available.
Random Charts
For common letter charts, the first set in a size is a common selection of characters. Each time the Select
button is pressed, a new chart of optotypes is presented which eliminates memorization by the patient.
The second and third sets of common optotypes are different, but consistent so that the practitioner can
eventually memorize them. After the third chart, all charts are randomly generated. This randomly
generated selection eliminates the problematic "Memory Effect” of conventional automatic and manual
projector systems.
Legends
Legends are controlled by the star button. Visible legends can be selected in the “Setup” menu. If a
remote display panel is used, it will indicate the Chart, Mode, and test details. A second press of the star
button provides a second page of legends for multi-line optotype charts.
Audible Legends may also be selected which announce the size of the first optotype line, and then
announce the identity of each optotype upon a second press of the star button. Young children like this
“Talking” test feature which can simplify some testing.
Optional Foot Pedals
Stimuli was first with foot pedal control of charts. This hands-free innovation is a boon to those working
with younger or difficult patients. This option is especially useful if the practitioner wishes to use a
number of hand held devices such as an occluder. The optional foot pedal unit allows handsfree control of
the chart size Up and Down
and Select buttons.
Page 13
Direct Access to Tests
Stimuli has always been the easiest system to use. In addition to providing for direct access to different
optotype sizes, and for direct access to film clips when playing, Stimuli supports direct access to tests, This
feature is easier than 1-2-3.
1 Press the Pause button.
2 Press any direct access button.
Button numbers correspond to the different available tests:
Programmed Favorite Chart
Acuity Charts
Red / Green
Fixation
Astigmatic Dial
4-Dot Test
Optional Test 1
Optional Test 2
200
160
125
100
80
50
30
20
An example of an Optional Test is “Contrast Sensitivity”. When this option is included it appears in the
Help screen lineup, and is automatically assigned to one of the Direct Access buttons.
Programmability
The initial test screen presented to the patient is progressive from 20/20 up to and including 20/80
(depending on screen size). However, Stimuli also supports a programmable chart starting point. To
program your favorite chart, size, optotype, and presentation option into memory:
1. Navigate to your favorite test chart, such as the Pediatric progressive column of optotypes.
2. Press the Pause
button on the remote. The test screen will go into “Sleep” mode (black).
3. Press the bottom left button, Star
programmed.
button twice, you will hear a Ding/Dong, your test is now
To return to the programmed favorite chart, form anywhere go into Pause
and then press the 200 direct
access button. Stimuli will return to your programmed choice. This feature greatly speeds vision testing
and helps keep the patient’s attention.
Note that the buttons both for programming and for navigating to the programmed chart are at the corners
of the remote, making reprogramming and navigation a snap.
Page 14
Sizable 4-Dot Test
Our unique sizable Four Dot chart sets the standard. The test is correctly calibrated for the refraction
distance.
The intensity of of the circles may be adjusted for different Red / Green eyewear to assure maximum
extinction (via the Four Dot Setup).
This test can be sized with the Up
and Down
Circle buttons.
The external and internal angles in degrees can be displayed or spoken via the
button.
Page 15
Fixation Dot
Upon entering this test, you will be presented a white dot on a black background. Stimuli includes many
features to make this the most flexible and useful fixation device.
The different features supported include:
1. Disappearing Dot Game.
2. White Dot on Black background.
3. Black Dot on White background.
4. Animated dot.
5. Flashing Dot.
6. Combinations.
Pressing the center button makes the dot disappear and reappear.
The and feature buttons Blink and Animate the dot respectively.
For convenience, the Left and Right buttons duplicate the feature buttons.
The animated dot moves in a varying trajectory in the patient’s central field.
The Up
and Down
buttons turn the background white or black respectively.
Page 16
Astigmatic Dial
The dial can be presented and a confirmation dot can be displayed with the Left
buttons. The indicators can be cleared with the Select button.
The optional foot pedals duplicate the Left
and Right
and Right
circle buttons and the Select
Circle
button.
Page 17
Playing Video
The Video Play button controls playing and stopping of video clips. When a video clip is playing the
Up
and Down Circle buttons and the Direct Access buttons control selection of additional clips
when this option is active.
The black Up and Down buttons are used to adjust volume when a film clip is playing.
The Mute button mutes the audio while the clip continues to play.
Sleep Mode
If video or audio is playing, the Pause
put to sleep.
button will pause the video or audio, otherwise the system will be
Page 18
Optional Video Clip Sets
Sets of multiple video clips can be selected (when this option is active) using the and feature buttons
when a clip is playing. This allows for example, a set of pediatric cartoons, and a set of patient education
film clips. These clip sets can be customized for the practice.
When a Clip Set is selected and playing, the Direct Access buttons allow direct selection of the first eight
clips in each set. The Up and Down buttons allow selection of every clip in the set.
Page 19
Optional Contrast Sensitivity
An optional Contrast chart, with similar features to the normal Acuity charts, has the ability to lower
contrast of the optotypes.
Sizes are selected with the Up and Down Circle buttons.
A new line of optotypes is generated each time the Select button is pressed.
The and buttons will adjust contrast level from 100% down to 0.6%.
The contrast level and size can be displayed via the Legend button.
Page 20
Software License Agreement
This is a legal agreement between you and Accommodata Corporation covering your use of Accommodata
Corporation software. Be sure to read the following agreement before using the software. IF YOU DO
NOT AGREE TO THE TERMS OF THIS AGREEMENT, DO NOT USE THE SOFTWARE AND
DESTROY ALL COPIES OF IT.
The software (including any documentation, electronic keys, images, photographs, animations, video, audio,
music, text, and fonts) accompanying this License whether on disk, in read only memory, on any other
media or in any other form are licensed to you by Accommodata Corporation. Accommodata Corporation
does not transfer title to the software to you.
This License allows you to install and use the software on a single computer at a time. You cannot
use the software without obtaining an electronic key from the copyright owner. You may not decompile,
reverse engineer, disassemble, modify, rent, lease, loan, sublicense, distribute or create derivative works
based upon the software in whole or part or transmit the software over a network or from one computer to
another. If you violate any part of this agreement, your right to use this software terminates automatically
and you then must return all copies of this software, documentation, and electronic keys to Accommodata
Corporation.
The software and related documentation are provided “AS IS” and without warranty of any kind and
Accommodata Corporation expressly disclaims all other warranties, express or implied, including, but not
limited to, the implied warranties of merchantability and fitness for a particular purpose and
noninfringement of third party rights. Under no circumstances shall Accommodata Corporation be liable
for any incidental, special or consequential damages that result from the use or inability to use the software
or related documentation, even if Accommodata Corporation has been advised of the possibility of such
damages. In no event shall Accommodata Corporation’s liability exceed the license fee paid, if any.
This Agreement shall be governed by the laws of the State of Ohio. If for any reason a court of competent
jurisdiction finds any provision of this Agreement, or portion thereof, to be unenforceable, that provision of
the Agreement shall be enforced to the maximum extent permissible so as to affect the intent of the parties,
and the remainder of this Agreement shall continue in full force and effect.
The software and documentation is provided with RESTRICTED RIGHTS. Use, duplication, or disclosure
by the Government is subject to restrictions as set forth in subdivision (b)(3)(ii) of The Rights in Technical
Data and Computer Software clause at 252.227-7013. Manufacturer is Accommodata Corporation, 18916
Arrowhead Avenue, Cleveland OH 44119.
Accommodata Corporation
18916 Arrowhead Avenue
Cleveland OH 44119
Under License from Accommodata Corporation
U.S. Patent Number 6,108,634
U.K. Patent Number 2329992
Japan Patent 3302697
Germany Patent 19781691
Canada Patent 2,251,080
Other Patents Pending
200602
Page 21