1
3. Setting up the Trito
4. Calibration
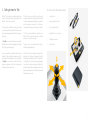
Follow the instructions below to setup the device for basic operation.
Calibration is the process of defining of the travel length
for each of axes of a DitoGear™ motion control rig. It is
also defining the limits of the operation for each of axis
either for operation convenience or to prevent crossing the
physical motion limits on each of axes.
Using the device for the first time
1
2
3
Unpack the Trito and remove protective caps and bubble wraps.
Be careful not to use any sharp device in order not to scratch the
surface of the equipment.
Prepare your DitoGear™ motion control devices
according to procedures described in their user manuals.
Connect one to three RJ45 type signal cables to
Trito’s sockets and to Input 1 port of the Breakout Box.
In case of the OmniHead: Connect two RJ45 type signal
cables to DitoGear™ Trito and to Input 1 & 2 port of the
Breakout Box.
4
5
6
Connect an RJ45 type signal cable to DitoGear™ motion
control devices and to the Output port of a DitoGear™
Breakout Box.
Finally, connect the power source – a DitoGear™
Power Pack 7Ah/14Ah, a DitoGear™ AC/DC power
adapter or a 3rd party compatible power source to a
Power port of the Breakout Box.
Proceed with calibration procedures as described later in
this manual. After calibration the Trito is ready to work.
The calibration process with Trito can include from 1 to
3 axes simultaneously. When you power up the Trito, it
automatically enters calibration mode for all of its axes. It is
indicated by a continuous light on en each of status LEDs.
IN and OUT calibration points are being set up
automatically basing on the total distance travelled in
calibration mode. When you enter the calibration mode,
the IN and OUT points are reset. Enter the calibration
mode, use the joystick to move the selected axis of the
device to the desired IN-point (either “left” or “right”) then
move to OUT-point (either “left” or “right”) and press the
Joystick Button to confirm the travel length and IN/OUT
points.
Connect the power. Trito will enter calibration mode
for each of axes (all 3 LEDs will light up).
3
Travel to the desired OUT-point on each of axes.
4
Confirm calibration by pressing the button.
Calibration method 2 -single axis calibration
1
Connect the power to your rig. Trito will enter calibration
mode for each of axes (all 3 LEDs will light up).
2
Press the Joystick Button to confirm calibration
with “zero” lengths.
3
Proceed with calibration for each of axes separately
as described below.
4
If you move too far in any of directions (beyond the desired IN
or OUT-point), you’ll have to enter the calibration mode again.
Calibration method 1 - manual IN-points
setting
Prior to connecting the power to DitoGear™ motion
control devices (step 5 in “Setting up the Trito” part)
set manually each of axes to the desired IN-point.
To enter a single-axis calibration mode set both dials
of an axis to minimum (fully to the left). All other
dials must not be in a “zero” position otherwise
they will be included in calibration as well. Press
the Joystick Button for 3 seconds. The LED will
blink a few times and will light up finally indicating
calibration mode on that axis.
5
Remember to adjust the speed after entering the
calibration mode, otherwise the axis won’t move.
6
Travel to the desired IN-point of the axis then travel
to the desired OUT-point and confirm calibration by
pressing the Joystick Button.
2 calibration methods are recommended:
1
8
2
7
If you move too far in any of directions (beyond the
desired IN or OUT-point, you’ll have to enter the
calibration mode again.
8
Repeat for all of axes.
Notes
1
You can carry out the calibration on one or more
axes simultaneously.
2
You may also recalibrate an axis anytime you want
using the procedures described above.
5. Conservation guidelines
1. While not in use DitoGear™ Trito should be stored in
a dry and dust-free place, preferably the Aluminum
Transport Case from DitoGear™.
2. Always be very careful storing and transporting the
device - watch out for the Joystick not to damage it.
3. After use in humid, wet or dusty conditions make sure
to clean the device with a soft fabric.
9