1
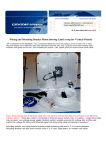
Wireless Box
User Guide
1
CONTENTS
PACKING LIST _______________________________________________ 3
DESCRIPTION AND CONNECTIONS ___________________________ 4
SOFTWARE INSTALLATION __________________________________ 7
PC WIRELESS CONFIGURATION ______________________________ 9
WIRELESS BOX CONFIGURATION ___________________________ 10
WIRELESS DESKTOP APPLICATION _________________________ 11
DVD STREAMING ___________________________________________ 17
MPEG 2 STREAMING AND OTHER VIDEO FILES ______________ 19
ADVANCED WIRELESS CONNECTION SETUP _________________ 21
WIRED CONNECTION SETUP________________________________ 26
WIRELESS/WIRED FIRMWARE UP-DATE _____________________ 27
TERMINOLOGY_____________________________________________ 29
NOTES ON USING THE WIRELESS TRANSMISSION ____________ 31
TROUBLESHOOTING________________________________________ 32
SECURITY __________________________________________________ 34
TRADEMARKS ______________________________________________ 35
2
Packing List
Contained of the package
Into the package you can find:
1
2
6
7
3
8
4
5
9
10
1)Handbag
2) AC Adapter
3) DVI cable
4) Audio cable
5) Ethernet cable
6) Antenna
7) USB Pen
8) Set of Screw
9)R. Controller
10) Manuals
3
Description and connections
Input/Output and Digitals Connections
IR
DVI OUT
AUDIO
12V
DVI IN
Rj45
USB2
Antenna
Digital Connections
The Wireless Box can be connected to a Wireless Box or to a LCD/Plasma
with the DVI cable (included on the package) and an audio cable(included
on the package too ). See the following image for an example..
4
It’s possible to establish a connection to a VGA port with a DVI/VGA
adaptor (not included on the package).
And/or
DVI-VGA
Adapter
Note: It is possible that both "HD" and "HD-Ready" projectors and
Displays have potential compatibility limitations on certain
applications.
This depends on Display compatibilities and very often such
limitations are clearly specified in the display User Manual.
On specific requirement our company could eventually
overcome this limitation with dedicated software
Source Selections
The input’s sources of the Wireless Box are the DVI/IN and the Wireless
source meanwhile for the output we use the DVI/OUT The input’s sources
can be set with the key <Source> of Remote Controller (see the next page).
DVI
5
Remote Controller
This is the Remote Controller’s image of the Wireless Box. On the table
there’s a description of the keys
6
Software Installation
Minimum System requirements
The computer must meet the following requirements in order to use
the supplied software.
OS:
Windows XP-SP2/2000
CPU:
Pentium III 8 0 0 M h z or compatible processor
RAM:
256 MB or more
Hard disk :
44 MB free or more
Peripheral:
CD-ROM/DVD drive (for software installation, viewing the
user’s manual and stream Video from DVD) , PC with
WLAN PCMCIA Card or PC with WLAN embedded
Nota:
•
For the wireless cards with chipset Atheros it’s
possible to have best performance (transmission speed
until 108 Mbps).
Note
• Better performances are achieved using the WLAN “g” or “a” version on
the PC, the Video streaming may not work properly with a WLAN “b”
version if the bit-rate of the source exceeds the throughput capability of
the WLAN.
• Operation is not guaranteed for all computers that do not meet the
above conditions
7
Software Installation
Wireless Box Software
Wireless Box Software:
This i s t h e software b u n d l e t o manage the Wireless Multimedia
Communication with the Wireless Box
Notes:
• Shut down all software currently active on Windows. Otherwise,
installation may not be possible.
• Administrator privilege is required for installation with Windows XP/2000.
Set the supplied CD-ROM in the CD-ROM drive or
USB Pen Flash in the USB drive
Double-Click [WDVP_Application.exe] in the CD-ROM or USB Pen Flash
and the following screen appears.
Click [Next].
Follow the instructions on the screen and install the software.
Note:
The Application will install Mirror Drivers, therefore the screen will go blank
for a few seconds before ending the installation
8
PC Wireless Configuration
PC Network Set-up
Configuring TCP/IP
The default configuration that comes with the Operating Systems is
usually the correct configuration for IP address (Automatically obtained
from DHCP server).
To check this, go to Start then Settings then Control Panel.
Select Network, right-click on Wireless Network Connection and then
select Properties.
Select TCP/IP protocol and select Properties.
Verify that under the General tab, Obtain an IP address automatically
and Obtain DNS server address automatically are selected.
9
Wireless Box Configuration
Network configuration Wireless Box
Configuring the Wireless Box
By Default the Wireless Box is configured as follows:
•
Master Mode in 802.11 a/b/g
•
DHCP Server : enabled on Wi-Fi
•
DHCP IP Address: 10.10.2.199
•
ESSID is “wv-net xx”
10
Wireless Desktop Application
Start Wireless Desktop
Notes:
• Make sure that the wireless network of the PC is connected to “wvnet” and the signal is appropriate (Excellent or Good). To check the
status Double Left Click on the Wireless Icon on the System Bar
• Make sure that the PC Resolution is set either in WXGA(1280x768),
XGA (1024x768) or SVGA (800x600).
Double-Left Click on the following icon on your Desktop
the Wireless Application.
to start
Click on the button “Connect” to start the Desktop Wireless Transmission.
The following windows will be displayed on the screen and a finding
procedure will be automatically started.
11
Wireless Desktop Application
Start Wireless Desktop
In this window more than a Wireless Box could be present and the
different status of the Wireless Box is shown with a different icon as
described below:
•
Busy: this Wireless Box is currently handled by another user
(check column Owned by) but could be requested to the user.
•
Free: this Wireless Box is free and could be immediately used
•
Trying: this icon appear when the PC is trying to connect with it or
when you ask for a busy Wireless Box
•
Lock: this Wireless Box is busy and locked by the owner.
Impossible to use the Wireless Box until the user closes his session.
Select any of the Free or Busy Wireless Box with a double click on it (or
select and then click on OK).
Different actions can take place depending on the Wireless Box status:
•
•
If the Wireless Box is FREE: the connection is immediately
established and the desktop is displayed by the Wireless Box.
If the Wireless Box is BUSY: ask to the current owner of the
Wireless Box to release it (a detailed information of the current user
and PC is provided). A request message appears on the current
owner PC and if the request is accepted by the user the connection
is immediately established and the desktop is displayed by the
Wireless Box. Alternatively a message informing you that the user
refused your request will be displayed.
12
Wireless Desktop Application
Start Wireless Desktop
•
If the Wireless Box is in LOCK status no access to it is possible
until the user closes his session.
The Refresh button refreshes the Wireless Box list (this operation can
require a few seconds depending on the current network settings).
Notes:
•
•
•
•
The following icon
will be displayed permanently in the bottom
right corner system tray when the Wireless Desktop application is
Minimised
In order to obtain the best performances set the WLAN on Turbo G
mode (only if it’s available).See the Advance Wireless
connections chapter
If the Wireless Box selected has been Set as default a simple
click on Play button of the Wireless Desktop application and the
Desktop will be transmitted every time that you click on Connect
button. However, if the Wireless Box isn’t available the Find
Wireless Display window will be visualized.
If the Wireless Box is connected both via Ethernet and Wireless,
two items will be displayed in the finding Window with different IP
address: (10.10.1.199 for Wired & 10.10.2.199 for Wireless.
13
Wireless Desktop Application
Navigation System
The main graphic interface is composed by Tab’s.
Each TAB provides a specific functionality related to the wireless video/data
application.
The upper portion of the interface provides the status information.
•
Connection: It shows Green light when the wireless connection
with the Wireless Box is successfully established.
The Red light tells that no connections is in place or not possible.
•
Mode : It provides real time status on what the Wireless Box is
displaying and confirm the application selected
•
Upper right image : Displays the synoptic view of the Mode.
.
This Setup Tab provides various combinations of parameters to satisfy all
possible user requirements.
Note:
•
•
An advanced streaming application is also provided (VLC) . We
recommend this option only for expert users.
The Reset button is provided in case the interaction with the
Wireless Box is lost.
14
Wireless Desktop Application
Wireless Desktop Options
Select the TAB Setup on the Wireless Desktop application. This entry
allows to change the Advance options of Wireless Desktop application
accordingly to the users preferences.
•
•
•
•
•
Lock WD:
Checking this flag will lock the Wireless Box usage. No other user can
ask for this Wireless Box
Stop Wireless Configuration Service on START:
It disables the “Zero Configuration” of Windows when the application
is launched. The service will be started when the application will be
disconnected.
Don't connect to Default WD:
If this function is checked the option Set as Default presents on the
Find Wireless Display-WD window will be disable(see page 12).
Don’t Minimize Icon Tray on Start
If this function is checked the application won’t be minimized on the
Notify area of the taskbar in Windows.
Sending Rate :
This slide bar allows to change the image refresh rate displayed on
the Desktop accordingly to the PC performance.
15
Wireless Desktop Application
Wireless Desktop Management
Virtual Remote Control
If you are Connected Click on Remote Control Icon
on
Wireless Desktop Application and the following interface will be displayed.
This virtual remote control enables to control from the PC the source
(Wireless or DVI cable) that you want to use.
16
DVD Streaming
Start DVD Streaming
Note:
• Make sure that the Wireless PC Network supports IEEE 802.11 g
(54Mbps) or IEEE 802.11 a (54Mbps). The Video and Audio may not
work properly in IEEE 802.11 b (11Mbps)
• Make sure that a DVD is inserted in the DVD drive of the PC
Select the TAB DVD on Wireless Desktop application and click on Play
button
•
Language Track: Used for Language Audio Track selection of the
DVD
•
Subtitles Track: Used for Subtitles Track selection of the DVD
•
Bit Rate Limit: Possibility to select the Rate between 3, 5 or 7Mbps.
Note:
• To be used in case the WLAN link is poor or the DVD is damaged
• For Video Streaming via Access Point a Bit Rate limit of 3Mb/s
needs to be set
17
DVD Streaming
Start DVD Streaming
Notes:
• When the Video Starts the Wireless Box brightness will automatically
adjust to perform better quality and obtain better contrast.
• The Audio will be played by the Speaker connected to the Wireless Box
by the AUDIO port.
• If the environment presents RF interference, select the TAB Setup,
Click on Connection Setup and select 802.11 a (54Mbs) on the
Wireless Setting panel
18
MPEG 2 Streaming and Other Video Files
MPEG 2 Streaming and Other Video Files
Note:
• Make sure that the Wireless PC Network supports IEEE 802.11 g
(54Mbps) or IEEE 802.11 a (54Mbps). The Video and Audio may not
work properly in IEEE 802.11 b (11Mbps)
Select the TAB MPEG2 File or Other Files on Wireless Desktop
application and click Open to select the Video File and then Click on
Play button
•
Bit Rate Limit: Possibility to select the Rate between 3, 5, 7Mb/s.
Note:
•
To be used in case the WLAN link is poor.
•
For Video Streaming via Access Point a Bit Rate limit of
3Mb/s needs to be set
19
MPEG 2 Streaming and Other Video Files
MPEG 2 Streaming and Other Video Files
Notes:
•
Make sure to choose an Mpeg2 or Mpeg1 format in case the
TAB Mpeg2 is selected. No matter what extension, .mpg - .ts .avi , but the content should be Mpeg2/1 compliant. If not the
Wireless Box will display a blank screen.
•
The Other Files TAB will play the remaining Video formats
available. (.wmv, mpeg4, DviX….)
•
If the environment presents RF interference, select the TAB
Setup, Click on Connection Setup and select 802.11 a (54Mbs)
on the Wireless Setting panel
20
Advanced Wireless Connection Setup
Advanced Wireless Connection Setup, part 1
Connection Setup (Via Access Point)
•
Semi-Auto Set-up
Select TAB Setup, Click
and fill in the windows with the Access
Point data requested. Wait for the Wireless Box to Reboot
Click
to go back to the Default mode and wait for the Wireless Box
to Reboot
•
Manual Set-up
Select the TAB SETUP on Wireless Desktop application and Click
Connection Setup, the following window will be displayed.
21
Advanced Wireless Connection Setup
Advanced Wireless Connection Setup, part 1
Note:
• Please make sure that the PC Network is connected to the Wireless Box
Wireless Display Name represents the name of the Wireless Box like will
be displayed on the devices list in the finding process.
In the Wireless Settings area input the following:
•
Change Mode from Master to Managed,
•
Name the ESSID with the name of the Access Point WLAN Network.
•
Select “Any” in the Channel selection
•
If the Access Point is in DHCP Server mode, set DHCP smart in the
Wi-Fi area, otherwise select Static IP and set manually the IP
Address and Subnet Mask.
•
Tick the Enable WEP flag, select the Key Type and insert your Key
(same key of the Access Point), then Click on OK
Note:
•
The Window above will not be available if the Wireless Desktop or
Video Transmission are active
•
You need to Activate an Encryption Key when connecting via
Access Point
•
To reset the Master mode you simply need to Click on Default
button and then OK
22
Advanced Wireless Connection Setup
Advanced Wireless Connection Setup, part 1
•
•
If the User wants to reset the Factory Default parameters, push the
following combination with the Key-Pad( one button for time with intervals
not
inferior
to
2
seconds)<Fast
Reverse>,<DVD>,<Channel
Next>,<PAUSE>.
In order to render effective the modifications you must execute a reboot of
the Wireless Box, push the following combination with the Key-Pad( one
button for time with intervals not inferior to 2 seconds) <Fast
Reverse>,<DVD>,<Channel Next><STOP>.Now wait 30 seconds for the
Wireless Box’s restart
23
Advanced Wireless Connection Setup
Advanced Wireless Connection Setup, part 1
WiFi/Wireless Settings
The connection’s parameters of the Wireless LAN are:
• IP Assignment:
Select the assignment mode to the IP address:
•
DHCP client. The Wireless Box look for a DHCP server
from witch receiving the IP address
•
DHCP server. The Wireless Box becomes a DHCP
server.
•
DHCP smart The Wireless Box look for a server. If don’t
found it the Wireless Box becomes a server.
•
Static IP. The address is assigned statically. If this option
is checked you must specify the IP address and the
Subnet Mask.
• IP Address
Insert here your preferred IP address of the Wireless Box (see
Operating System help for more details)
• Subnet Mask:
Insert here your preferred Subnet mask (see Operating System
help for more details)
• Channel:
Change the wireless transmission channel (change only if
there is too much interference with other 802.11g/b/a devices)
• Mode:
•
•
•
Ad-Hoc: Peer-to-peer WLAN connection
Managed: WLAN with Access Point device
Master: The Wireless Box works like an Access Point
• Encryption:
Enable/Disable encrypted transmission over the WLAN
• Key:
Key of the encrypted transmission (max length=152 bit)
• ESSID:
This is the Wireless Box WLAN network name
24
Advanced Wireless Connection Setup
Advance Wireless Connection Setup, part 2
Connection Setup (Streaming Video and Browse the
Web)
Usually Managed Mode connection Via Access Point, (as per Chapter
Part 1 above) limits the bandwidth therefore reducing quality for streaming
Video and browsing the Web at same time. To avoid this limitation use
two different WLAN card with different Driver and Chipset, ( i.e. 802.11
b/g Mini PCI Intel + 802.11 a PCMCIA Card D-Link…)
Notes:
• Our Company provides the option to purchase a Wireless LAN PCMCIA
card 802.11a/b/g
Select on the WD-Module Network Settings window(see the page 22)
the option 802.11a and click OK. This will enable the connection
between your PC and Wireless Box in 802.11 a Mode (5.4Ghz)
In this case the PC is handling 2 distinct WLAN connections,
•
one Peer-to-peer in 802.11 a (5.4Ghz) Mode to the Wireless Box
•
one Peer-to-peer in 802.11 b/g (2.4Ghz) Mode to the Access Point
Notes:
• Each time the Wireless Transmission Settings is changed from a - b/g Turbo G the Wireless Box will Reboot and wait for 30 sec before the
Mode is effective
25
Wired Connection Setup
Wired Connection Setup (Ethernet)
Fast Ethernet Settings
The connection’s parameters to the Fast Ethernet LAN are:
• IP Assignment:
Select the assignment mode to the IP address:
•
DHCP client. The Wireless Box look for a DHCP server
from witch receiving the IP address
•
DHCP server. The Wireless Box becomes a DHCP
server.
•
DHCP smart The Wireless Box look for a server. If don’t
found it the Wireless Box becomes a server.
•
Static IP. The address is assigned statically. If this option
is checked you must specify the IP address and the
Subnet Mask.
• IP Address
Insert here your preferred IP address of the Wireless Box (see
Operating System help for more details)
• Subnet Mask:
Insert here your preferred Subnet mask (see Operating System
help for more details)
Note:
•
Make sure the IP address of the Wireless Box and the PC is on
the same subnet
•
By changing the Default parameters the Wireless Box could be
no more accessible on the Network. See Troubleshooting
26
Wireless/Wired Firmware Up-date
Wireless/Wired Firmware Up-date
There are 2 types of Up-Dates:
•
•
User Files System (Fmw-Root)
Root File System (Fmw-User)
Note:
• During the Up-date DO NOT UNPLUG THE POWER CABLE of the
Wireless Box
• Use the Direct Ethernet cable connection between PC and Wireless
Box during the Root File System up-date procedure
• The Firmware Up-date process takes up to 5 minutes to complete
Go to Start, select All Programs and click Wireless Desktop .Click on
Firmware Update icon
The following window will be displayed
Note:
• Before downloading the new firmware from Internet make sure to check
the firmware versions (User Files & Root File System) number and
write it down. Click on Info to get this information.
27
Wireless/Wired Firmware Up-date
Wireless/Wired Firmware Up-date
Once the new firmware(s) has(have) been downloaded from our Web
site, open the Firmware Update window and click on Browse.
Select the User File System (FirmwareUSRFS_n_.x3d) or
(FirmwareROOTFS_n_.x3d )
Note:
If both User Files System and Root Files System were available on
the Web-site always start with the Root File System up-date.
• If the previous version numbers of the Root File System was “Odd”
number the new one will need to be “Even” and vice versa.
If the User makes a mistake in downloading the wrong one the System
will not up-date the Wireless Box.
For the User Files System no “Odd” or “even” number needs to be
respected
•
Once selected the new Firmware Click on Update and wait until the
Message “Completed” is displayed in the Message Box Area.
Switch OFF the Wireless Box by unplugging the power plug for a few
seconds and plug it back or Click on the Reboot button in the firmware
up-date Window and wait about 30 seconds to restart the system
To check if the Firmware has been successfully loaded please click on
Info and check if the User Files System or Root File System version
number has been changed to the one Downloaded from the Web-Site
28
Terminology
Terminology
Access point
A wireless station used to connect a wired LAN and a wireless LAN.
Ad Hoc mode
This mode performs communication directly between the Wireless Box
and a computer using built-in wireless LAN or a computer with a wireless
LAN card mounted. The Wireless Box and computer channel settings
must be the same. Some cards do not support this mode.
Channel
When multiple access points that use the same frequency band during
communication are installed near each other, radio wave interference
may cause the communication speed to drop. The 2.4 GHz frequency
band is divided into 14 channels for communication to reduce
interferences between wireless LAN’s. (The number of channels differs
according to the country of use.) However, there is still some interference
between adjacent channels, so communication channels should be
separated by 2 or 3 channels during actual use.
DHCP
Abbreviation for Dynamic Host Configuration Protocol. This function
automatically assigns IP addresses to the connected equipment. If a
device with the DHCP server function is present within a LAN, it
automatically assigns IP addresses to the connected equipment.
IP address
Internet Protocol (IP) is a protocol for distributing data, and the address
corresponding to the data distribution destination is called the IP address.
The same IP address cannot be used within the same LAN.
ESSID
Abbreviation for “Extended Service Set Identifier”.
This may appear as the “ESSID” or the “network name” for wireless LAN
cards made by some manufacturers.
29
Terminology
Terminology
Subnet mask
This limits the range of the IP addresses assigned to computers in order
to divide the network into a number of sections during TCP/IP connection.
TCP/IP
Abbreviation for Transmission Control Protocol/Internet Protocol. This is
the standard internet protocol. This protocol is a set of rules and
agreements governing data communications between computers.
WEP (Encryption Key)
Abbreviation for “Wired Equivalent Privacy”. This is a method for
encrypting communication data. The encryption key is created and
notified only to the communicating user, so the communication data
cannot be decrypted by a third party.
30
Notes on Using the Wireless Transmission
Notes Using the Wireless Transmission
The Wireless Link uses radio waves in the 2.4GHz and 5.4 GHz band.
A radio station license is not required when using the Wireless
Transmission, but be sure to read and fully understand the following items
before use.
The following equipment may emit radio waves in the same band as the
IEEE802.11g/b WLAN. When the WLAN is used near these devices,
radio wave interference may degrade the communication bit rate or even
cancel it:
•
Microwave ovens
•
Industrial, chemical and medical equipment, etc.
•
In-plant radio stations for identifying moving objects such as those
used in factory manufacturing lines, etc.
•
Cordless Phones
•
Bluetooth Devices
•
Designated low-power radio stations
31
Troubleshooting
Troubleshooting
Check the following points once more before requesting repair.
Symptom
Checkpoint
The Wireless
Desktop
Application
does not Start
Check that the Wireless Network Connection is connected to
the "wv-net"
The quality of
the Image
displayed
is not Sharp
Check that the resolution is set at 800x600,1024x768 or
1280x768
Image or
Video display
is slow
The speed depends largely upon the computer CPU
performance.
Check in the Find Wireless Display List if the Wireless Box’s
name is available
Adjust in the Options of the Wireless Application The frame rate
speed (only if PC performances are low)
Check the Wireless Connection Bandwidth
.
Check that in Video Mode the Connection is Excellent (54Mps).
The connection could drop in a mixed WLAN environment
Program or
Image not
Displayed
correctly
Check that program does not use Active X or Open GL
graphics. (the application does not support programs that use
Open GL)
The transfer
rate is slow
The transfer rate may be slower in some operating
environments(depending on such factors as the location, radio
signal conditions or distance).
32
Troubleshooting
Troubleshooting
The Wireless
Box cannot be
located
on the
connection list
of Wireless
Network
Connection
Check if the computer and the Wireless Box are located too
far apart, or if some object is obstructing the radio waves.
Check that the IP address and the subnet mask are set
correctly.
Does the WEP setting match with the Wireless Box?
Communication is not possible if the WEP function is set
when using a wireless card other than the optional card or
when using an access point. In these cases turn off the WEP
function.
In Infrastructure mode, set the same SSID for the Wireless
Box and the computer as that of the Access point used. The
SSID uses alphanumeric characters(case sensitive).In
addition, check that the computer control function that allows
communication with access point
In802.11AdHoc (Peer to Peer) mode, set the same SSID for
the Wireless Box and the computer. The SSID is case
sensitive.
Is a network device other than the wireless card enabled?
Check if the device’s IP address is in a different subnet.
Is proxy-client software active? Disable this software when
communicating with the Wireless Box.
Are you running a security program that contains a personal
firewall function? Before communicating data using the
Wireless Box , either close the software or set up an
exception.
Note
• The following combination with the Key-Pad( one button for time with
intervals not inferior to 2 seconds) <Fast Reverse>,<DVD>,<Channel
Next><STOP> will reboot the entire system. Wait 30 seconds for the
Wireless Box’s restart
33
Security
Security
The Wireless Box provides security through the built in WEP protocol.
Additional security is obtained by proprietary compression algorithm. This approach imply
that potential Hackers will have no way to decrypt the data in case they succeed in
defeating the WEP Security.
In order to activate the WEP Security the following steps are necessary:
•
Press the Setup TAB
•
Select then the Connection Setup button.
•
The Setup Window will show up
•
On the right bottom side check the Enable WEP Flag
•
•
Choose the bits count for the key on the available flags on the right side
Type your key and take note of it since the same key will be necessary for the
PC Wi-Fi Setup.
•
Press OK and wait for the system to reboot.
•
On the PC go to Start then Settings then Control Panel. Select
Network Connections , right-click on Wireless Network
Connection and then select Properties.
•
Select Wireless LAN TAB and then click on Show Wireless LAN.
•
Within the list of all available Wireless LAN select the one
corresponding to your W-Box.
•
A pop-up window will ask to type in the encryption key.
•
Type OK to complete this Setup.
34
Trademarks
Trademarks
Windows is a trademark or registered trademark of U.S. Microsoft
Corporation in the U.S. and other countries.
Other company names, product names or other names noted in this
manual are trademarks or registered trademarks of the respective
companies. Note that ® and TM marks are not indicated in the text of this
manual.
Notes:
• Unauthorized use or reproduction of part or all of this product
software and manuals is strictly prohibited.
• The company cannot be held liable for any effects resulting from
the use of this product software and manuals.
• The company reserves the right to revise this product software
specifications and manual contents without notice.
35