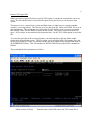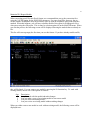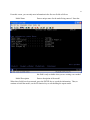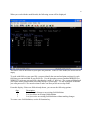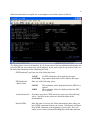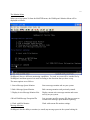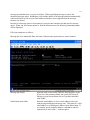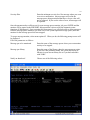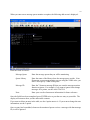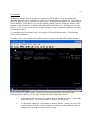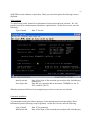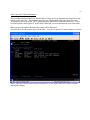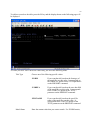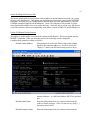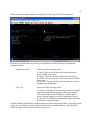
1
WebReport/i
Version 12
As of May 2012
Kisco Information Systems
89 Church Street
Saranac Lake, New York 12983
Phone:
FAX:
E-mail:
WWW:
Customer Support:
(518) 897-5002
(518) 897-5003
[email protected]
http://www.kisco.com
http://www.kisco.com/webreport/support
© 1998-2012 Kisco Information Systems
Table Of Contents
Introduction . . . . . . . . . . . . . . . . . . . . . . . . . . . . . . . . . . . . . . . . . . . . . . . . . . . . . . . . . . . . . . . . . . . . . . . .
Overview . . . . . . . . . . . . . . . . . . . . . . . . . . . . . . . . . . . . . . . . . . . . . . . . . . . . . . . . . . . . . . . . . . . .
What’s New In Release 12 . . . . . . . . . . . . . . . . . . . . . . . . . . . . . . . . . . . . . . . . . . . . . . . . . . . . . .
Installation and Security . . . . . . . . . . . . . . . . . . . . . . . . . . . . . . . . . . . . . . . . . . . . . . . . . . . . . . . .
Pre-Requisites . . . . . . . . . . . . . . . . . . . . . . . . . . . . . . . . . . . . . . . . . . . . . . . . . . . . . . . . . . . . . . . .
Kisco Software Support . . . . . . . . . . . . . . . . . . . . . . . . . . . . . . . . . . . . . . . . . . . . . . . . . . . . . . . .
World Wide Web Support . . . . . . . . . . . . . . . . . . . . . . . . . . . . . . . . . . . . . . . . . . . . . . . . . . . . . .
1
1
1
2
3
4
4
The Master Menu . . . . . . . . . . . . . . . . . . . . . . . . . . . . . . . . . . . . . . . . . . . . . . . . . . . . . . . . . . . . . . . . . . . . 6
Send Reports . . . . . . . . . . . . . . . . . . . . . . . . . . . . . . . . . . . . . . . . . . . . . . . . . . . . . . . . . . . . . . . . . . . . . . . 8
Send Report via E-mail . . . . . . . . . . . . . . . . . . . . . . . . . . . . . . . . . . . . . . . . . . . . . . . . . . . . . . . . . 8
Send Multiple Reports in a single E-mail . . . . . . . . . . . . . . . . . . . . . . . . . . . . . . . . . . . 30
Send Report by Fax . . . . . . . . . . . . . . . . . . . . . . . . . . . . . . . . . . . . . . . . . . . . . . . . . . . . . . . . . . . 32
Send Report to HTML File . . . . . . . . . . . . . . . . . . . . . . . . . . . . . . . . . . . . . . . . . . . . . . . . . . . . . 34
FTP Converted Spool Files . . . . . . . . . . . . . . . . . . . . . . . . . . . . . . . . . . . . . . . . . . . . . . . . . . . . . 51
Review HTML Index . . . . . . . . . . . . . . . . . . . . . . . . . . . . . . . . . . . . . . . . . . . . . . . . . . . . . . . . . 53
Work with WebReport/i Spool Files . . . . . . . . . . . . . . . . . . . . . . . . . . . . . . . . . . . . . . . . . . . . . 54
Maintain Address Book . . . . . . . . . . . . . . . . . . . . . . . . . . . . . . . . . . . . . . . . . . . . . . . . . . . . . . . 56
Working with Address Groups . . . . . . . . . . . . . . . . . . . . . . . . . . . . . . . . . . . . . . . . . . . 59
Restore *ISV Spool File . . . . . . . . . . . . . . . . . . . . . . . . . . . . . . . . . . . . . . . . . . . . . . . . . . . . . . . 61
Maintain XLS Report Models . . . . . . . . . . . . . . . . . . . . . . . . . . . . . . . . . . . . . . . . . . . . . . . . . . 63
Digital Signing for PDF Documents . . . . . . . . . . . . . . . . . . . . . . . . . . . . . . . . . . . . . . . . . . . . . . 68
IBM OS Requirements . . . . . . . . . . . . . . . . . . . . . . . . . . . . . . . . . . . . . . . . . . . . . . . . . . 68
WebReport/i Configuration . . . . . . . . . . . . . . . . . . . . . . . . . . . . . . . . . . . . . . . . . . . . . . 68
Create Your Signing Certificate . . . . . . . . . . . . . . . . . . . . . . . . . . . . . . . . . . . . . . . . . . 69
Applying The Digital Signature . . . . . . . . . . . . . . . . . . . . . . . . . . . . . . . . . . . . . . . . . . . 72
Automatic Operation . . . . . . . . . . . . . . . . . . . . . . . . . . . . . . . . . . . . . . . . . . . . . . . . . . . . . . . . . . . . . . . . 74
Automatic Routing Table Updates . . . . . . . . . . . . . . . . . . . . . . . . . . . . . . . . . . . . . . . . . . . . . . . 74
Update HTML Routing Table . . . . . . . . . . . . . . . . . . . . . . . . . . . . . . . . . . . . . . . . . . . . 74
Adding a new HTML Routing Instruction . . . . . . . . . . . . . . . . . . . . . . . . . . . . . . . . . . 76
Changing, Copying, Deleting and Reviewing HTML Routings . . . . . . . . . . . . . . . . . . 93
Update E-mail Routing Table . . . . . . . . . . . . . . . . . . . . . . . . . . . . . . . . . . . . . . . . . . . . 94
Adding a new E-mail Routing Instruction . . . . . . . . . . . . . . . . . . . . . . . . . . . . . . . . . . . 95
Changing, Copying, Deleting and Reviewing E-mail Routings . . . . . . . . . . . . . . . . . 111
Automatic Routing Using Email Addresses in the Spool File . . . . . . . . . . . . . . . . . . . 112
Automatic Routing by User Profile . . . . . . . . . . . . . . . . . . . . . . . . . . . . . . . . . . . . . . . 113
Automatic Routing Using *USRDFNDTA Field . . . . . . . . . . . . . . . . . . . . . . . . . . . . 114
Starting Automatic Routing . . . . . . . . . . . . . . . . . . . . . . . . . . . . . . . . . . . . . . . . . . . . . . . . . . . 115
Ending Automatic Routing . . . . . . . . . . . . . . . . . . . . . . . . . . . . . . . . . . . . . . . . . . . . . . . . . . . . 115
Activity Log . . . . . . . . . . . . . . . . . . . . . . . . . . . . . . . . . . . . . . . . . . . . . . . . . . . . . . . . . . . . . . . 115
The Monitor Menu . . . . . . . . . . . . . . . . . . . . . . . . . . . . . . . . . . . . . . . . . . . . . . . . . . . . . . . . . . . . . . . . . 117
Message Monitors . . . . . . . . . . . . . . . . . . . . . . . . . . . . . . . . . . . . . . . . . . . . . . . . . . . . . . . . . . . 117
File Monitors . . . . . . . . . . . . . . . . . . . . . . . . . . . . . . . . . . . . . . . . . . . . . . . . . . . . . . . . . . . . . . 122
Installation and Configuration . . . . . . . . . . . . . . . . . . . . . . . . . . . . . . . . . . . . . . . . . . . . . . . . . . . . . . . .
Installation from Media . . . . . . . . . . . . . . . . . . . . . . . . . . . . . . . . . . . . . . . . . . . . . . . . . . . . . .
Release Upgrade Installation . . . . . . . . . . . . . . . . . . . . . . . . . . . . . . . . . . . . . . . . . . . . . . . . . .
Installation from Internet . . . . . . . . . . . . . . . . . . . . . . . . . . . . . . . . . . . . . . . . . . . . . . . . . . . . .
Configuration Considerations . . . . . . . . . . . . . . . . . . . . . . . . . . . . . . . . . . . . . . . . . . . . . . . . . .
Considerations for using Internet Addresses . . . . . . . . . . . . . . . . . . . . . . . . . . . . . . . .
Control over ASCII Conversion . . . . . . . . . . . . . . . . . . . . . . . . . . . . . . . . . . . . . . . . .
The Install Menu . . . . . . . . . . . . . . . . . . . . . . . . . . . . . . . . . . . . . . . . . . . . . . . . . . . . . . . . . . . .
Display installation status . . . . . . . . . . . . . . . . . . . . . . . . . . . . . . . . . . . . . . . . . . . . . . . . . . . . .
Change installation status . . . . . . . . . . . . . . . . . . . . . . . . . . . . . . . . . . . . . . . . . . . . . . . . . . . . .
Permanent installation . . . . . . . . . . . . . . . . . . . . . . . . . . . . . . . . . . . . . . . . . . . . . . . . . . . . . . .
Print additional documentation . . . . . . . . . . . . . . . . . . . . . . . . . . . . . . . . . . . . . . . . . . . . . . . . .
125
125
126
126
127
128
129
130
132
132
133
134
3
Display Software Version Information . . . . . . . . . . . . . . . . . . . . . . . . . . . . . . . . . . . . . . . . . . .
Title Conversion Table Maintenance . . . . . . . . . . . . . . . . . . . . . . . . . . . . . . . . . . . . . . . . . . . .
Install Kisco PTF Package . . . . . . . . . . . . . . . . . . . . . . . . . . . . . . . . . . . . . . . . . . . . . . . . . . . .
Update WebReport/i Directory Info . . . . . . . . . . . . . . . . . . . . . . . . . . . . . . . . . . . . . . . . . . . . .
Update WebReport Default Settings . . . . . . . . . . . . . . . . . . . . . . . . . . . . . . . . . . . . . . . . . . . .
WebReport/i Configuration Wizard . . . . . . . . . . . . . . . . . . . . . . . . . . . . . . . . . . . . . . . . . . . . .
SMTP Journal Tracing . . . . . . . . . . . . . . . . . . . . . . . . . . . . . . . . . . . . . . . . . . . . . . . . . . . . . . .
User Profile Security Maintenance . . . . . . . . . . . . . . . . . . . . . . . . . . . . . . . . . . . . . . . . . . . . . .
134
135
138
139
139
144
146
148
1
Introduction
WebReport/i is an e-business application for your IBM i computer system which includes Power
Systems running IBM’s i/OS, i5, iSeries and AS/400. It lets you to take reports from your
system’s print spool and electronically deploy them. WebReport/i will let you send these reports
as E-mail or fax. It will also let you convert the reports into various format documents for
deployment on either your own company Intranet or to an Internet Website. With Release 12, a
full functioned Intranet website deployment using the IBM i/OS Apache server is included with
the software. Details about the Intranet feature are included in a separate manual.
For the purposes of this documentation, your system will be referred to as an “iSeries” system.
This term is used generically and applies to all systems in the IBM i family, including your Power
System running IBM i/OS, i5 system, your AS/400 system or your iSeries.
Overview
WebReport/i processes your iSeries print spool and extracts reports. It can be run manually on a
report by report basis, imbedded directly into your own programs using our standard IBM i/OS
commands or you can set it up to run automatically. When run manually, you simply identify the
spool file that you want to process. By choosing one of two commands, you can either send the
spool file as an E-mail or fax, or your can convert it into a document for web deployment. As an
alternative, you can use the Work With Web Spool Files (WRKWEBSPLF) command to review
spool file contents and choose WebReport/i options for them.
When setup for automatic operation, all you need to do is create routing instructions within
WebReport/i. These instructions are associated with specific output queues on your iSeries
system. To have something route automatically, you just route the output to the output queue and
the WebReport/i router will take over from there.
Each operation performed by WebReport/i is logged to an activity database within WebReport/i.
You can use this to trace activity and see what reports are being processed and how they are being
processed. A utility provided with WebReport/i will let you periodically print out this log to clear
the log and review the entries made in it.
WebReport/i comes in two different flavors. Basic WebReport/i contains all of the features and
capabilities that are documented. The enhanced WebReport/i PDF adds the capability to create
documents in Adobe Acrobat (PDF) format, in comma-separated-values (CSV) format, in Excel
format (XLS) and in our proprietary *ISP and *ISV formats for spool file storage. When the
product is first installed on trial, the full WebReport/i PDF version is loaded. If you decide to use
the basic product, Kisco Information Systems will give you instructions on how to reconfigure
your installed version.
What’s New In Release 12
Release 12 of WebReport/i includes the following changes and new features. Some of these were
introduced during the life cycle of the previous release, so current customers may already have
some of this functionality already installed.
!
New name - WebReport/400 has now become WebReport/i in keeping with the new
identification by IBM that has been in place now for some time.
2
!
Report Intranet feature added - hosted right on your IBM i using the built-in Apache server.
You can now send reports to the Intranet for automatic deployment on this Intranet site.
The site is set up with security so that only reports a use is allowed to see are available.
!
PDF Fill-in Forms feature lets you generate PDF documents from your spool files and
include fill-in boxes that can be used by the recipients to add information or feedback to
you.
!
Improved output queue security implemented. Prior to this change, anyone used
WebReport/i could access output queues that the IBM i/OS security would deny to them.
We now have the option to configure WebReport/i so that IBM i/OS security will be
honored.
!
Configuration support for HTTPS is now provided for the browser Intranet feature. We
provide complete instructions on how to implement the Intranet site using HTTS security.
!
Easy to use SMTP tracing utilities are now included in WebReport/i. An SMTP reset
process is also now included.
!
Spool files can now be converted into TIF format.
!
A new FTP output function in the WREPORT command and in HTML Automatic Routing
has been implemented to make FTP transfers of reports much easier. No need to code your
own program any longer and the needed FTP scripts are automatically created for you by
WebReport/i.
!
The HTML Automatic Routing rules maintenance has had a copy function added which
has been needed for a long time and requested by many customers.
!
A new internal PC format for spool file transfers to other IBM i platforms has been added
that makes the transfer much easier.
Installation and Security
Specific installation instructions are covered in the section of this manual titled "Installation". To
install your product on trial, follow those instructions. WebReport/i can be installed from
distribution media supplied by Kisco Information Systems or from a download file from the
Internet. The initial installation will allow WebReport/i to run on your system for a period of at
least thirty days. At the end of the trial period, the software will no longer function.
The initial installation will always install the full WebReport/i PDF product. After you have
completed your evaluation, if you decide that you prefer just the basic WebReport/i, contact Kisco
Information Systems and instructions will be provided to reconfigure your installation.
When you decide to keep WebReport/i, you must send your payment to Kisco Information
Systems. At that time, Kisco must know the full serial number for your system and the partition
number where you have the software installed. If you are not sure of your serial number or
partition number, you can display this information by running option #2 on the INSTALL menu in
the application library WEBREPORT.
3
When Kisco receives your payment and serial number/partition number, they will issue a password
to you. This password, when applied, will certify your copy of WebReport/i and will permanently
activate the software on your system. The password and certification instructions will be provided
in writing by email.
Pre-Requisites
WebReport/i assumes that you have the following components in place on your system:
!
!
!
!
A working TCP/IP environment on the iSeries.
An active SMTP (Simple Mail Transport Protocol) server function running on the iSeries
(for use of the E-mail features in WebReport/i only).
A working E-mail server. This may be on the iSeries or an external mail server. For
Internet destination E-mail addresses, the mail server must be connected to the Internet.
To use the fax output option, you must have an active account with MetroFax or a similar
internet fax service. See details in the fax output section of this manual.
Additional information about each of these components is discussed later in the manual under the
Installation and Configuration section. Configuration help is available by using the Configuration
Wizard function.
4
Kisco Software Support
Kisco Information Systems software support is available from 7am to 6pm eastern time. You can
reach software support with the following methods:
Phone:
Email:
Fax:
Mail:
518-897-5002
[email protected]
518-897-5003
Kisco Information Systems
89 Church Street
Saranac Lake, NY 12983
Off-hours support can be provided for all registered customers with advance notification. Contact
our support staff at least 24 hours in advance when you think you will need off-hours support and
we will provide instructions for contacting us during that time. If you have unscheduled off-hours
support needs, you should place a phone call and send an email request. Support is generally
available during off-hours.
Kisco Information Systems provides unlimited software support during your first year of
ownership. This includes the time during your free trial. Following the first year of ownership,
there is a modest fee structure to maintain support for your software.
The Kisco support policy program works as follows:
1.
First year support will continue to be FREE! This will include unlimited telephone
support, unlimited E-mail support, free release updates and free license transfers.
2.
After the first year, an annual charge will apply for support and software maintenance.
3.
The annual fee will be charged at the rate of 15% of the then current selling price.
4.
Support covered by this annual fee includes:
a.
b.
c.
d.
e.
f.
5.
Unlimited telephone support (518-897-5002)
Unlimited E-mail support ([email protected])
Defect analysis and correction
Free updates to correct known defects (Kisco PTFs)
Free updates for new releases and features
Free license transfers (when you upgrade to a different system)
Customers who are not on maintenance will be charged $100 for each license transfer.
At the end of your first year of ownership, you will receive an invoice from us for your next year's
maintenance charge. Non-payment of this invoice will be taken to mean that you decline
maintenance.
World Wide Web Support
You can use the World Wide Web to reach us and to obtain software support information. Just set
your web browser to our web address at:
http://www.kisco.com
5
Support information specifically for WebReport/i can be found at this address:
http://www.kisco.com/webreport/support
At our Website, you will find:
!
Product information about all Kisco software products for the IBM i.
!
Customer support information including:
<
<
<
<
<
<
Latest release level information for all products
Technical bulletins
Frequently asked questions and answers
Problem reports including WebReport/i PTF availability
Descriptions for recent enhancements to products
E-mail contact information for getting in touch with us
!
Information about consulting services available from Kisco Information Systems.
!
Registration for automatic notification about WebReport/i enhancements and changes.
!
..... and more
The first time you visit the Customer support section of our website for WebReport/i, be sure to
register for automatic notification. Once you are registered, we will automatically send Email
notices to you about upgrades, enhancements and fixes for WebReport/i as soon as they become
available.
We invite you to visit our Website, use the contact features to let us know what you think. We're
always looking for ways to better serve you, our customer.
6
The Master Menu
The main menu used by WebReport/i is called MASTER and is found in the library
WEBREPORT. There are several ways to display the menu. You can issue the following GO
command from any terminal command line:
GO WEBREPORT/MASTER
This method does not require that the library name be added to your library list. You can also add
the library to your library list and display the menu with an easier format. To add the library to
your library list and display the menu, enter the following two commands:
ADDLIBLE WEBREPORT
GO MASTER
The main WebReport/i menu appears as follows:
Each menu option handles the following functions. Each function is described in more detail later
in this manual:
1. Send Report via E-mail
Sends a specific iSeries spool file entry as an E-mail message
to a virtually unlimited number of recipients. This option is
also used to send your spool file by fax.
2. Send Report to HTML File
Converts a specific iSeries spool file entry into a document
for deployment on an Intranet or Internet Website.
3. Review HTML Index
Browse and maintain current HTML document list.
7
4. Work with WebReport/i
Spool Files
Displays spool file entries and lets you choose various
WebReport/i options for them.
5. Maintain Address Book
Lets you maintain a list of frequently used E-mail addresses
so that they can be referred to using abbreviations. This
option also allows you to create and maintain address groups.
6. Restore *ISV Spool File
Lets you restore a spool file from a PC file previously saved
using the *ISV format.
7. Work With PDF Forms
Lets you maintain configuration for the PDF Forms feature.
Refer to the separate user manual available for this feature.
8. Maintain XLS Report Models
Lets you maintain report model settings for Excel spool file
conversion processing.
15. Start Automatic Routing
Starts WebReport/i's automatic report routing process.
16. End Automatic Routing
Stops the automatic report routing process. If there are no
message monitors active, this will also close down the
EREPORT subsystem.
17. Update HTML Routing Table
Updates and maintains HTML routing instructions for the
automatic process.
18. Update Email Routing Table
Updates and maintains Email routing instructions for the
automatic process.
19. Display/Print Activity Log
Displays or Prints and clears the WebReport/i activity log.
20. To Monitor Menu
Switches to the WebReport/i Monitor tasks menu.
30. To Install Menu
Switches to the WebReport/i Installation tasks menu.
90. Signoff
Performs a terminal signoff operation.
8
Send Reports
Send Report via E-mail
You can send any *SCS spool file entry as an E-mail message using WebReport/i. You can also
choose to send any *AFPDS, *IPDS or *USERASCII spool file if you use the PDF option to send
it in Acrobat format. If your *AFPDS spool file includes an overlay, the overlay will also be
included in the email that is sent. Some color overlays are supported, contact Kisco for specific
instructions for color.
Choose menu option #1 or enter the command WEBREPORT/EREPORT and press F4. The
following screen will be displayed:
The parameters on the screen can be completed as follows:
Spooled File Name
Enter the name of the spool file to be sent. You can also
specify a special value of *NONE. When you do this, an
Email message will be sent with no attached report. To use
this option, the following additional conditions must be met:
1) The output format must be set to *TXT
2) You cannot use any of the special values allowed for the
TITLE parameter.
Job Name
Enter the three qualifiers for the job, job name, user profile
and system job number. If you use the special value of
*CURRENT, then the spool file from your current job will be
used. When use *CURRENT, leave the rest of the elements of
9
this parameter blank.
Spooled File Number
Enter the file number for the spool file to be sent. This
parameter will also accept the following special values:
*ONLY - the only spool file for the job will be used.
*LAST - the most recent spool file for the job will be used
Report Title
Enter a short title for the report, up to 50 characters. This will
become the Email “Subject” field. The following special
values are also available for this parameter:
The title will be taken from the User Data field
for the spool file entry.
*USRDFNDTA - the title will be taken from the first 50
characters of the USRDFNDTA parameter
associated with the spool file being processed.
If WebReport/i finds this value blank, a default
title of “No User Defined Data Available” will
be used.
*USRCNV
The Subject for your email will be extracted
from the Title Conversion Table based on the
contents of the USRDTA field for the spool
file.
*FILCNV
The Subject for your email will be extracted
from the Title Conversion Table based on the
name of the spool file.
*FRMCNV The Subject for your email will be extracted
from the Title Conversion Table based on the
formtype for the spool file.
*USRDTA
This field also supports a special “macro” expression. If you
encode a special value of ‘&DATE-EXPR’ anywhere in the
report title field, WebReport/i will replace that field with the
current system date using your configured date formatting.
Example:
“Sales Report for &DATE-EXPR”
will be converted to the following value by WebReport/i:
“Sales Report for 10/02/2006”
Attachment Format
Specifies how you want the report sent. Choose one of the
following options:
*TXT The spool file will be converted into a plain text file.
*RTF The spool file will be converted into a Rich Text
Format file (RTF). The RTF format can be used by
most PC-based word processing software. Choosing
this option will provide report recipients with a better
method of printing reports locally.
10
*PDF The spool file will be converted into a Adobe Acrobat
Format file (PDF). The PDF format can be viewed on
PC’s using the Adobe Acrobat Reader which is
available for free from Adobe. This reader can be used
to view and print reports on PC’s and Macintosh
computers.
*XLS The spool file will be converted into an Excel
spreadsheet file.
*CSV The spool file will be converted into a Comma
Separated Values PC file. This is a common format
for interchange with an electronic spreadsheet.
*TIF The spool file will be converted into TIF graphic
format
*ISV The spool file will be converted into a new special
format so that it can be restored to any iSeries system
and put back into an output queue (preferred over
*ISP).
*ISP The spool file will be converted into special format so
that it can be restored to any iSeries system and put
back into an output queue.
Note: The *PDF, *XLS, *CSV, *TIF, *ISV and *ISP options
are only available when WebReport/i PDF is installed.
Attachment file name
Use this parameter to control how the email attachment file is
named. You can specify a specific attachment file name or
you can use one of the following special values:
*GEN
*GENDAT
Sender Identifier
This is the default value. WebReport/i will
automatically assign a name to the attachment
file.
WebReport/i will assign a date differentiated
file name using the two letter *GENDAT
filename prefix code plus the create date for the
spool file being processed.
Choose one of the following values to have this email message
identified:
*DFT
The sender will be identified using the default
settings from the WEBSET command that was
entered when the software was installed and
configured.
*USER
The sender will be identified using the current
user profile and the default email address from
the WEBSET command.
*SPLUSER The sender will be identified as the user that is
associated with the spool file bring processed.
If that user profile is found in the WebReport/i
Address Book, then the sender’s full name as
shown in the Address Book will be used.
11
Using this option will have your email appear
to be arriving from the person who actually ran
the report.
Recipient Identifier
Name
If an address book abbreviation name is used,
then the sender will be identified with both the
name and email address that corresponds to the
name entered. The information will be taken
from the WebReport/i address book file.
Email
Enter any valid email address. The email
address entered here will be used as the sender's
email address. The sender's name will be taken
from the system default value shown in the
WEBSET command.
Abbrev
Enter a valid address abbreviation from the
WebReport/i Address Book. The sender's
name and email address will be used based on
the Address Book record.
This parameter identifies the recipient for this email message.
Choose one of the following values:
*DFT
The default value specified by the WEBSET
command is used.
Name
Enter the specific value that you want to use to
identify the recipient for this email.
12
Additional parameters are needed for this command. When the above parameters have been
completed, use the Roll function to display the next panel. It will appear as follows:
To complete the command, enter these parameters as follows:
Internet Address
Provision is made for up to 20 fields of direct internet address
information.
Addresses can take the following forms:
Direct Addresses - these are in standard form such as
“[email protected]”
WebReport/i Abbreviations - use any abbreviation name that
you have already entered into the WebReport/i Address Book.
When you use this form of addressing, the recipient’s name
will be encoded in the email message as it appears in the
Address Book.
Multiple E-mail addresses can be stacked together within each
of the 20 parameter fields provided. You can stack Direct
Addresses mixed with WebReport/i Abbreviations. To stack
addresses, just place a semi-colon (‘;’) between the addresses
without leaving any blank characters.
Example: [email protected];JOHN;[email protected]
In the above example, the report will be sent to the two direct
13
internet addresses shown and to the E-mail address associated
with the WebReport/i abbreviated name JOHN.
If you are processing a spool file that contains imbedded
internal #EMAIL directive statements, this parameter should
be set to the special value ‘*INT’.
You can also specify automatic routing using an email address
(or string of email addresses) taken from the USRDFNDTA
field in the spool file itself. To do this, have your printing
application store the addresses in the spool file field, then
specify the special value of *USRDFNDTA in this parameter.
Optional message text
This field lets you add text that will be sent along with the
report in the body of the E-mail message. Using the *DFT
option will send a default standard E-mail text to each
recipient. The default text is set on the INSTALL menu using
the WEBSET command.
This field can be expanded to include up to 1,024 characters of
information.
The message text field contains several formatting options you
can use to control the appearance of the message text portion
of your WebReport/i Email message. The feature lets you
force a carriage return into the message text at any point by
keying in a logical-not sign. This is the character that looks
like this: ( ¬ ). On many keyboards, this is the left bracket
character, just to the right of the letter P. The exact location
on your keyboard may vary. Check your keyboard mapping
for the exact location. Using this feature, you can separate
paragraphs and even insert blank lines.
You can also choose to include a list of all destination email
addresses where your email message is being sent.
WebReport/i sends each copy of your email separately to each
destination address. To include this information with your
email, just include the characters "&TOLIST" anywhere in the
message text field. WebReport/i will see this and then
substitute a list of the destination email addresses included
with the email send request. When the list is inserted into the
email message text, a line break will be generated followed by
the distribution list in the following format:
-------------------------------------------------------------------------This message was sent to the following:
=======================================
[email protected]
[email protected]
=======================================
It is a good idea to place this either at the start of the message
text or at the very end of the message text. You can also
14
include this option in the default message text by using option
#9 (WEBSET) on the INSTALL menu.
Note that some mail clients may not like the equal signs as
message text separators. This can be changed globally on your
system. These characters, a 40 character string, are kept in a
data area named CONTROL2 starting in position 368. If you
have email clients that have a problem with these, please use
the CHGDTAARA command to change the 40 character string
to some other characters.
Spool File Action
Choose one of the following special values:
*LEAVE
*HOLD
*CANCEL
the spool file will be left in the output spool
after the E-mail is sent.
the spool file will be left in the output spool
after the E-mail is sent and will be changed to
HOLD status.
the spool file will be deleted from the output
spool after the E-mail is sent.
15
Additional parameters are needed for this command. When the above parameters have been
completed, use the Roll function to display the next panel:
To
co
m
pl
ete the command, enter these parameters as follows:
New Output Queue
When you use a Spool File Action of *LEAVE (above), you
can optionally tell WebReport/i to place the spool file in a
different output queue and you can also change the formtype at
the same time. If you choose this option, be sure to specify a
valid output queue and the library where it is located.
Note: When processing a report in *ISP (spool file) format,
WebReport/i always defaults to placing the report on hold
following the operation. This is done for internal reasons.
Job Queue
Leave this parameter blank if you want to process the report as
email interactively. If you want to spin this process off into a
system job queue, enter the job queue name here. Note, the
job queue must be one that is in a library associated with the
library list for your current job.
16
When you select the *XLS option for Excel spreadsheet file format, the following additional
parameters will be requested:
Specify the following parameters to control your spool file conversion to Excel format:
Keep page headings?
Page heading start line
Use one of these options:
*FIRST - only keep the headings from the first page
*ALL - keep all page headings
*NONE - ignore all page headings
This parameter is only used when your conversion method
refers to a report model. If the XLSCONV parameter is set to
*AUTO, this parameter is ignored.
Enter the starting line number for the page headings on your
report.
Page heading ending line
This parameter is only used when your conversion method
refers to a report model. If the XLSCONV parameter is set to
*AUTO, this parameter is ignored.
Enter the ending line number for the page headings on your
report.
17
Keep column headings?
Use one of these options:
*FIRST - only keep the column headings from the first page
*ALL - keep all column headings
*NONE - ignore all column headings
Column heading start line
This parameter is only used when your conversion method
refers to a report model. If the XLSCONV parameter is set to
*AUTO, this parameter is ignored.
Enter the starting line number for the column headings on your
report.
Column heading ending line This parameter is only used when your conversion method
refers to a report model. If the XLSCONV parameter is set to
*AUTO, this parameter is ignored.
Enter the ending line number for the column headings on your
report.
Font face
Select the font that you want to use for the conversion. The
following are currently supported:
*ARIAL, *COURIER, *COURIERB, *COURIERO,
*COURIERBO, *HELVETICA, *HELVB, *HELVO,
*HELVBO, *TIMES, *TIMESB, *TIMESI, *TIMESBI,
*SYMBOL, *DINGBATS
Font size
Choose the size that you want to enforce for the selected font.
XLS conversion method
For conversion to XLS format, this parameter lets you select
the way WebReport/i does the conversion. Choose one of the
following options:
*AUTO - Use WebReport/i's automatic column interpretation.
This option is preferred for the first time that you attempt an
*XLS conversion on a report.
Model Name - Enter the name of an XLS Report Model that
you have built using the option from the MASTER menu for
this purpose.
When you select your output in the *CSV format, several additional parameters are requested as
shown here and on the next display panel:
18
Enter these parameters as follows:
Delimiters: (There are 5 elements to the parameter as follows)
Record delimiter
*CRLF
*CR
*LF
String delimiter
This parameter defines the characters to be used to indicate the
end of a record in the CSV file.
Carriage return and line feed. Both a carriage return (x'0D')
and a line feed.
Just a carriage return (x'0D') is used.
Just a line feed (x'0A') is used.
The character to be used to enclosed character string data.
*DBLQUOTE
A double quote (") is used.
*SGLQUOTE
A single quote (') is used.
*NONE
No delimiter is used. Alphanumeric data is not enclosed by
any special character.
The delimiter character to use.
Delimiter-char
Field delimiter
The character to be used to separate fields in the CSV file.
*COMMA
A comma (,) is used.
*TAB
A tab (x'09') is used.
19
*BLANK
A blank (x'20') is used.
*SEMICOLON A semicolon (;) is used.
Delimiter-char
Column separator
The delimiter character to use.
The values you select on this parameter control how the
spooled file is converted to a delimited ASCII text file (e.g. a
comma separated variable file).
The default for the first element is *SPLF. This tells
WebReport/i to break the spooled file data into columns based
on the way in which the data is split up in the spooled file.
Where the spooled file is created from an externally described
printer file this will probably give the best results, since the
data in the spooled file is likely to be organized so that each
natural or logical item of data appears as a separately
identifiable element.
However, if the spooled file is created from an internally
described printer file, or from an application such as IBM’s
Query/i, it is likely that the data in the spooled file will be
presented to WebReport/i as a single, unstructured data block
for each line of the report. If this is the case then better results
will probably be achieved by defining a column separator
character to control the splitting of the data in the report.
*SPLF
The column separator character can be any alphanumeric
character. Often the best results will be obtained by selecting
*BLANK (blank character) which will split the data in the
spooled file every time one or more consecutive blank
characters occur.
Split the data in the report based on the organization of the
data.
*BLANK
Blank
character
The character to use to force a column split.
Number of column
separator characters
The number of consecutive column separator characters
required to force a column split.
Number
The number of characters required.
Exclude pages
The EXCLPAGES (Exclude Pages) parameter allows you to
identify pages of the spool that should not be included in the
resultant stream file.
For example, if your spooled file contains header sheets or
batch separator pages dropped using this parameter.
There are five elements to this parameter, each providing a
20
different method of pages from the spooled file.
At start of spooled file
The number of pages to exclude at the beginning of the
spooled file. If you specify a number on this parameter
element, then that number of pages will be ignored at the start
of the spooled file. If your spooled file contains one or more
unwanted header sheets at the beginning of the spooled file,
these can be dropped by specifying the number of pages to be
dropped here.
At end of spooled file
The number of pages to exclude at the end of the spooled file.
If you specify a number on this parameter element, then that
number of pages will be ignored at the end of the spooled file.
If your spooled file contains one or more unwanted trailer
sheets at the end of the spooled file, these can be dropped by
specifying the number of pages to be dropped here.
At start of each stream file
The number of pages to exclude at the beginning of each
stream file created from the spooled file. If your spooled file
contains one or more unwanted header sheets at the beginning
of each set of required pages, these can be dropped from the
stream file by specifying the number of created from the
spooled file. If your spooled file contains one or more
unwanted header sheets at the beginning of each set of
required pages, these can be dropped from the stream file by
specifying the number of pages to be dropped here.
At end of each stream file
The number of pages to exclude at the end of each file created
from the spooled file. If your spooled file contains one or more
unwanted trailer sheets at the end of each set of required
pages, these can be dropped from the file by specifying the
number of pages to be dropped here.
Exclude pages by key
A key string identifying pages to be dropped. Every page of
the spooled file which contains the string specified here will
be omitted from the resultant file(s). For example, if your
spooled file contains batch header sheets, and these contain the
word "Batch" on them, they can be excluded from the stream
file by specifying "Batch" as the key string on this parameter.
Exclude line numbers:
The EXCLLINNBR (Exclude line numbers) parameter allows
you to define lines which should be dropped from the output
CSV or Excel file, for example unwanted headings.
The group is specified by indicating a starting line and a
number of following lines to be excluded.
From line number
Enter the starting line number or specify the special value
*NONE if none are to be excluded.
Number of lines
The number of lines to be excluded.
Exclude lines by key:
The EXCLLINKEY (Exclude lines by key) parameter allows
21
you to define lines which should be dropped from the output
CSV or Excel file, for example unwanted sub-headings.
The group is specified by indicating a key string, which, when
located in the spooled file, denotes the start of the group, and a
number of following lines to be excluded.
Exclude lines containing
The key string indicating the start of the group of lines to be
excluded from the output or the special value *NONE if no
lines are to be excluded.
Number of lines
The number of lines to be excluded.
When you specify an Acrobat format (*PDF) output file to be sent, you can also specify additional
security and control parameters that will be prompted as follows:
If you do not want to specify any of the Acrobat security features, leave the default value of *NO on
the password protect field (the first parameter) and skip to the Additional Margins fields.
22
By changing the one of the other values as shown here, you must the specify some or all of the
additional fields below:
*YES
The output PDF file will be encrypted with 40 bit encryption. The
password fields and restriction fields will be honored.
*RESTRICT
The output PDF file will be encrypted with 40 bit encryption. The
password fields will not be enforced, but the restriction fields will be
honored.
*RST128BIT
The output PDF file will be encrypted with 128 bit encryption. The
password fields will not be enforced, but the restriction fields will be
honored.
*PWD128BIT
The output PDF file will be encrypted with 128 bit encryption. The
password fields and restriction fields will be honored.
The following addition security fields are also used when processing PDF files with security
information:
User password
This is a case sensitive field of 32 characters. Enter the user
password you want associated with the converted PDF file.
Owner password
This is a case sensitive field of 32 characters. Enter the owner
password you want associated with the converted PDF file.
Allow printing?
If you want to allow printing of the PDF file, change this
parameter to *YES.
Allow modifications?
If you want to allow the PDF file to be modified, change this
parameter to *YES.
Allow copying of text?
If you want to allow text to be copied from the PDF file,
change this parameter to *YES.
Allow annotation?
If you want to allow annotations to be made to the PDF file,
change this parameter to *YES.
Note: When you specify *YES for the Acrobat password, the Acrobat file is automatically
encrypted.
23
WebReport/i also provides page size, page alignment and overlay alignment options that you will
see on the following display:
Kisco recommends that, initially, you use the default settings for the page size set of parameters. If
you find that you are having issues with page size, or if you are sending spool files as fax documents
through MetroFax, then you can experiment with different settings. For fax rules, see the separate
section of this manual for specific recommendations.
Paper size
Use one of the following values: *SPLF, *CUSTOM,
*A3, *A4, *A5, *B4, *B5, *LETTER, *LEGAL,
*EXEC, *LEDGER. Note that customer, exec and
ledger are not fully available as of this release.
Orientation
Use one of the following values: *SPLF,
*LANDSCAPE, *PORTRAIT
Rotated pages shown unrotated?
Choose either *YES or *NO
Auto-rotation in effect?
Choose one of the following values: *NO, *YES,
*SPLF, *COR, *PAGESIZE. Note that the pagesize
option is not implemented as of this release.
You can also control page alignment and AFP overlay alignment from this screen. Some trial and
24
error will be needed to find the right set of parameters. Most pages and AFP overlays will align
correctly without any adjustments. If you find you need adjustments, try the following:
Overlay left
Controls the left margin of the overlay. Specify a number in
the range indicated on the prompt.
Overlay top
Controls the top margin of the overlay. Specify a number in
the range indicated on the prompt.
Page left
Controls the left hand margin for the page.
Page top
Controls the top margin for the page.
Unit of measure
Describes the values used for alignment as either in inches
(*INCH), millimeters (*MM) or centimeters (*CC).
The following additional parameters are also requested for a *PDF process:
CCSID for conversion
Font size for PDF conv
PDF Font Type
Specify the CCSID value that you want to associate with the
spool file being converted. This parameter only applied to
*PDF conversions. Choose from the following:
*SPLF
Use the CCSID value associated with the spool
file.
*JOB
Use the CCSID value associated with the
current job.
*SYSVAL
Use the CCSID value associated with the
system value QCCSID.
*USER
Use the CCSID value associated with the user
profile.
1-65533
Use the specific CCSID value entered.
For *PDF conversions, this parameter gives you control over
the size of the font used. Choose from the following:
*CALC
Use this default value to let WebReport/i
calculate a font size based on the attributes of
your print file.
*SCALE
If you find that *CALC does not produce a
satisfactory result, try this *SCALE value. A
different method will be used to set the font
size based on different spool file attributes from
your report.
4-36
If you want to use a specific font size, code the
numeric value within the range of 4 to 36.
Choose one of the following values:
25
*MAP
WebReport/i will attempt to map the font in
your spool file as closely as possible using PDF
fonts available. This is the default value and
will normally produce the desired result.
*EMBED
WebReport/i will embed the selected font
directly into the PDF file. When *MAP results
are unsatisfactory, this option should be tried as
it may give better results.
*CONVERT This is the same as *MAP.
For specific font faces, use the HELP (F1) key to display a list
of those that are available.
Some customers reported issues to us when using color overlays. The problems are associated with
sections of the spool file getting overlaid with areas of the overlay. If you experience this problem,
then we recommend that you process the following two commands on your system and then try the
PDF conversions again:
ADDENVVAR ENVVAR(CS_PDF_NON_HPT_OVL_IMG) VALUE(*YES)
LEVEL(*SYS)
ADDENVVAR ENVVAR(CS_PDF_HPT_OVL_IMG) VALUE(*YES) LEVEL(*SYS)
With this version installed, the above two commands should change the results that you are seeing
so that the overlay is handled correctly.
We specifically do NOT recommend setting these two environment variable unless you have the
documented issue.
26
A final screen of options is also available as follows:
Fill in the parameters as follows:
Include pages
Lets you specify a range of pages to be included in the PDF
that is created for this process. Leaving the default values will
send the entire report.
Add digital signature?
If no digital signature is wanted, leave the default value. To
enter information about using a digital signature, change the
value to *YES. When you do this, the additional parameters
needed will be prompted. Please refer to the special section of
this documentation for more details on filling out the digital
signature values.
27
There are some optional parameters for this command that are hidden from the prompt. These are
little used parameters, but they can be displayed by pressing the F10 key and then scrolling up to
view them. They will appear as follows:
These parameters are defined as follows:
Recipient
Note: This parameter is included to provide compatibility with
earlier releases of WebReport/i. It is used when you are using
SMTP destination addresses that are still defined in the
WRKDIRE system directory. Kisco does not recommend this
addressing scheme for new customers just starting with
WebReport/i.
Enter up to twenty pairs for user ids and locations. These must
all be currently active in your system directory. You may
leave these blank if you are using Internet Addresses for your
recipients. If you are using imbedded email directive
statements in your spool file, you can indicate that by using the
special value of *INT in the first occurrence of this parameter.
Refresh Directory?
If you have made recent changes to the system directory, you
may want to respond to this with the *YES special value.
Specifying *YES will add overhead to the transmission
process and slow down sending your report. This should
28
probably NOT be used in a production environment. To use
the *YES option, you must be enrolled in the system directory.
Merge Overprint Lines?
This option controls how overprint lines in the spool file are
handled by WebReport/i for *TXT and *RTF processing.
Choose one of the following values:
*NO
Default value. When overprint lines are found in the
spool file, only the first line will be processed. All
other overprint lines will be ignored.
*YES When overprint lines are found, the contents of each
line will be merged together into a single line.
Text Page Breaks?
Controls whether or not an additional separator line of
hyphens will be inserted in *TXT spool file conversions.
Choose one of the following:
*BREAKS
Default value. The line of hyphens will
be inserted at the page break points.
*NOBREAKS
No line of hyphens will be inserted.
*GENDAT filename prefix
If you are using the *GENDAT file naming option, enter a two
character code in this field. It will default to ‘AA’.
Message text CCSID
For most processing, the *JOB default value will work. If you
want to use a specific CCSID value for the message text on
this email, enter the specific value. This can be of use when
you have text in a different language from that in effect for
your job.
After all parameters have been entered, press ENTER and the spool file will be processed. Each
user specified as a recipient will receive a copy of the report selected as an E-mail attachment.
Because of timing problems with earlier versions of IBM i/OS, a delay was added to the email
process in WebReport/i. This delay added 5 seconds to the time needed to email a report. For most
customers this is not an issue, but some customers have requested to reduce this delay time.
WebReport/i has been changed so that the delay time is now an external variable that is stored in the
data area named CONTROL2 in library WEBREPORT.
The delay time is found in positions 409-410 of the CONTROL2 data area. If these characters are
blank, then the default value of 5 seconds will be enforced. You cannot change this value to zero.
You can change the delay time variable by using the following command:
CHGDTAARA DTAARA(WEBREPORT/CONTROL2 (409 2)) VALUE('01')
This example will set the delay time to 1 second.
An alternate command format, EREPORTA, is also available. This alternate format has some of the
parameters sequenced differently. Several customers report finding this format easier to use for
their purposes. We suggest that you experiment with its use to find which works best for your
29
installation.
If you find that you prefer the alternate version, you can make it your default version by running the
following two commands on your system:
RNMOBJ OBJ(WEBREPORT/EREPORT) OBJTYPE(*CMD) NEWOBJ(EREPORTSAV)
RNMOBJ OBJ(WEBREPORT/EREPORTA) OBJTYPE(*CMD) NEWOBJ(EREPORT)
When this is done, the alternate form of the command will be in use for all users on your system.
30
Send Multiple Reports in a single E-mail
Some customer may want to process several reports attached to a single E-mail message. This is
possible in WebReport/i using the special command EREPORTM. This command will let you
bundle up to 5 different reports into a single email send operation. You can run this command from
the IBM i/OS command line or integrate it into your own CL programs. The command supports
full HELP text. To get started with it, just type the command and press the F4 key to prompt it. The
following screen will be displayed:
The parameters for this command are the same as for the EREPORT command already described.
The difference between the two is that this command allows you to specify multiple spool files to be
processed. Note that the attachment file name can be set differently for each spool file entered.
The prompt screen comes up with fields for processing two different reports. To access the fields
for the additional reports, just enter a plus sign (‘+’) in the spool file name parameter and press
ENTER. The additional fields will be shown.
Some restrictions, however, do apply to the use of the EREPORTM command as follows:
1.
It does not support *INT processing to obtain destination email addresses from within the
spool files.
2.
It does not support the older TOUSRID fields for specifying destination email addresses.
31
Only internet addresses can be used.
3.
It does not support the *GENDAT option for attachment file naming.
4.
It does not support the *NONE option for the spool file name.
5.
Automatic processing can only be accomplished by integrating the command directly into
your own CL programs.
32
Send Report by Fax
WebReport/i supports sending spool files by fax using the internet fax service "MetroFax". As of
this writing, you can establish a MetroFax account for $12.95 per month which will allow you to
send up to 1,000 pages per month for this single fixed fee. After the first 1,000 pages in any month,
the charge is $0.03 per page. For many installations, this will end up being cheaper than the
monthly cost of an additional phone line and you will not need any special equipment or modems on
your system to support fax transmissions.
To send spool files by fax, you will need to open an account with MetroFax. Their website for
getting started is found at:
http://www.metrohispeed.com/
Choose the plan you want. The plan that is highlighted above is for Individual & Small Business
accounts.
When you create your account, you must remember the email address that you are registering with.
All outbound fax email messages must have this email address as the sender address.
Once your account is active, you can start sending spool files by fax. To do this, just use the regular
email feature of WebReport/i. To send by fax, just specify the destination fax number in the email
address followed by "@metrofax.com". For example, to send a fax to us at Kisco Information
Systems, you would use the following email address:
[email protected]
The "Sender Identifier" on your email message must be the email address that you signed up with.
On the EREPORT command, this is parameter FROMID. In the automatic routing setup, it is called
"From Identifier".
The message text field of your transmission will become a cover page for your fax. On the
EREPORT command, this is specified as the MSGTEXT parameter. If you do not want any cover
page sent, change this parameter value to *NONE. The cover page will be included in your
MetroFax page count.
Also, when sending spool files by fax, we recommend that you specify Acrobat (*PDF) format.
When you do this for regular reports that are set up as 132 columns wide by 66 lines high, you will
need special page size parameter settings. These are controlled by the page size parameters. Special
page alignment settings will also be needed.
33
When using the EREPORT command, use the following settings for page size:
Paper size . . . . . . . . . .
Orientation . . . . . . . . .
Rotated pages shown unrotated?
Auto-rotation in effect? . . .
*LETTER
*PORTRAIT
*YES
*COR
NOTE: The *PORTRAIT setting sounds wrong, but it is what works.
Also use the following settings for PDF page margins:
Page left . . . . . . . . . . -.3
Page top . . . . . . . . . . . .2
If you choose an internet fax service other than MetroFax, you will have to do some
experimentation with these settings to find what works best for you. WebReport/i should work with
other internet fax services, but it has only been fully tested with MetroFax.
Based on our testing with MetroFax, other documents sent from the spool file like invoices,
statements, purchase orders and so on tend to get faxed correctly when the original default values
are set. Once you find the combination of settings that works best for each situation, we recommend
that you set them up in the automatic routing table so that they are pre-set for all use.
The MetroFax service can also be used as a destination fax service with incoming faxes being
converted to email and forwarded to you. Kisco and MetroFax are completely separate companies
and you may, at time, need to contact MetroFax for support separate from what is provided by Kisco
Information Systems. Kisco recommends MetroFax for this application, but does not receive any
compensation from them in return.
34
Send Report to HTML File
This menu option is used to convert a report into a document that can be served on your website.
Within WebReport/i, this is generally referred to as an HTML file, but the actual file can take
several forms. Choose menu option #2 or enter the command WEBREPORT/WREPORT and
press F4. The following screen will be displayed:
The parameters on the screen can be completed as follows:
Spooled File Name
Enter the name of the spool file to be converted.
Job Name
Enter the three qualifiers for the job, job name, user profile
and system job number.
Spooled File Number
Enter the file number for the spool file to be converted. This
parameter will also accept the following special values:
*ONLY the only spool file for the job will be used.
*LAST the most recent spool file for the job will be used.
Replace existing file?
Choose one of the following options:
*YES If there is already a file by the same name, replace it
with the file being converted now.
*NO
If there is already a file by the same name, do not
35
replace it. An error message will be issued and the
conversion will be stopped.
Report Title
Enter a short title for the report. If you use the special value
*USRDTA, this will be taken from the User Data field for the
spool file entry.
Output report format Choose one of the following options:
*HTML The default. The report will be converted into an
HTML document for web deployment.
*RTF The report will be converted into Rich Text Format.
This format is better suited to applications where you
want people retrieving the information to be able to
print it. RTF is a format that is compatible with more
PC-based word processing software.
*PDF The spool file will be converted into a Adobe
Acrobat Format file (PDF). The PDF format can be
viewed on PC’s using the Adobe Acrobat Reader
which is available for free from Adobe. This reader
can be used to view and print reports on PC’s and
Macintosh computers.
*CSV The spool file will be converted into a Comma
Separated Values file (CSV). This format can be used
to easily transfer the report content into an electronic
spreadsheet.
*TXT The spool file will be converted into a DOS text file.
*XLS The spool file will be converted into Excel format
*TIF The spool file will be converted into TIF graphic
format
*ISV The spool file will be converted into a new special
format so that it can be restored to any iSeries system
and put back into an output queue (preferred over
*ISP).
*ISP The spool file will be converted into special format so
that it can be restored to any iSeries system and put
back into an output queue.
Note: The *PDF, *CSV, *XLS, *TIF, *ISP and *ISV options
are only available when have WebReport/i PDF installed.
Type of Web Document
WebReport/i can create documents at three different locations.
You can choose between creating a member in a Source
Physical File, a PC file in a shared folder or a PC file in the
Integrated File System (IFS). You can also choose to create
the file in the IFS and then automatically send it using FTP to
another server. Choose one of the following values:
*FLR
*FILE
The output will be a PC file stored in a shared
folder. (Note: this is in the QDLS folder
system within the IFS.)
The output will be a member in a Source
Physical File.
36
*IFS
*FTP
*INTR
The output will be in a PC file stored in the
IFS.
The output will be in a PC file stored in the IFS
and will then be sent using FTP to another
server that you also specify on the command.
The output will be in a PC file stored in the IFS
for immediate deployment using the
WebReport/i Intranet website feature.
The WREPORT command contains selective additional parameter prompts. If you specify that you
want your output placed in a shared folder (*FLR), the following additional parameters will be
prompted for you:
Folder Name
Enter the full folder name where you want your PC file stored.
Document Name
Enter the name of the PC file that you want to use in the
shared folder. If you want WebReport/i to generate a file
name for you, there are two options for this:
*GEN
WebReport/i will automatically generate a
unique file name with an appropriate extension
code based on the output format you have
already selected.
*GENDAT WebReport/i will generate a filename for you
using the two letter prefix code plus the date
associated with the spool file. The correct file
extension code will be added to the name based
on the selected format.
If you specify that you want your output placed in a source physical file (*FILE), the following
additional parameters will be prompted for you:
File Name/Library
Enter the name of the Source Physical File where you want to
place the document as a member. The file must already be in
existence and should be created with a record length capable
of holding a complete print line from the report.
Source file member name
Enter the name of the member that you want to use.
Source Member Description Enter the text you want to use as a description for the member
being created.
If you specify that you want your output placed in the IFS by using either the *IFS or *FTP option,
the following additional parameters will be prompted for you:
IFS file name
Enter the fully qualified name of the file in the IFS.
To provide you with more file naming flexibility, there are several
“macro” expressions that you can include in the IFS file name string
that WebReport/i will look for and convert before arriving at the final
IFS file name that will be used.
*GENDAT
The two character prefix code plus the current date in
system date format.
37
Example:
/webreport/sales*GENDAT.pdf
converts to:
/webreport/salesAA060918.pdf
*GENUSR
The two character prefix code plus the user profile
associated with the spool file being processed:
Example:
/webreport/sales*GENUSR.pdf
converts to:
/webreport/salesAAQSECOFR.pdf
*GENDATTIM The two character prefix code plus the date in
system date format plus the current time in hhmmss
format:
Example:
/webreport/sales*GENDATTIM.pdf
converts to:
/webreport/salesAA091806100925.pdf
*GEN This will insert a 6 digit unique number preceded by the two
character file naming prefix into the IFS filename
where the value *GEN is placed.
Example:
/webreport/sales*GEN.pdf
converts to:
/webreport/salesAA000001.pdf
NOTE: In all cases, for the macro to be recognized in WebReport/i,
all of the alpha characters will have to be CAPITALIZED.
If you specified the *FTP option, the following additional parameters are also prompted:
FTP Signon ID
Enter the user profile you want to use to connect with your FTP
server. If the remote server is another iSeries or AS/400 system, then
you can just enter the profile in either upper case or lower case. If the
remote server is Unix, then the user profile may be case sensitive. If
38
so, you must surround the value entered with single quotes.
FTP Password
Enter the password you want to use to connect with your FTP server.
If the remote server is another iSeries or AS/400 system, then you can
just enter the password in either upper case or lower case. If the
remote server is Unix, then the password may be case sensitive. If so,
you must surround the value entered with single quotes. The value
will not show when you enter it, so be careful.
FTP Destination
Enter the internet address of the remote server that you are connecting
to via FTP. This can be either a numerical address, such as
"10.2.43.1" or a named address such as "www.myserver.com". Before
attempting your first FTP transfer, you should make sure that your
System i can PING the address you want to use.
FTP Destination file name
Enter a valid path and file name where you want to store the
converted spool file at the FTP server location.
Keep IFS copy?
Select whether you want to keep the converted spool file in the IFS
following the FTP process. Choose one of the following options:
*NO
The converted spool file located in the FTPIFS location will
be deleted following the FTP process.
*YES The converted spool file located in the FTPIFS location will
be kept on file following the FTP process. It will also be
logged into the index file.
Print FTP log?
Select whether you want a printed log of the FTP connection session
produced during the transfer process. When first setting up an *FTP
routing, we recommend that you print the FTP log to confirm that the
routing is working correctly. Choose one of the following options:
*NO
No log of the FTP connection will be printed.
*YES A log of the FTP connection session will be printed.
If you specify that you want your output placed in the IFS by using either the *INTR option for
deployment using the WebReport/i Intranet webserver function, the following additional parameters
will be requested:
Intranet folder name Enter the name of the folder within the Intranet site that you want to
use for this document. If the folder does not already exist, it will be
created.
Intranet file name
Enter the fully qualified name of the file in the IFS.
To provide you with more file naming flexibility, there are several
“macro” expressions that you can include in the IFS file name string
39
that WebReport/i will look for and convert before arriving at the final
IFS file name that will be used.
*GENDAT
The two character prefix code plus the current date in
system date format.
Example:
/webreport/sales*GENDAT.pdf
converts to:
/webreport/salesAA060918.pdf
*GENUSR
The two character prefix code plus the user profile
associated with the spool file being processed:
Example:
/webreport/sales*GENUSR.pdf
converts to:
/webreport/salesAAQSECOFR.pdf
*GENDATTIM The two character prefix code plus the date in
system date format plus the current time in hhmmss
format:
Example:
/webreport/sales*GENDATTIM.pdf
converts to:
/webreport/salesAA091806100925.pdf
*GEN This will insert a 6 digit unique number preceded by the two
character file naming prefix into the IFS filename
where the value *GEN is placed.
Example:
/webreport/sales*GEN.pdf
converts to:
/webreport/salesAA000001.pdf
NOTE: In all cases, for the macro to be recognized in WebReport/i,
all of the alpha characters will have to be CAPITALIZED.
Intranet class
Enter a classification code for the report for use with the Intranet
40
website security feature. You can see more information about the
Intranet feature in the separate manual for the Intranet feature.
For any of these options (*FILE, *FLR, *IFS, *INTR or *FTP), the following parameters are also
requested:
Spool File Action
Choose one of the following special values:
*LEAVE
*HOLD
*CANCEL
New Output Queue
the spool file will be left in the output spool
after it has been converted to HTML.
the spool file will be left in the output spool
after it has been converted to HTML and will
be changed to HOLD status.
the spool file will be deleted from the output
spool after it has been converted to HTML.
When you use a Spool File Action of *LEAVE (above), you
can optionally tell WebReport/i to place the spool file in a
different output queue and you can also change the formtype at
the same time. If you choose this option, be sure to specify a
valid output queue and the library where it is located.
When you specify that you want the output in *CSV format, the following additional parameters are
prompted for you:
Delimiters: (There are 5 elements to the parameter as follows)
Record delimiter
*CRLF
*CR
*LF
String delimiter
This parameter defines the characters to be used to indicate the
end of a record in the CSV file.
Carriage return and line feed. Both a carriage return (x'0D')
and a line feed.
Just a carriage return (x'0D') is used.
Just a line feed (x'0A') is used.
The character to be used to enclosed character string data.
*DBLQUOTE
A double quote (") is used.
*SGLQUOTE
A single quote (') is used.
*NONE
No delimiter is used. Alphanumeric data is not enclosed by
any special character.
The delimiter character to use.
Delimiter-char
Field delimiter
The character to be used to separate fields in the CSV file.
*COMMA
A comma (,) is used.
*TAB
A tab (x'09') is used.
*BLANK
A blank (x'20') is used.
*SEMICOLON A semicolon (;) is used.
41
Delimiter-char
Column separator
The delimiter character to use.
The values you select on this parameter control how the
spooled file is converted to a delimited ASCII text file (e.g. a
comma separated variable file).
The default for the first element is *SPLF. This tells
WebReport/i to break the spooled file data into columns based
on the way in which the data is split up in the spooled file.
Where the spooled file is created from an externally described
printer file this will probably give the best results, since the
data in the spooled file is likely to be organized so that each
natural or logical item of data appears as a separately
identifiable element.
However, if the spooled file is created from an internally
described printer file, or from an application such as IBM’s
Query/i, it is likely that the data in the spooled file will be
presented to WebReport/i as a single, unstructured data block
for each line of the report. If this is the case then better results
will probably be achieved by defining a column separator
character to control the splitting of the data in the report.
The column separator character can be any alphanumeric
character. Often the best results will be obtained by selecting
*BLANK (blank character) which will split the data in the
spooled file every time one or more consecutive blank
characters occur.
*SPLF
Split the data in the report based on the organization of the
data.
*BLANK
Blank
character
The character to use to force a column split.
Number of column
separator characters
The number of consecutive column separator characters
required to force a column split.
Number
The number of characters required.
Exclude pages
The EXCLPAGES (Exclude Pages) parameter allows you to
identify pages of the spool should not be included in the
resultant stream file.
For example, if your spooled file contains header sheets or
batch separator page dropped using this parameter.
There are five elements to this parameter, each providing a
different method of pages from the spooled file.
At start of spooled file
The number of pages to exclude at the beginning of the
42
spooled file. If you specify a number on this parameter
element, then that number of pages will be ignored at the start
of the spooled file. If your spooled file contains one or more
unwanted header sheets at the beginning of the spooled file,
these can be dropped by specifying the number of pages to be
dropped here.
At end of spooled file
The number of pages to exclude at the end of the spooled file.
If you specify a number on this parameter element, then that
number of pages will be ignored at the end of the spooled file.
If your spooled file contains one or more unwanted trailer
sheets at the end of the spooled file, these can be dropped by
specifying the number of pages to be dropped here.
At start of each stream file
The number of pages to exclude at the beginning of each
stream file created from the spooled file. If your spooled file
contains one or more unwanted header sheets at the beginning
of each set of required pages, these can be dropped from the
stream file by specifying the number of created from the
spooled file. If your spooled file contains one or more
unwanted header sheets at the beginning of each set of
required pages, these can be dropped from the stream file by
specifying the number of pages to be dropped here.
At end of each stream file
The number of pages to exclude at the end of each file created
from the spooled file. If your spooled file contains one or more
unwanted trailer sheets at the end of each set of required
pages, these can be dropped from the file by specifying the
number of pages to be dropped here.
Exclude pages by key
A key string identifying pages to be dropped. Every page of
the spooled file which contains the string specified here will
be omitted from the resultant file(s). For example, if you
spooled file contains batch header sheets, and these contain the
word "Batch" on them, they can be excluded from the stream
file by specifying "Batch" as the key string on this parameter.
Exclude line numbers:
The EXCLLINNBR (Exclude line numbers) parameter allows
you to define lines which should be dropped from the output
CSV or Excel file, for example unwanted headings.
The group is specified by indicating a starting line and a
number of following lines to be excluded.
From line number
Enter the starting line number or specify the special value
*NONE if none are to be excluded.
Number of lines
The number of lines to be excluded.
Exclude lines by key:
The EXCLLINKEY (Exclude lines by key) parameter allows
you to define lines which should be dropped from the output
CSV or Excel file, for example unwanted sub-headings.
43
The group is specified by indicating a key string, which, when
located in the spooled file, denotes the start of the group, and a
number of following lines to be excluded.
Exclude lines containing
The key string indicating the start of the group of lines to be
excluded from the output or the special value *NONE if no
lines are to be excluded.
Number of lines
The number of lines to be excluded.
There are also some additional parameters for the WREPORT command that can only be displayed
by using the F10 function key. These are only used under special circumstances as follows:
Post processing program
(Optional) WebReport/i can optionally call a program for you
after a report has been through conversion to HTML, RTF or
PDF format for local deployment. This program can be used
to perform additional processing steps on the output file once
the conversion is complete. Enter the name of the program
you want to call in this parameter along with the library where
it is stored on your system. If you leave this parameter blank
or specify the special value '*NONE', no program will be
called.
Parameters for post pgm
(Optional) This parameter provides for user parameter values
to be passed to the post processing program. These values are
passed as the third parameter to the called program.
When you specify a post processing program, the program will be called with three parameters
passed to it. These parameters are dependent on the specifications for the report conversion
requested and will be as follows:
Parm 1 - Length=5 Contains one of the following values:
*FILE
the report was converted and stored in a source
physical file
*FLR
the report was converted and stored in a shared folder
*IFS
the report was converted and stored in an IFS folder
Parm 2 - Length=120 This parameter describes where the converted report has been
stored. It has a variable format as follows:
For *FILE calls:
Pos 1-10 - Source File Name
11-20 - Source File Library
21-30 - Source File Member
For *FLR calls:
Pos 1-12 - PC File Name
13-53 - Folder Name
For *IFS calls:
Pos 1-12 - PC File Name
13-120 - IFS Location
Parm 3 Length=150 An external parameter string supplied by you. This will contain the
parameter POSTPARM from the WREPORT command.
44
If you specify *HTML for the type of output format, the following additional parameters will be
prompted for the WREPORT command:
Note that for this example, the *FLR option for the file destination has also been chosen. The
parameters on the screen can be completed as follows:
HTML Breaks Option
Choose one of the following values:
*BREAKS
a line of hyphens will be inserted in the output
HTML document to show where the page
breaks occur.
*NOBREAKS no line of hyphens will be inserted.
Report Index Option
Specifies whether you want to generate an index to the report
at the top of the HTML document. Choose one of the
following values:
0 - No page index will be produced.
99999 - A single page index will be generated which will point
to the last page of the report.
nnn - A page index will be generated for every nnnth page of
the report. An index to the last page will automatically be
included.
45
Scrolling up will display the following screen of additional HTML conversion options:
Text Color
Enter the name of the color that you would like to have used
when the text for the report is displayed on a browser. The
default value is BLACK. Any valid color name can be used.
Sixteen standard color names include supported include
AQUA, BLACK, BLUE, FUCHSIA, GRAY, GREEN, LIME,
MAROON, NAVY, OLIVE, PURPLE, RED, SILVER,
TEAL, WHITE and YELLOW.
Header HTML
Enter the name of a source file, library and member name
where you have HTML statements built on your system.
WebReport/i will insert these HTML statements at the
beginning of your report. This will enable you to create a
customized heading that can include links and graphics.
Trailer HTML
Enter the name of a source file, library and member name
where you have HTML statements built on your system.
WebReport/i will insert these HTML statements at the end of
your report. This will enable you to create a customized trailer
that can include links and graphics.
Note: WebReport/i is shipped with sample HTML code blocks for header and trailer use. There are
named TESTHDR and TESTTRL respectively and are stored in a source file named QDOC in the
library named WEBREPORT.
46
47
If you specify *PDF for the type of output format, the following additional parameters will be
prompted for the WREPORT command:
Note that for this example, the *FLR option for the file destination has also been chosen. The
parameters on the screen can be completed as follows:
Type of PDF bookmarks
Initial bookmark action
Enter one of the following values:
*NONE
No PDF bookmarks will be added to the report
*PAGNBR
Page number PDF bookmarks will be added
Enter one of the following values:
*SHOW
The bookmarks will be displayed when the
PDF file is opened
*HIDE
The bookmarks will not be displayed when the
PDF file is opened. The user will have the
option to open them on demand.
48
When a *PDF conversion is selected, you will be prompted for the Acrobat security fields:
If you do not want to specify any of the Acrobat security features, leave the default value of *NO on
the password protect field (the first parameter) and skip to the Additional Margins fields. By
changing the value to *YES, you must the specify some or all of the additional fields as follows:
User password
This is a case sensitive field of 32 characters. Enter the user
password you want associated with the converted PDF file.
Owner password
This is a case sensitive field of 32 characters. Enter the owner
password you want associated with the converted PDF file.
Allow printing?
If you want to allow printing of the PDF file, change this
parameter to *YES.
Allow modifications?
If you want to allow the PDF file to be modified, change this
parameter to *YES.
Allow copying of text?
If you want to allow text to be copied from the PDF file,
change this parameter to *YES.
Allow annotation?
If you want to allow annotations to be made to the PDF file,
change this parameter to *YES.
49
Note: When you specify *YES for the Acrobat password, the Acrobat file is automatically
encrypted.
WebReport/i also provides page size, page alignment and overlay alignment options that you will
see on the following display:
Kisco recommends that, initially, you use the default settings for the page size set of parameters. If
you find that you are having issues with page size, or if you are sending spool files as fax documents
through MetroFax, then you can experiment with different settings. For fax rules, see the separate
section of this manual for specific recommendations.
Paper size
Use one of the following values: *SPLF, *CUSTOM,
*A3, *A4, *A5, *B4, *B5, *LETTER, *LEGAL,
*EXEC, *LEDGER. Note that customer, exec and
ledger are not fully available as of this release.
Orientation
Use one of the following values: *SPLF,
*LANDSCAPE, *PORTRAIT
Rotated pages shown unrotated?
Choose either *YES or *NO
Auto-rotation in effect?
Choose one of the following values: *NO, *YES,
*SPLF, *COR, *PAGESIZE. Note that the pagesize
option is not implemented as of this release.
50
You can also control page alignment and AFP overlay alignment from this screen. Some trial and
error will be needed to find the right set of parameters. Most pages and AFP overlays will align
correctly without any adjustments. If you find you need adjustments, try the following:
Overlay left
Controls the left margin of the overlay. Specify a number in
the range indicated on the prompt.
Overlay top
Controls the top margin of the overlay. Specify a number in
the range indicated on the prompt.
Page left
Controls the left hand margin for the page.
Page top
Controls the top margin for the page.
Unit of measure
Describes the values used for alignment as either in inches
(*INCH), millimeters (*MM) or centimeters (*CC).
The following additional parameters are also requested for a *PDF process:
CCSID for conversion
Font size for PDF conv
Specify the CCSID value that you want to associate with the
spool file being converted. This parameter only applied to
*PDF conversions. Choose from the following:
*SPLF
Use the CCSID value associated with the spool
file.
*JOB
Use the CCSID value associated with the
current job.
*SYSVAL
Use the CCSID value associated with the
system value QCCSID.
*USER
Use the CCSID value associated with the user
profile.
1-65533
Use the specific CCSID value entered.
For *PDF conversions, this parameter gives you control over
the size of the font used. Choose from the following:
*CALC
Use this default value to let WebReport/i
calculate a font size based on the attributes of
your print file.
*SCALE
If you find that *CALC does not produce a
satisfactory result, try this *SCALE value. A
different method will be used to set the font
size based on different spool file attributes from
your report.
4-36
If you want to use a specific font size, code the
numeric value within the range of 4 to 36.
51
PDF Font Type
Choose one of the following values:
*MAP
WebReport/i will attempt to map the font in
your spool file as closely as possible using PDF
fonts available. This is the default value and
will normally produce the desired result.
*EMBED
WebReport/i will embed the selected font
directly into the PDF file. When *MAP results
are unsatisfactory, this option should be tried as
it may give better results.
*CONVERT This is the same as *MAP.
For specific font faces, use the HELP (F1) key to display a list
of those that are available.
Some customers reported issues to us when using color overlays. The problems are associated with
sections of the spool file getting overlaid with areas of the overlay. If you experience this problem,
then we recommend that you process the following two commands on your system and then try the
PDF conversions again:
ADDENVVAR ENVVAR(CS_PDF_NON_HPT_OVL_IMG) VALUE(*YES)
LEVEL(*SYS)
ADDENVVAR ENVVAR(CS_PDF_HPT_OVL_IMG) VALUE(*YES) LEVEL(*SYS)
With this version installed, the above two commands should change the results that you are seeing
so that the overlay is handled correctly.
We specifically do NOT recommend setting these two environment variable unless you have the
documented issue.
FTP Converted Spool Files
WebReport/i now contains an easy to use batch FTP routine that you can use to transfer converted
spool files to other systems. Typically, this is done when you want to transfer a spool file to a web
server.
The batch FTP process is done using a new command in WebReport/i called WRFTPSND
(WebReport/i FTP File Send). You can use this command on a stand-alone basis or you can
integrate it into a post process program automatically called by WebReport/i following a spool file
conversion.
Batch FTP in IBM i/OS works with a script file. We have added a new source physical file to the
WEBREPORT library named QWEBSRC where your FTP scripts should be stored. You will find a
sample script in this file already. You can create new scripts from scratch or use the sample as a
pattern. The script is nothing more than a series of FTP commands to be issued once an FTP
connection has been established. When creating scripts, do not use a starting line with your user
profile and password, WebReport/i will automatically add that FTP logon information at the start of
your script before it is executed. These fields are provided in the new command.
52
In the sample script included, which is named "SS", the objective of the FTP session is to send a file
named TEXTIN.HTM to the remote system. The file is stored in the /QDLS/KISCO folder on your
sending system. On the receiving system, it will be placed in the /QDLS/WEBREPORT folder and
the name will be changed to TEXTOUT.HTM.
You must specify a log file name. That will be created as a member in the QWEBSRC file when
the batch FTP process runs. If you have any problems with the FTP session, reviewing the log file
should show you exactly what's going on.
You can also use this process for automatic file processing from the POSTPGM parameter in the
WREPORT command. This will let you create your own CL program to automatically use batch
FTP to send a file as soon as the spool file conversion is done. We have included a sample CL
program for you to use in the new QCLSRC source physical file in the WEBREPORT library. This
sample CL program is named WRFTPPOST. The POSTPGM process passes parameters to the
called CL program, but the sample provided ignores the parameters and just calls the FTP batch
process to accomplish the file send via FTP.
If you have any questions about how to best implement FTP for spool file conversion transfers and
can't sort it out from this explanation, feel free to contact us at "[email protected]" for advice.
53
Review HTML Index
This menu option will let you review the current contents of the HTML Index. This index shows all
reports that have been converted into HTML documents (or other formats) along with complete
information about each one. When you start the review, the following screen will be displayed:
Each detail line on the display represents a different HTML document that has been created by
WebReport/i. You can work with these entries by typing one of the option numbers shown at the
top of the screen under the “Opt” column on the left of the screen. The options take the following
actions:
Option
2
Action Description
Change - This option allows you to change the Report Title information for the
selected entry.
4
Delete - The selected entry will be deleted along with the associated HTML
document.
5
Browse File - The contents of the HTML document will be displayed for review.
You will not be able to make any changes to the HTML document using this option.
8
Show Details - More detailed information about the HTML document will be
displayed for the selected entry.
We recommend that you use this screen to perform all deletions of HTML documents. This will
guarantee that both the HTML document and the index entry for it are deleted concurrently.
54
Work with WebReport/i Spool Files
This menu option will display all spool files for the current user profile. A typical display might
appear as follows:
Each line on the display represents a separate spool file on your system. You can work with these
spool files by choosing an option from the list shown across the top of the display and placing it in
the field shown to the left of the line. The options are as follows:
Opt
1
Description
Send Email
Selects the spool file and then prompts for the EREPORT command to send it as an Email
attachment. The spool identification fields are pre-filled for you and all you have to do is
complete the command parameters. Refer to the previous section on sending Email for a full
discussion on these command options.
2
Send HTML
Selects the spool file and then prompts for the WREPORT command to convert it into an
HTML file. The spool identification fields are pre-filled for you and all you have to do is
complete the command parameters. Refer to the previous section on converting reports into
HTML for a full discussion on these command options.
4
Delete
Lets you delete the selected spool file. A confirmation screen is displayed that allows you to
55
cancel the delete operation if it was selected in error.
5
Display
Displays the contents of the spool file on your display. You can use this to confirm that the
correct spool file is selected prior to acting on it.
8
Attributes
Displays some of the print attributes for the selected spool file.
When you run this option from the MASTER menu, it starts in prompt mode so that you can use
different filters that will limit the spool files displayed. This same option can be done by typing the
command name and pressing the F4 prompt key. While the spool file list is displayed, you can use
the F4 function key to change the filters without having to exit the list.
These command displays offer two different views and have been patterned after the IBM i/OS
command WRKOUTQ (Work with Output Queue). As shipped, the display defaults to View 1.
From this display, you can press the F11 key and toggle over to View 2. Pressing F11 again
will bring you back to View 1.
The heading of the display shows the selection/filter criteria that you selected when starting the
command. If you find that you prefer to the set of information displayed from View 2, you can set
that as your default starting view. This is done from the WEBSET command (option #9 on the
INSTALL menu). A new parameter lets you specify your default view setting.
In a recent change, WebReport/i was updated so that it would always automatically refresh the list
of spool files on the WRKWEBSPLF display after every individual use. Some customers, however,
have expressed to us that they were in the habit of selecting multiple line item options and then
working through them in a single work flow. The change we implemented would no longer support
this method of working from the WRKWEBSPLF display.
With this version, there is a global option that you can set for WebReport/i that will make the
WRKWEBSPLF process work like it used to prior to the change. To implement this global change,
you must update the CONTROL data area in library WEBREPORT so that position 199 is set to the
letter 'A' (upper case only). You can use the following command to make this change:
CHGDTAARA DTAARA(WEBREPORT/CONTROL (199 1)) VALUE('A')
Once you have made this change, you will then be able to run multiple line item options from the
WRKWEBSPLF display and move from selection to selection without going back to the list of
spool files. If after making this change, you decide that you want to go back to the new default way
of handling the spool file list, you can reset the data area by using the following command:
CHGDTAARA DTAARA(WEBREPORT/CONTROL (199 1)) VALUE(' ')
56
Maintain Address Book
The WebReport/i address book lets you store complex direct internet E-mail addresses and other
information in an easy to reference way. Once an address book entry has been established, you can
then refer to it by just using the abbreviation that you assign when the entry is created.
To start using the address book, choose option #5 from the MASTER menu and the following
screen will be displayed:
From this screen, you can add new address book entries, review and update existing entries and
delete entries that you do not want to use any longer. The following control keys can be used from
this display:
F3
End the update session.
F5
Refresh the information displayed on the screen.
F6
Open a blank window to add a new address book entry.
F8
Create a listing of the Address Book in sequence by the abbreviation code.
F9
Create a listing of the Address Book in sequence by the name.
F10
Work with address group codes.
57
After address book entries have been established, you can use the options listed at the top of the
screen to work with the entries. The options are as follows:
2
Change - Lets you make changes to the selected entry.
3
Copy - Lets you make a copy of an existing entry and give is a new abbreviation.
4
Delete - Lets you delete a selected entry.
5
Review - Displays the full address book entry for your review.
To use any of these options, key the option on the line you want to work with and press ENTER.
Each option is discussed separately below along with the “Add” functions:
Adding a new Address Book Entry
When you press the F6 function, a blank screen will be opened to let you create a new address book
entry. This screen will appear as follows:
Fill in the fields as follows:
Short Name
Enter the abbreviation name that you want to use. Any value can be
used. This is a required entry.
Internet Address
Enter the direct internet address that you want to use for the person.
This is a required entry.
58
The rest of the entries on the screen are optional and do not need to be entered.
Name
Enter the recipient’s name.
Organization Name
Enter the recipient’s company or organization name.
Address
Enter the street address for the recipient.
City
Enter the city name.
State
Enter an abbreviated state name.
Zip/Postal Code
Enter the zip or postal code for the address.
Phone Number
Enter the recipient’s telephone number
Fax Number
Enter the recipient’s fax number
Once the fields you want to use have been entered, press ENTER to record the entry. It is your
responsibility to make sure that the direct internet address provided is a good address. WebReport/i
will check it for address format but will not verify that it is a working address.
Changing, Deleting and Reviewing Address Book Entries
From the initial display screen, you can Change, Delete or Review address book entries. When you
change an entry, all of the edit criteria are reviewed again to guarantee that the stored information is
accurate. When you delete an entry, a confirmation screen is displayed so help avoid accidental
deletions.
59
Working with Address Groups
By pressing the F10 key from the Address Master maintenance screen, you can access the address
groups feature in WebReport/i. This will display the following screen:
Address groups allows you to group existing Address Book entries into groups. Once a group has
been created, you can send an email report using WebReport/i by just referring to the group name in
the address field. For each new name in the group, you must create an additional entry similar to
how it is shown above.
From this screen, you can get a listing of the existing groups by pressing the F8 key. This listing
will be routed your default session printer.
To return to the Address Book maintenance program, press the F3 key.
60
To add a new entry to your list, press the F6 key from this display and the following screen will be
displayed:
Enter the following three fields:
Group Name
The name that you want to use to identify your group. It is
critical that all the entries you create for your group have the
group name spelled identically.
Group Member
Enter the WebReport/i Address Book abbreviation that you
want to include in the group. You can use the F4 key to
prompt for a list of available entries. From that prompt, you
can select entries that are displayed.
Group Description
Enter a simple description for the group.
The other fields on this screen will be filled in for you. When all fields have been entered, press the
ENTER key and the group maintenance screen will be displayed showing the groups as configured
after the update.
61
Restore *ISV Spool File
When you convert a spool file into our special *ISV format, it can then be stored and/or sent as an
email. The file can then later be restored to the spool file on your iSeries or on any other same
system.
The process to save a report from a system and then restore it (either on your system or another
system) is a two step process. The first step is to save the spool file, either as an HTML file or as an
email attachment. The second step is to restore that file into a folder on the receiving system and
then transfer it back into the IBM i/OS spool on that system. This process supports all spool file
types. AFP overlays are not transferred at the present time. Use the *ISV format option to create the
file.
To restore the spool file at the receiving location, you must transfer the file into folder on this
system in the shared folder system. This file system is also called the QDLS file system. Once the
file has been stored in a folder, you can then run the new menu option #6 on the MASTER menu in
the WEBREPORT library. This will run the new RSTISVL400 (Restore Spool File) command as
follows:
This command has three parameters as follows:
Folder location of file(s)
Enter the name of the folder where the *ISV format file or
62
files are stored in the QDLS file system. The default value of
WEBWORK can be used if this is where the file or files were
stored when created.
Name of file
The file name of the *ISP format file. This will end with the
'.40v' filename extension. If you want to restore all of the
stored spool files in the selected folder, use the special value
of *ALL.
Printer Device ID
The name of the printer device on the receiving system where
you want the spool files placed.
When you run the command, the spool file will be restored and placed in the output queue
associated with the PRTDEV parameter.
Note: When the .40i file is created, a target IBM i/OS level is associated with the file. If the system
on which it is being restored has an earlier version of IBM i/OS, the restore process will fail.
Note: Customers who used an older version of WebReport/i may have been familiar with the *400
or *ISP formats that were implemented with older versions. WebReport/i replaces this support with
the *ISV format. The OS APIs that the *400 format was built upon have been removed from the
OS by IBM as of level V5R4M0. The new format, *ISV, is now compatible with all OS levels.
Support for restoring *ISP files is still included in WebReport/i using the RSTISPL400 command.
63
Maintain XLS Report Models
When converting spool files into Excel format, we recommend that you try the conversion first
using the *AUTO setting for the XLSCONV parameter. For some spool files, however, due to
erratic content, WebReport/i may not be able to come up with an acceptable conversion using this
method. When this happens, you will have to build a model of the report for WebReport/i to use
when processing the conversion. This is done by selection option #8 on the MASTER menu. When
you start the process, the following screen will be displayed showing the models that are already on
file:
This list will come up empty the first time you use this feature. If you have already models on file,
they will be listed. You can create a new model by pressing the F6 function key. To work with
existing models, choose one of the options as follows:
Opt
2
3
4
5
Description
Lets you work with the model and make changes
Lets you make a copy of an existing model to start a new model
Lets you delete an existing model
Lets you review an existing model without making changes
When you either create a new model or work with an existing model, the following screen will be
displayed next:
64
From this screen, you can only enter information in the first two fields as follows:
Model Name
Enter a unique name for the model being entered. Note that
this field is only available when you are creating a new model.
Model Description
Enter a description of the model.
When these fields have been entered, press the ENTER key to record the information. Then, to
continue to build the model, use the F4 function key to start building the report model.
65
When you work with the model details, the following screen will be displayed:
This shows a list of the fields on your spool file print line. If this is a new model, the screen will be
empty.
To work with fields on your spool file, you must identify the start and end print positions for each
field that you want included in your Excel file. Use the operating system command WRKSPLF or
WRKOUTQ to locate your spool file, then display it with a ‘5' next to it. The system will displayed
your report with a print position ruler along the top of your display. Use this to map the fields that
you want processed. Care must be taken to make sure that you do not overlap fields.
From this display, if there are fields already shown, you can use the following options:
Opt
2
4
5
Description
Lets you make changes to an existing field definition
Lets you delete an existing field definition
Lets you review an existing field definition without making changes
To create a new field definition, use the F6 function key.
66
When you work with an existing field definition or use the option to create a new field definition,
the following detail screen will be displayed:
Fill out the fields on this display as follows:
Sequence Number
A unique sequential number that will control the sequence in
which the fields are processed. When creating a new model,
we recommend that you use increments of 10 to start with.
Field Position
Up to 3 digits to designate the print position for the field. The
position you choose depends on how the Alignment is defined:
Alignment L: Use the left-most print position
Alignment R: Use the right-most print position
Alignment
Enter R for Right alignment (typically for numeric fields) or L
for Left alignment (typically for character fields).
Field Type
Enter A to describe an alphabetic field or N for a numeric
field.
Length
Enter the number of print positions to be included.
67
Keep adding field specifications until all of the fields for your report have been described. If there
are fields on your report that you do not want included, simply do not include a specification for
them.
When you are finished with the model, you can then use either the EREPORT or WREPORT
command to use the model. We find that a little trial and error is normally needed before you get
the hang of how the model setup works. Once you have the model working the way you want, you
can also specify it in an automatic routing entry.
68
Digital Signing for PDF Documents
WebReport/i includes a feature that will allow you to add a digital signature to a spool file that you
have converted into Adobe Acrobat (*PDF) format.
To implement this feature, there are configuration requirements for your system, additional
installation of components for both your systems's OS and for WebReport/i. You will also have to
be able to obtain a digital signing certificate. These instructions will describe each of these
requirements, including how to create your own signing certificate using the Digital Certificate
Manager (DCM) that is built into IBM's i/OS.
IBM OS Requirements
To use digital signing, you must be running on IBM's OS level of V5R4 or higher.
The digital signing process relies on Java to complete the task. For this to work, you must check the
OS on your IBM i and make sure that all components of Java have been installed.
To review this, go to the LICPGM menu in the OS (GO LICPGM from the command line) and run
option #10. This will show you a list of the installed license programs on your system. Scroll up
until you see the Java components displayed. On our test system here, these are all listed under the
licensed program reference of 5722JV1. It may be different on other levels of the OS.
When the Java components are listed, press the F11 key until the second column on the display
shows you the Product Option information. You must have *BASE support along with four
additional options. On our system, this display looks like this:
5722JV1
5722JV1
5722JV1
5722JV1
5722JV1
*BASE
5
6
7
8
IBM Developer Kit for Java
Java Developer Kit 1.3
Java Developer Kit 1.4
Java Developer Kit 5.0
J2SE 5.0 32 bit
All of these components are required for digital signing of PDF documents to work correctly. If any
of these are missing, you must arrange to have them installed from your original program
distribution media received from IBM with your computer system.
Note: On some newer versions of IBM’s i/OS, the Java Developer Kit 1.3 is no longer available and
will not be needed.
Once all components have been verified as installed, it is also strongly recommended that you
obtain the latest IBM PTFs as they apply to the Java components. This can be done via download
from IBM's Fix Central website. If you need a link to this website, contact support at Kisco
Information Systems.
WebReport/i Configuration
To use the digital signing feature, additional components and configuation work will be required.
Fortunately, we have simplified this process by providing the additional objects in a save file and
creating an installation program to take care of this.
To make the required software configuration changes in WebReport/i, please sign on to a terminal
session as a security officer and then run the following command:
69
CALL PGM(WEBREPORT/INSTJAVA)
This program will do the following on your system:
1.
Several required java objects will be moved into the IFS in a new folder named "webrjava".
2.
A required environment variable will be set that will point the java signing routines to this
new folder.
Create Your Signing Certificate
To add a digital signature to your PDF document, you first need to get a suitable digital certificate.
These are available commercially from a number of different authorities including Verisign, Thawte
and Comodo. Any certificate that you obtain by these methods must be in PKCS#12 format. Keep
that in mind if you decide to purchase a certificate from one of these trusted sources. If the
certificate is not in PKCS#12 format, you can probably convert it on your system using Internet
Explorer; see the instructions for this farther along in this discussion.
If you do not want to purchase a digital certificate, you can use the Digital Certificate Manager on
your System i to create your own certificate. The process to do this and take it to where you have a
certificate that you can use for signing includes:
Step 1: Start the Digital Certificate Manager (DCM) on your system
Step 2: Create the certificate
Step 3: Export the certificate to the IFS
Step 4: Import the certificate into Internet Explorer (IE)
Step 5: Export the certificate from IE in PCCS#12 format
Step 6: Store the certificate in the IFS
The following documentation will walk you through these six steps if you are unfamiliar with them.
Step 1: Start the Digital Certificate Manager (DCM) on your system
The DCM runs on your system in the HTTP server function and you access the function from your
PC using a browser. To start DCM, issue the following command from the command line:
STRTCPSVR SERVER(*HTTP) HTTPSVR(*ADMIN)
If the administrative instance of the HTTP server is already active on your system, there is no need
to start it again at this point.
After starting the server, give it about 1 full minute to settle down as the startup process can take a
fair amount of time on some systems. To access the DCM, type the following URL on your
browser:
http://myserver.com:2001
70
If your server does not have a registered name, you can use the following URL format which will
access the system using the numerical IP address for your server:
http://10.1.4.10:2001
where 10.1.4.10 is the IP address of your System i.
During the DCM startup from your browser, you will be prompted for a user profile and password.
Use a security officer profile for this process.
The DCM startup tasks menu will be displayed following your logon process. Select the "Digital
Certificate Manager" link to access DCM.
Step 2: Create the certificate
From the main DCM panel, on the left side, click on the "Select a Certificate Store" button. Several
options will be offered, select the option for "*OBJECTSIGNING" and provide a password. If none
already exists, you will be able to create one at this point. Keep track of this for future reference.
Now use the following sequence to create your signing certificate:
!
!
!
!
!
!
select "Create Certificate" from the lefthand panel
Select "Object signing certificate" and press Continue
Select "Local Certificate Authority (CA)" and press Continue
Select a key size of 2048
Fill in the Required fields. For Certificate name, use a name that will point to the specific
use for this certificate. For Common name, we recommend that you use the system name
for your system from DSPNETA. All required fields must be coded.
Press Continue - your certificate has now been created
Step 3: Export the certificate to the IFS
The export process is also done using DCM. This process will export the certificate you have just
created to the IFS on your System i. Assuming that you do this immediately after step #2, follow
these steps to export your certificate:
!
!
!
!
!
!
!
On the left panel, select the "Manage Certificates" link which will open a list of subtasks.
Select "Export certificate"
Select "Object signing" and press Continue
Select the certificate you have just created and press Export.
Select "File, as an object signing certificate" and press Continue
Enter an IFS path name for your certificate and assign a password for the certificate. Make a
note of the password. If you are unfamiliar with IFS path naming, you can use the
"webwork" IFS folder that was created when you installed WebReport/i. As an example,
if you want to name your exported certificate "testcert" and place it in the "webwork" IFS
folder, then the "Export to file name" would be "/webwork/testcert".
Press Continue and your certificate will be exported.
Step 4: Import the certificate into Internet Explorer (IE)
71
Before moving on to the next step, you must move the certificate that you have just exported from
the IFS to a place where you can access from your PC desktop. If you have a mapped drive on your
System i, that will work, otherwise you must transfer the exported certificate onto your PC first.
On your PC desktop, start up Microsoft's Internet Explorer browser. From the tool bar, select
"Tools" then following these steps to complete importation of your certificate.
!
!
!
!
!
!
!
!
!
!
!
Select "Internet Options"
Select the "Content" tab
Select the "Certificates" button
Select the "Import" button, this will start the import wizard
Select "Next" to start the process
Use the browse button to display the certificate that you want to import and select it.
Select "Next"
Enter the password you associated with the certificate when it was created. Select the box to
mark this key as exportable.
Select "Next".
Select to place the certificate in your personal store and press "Next"
Select "Finish" to complete importing your certificate into IE.
Step 5: Export the certificate from IE in PCCS#12 format
From your IE browser, select "Tools" from the top tool bar and follow these steps to export the
certificate in PKCS#12 format:
!
!
!
!
!
!
!
!
!
!
!
!
!
!
Select "Internet Options"
Select the "Content" tab
Select the "Certificates" button
Highlight the certificate you have just imported and then select the "Export" button.
This will start the export wizard function - select "Next"
Select "Yes, export the private key" and press "Next"
Select "Personal Information Exchange - PKCS#12 format.
Check the box for "Include all certificates in the certification path if possible"
If any other boxes are checked, remove the check marks
Select "Next"
Enter the certificate password in both password boxes and select "Next"
Enter the filename and location where you want the exported certificate placed. Note that
when exported, IE will append the suffix ".pfx" to your filename.
Select "Next"
Select "Finish" to export the certificate in PKCS#12 format.
Step 6: Store the certificate in the IFS
To use the digital certificate, you must now store it in the IFS on your System i. If you want, you
can store it in the "webwork" folder which is also used by other functions within WebReport/i.
Once this is done, then your certificate is now ready to be used for signing PDF documents created
by WebReport/i.
Applying The Digital Signature
72
In WebReport/i, you can create PDF documents from the EREPORT command, the WREPORT
command or from automatic routing for both email and local storage functions. For each method,
new digital signature options have now been added that will let you use this new capability in
WebReport/i.
On the EREPORT and WREPORT commands, you must first specify *YES for using PDF Digital
Signatures before the additional parameters will be prompted for.
The following new parameters must be provided, they are all parts of the SIGNATURE parameter:
Add digital signature
If you do not want to use a digital signature, leave this parameter set to *NO and
leave the rest of the fields set to their default values. If you do want to apply a digital
signature, change this value to *YES.
Certificate file path
Enter the file name of your digital signature file as it resides in the IFS. For example,
if your certificate is named testcert.pkcs.pfx and resides in the "webwork" folder in
the IFS, then the following certificate file path should be used:
/webwork/testcert.pkcs.pfx
Certificate password
Enter the password that you assigned to the certificate. Keep in mind that this is a
mixed case field and the password is case sensitive.
Reason for signing
This is an optional field. If you do not want to specify a value, leave the *NONE
default value. To add a reason, enter a text description of your reason, up to 80
characters.
Signing location
This is an optional field. If you do not want to specify a value, leave the *NONE
default value. To add a location, enter a text description, up to 80 characters.
Signing contact information
This is an optional field. If you do not want to specify a value, leave the *NONE
default value. To add contact information, enter a text description, up to 80
characters.
Visible signature?
If you want the digital signature to show when your PDF document is displayed,
leave the default value of *VISIBLE here. To hide the digital signature, change this
value to *INVISIBLE.
Show on page
Enter the value to place the signature on either the *FIRST page or the *LAST page
of your PDF.
Display image file
If you want to use a custom image for the displayed signature, enter the name of the
graphic file that you want to use. This can be a TIF, JPG or GIF file. To use the
default graphic representation, leave this field set to *NONE.
73
X signature position
This value controls the horizontal placement of the digital signature. You can place
it on the *RIGHT side, the *LEFT side or in the *CENTER of the page.
Y signature position
This value controls the vertical placement of the digital signature. You can place it at
the *BOTTOM or at the *TOP of the page.
After filling in the parameters that you want to use, press ENTER and the PDF will be created with
a digital signature. At a minimum, the first three parameters are required.
74
Automatic Operation
You can set up WebReport/i to automatically process output spool files (reports) using either
method already described. You can automatically send a report as an E-mail attachment or you can
automatically convert a report into an Internet document.
To use the automatic feature, you must do two things. First, you must set up a valid routing
instruction in the Automatic Routing Table for either an HTML document routing or an E-mail
routing. Once this is done, you must then start the Automatic Report Routing task.
Automatic Routing Table Updates
There are two menu options for maintaining the WebReport/i Automatic Routing Table. One is for
HTML routings and the other is for E-mail routings.
Update HTML Routing Table
Choose menu option #17 to update the WebReport/i HTML Automatic Routing Table. This option
is also used for Intranet documents. The following screen will be displayed:
From this screen, you can add new routing instructions, review and update existing routing
instructions and delete routing instructions that you do not want to use any longer. The following
control keys can be used from this display:
F3
End the update session.
F5
Refresh the information displayed on the screen.
75
F6
Open a blank window to add a new HTML routing instruction.
After routing entries have been established, you can use the options listed at the top of the screen to
work with the entries. The options are as follows:
2
Change - Lets you make changes to the selected entry.
4
Delete - Lets you delete a selected entry.
5
Review - Displays the full routing instruction for your review.
To use any of these options, key the option on the line you want to work with and press ENTER.
Each option is discussed separately below along with the “Add” functions.
76
Adding a new HTML Routing Instruction
When you press the F6 function, a blank screen will be opened to let you create a new HTML
routing instruction. This screen, the first of two needed, will appear as follows:
Fill in the fields as follows:
Routing Que Name
Enter the name of the output queue to use. If this queue does not
exist, WebReport/i will prompt you to create it. It will also create a
virtual print device so that output can be routed to either the output
queue or the virtual device.
Routing Form ID
You should create an entry with a blank form first. This will identify
the default routing for this output queue. If you want special routing
for a set of spool files, you can also specify one of the following:
Enter a specific Form ID. This corresponds to the
FORMTYPE parameter on the spool file. WebReport/i
will check for a specific form ID before applying the
default routing.
*FILENAME Enter this special value if you want to route the report
based on the spool file name. When you specify this
value, you must also complete the following parameter.
WebReport/i will check for the *FILENAME routing
Form ID
77
before applying the default routing.
*USRDTA
Enter this special value if you want to route the report
based on the contents of the user data field in spool
file. When you specify this value, you must also
complete the following parameter. WebReport/i will
check for the *USRDTA routing before applying the
default routing.
*USER
Enter the user profile of the spool file that should apply
for this routing.
Filename/USRDTA
User Profile
If you have specified *FILENAME, *USRDTA or User Profile for
the Form ID above, then you must enter the spool file name or user
data field contents in this field. This will allow you to route a report
based on the spool filename, user data field contents or user profile.
Report Title
Enter a short description of the report. This will be inserted into the
document TITLE field.
HTML Destination
Type
Choose one of the following values:
*FLR
The output will be placed in a PC file in a shared
folder.
*FILE
The output will be placed as a member in a source
physical file.
*IFS
The output will be placed in a PC file in the Integrated
File System.
*INTR
The output will be placed in the IFS for deployment by
the WebReport/i Intranet server.
*FTP
The output will be sent via FTP to the destination
server that you set up for this routing rule
Replace existing file? Choose one of the following values:
*YES
*NO
If there is already a file by the same name, replace it
with the file being converted now.
If there is already a file by the same name, do not
replace it. An error message will be issued and the
conversion will be stopped.
Output format option Choose one of the following options:
*HTML
*RTF
*PDF
The default. The report will be converted into an
HTML document for web deployment.
The report will be converted into Rich Text Format.
This format is better suited to applications where you
want people retrieving the information to be able to
print it. RTF is a format that is compatible with more
PC-base word processing software.
The spool file will be converted into a Adobe Acrobat
Format file (PDF). The PDF format can be viewed on
PC’s using the Adobe Acrobat Reader which is
available for free from Adobe. This reader can be used
78
*CSV
*ISP
*TXT
*XLS
*TIF
*ISV
*ISP
to view and print reports on PC’s and Macintosh
computers.
The spool file will be converted into a Comma
Separated Values file (CSV). This format is easily
used to transfer the report contents into an electronic
spreadsheet.
The spool file will be converted into special format so
that it can be restored to any iSeries system and put
back into an output queue.
The spool file will be converted into a DOS text file.
The spool file will be converted into Excel format
The spool file will be converted into TIF graphic
format
The spool file will be converted into a new special
format so that it can be restored to any iSeries system
and put back into an output queue (preferred over
*ISP).
The spool file will be converted into special format so
that it can be restored to any iSeries system and put
back into an output queue.
Note: The *PDF, *CSV, *XLS, *ISC and *ISP options are only
available when have WebReport/i PDF installed.
HTML Breaks
option
Controls how page breaks are treated when a report is converted
into HTML format. Choose one of the following values:
*BREAKS
a line of hyphens will be inserted in the output HTML
document to show where the page breaks occur.
*NOBREAKS no line of hyphens will be inserted.
Folder Name
Only valid for *FLR or *INTR routings. When used with the *FLR
option, enter the name of the shared folder where you want this
document stored. When used with the *INTR option, this is the name
of the folder within the Intranet feature path where the document
should be stored. If it does not exist, it will be created.
IFS file name
Only valid for *IFS or *INTR routings. When used with the *IFS
option, enter the fully qualified name of the file you want to use in the
Integrated File System. When used with the *INTR option, enter the
name of the file without any other path information (See the preceding
Folder Name).
Document Name
Only valid for *FLR routings. Enter the name of the PC file to be
placed in the shared folder. DOS PC file naming rules apply (eight
characters with a three character suffix, as in “testfile.txt”).
Source File/Library
Only valid for *FILE routings. Three fields are specified for this
parameter. The first is the file name, the second is the library name
and the last is the member name.
Member Description Only valid for *FILE routings. Enter a description that you would
79
like to use for the file member being created.
Merge Overprint
Lines?
This option controls how overprint lines in the spool file are
handled by WebReport/i for *TXT and *RTF processing. Choose one
of the following values:
*NO
Default value. When overprint lines are found in the spool
file, only the first line will be processed. All other overprint
lines will be ignored.
*YES When overprint lines are found, the contents of each line will
be merged together into a single line.
Report Index Option This is only valid for *PDF format conversions. Choose the report
index option you want to use as follows:
0 - No report index will be generated
99999 - A single index to the last page of the report will be generated
nnn - An index entry will be generated for every nnnth page along
with an entry for the last page of the report.
Text Color
Enter the name of the color that you would like to have used when the
text for the report is displayed on a browser. The default value is
BLACK. Any valid color name can be used. Sixteen standard color
names include supported include AQUA, BLACK, BLUE, FUCHSIA,
GRAY, GREEN, LIME, MAROON, NAVY, OLIVE, PURPLE,
RED, SILVER, TEAL, WHITE and YELLOW.
Send-to Queue Name When you use the *LEAVE Ending Option, you can also specify
/Library/Form
an alternate output queue where you want to leave the spool file.
Enter the name of that queue and library here. If you leave it blank,
the spool file will be left in the original output queue.
Ending Action To
Take
Optional. Enter one of the following values:
*LEAVE
*CANCEL
*HOLD
The spool file entry will be left in the print spool.
The spool file entry will be deleted from the print
spool.
The spool file entry will be kept in the print spool but it
will be put into hold status.
When all fields have been completed, press ENTER. WebReport/i will edit the information and
return any error condition for your correction.
80
When the information is accepted, the second update screen will be shown as follows:
The fields on this screen are all optional. If you do not want to enter any additional information, just
press ENTER and your routing entry will be updated. If you want to specify any of these fields, use
the following information when completing the fields:
PDF Bookmark Type Enter one of the following values:
*NONE
*PAGNBR
PDF Bookmark
Initial Action
No PDF bookmarks will be added to the report
Page number bookmarks will be added to the report
Enter one of the following values:
*SHOW
*HIDE
The bookmarks will be displayed when the PDF file is
opened
The bookmarks will not be displayed when the PDF
file is opened.
Acrobat Password?
If you have specified a *PDF conversion, enter one of the following
values. Specifics for this option are described further in this
documentation.
Header HTML
Enter the name of a source file, library and member name where you
have HTML statements built on your system. WebReport/i will insert
these HTML statements at the beginning of your report. This will
enable you to create a customized heading that can include links and
81
graphics.
Trailer HTML
Enter the name of a source file, library and member name where you
have HTML statements built on your system. WebReport/i will insert
these HTML statements at the end of your report. This will enable
you to create a customized trailer that can include links and graphics.
Post Process
Program/Lib
Enter the post process program and library reference that you want
to use for this conversion. See the documentation on the WREPORT
command for a complete discussion of this option.
Post Process
Parameter
(Optional) This parameter provides for user parameter values to
be passed to the post processing program. These values are passed as
the third parameter to the called program.
*ISP Target IBM
i/OS Release
If you are setting up an automatic conversion to IBM i/OS spool file
format, specify the target OS level here. You can specify
*CURRENT for the same OS level as installed on your system, *PRV
for the immediately prior OS level or you can enter a specific OS level
in the form of VnRnMn. You must use a level that is supported by
the OS level you have installed.
PDF Spool File
CCSID
Enter the CCSID value you want to use for your spool file conversion
to PDF.
PDF Font Size
For *PDF conversions, this parameter gives you control over the size
of the font used. Choose from the following:
PDF Font Type
*CALC
Use this default value to let WebReport/i calculate a
font size based on the attributes of your print file.
*SCALE
If you find that *CALC does not produce a satisfactory
result, try this *SCALE value. A different method will
be used to set the font size based on different spool file
attributes from your report.
4-36
If you want to use a specific font size, code the
numeric value within the range of 4 to 36.
Controls the way the text from your spool file is rendered in your
PDF document. Choose one of the following values:
*MAP
WebReport/i will attempt to map the font in your spool
file as closely as possible using PDF fonts available.
This is the default value and will normally produce the
desired result.
*EMBED
WebReport/i will embed the selected font directly into
the PDF file. When *MAP results are unsatisfactory,
this option should be tried as it may give better results.
*CONVERT This performs the same conversion as *MAP.
font
Choose one of the following specific font values to be
82
used throughout the conversion:
*COURIER, *COURIERB, *COURIERO,
*COURIERBO, *HELVETICA, *HELVB, *HELVO,
*HELVBO, *TIMES, *TIMESB, *TIMESI,
*TIMESBI, *SYMBOL, *DINGBATS
PDF DBCS Coding
This parameter gives you control over the font that is selected when a
DBCS coded font is to be used.
Choose one of the following options:
*SPLF
This is the default value. WebReport/i determines the
DBCS font name from the spool file attributes.
*BUILTIN
WebReport/i will use its built in conversion font.
*IGNORE
WebReport/i will ignore data that appears to be DBCS
and will treat it as SBCS data.
*NOERROR If the DBCS font cannot be identified, WebReport/i
continues processing as if *IGNORE had been
specified and no error is issued.
PDF Form Name
If no PDF form is defined, set this value to the default value of
*NONE. If you are using a PDF form, enter the name of the form
definition. PDF Forms are fully documented in a separate user’s
guide.
83
When you are converting your spool file into an Excel file (*XLS format), then the following
additional screen will be displayed:
Complete the fields as follows:
Keep page headings?
Page heading start line
Use one of these options:
*FIRST - only keep the headings from the first page
*ALL - keep all page headings
*NONE - ignore all page headings
This parameter is only used when your conversion method
refers to a report model. If the XLSCONV parameter is set to
*AUTO, this parameter is ignored.
Enter the starting line number for the page headings on your
report.
Page heading ending line
This parameter is only used when your conversion method
refers to a report model. If the XLSCONV parameter is set to
*AUTO, this parameter is ignored.
Enter the ending line number for the page headings on your
report.
Keep column headings?
Use one of these options:
84
*FIRST - only keep the column headings from the first page
*ALL - keep all column headings
*NONE - ignore all column headings
Column heading start line
This parameter is only used when your conversion method
refers to a report model. If the XLSCONV parameter is set to
*AUTO, this parameter is ignored.
Enter the starting line number for the column headings on your
report.
Column heading ending line This parameter is only used when your conversion method
refers to a report model. If the XLSCONV parameter is set to
*AUTO, this parameter is ignored.
Enter the ending line number for the column headings on your
report.
Font face
Select the font that you want to use for the conversion. The
following are currently supported:
*ARIAL, *COURIER, *COURIERB, *COURIERO,
*COURIERBO, *HELVETICA, *HELVB, *HELVO,
*HELVBO, *TIMES, *TIMESB, *TIMESI, *TIMESBI,
*SYMBOL, *DINGBATS
Font size
Choose the size that you want to enforce for the selected font.
XLS conversion method
For conversion to XLS format, this parameter lets you select
the way WebReport/i does the conversion. Choose one of the
following options:
*AUTO - Use WebReport/i's automatic column interpretation.
This option is preferred for the first time that you attempt an
*XLS conversion on a report.
Model Name - Enter the name of an XLS Report Model that
you have built using the option from the MASTER menu for
this purpose.
85
When you specify that you want the spool file converted into *CSV format, the following additional
parameter screen will be displayed:
These parameters can be filled in as follows:
Delimiters: (There are 5 elements to the parameter as follows)
Record delimiter
*CRLF
*CR
*LF
String delimiter
This parameter defines the characters to be used to indicate the
end of a record in the CSV file.
Carriage return and line feed. Both a carriage return (x'0D')
and a line feed.
Just a carriage return (x'0D') is used.
Just a line feed (x'0A') is used.
The character to be used to enclosed character string data.
*DBLQUOTE
A double quote (") is used.
*SGLQUOTE
A single quote (') is used.
*NONE
No delimiter is used. Alphanumeric data is not enclosed by
any special character.
The delimiter character to use.
Delimiter-char
Field delimiter
The character to be used to separate fields in the CSV file.
86
*COMMA
A comma (,) is used.
*TAB
A tab (x'09') is used.
*BLANK
A blank (x'20') is used.
*SEMICOLON A semicolon (;) is used.
Delimiter-char
Column separator
The delimiter character to use.
The values you select on this parameter control how the
spooled file is converted to a delimited ASCII text file (e.g. a
comma separated variable file).
The default for the first element is *SPLF. This tells
CVTSPLSTMF to break the spooled file data into columns
based on the way in which the data is split up in the spooled
file.
Where the spooled file is created from an externally described
printer file this will probably give the best results, since the
data in the spooled file is likely to be organized so that each
natural or logical item of data appears as a separately
identifiable element.
However, if the spooled file is created from an internally
described printer file, or from an application such as IBM’s
Query/i, it is likely that the data in the spooled file will be
presented to WebReport/i as a single, unstructured data block
for each line of the report. If this is the case then better results
will probably be achieved by defining a column separator
character to control the splitting of the data in the report.
The column separator character can be any alphanumeric
character. Often the best results will be obtained by selecting
*BLANK (blank character) which will split the data in the
spooled file every time one or more consecutive blank
characters occur.
*SPLF
Split the data in the report based on the organization of the
data.
*BLANK
Blank
character
The character to use to force a column split.
Number of column
separator characters
The number of consecutive column separator characters
required to force a column split.
Number
The number of characters required.
Exclude pages
The EXCLPAGES (Exclude Pages) parameter allows you to
identify pages of the spool should not be included in the
87
resultant stream file.
For example, if your spooled file contains header sheets or
batch separator page dropped using this parameter.
There are five elements to this parameter, each providing a
different method of pages from the spooled file.
At start of spooled file
The number of pages to exclude at the beginning of the
spooled file. If you specify a number on this parameter
element, then that number of pages will be ignored at the start
of the spooled file. If your spooled file contains one or more
unwanted header sheets at the beginning of the spooled file,
these can be dropped by specifying the number of pages to be
dropped here.
At end of spooled file
The number of pages to exclude at the end of the spooled file.
If you specify a number on this parameter element, then that
number of pages will be ignored at the end of the spooled file.
If your spooled file contains one or more unwanted trailer
sheets at the end of the spooled file, these can be dropped by
specifying the number of pages to be dropped here.
At start of each stream file
The number of pages to exclude at the beginning of each
stream file created from the spooled file. If your spooled file
contains one or more unwanted header sheets at the beginning
of each set of required pages, these can be dropped from the
stream file by specifying the number of created from the
spooled file. If your spooled file contains one or more
unwanted header sheets at the beginning of each set of
required pages, these can be dropped from the stream file by
specifying the number of pages to be dropped here.
At end of each stream file
The number of pages to exclude at the end of each file created
from the spooled file. If your spooled file contains one or more
unwanted trailer sheets at the end of each set of required
pages, these can be dropped from the file by specifying the
number of pages to be dropped here.
Exclude pages by key
A key string identifying pages to be dropped. Every page of
the spooled file which contains the string specified here will
be omitted from the resultant file(s). For example, if you
spooled file contains batch header sheets, and these contain the
word "Batch" on them, they can be excluded from the stream
file by specifying "Batch" as the key string on this parameter.
Exclude line numbers:
The EXCLLINNBR (Exclude line numbers) parameter allows
you to define lines which should be dropped from the output
CSV or Excel file, for example unwanted headings.
The group is specified by indicating a starting line and a
number of following lines to be excluded.
88
From line number
Enter the starting line number or specify the special value
*NONE if none are to be excluded.
Number of lines
The number of lines to be excluded.
Exclude lines by key:
The EXCLLINKEY (Exclude lines by key) parameter allows
you to define lines which should be dropped from the output
CSV or Excel file, for example unwanted sub-headings.
The group is specified by indicating a key string, which, when
located in the spooled file, denotes the start of the group, and a
number of following lines to be excluded.
Exclude lines containing
The key string indicating the start of the group of lines to be
excluded from the output or the special value *NONE if no
lines are to be excluded.
Number of lines
The number of lines to be excluded.
89
If you are processing a PDF spool file conversion and you want to access the additional PDF
options, press the F10 key and the following additional screen will be displayed:
Complete these fields as follows:
Password
Use one of the following values:
*NO
No security features will be specified. Leave
the other security parameters on this screen set
to their default values.
*YES
Security feature, including passwords, will be
enforced. The output PDF file will be
encrypted with 40 bit encryption.
*RESTRICT Security features will be enforced, including 40
bit encryption, but no passwords will be used.
*RST128BIT Security features will be enforced, but no
passwords will be used. Encryption will be at
the 128 bit level.
*PWD128BIT Security features will be enforced, including
passwords. The output PDF file will be
90
encrypted with 128 bit encryption.
User password
This is a case sensitive field of 32 characters. Enter the user
password you want associated with the converted PDF file.
Owner password
This is a case sensitive field of 32 characters. Enter the owner
password you want associated with the converted PDF file.
Allow printing?
If you want to allow printing of the PDF file, change this
parameter to *YES.
Allow modifications?
If you want to allow the PDF file to be modified, change this
parameter to *YES.
Allow copying of text?
If you want to allow text to be copied from the PDF file,
change this parameter to *YES.
Allow annotation?
If you want to allow annotations to be made to the PDF file,
change this parameter to *YES.
You can also control alignment on an AFP overlay from this screen. Some trial and error will be
needed to find the right set of parameters. Most AFP overlays will align correctly without any
adjustments. If you find you need adjustments, try the following:
Overlay left / top
The first value controls the left margin of the overlay. The
second value controls the top margin of the overlay. Specify a
number in the range indicated on the prompt.
Page left / top
The first value controls the left hand margin for the page. The
second value controls the top margin for the page.
Unit of measure
Describes the values used for alignment as either in inches
(*INCH), millimeters (*MM) or centimeters (*CC).
Paper size / Orientation
The first value is for the paper size. Use one of the following
values: *SPLF, *CUSTOM, *A3, *A4, *A5, *B4, *B5,
*LETTER, *LEGAL, *EXEC, *LEDGER. Note that
customer, exec and ledger are not fully available as of this
release.
The second value is for the page orientation. Use one of the
following values: *SPLF, *LANDSCAPE, *PORTRAIT
Rotated pgs shown
unrotated?
Choose either *YES or *NO
Auto-rotation in effect?
Choose one of the following values: *NO, *YES, *SPLF,
*COR, *PAGESIZE. Note that the pagesize option is not
implemented as of this release.
91
When you specify that the converted document is to be sent to a remote server using FTP, the
following additional screen of input will be requested:
Fill in the fields as follows:
FTP Logon ID
Enter the logon ID that you want to use at the remote server
that you are connecting to for this FTP transfer.
FTP Logon Password
Enter the password for the Logon ID being used.
FTP Server Address
Enter the remote server IP address. This can be a named
address or a numeric IP address.
FTP IFS Path/Name
Enter a path and file name where you want to store the
converted spool file in the IFS on your system BEFORE the
FTP transfer is made.
Example: If you want to store the file in the tmp folder and
name it testfile.pdf, you would enter the following value here:
/tmp/testfile.pdf
FTP Destination Path/Name Enter the path and file name where you want to store the file at
the remote system.
92
Examples would vary depending on the exact nature of the
remote system that you are connecting to. We connected to a
unix system during testing and the path ended up looking like
this:
/home/www/server/testfile.pdf
FTP Keep File in IFS?
If you want to keep the converted spool file in your IFS after
the FTP transfer completes, use the *YES value. If you use
*NO, the file will be deleted.
FTP Session Log Print?
If you use the *YES value, a printed log of your FTP session
will be printed when the FTP transfer process completes. If
there are any errors in the transfer process, they will show up
on this log.
Once an *FTP routing has been set up, every time a qualifying spool file is created, it will
automatically be sent via FTP using the options entered here.
93
Changing, Copying, Deleting and Reviewing HTML Routings
From the initial display screen, you can Change, Copy, Delete or Review HTML routing entries.
When you change an entry, all of the edit criteria are reviewed again to guarantee that the stored
information for the routing is accurate. When you delete an entry, a confirmation screen is
displayed so help avoid accidental deletions.
When you copy process, a screen that looks like this will be displayed:
Fill in the new output queue, form type and filename fields and press ENTER. A new rule will be
created using these new values and all of the previous settings for the selected rule.
94
Update E-mail Routing Table
To update an E-mail routing table in WebReport/i, choose menu option #18 from the MASTER
menu. Before starting the update, WebReport/i will ask if the System Directory information should
be refreshed. If you have recently made changes to a recipient address that you want to use from the
system directory, then this information should be updated before you start updating routing
information. The following screen will be displayed after any directory information is updated:
From this screen, you can add new routing instructions, review and update existing routing
instructions and delete routing instructions that you do not want to use any longer. The following
control keys can be used from this display:
F3
End the update session.
F5
Refresh the information displayed on the screen.
F6
Open a blank window to add a new E-mail routing instruction.
F9
Update the directory information used in WebReport/i (only used if you are
addressing your messages using SMTP addresses associated with the IBM i/OS
system directory).
After routing entries have been established, you can use the options listed at the top of the screen to
work with the entries. The options are as follows:
2
Change - Lets you make changes to the selected entry.
95
3
Copy - Use an existing routing entry to create a new one. All of the information
associated with the existing entry is copied over to the new one.
4
Delete - Lets you delete a selected entry.
5
Review - Displays the full routing instruction for your review.
To use any of these options, key the option on the line you want to work with and press ENTER.
Each option is discussed separately below along with the “Add” functions:
Adding a new E-mail Routing Instruction
From the initial display, you can create a new E-mail routing by pressing the F6 function key. When
you do, the following screen will be displayed:
Fill in the fields as follows:
Routing Que Name
Enter the name of the output queue to use. If this queue does not
exist, WebReport/i will prompt you to create it. It will also create a
virtual print device so that output can be routed to either the output
queue or the virtual device.
Routing Form ID
You should create an entry with a blank form first. This will identify
the default routing for this output queue. If you want special routing
for a set of spool files, you can also specify one of the following:
96
Enter a specific Form ID. This corresponds to the
FORMTYPE parameter on the spool file. WebReport/i
will check for a specific form ID before applying the
default routing.
*FILENAME Enter this special value if you want to route the report
based on the spool file name. When you specify this
value, you must also complete the next parameter.
WebReport/i will check for the *FILENAME routing
before applying the default routing.
*USRDTA
Enter this special value if you want to route the report
based on the spool file’s user data field contents.
When you specify this value, you must also complete
the next parameter. WebReport/i will check for the
*USRDTA routing before applying the default routing.
*USRPRF
Enter this special value if you want to route the report
based on the user profile that is associated with the
spool file. When you specify this value, you must also
complete the next parameter. WebReport/i will check
for the use profile routing before applying the default
routing.
Form ID
Routing modifier
If you have specified *FILENAME, *USRDTA or *USRPRF for the
Form ID above, then you must enter the spool file name, user data
field contents or user profile in this field.
Report Title
Enter a short description of the report. This will be inserted into the
E-mail message as the Subject.
This field also supports a special “macro” expression. If you encode a
special value of ‘&DATE-EXPR’ anywhere in the report title field,
WebReport/i will replace that field with the current system date using
your configured date formatting.
Example:
“Sales Report for &DATE-EXPR”
will be converted to the following value by WebReport/i:
“Sales Report for 10/02/2006”
E-mail format option Choose one of the following:
*TXT The report will be converted into a simple text file and sent in
that form.
*RTF The report will be converted into a Rich Text Format file and
sent in that format. RTF files can be processed using most
popular PC-based word processing software and can provide
better control when the recipient wants to print the report on
their PC.
*PDF The spool file will be converted into a Adobe Acrobat Format
file (PDF). The PDF format can be viewed on PC’s using the
Adobe Acrobat Reader which is available for free from Adobe.
97
*XLS
*CSV
*TIF
*ISV
*ISP
This reader can be used to view and print reports on PC’s and
Macintosh computers.
The spool file will be converted into an Excel spreadsheet file
that can be used directly by Excel or other popular spreadsheet
programs.
The spool file will be converted into a Comma Separated
Values file (CSV). This format is easily used to transfer the
report contents into an electronic spreadsheet.
The spool file will be converted into TIF graphics format.
The spool file will be converted into special format so that it
can be restored to any iSeries system and put back into an
output queue. (Recommended)
The spool file will be converted into special format so that it
can be restored to any iSeries system and put back into an
output queue. (No longer recommended, but available for
compatibility reasons.)
Note: The *PDF, *CSV, *XLS, *TIF, *ISV and *ISP options are only
available when have WebReport/i PDF installed.
From Identifier
Choose one of the following values to have this email message
identified:
*DFT The sender will be identified using the default
settings from the WEBSET command that was entered when
the software was installed and configured.
*USER
The sender will be identified using the current user profile and
the default email address from the WEBSET command.
Name If an address book abbreviation name is used, then the sender
will be identified with both the name and email address that
corresponds to the name entered. The information will be
taken from the WebReport/i address book file.
Email Enter any valid email address.
Recipient ID
This parameter identifies the recipient for this email message. Choose
one of the following values:
*DFT The default value specified by the WEBSET command is
used. You can use the WEBSET command from the
WebReport/i INSTALL menu. This value is normally set
during installation and configuration of the software.
Name Enter the specific value that you want to use to identify the
recipient for this email.
Optional message
This field lets you add text that will be sent along with the report in
the body of the E-mail message.
*DFT Will send a default standard E-mail text to each recipient.
You can control the default message text from the INSTALL
98
*NONE
Internet Address
menu with the WEBSET command.
This option will completely suppress the message text in the
created email.
Enter the address for this E-mail routing. You must specify at least
one destination address.
Addresses can take the following forms:
Direct Addresses - these are in standard form such as
“[email protected]”
WebReport/i Abbreviations - use any abbreviation name that you have
already entered into the WebReport/i Address Book.
Multiple E-mail addresses can be stacked together within each of the
20 parameter fields provided. You can stack Direct Addresses mixed
with WebReport/i Abbreviations. To stack addresses, just place a
semi-colon (‘;’) between the addresses without leaving any blank
characters.
Example: [email protected];JOHN;[email protected]
In the above example, the report will be sent to the two direct internet
addresses shown and to the E-mail address associated with the
WebReport/i abbreviated name JOHN.
When the first screen is filled in, press ENTER to continue on to the next screen. If the Routing
Que is a new one that does not already exist on your system, WebReport/i will prompt you to create
the new output queue. If you decide that you do not want to create the output queue, then it will not
get created and an error will prevent you from completing this entry.
99
If you do create the queue or it already exists, then the following detail information will be
displayed:
Continue entering information fields:
Merge Overprint
Lines?
This option controls how overprint lines in the spool file are
handled by WebReport/i for *TXT and *RTF processing. Choose one of the
following values:
*NO
Default value. When overprint lines are found in the spool
file, only the first line will be processed. All other overprint
lines will be ignored.
*YES When overprint lines are found, the contents of each line will
be merged together into a single line.
Txt Page Break
*BREAKS
A line of hyphens will be inserted where the
natural page breaks occur when converting the
spool file to *TXT format. This is the default.
*NOBREAKS
No additional lines will be added when
converting the spool file to *TXT format.
PDF Bookmark Type Enter one of the following values:
*NONE
No PDF bookmarks will be added to the report
100
*PAGNBR
PDF Bookmark
Initial Action
Page number PDF bookmarks will be added to the
report
Enter one of the following values:
*SHOW
The bookmarks will be displayed when the PDF file is
opened
*HIDE
The bookmarks will not be displayed when the PDF
file is opened. The user will have the option to open
them on demand.
Send-to Output
Queue & Library
If you want to route the report on to another output queue for
additional processing or local printing, enter the destination output
queue name here. You can also specify a different form type when
this is processed.
Note: If you want to use the Route To field, you must designate an
End Option of *LEAVE.
Ending Action
Enter one of the following values:
Acrobat Password?
*LEAVE
The spool file entry will be left in the print spool.
*CANCEL
The spool file entry will be deleted from the print
spool.
*HOLD
The spool file entry will be kept in the print spool but it
will be put into hold status.
To access the controls for PDF security fields, press the F10 key.
Target IBM i/OS Level
If you have specified a *ISP conversion, enter one of the
following values:
*CURRENT Use the current IBM i/OS level value for this system.
*PRV
Use the prior IBM i/OS level based on the value for
this system.
VxRxMx
Use the specific value entered. Note that this must be a
valid level based on the current installed IBM i/OS on
your system.
PDF Spool File
CCSID
If you are processing a PDF conversion, choose the value that works
best for the spool file being processed.
PDF Font Size
For *PDF conversions, this parameter gives you control over the size
of the font used. Choose from the following:
*CALC
Use this default value to let WebReport/i calculate a
font size based on the attributes of your print file.
*SCALE
If you find that *CALC does not produce a satisfactory
101
result, try this *SCALE value. A different method will
be used to set the font size based on different spool file
attributes from your report.
4-36
PDF Font Type
If you want to use a specific font size, code the
numeric value within the range of 4 to 36.
Controls the way the text from your spool file is rendered in your
PDF document. Choose one of the following values:
*MAP
WebReport/i will attempt to map the font in your spool
file as closely as possible using PDF fonts available.
This is the default value and will normally produce the
desired result.
*EMBED
WebReport/i will embed the selected font directly into
the PDF file. When *MAP results are unsatisfactory,
this option should be tried as it may give better results.
*CONVERT This performs the same conversion as *MAP.
font
Choose one of the following specific font values to be
used throughout the conversion:
*COURIER, *COURIERB, *COURIERO,
*COURIERBO, *HELVETICA, *HELVB, *HELVO,
*HELVBO, *TIMES, *TIMESB, *TIMESI,
*TIMESBI, *SYMBOL, *DINGBATS
PDF DBCS Coding
This parameter gives you control over the font that is selected when a
DBCS coded font is to be used.
Choose one of the following options:
*SPLF
This is the default value. WebReport/i determines the
DBCS font name from the spool file attributes.
*BUILTIN
WebReport/i will use its built in conversion font.
*IGNORE
WebReport/i will ignore data that appears to be DBCS
and will treat it as SBCS data.
*NOERROR If the DBCS font cannot be identified, WebReport/i
continues processing as if *IGNORE had been
specified and no error is issued.
PDF Form Name
.
If no PDF form is defined, set this value to the default value of
*NONE. If you are using a PDF form, enter the name of the form
definition. PDF Forms are fully documented in a separate user’s
guide
102
From this screen, you can choose the following function key options for additional entry fields:
F8=Addtl Addrs
Using the F8 option will open up several additional screens of
destination Internet email addresses. If the initial field is not
sufficient to hold all of the destination addresses, use this option to
add more.
F9=Ext Text Msg
The initial message text field in the first screen is limited to 256
characters. The actual message text field in WebReport/i supports up
to 512 characters. If the initial field did not contain the entire message
text that you want to use, the F9 key will give you access to the entire
text.
F10=PDF Sec.
If this is an Acrobat routing (*PDF) and you have specified that you
want to use PDF Passwords, press this function key to access the
additional Acrobat security settings. See below for details.
F13=Addr WRKDIRE When WebReport/i was initially created, the only email addressing
scheme available was tied to the system directory. If you are an
existing WebReport/i customer who used this method of email
addressing, you can use this option to access those address fields.
Kisco does not recommend this method for new WebReport/i
customers. If you need additional information about this feature,
please contact Kisco Support.
If you select F10 to specify the Acrobat options, the following screen will be shown:
103
Complete these fields as follows:
Password
Use one of the following values:
*NO
No security features will be specified. Leave
the other security parameters on this screen set
to their default values.
*YES
Security feature, including passwords, will be
enforced. The output PDF file will be
encrypted with 40 bit encryption.
*RESTRICT Security features will be enforced, including 40
bit encryption, but no passwords will be used.
*RST128BIT Security features will be enforced, but no
passwords will be used. Encryption will be at
the 128 bit level.
*PWD128BIT Security features will be enforced, including
passwords. The output PDF file will be
104
encrypted with 128 bit encryption.
User password
This is a case sensitive field of 32 characters. Enter the user
password you want associated with the converted PDF file.
Owner password
This is a case sensitive field of 32 characters. Enter the owner
password you want associated with the converted PDF file.
Allow printing?
If you want to allow printing of the PDF file, change this
parameter to *YES.
Allow modifications?
If you want to allow the PDF file to be modified, change this
parameter to *YES.
Allow copying of text?
If you want to allow text to be copied from the PDF file,
change this parameter to *YES.
Allow annotation?
If you want to allow annotations to be made to the PDF file,
change this parameter to *YES.
You can also control alignment on an AFP overlay from this screen. Some trial and error will be
needed to find the right set of parameters. Most AFP overlays will align correctly without any
adjustments. If you find you need adjustments, try the following:
Overlay left / top
The first value controls the left margin of the overlay. The
second value controls the top margin of the overlay. Specify a
number in the range indicated on the prompt.
Page left / top
The first value controls the left hand margin for the page. The
second value controls the top margin for the page.
Unit of measure
Describes the values used for alignment as either in inches
(*INCH), millimeters (*MM) or centimeters (*CC).
Paper size / Orientation
The first value is for the paper size. Use one of the following
values: *SPLF, *CUSTOM, *A3, *A4, *A5, *B4, *B5,
*LETTER, *LEGAL, *EXEC, *LEDGER. Note that
customer, exec and ledger are not fully available as of this
release.
The second value is for the page orientation. Use one of the
following values: *SPLF, *LANDSCAPE, *PORTRAIT
Rotated pgs shown
unrotated?
Choose either *YES or *NO
Auto-rotation in effect?
Choose one of the following values: *NO, *YES, *SPLF,
*COR, *PAGESIZE. Note that the pagesize option is not
implemented as of this release. .
105
If you are converting your spool file into Excel format (*XLS), then the following additional screen
will be displayed:
Complete the fields as follows:
Keep page headings?
Page heading start line
Use one of these options:
*FIRST - only keep the headings from the first page
*ALL - keep all page headings
*NONE - ignore all page headings
This parameter is only used when your conversion method
refers to a report model. If the XLSCONV parameter is set to
*AUTO, this parameter is ignored.
Enter the starting line number for the page headings on your
report.
Page heading ending line
This parameter is only used when your conversion method
refers to a report model. If the XLSCONV parameter is set to
*AUTO, this parameter is ignored.
Enter the ending line number for the page headings on your
report.
106
Keep column headings?
Use one of these options:
*FIRST - only keep the column headings from the first page
*ALL - keep all column headings
*NONE - ignore all column headings
Column heading start line
This parameter is only used when your conversion method
refers to a report model. If the XLSCONV parameter is set to
*AUTO, this parameter is ignored.
Enter the starting line number for the column headings on your
report.
Column heading ending line This parameter is only used when your conversion method
refers to a report model. If the XLSCONV parameter is set to
*AUTO, this parameter is ignored.
Enter the ending line number for the column headings on your
report.
Font face
Select the font that you want to use for the conversion. The
following are currently supported:
*ARIAL, *COURIER, *COURIERB, *COURIERO,
*COURIERBO, *HELVETICA, *HELVB, *HELVO,
*HELVBO, *TIMES, *TIMESB, *TIMESI, *TIMESBI,
*SYMBOL, *DINGBATS
Font size
Choose the size that you want to enforce for the selected font.
XLS conversion method
For conversion to XLS format, this parameter lets you select
the way WebReport/i does the conversion. Choose one of the
following options:
*AUTO - Use WebReport/i's automatic column interpretation.
This option is preferred for the first time that you attempt an
*XLS conversion on a report.
Model Name - Enter the name of an XLS Report Model that
you have built using the option from the MASTER menu for
this purpose.
107
If you are entering a *CSV conversion entry, the following additional parameter screen will appear
when the previous screens have been completed:
These additional parameters can be completed as follows:
Delimiters: (There are 5 elements to the parameter as follows)
Record delimiter
*CRLF
*CR
*LF
String delimiter
This parameter defines the characters to be used to indicate the
end of a record in the CSV file.
Carriage return and line feed. Both a carriage return (x'0D')
and a line feed.
Just a carriage return (x'0D') is used.
Just a line feed (x'0A') is used.
The character to be used to enclosed character string data.
*DBLQUOTE
A double quote (") is used.
*SGLQUOTE
A single quote (') is used.
*NONE
No delimiter is used. Alphanumeric data is not enclosed by
any special character.
The delimiter character to use.
Delimiter-char
Field delimiter
*COMMA
The character to be used to separate fields in the CSV file.
A comma (,) is used.
108
*TAB
A tab (x'09') is used.
*BLANK
A blank (x'20') is used.
*SEMICOLON A semicolon (;) is used.
Delimiter-char
Column separator
The delimiter character to use.
The values you select on this parameter control how the
spooled file is converted to a delimited ASCII text file (e.g. a
comma separated variable file).
The default for the first element is *SPLF. This tells
WebReport/i to break the spooled file data into columns based
on the way in which the data is split up in the spooled file.
Where the spooled file is created from an externally described
printer file this will probably give the best results, since the
data in the spooled file is likely to be organized so that each
natural or logical item of data appears as a separately
identifiable element.
However, if the spooled file is created from an internally
described printer file, or from an application such as IBM’s
Query/i, it is likely that the data in the spooled file will be
presented to WebReport/i as a single, unstructured data block
for each line of the report. If this is the case then better results
will probably be achieved by defining a column separator
character to control the splitting of the data in the report.
The column separator character can be any alphanumeric
character. Often the best results will be obtained by selecting
*BLANK (blank character) which will split the data in the
spooled file every time one or more consecutive blank
characters occur.
*SPLF
Split the data in the report based on the organization of the
data.
*BLANK
Blank
character
The character to use to force a column split.
Number of column
separator characters
The number of consecutive column separator characters
required to force a column split.
Number
The number of characters required.
Exclude pages
The EXCLPAGES (Exclude Pages) parameter allows you to
identify pages of the spool should not be included in the
resultant stream file.
For example, if your spooled file contains header sheets or
109
batch separator page dropped using this parameter.
There are five elements to this parameter, each providing a
different method of pages from the spooled file.
At start of spooled file
The number of pages to exclude at the beginning of the
spooled file. If you specify a number on this parameter
element, then that number of pages will be ignored at the start
of the spooled file. If your spooled file contains one or more
unwanted header sheets at the beginning of the spooled file,
these can be dropped by specifying the number of pages to be
dropped here.
At end of spooled file
The number of pages to exclude at the end of the spooled file.
If you specify a number on this parameter element, then that
number of pages will be ignored at the end of the spooled file.
If your spooled file contains one or more unwanted trailer
sheets at the end of the spooled file, these can be dropped by
specifying the number of pages to be dropped here.
At start of each stream file
The number of pages to exclude at the beginning of each
stream file created from the spooled file. If your spooled file
contains one or more unwanted header sheets at the beginning
of each set of required pages, these can be dropped from the
stream file by specifying the number of created from the
spooled file. If your spooled file contains one or more
unwanted header sheets at the beginning of each set of
required pages, these can be dropped from the stream file by
specifying the number of pages to be dropped here.
At end of each stream file
The number of pages to exclude at the end of each file created
from the spooled file. If your spooled file contains one or more
unwanted trailer sheets at the end of each set of required
pages, these can be dropped from the file by specifying the
number of pages to be dropped here.
Exclude pages by key
A key string identifying pages to be dropped. Every page of
the spooled file which contains the string specified here will
be omitted from the resultant file(s). For example, if your
spooled file contains batch header sheets, and these contain the
word "Batch" on them, they can be excluded from the stream
file by specifying "Batch" as the key string on this parameter.
Exclude line numbers:
The EXCLLINNBR (Exclude line numbers) parameter allows
you to define lines which should be dropped from the output
CSV or Excel file, for example unwanted headings.
The group is specified by indicating a starting line and a
number of following lines to be excluded.
From line number
Enter the starting line number or specify the special value
*NONE if none are to be excluded.
110
Number of lines
The number of lines to be excluded.
Exclude lines by key:
The EXCLLINKEY (Exclude lines by key) parameter allows
you to define lines which should be dropped from the output
CSV or Excel file, for example unwanted sub-headings.
The group is specified by indicating a key string, which, when
located in the spooled file, denotes the start of the group, and a
number of following lines to be excluded.
Exclude lines containing
The key string indicating the start of the group of lines to be
excluded from the output or the special value *NONE if no
lines are to be excluded.
Number of lines
The number of lines to be excluded.
111
Changing, Copying, Deleting and Reviewing E-mail Routings
From the initial display screen, you can Change, Copy, Delete or Review E-mail routing entries.
When you change an entry, all of the edit criteria are reviewed again to guarantee that the stored
information for the routing is accurate. When you delete an entry, a confirmation screen is
displayed so help avoid accidental deletions.
When selecting to copy a routing entry, the following will be displayed:
Fill in the new output queue, form type and filename fields and press ENTER. A new email routing
rule will be created based on the selected rule with this new information. You can then edit it to
make any additional modifications needed.
112
Automatic Routing Using Email Addresses in the Spool File
This feature of WebReport/i lets you place direct internet addresses in your print spool for automatic
routing purposes. Using this feature, you can create a single spool file that contains multiple
messages to different Email destinations. WebReport/i will process the report and send it to the
various destinations automatically. Using this feature, you can create reports using Email addresses
on your database files for automatically routing output reports. It will even let you send segments of
the report for local printing on paper. You can use this method of automatic routing for *PDF,
*TXT, *RTF and *XLS conversions.
Note: When sending Adobe Acrobat attachments, this feature will only work when the spool file is
an *SCS type spool file (ie: character based, non-graphic). If you have a spool file that is using an
AFP (IBM’s Advanced Function Printing) overlay, it can be used with an *SCS spool file and
WebReport/i will keep the overlay with the output that is processed.
There are two components to this feature. First, you have to add the destination Email addresses to
the spool file output from your program. This is done by inserting "Email Directive" lines in your
print spool. The Email Directive lines will NOT be included in the output Email that is sent and are
only used for telling WebReport/i where to send the reports and/or report segments.
The Email Directive statements must always start in position 1 (or position 2) of the spool file print
line. A Directive can contain a single Email address or multiple addresses. You can code a single
Directive at the start of the spool file or place them throughout the spool file.
A simple Email Directive statement might look as follows:
#EMAIL("[email protected]")
If you used this example, the spool file contents starting with the line following the Directive
statement will be sent to the Email address "[email protected]" until another Directive is found
or until the end of the report is found. Note that you must use double quotes exactly as shown in
this example.
To send a segment of the spool file for local printing, the Email Directive should look as follows”
#EMAIL(“*OUTQ”)
When WebReport/i sees this directive, it will route the segment of the spool file to the default
output queue that is specified in the INTOUTQ parameter of the WEBSET command (option #9 on
the INSTALL menu). See the documentation for the WEBSET command for more details.
If you want to send the report to multiple destinations, then you can code the Directive as follows:
#EMAIL("[email protected];[email protected]")
Note the use of a semi-colon to separate the addresses. If you have more Email addresses than will
fit on a single line, you can use multiple Directive lines. Note that they MUST be on lines
immediately following the first of the Directive lines. An example of this might look like the
following:
#EMAIL("[email protected];[email protected]")
#EMAIL("[email protected];[email protected]")
113
The Directive line can also be used to specify a variable Email Title value. To implement this
feature, you need to change the format of the #EMAIL directive that you place in your spool file.
This directive is used for sending different segments of a report to unique destination Email
addresses. You can add the title information by coding an additional parameter on the #EMAIL
directive.
Here is an example of the format you should use:
#EMAIL("[email protected]") TITLE("Special Email for Name1")
In this example, the segment of the report will be sent to the Email address
"[email protected]". That Email message will carry the subject line shown in the TITLE
parameter. You must be careful to code the parameter exactly as shown, complete with the quotes
as shown. Also, the TITLE parameter has to conform to the following rules:
1.
2.
It cannot exceed 50 characters in length.
If you have multiple #EMAIL directive lines, the TITLE parameter must appear on
the last of these before the report segment starts.
The second part of this feature is the method that you use to tell WebReport/i to use the Internal
Addresses. If you are using the EREPORT command (or menu option #1 from the MASTER
menu), then you must use the special value '*INT' in the first Internet Address parameter (TOINET)
or the first Recipient Address parameter (TOUSRID). No other Internet Addresses or Recipient
Addresses can be coded on the command. This configuration will tell WebReport/i to look for the
Email Directive statements in the spool file being sent.
If you are using Automatic Email Routing, then the automatic routing entry must be set up in a
similar manner. Internet Address # 01 or E-mail Recipient # 01 must be set to the special value
'*INT'. No other recipient information can be entered.
Automatic Routing by User Profile
WebReport/i includes a method for automatic Email routing of iSeries spool files based on user
profile. Using this option, you can create reports on the system for your user profile. When these
reports are routed to a special output queue, WebReport/i will pick them up and automatically route
the reports according to the routing instruction that you set up.
There are two setup tasks that you need to do to get this working. First, you need to create the
special output queue. The queue must be named SEND2ME. You will find an output queue by this
name in the WEBREPORT library. We recommend that you copy this output queue into the
QUSRSYS library where it will be generally available to all of your users and your application
programs.
Once the SEND2ME output queue has been created, you then have to set up a special routing
instruction in the Email routing table. Use menu option #18 from the MASTER menu and create a
new Email routing entry. The Routing Que Name must be set to your user profile name and the
Routing Form ID should be set to the special value *USER. Set up the rest of the Email routing to
work the way you want, you can find instructions on how to set up Email routings in the user's
guide.
Once the special output queue has been created and a routing entry added, then you are ready to use
the feature. This feature requires that the Automatic Routing feature be started (menu option #15 on
114
the MASTER menu). To use this feature, create a report on your system. When the spool file is
ready, change it to point to the output queue named SEND2ME. As soon as it is moved to the
special output queue, WebReport/i will pick it up and route it for you.
Automatic Routing Using *USRDFNDTA Field
You can also store the destination email address (or addresses) in the USRDFNDTA field associated
with your spool file. The USRDFNDTA parameter is a 256 character long string that is associated
with every spool file on your system. It can be set to whatever value you desired and can be coded
in your application programming. It can be built into a print file using the CRTPRTF or CHGPRTF
commands or on the OVRPRTF command.
To use this feature, specify the *USRDFNDTA special value for the destination email address in the
EREPORT command or in the automatic routing table. Then, when you prepare your spool file,
store the destination email address in the USRDFNDTA field for your spool file. If you want to
specify multiple destinations, just separate them by semi-colon (";") characters with no blanks. You
can use WebReport/i address book abbreviation names as well as full email addresses.
115
Starting Automatic Routing
Once you have set up at least one routing instruction, you can start the automatic routing process by
selecting menu option #15. You can also use the command to start the automatic routing process
from within your own program. To use the command, type the following:
WEBREPORT/STRWEBRTR
When you start the routing process, a new subsystem will be started on your system named
EREPORT. On most systems, this subsystem will appear listed first on your display for active jobs.
Within this subsystem there will be a single job named WEBRTR which will process all automatic
routing requests. This job will normally lie dormant waiting for work to be done so little system
resource is needed to maintain the routing function when there is no activity.
Ending Automatic Routing
To end the automatic routing function, select menu option #16. You can also end the function by
keying the command as follows:
WEBREPORT/ENDWEBRTR
When the automatic function ends, it leaves the EREPORT subsystem enabled for future use.
Activity Log
All functions of WebReport/i automatically log activity to the log. All entries in the log can be
viewed by selecting menu option #19. When you start this menu option, you will be prompted for a
starting date parameter. Use one of the following values:
*TODAY
Will start the display as of the current day
*PRVDAY
Will start the display as of the previous day
YY/MM/DD Will start the display as of the specific date entered. Make sure that you use
the date format shown, including the ‘/’ characters.
116
The activity log will appear as follows:
To see the details about any specific entry, place a 5 next to it and press ENTER. You can print the
contents of the entire log as a report by selecting the F8 function key. Pressing the F9 function key
will allow you to purge old information from the log.
117
The Monitor Menu
When you select option 20 from the MASTER menu, the WebReport/i Monitor Menu will be
displayed as follows:
WebReport/i has two different monitoring capabilities. For each, an event will be watched for by
WebReport/i and then reported via email according to the directions that you have set up.
The menu options are as follows:
1. Start a Message Queue Monitor
Start a message monitor task on your system.
2. End a Message Queue Monitor
End a message monitor task previously started.
3. Display Active Message Monitor Jobs
Display current active message monitor and router
activity on you system.
4.Work With Message Exception IDs
Lets you enter specific message IDs that you want to
exclude from message queue monitor reporting.
6. Work with File Monitor
Message Monitors
Work with current file monitor settings.
WebReport/i has the ability to monitor (or watch) any message queue in the system looking for
118
messages posted that meet a severity level filter. When a qualifying message is sent to the
monitored message queue, WebReport/i will read the details of the message and then automatically
send a notification to one or more email addresses that have been supplied when the message
monitor was started.
In order for a message queue to be monitored, you must start a monitor for that specific message
queue. When you select menu option #1 from the Monitor menu, the following command prompt
will be displayed:
Fill in the parameters as follows:
Message que to be monitored Enter the name of the message queue that you want to monitor.
Message que library
Enter the name of the library where the message queue exists.
If you leave this parameter blank, the system will check all
libraries in your current library list as if you had coded this
with *LIBL.
Notification email addrs
Enter the email address or list of email address where you
want message notification messages sent. This must be a valid
email address or a WebReport/i address book abbreviation. If
you want to specify multiple address, each address must be
separated by a semi-colon (’;’)with no spaces.
119
Severity filter
Enter the minimum severity level for message where you want
to receive a notification. Any messages received in the
message queue being monitored that have a lower value will
not be reported. If you use the value of zero, all messages will
be reported.
Once the parameters have all been set for your message queue monitor job, press ENTER and the
monitor will be started in the EREPORT subsystem that is also used by the automatic router
functions of WebReport/i. Once a monitor has been started, you will not be able to delete messages
from the message queue manually (as in the case of the system operator message queue) until the
monitor for the message queue has been stopped.
To stop a message monitor, select menu option #2. When you do, the following prompt screen will
be displayed:
Fill in the parameters as follows:
Message que to be monitored
Enter the name of the message queue where you want monitor
activity to be stopped.
Message que library
Enter the name of the library where the message queue exists.
If you leave this parameter blank, the system will check all
libraries in your current library list as if you had coded this
with *LIBL.
Notify on shutdown?
Choose one of the following values:
120
*NOTIFY
An email message will be sent to the
notification ELIST when the monitor
function ends.
*NONOTIFY
No email notification message will be
sent.
When ready, press ENTER and the message monitor function that is active for the named message
queue will be ended.
To check for active message monitor activity, run option #3 on the Monitor menu. This will display
the EREPORT subsystem along with all active tasks. If you have automatic report routing active,
you will see an active job named WEBRTR. All other active jobs will be for message monitor
tasks.
You can also enter specific message IDs that you want the message queue monitor to ignore. You
might use this for things like printer forms changes or out of forms messages which are typically
just handled locally by your operations room staff.
To work with these message monitor exceptions, run option #4 from the MSGMON menu. When
you start this option, a list of any currently specified exception message IDs will be displayed. To
create a new exception, use the F6 key.
121
When you enter a new message queue monitor exception, the following add screen is displayed:
Enter the fields as follows:
Message Queue
Enter the message queue that you will be monitoring
Queue Library
Enter the name of the library where the mssage queue resides. Note:
If you start your message monitor process using the *LIBL value, you
MUST also specify *LIBL at this point.
Message ID
Enter the 7 character message ID that you want the message monitor
function to ignore. For example, if you want to ignore forms change
messages for a printer, use the value CPA3394.
Note
Enter your own free format note information for future reference.
Once the fields have been completed, press ENTER twice to post the new entry to your table. The
display will return to show you the entire table contents.
If you want to delete an entry in the table, use the 4 option next to it. If you want to change the note
information, use the 2 option.
Once an entry has been added, whenever the monitored queue receives a message with that message
ID, it will be ignored.
122
File Monitors
WebReport/i has the ability to monitor (or watch) a specific database file on your system and
automatically notify you via email about certain file events that happen with that file. This works on
IBM i/OS database files in any library on your system. WebReport/i can monitor for record updates,
record deletions, record adds or even just for someone reading a record. When one of these events
happens on the selected file, an email is sent with notification of the event. WebReport/i can with
report to you for every event on the file (a detail monitor) or send you periodic summaries of events
(a summary monitor).
To control how the file monitors work, select option #6 from the Monitor menu. The following
screen will be displayed:
From this screen, you can review file monitors that are already set up and make changes to them as
well as add new file monitor tasks. To work with existing file monitors, choose one of the
following options and key it in the “Opt” column in the left margin of the screen:
1
A file monitor will only work if its current status is showing as “Active” on the right
side of this screen. To activate an inactive monitor, use this option.
2
To change the settings for a file monitor, it must be inactive. Settings for active file
monitors cannot be made. Once the monitor is inactive, use this option to make any
changes you want in the way the monitor is set up.
123
4
To delete a file monitor, it must be inactive. Use this option to delete a monitor.
5
To view the setup for a file monitor, use this option.
6
To deactivate an active file monitor, use this option.
To create a new file monitor, press the F6 key. When you do, the following file monitor detail
screen will be displayed:
Fill in the fields for your file monitor as follows:
File Library
Enter the name of the library where you file is located.
File Name
Enter the name of the file that you want to monitor.
124
File Monitor Type
This can be set to one of these two values:
D - A detail file monitor will be set
S - A summary file monitor will be set
Summary Threshold Level
This value can only be used when you are configuring a summary
monitor. Enter the number of events you want to occur before a
notification email is sent. For example, if you only want to know
activity after every 20 events, then enter the number 20.
Insert
If you want to be notified when records are added to the file, type an
X in this field.
Delete
If you want to be notified when records are deleted from the file, type
an X in this field.
Update
If you want to be notified when records are Updated in the file, type
an X in this field.
Read
If you want to be notified when records are read from the file, type an
X in this field. WARNING - using the read option could have
serious side effects if a program is started that will read through
the contents of the file. In detail mode, you will receive an email
for every record read. If the file is large, it could easily result in a
slowdown on your computer system. Use this option with great
caution! If required, consider using the summary mode with a
high threshold value.
Email Notification List
Enter the email address or addresses that you want notified when the
file monitor conditions are met. You can code either a WebReport/i
address book abbreviation or a full email address. If you want to
specify multiple addresses, they must be separated by a semi-colon
character (‘;’) with no spaces.
Only check between times
If you only want to monitor file activity during a certain time of day
(for example, during off hours), then you can specify here the from
and to time ranges where you want WebReport/i to watch the file.
Only events that occur within the defined time range(s) will be
reported.
Check all day on
If you are using a time of day control, you may want to extend
monitor coverage during weekends. These parameters will allow you
to do so.
Once a file monitor has been defined, it will not work until it has been activated. Kisco
recommends that you activate it and then test it to make sure you get the results that you are
expecting. Care must be taken to make sure that you do not set a file monitor on a very active
file or system problems, including degraded response time, could result.
125
Installation and Configuration
Before any WebReport/i functions will work, the initial install procedure must be run.
WebReport/i can be installed from media received with a shipment from Kisco Information Systems
or from a download file obtained from the Internet. If you received a direct shipment from Kisco,
use the Installation from Media instructions. If you downloaded a file from the Internet, use the
Installation from Internet instructions. Both sets of instructions will result in the installation of
WebReport/i PDF. If, after you have evaluated the software, you prefer to purchase just the basic
WebReport/i product, contact Kisco Information Systems and we will send you instructions to
reconfigure your software.
Installation from Media
You can install WebReport/i by following these easy instructions:
1.
Sign on using the QSECOFR user profile or from another user profile that has *SECOFR
authority. If a non-conforming profile is used, the installation will abort.
2.
Create the new special user profile, WEBREPTUSR, using the following command:
CRTUSRPRF USRPRF(WEBREPTUSR) PASSWORD(*NONE) PWDEXP(*NO)
USRCLS(*SECOFR) ASTLVL(*SYSVAL) INLMNU(WEBREPORT/MASTER)
TEXT('WebReport/i Ownership User - DO NOT DELETE')
Note: This profile will be the owner of all objects in the WebReport/i application library.
Using this exact command will result in a user profile that cannot be used for logon purposes
since no password has been assigned.
3.
Use the WRKDIRE command on your system and create an entry (option #1 on the first
line) for user WEBREPTU. The Address field should be set to your system name. When
the full screen is displayed, specify the user profile WEBREPTUSR and then take all of the
default entries. This new profile must be enrolled in the system directory before you load
this new version.
4.
Check the following system values. They should be set as indicated here. If they are not, note the
current settings then change them to these settings:
QALWOBJRST - *ALL
QVFYOBJRST - value 3 or lower
QFRCCVNRST - value 0
5.
Place the installation CD in your system’s CD reader and key the following command:
LODRUN DEV(xxxx)
where xxxx is the name of your CD drive (normally “OPT01").
6.
During installation, WebReport/i does the following:
!
!
Checks to see if this is a new install or an update install.
For update installs, the old WebReport/i program library is saved in library
WEBREPOLD and history information is transferred to the newly installed library.
126
!
!
For new installs, the software is initialized for the free 30 days trial period.
Additional documentation is printed which covers topics that have been added or
changed since this user documentation manual was last printed.
7.
During installation, the WEBSET procedure is automatically run to make sure that certain
parameters are set correctly right away. Check the section of this manual titled “Update
WebReport Default Settings” for the WEBSET command and details on how to complete
this procedure. The iSeries HELP key can also be used.
8.
When the command finishes, the WebReport/i Master Menu will be displayed.
9.
If you changed any system values at step #3, reset them back to their original values now.
When the procedure finishes, your copy of WebReport/i will be successfully installed for your thirty
day trial period. At the end of the trial period, WebReport/i will cease functioning until either an
extension password or a permanent password is entered. The additional documentation printed
during the installation covers features and functions that have been added or changed since your
copy of the manual was last updated. Before using WebReport/i, please review this manual and the
additional documentation in detail.
If you upgraded from an earlier release of WebReport/i, you may delete the library named
WEBREPTOLD created during the installation after you are certain that the new release is working
to your satisfaction. Kisco recommends keeping the WEBREPTOLD library on your system for a
period of at least two weeks.
Release Upgrade Installation
When Kisco Information Systems completes work on a new Release of WebReport/i, you will be
notified of the availability for the new release. New releases can be shipped on install media or
distributed via the Internet using a website download.
To install an upgrade from media received from Kisco Information Systems, follow the instructions
provided along with the upgrade install media. For upgrades from website download, use the
instructions at the website.
If you have WebReport/i PDF installed, the new installation will be for the PDF version. If you
have the basic WebReport/i installed, it will be active following the install. If you want to upgrade
to WebReport/i PDF at this time, contact Kisco Information Systems for instructions and upgrade
charges.
Installation from Internet
We recommend that you use the install instructions from the WebReport/i Download web page.
After you download the install file from the website, please print the Download page and use it for
reference while completing the installation.
127
Configuration Considerations
As stated in the introduction section of this manual, WebReport/i assumes that you have a number
of functions defined and working. As stated earlier, these include:
!
!
!
A working TCP/IP environment on the iSeries.
An active SMTP (Simple Mail Transport Protocol) server function running on the iSeries
(for use of the E-mail features in WebReport/i only).
A working E-mail server. This may be on the iSeries or an external mail server. For Internet
destination E-mail addresses, the mail server must be connected to the Internet.
When WebReport/i was first released, few installations had a good working TCP/IP environment as
described above. Since then, most installations have embraced this environment and have set up
most, if not all, of the required configuration elements. If you have a working TCP/IP environment
for your installation, you may not need any additional configuration work at this time. If this is the
case, Kisco Information Systems recommends that you start working with WebReport/i after a
review of the configuration requirements but before you make any configuration changes. You may
find that you have no need for any configuration changes.
If you are installing WebReport/i for the first time and are not sure about the configuration
requirements, we recommend that you look at the WebReport/i Configuration Wizard. This
feature is documented in the following pages.
If you do not have TCP/IP up and working yet, IBM has a very good “Quick Start” guide that should
have come with your system. The guide is titled TCP/IP Fastpath Setup and is publication number
SC41-3430-0. This booklet will give you a brief overview of TCP/IP and its use and configuration
on the iSeries.
If you received your WebReport/i software from Kisco Information Systems on a CD, you will find
a helpful PowerPoint presentation on the CD that steps you through all of the configuration
considerations. If you got your software from an Internet download, this same PowerPoint
presentation is also available via download from the same web page.
WebReport/i E-mail functions work with the SMTP server on your iSeries. When configuring the
various TCP/IP functions and applications, be sure that you set up SMTP so that it is active on your
system.
WebReport/i requires that everyone who uses the product to either send reports as E-mail or store
reports for local deployment be registered in the system directory. To make implementation of the
product easier, we have added an optional feature that allows WebReport/i to automatically enroll
anyone that uses it the first time they use the product. This optional setting is pre-set when we ship
the product to you to *YES.
You can turn this feature off from the INSTALL menu. Use option #9 and change the "System
Directory Auto Enroll?" setting from *YES to *NO. Remember, however, that users will still have
to be enrolled. Also, this option does NOT enroll the special IBM user profiles that need to be
enrolled before you start using the product.
Once you have TCP/IP configured and working, you may want to make certain that it always gets
properly started following an IPL. You may want to include the following command sequence in
your QSTRUP program which runs following every IPL operation:
STRTCP (starts TCP/IP processing)
128
STRHOSTSVR *ALL (starts all host server functions)
SMTP is the only TCP/IP server application that WebReport/i uses. You do not need to start
SNADS (the QSNADS subsystem) or the POP3 server for WebReport/i to work. If you use those
applications, they will not conflict with WebReport/i, but you do not need to activate them to
support WebReport/i. Note: Earlier versions of WebReport/i also used the Mail Server Framework
(MSF) function, but as of Release 7, this is no longer a requirement.
You may find it helpful to copy the various commands for WebReport/i into a system library on
your system so that they can always be easily called from a command line. We recommend that you
do this for the following commands:
EREPORT - Sending reports as Email
ENDWEBRTR - Stop the automatic router
STRWEBRTR - Start the automatic router
WREPORT - Converting reports to HTML
WRKWEBSPLF - Work with WebReport/i Spool Files and Functions
These commands can be copied to the library named QUSRSYS on your iSeries. Use the IBM
command CRTDUPOBJ to make the copies. When you install an upgrade that you have received
from Kisco Information Systems, you should make new copies of these commands to make sure that
your parameters are compatible.
Considerations for using Internet Addresses
Before sending any email messages to direct internet addresses, there are three additional
configuration steps that you need to take care of. (Note: If you use the WebReport/i Configuration
Wizard, this is taken care of for you when that feature is run.)
These must be done by someone with *SECADM authority on your system. Check with your
security officer first.
Step 1:
You must create a special user profile on your system that will be used by IBM i/OS
as a “pointer” to your E-mail server. We recommend that you create a user profile
named GATEWAY. This profile can be setup as a standard user with default
information specified.
Step 2:
Create a directory entry for the GATEWAY user profile using the WRKDIRE
command. You must specify the following specific fields when creating the
directory entry. If a field is not included in this list, you can use the default value:
System name/Group - Enter TCPIP
Mail service level - Enter ‘2' for “System message store”
Preferred Address - Enter ‘9' for “Other preferred address”
Address Type - Press F4 and select ATCONTXT
Field name - NETUSRID - *IBM (immediately following Address Type)
Step 3:
Type in the following command and press F4: CHGDSTA
When the screen is displayed, change the two fields in the "Route to SMTP gateway"
to show the GATEWAY user profile and location that was established in Step 2.
129
This configuration, when completed, will allow you to use Internet Addresses when sending reports
as E-mail with WebReport/i. Note: If you use the Configuration Wizard feature, this is taken care
of for you during that process.
Control over ASCII Conversion
Customers using WebReport/i to send spool files as *TXT attachments have periodically requested
better control over the EBCDIC to ASCII conversion processing in WebReport/i.
WebReport/i gives you control over the following parameters on the CPYTOSTMF command when
a *TXT or *RTF spool file conversion is processed.
DBFCCSID
STMFCODPAG
CVTDTA
TBL
Control is implemented by allowing you to store default settings in the CONTROL and the new
CONTROL2 data areas in the WEBREPORT library as follows:
In the data area named CONTROL:
DBFCCSID in positions 178-187
STMFCODPAG in positions 188-198
In the data area named CONTROL2:
CVTDTA in positions 1-5
TBL in positions 6-105
If you leave the data areas blank, the following defaults are assumed:
DBFCCSID defaults to '37
'
STMFCODPAG defaults to '437
CVTDTA defaults to '*AUTO'
TBL defaults to blanks
'
Changes to the data areas must be made carefully using the CHGDTAARA command. WebReport/i
does not do any parameter editing, so it is the customer's responsibility to use a valid combination of
parameters.
130
The Install Menu
When you select item 30 from the main menu, the installation menu is displayed as follows:
Menu items perform the following functions. Each function is discussed in greater detail later in
this document:
1. Run initial install procedure -
Do not use this option unless directed to do so by Kisco
Support staff. This option is automatically run during normal
install processing.
2. Display installation status -
Displays a screen showing the current installation status for
the software.
3. Change installation status -
Displays the current software installation status and allows for
changes to be made.
4. Print documentation -
Prints this documentation manual to the default print device.
5. Maintain Title Conversion Table - Updates this table used during email processing
6. Display Software Version -
Displays information about the specific version of
WebReport/i that is installed on your system.
7. Install Kisco PTF package -
Allows you to process a corrective PTF package received from
Kisco for program fixes.
131
8. Update WebReport Directory -
Used to manually change system directory information stored
in WebReport/i.
9. Update WebReport Default Settings
Used to update default settings for WebReport/i
10. Configuration Wizard - Test -
Runs the WebReport/i Configuration Wizard in test mode.
11. Configuration Wizard - Post -
Runs the WebReport/i Configuration Wizard in posting mode.
12. SMTP Journal Tracing
Helps with email problem diagnostics by starting, stopping
and viewing journal tracing of the IBM i/OS SMTP server.
15. WebReport/i User Security -
When optional user profile security is active, this option is
used to maintain the list of user profiles that are permitted to
use WebReport/i.
20. To Main Menu -
Will display the WebReport/i main menu.
132
Display installation status
At any time, you can check the current installation status of your copy of WebReport/i by selecting
this menu option. You must be signed on with security authority of QSECOFR or equivalent. The
following screen will be displayed:
The message at the center of the screen indicates your current installation status. You should also
check the Sec. expire date for an expired trial period. WebReport/i may still show as installed on a
trial basis but, if the trial is expired, it will no longer function.
The following are the possible status messages that can appear on this display:
Message
Z-001 NOT INSTALLED
Z-002 TRIAL EXPIRED
Z-003 PERMANENTLY INSTALLED
Z-004 INSTALLED ON TRIAL
Z-005 PASSWORD NOT ACCEPTED
Z-006 WRONG LIBRARY
Z-007 PLEASE RUN TRIAL INSTALL
Z-008 INVALID INSTALL REQUEST
Z-009 INVALID SECURITY (REC#6)
Z-010 INVALID SECURITY (NO ZZ)
Z-011 INVALID SECURITY (HASH.)
Explanation
Trial installation not started
Trial period has ended
Software is permanently installed
Software is installed on trial
Password keyed is not valid
Programs must run from our library
Must have trial install before perm.
Must be P or T
Call Kisco
Call Kisco
Call Kisco
Change installation status
To make changes to your installation status, use this menu option. The changes processed can
include both a trial period extension and permanent installation. You must be signed on with
133
QSECOFR security authority or equivalent. When you select this option, the following screen is
displayed:
Trial extension
To extend a trial period, contact Kisco Information Systems and request an extension. We will
provide you with an extension password and new expiration date. On the above screen, enter the
following:
Type of install
Enter 'T' for trial
Install password
Enter all six digits of the extension password provided, including any
leading zeros
Enter the new expiration date in the format YYMMDD (ie: Jan 12,
2012 would be 120112)
New expire date
When the parameter fields have been completed, press enter to reactivate your software.
Permanent installation
To permanently install your software package, use the permanent password provided by Kisco
Information Systems following receipt of payment. On the above screen, enter the following:
Type of install
Install password
Enter 'P' for permanent
Enter all six digits of the extension password provided, including any
134
New expire date
leading zeros
Enter all 9's (ie: 999999)
When the parameter fields have been completed, press enter. Your software is now permanently
installed.
Print additional documentation
At any time, you can reproduce the additional documentation by using this menu option. A full
copy of the additional documentation topics will be printed.
Display Software Version Information
This menu option will display the current release level and PTF information for your version of
WebReport/i. The developer may need to verify this when working with you on a support issue.
135
Title Conversion Table Maintenance
When sending reports as Email, the Email Subject (Title) can be set automatically based on several
settings in the spool file. These include the form type, the user data field or the spool file name.
These options are set up on the TITLE parameter of the EREPORT command (which see). If you
use these options, menu option #7 on the MASTER menu is used to maintain the conversion table.
When you start the option, the following screen will be displayed:
This will show you the current entries in the table. You can use option 2 to make changes to current
entries, option 4 to delete current entries and option 5 to just display and review entries without
making any changes.
136
To add new records to the table, press the F6 key and the display shown on the following page will
be displayed.
To create your new Title Conversion Table entry, just fill in the following fields:
Title Type
Match Name
Choose one of the following specific values:
*FORM
If you want the title based on the formtype of
the spool file, use this value. It corresponds to
the *FRMCNV option for the TITLE parameter
on the EREPORT command.
*USRDTA
If you want the title based on the user data field
of the spool file, use this value. It corresponds
to the *USRCNV option for the TITLE
parameter on the EREPORT command.
*FILENAME
If you want the title based on the spool file
name of the spool file, use this value. It
corresponds to the *FILCNV option for the
TITLE parameter on the EREPORT command.
Enter the content value that you want to match. For *FORM entries,
137
this should be the formtype you want to match in the spool file. For
*USRDTA entries, this is the user data field and for *FILENAME
entries, enter the spool file name here.
Title
Enter the TITLE (email subject) that you want WebReport/i to use
when the correct match-up is made.
138
Install Kisco PTF Package
WebReport/i supports distribution of program updates remotely via the Internet. When programs in
WebReport/i are updated or program fixes are required, Kisco Information Systems can send the
updates directly to you via the Internet. If needed, we will send E-mail to you with an attached PC
file. This file, when loaded into a folder on your system, can be used to post program updates and
changes to your copy of WebReport/i.
When you receive a PTF update package from Kisco, you will be given an eight character PTF
Package Name. To load and apply the PTF to your system, follow these steps:
Step# Instructions
1.
Create a folder on your system named KISCO. You can do this with the following
command:
CRTFLR FLR(KISCO)
Note: This folder only has to be created the first time you install a PTF.
2.
From a PC that is attached to your system, move the PTF Package file that you received
from Kisco into this folder. If you are not familiar with this process, please check the
following URL at the Kisco website for specific instructions:
http://www.kisco.com/pctoflr.htm
3.
Sign on to any terminal or terminal session as QSECOFR.
4.
Make sure that no WebReport/i functions are in use and that no users are logged into any
WebReport/i menu.
5.
Type the following command:
WEBREPORT/KISPTF
and press the F4 prompt key. You can also choose option #7 from the INSTALL menu.
6.
The command will prompt for two values. The first is the name of the WebReport/i
application library and should not be changed. The second command must contain the eight
character name of the PTF Package File. When both parameters are set, press ENTER and
the PTFs will be loaded and applied to your copy of WebReport/i.
7.
All Kisco PTFs are loaded so that the prior version of any program objects is saved. This
will allow for the effects of a PTF to be reversed at a later time should a defect be identified
in the PTF. This can only be done via direct instruction from a Kisco support representative.
During the PTF installation process, one or two printouts will be created. The first of these will be
the PTF Cover Letter Documentation. The second is optional and, if printed, will be a fresh update
of the additional documentation topics for all WebReport/i changes. Kisco recommends that you
read both documents before starting to use WebReport/i again.
139
Update WebReport/i Directory Info
This menu option can be used to perform a direct update of the information stored in your system
directory into WebReport/i. This update can also happen as a parameter setting in the EREPORT
command. Note that you can call this function directly from your own applications by using the
UPDDIR command supplied with WebReport/i. (Note: This function is only needed if you are
using Email addressing based on your system directory. Normally, this is not the case, this feature
is used for customers who need compatibility with earlier versions of IBM i/OS and WebReport/i.)
Update WebReport Default Settings
This option is used to define several default settings in WebReport/i. This menu option runs the
WEBSET command. When you start this process, the following screen is displayed:
Complete these parameter settings as follows:
Default Sender Address
This parameter is used as the default value when sending
Email to direct internet addresses. It will be used as the
“Reply To” address on all Email messages sent to direct
internet addresses. A valid Email address MUST be specified
here.
Default Sender Name
Enter the default name that you want associated with the
sender of Email messages. (Note: Do not use any slash (‘/’)
characters in this field.)
Default Recipient Name
Enter the default name that you want associated with the
140
recipient of Email messages. (Note: Do not use any slash (‘/’)
characters in this field.)
System Directory Auto
Enroll?
Specifies how you want WebReport/i to handle users
that are not enrolled in the system directory. Certain functions
within WebReport/i use the Integrated File System (IFS). IBM
i/OS requires that a user be enrolled in the system directory
before the IFS can be used. Choose one of the following
values:
*YES If a user attempts to use WebReport/i and they are not
enrolled in the system directory, WebReport/i will
automatically enroll them. We recommend that you
use this setting.
*NO
If a user is not enrolled in the system directory,
WebReport/i will generate an error and the
WebReport/i function will fail.
Application Security Active? Specifies whether you want to use WebReport/i's
optional built-in user profile security. Choose one of the
following values:
No security checking will be done by WebReport/i and
any user profile on your system will be allowed to use
the product.
*YES WebReport/i user profile security is active. To use the
product, a user profile must be enrolled using option
#15 on the INSTALL menu.
*NO
Default Message Text
Enter the default value you want to use when the *DFT
parameter is used for your optional email message text.
Default WRKWEBSPLF
View
Controls the starting view used when the WRKWEBSPLF
command is issued. Choose the value you prefer.
Email transmit error action
Used to describe how you want WebReport/i to handle Email
transmission errors encountered in the actual TCP/IP send
routine. Choose one of the two following options:
*HALT
This is the recommended setting. You should
use this setting when you are setting up and
configuring WebReport/i email. When set to
this value, transmission errors will halt with
error diagnostic information issued.
*LOG
You should only consider switching to the
*LOG option after discussing this with Kisco
support staff. When set to *LOG,
transmission errors will be logged to the
WebReport/i activity log and processing will
continue with the next message. This setting is
NOT recommended.
141
Output que for *INT
*OUTQ use
When you use the email destination *INT to route a report to
a variety of destinations (email, fax, etc), one of the options is
*OUTQ in the #EMAIL output directive statement. When you
specify this, WebReport/i will use the output queue specified
here and the final destination for the selected report segment.
The output queue entered here must be accessible from the
*LIBL library list.
*INT *OUTQ action
When you use the special #EMAIL output directive (see
above) of *OUTQ, this setting controls whether the specified
report segment(s) will arrive at the output queue on hold or
released.
Choose one of the following values:
*HLD - The report segment will be placed in the
output queue on hold.
*RLS - The report segment will be placed in the output
queue in ready status available for immediate
printing.
Output queue security
This setting controls how you want WebReport/i to enforce
IBM i/OS security on the output queues used by the software.
Choose one of the following values:
*NONE
*IOS
Default Email Command
This is the default value and represents how
WebReport/i enforced output queue security
before this parameter option was added. With
this set to *NONE, no i/OS security setup is
observed and every user will have open access
to every output queue.
Changing this value to *IOS will cause
WebReport/i to honor the output queue security
configuration already set up on your system.
WebReport/i users will only have access to the
output queues that the IBM OS security grants
to them.
This setting controls which command format will be used
when sending email from the WRKWEBSPLF process (option
#4 on the MASTER menu).
Choose one the following values:
EREPORT
The standard EREPORT command format will
be used.
EREPORTA The alternate EREPORTA command format
will be used.
142
Additional setup parameters are available when you then roll up to the following display:
Fill in these additional parameters:
Intranet Lines Roll Factor
Controls the number of detail lines that are presented on each
Report Intranet panel in your browser session. A default value
of 20 is shipped with the software. Make sure that you enter all
three characters as numerics.
Intranet Title
This field is displayed as a heading when the reports in the
Report Intranet are shown to your users.
Use SMTP If Available
Choose one of the following values:
*YES When specifying destination addresses from the system
directory, use the SMTP equivalent if it is available.
*NO
When specifying destination addresses from the system
directory, do not use the SMTP address. This option is
available for backwards compatibility with outbound
Email transmissions. Using the *NO option will force
WebReport/i to send Email to system directory
destinations using the method from Release 2 and
143
earlier of WebReport/i.
Internal SMTP Debug On?
Choose one of the following values:
*NO
The recommended default value. No special SMTP
trace reports will be generated when sending reports as
Email attachments.
*YES When set to *YES, a short print spool file named
QPRINT will be created every time a report is sent as
an Email attachment. You can use this when
debugging configuration problems.
144
WebReport/i Configuration Wizard
WebReport/i includes a configuration utility that will walk you through the configuration
requirements in IBM i/OS. Using the Configuration Wizard, we do most of the work for you.
Important Note: If you have just installed WebReport/i and have already been using your system to
send email messages, Kisco recommends that you not run the Configuration Wizard until such time
as you have already tried the email functions in WebReport/i. Most systems are already configured
sufficiently for email processing and running the Wizard could change settings on your system
adversely. If you are unsure about this, we recommend that you contact our support staff before you
proceed.
If you decide to use the Configuration Wizard, the following section describes how to use it.
The Configuration Wizard is found on the INSTALL menu where you will find two new menu
options. Menu option #10 will run the Wizard in test mode and option #11 will run the Wizard in
post mode. Test mode will collect the various configuration information from you and verify that it
is correct and working. Post mode will re-verify the information and then do all of the required
configuration work on your system.
When running the Configuration Wizard, you must be signed on with a user profile that has security
officer status and is authorized to perform system I/O configuration. The Wizard will verify that a
proper user profile is being used before it runs.
We recommend that you run the Configuration Wizard in test mode first. This will step you through
entering the configuration elements and it will store them for all future configuration work. After
everything has been entered and tested successfully, you can then perform the Configuration Wizard
posting run.
Before you start, you should gather the following information:
1
The IP address of your Internet Router
This is the address of the point where your network connects to the Internet.
2
The IP address of your Mail router
This is the address of the server that processes your E-mail. It can be the same
address as your iSeries, in which case the Configuration Wizard will optionally
activate the POP3 server on your IBM i.
3
The IP address of your iSeries
If your iSeries is already using TCP/IP, you should already have this information in
place. Go to the CFGTCP menu and run option #1 to obtain this value.
4
The Host Name and Domain Name of your iSeries
If your AS/400 is already using TCP/IP, you can get this information from your
system. Go to the CFGTCP menu and run option #12 to obtain these two values.
5
The IP address of up to 3 DNS servers
145
You should specify at least 2 of the three addresses that are available. This
information is generally available from your Internet Service Provider (ISP).
When you run the Configuration Wizard, each of the above pieces of information will be requested.
As you enter each value, the Wizard will perform an edit and verification on the value supplied. If
any given value fails, the Wizard will advise of the fact and stop to allow you to make corrections.
Once a value has been verified and accepted, the Wizard will go on to the next value. When all
values have been entered and verified, the Wizard will let you know that the configuration is
complete and accepted.
Some installations using a firewall may have disabled the ability to use the PING command to
locations outside of your own network. If this is the case, you will need to let WebReport/i know
that pinging to outside system locations is disabled on your network. You can do this by processing
the following command on your system:
CHGDTAARA DTAARA(WEBREPORT/CONTROL (162 8)) VALUE(*PINGOFF)
Once you have an accepted configuration, you can then run the configuration Wizard in Post mode.
The information will be recalled from your test run and re-verified. Assuming that the verification
still holds, the actual configuration changes will be made to your system.
Note: the Wizard is depending on a series of successful PING operations to verify the addresses
supplied. Each ping operation repeats a series of five pings. If any one of the five pings results in a
failure, then the Wizard will report a problem to you. If you have provided what you believe to be
good addresses and you get a failure, we recommend that you repeat the operation with the same
values to see if it will work on a second attempt.
After the Post mode run is complete, you will have to reset the TCP/IP environment on your iSeries
before all of the changes are recognized by your system. Ending and restarting TCP/IP will
accomplish this, but it may not be feasible while your system is in productive use by your users. If
this is the case, and you already have TCP/IP active and running on your system, you will probably
be able to get your system to recognize the changes made by the Configuration Wizard by entering
the following sequence of IBM i/OS commands:
1
2
3
4
5
ENDTCPSVR *SMTP - ends the current SMTP server function
ENDTCPSVR *POP - ends the current POP3 server function (only if you plan to use
this function on your iSeries)
Wait for servers to shut down - 30 seconds is enough time on most systems
STRTCPSVR *SMTP - restarts the SMTP server function
STRTCPSVR *POP - restarts the POP3 server function, if you are planning on using
it
If you do not want to use the Configuration Wizard, we recommend that you review the
configuration PowerPoint presentation that is available from the install CD or from our website.
This will help you step through the configuration steps manually.
146
SMTP Journal Tracing
When using WebReport/i to send reports via email, the software works with the SMTP server in the
IBM i/OS. When there are problems, there is a trace function available that is not always easy to set
up and use. WebReport/i has implemented a command for this purpose that you can use. The
command is SMTPJRNL and can be run using option #12 from the INSTALL menu. Using this
feature, you can start SMTP journaling on your IBM i, end SMTP journaling and then view the
SMTP journal information in a database file.
This feature is implemented so that you can trace activity in the SMTP server function in IBM's
i/OS. It is provided to help customers diagnose situations where WebReport/i runs correctly but the
email is not getting delivered. This process will at least show you that the email message was
picked up by the SMTP server in the i/OS and may provide additional diagnostics at that level.
When you start the feature from the INSTALL menu, it will prompt the command and show on your
display as follows:
The parameter values do the following:
*ON
activates SMTP journaling on your system
*OFF
deactivates SMTP journaling on your system
*VIEW
extracts journal information into a database file and displays it on your
terminal session
147
To use this feature, we recommend the following sequence:
1.
Activate SMTP journaling by using the *ON function.
2.
Run the email process that you are having trouble with. Or, if you have SMTP functions
looping, just activating the journal will start capturing information.
3.
Let the journal process run for a few minutes to gather information from the server.
4.
Deactivate SMTP journaling by using the *OFF function. We recommend that you normally
keep SMTP journaling off to avoid resource usage.
5.
Run the *VIEW function to extract the journal information and show the database file on
your session. Go to the bottom of the displayed file and window right to see the diagnostic
information that is most helpful. The database file created is named QZMF and is stored in
the QTEMP library for your terminal session.
We have found that by scrolling to the right on the database display, you can locate specific tracing
functions to see what is happening with email messages that have been submitted to SMTP from
WebReport/i. If you have difficulty interpreting the information, contact Kisco Information
Systems support.
148
User Profile Security Maintenance
When you specify *YES for Application Security Active in the WEBSET parameters (option #9 on
the INSTALL menu), then individual user profiles must be enrolled in WebReport/i before they can
use any of the features of the software. Option #15 on the INSTALL menu is used to maintain the
user profiles that are enrolled in WebReport/i. When you start this option, the following will be
displayed to show you the list of users already enrolled. You must have security officer clearance to
use this menu option.
From this display, you can choose the following options:
F6
Will present a blank screen to add a new user profile to the list.
Opt 2 Will let you update an existing entry.
Opt 4 Will let you delete an existing entry. Once deleted, that user will no longer
have access to WebReport/i.
Opt 5 Will let you view the user profile information for the selected user.
149
When you choose to add or update a user profile, the following screen will be displayed:
Enter the user profile name you want to specify and then select the following two additional
information fields:
Authorization code
Select one of the following values:
1 - Both - The user will be allowed to send Email and to
process HTML conversions.
2 - Email - The user will only be allowed to send Email.
3 - HTML - The user will only be allowed to process HTML
conversions.
9 - Exclude - The user profile will not be allowed to process
anything using WebReport/i.
User Type
Select one of the following values:
U - the user is an end-user and can process reports according
to the above authorization, but they cannot set up routing
rules, make changes to the WebReport/i Address Book,
process settings changes or use the Configuration Wizard.
A - the user is a WebReport/i Administrator and can perform
all functions within the product.
Security checking in WebReport/i supports both user profiles and group profiles. Using the Exclude
option, you can authorize an entire group but then enter an exclusion entry for a specific profile
within the group to prevent that user from having access.
150
If you choose to activate the security option, make sure that you authorize the user profile that starts
the automatic routing option to avoid problems. Also, make sure that you have the user profiles all
setup before activating the option from the WEBSET command.