1
e.
f.
g.
h.
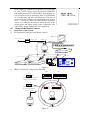
the front part means optical multiplication while the rear part means digital
multiplication.
Description of Electronic Shutter: it is fixed on 1/50 sec after initialization when the
camera is switched on, and the digital 50 appears on the screen.
Setup of Image Effect: the camera works on OFF state under normal condition and
no image effect symbol appears on the screen. When “B&W” appears on the screen, it
means the camera is on black and white state.
AE Mode: setup of Manual/Automatic.
Zero Illuminance: It is used only when the external brightness is extremely low.
Normally the camera works on the automatic state. In case the external brightness is
lower than 1Lux, the camera can be switch to the Zero Illuminance state automatically
and icon
appears on the screen. You can also set the Zero Illuminance state
manually.
III. Setup of the Menu of the Dome Camera
Basic Operation of the Menu
1.1 Open the main menu of the setup by the control keyboard or by the matrix via the
operation “Call No. 64 preset position”.
1.2 When the menu is displayed on the screen, operate “TILT UP”, “TILT DOWN” to move
the cursor to the option to be set, operate “PAN LEFT”, “PAN RIGHT” to modify the
content or the order to enter this option.
1.3 Keep the joystick in one direction for over 1 second to speed up operation.
1.4 All setups on the menu couldn’t be lost even power failure happens.
1.5 Special utilizations can be seen on the descriptions of functions of the menu in detail.
2. Setup of the Menu
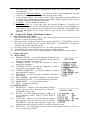
2.1 MAIN MENU
2.1.1 DISPLAY SETUP: to enter the submenu of display of the
screen by which ID display, title display of preset point and
display of camera screen can be set.
2.1.2 CAMERA SETUP: to enter the submenu of setup of
normal data of camera.
2.1.3 CONTROL SETUP: to enter the submenu of setup of
control data over the dome camera.
2.1.4 CAMERA MASK SET: to enter the submenu of setup of
mask function of camera.
2.1.5 PROGRAM: to enter the setup of enhanced function of
dome camera.
2.1.6 PAL CAMERA: PAL/NTSC switching to suit the camera.
2.1.7 CAM DEFAULT SET: to reset default setup of camera.
2.1.8 DOME RESET: to reset the dome camera.
2.1.9 EXIT: to quit the main menu.
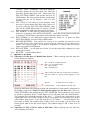
2.2 DISPLAY SETUP
2.2.1 ID DISPLAY: when it is set at ON, address of dome
camera appears on the screen such as “CAM 001”.
The default setting is ON.
2.2.2 ID POS: to set the display position of address on
one of following corners: TOP-L, TOP-R, BOTT-R
and BOTT-L.
2.2.3 TITLE DIS: when it is set at ON, the title of preset
point appears on the left of screen such as "NO.001
ABCDEFGH” when the preset point is called. The
modification of title of preset point is set on PROGRAM option.
2.2.4 TITLE POS: to set the display position of title of preset point from Line 1 to Line 10.
Line 1 is at the top of screen.
1.
3