1
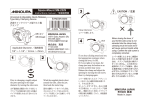
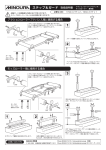
PEAK SENSOR KIT INSTALLATION AND USER’S
GUIDE
Model ITS-2 | WebRacing™ Ltd.
Contents
PEAK Sensor Kit Checklists ............................................................................................................... 3
Components Checklist ................................................................................................................. 3
Recommend Installation Items .................................................................................................... 4
Optional Accessories (Sold Separately) ....................................................................................... 5
System Requirements .................................................................................................................. 5
Hardware Installation ...................................................................................................................... 5
Bicycle Trainer or Roller ............................................................................................................... 5
Exercise or Spin Bike .................................................................................................................... 7
Rowing Machine .......................................................................................................................... 8
Serial “COM” Port Configuration ................................................................................................... 10
USB Port Configuration .................................................................................................................. 11
Heart Rate Setting.......................................................................................................................... 11
Software Installation...................................................................................................................... 12
Trouble Shooting Tips .................................................................................................................... 12
Equipment Circumference Settings for Exercise Bikes .................................................................. 13
Equipment Settings for Trainers .................................................................................................... 15
Limited One Year Warranty ........................................................................................................... 17
PEAK Sensor Kit Checklists
The PEAK Sensor Kit by WebRacing™ Ltd. allows you to connect your stationary bike,
trainer or rowing machine to the NetAthlon software on your home computer. Before you
proceed with installation, you should keep in mind these notes to enjoy your exercise
experience:
1. Consult with your physician before beginning this or any new exercise program.
2. Stop exercising immediately and pursue medical attention if you experience
medical symptoms during your workout.
3. Keep your exercise room well ventilated with a circulating fan or large open
window.
4. Warm up before your workout and cool down after your workout to prevent
muscle injuries.
5. Inspect your stationary trainer to determine if it is on a solid base, your front
wheel is level and rear wheel adjustment knobs are secure.
6. Stay hydrated by taking frequent water breaks during your workout.
7. Place towels around your stationary trainer to keep sweat away from your floor.
The following checklists ensure that you have the proper parts and computer settings to
simplify the PEAK Sensor Kit installation process.
Components Checklist
This list represents the components that should arrive with your PEAK Sensor Kit order:
o
Digital Signal Processor/ITS Box (1)
o
Box features 3.5 mm stereo jacks for speed (SPD), cadence (CAD) and
heart rate (HR) along with an RJ1 1 PC Jack and RJ45 auxiliary (AUX)
jack.
o
Round Tube Adapter (1)
o
Rubber Ladder Strap (2)
o
o
o
Serial Cable (1)
o
Sensor Holder (2)
o
Speed Sensor with Cable (2)
o
Wheel Magnet with Velcro Pad
(1)
Rubber Pad (2)
Self Tapping Screws (2)
Recommend Installation Items
This list includes all items outside of the PEAK Sensor Kit parts needed to complete
installation:
o
Electrical Tape
o
Duct Tape or Wire Ties for Speed Sensor Cables
Optional Accessories (Sold Separately)
This list features accessories that can enhance your experience with the PEAK Sensor
Kit and WebRacing™ Ltd. software:
o
Heart Rate Monitor Strap
o
Heart Rate Receiver
o
Serial to USB Dongle Kit (for computers with USB ports and no serial ports)
System Requirements
Your computer will need to meet the following requirements for the PEAK Sensor Kit and
NetAthlon 2/2XF software to function properly:
Minimum
o
Pentium 4 CPU
o
256 MB RAM
o
DirectX 9-compatible graphics card with 64 MB graphics memory
o
Windows XP
Recommended
o
Pentium 4 CPU
o
512 MB RAM
o
NVidia or ATI graphics card with 256 MB graphics memory
o
Windows XP
Hardware Installation
The instructions for installing the PEAK Sensor Kit vary depending on your training
equipment. We support a variety of bicycle trainers, exercise bikes and rowing machines
through our NetAthlon software. Use the following instructions to assemble the PEAK
Sensor Kit and optimize NetAthlon settings for your training equipment.
Bicycle Trainer or Roller
1. Install bike on trainer or roller. For trainers, adjust the tension so that the wheel is
stable.
2. Attach the spoke magnet to your trainer. Remove the screw from the magnet,
attach the magnet to the spoke on the left side of the wheel about 2” from the
rim. Replace screw into the magnet and tighten. The magnet should face the left
side of the bike.
3. Place the magnet sensor on your trainer. Affix the rubber pad under the sensor
bracket and against the frame. Install the sensor bracket facing left so sensor tip
is within 1/4” of the magnet. Attach the rubber ladder strap to the bracket
securely. Run the sensor cable toward the trainer with electrical tape while
keeping the cable away from any moving components.
Magnet on wheel spoke, sensor on
trainer frame
4. Use two small pieces of self-adhesive Velcro to attach the Digital Signal
Processor/ITS Box to the bike frame. You should use the following criteria to
choose a location on the frame:
a. Near the sensor wires
b. Away from moving parts
c. Away from the peddling mechanism
5. Connect the round tube adapter to the Digital Signal Processor/ITS Box if you
have a Cycle Ops or Blackburn trainer with a rounded frame. This connection
can be done using the two Phillips screws provided in the package.
6. Plug the speed sensor into the Digital Signal Processor/ITS Box space labeled
SPD.
Sensor plugged in SPD jack of ITS Box
7. Insert the telephone end of the serial cable into the PC jack on the Digital Signal
Process/ITS Box.
Serial cable plugged in PC jack of ITS
Box
8. Start your NetAthlon software and use the System Settings menu to format for
your training equipment including wheel circumference and COM port.
Exercise or Spin Bike
1. Find a location on the bike’s frame or housing where the sensor can be close to
the magnet on the pedal arm. The bottom and the rear of the bike are good
locations to avoid interference with moving parts or your feet.
Wheel magnet on pedal arm of exercise bike
2. Install the magnet by removing the Velcro backing and pressing the sensor into
place on the pedal crank.
3. Slide the magnetic sensor onto the sensor holder. Rotate the pedal arm so that
the pedal magnet is near the position where the sensor will be placed. Check that
this location is away from moving parts and that the sensor and its cables will not
be damaged by moving parts in regular use. The sensor must be within 1/4” of
the magnet when the pedal arm is in motion.
4. Secure the sensor holder to the frame using the ladder strap. Route the wire to
the Digital Signal Processor/ITS Box and plug it into the jack labeled CAD. Check
the placement of the cables so that they do not disrupt operation of your trainer.
Sensor plugged in CAD jack of ITS Box
5. Start your NetAthlon software and use the System Settings menu to format for
your training equipment including wheel circumference and COM port.
Rowing Machine
1. Start installation by mounting the magnet on the moving seat using the included
Velcro backing.
Wheel magnet on seat of rowing machine
2. Position the speed sensor on the machine frame with electrical tape so that it can
pick up the magnet’s signal with each motion. The magnet and sensor must be
¼” apart from each other as the seat is in motion. A recommended location for
the sensor is at the midway point of the rail. The sensor location should keep the
sensor wires away from any moving parts.
Speed sensor installed along machine frame
3. With the magnet and sensor installed, start NetAthlon Rowing/Kayaking software
and click System Settings.
4. Click Exercise Equipment and choose your brand of rowing machine.
5. Enter 5,000 into the Wheel Circumference field and click Save to keep your
changes to system settings.
6. You may need to return to the Exercise Equipment option to adjust the Wheel
Circumference depending on the responsiveness of the sensors. If your avatar is
rowing too slowly, you should increase the Wheel Circumference and vice versa
if your avatar is rowing too quickly.
Serial “COM” Port Configuration
A COM port or communications port is a device on your computer that provides for input
and output of serial data. Serial data transmits and receives within limited lines with your
mouse acting as a good example of a serial device. Each COM port uses one port
address and one IRO channel. A port address is an address at which the CPU can find a
certain device. Every device on your computer probably has a port address to expedite
communications between the device and the CPU. The Interrupt Request Channel (IRO)
is used by the device to request time from the CPU. In essence, the IRO channel allows
a device to get the CPU’s attention if processing time is required.
Given this background, you should be aware of how your COM ports are used before
installing the PEAK Sensor Kit. The PEAK Sensor Kit requires a free DB9 serial COM
port or USB port for data transmission. You might encounter a device conflict when you
have multiple devices plugged into COM ports. For example, you may have problems
running the system on COM3 if you have a mouse in COM1 due to IRO channel sharing.
This example extends to IRO conflicts between COM2 and COM4. One way to get
around this issue is to use a wireless mouse and keyboard to free up your COM port for
the PEAK Sensor Kit. You can also choose consecutive COM ports for your mouse and
your equipment to avoid conflicts (i.e. COM1 for the mouse, COM2 for the equipment).
Your computer may feature two serial ports in the back of the tower along with a PS/2
port. One of these serial ports may not be configured while the other port might be used
for an external modem. Your mouse should be connected to the PS/2 port in this
scenario while your modem should be removed from the configured port. Insert the
PEAK connector into the now-vacant serial port.
You can check which COM port is used by your modem to avoid device conflicts:
1. Right-click on My Computer.
2. Select Properties.
3. Expand the Modem menu.
4. Left-click on your modem.
5. Click on Properties.
6. Select the Modem tab and look at the Port section to find the COM port.
After determining available COM ports, you can proceed with connecting the PEAK
Sensor Kit to your computer:
1. Connect the speed sensor line to the Digital Signal Processor/ITS Box jack
labeled SPD.
2. Install the serial cable’s telephone connector into the PC jack in the Digital Signal
Processor/ITS Box.
3. Route the serial cable to the PC while making sure that the cable does not
interfere with moving parts and pedals.
The variations in home computers mean that we will not provide any technical support in
setting up serial COM ports. We also do not recommend adjusting advanced settings if
you are not experienced in manipulating COM ports. These questions and concerns
should be forwarded to a qualified computer technician.
USB Port Configuration
The easiest way to connect your training equipment to a PC is to use a standard USB
connection. You will need a Serial to USB dongle to accomplish this task, which can be
ordered at http://www.riderunrow.com. The dongle comes with a USB driver CD with
step-by-step instructions on screen so you can install the driver properly.
After the USB drive installation is complete, you can use the PEAK Sensor Kit by simply
connecting the Digital Signal Processor/ITS Box to the USB port with a USB cable. You
should check your computer for the right COM port for your exercise equipment by:
1. Right-click on the My Computer icon.
2. Select Properties.
3. Click Device Manager within Properties.
4. Expand the Ports (COM & LPT) menu.
5. Locate the correct COM port for your USB port.
6. Open NetAthlon and select System Settings.
7. Click Equipment Settings and choose the appropriate COM port.
Heart Rate Setting
The PEAK Sensor Kit and NetAthlon software can measure heart rate using the Polar
HR wireless receiver. This receiver can be connected to the same Digital Signal
Processor/ITS Box used for the speed and cadence sensors. Plug the Polar HR wireless
receiver into the HR input on the Digital Signal Processor/ITS Box.
The receiver should be compatible with all transmitter belts using the 5khz frequency.
We can only guarantee this frequency for the Polar HR wireless receiver. You can
purchase the Polar HR receiver and enhance your exercise experience by visiting
http://www.riderunrow.com.
Software Installation
1. Start downloading the NetAthlon software using the CD-ROM sent by mail or the
.exe file sent by email. Follow the prompts to advance through the InstallShield
and the Medical Disclaimer and License Agreement. The simplest approach to
installation is to select the normal optimization process for NetAthlon. If you
encounter problems with installation, you can choose custom optimization to
reinstall missing courses and features.
2. Restart your computer after installation.
3. Launch your NetAthlon software and click on System Settings and then Exercise
Equipment. Choose your brand of exercise equipment and the correct COM port
for your equipment. Enter the wheel circumference settings for your trainer as
detailed in the section entitled Equipment Circumference Settings for
Exercise Bikes.
4. Click Sound Settings in System Settings to turn off all sounds if you do not have
a sound card. The program will freeze up if you do not complete this step.
5. Select Main Menu at the bottom left side of the screen and scroll through
available courses. Choose Live Racing or Race Now to start racing on these
courses.
6. Review the User’s Manual for your NetAthlon software to learn more about
program feature. The Manual can be accessed by clicking the ? icon within the
Main Menu.
Trouble Shooting Tips
During the installation process for the PEAK Sensor Kit, you may encounter a few
technical issues. The following tips are based on the most common issues that our
customers face when installing the system:
1. The program will not start after installation of NetAthlon software.
Start by opening NetAthlon software and clicking System Settings. Turn off the
sound in the Sound Settings subsection if you do not have a sound card. Turn off
the sound and turn the sound back on if you have a sound card. If this does not
work, restart your computer and open NetAthlon in demo mode. Our software
requires DirectX, an Application Program Interface (API), to access exercise
equipment and sensors. Ensure that you have DirectX properly installed on your
PC and the latest driver for your 3D accelerator card before you contact
NetAthlon Technical Support at [email protected].
2. My graphics are not optimal after installation of NetAthlon software.
Any visual anomalies seen in NetAthlon might be caused by an outdated 3D
accelerator driver. You may need to get an updated driver from the manufacturer
of your 3D accelerator card if NetAthlon runs slow or does not run at all. Check
the manufacturer’s website to find driver updates and download the latest
updates to your computer.
3. My rider does not move on the screen even though I am peddling.
This issue is likely caused by an incorrect COM port configuration. Check all
cable connections and inspect the magnets so that they are close to the sensor.
Look at your COM port settings as well before contacting Technical Support.
Equipment Circumference Settings for Exercise Bikes
The onboard cycle computer on your exercise bike is responsible for tracking
performance metrics like speed, distance and total time. You need to determine the
circumference of your bike’s wheels to receive accurate performance information.
Please follow the procedure below to synchronize the NetAthlon software with your
exercise bike’s onboard computer through the sensor kit:
1. Attach the magnet to the pedal and the sensor to the bike frame with the sensor
tip at least ¼” away from the pedal magnet.
2. Insert the sensor’s 3.5-millimeter plug into the CAD jack on the CycleFX sensor
box.
3. Start a NetAthlon 2/2XF session.
4. Choose the US Standard form of measurement by clicking Personal Profile and
Units to read your speed in miles per hour.
5. Take out a writing utensil and paper to record RPM readings from your computer
and your onboard cycle computer.
6. Operate your bicycle at 70 RPM, 80 RPM and 90 RPM and record the MPH from
your onboard cycle computer.
7. Calculate the average MPH by adding the three speeds from your tests and
dividing by three. Use the same formula to calculate average RPM.
8. Use the formula average MPH/average RPM x 1056 to get the circumference of
your bike wheel.
a. The circumference determined by this formula may seem far too high for
your wheel. If your average MPH and RPM rates are calculated correctly,
the circumference should be accurate. The resulting number represents
the conversion of pedal speed to land speed, which takes into account
gear shifts and other criteria.
9. Remove the plug from the CAD jack and insert into the SPD jack.
10. Your onboard cycle computer should be synchronized to the NetAthlon software.
Bicycle Wheel Circumference for Equipment Setup
Tire Size
Inches
Millimeters
700 x 38c
85.8
2180
700 x 35c
85.4
2168
700 x 32c
84.8
2155
700 x 28c
84.1
2136
700 x 25c
82.9
2105
700 x 23c
82.5
2096
700 x 20c
82.1
2086
700 x 19c
81.9
2080
700 x 18
81.5
2070
650 x 38b
83.1
2110
650 x 38a
83.5
2120
650 x 35a
82.3
2090
27 x 1 3/8
85.4
2169
27 x 1 1/8
84.8
2155
27 x 1
84.6
2150
26 x 2.35
81.9
2080
26 x 2.125
81.7
2075
26 x 2.1
81.5
2070
26 x 2
81.1
2060
26 x 1.95
80.7
2050
26 x 1.75
79.5
2020
26 x 1.5
78.3
1990
26 x 1.4
78.7
2000
26 x 1 ½
82.7
2100
26 x 1 3/8
81.5
2070
26 x 1.25
76.8
1950
26 x 1
75.2
1910
Equipment Settings for Trainers
The proceeding information about stationary trainers was determined through extensive
lab testing. We used the Power Tap from Tune Corp. as the source for torque and watts
measurements where watts equal torque multiplied by speed. Each trainer was used for
20 minutes before official testing in order to get the trainer’s resistance unit to a standard
riding temperature. Measurements were taken at intervals of 15, 17.5, 20, 22.5 and 25
MPH. The 25 MPH limit on your testing means that your onboard cycle computer’s watt
measurements will remain at 25 MPH levels even if actual watts increase.
Wheel press-on force, tire air pressure and resistance unit temperature play an
important role in the accuracy of your data. This information may vary if you use the
Power Tap on your stationary trainer. The watts information is for reference purposes
and the accuracy of our testing is within plus or minus 15%. If you are not satisfied with
the data or using a trainer not listed below, choose “not set” in the System Settings for
NetAthlon. You may have a Mag trainer that uses a handlebar mounted resistance
control lever. You should choose “not set” or a middle setting if you want to change
resistance frequently on a Mag trainer.
Resistance Types for Stationary Trainers
Number
Not set
Manufacturer
-
Model
-
Resistance
-
101
Cycleops
Wind
N/A
102
Cycleops
Fluid
N/A
103
Cycleops
Fluid Plus
1
104
Cycleops
Fluid Plus
2
105
Cycleops
Fluid Plus
3
106
Cycleops
Fluid Plus
4
107
Cycleops
Fluid Plus
5
108
Cycleops
Mag
1
109
Cycleops
Mag
2
110
Cycleops
Mag
3
111
Cycleops
Mag
4
112
Cycleops
Mag
5
113
Cycleops
Mag
6
114
Minoura
Mag
1
115
Minoura
Mag
2
116
Minoura
Mag
3
117
Minoura
Mag
4
118
Minoura
Mag
5
119
Minoura
Mag
6
120
Minoura
Mag
7
121
CyclePro
Mag
Low
122
CyclePro
Mag
Middle
123
CyclePro
Mag
High
124
C-Force
Centrifugal
N/A
125
Elite/Performance
Fluid
N/A
126
Elite/Performance
Mag
1
127
Elite/Performance
Mag
2
128
Elite/Performance
Mag
3
129
Elite/Performance
Mag
4
130
Elite/Performance
Mag
5
131
Elite/Performance
Mag
6
132
Elite/Performance
Mag
7
133
Elite/Performance
Mag
8
134
Blackburn Defender
Mag
1
135
Blackburn Defender
Mag
3
136
Blackburn Defender
Mag
5
137
Tacx
Mag
1
138
Tacx
Mag
4
139
Tacx
Mag
7
Limited One Year Warranty
This product is protected for a period of one year against defects in materials and
workmanship, effective from the date of purchase to the original purchaser. The
manufacturer will repair or replace any defects due to materials or workmanship. The
manufacturer of this product shall not extend the warranty to:
1. Any failure or malfunction of the product due to any modifications made to the
product
2. Damages resulting from misuse of product
3. Damages not attributable to a defect in workmanship or material
The customer is responsible for properly packing the defective product for shipment and
for the cost of shipment back to the company. The company will ship the repaired or
replaced product back to the customer. The manufacturer shall not be liable for any
consequential or incidental damages in connection with the purchases, use or handling
of this product. Some states do not allow the exclusion or limitation of consequential
damages and the above limitation may not apply to you. This warranty gives you specific
rights, and you have other rights which vary from state to state.
Before returning a product for repair or replacement, a Return Merchandise
Authorization number (RMA) must be obtained from the company. The RMA can be
obtained by email at [email protected]. Please having the following information
available when obtaining the RMA:
1. Date of purchase
2. Place of purchase and serial number
3. Email receipt (helpful but not required)
The RMA number must be clearly displayed on the outside of the package. Please refer
all software technical support to [email protected].