1
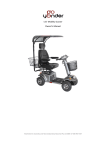
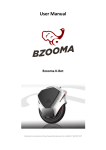
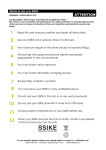
Owner’s Manual
‘Raven’
Marketed in Australia and New Zealand by Bzooma Pty Ltd ABN 37 640 907 507
TABLE OF CONTENTS
Table of Contents............................................................................................................................................... 1
BZOOMA PTY LTD .............................................................................................................................................. 2
Manufacturing Company Profile ....................................................................................................................... 2
General Cautions & Maintenance ..................................................................................................................... 2
Assembly Of Raven ............................................................................................................................................ 3
Charging The Battery ......................................................................................................................................... 4
Important Tips While Riding .............................................................................................................................. 5
Tips For Parking.................................................................................................................................................. 6
Operating Bicycle ............................................................................................................................................... 6
Continual Mileage .............................................................................................................................................. 8
Basic Maintenance ............................................................................................................................................. 8
Diagnose And Troubleshooting ......................................................................................................................... 9
Recommended Torque Values For Threaded Fasteners ................................................................................. 10
Wiring Diagram For Raven With 3 Speed Display............................................................................................ 10
Wiring Diagram For Raven With LCD Display .................................................................................................. 11
Battery Maintenance ....................................................................................................................................... 11
Useful Tips........................................................................................................................................................ 11
Technical Specifications ................................................................................................................................... 13
1
BZOOMA PTY LTD
This User Manual is written and published according to the latest BZOOMA PTY LTD specifications. We
will continue the policy of improvement and may make some changes in the design and specifications
without notice. If you have any enquiries, please contact your local dealer or buy directly from this web
site bzooma.com.au. Delivery will be via your nearest Bzooma dealer.
This manual is published by Bzooma Pty Ltd.
MANUFACTURING COMPANY PROFILE
Bzooma’s partner, Changzhou FUJIANG Vehicle Co., Ltd. China, specialises in manufacturing E-bikes.
They qualify for ISO9001 international quality system certification’ and ISO14001 environment system
certification. This is achieved through having experienced designers, engineers, and employment of
advanced testing equipment. It is by this combination that they can deliver innovative high quality
products, at such a competitive price.
GENERAL CAUTIONS & MAINTENANCE
•
Fully charge batteries before use
•
Read manual and check condition of bicycle before riding (brakes, lights, tyre pressure etc)
•
Please do not disassemble or repair without technical assistance from an authorized dealer using
only original parts. A poorly performed maintenance can cause damage and/or accident.
2
ASSEMBLY OF RAVEN
Handle Bars
•
•
Tighten handlebar stem using a spanner
Press the rubber after tightening
3
CHARGING THE BATTERY
The vehicle battery must be recharged when finished or running low. You can charge the battery either
assembled or removed from the bicycle.
•
•
Remove the battery case using the key
Remove the battery by pulling the battery handle
4
With the battery removed
1. When the battery is removed, do not touch the ‘+’ and ‘–‘ contacts, especially with wet hands
or metallic objects
2. Ensure the battery is not in the inverted position while charging
3. Place the charger in a flat, secure place and connect the output plug (24V/36V terminal) to the
socket in the battery box
4. Connect the input plug (110v/220v terminal) to the power outlet and the charging will start
5. After the charging has finished, unplug the input plug
6. Then unplug the output plug
When the battery is charging on the bike
1. Switch off the power and remove the key
2. Remove (rotate to open) rubber stopper in the charging hole. Plug in the output plug (24v/36v
terminal) of the charger to the socket of battery box.
3. Plug in power input plug (110v/220v terminal) to household power socket to start charging
4. When finished charging, pull out power input plug
5. Then unplug the output plug
Duration of Charging
•
•
•
•
•
When charging for the FIRST time, the battery will take 8-10 hours
Normal charging will take 2-8 hours
Red light indicates the battery is charging
Green light indicates the battery is full
This device has protection to avoid overcharging and damaging the battery however, it is
recommended that it does not exceed 24hours
IMPORTANT TIPS WHILE RIDING
1. In order to reduce consumption, increase autonomy, and extend the motors lifespan, use the
pedals during the startups and climbs
2. Do not push the throttle too fast. The bicycle should accelerate slowly, reducing consumption
and risk of damage to the electrical system. It is better to use the pedals to help during startups
3. To increase security and reduce power consumption, it is advised to avoid sudden stops and
startups
4. The bicycle controller has a charge overload protection. If on overload, energy will be cut
automatically and restored when it returns to normal
5. While riding, avoid using the throttle as you brake, as it may damage the motor
6. The maximum load is 90kgs. Avoid riding with excessive loads. Do not ride faster than is safe
under the conditions.
5
TIPS FOR PARKING
1. When pushing the bicycle manually, turn off the power, to avoid accidental acceleration and
accident
2. It is recommended to park indoors. Do not forget to switch off the power and remove the key
3. Do not forget to switch off the power and remove the key.
OPERATING BICYCLE
How to start:
6
7
CONTINUAL MILEAGE
BASIC MAINTENANCE
•
•
•
•
•
•
Ensure correct tyre pressure
Tighten and correct operation of both wheels, frame and front fork
Check bell, brakes, reflectors and gear shift operation
If not using the bicycle for a long period of time, charge the battery at least once a month to
avoid reducing its lifespan
Avoid use of abrasive cleaners, clean with soap and water and dry with a cloth
Do not apply lubricant on brakes, brake levers, rims, battery or controller
8
DIAGNOSE AND TROUBLESHOOTING
Symptoms
Possible causes
1
It doesn’t work
1. Insufficient
battery power
2. Faulty
connections
3. Key in wrong
position
2
Irregular acceleration and/or reduced top
speed
1. Insufficient
battery power
2. Loose throttle
magneto
3. Damaged
throttle spring
3
When powered on, the motor doesn’t
respond
1. Loose wiring
2. Loose throttle
magneto
3. Loose or
damaged
motor wiring
plugs
Reduced range
1. Low tire
pressure
2. Low or faulty
battery charge
3. Driving with
too many hills,
headwind,
braking,
departures and
or excessive
load
4. Battery
discharged for
long period of
time, without
regular
charges, aged
or damaged
Most common solutions
I.
Charge the battery
II.
Clean the
connections
III.
Turn the key into the
correct position
I.
II.
III.
Charge the battery
Weld and adjust
Contact an
authorized service
center
I.
Repair and/or
connect
Weld and adjust
Contact an
authorized service
centre
II.
III.
I.
4
II.
III.
IV.
V.
I.
5
6
The battery won’t charge
Driving wheel makes unusual noise
1. Charger not
well connected
2. Battery cases
fuse blown
3. Battery wiring
disconnected
or with a bad
contact
1. Damaged
II.
III.
I.
II.
Adjust the tire
pressure
Check the
connections and/or
fully charge the
battery
Help with the pedals
Replace the battery
Make a prolonged
battery charge
Adjust the
connections
Replace the fuse
Reconnect/repair the
wiring
Replace the bearing
Adjust/replace the
9
motor bearing
2. Bent or
misaligned rim
rim
For your safety, do regular maintenance and tightening checks. If you find any abnormalities, repair
immediately
RECOMMENDED TORQUE VALUES FOR THREADED FASTENERS
No
Parts
Torque required (N.M)
1
Handlebar
18-20
2
Handlebar-stem
18-20
3
Saddle
18-20
4
Seat-pillar
18-20
5
Front wheel
16-25
6
Rear wheel
25-35
7
B.B Parts
35-55
WIRING DIAGRAM FOR RAVEN WITH 3 SPEED DISPLAY
10
WIRING DIAGRAM FOR RAVEN WITH LCD DISPLAY
BATTERY MAINTENANCE
Frequent braking and starting, riding up hill, travelling against a strong wind, starting from a standstill
and riding on rough or muddy roads and carrying more than one person, or heavy loads will consume
extra battery power and shorten the range.
Tips to prolong the battery life:
1.
2.
3.
4.
Frequent braking-try to look ahead and coast rather than stopping and starting frequently.
Riding uphill or against a wind, you should pedal to supplement the battery power.
When starting from a standstill, use the pedals to help bring you up to speed.
When the monitor indicates the battery voltage is low, switch to manual power and avoid using
the battery, so you don’t shorten the battery life.
5. If the battery is being stored, remove the battery from the bicycle and recharge it every month.
USEFUL TIPS
This manual only explains the bicycle’s use and functions and should not be used as reference for its
inspection. The images shown may differ from the actual model presented in the shops. We reserve the
right to change the model without prior notice due to technical improvements. This vehicle has a top
speed limiter. For security reasons, its removal is strictly prohibited.
11
WARRANTY
Bzooma Pty Ltd Limited Warranty
Bzooma Pty Ltd provides this Limited Warranty to the
original purchasers of new Bzooma machines in Australia
and New Zealand.
Bzooma Pty Ltd guarantees the machine, power base
including Motor, Battery and charger, against defects in
materials and workmanship for a period of one (1) year,
from date of delivery to the original purchaser. Damage
caused by accident or obvious abuse is not covered by this
warranty. Warranty does not include the batteries or tyres
as subject to rider taking care and maintenance of the
vehicle.
To make a claim covered by this warranty the purchaser
must contact an authorised BZOOMA Pty Ltd Dealer for
inspection and service. Indications of abuse, accident, or
unauthorised tampering with the machine power base
mechanical, or electrical equipment, will void any claim.
Bzooma Pty Ltd is not responsible for transport costs
associated with obtaining service or repairs under this
warranty.
12
TECHNICAL SPECIFICATIONS
Motor Power
250 Watt Brushless hub motor
Battery
36 Volt 10 Amp Lithium
Derailleur
Outer 6 speed Shimano
Charging Time
From 4 - 6 hours
Life of Battery
Over 1000 charge cycles
Wheel
26” Magnesium
Saddle
Sport type
Top Speed
50 KPH
Range on single charge
Up to 60 Klm
Max. Weight Capacity
90 kilograms
Tyre
Kenda 125
Brake System
Hydraulic disk front and rear
13