1
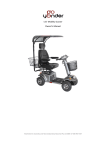
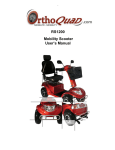
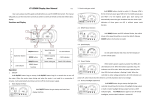
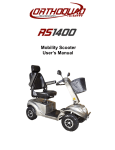
R8S- Mobility Scooter
Owner’s Manual
Marketed in Australia and New Zealand by Bzooma Pty Ltd ABN 37 640 907 507
TABLE OF CONTENTS
Table of Contents............................................................................................................................................... 1
Introduction ....................................................................................................................................................... 2
Bzooma Pty Ltd .................................................................................................................................................. 2
General Cautions ............................................................................................................................................... 2
General Operations ........................................................................................................................................... 2
Brakes ................................................................................................................................................................ 8
Climbing Inclines ................................................................................................................................................ 8
Freewheel Mode ................................................................................................................................................ 9
Control Panel ...................................................................................................... Error! Bookmark not defined.
Precautions During Inclement Weather .......................................................................................................... 10
Charging The Battery ....................................................................................................................................... 10
Maintenance .................................................................................................................................................... 11
Troubleshooting And Repair ............................................................................................................................ 13
Specifications ................................................................................................................................................... 15
1
INTRODUCTION
Your GoYonder scooter is easy to operate,
operate however you will need to read this manual first to
ensure you fully understand the controls of the vehicle. Following that,
tha you must gain
experience in a safe place with practice, in order to ensure your safety when you go traveling.
Bzooma takes pride in improving your quality of life. You should be able to reach all the places
you need to visit in your neighborhood with ease
ea and safety.
Your GoYonder R8-S
S is manufactured to the highest standard of quality possible, and uses the
finest components coupled to the latest technology available. Your safety relies upon your
responsible use of this machine.
Now you can go your own way.
BZOOMA PTY LTD
This User Manual is written and published according to the latest BZOOMA PTY LTD
specifications. We will continue the policy of improvement and may make some changes in the
design and specifications without notice. If you have any enquiries,
enquiries, please contact your local
dealer or visit directly from this web site bzooma.com.au.
This manual is published by Bzooma Pty Ltd
GENERAL CAUTIONS
1. The brakes are electrically operated and they require the power to stop you so don’t turn the
key off while still moving.
2. Go up or down a slope and avoid going across the slope.
3. Turn off the key when not in use.
4. Maintain the pressure indicated on the sidewall of the tyre.
5. Electromagnetic interference may affect the control system of the scooter. Such interference
may be encountered in shops with security controls at the entrance.
GENERAL OPERATIONS
2
(Numbers refer to Figure A)
Key Switch (#1)
The main key switch is located on side of tiller column The
key switch has two positions: OFF: The R8-S cannot be
driven and the EMB is locked.
ON: Power is supplied to the R8-S and the EMB is released
automatically when the throttle control lever is squeezed.
To operate the R8-S, insert the key in the key switch and
turn it to
ON (clockwise). The switch will remain in this position and
the Power indicator will be lit.
Note: The key switch is used to operate the R8-S, not for
locking.
Handlebar
adjustment lever
(#2)
Adjust the position of the handlebars (height and distance)
as follows:
1. Push the handle bar adjustment lever (which locks the
handlebars in place), and move the handlebars to the
position you want.
2. Release the lever to lock the handle bars in place.
Charging Socket
(#3)
Before attempting to drive the R8-S, make sure the plug is
disconnected from the charging socket.
Note: While the plug is in the charging socket, the R8-S
cannot be operated.
Insert the charger plug in the charging socket located on
the right side of the tiller column to charge your scooter.
3
(Numbers refer to Figure B )
(#1)Battery Status
Indicator
The battery status indicator is located on the tiller
panel and shows you the remaining capacity of the
batteries. Like petrol gauges in cars, the indicator is
not absolutely accurate; it is merely a guide to help
stop you running out of power. The accuracy of the
indicator also depends on the age of the batteries.
When the indicator shows 4 bars, recharge batteries
as soon as possible.
When
possible. When the indicator shows 2
bars, recharge immediately
Maintenance LED
(#2)
When the LED is flashing, it blinks the code of the
fault.
4
Speed limit dial
(#3)
The speed limit dial is located on the handlebar
panel.
When the speed limit dial is set to MAX, the R8-S will
drive at approximately 15 km/hr.
When the speed limit dial is set to MIN, the R8-S will
drive at approximately 3 km/hr.
Do not change the speed limit dial setting while the
R8-S is moving.
Note:
Set the speed limit dial to
MIN:
Until you get used to driving your new R8-S, and
When driving the R8-S inside a building or in a
crowded area
High – Low Speed
mode Switch (#4)
Set the maximum speed of the scooter to HIGH or
LOW speed. Use the LOW speed mode when driving
in close and crowded areas.
Throttle control
lever (#5)
To drive: Gently squeeze the throttle control lever
(depending on whether you want to drive forward or
backward) until you reach the desired speed. Your
speed is directly proportional to the deflection of the
throttle control lever.
Note: You can squeeze one side of the throttle
control lever towards you, or you can push the other
side away from you to achieve the same effect. Use
whichever method is most comfortable for you.
To stop: Release the throttle control lever. The R8-S
will stop gradually.
Turning buttons
(#6)
Before you turn, press the applicable indicator button.
When a turn indicator is activated, the applicable LED
will flash.
To turn off the indicator, press the button
again.
Hazard button (#7)
The Hazard button activates the hazard lights (front
and rear blinkers). To turn off the hazard lights, press
5
the button again.
Buzzer button (#8)
To activate the buzzer, push the buzzer button.
Automatic
Freewheel switch
(#9)
Turn ignition key switch to ON then push the button to
engage the freewheel mode, push again for
disengage the freewheel mode. This function allowed
moving scooter manually.
WARNING! Do not press the automatic freewheel
button while the R8-S is moving.
Button for headlight
and rear lights
(#10)
To turn on the lights (headlight and rear lights), press
the Lights button. When the lights are on, the Light
LED is lit. To
turn off the lights, press the button
again.
After stopping
After stopping the R8-S, turn the key switch to OFF
and remove the key. The ON LED will turn off.
Note: The EMB locks automatically when the throttle
control lever is released and the R8-S has come to a
complete stop.
Safe driving
When driving on ramps, high curbs and on sharp
turns, drive very slowly and carefully, preferably with
the speed set to MIN.
When going up or down a
step, always drive so that the wheels are fully
perpendicular to the step and both of the rear wheels
meet the step at the same time.
Never try to go on an obstacle that is more than the
maximum recommended slope or curb height (see
the stabilities and the obstacle climbing specifications
given in specification Sheet) Always drive carefully
and adjust your speed to the road conditions.
Before
making sharp turns, reduce speed to minimum to
prevent side roll-over.
Climbing an
obstacle
To climb an obstacle, drive the R8-S forward toward
the obstacle until the front wheel touches the
obstacle, then, maintaining your direction, increase
6
speed.
Prior to use
After reading through this entire manual and before
using the R8-S, do a visual check of all the parts of
the vehicle, to make sure that there is no visible
damage. If you have any questions or concerns,
contact your dealer.
Controller
programming
Several parameters of the R8-S controller can be
programmed. Programming must be done by trained
authorized technician only. Incorrect programming
can cause abnormal operation of the R8-S and may
result in damage and personal injury.
Prior to use
Before using the Breeze C, be sure you know your
own weight and the weight of any items you will be
carrying on it. The maximum total load is 150kg
(330lbs).
Performance check
A performance check is highly recommended when
you first receive Your R8-S or after a period of not
using the R8-S, as follows:
1. Turn on the key switch.
2. Verify that both the ON LED and the battery status
indicator are lit.
3. Slowly squeeze the drive control lever and verify
that the R8-S travels at a speed that corresponds to
the degree to which you are squeezing the lever.
4. Release the throttle control lever and verify that the
R8-S stops smoothly, and that you hear the click of
the EMB engaging.
5. Check that all the buttons on the dashboard work
correctly.
6. Switch off the key switch.
Your R8-S is now ready to drive.
7
BRAKES
Your R8-S scooter is equipped with two powerful braking systems:
Regenerative: Uses electricity to rapidly slow the vehicle when the throttle control lever returns
to the center/stop position.
Park Brake: Activates automatically after regenerative braking slows
the vehicle to a near stop, or when power is removed from the system for any reason.
CLIMBING INCLINES
Maximum Recommended Incline Angles
When driving up an incline, try to keep your R8-S moving. If you must stop, start up
again
slowly, and then accelerate cautiously. When driving down an incline, set the speed switch to
MIN and drive forward only. If your R8-S starts to move down the incline faster than you want,
allow it to come to a complete stop by releasing the throttle control lever, then push the throttle
control lever forward slightly to ensure a safely controlled descent.
WARNING! When on any incline, never place the R8-S in freewheel mode while seated on it or
standing next to it.
WARNING! When climbing an incline, do not zigzag or drive up at an angle. Always drive your
R8-S scooter straight up the incline. Crossing an incline greatly increases the possibility of
tipping.
Figure B. Normal Driving Position
Figure C. Increased Stability Drive Position
8
When you approach an incline, it is best to lean forward. See Figures B and C. This shifts the
centre of gravity of you and your R8-S
R8 toward the front of the R8-S
S for improved stability.
NOTE: If the throttle control lever is released while you are moving forward up a ramp, the R8-S
R8
may roll back approximately 1 foot (30 cm) before the brake engages. If the throttle control lever
is released while you are moving in reverse, the R8-S may roll back approximately
oximately 3 feet (one
(
meter) before the brake engages.
FREEWHEEL MODE
Your R8-S
S is also equipped of an automatic freewheel function located on dashboard to
release the brake. Turn key switch to ON position, then push the button
button to engage the freewheel
mode, push the button again to disengage the freewheel mode.
WARNING! When your R8-S
S is in freewheel mode, the parking brake system is disengaged.
WARNING! Do not press the automatic freewheel button while the R8-S
R8 S is moving.
Disengage the drive motors only on a level surface.
Stand
surface.
beside the R8-S to engage or
disengage freewheel mode. Never do this while sitting on the machine
9
After you have finished pushing your R8-S,
R8 S, always return it to the drive mode to lock the brakes
(pull the manual freewheel lever backward).
backward).
PRECAUTIONS DURING INCLEMENT
NCLEMENT WEATHER
Avoid exposing your R8-S
S scooter to inclement weather.
weather. The R8-S
S will operate in light rain
showers, but extended use is not recommended in heavy rain. If you are suddenly caught
c
up in
rain, snow, severe cold or heat while operating your
R8-S,
your
S, proceed to shelter at the earliest
opportunity. Thoroughly dry your R8-S
R8 S before storing, charging, or operating it. Maintain and
store your R8-S
S in dry and clean conditions.
conditions.
CHARGING THE BATTERY
1. Insert the charger plug (8) in the charging socket (10) located on the right side of the tiller
column.
2. Plug the charger power cord (9) into a wall socket (11).
3. When charging is complete, remove the charger power cord (9) from the wall socket (11)
and then remove the charger plug (8) from the charging socket (10).
4. Under ideal storage conditions, batteries that were charged to full capacity and were not
used should be recharged every month.
5. If you expect not to use your R8-S
R8 for an extended period
eriod of time, we recommend charging
it for two days and then disconnecting the batteries.
6. If you have not used your R8-S
R8 S for an extended period of time, charge the batteries for at
least 24 hours before driving.
Note: There is NO need to disconnect the charging plug immediately after the charging is
complete. However,
However, DO NOT leave the charger connected to the batteries FOR MORE
THAN TWO WEEKS. As long as the charging plug is in the charging socket, the electronic control
con
of the R8-S
automatically cuts all power to the electric system and it cannot be driven.
The charger supplied is suitable for charging lead acid dry/gel batteries. Use only the
defined type of charger. Before using any other type of charger, check with
wit your dealer.
10
MAINTENANCE
Although the R8-S requires very little maintenance, do not neglect it.
This chapter contains both periodic maintenance procedures and maintenance procedures to be
performed as required.
Periodic Maintenance Procedures: For periodic maintenance, no special tools are
needed.
•
No.
Type of Service
Frequency
2
Check air pressure in all
tyres.
Every two weeks (30psi)
3
Replace batteries
Every 2-3 years,
When the distance you can travel
on a single charge becomes short,
or
After a technician recommends
replacing it.
Note: To replace the batteries, (which are located under the seat) the seat and
the battery cover must be removed.
Tyres
Correct tyre pressure is essential for steering and stability.
Check the tyre pressure every two weeks (30 psi).
Cleaning
Use only a damp cloth and mild detergent for cleaning.
Never use a hose, as this may severely damage the power
and electronic components.
11
Replace
batteries
Note! Batteries must be replaced by trained professionals
only.
Warning! Batteries contain high energy and can spark,
resulting in a possible fire hazard.
Warning! Working with
batteries can cause damage and Injury if not done
properly.
In this procedure, refer to Figure bellow.
1. Remove the terminal insulating cap from one battery
terminal.
2. Using an 8 mm key, unscrew the wiring from the terminal.
Take care not to let the key touch any other terminal or
metal part, as this could cause damage or injury.
3. Repeat steps 1 and 2 for all the other terminals.
4. Remove the old batteries and install the new ones.
5. Connect the wires of the new batteries as shown in Figure
bellow
6. Screw down the terminals securely, and replace the
insulating
caps.
12
TROUBLESHOOTING AND REPAIR
The following table provides troubleshooting and repair instructions for problems that may be
encountered when operating the R8-S, as well as the best way to correct the problem. The table
contains three columns:
Symptom
Probable Cause
Remedy
The problem you
are experiencing
The most likely causes, in order of
probability (most likely first)
Recommended action to correct
each probable cause
Remember: you can contact your dealer at any time for further professional support.
13
No.
Symptom
Probable Causes
Remedy
1
Flat tyre and
unstable driving.
Low air pressure
Puncture
Pump tyre to normal pressure
Repair tyre
2
When throttle control
lever is released on
a level surface, the
R8-S takes
longer
than 3
meters to stop.
Controller is faulty or
out of adjustment
Call for technical support
3
Key switch is turned
ON but the ON light
does not come on.
Main fuse (2.1a in Fig.
1) popped
Electrical fault
Reset fuse
Note: Do not reset
fuse more than twice. If the
symptom still recurs, call your
authorized dealer for support.
R8-S does not move
Key switch is OFF
Turn key switch ON
when you squeeze
the throttle control
lever
Charger is connected
to charging socket
Disconnect charger
4
Call for technical support
Control system failure
5
Intermittent drive.
Battery capacity is low
Faulty connections
Faulty battery
Charge batteries for at least 18
hours Remove battery cover and
check battery connection. If
terminals are corroded, clean
them with a damp, clean cloth
If red LEDs are still on, contact
your dealer for a replacement
battery 6
Right or left indicator
light is inoperative.
Faulty LED light board
Replace LED board
7
Headlight or rear
light not lit.
Burnt out LED
Replace LED
14
8
When driving uphill
or carrying heavy
loads, speed
reduces gradually
(but scooter still
moves).
Controller became
overheated
Stop driving and let controller
cool
SPECIFICATIONS
Maximum forward speed
18km/h
Maximum backward speed
7km/h
Maximum Safe Climbing Grade
10°10%
Turning radius
77’’
Load Capacity (max)
205kg
Range with Full Charge
Up to 50 - 60 km
Wheel size
(14inches high)
Tyres pressure
30psi
BATTERY Sealed battery x 2 pcs
12V/55Ah Gel or *12V/75Ah AGM
BATTERY CHARGER
Input 110V/ AC Output 24V DC / 5amp
MOTOR POWER
1400W – 24V DC
BRAKING TYPE
Regenerative braking
OVERALL DIMENSIONS
Length: 60’’ Width: 28’’
15
WARRANTY
Bzooma Pty Ltd Limited Warranty
Bzooma Pty Ltd provides this Limited Warranty to the
original purchasers of new Bzooma machines in Australia
and New Zealand.
Bzooma Pty Ltd guarantees the machine, power base
including Motor, Battery and charger, against defects in
materials and workmanship for a period of one (1) year,
from date of delivery to the original purchaser. Damage
caused by accident or obvious abuse is not covered by this
warranty. Warranty does not include the batteries or tyres
as subject to rider taking care and maintenance of the
vehicle.
To make a claim covered by this warranty the purchaser
must contact an authorised BZOOMA Pty Ltd Dealer for
inspection and service. Indications of abuse, accident, or
unauthorised tampering with the machine power base
mechanical, or electrical equipment, will void any claim.
Bzooma Pty Ltd is not responsible for transport costs
associated with obtaining service or repairs under this
warranty.
1.
. W HEN THE MIRROR IS PROPERLY ADJUSTED YOU CAN SEE THE EDGE OF YOUR
ARM AND SHOULDER.
16