1
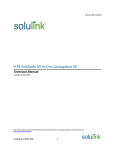
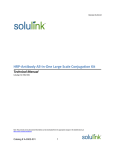
ShiftedIonsFinder
(Version 1.1)
User's Manual
1
<Introduction>
In mass spectrometry-based metabolomics, it is important that the elemental composition is
estimated from the accurate mass values of all the detected peaks and that the annotation of a
compound is performed by comparing its analytical data with that of authentic chemicals or
compounds in public databases. However, when the intensity of a detected peak is not within an
appropriate range, a deviation (error) from the accurate mass occurs, and it may not be possible to
estimate the elemental composition accurately. This problem tends to occur in particular when
analyzing biological samples, because the quantities of the compounds contained in a sample differ
widely. A technique for solving this problem is to label the biological sample externally with a stable
isotope and estimate the elemental composition at a very reliable level using as an index the number
of stable isotopes incorporated in the compound.
The ShiftedIonsFinder is an analytical tool (GUI program) for finding peaks having specified mass
differences by comparing the mass spectra in two data sets obtained using chromatography-accurate
mass spectrometry. This tool enables the user to select candidate labeled peaks by comparing a
sample that is externally labeled with a stable isotope with an unlabeled sample. It is also easy to
select peaks that may have been modified by hydration, glycosylation, or acylation. Since the search
results can be output in Excel or text file format, the user can perform further analysis or edit the list
as needed.
The tool is compatible with the output file of the LC-MS analytical tool for metabolomics,
PowerGet, which is available at KOMICS (http://www.kazusa.or.jp/komics/). Since it prepares text
files that follow a prescribed format, it also supports analyzed data produced by other software
programs. Therefore, the user can perform a peak search using this software alone after performing
peak picking, peak alignment, and database searching using other types of software. Furthermore,
because the search is basically performed using only accurate mass values, the tool is also
compatible with analysis data produced using other (chromatography) mass spectrometers, and thus
its use is not limited only to LC-MS.
The tool was previously called Metaboloblast, but was renamed ShiftedIonsFinder upon general
publication.
2
Contents
<Search System Overview>................................................................................................................4
- Search Process Flow - ...................................................................................................................4
<Setup> ................................................................................................................................................6
- Operating Environment - .............................................................................................................6
- Installing ShiftedIonsFinder -......................................................................................................6
- Uninstalling ShiftedIonsFinder - .................................................................................................6
<Preparing Import Data Used in Search> ........................................................................................7
- When Using PowerGet - ...............................................................................................................7
- When Not Using PowerGet - ........................................................................................................7
<Memory Setup and Startup> ...........................................................................................................8
- Memory Setup - ............................................................................................................................8
- Starting Up ShiftedIonsFinder - ..................................................................................................8
<Screen Configuration> .....................................................................................................................9
- Configuration of Main Frame - ...................................................................................................9
- Configuration of Menu Bar - .......................................................................................................9
- Configuration of Data Display Tab Panel - ..............................................................................10
<Import Data Input> ........................................................................................................................ 11
- Import Data Input - .................................................................................................................... 11
<Management of Element Data> .....................................................................................................13
- Editing Element Data - ...............................................................................................................13
- Adding Element Data - ...............................................................................................................14
- Deleting Element Data - .............................................................................................................15
<Search Conditions Setup> ..............................................................................................................16
- Setting the Element Data - .........................................................................................................16
- Setting the Max.Fold - ................................................................................................................16
- Setting the m/z Dif - ....................................................................................................................16
- Setting the RT Dif - .....................................................................................................................17
<Search Execution and Search Results Format> ...........................................................................18
- Search Execution Method - ........................................................................................................18
- Search Results Format - .............................................................................................................19
<Join the search result>....................................................................................................................20
<Output of Search Results> .............................................................................................................23
<Terms of Use>..................................................................................................................................24
3
<Search System Overview>
In this section, the process flow according to which this application software searches for peaks that
have specified mass differences is described. The data that are the object of comparison are called
the import data, and are called "basic samples" or "shifted samples" depending on the respective
application. Furthermore, the data that describe the specified mass difference are called "element
data." The three parameters that are set and used in the search are the multiple (Max. Fold), the
mass-to-charge ratio (m/z) difference threshold (m/z Dif), and the retention time difference threshold
(RT Dif).
For example, when searching for peaks labeled with a stable isotope, the unlabeled sample is the
basic sample, the sample externally labeled with a stable isotope is the shifted sample, and the mass
difference between the principal isotope and the stable isotope used in labeling is the element data.
The multiple is the estimated maximum number of stable isotope atoms incorporated in the
compound, and the m/z Dif and RT Dif are the allowable limits of error.
- Search Process Flow 1.
The hypothetical m/z value (Masshyp, Mbn,f) is calculated by adding the m/z value of the selected
element data to the m/z value of ions (Mbn) present in the basic sample. Masshyp is calculated for
each respective value from zero to the value set by the multiple (Max.Fold, F).
2.
A search is performed to determine whether the calculated Masshyp is present in the shifted
sample (Msn).
3.
Filters are applied using the m/z Dif (m or m’) and RT Dif (t) values that were set.
4.
The search results are displayed.
4
Overview of the search process flow
5
<Setup>
In this section, the operating environment and methods for installing and uninstalling this
application software are described.
- Operating Environment The application software was developed using the Java programming language. The Java Runtime
Environment (JRE) is required to run a Java program. The JRE must be installed in PC environments
where it has not already been installed or where an earlier version than JRE version 1.6.0_10 set
forth in this specification is installed. The recommended environment is as follows:
OS:
Windows XP or above
CPU:
Intel Core 2 Duo equivalent or above
Memory: 512 MB or above (depending on processed files)
Java:
JRE Version 1.6.0_10 or above
- Installing ShiftedIonsFinder The application software is installed by decompressing the downloaded compressed file and
locating the installation folder called "ShiftedIonsFinder" on a local drive (any location). The
installation folder contains the following folders.
config:
This is a folder for storing basic information. A file called "atom.txt" (editable by
Element Manager), which contains the element data used in the search, is saved in this
folder.
doc:
This is a folder for storing the manual and the templates used in the creation of import
data and created import data. However, created import data do not necessarily have to
be saved in this folder, but can be saved in any location.
img:
Images such as the ShiftedIonsFinder logo are stored in this folder.
lib:
Programs required for startup are stored in this folder.
launch.bat: Starts up ShiftedIonsFinder when double-clicked.
- Uninstalling ShiftedIonsFinder The application software is uninstalled by deleting the installation folder that was located on a
local drive (any location).
6
<Preparing Import Data Used in Search>
In this section, the preparation of data for use in this application software is described. The import
data used in the search function in this application software must be prepared as a text file
(tab-delimited format). Further, the values of "Ave. mass (detected)" and "Ave. R.T. (min)" must be
prepared as items used in computation, where Ave. mass (detected) is the m/z value of the detected
ions, and Ave. R.T. (min) is the retention time. The names of these columns must not be changed
because calculations in this application software are performed based on their recognition. In
analyses such as in-fusion analysis, an arbitrary numeric value must be entered for Ave. R.T. (min),
even when there is no retention time. As a precaution, please make sure that the two import data to
be compared are in the same format. Details for preparing data when either PowerGet or other
programs are used are given separately below.
- When Using PowerGet Please refer to the PowerGet manual for details on using PowerGet. An example of outputting data
from PowerGet is described below, as well as a precautionary note.
1.
From the [File] menu, select [Output…], and on the [List] tab, check all boxes in [Alignment:]
and [Samples:].
2.
Select [Each Sample] from [Group by:], and click the [Save As…] button to output the file.
3.
Open the output file in Excel, and save it as a tab-delineated text file to any location. We
recommend that you do not delete columns not used in the analysis at this stage, but wait until
after the search is finished. The data preparation is now complete.
- When Not Using PowerGet As described above, the Ave. mass (detected) and Ave. R.T. (min) columns are required. A
recommended template is provided in the form of an Excel file in the data folder. It is recommended
that you use this template when performing this operation for the first time.
1.
Open the recommended template file in the data folder.
2.
Enter values in the corresponding columns of the template.
3.
Output the template to any location as a tab-delineated text file. We recommend that you do not
delete columns not used in analysis at this stage, but wait until after the search is finished. The
data preparation is now complete.
7
<Memory Setup and Startup>
In this section, the memory set up and startup procedures are described.
- Memory Setup A large amount of memory is used if a large quantity of data is processed. You can set the memory
size in accordance with the PC environment. In the initial setup, the maximum memory is set to 1
GB (-Xmx1G).
1.
In a text editor, open "launch.bat" located in the installation folder.
2.
Overwrite the maximum memory size set in the -Xmx option, and save.
- Starting Up ShiftedIonsFinder 1. Double click "launch.bat" in the installation folder. After the splash screen is shown, the main
frame is displayed.
8
<Screen Configuration>
In this section, the screen configuration is described.
- Configuration of Main Frame -
(1) Menu bar: This is the menu for file management and other tasks.
(2) Search conditions setup panel: This is the panel where search conditions are set.
(3) Data display tab panel: This is the tab panel where import data and search results are displayed.
- Configuration of Menu Bar [File]
[Import]: Menu for importing import data used in the search.
* Details are described in a separate section.
[Export]: Menu for writing search results.
* Details are described in a separate section.
[Element Manager]: Menu for managing element data used in the search.
* Details are described in a separate section.
[Exit]: Menu for quitting ShiftedIonsFinder.
[Tool]
[Join Files]: Menu for joining multiple search results.
* Details are described in a separate section.
[Help]
[Open Manual]: Menu for displaying manual of ShiftedIonsFinder.
[About]: Menu for displaying version information of ShiftedIonsFinder.
9
-Configuration of Search Conditions Setup Panel-
(1) Space where the file name of the basic sample that was input is displayed.
(2) Space where the file name of the shifted sample that was input is displayed.
(3) Selection menu for setting element data.
(4) Box in which the value of multiple is entered.
(5) Button for adding (3) and (4).
(6) Button for deleting (3) and (4).
(7) Box in which the value of m/z Dif is entered.
(8) Box in which the value of RT Dif is entered.
(9) Button for starting search.
* (1) and (2) are not displayed before input.
* Details are described in a separate section.
- Configuration of Data Display Tab Panel -
(1) Tab that displays the basic sample information that was input.
(2) Tab that displays the shifted sample information that was input.
(3) Tab that displays the shifted sample data that was input.
(4) Tab that displays the search results data.
* Details are described in a separate section.
10
<Import Data Input>
In this section, we describe how to input import data.
- Import Data Input 1. From the [File] menu, select [File Import].
2. The file import dialog [File Import] is displayed.
(1) Box in which the import data file name is displayed.
(2) Button for displaying the file selection dialog.
(3) Button for confirming input of the selected import data.
(4) Cancel button.
3. Click the [Browse…] button.
4. The file selection dialog is displayed. Select the import data to be used, and click the [Open]
button. If you want to import multiple shifted samples, please select all shifted samples to
analyze.
11
5. When the import data has been selected, the file name of the selected import data file is
displayed in the [File Import] dialog.
6. Click the [OK] button to complete the input of the import file. The basic sample and shifted
sample data that were imported are respectively displayed on the basic sample information tab
and shifted sample information tab.
The basic sample information tab
The shifted sample information tab
12
<Management of Element Data>
The element data can be customized as needed. In this section, we describe how element data are
edited, added, and deleted.
- Editing Element Data Element data information is managed in a file called "atom.txt" in the [config] folder in the
installation folder. Although you can edit "atom.txt" directly, you can also edit it by using Element
Manager.
1. From the [File] menu, select [Element Manager].
2. The element data management dialog [Element Manager] is displayed.
(1) Column that displays the element names of the element data.
(2) Column that displays the mass differences of the element data.
(3) Button for adding element data.
(4) Button for deleting element data.
(5) Button for confirming and saving edited contents.
(6) Cancel button.
3. To edit a cell of the element data, double click it.
13
4. After editing, press the Enter key on the keyboard to confirm, and click the [OK] button to save
the edited contents. Please note that if the same element name already exists, the edited contents
will not be accepted.
- Adding Element Data 1. From the [File] menu, select [Element Manager].
2. The element data management dialog [Element Manager] is displayed.
3. Click the [Add] button to display the dialog for adding new element data [Add Element Data].
4. Enter the data to be added, and click the [OK] button to update the [Element Manager] table
information. Please note that if the same element name already exists, the edited contents will
not be accepted.
5. Click the [OK] button in the [Element Manager] dialog to confirm and save the edited contents.
14
- Deleting Element Data 1. From the [File] menu, select [Element Manager].
2. The element data management dialog [Element Manager] is displayed.
3. Select the item to be deleted, and click the [Delete] button.
4. A dialog to confirm deletion is displayed.
5. Click the [Yes] button to update the [Element Manager] table information.
6. Click the [OK] button in the [Element Manager] dialog to confirm and save the edited contents.
15
<Search Conditions Setup>
In this section, we describe how to set the values of the element data, multiple, m/z Dif, and RT Dif.
When you want to use multi-element data for the search, click the [Add] button to increase the
selection menu for setting the element data and the multiple.
- Setting the Element Data Select any element from the [Element] selection menu on the search conditions setup panel. "C" is
set as the default.
- Setting the Max.Fold In the search conditions setup panel, enter any value in the [Max. Fold] box. Integer values from
zero to the value set as the multiple are used in calculating Masshyp in the direction of addition. It is
set to "5" by default, but an appropriate value must be entered depending on the selected element,
assuming that the number of that element can be incorporated. We recommend that you use a certain
degree of margin when setting a numeric value. After editing, press the Enter key on the keyboard to
confirm and save the edited contents.
- Setting the m/z Dif In the search conditions setup panel, enter any value in the [m/z Dif] box. It is set to "0.005 unit" by
default, but an appropriate value must be entered depending on analysis conditions, such as the
performance of the mass spectrometer. Additionally, the units (unit or ppm) can be changed by
clicking the [unit] or [ppm] button.
16
- Setting the RT Dif In the search conditions setup panel, enter any value in the [RT Dif] box. It is set to "0.3" by default,
but an appropriate value must be entered depending on analysis conditions, such as the
chromatography conditions.
17
<Search Execution and Search Results Format>
In this section, we describe how the search is executed and how to read the search results.
- Search Execution Method After the required setup is complete, start the search process by clicking the [Start] button in the
search conditions setup panel. When the process is started, a dialog that shows the state of progress
is displayed.
When the process is finished, the search results are displayed on the [Output] tab of the data display
tab panel. The flow of the search, including setup and related functions performed up to this point, is
shown below.
Importing of import data
↓
Selection of element data
↓
Setting Max.Fold
↓
Setting m/z Dif
↓
Setting RT Dif
↓
Start of search by clicking the [Start] button
↓
Display of search results data on [result: the name of selected element data] tab of data display tab
panel
18
- Search Results Format Peaks that match the search conditions are associated with both the basic and the shifted sample.
These peaks are displayed in the search results; the order of the displayed data is 1) basic sample; 2)
associated information; and 3) shifted sample from left to right. Associated information is as follows.
Lag(times):
Value of multiple of the search hit.
RT Difference:
Difference in elution time of the peak of the basic sample and the peak of the
shifted sample. Units are minutes (min).
m/z Difference (u):
Difference in the m/z value of the peak of the shifted sample and Masshyp.
Units are unified atomic mass units (u).
m/z Difference (ppm): Difference in the m/z value of the peak of the shifted sample and Masshyp.
Units are ppm.
(1) Column that displays the information of the basic sample that was hit in the search. If there are
multiple hits, the same information is displayed in different rows, since a row is created for each
hit.
(2) Column that displays associated information.
(3) Column that displays the information of the shifted sample that was hit in the search.
19
<Join the search result>
The “Join” function combines into a table the multiple search results in which the same basic
sample is used. Thus, you can check multiple search results simultaneously. Moreover, the output
file of previous search results and the current search result can be joined. In this section, we describe
how to join the search results.
Overview of “Join” function
20
1.
From the [Tool] menu, select [Join Files].
2.
The join dialog [Join] is displayed.
(1) Box in which the common basic sample name used for joining is displayed.
*If the basic sample has already been imported for search, this name is displayed.
(2) Button for displaying the file selection dialog.
(3) Space where the file names of the search result are displayed.
*If the search is not performed, no file name is displayed.
(4) Button for resetting the selected search results.
(5) Space where the file names of the selected search results that were processed
previously are displayed.
*The files selected here should be prepared as a text file (tab-delimited format) in advance.
21
(6) Button for displaying the file selection dialog.
(7) Button for removing the selected search results from (5).
(8) Button for joining all selected (blue highlight) search results.
(9) Cancel button.
3.
Click the [Browse…] button to select the basic sample. If there is already a basic sample in the
box, skip this and the next steps.
4.
The file selection dialog is displayed. Select the import data to be used, and click the [Open]
button.
5.
Click the [Add] button to select the search results that were prepared previously as needed. If
you do not need these search results, skip this and the next steps.
6. The file selection dialog is displayed. Select the search results to be used, and click the [Open]
button.
7. After selecting all the files that you want to join, click the [OK] button to start the join process.
22
<Output of Search Results>
In this section, we describe how to output search results. The output file is in Excel format (.xlsx)
1. From the [File] menu, select [Export].
2. The file dialog is displayed.
3. After entering the output file name, click the [Save] button to output the search results file.
23
<Terms of Use>
1. This application software will be used for research purposes only. It is available for commercial
use at a cost to be negotiated with Kazusa DNA Research Institute (referred to as "the Institute"
hereinafter) on a case-by-case basis. Partial rights may be requested.
2. This application software will be used only by the laboratory of the requester, and will not be
transferred to a third party.
3. When publishing research results obtained by using this application software, it will be clearly
noted that the application software provided by this Institute was used.
4. This application software is provided free of charge, and the Institute makes no guarantees
regarding its performance. Furthermore, the Institute is not in any way responsible for damages
incurred due to either the use of or the inability to use this application software.
24