Transcript
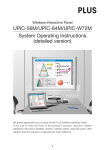
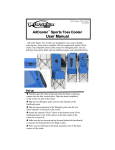
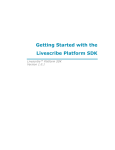
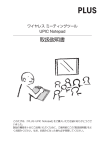
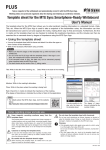
Exclusively for the UPIC series of Wireless Interactive Panels Movable Tool Bar User’s Manual This Movable Tool Bar is an external toolbar offering additional functions for Wireless Interactive Panels. It can be used in the same way as the toolbar on the projected image by touching (“clicking on”) icons with the digital pen. NOTE This product is compatible with UPIC software (Utility and Touch&Draw) versions 2.0 and on. • The Movable Tool Bar can be attached and removed freely, even while the panel is being used. • The entire rear surface has a sheet structure consisting of magnetic layers, allowing the Movable Tool Bar to be attached to commercially available whiteboards (made of steel) and steel panels with smooth, flat surfaces. • Mount within a range in which the digital pen and computer can communicate (about 10 meters). No special settings are required on the computer to use the Movable Tool Bar; it will operate whenever UPIC Touch&Draw is running. • The software can be operated even when the projected image’s toolbar is minimized, allowing you to use the maximum amount of drawing area. • The cross pattern for calibrating the projector’s projected image and the computer’s screen can be displayed in a single touch. Projector Wireless interactive panel Whiteboard (steel) or steel panel with smooth, flat surface Digital pen Submenu Movable Tool Bar Part Names and Functions To select, click within the frame (stylus). with the digital pen Mouse Switches the input mode to the mouse mode. In the mouse mode, the computer can be operated from the projected image on the screen. When the mouse mode icon is clicked, the icons below will not function when clicked. Screen Mode/Style/Color/Eraser/Figure/ Insert Picture/Delete Pen Movable Tool Bar (this product) Cautions on Use Do not let the Movable Tool Bar near magnetically recorded media. The Movable Tool Bar includes layers of magnetic film. Do not let credit cards, commuter passes, floppy disks, video tapes, cassette tapes or other magnetically recorded media near the Movable Tool Bar. Letting the Movable Tool Bar within about 10 cm of such media could damage the recorded data. Cautions on storing the Movable Tool Bar Do not store the Movable Tool Bar near magnetically recorded media. Also, do not store it rolled up or bent. Creases will reduce adhesive strength and could make normal operation impossible. Cautions concerning the Movable Tool Bar’s edges When attaching and removing the Movable Tool Bar, be careful not to cut your fingers on the edges of the sheet. Do not apply chemicals to the Movable Tool Bar. Do not wipe the Movable Tool Bar with thinner, benzene, alcohol or other such substances. Doing so could discolor or damage the Movable Tool Bar, making it impossible to read with the digital pen or resulting in malfunction. About cleaning • If the Movable Tool Bar gets dirty, clean it with a damp, carefully wrung out cloth. Do not use pre-moistened wipes, office equipment cleaners, neutral detergent, etc. • Dirt, dust, paper clips or other objects stuck to the back of the Movable Tool Bar will reduce adhesive strength. Keep the back of the Movable Tool Bar clean. Style Displays the “Style Menu” screen. Use this to select the thickness for the current input mode (pen, marker, eraser or figure). The “Style Menu” screen is not displayed if clicked when the input mode is set to “Mouse” or “Select Object”. Color Switches the input mode to “Marker”. Eraser Zoom Marker Switches the input mode to “Eraser”. • Use this to erase elements on the screen. Drag over letters and lines drawn with the digital pen to erase. • Figures and pictures cannot be erased with this Eraser function. Sets the magnification of the image in the drawing area. Click the [Zoom] icon then click in the drawing area to zoom. The zoom rate setting switches as follows each time the [Zoom] icon is clicked: 200% → 300% → 400% → 100% ... Figure Insert Picture Select Object Computer The screen mode switches between “White Screen” and “Overlay Screen” each time the [Screen Mode] icon is clicked. Displays the “Color Menu” screen. Use this to select the color for the current input mode (pen, marker or figure). The “Color Menu” screen is not displayed if clicked when the input mode is set to “Eraser”, “Mouse” or “Select Object”. Switches the input mode to “Pen”. Switches the input mode to “Figure” and displays the “Figure Menu” screen. Click on the desired figure icon and drag the digital pen to draw figures. Projected image’s toolbar Screen Mode Switches the input mode to “Select Object”. Select the object by clicking it, then move it, copy & paste it, etc. Save Displays the “Save As” screen. Saves the data in the drawing area. * Double-click Switches to the Windows mouse doubleclick operation. * Page up Switches to the Windows page up operation. Moves to the page above the currently display page. The operation differs according to the application. * Calibration Displays the cross pattern for calibrating the projector’s projected image and the computer’s screen. Displays the Windows “Open File” screen. Images in the following formats can be inserted: JPEG, BMP, PNG, TIFF, GIF Delete Displays the “Delete Menu” screen. The screen closes after deleting. * To cancel, click anywhere outside the projected image’s menu. The “Delete Menu” screen closes. Operating the Movable Tool Bar Functions of the Movable Tool Bar are performed in the same way as those of the UPIC Touch&Draw tool ber (wiht the exception of the Movable Tool Bar’s additional functions). For instructions, see the “System Operating Instructions (detailed version)” on the CD-ROM included with the wireless interactive panels. • Displaying and moving the submenu To give one example, the [Figure] icon includes the “Figure Menu” submenu. When the projected image’s toolbar is minimized and the [Figure] icon on the Movable Tool Bar is clicked, the “Figure Menu” is displayed at the position where the toolbar was displayed, with the same menu layout (horizontal or vertical). To close the “Figure Menu”, click the [Figure] icon on the Movable Tool Bar again, or click anywhere outside the figure menu. Submenus can be moved by dragging on the “move menu” area with the digital pen. (Submenu display with horizontal layout) When the minimized projected image’s toolbar is displayed at this time, it is displayed at the position to which the submenu has been moved. • Example: Copying objects using the icon 1. 2. 3. Click the object you want to copy (this selects the object). Click the [Right-click] icon, then click the selected object. The pop-up editing menu appears. Click “Auto Copy” on the edit menu. The object is copied. • Example: Using the [Right-click] [Double-click] icon 1. With the digital pen, click the [Mouse] icon on the Movable Tool Bar, then click the [Double-click] icon. 2. Click the UPIC Touch&Draw’s shortcut icon on the Windows screen projected from the projector. UPIC Touch&Draw starts up. Minimize Closes the toolbar, placing the minimized icon in the taskbar. • The Movable Tool Bar can be used with the drawing area’s toolbar displayed. • Restore by clicking the minimized icon in the taskbar. * Right-click Material: Magnetic sheet, PET Reading system: Anoto pattern reading using Anoto pen • Microsoft and Windows are registered trademarks or trademarks in the United States and other countries of the Microsoft Corporation of the United States. • Anoto® is a registered trademark of the Anoto Group AB. Switches to the Windows mouse right-click operation. * Page down Switches to the Windows page down operation. Moves to the page below the currently display page. The operation differs according to the application. Items marked “ * ” function as long as UPIC Utility is present in the task tray. TM Printed on recycled paper.