1
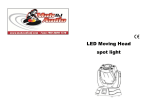
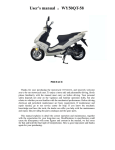
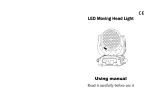
LED Moving Head
spot light
User manual
Pls read this before use this light
User manual
1. Before using
1. Dispacking
2. View of the light
3. Speciflications
4. Attentions
2.Installation
1.Fixed installation
2.The connection of the DMX 512/the lights
3.Connection of the master machine
3.operation
1.Operation of the main light
2.Operation of the screen
3.Channals
4. Supplement
1. protect and maintain of the LED
2.LED installation
1.1 DISPACKING
Thank you for using the products of our CO..For your owe safety,please read this
manual before installing the device.This manual covers the important imformation of
installing and using.Please install and operate following the manual
book.Meanwhile ,please keep this manual well for using at any time.
Our moving wash is made of a new type of high temperature strength of engineering
plastics and cast aluminum casing from manufacturing,design beautiful smooth,fully
embodies the characteristics of modern lighting products.Products according to strict
CE standards of production design,in full compliance with international standards
DMX512 prorocol,a single control can also be controlled in conjuction with each
other,suitable for large-scale performances,theater,studio and places of higher Disco
use.
The Moving head light adopt the powerfull LED lamp which is import in the foreign
country. Once receive it,please handle it carefully and check if there is some shatter
because of transportation and the following fittings are ok:
main light: one
singal cable----one
stand : one
Manual-------one
1.2 View of the light
1.3 SKILL SPECIFICATION
Power source:
1.Voltage AC 100-240V, 50/60HZ
2. Total power: 150W
3.Lamp:The United States Luminus’s 50W high-power white light lampbeads.
4.Cooling system: Built-in convection of heat- cold stream
5.Control channal
6. Color wheel:8color+white,rainbow effect can be speed
7. pattern:8 figure+white,may be speed,running water and the pattern jitter
effects,positive and negative rotation function
8. Prism:rotating speed,direction variable
9. Focus:2m to the infinite power adjustmeng
10. Beam angle:13°
11. Dimmer strobe:0-100% linear dimmer,1-30times/sec,high-speed slectronic srobe
effects
12. Rotation angle:horizontal(x-axis)0-540with automatic error correction,16bit
adjustment.The vertical 0-270 withautomatic error correction,16bit adjust
13. The vertical 0-270 with automatic error correction,16bit adjust
14. Control mode:DMX international 512 standard signalcontrol,voice
control,automatic operation,the main,from the machine connected model
15. LCDliquid crystal display system in english,DMX512signal reception indicator
16. Dimensions:335X430X415mm
17. Net weight:8.5kg GW:10kg
1.4 Attention
The guy who install it and maintain it,you must follow:
-Have the qualification of technician.
-Follow the instruction
Attention:prevent water damp,cut the power off when open the machine. Keep
Clear-High Voltage,the machine is in good condition before sell.To confirm the
safety,please control it under the instruction.
-The factory will not take responsibility,if you don’t control it under the instruction or
change the machine personly or change the instruction casually.
-Don’t conect te power wire with other wire,confirm the power is availerbale to the
machine,expecially don’t outstrip the power.
-confirm plug connect with the power, and the switch button is off before you connect
with power.
-Confirm the power wire is not puckered or damaged by the sharp,check it once in a
while. –Cut the power when it is not work or maintained.When you cut off power,pull
up the plug not the wire to avoid the damage.
-The level of protection is the first level,connect the green/yellow to the ground.The
connection and maintainment shoud be dong by the careerman.
-Don’t connect the machine to the dimmmer equipment.
-Don’t make on and off action frequently,or the working life will become short.
-It may be smeelly when the first use,it’s the common.
- To avoid hurting the eyes,please do not look at the lamp-house steadily.Especially
for the eye sicker.
2.1 Install The Equipment
-During installation,please make sure no inflammable thing within 0.5 meters.
WARNING:use the two hooks to fix the bottom of the machine.and be sure the place
where you installed is safe,and it can stand ten times weight than the light,test that if
the place is out of shape in one our.
-You’d better add second protection to avoid the shed of lose of the spare parts.
the light can be installed on the shelf. as shown in illustration
The strand wire is usually used in the shelf for the safety,the strand wire shoud stand
ten times weiht than the machine.you should ues the stand wire which has safety lock
pins,the strand wire pass through the hole at the bottom,then tie it to the fixity.then
tighten it.
2.2
The connection of the DMX 512/the
lights
◆Connect the XLR-XLR control wire from output of the controller to the input of the
light,and connect the output of the master light to the slave light,and the like,till
connect all the light,the end connect the loop plug to the output of the last one.Pls
don’t connect more than 32pcs light.
Connect of XLR:
◆If you want connect more light,you must connect a loop plug to the DMX signal
wire. Put a 150¤resistance between the –of the three pin plug and +of the
three pin plug.
◆If you use the standard controller,you can connect the output of the
controller to the input of the light.and if you still want the controller
connect with the other XLR output,you need a converter.
2.3
The Connect of Main Frame
-Confirm the power before connect!
-use the plug to connect the machine to the power.
(European
Union)wire
(United states)wire
Brown
light blue
yellow/green
Black
White
green
Line
Mark
live line
null line
earth wire
L
N
The connect of DMX-512 and lights.
Connect the XLR-XLR control wire from DMX Pulse Output of the controller to the light,
XLR connection:
DMX output
XLR plug seat
1.
earth wire2. cathode 3. anode
earth wire2. cathode 3. anode
DMX plug 1.
Attention:The last DMX signal wire must connect to
the loop plug seat,pue a electric resistance of 120Ω,between the signal-and signal+of the
plug.then put them in the Pulse DMX Output of the last one.
3.1 INSTRUCTIONS
-The machine is moving head light used to make the decorate effect.
-Don’t start the machine when it’s temperature changed drastically,because the change of
the temperature may damang the machine,start it when temperature is in the conmon condition.
-Be carefully for the shock when install
-Don’t pull up the machine by the heda of it,this may damage it,use the special tools to transport
it.
-The install place shout not overheating overdamp or too much dust,don’t put wire on the ground
to avoid hurting any man,
- At the botton of this product there is a hole for safety wire,please make sure that the
safety wire is done with it.
-When the machine is not installed or the screw is not tighten,don’t start it.
-Caution:when lens is damaged visible,change to keep the previous effect.
-It maybe injure the machine if it is controlled by the guy who is not professional,lots
of the damage is coming by this.
-Use the original packing when delivery it. Forbit change the machine unless
approved.
-The fault is not belong to guarantee to keep in good repair,if you don’t control it
under the instrution.The short circuit,damage, accidental contact,the damage by
ultraviolet radiation,the blow up,all of this not belong to guarantee to keep in good
repair.
3.2 Set of the display
3.3 The Channel
3.3
channal
1
2
channal
instruction
DMX512 通道表
data
effect
GOBO plate
000~255
000~255
000~009
010~019
020~029
030~039
040~049
050~059
060~069
070~079
080~089
the strobe, from low speed to fast
from dark. to bright
blank
Gobo 1
Gobo 2
Gobo 3
Gobo 4
Gobo 5
Gobo 6
Gobo 7
Gobo 8
4
GOBO Rotate
000~128
129~133
134~170
171~175
176~213
214~219
220~255
GOBO angle
empty
GOBO rotate positive-going
empty
GOBO rotate opposite-going
empty
rotate outward and homeward
5
6
scan horizontal
垂直扫描
000~255
000~255
0~540 rotate
0~270 rotate
3
:Strobe
Dimmer
7
color sheet
8
9
Focus
prism
10
11
prism rotate
speed of
horizontal or
vertical
reset
12
000~009
010~019
020~029
030~039
040~049
050~059
060~069
070~079
080~089
090~099
100~109
110~119
120~129
130~139
140~149
150~159
160~169
170~179
180~255
white
half color 1
color 1
half color 2
color 2
half color3
color 3
half color 4
color4
half color 5
color 5
half color 6
color 6
half color 7
color 7
half color 8
color 8
half color9
rainbow effect ,from slow to fast
000~255
000~127
128~255
000~255
000~255
unlimited focus
No prism
Three prism
prism rotate
speed max to min speed
000~250
251~255
nothing
rest,press 3 second
4.1 luxmeter
4.2 supplement
Failure
Failure Analysis
Failure Parts
power line
Don’t Work
Power supply loose or fault
fuse
power supply
Beads aren’t lighted
LED13 beads damaged
LED13 bead board
Driven Plate damaged
Driven Plate
XH2 core cables loose contact or
XH2 core cables
ddisconnect
Lamp’s fan damaged
Plastic moter(90*90*20)
Led driven board
Fan works unnromal
Bottom’s fan damaged
the whole can reset but can not be
Display
controlled
XH3 pin does not connect well
Plastic moter(60*60*25)
power switch
damage
Do not operate follow the instruction
display
XH3 pin connect
instruction
the mistake of the three-prism
Three-prism fall of
Three-prism
the mistake of the color sheet
Three-prism moter damage
Color sheet moter damage
Three-prism moter
Color sheet moter
Rotate Gobo moter damage
Rotate Gobo moter
the mistake of the rotate Gobo light
the mistake of the horizontal work
LED control board
the mistake of the vertical work
Rotage Gobo jam
Rotate Gobo
Gobo hall board damage
Gobo hall board
Gobe moter damage
Vertical moter damage
Vertical belt damage
Gobe moter
Vertical moter
Vertical belt
Vertical hall board damage
Vertical hall board
optical code board damage
optical code board
Horizontal moter damage
horizontal belt damage
Horizontal moter
horizontal belt
horizontal hall board
horizontal hall board
d
optical code board damage
optical code board
4.3 picture of structure
number
name
number
name
number
name
1
Sheath of lens
11
Drive-board
21
Component
of motor
of the X axis
driven wheel
2
concave-convex
12
lens
3
Fix board
Main stand of
22
head
13
White
bridge
LED
23
component
4
Prism board
14
Stand of the
Component
of the screen
The heatout
24
Base board
25
Stand of the
sheet of the
LED
5
Fix board of
15
kens
Stand of the
len motor
hook
6
stepper motor
16
Plastic motor
26
power
7
Component of
17
Sheath
27
Plug of the
gocus
8
Stand of Gobo
motor
18
moter
9
Gobo sheet
of
y axis driving
power
28
knob
29
Plastic motor
30
Three
wheel
19
Strenthen
board
10
Color sheet
20
stepper motor
XLR plug
pin