1
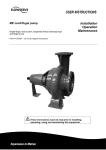
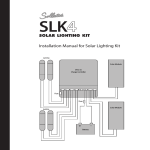
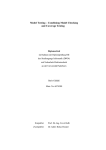
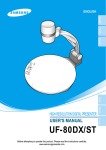
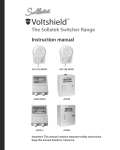
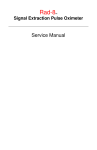
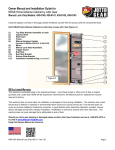
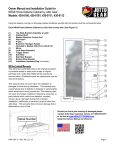
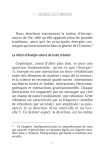
THE SOLLATEK GLOWSTAR
Low-cost lighting brilliance – a revolution in solar energy
USER'S MANUAL
Solar Systems
1. Unpacking and inspection
Thank you for purchasing your new Glowstar lantern.
On receiving your new Glowstar, make sure the outer packaging
is not damaged. Then carefully unpack the unit and inspect the
Glowstar casing and lamp. If there is any problem, immediately
contact your supplier.
Before using Glowstar, leave the light off and fully charge the unit
for at least one day
(see ‘How to use your Glowstar).
2. Important information
To charge your Glowstar you will need at least one of the
following items:
•
AC mains charger, or
•
Vehicle charge cable, or
•
Solar panel
Glowstar (GS5) and Glowstar (GS7): what’s the difference?
Glowstar (GS5)
Glowstar (GS7)
5W
7W
Lamp
Battery
4.4Ahr
7.2Ahr
Running time
from full charge
5.2 hours
8 hours
Auxiliary output*
-
12V, 0.5A
Auto function**
Max charge current
Weight
-
Yes
1.2A (20W)
1.8A (30W)
2.4kg
3.3kg
* 12V DC output for running radio, etc – other voltages available.
** Used with mains charger, auto function detects mains power
failure and acts as emergency light; used with solar module,
detects nightfall and acts as security light.
You can use a 5W, 7W or 9W compact fluorescent lamp with both
Glowstar models, but running times vary:
Lamp & equivalent
output
Glowstar (GS5)
5W (25W GLS)
5.2 hours*
7W (40W GLS)
3.7 hours
9W (60W GLS)
2.9 hours
NB. Times are approximate.
* Fitted as standard.
Glowstar (GS7)
8.5 hours
6.2 hours*
4.8 hours
The following Glowstar accessories are available:
Accessory
Use with
Use with
Glowstar (GS5) Glowstar (GS7)
Stock No.
5W solar module
Yes
Not
recommended
68005207
10W solar module
Yes
Yes
68013913
20W solar module
Yes
Yes
contact us
AC mains charger
Yes
Yes
96251000 (UK)
96251050 (euro)
96251100 (us)
Vehicle charge cable Yes
Yes
64523211
Cigar lighter socket No
Yes
64524211
AC mains charger
The AC mains charger connects to a normal wall socket (US, UK &
European) . It charges a Glowstar (GS5) in about 4 hours and a
Glowstar (GS7) in about 6 hours, and can work from 85 to 300V
AC (or 120V to 350V DC). The charger can be permanently
connected.
Vehicle charge cable
This connects between the charge input socket on the Glowstar
and a 12V vehicle cigar lighter socket. If the engine is off, the
lantern will charge slowly and will not reach full charge. If the
engine is running, the Glowstar battery will receive more charge.
The Glowstar can remain connected to the vehicle socket for
long periods.
Solar module
If your Glowstar package does not include a solar module, you
can install your own, provided it meets the following
specification:
Nominally 12V type
Max open-circuit voltage 24V
Max short-circuit current:
• Glowstar (GS5) 1.3A
• Glowstar (GS7) 2.1A
• Max peak power:
• Glowstar (GS5) 20W
• Glowstar (GS7) 30W
• Optimum voltage (Vspec.) 14V – 17V
• Optimum current (I @ Vspec.):
• Glowstar (GS5) 1.2A
• Glowstar (GS7) 1.8A
• Type: amorphous, poly- or mono-crystalline
• Must be robust enough to cope with intended use
(eg portable applications)
• Must have suitable cable or facility for connection
• Module cable will need a standard-type 2.1mm DC plug
(available from Sollatek).
Polarity: centre contact: positive
• Must be of good make and quality, for good service,
and reliable operation
Charging time when using a solar panel is variable and depends
on geographical location, availability of sunlight and cloud cover.
DC output adapter
The DC output adapter cable plugs into the ‘Aux’ output
socket on the Glowstar (GS7) and converts it to a socket like a
vehicle cigarette lighter socket. This can then be used to run a
mobile phone charger and other small appliances.
3. Safety advice
Used with care, Glowstar will give you many years of troublefree service. To make the most of your lantern, please follow
these hints:
Always:
• Keep your Glowstar lantern on charge (when possible).
(See section 9: proper care of batteries).
This will extend battery life and keep it ready to use.
• Keep Glowstar dry; store in moderate to low temperatures.
• If charging Glowstar outdoors, keep it in the shade.
Remember:
• Never immerse Glowstar in water deeper than 160mm.
• Never store in extreme conditions or expose to direct
sunlight.
• Never attempt to open Glowstar yourself (except to
change the lamp or battery).
• Do not confuse the two DC sockets (on GS7)
Charge from
solar module
4. How to use your Glowstar
Turning the lamp on:
Press on/off button (marked ‘I’) once. LEDs will show the
battery’s charge status. The left-hand green LED will light
when the battery is full. Other LEDs indicate ‘battery good’,
‘battery low’ and ‘lamp off’.
To avoid battery damage the lamp automatically turns off
when the battery is very low. With about 10 minutes running
time left, the lamp will switch off for 1 second and back on as
a warning. When the lamp finally turns off, the LEDs will
continue to indicate the lamp status for a few minutes. The
unit then shuts down to save power.
Turning the lamp off:
Press the on/off button again. The LEDs will continue to show
Glowstar’s status. It will shut down completely after a few
minutes. Alternatively, hold the button down again for seven
seconds and release; it will then shut down.
AUTO*
AUX
BUTTON & LED
OUTPUT*
*on Glowstar (GS7) only
DC INPUT FROM 12V SOLAR MODULE, MAINS ADAPTER
OR VEHICLE CIGARETTE LIGHTER SOCKET
Charge from mains
•
•
•
BATTERY
FULL
BATTERY
GOOD
BATTERY
LAMP
ON/OFF
LOW
OFF
BUTTON
Legends description
5. How to charge your Glowstar’s battery
Charge from vehicle
1. Connect your charging source (solar module, mains charger or vehicle lighter socket) to
the small side socket marked with a battery symbol. The battery will charge automatically.
2. The yellow charge indicator (above the socket) will light when there is charging power
available.
3. You can run the light while you are charging. However, the battery will receive little or no
charge. For a correct charge it is best to have the light off (and nothing plugged into the
‘Aux’ socket on Glowstar (GS7)).
4. As the battery charges, indicators will change until the green ‘battery full’ LED lights. To
ensure the battery is totally charged, leave power connected for an hour or two longer.
5. It is important to keep the battery fully charged and ready for use. Glowstar should
therefore always be connected to the charge source when not in use. If you use the light in
the same place as it is charged, there is no need to disconnect the charge cable.
6. Special features of Glowstar
(GS7)
turn off the light with the on/off button.
NB: if Glowstar (GS7) is in auto mode and the solar module
faces the lantern, the light may flash on and off. This is
because the module detects light from Glowstar at night and
‘thinks’ it is day again. This can be used to attract attention or
warn of an emergency.
8. How to change the battery/fuse
After a few years of use, the battery may need replacing. This will be evident when the ‘battery low’ LED comes on and then
the lamp turns off due to low voltage after only a short time, despite having been fully charged to the green ‘full’ level. It is
important to replace the battery with the correct size and type; If unsure contact your Sollatek distributor.
7. How to change the lamp
mobile phone charging
on Glowstar (GS7) only
1. Unscrew the 2 hex bolts with an M5 hex key, they will not
come right out as the are retained.
Auxiliary output
The side socket (marked with a ‘radio’ symbol) is for running
small appliances such as radios, extra lights, mobile phone
chargers, and any other appliance or device. It can be used
with the lamp on or off. It also can be used during charging
(but note that current to the battery will be reduced).
Please ensure the battery is replaced with a replacement of
the correct type. Contact your Sollatek distributor for details.
Simply remove the battery terminal connectors and replace
the battery, ensuring the polarity of the battery terminals
are reversed on reconnection i.e. make sure the red lead is
connected to the red terminal on the battery and that the
black lead is connected to the black terminal of the battery.
Output current is limited to 0.5Amps @12V. The auxiliary
output automatically turns off if the battery gets too low.
Pressing the on/off button turns on the lamp and auxiliary
output. To use the auxiliary output only, press the button once
more. The lamp will turn off whilst the auxiliary output
remains on for 1 hour, after which it will automatically turn off.
To turn it off earlier, hold down the on/off button for 7
seconds and release. Glowstar will switch off.
‘Auto’ function
This allows you to use Glowstar (GS7) as an emergency or
security light.
If the mains charger is connected and switched on, press the
‘auto’ button. A red LED will light to show automatic mode. If
mains power fails, Glowstar (GS7) will automatically turn the
lamp on. When mains power returns, the lamp will be
automatically turned off and the battery will start to recharge.
With a solar module, the auto function turns Glowstar (GS7)
into a security light. Place the module outside in sunlight. Run
the cable indoors to the Glowstar charging socket. Press the
on/off button to turn the light on, then press the auto button.
The lamp will turn off in daytime and on after dark.
Step 4: To change a battery.
After 10,000 hours, you may need to replace your Glowstar
lamp. Ensure you use a Philips, Osram or other Sollatek
approved lamps.
1. Remove connectors from charge input (and auxiliary output
on Glowstar GS7) ensuring lantern is turned off. No LEDs
should be lit.
2. Lift off handle/diffuser assembly.
2. Use a Pozi screwdriver to remove the screw at the top of the
clear lamp cover. Lift off the two halves of the cover and put
them aside. The screw should be held by a fibre washer.
It may be necessary to change the fuse in your Glowstar.
Please ensure the fuse is replaced with a spare of the correct
type and rating. If unsure, contact your Sollatek distributor.
3. Carefully lift lamp from its socket (it is a push fit with a
retaining spring-clip; it may be quite firm). Fit the new lamp,
ensuring it is pushed fully into the socket and is straight.
Step 5: How to change the fuse.
4. Clean lamp covers if necessary with clean water and a little
mild soap. Do not use abrasive cleaners. Dry thoroughly.
The lamp will light until the battery gets low, automatically
turning off at night. At sunrise, the battery will start to
recharge ready for automatic operation the following evening.
5. Refit lamp covers by inserting them into the base and
closing them at the top. Secure them in place with the screw.
Do not overtighten.
To cancel auto mode, press the auto button once. If necessary,
6. Press the on/off switch to ensure the new lamp works.
Simply remove the fuse from the inline fuse holder and
replace with an identically rated spare. See above diagram.
3. Carefully remove the black section and battery from the
orange casing and place on a table or workbench.
Angle of Glowstar Solar Module
from the ground
80º
70º
RI
S
60º
EW
Y
O
PO
N
E,
IC
N
50º
R
R
K
TL
A
N
D
PA
If in the southern hemisphere:
face your panel directly north.
LO
ND
ON
If in the northern hemisphere:
face your panel directly south.
M
A
D
RI
D
ST
LO
U
IS
KA
BU
SA
N
40º
L
DI
EG
CA
O
IRO
MIA
30º
MI
20º
KHAR
O
BANGAL
TOUM,
RE,LAG
RA,
OS, ACC
HARARE
M
S SALAA
I, DAR E
NAIROB
H O R I Z O N T A L
G R O U N D
15º
MINIMUM
T ILT
0º
9. Proper care of batteries
10. Troubleshooting guide
�
��������
������
��������
��
�����������������������������������
������������������
���������������������������������������������������
Full capacity will be reached after 2 or 3 full discharge / charge cycles.
���
�
��������������������������������
���������������������������
����������������������������������������
��������������������������������������������������
•
To obtain maximum life, always store batteries in a charged state.
�
�
�
�
������������������������
�
����������������������������������������������������������� �
����
•
When storing batteries, re-charge every 6 months to prevent damage through self discharge. This should be
done more often if storage temperature exceeds 25ºC.
�
�
�
�
�
�
����������������������������������������
������������������������������������������������������
�
������������������������������������������������������
�����������������������������������������������������
��
�
�����������������������������������������������
�
�������������������������������
�
������������������������������������������������������������
������������������������������
•
Do not subject the battery to heavy vibration or mechanical shock.
•
When you receive a new battery, charge fully before use.
•
• Try to store / use in a cool, dry place. Do not expose to excessive hot or cold (i.e. outside the range 10-35°C
ambient temp).
�
��
����������������������������������������
����������������������������
����������������������������������
��
�
����������������������������������������������
�
�����������������������������������������������������
���������������
��������������������������������������������������������������� �
• Do not attempt to dismantle a battery. They do not require topping up.
��
�
����������������������������������������������������������
�
������������������������
�������������������������������
����������������������������������
�����������������������������������������
• Do not incinerate batteries. Always recycle old batteries.
��
�
��������������������������������������
�
������������������������������
�
��������������������������������������������������������������� �
�������
��
�
�
�
��������������������������������������������
�
�
�
��������������������������
������������������������
�
�����������������������������������������
������������������������������������������������
����������������������������������������������������������� �
����������
������������������������������������������������������������
�
�
�
�
�������������������������������������������������
�
������������������������������������������������������������ �
����������
�
�
������������������������������������������������������
����������������������������������������������������
��
�
�
�
�
�������������������������������������������������
������������������������
�
�
�
���������������������������������������
�
�
�
����������������������������������������������������������
���������������������������������������������������������������������
�����������������������������������������������������������������������
�������
���
�
�
�
�
�
�
�
�
���������������������������������������������
���������������������������������
�
�
�
�
�
�
�
���������������
�
�
�����������������������������������������
�
�
�������������������
�
���������������������������������������������������������
�
���������������������������������������������������������������
����������������������������������
�������������������������������������������������������
�
������������������������������������������������������������������
����������������������
������������������������������������������������������������
������������������������
���
�
�
���
�
�
�
�
������������������������������������������������
�
������������������������������������������������
�
������������������������������������������������������������� �
����������������������������
�������������������������������������������������
����������������������������������������������
�
�
�
����������������������������������������������
�
�
�
������������������������������
��������������������������������������������������������
������������������������������������������������������������
���������������
• To prolong battery life, try to avoid the complete discharge of your battery before recovery charge.
• Do not discharge a battery deeper than you have to.
• To avoid the risk of shock, do not touch the terminals.
• Keep terminals free from dirt and corrosion.
• Do not short the connections.
• Always charge in a ventilated area.
• Always use a suitable charging device. If unsure, contact your distributor.
• Replace only with Sollatek recommended replacement batteries.
If unsure, contact your distributor.
11. Notes on Solar Module Use
Note that the black surface of the amorphous solar modules is
the active one and should face the sun. The silver surface
should face down. Carefully clean the surface of the module
once every 6 months or when dust builds up. Use a soft brush.
The module can also be wiped with a soft, damp cloth at a
cool time of day. Don’t use rough or abrasive cleaners.
For portable applications, avoid frequently holding the solar
module by one edge and tilting it, as this will in time cause a
break along the top of the module. Position the solar module
where it gets no shade or shadow over it all day. Make sure
vehicles will not run into it or animals knock it over. Charging
though window glass will reduce the charging efficiency.
Position the solar module to face the sun and adjust the angle
so as to make the largest shadow on the ground behind it.
For fixed use, the module is best mounted on the roof or some
other permanent position where it will not be damaged,
moved or stolen. Mount it on a small metal or wooden frame
to keep it away from the surface of the roof to allow air to
circulate under it. This will improve efficiency by preventing
the module from getting too hot. Don't mount it direct on a
metal roof or metal surface as this will get too hot. Instead put
a wooden board or similar on the metal roof.
For fixed use, it should be tilted at an angle from the ground
according to the table below and towards the equator. This
way it will get the best total sun though out the day and will
generally give you the best solar charge throughout the year,
taking into account the worst month. Don’t mount it at less
than 15º from flat, otherwise it won’t benefit from the natural
washing effect of rain.
Get into the habit of leaving the Glowstar plugged in to the
charge all the time and only remove it when you need to use
the lantern in an other room or location. Plug it back in as
soon as you have finished. This way it will stay topped up and
ready for use all the time. It will also help to give longer
battery life. There is no problem leaving the solar module or
charger plugged into the Glowstar over night because the
Glowstar has reverse discharge protection.
Actual solar module
appearance may differ
Tilt Angle of Solar Module.
It is best to face it to the equator, i.e. directly north (if you are
in the southern hemisphere) or directly south if you live in the
northern hemisphere). This way it will get the best total sun
though out the day. Alternatively you can move the module
round as the day goes on – if you remember! As a rough
guide, tilt it at an angel from the ground as shown in the table
below. This will generally give you the best solar charge
through out the year, taking into account the worse month. If
it is not going to be cleaned regularly, don’t mount it at less
than 15º otherwise it won’t benefit from the natural washing
effect of rain.
Location latitude
0-15°
15-25°
25-30°
30-35°
35-40°
40° +
Suggested Tilt Angle
from Horizontal
15º
Same as latitude
add 5° to local latitude
add 10° to local latitude
add 15° to local latitude
add 20° to local latitude
Latitude Tilted Angle
London, England
51
Paris, N France
48
Nice, S France
43
Madrid, Spain
40
Kabul, Afghanistan
34
Cairo, Egypt
30
Khartoum, Sudan
15
Bangalore, India
13
Lagos, Nigeria
6
Accra, Ghana
5
Nairobi, Kenya
-1
Dar Es Salaam, Tanzania -7
Harare, Zimbabwe
-17
Seattle
47
Melbourne
-37
Perth
-32
Darwin
-12
Wellington, NZ
-41
Rio de Janerio
-23
Buenos Aires
-34
Lima
-12
Belem, Brazil
-1
Guatemala
14
NYC, USA
40
Miami, FL, USA
25
San Diego, CA, USA
32
Portland, Oregon, USA 45
St. Louis, MO, USA
38
71
68
63
57
44
37
15
15
15
15
15
15
17
67
52
42
15
61
23
44
15
15
15
60
25 or 30
42
65
53
You can not have too large a solar panel, as long as you don’t
exceed the 20W max limit for the GS5 and 30W max for the
GS7.
The table below shows the recommended peak power of the
module. This takes into account the worst month of the year
for solar in that location, working on average solar data over
the past 10 years. It also assumes using 4 hours of a 5W lamp
with a GS5, or 7 hours of a 7W lamp with the GS7. The figures
in brackets are the calculated minimum module size. Some
generalisations have been made because of variations across
a region and there will also be variations due to localised
climate conditions. The table is therefore only an approximate
guide. Contact Sollatek for information that’s specific to your
location and intended use.
Location
The table below give some examples.
Location
Which Size of Solar Module?
This depends on the Glowstar model you have and on your
location on the globe. The table below gives a guide. If you
have a module that is too small, then the battery will not be
charged fully each day and so the lamp will turn off sooner
each evening. This will also mean the battery is permanently
in a low state of charge, which over a long period, will have a
detrimental effect on battery life.
Direction to
face
South
South
South
South
South
South
South
South
South
South
North or South
North
North
South
North
North
North
North
North
North
North
North or South
South
South
South
South
South
South
Tilted Average Insolation Module Wp
(sun hours per day) GS5
GS7
Nairobi, Kenya
4.0
Cairo, Egypt
5.0
5 (4)
10 (9.8)
Khartoum, Sudan
6.0
5 (3.3)
10 (8.2)
Accra, Ghana
3.5
5 (5.7)
20 (14)
Lagos, Nigeria
3.5
5 (5.7)
20 (14)
Tripoli, Libya
5.0
5 (4)
10 (9.8)
Dar es Salaam, Tanzania 4.0
5 (5) 10 or 15 (12.25)
5 (5) 10 or 15 (12.25)
Harare, Zimbabwe
5.5
5 (3.6)
10 (8.9)
Most of India
4.5
5 (4.5)
10 (10.8)
Kabul, Afghanistan
5.0
5 (4)
10 (9.8)
Northern France
1.5
20 (13.4)
30 (32.7)
Southern France
2.0
10 (10)
30 (24.5)
Spain
3.0
10 (6.7)
20 (16.4)
England
1.0
20 (20)
50 (49)*
* Using the GS7 with a 7W tube for 7 hours a day in winter will
require a solar module which exceeds the input rating of the
Glowstar. A 30W module should be used and ether a 5W tube
used or less that 7 hours running time per day in winter be
expected.
Other modules available now feature flexible solar
modules for the most unforgiving of environments.
Ask your sollatek distributor for further details.
Sollatek (UK) Ltd.
Unit 10, Poyle 14 Industrial Estate,
Newlands Drive,
Poyle, Slough,
Berkshire SL3 0DX, UK
Tel: +44 (0)1753 688300
Fax: +44 (0) 1753 685306
Technical support: [email protected]
Sales: [email protected]
www.sollatek.com
www.glowstar.net
© Sollatek (UK) Limited 1996
All Rights Reserved.
SOLLATEK and the SOLLATEK device
are the trade marks of the Sollatek
group of companies.
Specifications are subject to change without prior notice.
Revision No. 2.0 March 05
Solar Systems