1
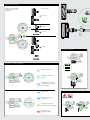
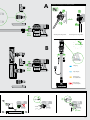
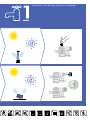
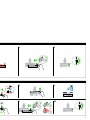
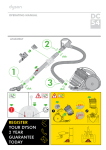
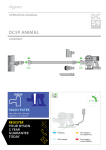
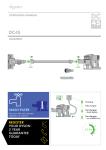
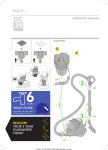
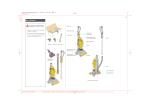
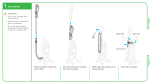
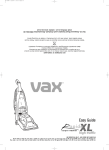
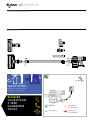
OPERATING MANUAL
ASSEMBLY
click
click
WASH FILTERS
Wash filters with cold water
regularly or as required.
REGISTER
YOUR DYSON
2 YEAR
GUARANTEE
TODAY
SV09
Charging.
Not charging –
too cold/too hot.
Fully charged.
Not charging –
contact Helpline.
IMPORTANT SAFETY INSTRUCTIONS
BEFORE USING THIS APPLIANCE READ ALL INSTRUCTIONS AND CAUTIONARY MARKINGS
IN THIS MANUAL AND ON THE APPLIANCE
When using an electrical appliance, basic precautions should always be followed, including
the following:
WARNING
1.
2.
3.
4.
5.
6.
7.
8.
9.
10.
11.
12.
13.
14.
15.
16.
17.
18.
19.
20.
21.
22.
23.
2
These warnings apply to the appliance, and also where applicable, to all tools, accessories,
chargers or mains adaptors.
TO REDUCE THE RISK OF FIRE, ELECTRIC SHOCK, OR INJURY:
This Dyson appliance is not intended for use by young children or infirm persons with reduced
physical, sensory or reasoning capabilities, or lack of experience and knowledge, unless they have
been given supervision or instruction by a responsible person concerning use of the appliance to
ensure that they can use it safely.
Do not allow to be used as a toy. Close attention is necessary when used by or near children.
Children should be supervised to ensure that they do not play with the appliance.
Use only as described in this Dyson Operating Manual. Do not carry out any maintenance other
than that shown in this manual, or advised by the Dyson Customer Care Helpline.
Suitable for dry locations ONLY. Do not use outdoors or on wet surfaces.
Do not handle any part of the plug or appliance with wet hands.
Do not use with a damaged cable or plug. If the supply cable is damaged it must be replaced by
Dyson, its service agent or similarly qualified person in order to avoid a hazard.
If the appliance is not working as it should, has received a sharp blow, has been dropped,
damaged, left outdoors, or dropped into water, do not use and contact the Dyson Customer
Care Helpline.
Contact the Dyson Customer Care Helpline when service or repair is required. Do not
disassemble the appliance as incorrect reassembly may result in an electric shock or fire.
Do not stretch the cable or place the cable under strain. Keep the cable away from heated
surfaces. Do not close a door on the cable, or pull the cable around sharp edges or corners.
Arrange the cable away from traffic areas and where it will not be stepped on or tripped over.
Do not run the appliance over the cable.
Do not unplug by pulling on the cable. To unplug, grasp the plug, not the cable. The use of an
extension cable is not recommended.
Do not use to pick up water.
Do not use to pick up flammable or combustible liquids, such as petrol, or use in areas where
they or their vapours may be present.
Do not pick up anything that is burning or smoking, such as cigarettes, matches, or hot ashes.
Keep hair, loose clothing, fingers, and all parts of the body away from openings and moving
parts, such as the brush bar. Do not point the hose, wand or tools at your eyes or ears or put
them in your mouth.
Do not put any object into openings. Do not use with any opening blocked; keep free of dust, lint,
hair, and anything that may reduce airflow.
Use only Dyson recommended accessories and replacement parts.
Do not use without the clear bin and filters in place.
Unplug when not in use for extended periods and before maintenance or servicing.
Use extra care when cleaning on stairs.
Do not install, charge or use this appliance outdoors, in a bathroom or within 3 metres (10 feet) of
a pool. Do not use on wet surfaces and do not expose to moisture, rain or snow.
Use only Dyson chargers for charging this Dyson appliance. Use only Dyson batteries: other types
of batteries may burst, causing injury to persons and damage.
Do not incinerate this appliance even if it is severely damaged. The battery may explode in a fire.
Always turn ‘OFF’ the appliance before connecting or disconnecting the motorised brush bar.
READ AND SAVE THESE INSTRUCTIONS
THIS DYSON APPLIANCE IS INTENDED FOR HOUSEHOLD USE ONLY
Do not use near
naked flames.
Do not store near
heat sources.
Do not pick up
water or liquids.
Do not pick up
burning objects.
Do not put hands near
the brush bar when the
appliance is in use.
3
Power mode and run-time
Powerful suction
To change the mode, hold the
trigger down and press the
max button.
16 minutes.
17 minutes.
20 minutes.
1
2
click
Max mode
6 minutes.
Emptying the clear bin
Diagnostics – main body and battery.
Solid blue: Max ‘ON’.
Flashing blue: Low battery
warning.
Fast flashing blue: No power,
temporary fault (e.g. check filter
or for blockages).
Solid blue: On.
Flashing blue: No power,
charge battery.
Flashing amber: No power,
temporary fault (e.g. too hot/cold).
Flashing red: Fault
(ring Dyson Helpline).
4
Looking for blockages – main body.
A
Storage and charging in the docking station
1
1
click
2
Attaching to docking station.
click
2
Removing from docking station.
B
Charging.
click
Fully charged.
Not charging –
too cold/too hot.
Not charging –
contact Helpline.
click
5
IMPORTANT!
WASH FILTERS
A
B
6
Wash filters with cold water regularly or as required.
7
Soft roller cleaner head instructions
Looking for blockages
•
Ensure the appliance is disconnected from the charger before looking for
blockages. Be careful not to pull the ‘ON’ trigger.
Do not operate while checking for blockages. Failure to do so could result in
personal injury.
Beware of sharp objects when checking for blockages.
To gain access to blockages in the floor tool, remove the base plate by using a
coin to loosen the screw marked with a padlock.
If you cannot clear an obstruction you may need to remove the brush bars,
please refer to the ‘Washing the brush bars’ section for instructions on how to
do this. Remove the obstruction and replace the brush bars as shown in the
‘Washing the brush bars’ section. Ensure that the fastener is fully turned and the
base plate and brush bars are secure before operating the appliance.
This product has carbon fibre brushes. Take care if coming into contact with
them, as they may cause minor skin irritation. Wash your hands after handling
the brushes.
Refit all parts securely before using.
Clearing blockages is not covered by your Dyson guarantee.
•
•
•
•
•
•
•
WASHING THE BRUSHBARS
•
•
•
•
•
•
•
•
•
•
•
Your appliance has two washable brush bars, check and wash these regularly
according to the following instructions to maintain performance.
Ensure the appliance is disconnected from the charger before removing the
brush bar. Be careful not to pull the 'ON' trigger.
•
TO REMOVE, WASH AND REPLACE BRUSHBARS:
•
Please refer to the 'Washing the brush bars' illustrations alongside the
instructions below.
Turn the cleaner head upside down so the underside of the cleaner head is
facing you. Use a coin to turn the fastener one quarter anti-clockwise to the
unlocked position.
Rotate the end cap to the open position. Gently slide the large brush bar away
from the cleaner head.
Remove the end cap from the large brush bar.
Lift out the small brush bar from the octagonal end and pull away from the
cleaner head.
Hold the brush bars under running water and gently rub to remove any lint
or dirt.
Stand both brush bars upright. Ensure the large brush bar is stood upright as
shown. Leave to dry completely for a minimum of 24 hours.
Before replacing, check that the brush bars are completely dry. Refit the small
brush bar before the large one. Insert the round end of the small brush bar into
place. Push down the octagonal end until it clicks into place.
Reattach the end cap to the brush bar.
Slide the large brush bar back onto the cleaner head, around the motor. The
end cap should be in the open position as shown. Once in place, rotate the end
cap back into the closed position.
Close the fastener by turning a quarter turn clockwise. Ensure that the fastener is
fully turned and the brush bars are secure.
Clearing brush bar obstructions
1
2
3
1
2
Washing the brushbars
2
3
1
1
2
6
7
8
click
8
cli
4
5
2
1
5
9
10
2
4
1
ick
9
Direct drive cleaner head instructions
Looking for blockages
•
•
•
•
•
•
•
•
Ensure the appliance is disconnected from the charger before looking for
blockages. Be careful not to pull the ‘ON’ trigger.
Do not operate while checking for blockages. Failure to do so could result in
personal injury.
Beware of sharp objects when checking for blockages.
To gain access to blockages in the floor tool, remove the base plate by using a
coin to loosen the screw marked with a padlock.
If you cannot clear an obstruction you may need to remove the brush bar. Use
a coin to unlock the fastener marked with a padlock. Remove the obstruction.
Replace the brush bar and secure it by tightening the fastener. Ensure it is fixed
firmly before operating the appliance.
This product has carbon fibre brushes. Take care if coming into contact with
them, as they may cause minor skin irritation. Wash your hands after handling
the brushes.
Refit all parts securely before using.
Clearing blockages is not covered by your Dyson guarantee.
Looking for blockages
Clearing brush bar obstructions
1
10
2
3
USING YOUR DYSON APPLIANCE
Diagnostics - main body
Please read the 'Important Safety Instructions' in this Dyson
Operating Manual before proceeding.
When in use, trigger pressed:
Operation
•
•
•
•
•
•
•
•
Do not use outdoors or on wet surfaces or to vacuum water or other liquids –
electric shock could occur.
Ensure the appliance remains upright in use and in storage. Dirt and debris may
be released if it is turned upside down.
Do not operate while checking for blockages.
For domestic indoor and car use only. Do not use it whilst the car is in motion or
while driving.
To operate the MAX mode, hold the trigger down and press the MAX button.
The MAX button will light up.
To switch off MAX mode, hold the trigger down and press the MAX button
again. Note: The appliance will retain the last used mode. So if you use it in
MAX mode and do not disengage it, the appliance will operate in MAX mode
when it is next used until you depress the MAX button to disengage it.
This product has carbon fibre brushes. Take care if coming into contact with
them, as they may cause minor skin irritation. Wash your hands after handling
the brushes.
To watch a short online video visit:
–– AU: www.dyson.com.au/SV09gettingstarted
–– NZ: www.dyson.co.nz/SV09gettingstarted
Solid blue: Max ‘ON’.
Light off: powerful suction.
Flashing blue: Low battery warning.
Fast flashing blue: No power, temporary
fault (e.g. check filter or for blockages).
DOCKING STATION INSTALLATION
•
•
•
Use appropriate mounting hardware for your wall type and ensure that the
docking station is mounted securely. Ensure no pipe work (gas, water, air) or
electrical cables, wires or ductwork are located directly behind the mounting
area. The docking station must be mounted in accordance with regulations
and applicable codes/standards (state and local laws may apply). Dyson
recommends the use of protective clothing, eyewear and materials as necessary.
•
•
CARPETS OR HARD FLOORS
•
Before vacuuming your flooring, rugs and carpets, check the manufacturer's
recommended cleaning instructions.
The brush bar on the appliance can damage certain carpet types and floors.
Some carpets will fuzz if a rotating brush bar is used when vacuuming. If this
happens, we recommend vacuuming without the motorised floor tool and
consulting with your flooring manufacturer.
Before vacuuming highly polished floors, such as wood or lino, first check that
the underside of the floor tool and its brushes are free from foreign objects that
could cause marking.
LOOKING AFTER YOUR DYSON APPLIANCE
•
•
•
•
•
Do not carry out any maintenance or repair work other than that shown in this
Dyson Operating Manual, or advised by the Dyson Customer Care Helpline.
Only use parts recommended by Dyson. If you do not this could invalidate your
Dyson guarantee.
Store the appliance indoors. Do not use or store it below 3°C (37.4°F). Ensure
the appliance is at room temperature before operating.
Clean the appliance only with a dry cloth. Do not use any lubricants, cleaning
agents, polishes or air fresheners on any part of the appliance.
Check the brush bar regularly and clear away any debris (such as hair). Debris
left on the brush bar may cause damage to flooring when vacuuming.
VACUUMING
•
•
•
•
•
•
•
•
•
Do not use without the clear bin and filters in place.
Fine dirt such as flour should only be vacuumed in very small amounts.
Do not use the appliance to pick up sharp hard objects, small toys, pins, paper
clips, etc. They may damage the appliance.
When vacuuming, certain carpets may generate small static charges in the
clear bin or wand. These are harmless and are not associated with the mains
electricity supply. To minimise any effect from this, do not put your hand or
insert any object into the clear bin unless you have first emptied it. Clean the
clear bin with a damp cloth only. (See ‘Cleaning the clear bin’.)
Use extra care when cleaning on stairs.
Do not rest the appliance on chairs, tables, etc.
Do not press down on the nozzle with excessive force when using the appliance
as this may cause damage.
Do not leave the cleaner head in one place on delicate floors.
On waxed floors the movement of the cleaner head may create an uneven
lustre. If this happens, wipe with a damp cloth, polish the area with wax, and
wait for it to dry.
Emptying the clear bin
•
•
•
•
•
Empty as soon as the dirt reaches the level of the MAX mark – do not overfill.
Ensure the appliance is disconnected from the charger before emptying the
clear bin. Be careful not to pull the 'ON' trigger.
To make emptying the clear bin easier, it is advisable to remove the wand and
floor tool.
To release the dirt, push the red button by the clear bin: Press once to open the
bin base. Press a second time to release the clear bin from the main body of
the appliance.
To minimise dust/allergen contact when emptying, encase the clear bin tightly in
a plastic bag and empty.
Remove the clear bin carefully from the bag.
Seal the bag tightly, dispose as normal.
Close the clear bin base so it clicks into place and is secure.
Cleaning the clear bin
•
•
•
•
•
•
•
•
•
•
•
Ensure the appliance is disconnected from the charger before removing the
clear bin. Be careful not to pull the ‘ON’ trigger.
Remove the wand and floor tool.
Push the red button by the clear bin: Press once to open the bin base. Press a
second time to release the clear bin from the main body of the appliance.
Remove the clear bin carefully.
Clean the clear bin with a damp cloth only.
Do not use detergents, polishes or air fresheners to clean the clear bin.
Do not put the clear bin in a dishwasher.
Clean the cyclone shroud with the brush on the combination tool to remove lint
and dust.
Ensure the clear bin is completely dry before replacing.
To replace the clear bin, push the clear bin up and in to the main body of the
appliance. It will click into place.
Close the clear bin base so it clicks into place and is secure.
WASHING THE FILTERS
•
Your appliance has two washable filters; wash the filters at least once a month
according to the following instructions to maintain performance. More frequent
washing may be required where the user: vacuums fine dust, operates mainly in
'Powerful suction' mode, or uses the machine intensively.
WASHING FILTER A
•
•
•
•
•
•
•
•
•
•
•
Ensure the appliance is disconnected from the charger before removing the
filter. Be careful not to pull the ‘ON’ trigger.
To remove the filter, lift it out of the top of the appliance.
Check and wash the filter regularly according to instructions to
maintain performance.
The filter may require more frequent washing if vacuuming fine dust or if used
mainly in ‘Powerful suction’ mode.
Wash the filter with cold water only.
Run water over the outside of the filter until the water runs clear.
Squeeze and twist with both hands to make sure the excess water is removed.
Lay the filter on its side to dry. Leave to dry completely for a minimum of
24 hours.
Do not put the filter in a dishwasher, washing machine, tumble dryer, oven,
microwave or near a naked flame.
To refit, place the dry filter back into the top of the appliance. Make sure it is
fitted properly.
To watch a short online video, visit:
–– AU: www.dyson.com.au/SV09filterwash
–– NZ: www.dyson.co.nz/SV09filterwash
11
WASHING FILTER B
•
•
•
•
•
•
•
To remove the filter, twist anti clockwise to the open position and pull away from
the appliance.
Wash the inside of the filter under cold running water, rotating the filter to
ensure all pleats are covered.
Gently tap the filter against the side of the sink several times to remove
any debris.
Repeat this process 4-5 times until the filter is clean.
Place the filter upright, with the Max button facing upwards, and leave to dry
completely for a minimum of 24 hours.
To refit, return the filter to the open position and twist clockwise until it clicks
into place.
To watch a short online video, visit:
–– AU: www.dyson.com.au/SV09filterwash
–– NZ: www.dyson.co.nz/SV09filterwash
Battery safety instructions
•
•
•
CAUTION
The battery used in this device may present a risk of fire or chemical burn if
mistreated. Do not disassemble, short contacts, heat above 60°C (140°F), or
incinerate. Keep away from children. Do not disassemble and do not dispose of
in fire.
Blockages – automatic cut-out
•
•
•
•
•
•
•
•
This appliance is fitted with an automatic cut-out.
If any part becomes blocked the appliance may automatically cut out.
This will happen after the motor pulses a number of times (i.e switches on and
off in quick succession).
Leave to cool down before looking for blockages.
Ensure the appliance is disconnected from the charger before looking for
blockages. Failure to do so could result in personal injury.
Clear any blockage before restarting.
Refit all parts securely before using.
Clearing blockages is not covered by your Dyson guarantee.
AUSTRALIAN CONSUMER LAW
The details of the Dyson guarantee are set out below. In addition to your rights
under the Dyson guarantee, we also provide the following statement as required
by the Australian Consumer Law: In Australia, your Dyson appliance comes with
statutory guarantees that cannot be excluded under the Australian Consumer
Law. You are entitled to a replacement or refund for a major failure and for
compensation for any other reasonably foreseeable loss or damage. You are
also entitled to have your Dyson appliance repaired or replaced if it fails to be of
acceptable quality and the failure does not amount to a major failure.
CHARGING AND STORING
•
•
•
This appliance will switch ‘OFF’ if the battery temperature is below 3°C
(37.4°F). This is designed to protect the motor and battery. Do not charge the
appliance and then move it to an area with a temperature below 3°C (37.4°F)
for storage purposes.
To help prolong battery life, avoid recharging immediately after a full discharge.
Allow to cool for a few minutes.
Avoid using the appliance with the battery flush to a surface. This will help it run
cooler and prolong battery run time and life.
Diagnostics – battery
When in use, trigger pressed:
If the battery needs replacing please contact the Dyson Customer Care Helpline.
Use only Dyson chargers for charging this Dyson appliance.
The battery is a sealed unit and under normal circumstances poses no safety
concerns. In the unlikely event that liquid leaks from the battery do not touch the
liquid and observe the following precautions:
–– Skin contact – can cause irritation. Wash with soap and water.
–– Inhalation – can cause respiratory irritation. Expose to fresh air and seek
medical advice.
–– Eye contact – can cause irritation. Immediately flush eyes thoroughly with water
for at least 15 minutes. Seek medical attention.
–– Disposal – wear gloves to handle the battery and dispose of immediately,
following local ordinances or regulations.
DYSON 2 YEAR GUARANTEE
TERMS AND CONDITIONS OF YOUR DYSON 2 YEAR GUARANTEE.
•
•
•
•
•
•
The Dyson guarantee becomes effective from the date of purchase.
All work will be carried out by Dyson Appliances (Aust) Pty Ltd., Avery Robinson
Ltd. (NZ) or their authorised agents.
Any parts replaced by Dyson or its service agents will become the property of
Dyson Appliances (Aust) Pty Ltd. or Avery Robinson Ltd. (NZ).
The repair or replacement of your Dyson appliance under the Dyson guarantee
will not extend the period of the Dyson guarantee.
The Dyson guarantee provides benefits which are additional to and do not affect
your statutory rights as a consumer.
You must provide proof of (both the original and any subsequent) delivery/
purchase before any work can be carried out on your Dyson appliance. Without
this proof, any work carried out pursuant to the Dyson guarantee and any
associated delivery charges (both to and from us) will be at your cost, subject to
your statutory rights and remedies as a consumer. Please keep your receipt or
delivery note.
WHAT IS COVERED
Solid blue: On.
•
Flashing blue: No power, charge battery.
Flashing amber: No power, temporary fault
(e.g. too hot/cold).
•
WHAT IS NOT COVERED
Solid amber: Not charging, temporary fault (e.g.
too hot/cold).
•
Flashing red: Fault (ring Dyson Helpline).
When charging battery:
•
•
•
•
•
•
•
Solid blue: Charging.
Flashing blue - Not charging - Re-fit charger or try another
socket. If persists, contact helpline.
Lights off: Charging complete.
Solid amber: Not charging, temporary fault
(e.g. too hot/cold).
Flashing red: Fault (ring Dyson Helpline).
12
Your Dyson guarantee covers:
The repair or replacement of your Dyson appliance if your Dyson appliance is
found to be defective due to faulty materials, workmanship or function within
2 years of purchase or delivery (if any part is no longer available or out of
manufacture, Dyson will replace it with a functional replacement part).
This Dyson guarantee will only be valid if the appliance is used in the country in
which it was sold.
•
•
•
•
•
Under your Dyson guarantee, Dyson shall not be liable for costs of repair or
replacement of a product incurred as a result of:
Accidental damage, faults caused by negligent use or care, misuse, neglect,
careless operation or handling of the Dyson appliance which is not in
accordance with this Dyson Operating Manual.
Use of the Dyson appliance for anything other than normal domestic purposes
in the country of purchase.
Use of parts not assembled or installed in accordance with the instructions
of Dyson.
Use of parts and accessories other than those produced or recommended
by Dyson.
Repairs or alterations carried out by parties other than Dyson or its
authorised agents.
Damage from external sources such as transit, weather, electrical outages or
power surges.
Failures caused by circumstances outside Dyson’s control.
Blockages – please refer to the illustrations and the section ’Looking for
Blockages‘ in this Dyson Operating Manual for details of how to look for and
clear blockages.
Normal wear and tear (e.g. fuse, brush bar etc.).
Use of this appliance on rubble, ash, plaster.
Reduction in battery discharge time due to battery age or use (cordless
machines only).
If your Dyson guarantee does not apply, you may have statutory rights and
remedies available to you as a consumer.
If your Dyson guarantee does not apply, you may have statutory rights
and remedies available to you as a consumer. If you are in any doubt as to
what is covered by your Dyson guarantee, please call the Dyson Customer
Care Helpline.
REGISTERING YOUR DYSON GUARANTEE
•
•
•
To help us ensure you receive prompt and efficient service, please register as a
Dyson appliance owner. There are three ways to do this:
Online:
AU: www.dyson.com.au/register
NZ: www.dyson.co.nz/register
By calling the Dyson Customer Care Helpline.
By completing and returning the enclosed form to us by mail.
This will confirm ownership of your Dyson appliance in the event of an insurance
loss, and enable us to contact you if necessary.
DYSON CUSTOMER CARE
•
•
•
•
Your Dyson appliance will be covered for parts and labour for 2 years from the
date of purchase, as detailed in the terms of the Dyson guarantee in this Dyson
Operating Manual.
If you have a query about your Dyson appliance, call the Dyson Customer Care
Helpline quoting your serial number and details of where and when you bought
the appliance. Alternatively, contact us via the website.
Most queries can be solved over the phone by one of our Dyson Customer Care
Helpline staff.
If your Dyson appliance needs a service, call the Dyson Customer Care Helpline
so we can discuss the available options.
Your serial number can be found on your rating plate. For information on your
rating plate see the inside front cover.
To enable us to carry out work on your appliance, please contact the Dyson
Customer Care Helpline to obtain a reply paid delivery address in your state
(available in Australia only).
If your Dyson appliance is under Dyson guarantee and the repair or
replacement is covered, it will be repaired or replaced at no cost. If the repair or
replacement is found not to be covered under the Dyson guarantee, the repair
or replacement of the Dyson appliance and any associated delivery charges
(both to and from us) will be at your cost, subject to your statutory rights and
remedies as a consumer.
ABOUT YOUR PRIVACY
•
•
Dyson may use this information for future marketing and research purposes
(including sending commercial electronic messages) and may disclose it to third
parties for the purposes of providing the services you have requested or to our
business partners or professional advisers.
If you wish to access your personal information or see our full privacy policy,
please contact us at: [email protected]
DISPOSAL INFORMATION
Dyson products are made from high grade recyclable materials. Please dispose
of this product responsibly and recycle where possible. The battery should be
removed from the product before disposal. Dispose of or recycle the battery in
accordance with local ordinances or regulations.
When your Dyson appliance reaches the end of its life, we are responsible for
its safe disposal. You can send your old Dyson appliance back to us (at our
cost) and we will organise for it to be recycled. Please note that not all parts are
recyclable. Recycling of parts is subject to the capabilities of 3rd party suppliers.
Available in Australia only.
Simply:
1. Box up your old Dyson appliance.
2. Take the package to your local post office and send to the address below:
Dyson We Recycle
Reply Paid 83215
Dyson Service Centre
8–10 Mangrove Lane
Taren Point, NSW 2229
PRODUCT INFORMATION
Please note: Small details may vary from those shown.
13
IMPORTANT!
WASH FILTERS
Wash filters with cold water regularly or as required.
DYSON CUSTOMER CARE
Your Dyson appliance will be covered for parts and labour
for 2 years from the date of purchase, as detailed in the
terms of the Dyson guarantee in this Dyson Operating
Manual.
If you have a query about your Dyson appliance, call the
Dyson Customer Care Helpline quoting your serial number
and details of where and when you bought the appliance.
Alternatively, contact us via the website.
Most queries can be solved over the phone by one of our
Dyson Customer Care Helpline staff.
DYSON CUSTOMER CARE
Australia
Website: www.dyson.com.au
Email: [email protected]
Dyson Customer Care:
1800 239 766 (Mon-Fri 8:00am to 6:00pm EST,
Sat-Sun 8:30am to 4:00pm EST).
Address: Dyson Appliances (Aust) Pty Ltd.,
PO Box 2835, Taren Point, NSW 2229 Australia.
New Zealand
Website: www.dyson.co.nz
Email: [email protected]
Dyson Customer Care:
0800 397 667 (Mon-Fri 8:30am to 5:00pm).
Address: Avery Robinson Ltd., Unit F, 151D Marua Road,
Ellerslie, Auckland, 1051 New Zealand.
JN.67729 PN.211157-03-02 19.12.14
www.dyson.com.au
GUARANTEE FORM
Date of purchase
/
/
Country of purchase
Australia
New Zealand
Serial number
Title
Surname
First name
Address
Postcode
email
Mobile
Telephone
Store of purchase
Privacy Act
Dyson Appliances Ltd (Dyson) may collect and use your personal information to provide you updates on latest products and services, to
analyse and research customer’s choice on products, to provide products and services you have requested and for other purposes relating
or incidental to product guarantee (e.g. product guarantee registration, product recalls) (“the Purposes”). To do so, Dyson may disclose your
personal information to its related bodies, business partners or third parties. Some of the recipients are located overseas, including United States
of America, Amsterdam and United Kingdom.
If Dyson does not collect your personal information, then it may not be able to fulfil the Purposes.
Our privacy policy, located at www.dyson.com.au/support/privacy-policy.aspx, contains information about how you may access and correct your
personal information held by Dyson, and the privacy complaints handling process of Dyson.
You may contact Dyson at [email protected]
If you wish to receive information and updates about Dyson’s products and services, please tick this box. ■
Under the Australian Privacy Principles, before Dyson discloses personal information overseas, Dyson will take such steps as are reasonable in
the circumstances to ensure that the overseas recipient does not breach the Australian Privacy Principles. However, an individual may consent
to such disclosure without this requirement. If you consent to Dyson disclosing your personal information to business partners or third parties
overseas for the Purposes, please tick this box. ■
Note: If you do not provide consent, then Dyson may not be able to fulfil the Purposes.
3 EASY WAYS TO REGISTER YOUR DYSON 2 YEAR GUARANTEE
REGISTER
ONLINE
REGISTER
BY PHONE
AU: www.dyson.com.au/register
NZ: www.dyson.co.nz/register
AU 1800 239 766
NZ 0800 397 667
Visit our website to register
your Dyson full parts and labour
guarantee online.
Call our dedicated Helpline.
REGISTER
BY MAIL
Complete and return
the form to Dyson in the
envelope supplied.