1
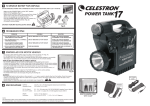
POWER TANK
Model: #18777
1. RECHARGE
3.OPERATION
IMPORTANT
- Make sure that your battery charger is set to the proper voltage setting before recharging. (FIG. 1 & 2)
- Charge your PowerTank before using the first time.
- Always make sure the switch is “OFF” when not in use.
- Never attempt to use the battery charger provided for other products.
- If yellow LED light is on during operation, battery is weak and should
be recharged. (FIG. 5 & 7)
- It is not recommend to use continuously when yellow LED light is ON,
do not use in this condition and recharge immediately.
- Do not exceed recommended charging times. Explosion hazard exists if you do not follow this instruction sheet.
- Do not expose to extreme heat, flame, rain or moisture. (FIG. 3)
Power Supply
-Make sure your devices match the PowerTank’s rating - 10Amp for DC 12V & 1 Amp for DC 3, 6, 9V. (FIG.11, 12)
-Connect your device to the
appropriate output receptacle.
-Switch “ON” the PowerTank before turning ON your device. (FIG.10)
WARNING:
- CONTINUOUS USE WHEN THE BATTERY IS LOW
WILL DAMAGE THE BATTERY AND MAY AFFECT
THE ABILITY TO RECHARGE YOUR POWER TANK.
- RECHARGE AFTER EVERY USE, FOLLOW THE INSTRUCTIONS TO RECHARGE.
HOW TO RECHARGE
AC RECHARGING
- Select the suitable adapter plug for the AC adapter (FIG. 6). Make sure that the plug
is completely locked in the adapter and snaps into place.
- Push the main switch to the “CHA” position (FIG. 4) and insert the small end of the included AC adapter into the charge input jack located on the SIDE PANEL of
PowerTank.
- Plug the charger into an appropriate electrical outlet. (FIG. 1 & 2). The RED recharging light should come “ON” indicating the battery is recharging. (FIG. 7)
- Charge the battery for 15 to 20 hours before initial use or long period of storage. After the initial charge, subsequent charges will only be 10 to 12 hours (approx). If the unit is used too long after the yellow light comes on, recharging could take up to 20 hours.
DC RECHARGING
- The DC recharging adapter is located in the compartment on the back side of the
PowerTank.
- Push the power switch to the “CHA” position (FIG. 4) and insert the provided “DC POWER CORD” into the charge input jack located on the SIDE PANEL of PowerTank. (FIG. 7)
- Insert the other end into the cigarette lighter and rotate to receive a good electrical
contact. (FIG. 9) The red light should come “ON” indicating the battery is recharging. (FIG. 7) Use DC 12V negative ground system only.
- The PowerTank should be charged for 10 to 12 hours (The charging rate will be 14.5 volts to 15.5 volts) while driving before initial use or long period of storage.
After the initial charge, subsequent charges will last only 6 to 8 hours (approx).
NOTE: Charging the battery while the car engine is not running is not recommended as it drains the car battery.
Engine must be running and the charging system functioning properly in order to initiate a charge. The ideal
charging rate is 14.5 volts to 15.5 volts, nearly identical to the charging system in most vehicles. If the unit is used
too long after the yellow light comes ON, recharging can take up to 8 hours.
WARNING:
- DON’T PLUG IN THE CIGARETTE LIGHT PLUG AND CHARGE THE UNIT WITHOUT STARTING THE ENGINE. THIS MAY DESTROY YOUR VEHICLE’S BATTERY.
- ALWAYS RECHARGE IN AN OPEN AREA, OTHERWISE EXPLOSIVE GAS MAY GENERATE DURING OVERCHARGING.
2.STORAGE
- High Temperature above 4°C should be avoided.
- It is important to store the PowerTank in a clean, cool and dry place. Radiant heat such as sunshine, heating units, radiators or steam pipes will shorten the life of the PowerTank.
- For longest life, PowerTank should be fully charged before going into storage. The PowerTank stored at 10°C or lower should be recharged at least once per six months. The PowerTank stored at 10°C TO 27°C should be charged every 3 months and recharging should occur every 45 days in temperature from 27°C TO 40°C.
The storage battery discharges automatically when the Power Tank is not used for a long time.
- Make sure the PowerTank IS “OFF” before going into storage.
Flashlight
- Switch “ON” the PowerTank. (FIG.10)
- Press Flashlight “ON/OFF” button to operate
“ON - FLASH - OFF”. (FIG.13)
- Flashlight can be detached for remote operation, screw
clockwise and pull out to detach. To reinstall, use the lever
behind the lid on the back of the flashlight to recoil the cord then push the flashlight back in and turn counter-clockwise.
Powerful Spotlight
- Adjust the spotlight head to desired direction. (FIG.16)
- Switch ON the PowerTank. (FIG.10)
- Switch ON the spotlight. (FIG.13)
Radio
- Switch “ON” the PowerTank. (FIG. 10)
- Turn the volume knob clockwise to turn “ON” the radio.
- Select AM or FM. (FIG.15)
- Adjust the frequency and volume as desired. (FIG.15)
Emergency Siren
- Switch “ON” the PowerTank. (FIG. 10)
- Turn the FM / AM / SIREN selector to SIREN position. (FIG.15)
WARNING:
- DO NOT OVERLOAD THE POWER TANK, DC 12V / 10A, DC3, 6, 9V/ 1A
- THE GLASS, REFLECTOR CUP AND THE BULB IS EXTREMELY HOT WHEN OPERATING, DO NOT TOUCH!!
- DO NOT USE TO JUMP START FROM DC 12V OUTPUT JACK. SHORT CIRCUIT OR CIRCUIT BREAKER CUT OFF WILL RESULT.
4. REPLACEMENT
FLASHLIGHT BULB
- Make sure to switch “OFF” the PowerTank and flashlight. (FIG. 17)
- Make sure the light has COOLED DOWN before replacing the bulb.
- Detach by screw clockwise and pull out.
- Remove the light cap by screwing it counter clockwise. (FIG. 18)
- Screw the bulb counter-clockwise to take off and replace with a
new bulb.
- Reassemble the light cap and reinstall to main body by pushing in
and screw counter-clockwise.
CIRCUIT BREAKER
Your PowerTank has a built-in circuit breaker to ensure a safe
operation.
If the output current goes over 12V, the circuit breaker will cut off
the power.
HOW TO RESET THE CIRCUIT BREAKER
- Turn “OFF” the PowerTank.
- Press the CIRCUIT BREAKER Button to reset it. (FIG. 19)
WARNING: DO NOT RECHARGE WHEN RESETTING THE CIRCUIT BREAKER
FUSE
If the 3V, 6V 9V is overloaded the fuse will break. Just turn “OFF” the Power Tank (FIG. 17). Open the fuse cap
(FIG. 20) and replace with a new 2 Amp Fuse.
5. TO REMOVE BATTERY FOR DISPOSAL
THIS RECHARGEABLE POWER TANK IS POWERED BY A SEALED
LEAD-ACID BATTERY, ONE PC (12V 17 Ah/20 HR).
- Make sure the PowerTank is in the “OFF” position before
removing battery. (FIG. 21)
- Make sure the PowerTank is disconnected from the charger which must be OFF from the electric supply. (FIG. 23)
- Remove the spotlight by loosening the screw.
- Face the PowerTank down and open into 2 halves by unscrewing screws counterclockwise. (FIG. 22)
- Cut wires to remove battery.
CAUTION: THERE MAY BE AN ELECTRIC SHOCK.
6. TROUBLESHOOTING
PROBLEM
1. NO LED INDICATOR (LOW or CHARGE) WHEN SWITCH IN ‘ON’ POSITION
2. NO LED INDICATOR (FULL or CHARGE) WHEN RECHARGING.
3. DC-12V OUTPUT DOESN’T WORK WHEN SWITCH IN ‘ON’ POSITION
4. DC 3, 6, 9V OUTPUT DOESN’T WORK WHEN SWITCH IN ‘ON’ POSITION
POSSIBLE CIRCUIT BREAKER BREAK THE CIRCUIT
CIRCUIT BREAKER BREAK THE CIRCUIT
CIRCUIT BREAKER BREAK THE CIRCUIT
FUSE WAS BROKEN
SOLUTION
RESET THE CIRCUIT BREAKER
ACCORDING TO THE INSTRUCTIONS
RESET THE CIRCUIT BREAKER
ACCORDING TO THE INSTRUCTIONS
RESET THE CIRCUIT BREAKER
ACCORDING TO THE INSTRUCTIONS
REPLACE THE FUSE ACCORDING TO
THE INSTRUCTIONS
7. STARTING AID FOR MOTOR VEHICLES
- The jumper cable with the battery clips is located on the rear of the unit. (Fig. 24)
- Do not take the jumper cables out of the unit unless you need them.
- The PowerTank can only be used as a starting aid when the
vehicle’s battery is only partially discharged. Thus, only a limited
capacity can be transferred into the vehicle’s battery.
HOW TO USE THE PowerTank TO START A VEHICLE:
- The ON/OFF switch can be set to”ON” or “OFF” position for the
starting aid function.
- Connect the POSITIVE pole (+) of the PowerTank to the POSITIVE pole (+) of the vehicle battery.
- Connect the NEGATIVE pole (-) of the PowerTank to the NEGATIVE pole (-) of the vehicle battery.
- Leave the PowerTank connected to the vehicle battery for around 20 minutes.
- After approximately 20 minutes, disconnect the jumper cable from the NEGATIVE pole (-) of
the vehicle battery.
- Then disconnect the jumper cable from the POSITIVE pole (+) of the vehicle battery.
- This partial charge should be sufficient to start the vehicle.
- The PowerTank needs to be recharged after using as a starting aid.
WARNING:
- The Fuse and Switch is no function on the connect ( + ) ( - ) pole, current flows directly from the
battery, Once the jumper cables are connected, NEVER allow the cables to touch together or be left on the same metal surface, this will result in short circuit and may start a fire.
- NEVER ATTEMPT TO START THE VEHICLE WITH THE POWER TANK CONNECTED.
8. SPECIFICATION
Batteries:
Operation Temp.:
DC 12V Output
DC 3,6,9V Output
Weight:
Dimension:
One Pc. 12V/17Ah Rechargeable Sealed Lead-Acid Battery.
32 to 86°F/ 0°C to 30°C
D.C. 12V/10A protect with 15A CIRCUIT BREAKER. Negative Ground.
D.C. 3,6,9V 1A output with 2 A FUSE Negative Ground.
20 lbs. / 9.1 kg. (Approx.)
355 H x 345 W x 132 D / 13.9” x 13.6” x 5.2” (Approx.)
NOTE: THE MANUFACTURER IS NOT RESPONSIBLE FOR ANY RADIO OR TV INTERFERENCE CAUSED
BY UNAUTHORIZED MODIFICATIONS TO THIS EQUIPMENT. SUCH MODIFICATIONS COULD VOID THE
USER’S AUTHORITY TO OPERATE THE EQUIPMENT.
2835 Columbia Street | Torrance, CA 90503 | TEL (310) 328-9560 | FAX (310) 212-5835 | www.celestron.com
Copyright 2012 Celestron | All rights reserved.
(Products or instructions may change without notice or obligation).
This product is designed and intended for use by those 14 years of age and older.