1
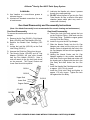
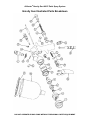
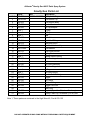
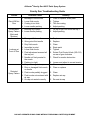
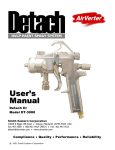
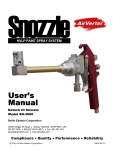
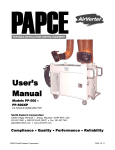
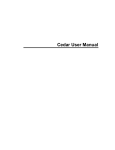
GravityGun HVLP PAINT SPRAY SYSTEM User ’ s Manual Gravity Gun GG-100 Smith Eastern Corporation 10630-S Riggs Hill Road • Jessup, Maryland 20794-9425 USA 301.497.7600 • 800.937.HVLP (4857) • Fax 301.497.7613 [email protected] • www.airverter.com Compliance • Quality • Performance • Reliability © 2000 Smith Eastern Corporation AirVerter® Gravity Gun HVLP Paint Spray System DO NOT OPERATE SPRAY GUNS WITHOUT PERSONAL SAFETY EQUIPMENT AirVerter® Gravity Gun HVLP Paint Spray System Please Read This Owner’s Manual BEFORE Using Your Gravity Gun DO NOT OPERATE THIS EQUIPMENT WITHOUT USING PROPER PERSONAL SAFETY EQUIPMENT INCLUDING RESPIRATOR, GOGGLES AND SAFETY CLOTHING. OBSERVE ALL PRECAUTIONS RELATED TO SPRAYING. WARNING THIS EQUIPMENT IS OPERATED USING PRESSURIZED AIR. ALWAYS DISCONNECT SPRAY GUN FROM AIR AND FLUID HOSES AND DEPRESSURIZE SYSTEM PRIOR TO ANY MAINTENANCE OR DISASSEMBLY PROCEDURE. WARRANTY Smith Eastern Corporation warrants to the Purchaser that the GG-100 Gravity Gun is free from defects in material or workmanship under normal use and service for a period of twelve (12) months from the date of purchase. Should any failure appear during this period, Smith Eastern shall, if given prompt written notice by the Purchaser, correct such nonconformity by repair or replacement of the nonconforming part, F.O.B. Smith Eastern’s repair facility. Repair parts are warranted for ninety (90) days from the date of shipment, but repairs or replacements to original equipment shall not renew or extend the warranty period of such equipment. Equipment and parts furnished by Smith Eastern but manufactured by others shall be limited to the warranty offered by the manufacturer thereof. Smith Eastern reserves the right to limit this warranty in cases of misuse or abuse. Any modifications to spray guns or recommended procedures will void the warranty. The foregoing warranty is exclusive and in lieu of other warranties of quality or performance, expressed, implied or statutory, including any warranties of merchantability or of fitness for a particular purpose. Why Airverter Spray Gun Systems Work Better To accomplish effective atomization of a liquid at low pressure (below 10 PSI) it is necessary to substantially decrease pressure (PSI) and increase air volume (CFM). AirVerter® systems, by design, do not exceed 10 PSI at the spray head and prevent the operator from taking AirVerter® spray guns out of compliance with EPA and California’s South Coast Air Quality Management District (SCAQMD) regulations. DO NOT OPERATE SPRAY GUNS WITHOUT PERSONAL SAFETY EQUIPMENT AirVerter® Gravity Gun HVLP Paint Spray System EQUIPMENT REQUIREMENTS Air Compressor High Pressure Air Hose ® Air compressors used with AirVerter Spray Guns must be able to HOLD a minimum of 40 PSI while spraying. Note: Position a pressure gauge in the air hose nearest the spray gun to be assured of the PSI required to satisfactorily spray your coating. A. Air hose lengths up to 50 feet MUST have an I.D. of 3/8" including fittings. B. Air hose lengths greater than 50 feet MUST have an I.D. of 1/2" including fittings. OPERATING INSTRUCTIONS OPERATION: Starting: A. The Gravity Gun GG-100 Spray Gun operates with the trigger controlling both the fluid flow and air flow. B. Consult the Needle, Nozzle and Air Cap Selection Guide to select the proper combination for the coating and finish quality desired. Too much pressure will create unnecessary overspray! Before Spraying A. Follow the Air and Paint Management Guidelines listed on the following page. B. Before paint is poured into the cup, make certain paint is properly mixed. This is particularly true when mixing multi-component paints. Use a paint shaker, rotary mixer, or paint paddle to achieve a homogeneous mixture. (Hint: Split your paint into two parts; the top will be lighter and the bottom will be heavier. Completely stir the bottom half of the paint and slowly add small amounts of the top half into the heavier bottom.) C. Strain your paint to remove impurities. Use a cone strainer or a 100-mesh nylon bag or equivalent strainer. D. Thin your paint according to the manufacturer’s specifications. E. Ensure needle packings are properly adjusted. Needle packings are preset at the factory to proper tension. However, use and cleaning may alter this setting. To adjust needle packings to proper tension: 1. With gun disconnected from air and fluid sources, pull trigger to move the needle out of the nozzle. 2. Adjust packing nut until needle is held in the open position by tension from the needle packings. 3. Loosen packing nut approximately ¼ turn or until needle returns to closed position. 4. Connect air supply hose to the Air Inlet Fitting (GG-027) at handle of gun. 5. The Air Control Valve (GG-026) in the gun handle can be used to adjust gun inlet pressure 6. Screw the Paint Cup (GG-031) onto the Fluid Inlet Fitting (GG-011) Spraying A. Gravity forces paint from the paint container into the fluid chamber of the gun and out through the nozzle where the flow of atomizing air breaks the paint stream into tiny particles, creating the spray. 1. Needle position controls the amount of paint flowing through the fluid nozzle. 2. Trigger action controls needle position. 3. The Fluid Control Knob (GG-015) at the rear of the spray gun controls trigger action. Turning the knob to the right reduces the fluid flow, turning it to the left increases the flow. B. Adjust the pattern by turning the Fan Control Assembly (GG-013) at the rear of the Spray Gun. 1. Round Pattern - used to draw fine lines with the gun close to the work, for touch-up work, camouflage patterns and painting surfaces in difficult to reach places distant from the spray gun. This pattern is achieved by turning the Fan Control Knob clockwise 2. Full Fan Pattern - used with the spray gun 6"-8" from the work. Overlap not more than DO NOT OPERATE SPRAY GUNS WITHOUT PERSONAL SAFETY EQUIPMENT AirVerter® Gravity Gun HVLP Paint Spray System 50% of the previous pass. Do not “fog” coat. This pattern is achieved by turning the Fan Control Knob counterclockwise. 3. The full fan pattern may be reduced in size by gradually turning the Fan Control Knob clockwise. Fluid flow must be reduced at the same time to maintain even paint distribution. C. If you are having problems with the operation of your paint gun, check the Trouble Shooting Guide at the end of the manual for possible causes and solutions. Air and Paint Management Guidelines Approximate PSI Application Thin Coatings Machines and implements, small parts, plant maintenance, controlled production work, work in enclosed areas with poor ventilation, priming. ZAHN #2 Test: 16 to 22 seconds Minimum 40 PSI compressor pressure Thin to Medium Coatings ZAHN #2 Test: 22 to 30 seconds 40 to 60 PSI compressor pressure High Solid Coatings ZAHN #3 Test: 37 + seconds 50 to 70 PSI compressor pressure 80% Solids Coatings 60 to 80 PSI compressor pressure Dual gun work for all of the above listed applications - will support up to 50' of 3/8" ID hose for each gun. Also for higher production levels of all of the above. Marine epoxies, marine enamels, high production steelwork, high production with conveyer lines, large surfaces with thinner viscosity material, latex on wood or metal. Ultra high production levels on extremely large surfaces; un-thinned epoxies, enamels, latex, urethane. WARNING Gun must be de-pressurized prior to any maintenance or disassembly procedure. Disconnect all air hoses prior to performing any maintenance operation. Cleaning the Gravity Gun Cleaning and Gun Care A. Remove the Air Cap and Ring and clean with solvent. B. Flush gun thoroughly with solvent. C. Clean nozzle with brush. Never place the whole gun in solvent. D. Clogged holes should never be cleaned with hard objects as the smallest amount of damage may badly influence the spray pattern. E. Packing must be slightly lubricated after cleaning of gun. Spray Gun Performance Is Directly Related To How Well The Gun Is Cleaned After Use DO NOT OPERATE SPRAY GUNS WITHOUT PERSONAL SAFETY EQUIPMENT AirVerter® Gravity Gun HVLP Paint Spray System Lubricate A. Use Vaseline or a non-silicone grease to lubricate the gun. B. Lubricate all threaded connections for ease of maintenance. C. Lubricate the Needle only where it passes through the needle packings. D. DO NOT allow lubricant to get into the Fluid Tube, Nozzle, Air Cap, or interior of the paint chamber (areas where paint may come in contact with lubricant). Gun Head Disassembly and Re-assembly Instructions (Note: Gun Head disassembly is not recommended for normal cleaning and maintenance.) Gun Head Disassembly Gun Head Re-assembly To remove the nozzle carrier and air cap adapter: A. Remove the Air Cap (GG-001), Fluid Nozzle Body (GG-002) and Fluid Needle (GG-014). B. Remove the Needle Seal Cartridge (GG024). C. Loosen the Lock Nut (GG-010) on the Fluid Inlet Fitting (GG-011). D. Unscrew the Fluid Inlet Fitting from the gun E. The Nozzle Carrier (GG-005) and Air Cap Adapter (GG-006) will now slide forward from the Gun Handle (GG-012). Note: a seal will remain in the gun body and should not be removed. The Copper Gasket and Lower Seal should be replaced. A. Thread the Lock Nut back against the hex on the Fluid Inlet Fitting. Slide seal onto the Fluid Inlet Fitting. Thread the copper gasket onto the Fluid Inlet Fitting. B. Install O-ring onto the Air Cap Adapter. C. Slide the Nozzle Carrier into the Air Cap Adapter and rotate until the inlet port in the Nozzle Carrier is aligned with the hole in the Air Cap Adapter; the two will lock together in this position. D. Holding the Nozzle Carrier and Air Cap Adapter together in the position described, slide them into the gun head and rotate until the locating pin is aligned with the slot in the Gun Body and slide further into the Gun Body. E. Install the Needle Seal Cartridge and tighten to approx. 150-175 in-lb. torque. F. Install the Fluid Inlet Fitting and tighten to approx. 175 in-lb. torque. Tighten the Lock Nut against the Gun Body. GG-011 GG-010 Upper Seal GG-012 Lower Seal Copper Gasket GG-006 GG-005 O-ring GG-024 DO NOT OPERATE SPRAY GUNS WITHOUT PERSONAL SAFETY EQUIPMENT AirVerter® Gravity Gun HVLP Paint Spray System Gravity Gun Illustrated Parts Breakdown DO NOT OPERATE SPRAY GUNS WITHOUT PERSONAL SAFETY EQUIPMENT AirVerter® Gravity Gun HVLP Paint Spray System Gravity Gun Parts List 1&2 3 4 5 6 7 8 9 10 11 12 13 14 15 16 17 18 19 20 21 22 23 24 25 26 27 28 29 30 31 Part # GG-001-xx GG-003-xx GG-002 GG-005 GG-006 Note 1 Note 1 Note 1 GG-010 GG-011 GG-012 GG-013 GG-014-xx GG-015 Note 1 Note 1 GG-018 Note 1 GG-020 GG-021 Note 1 Note 1 GG-024 GG-025 GG-026 GG-027 GG-028 GG-030 GG-029 NSN Description 4940-01-481-0571 Air Cap with Ring Fluid Nozzle Tip Fluid Nozzle Body Nozzle Carrier Air Cap Adapter O-Ring O-Ring Seal Lock Nut Fluid Inlet Fitting Gun Body HVLP Fan Control Assembly Fluid Needle Fluid Control Knob Spring Seat Needle Return Spring Rear Bushing Seal Air Valve Assembly Air Valve Poppet O-Ring Air Valve Spring Needle Seal Cartridge Trigger Air Control Air Inlet Fitting Trigger Pivot Set Allen Plug Cup Lid (3 pack for Stainless Steel cup) Gravity Feed Cup, Aluminum (750 cc) Std. Note 1: These parts are contained in the High Wear Kit, Part # GG-125 DO NOT OPERATE SPRAY GUNS WITHOUT PERSONAL SAFETY EQUIPMENT AirVerter® Gravity Gun HVLP Paint Spray System Needle, Nozzle and Air Cap Selection Guide Select the proper fluid nozzle and needle for the material to be sprayed. Needle and nozzle are a matched set - machined to act as a valve. Replace the Needle and Nozzle when the Needle protrudes approximately 3/32″ beyond the Nozzle. Needle Nozzle Finish Air Cap Compressor Air Pressure* Uses or Coating Type Ultra Fine Finish With Thin Coatings on Small Parts Ultra Fine Finish 0.7 5 Ultra Fine Touch Up 45- 50 Specialty Applications/Wood Working Water-Based Lacquers, Urethanes Automotive Base or Clear Coat Top Coats For Automotive, Aviation and Marine Use Excellent Finish 1.0 Good Production 5 Wood: Lacquers, Stains, Polyurethanes, Varnishes 45-55 Thin Specialty Coatings With Low Mil Build and Fine Finish Requirements Water-Based Coatings Higher Production For The Same Applications As Above Good Finish 1.2 High Production 10 Fine Finish With Gloss Alkyd Enamel Primers and Sealers For Automotive, Aviation and Marine 55-65 Water-Based Coatings General Industrial Finishing Zinc-Rich Primers, Water-Based Primers, Flat & SemiGloss Alkyd Enamels & Polyurethanes Excellent Finish 1.4 Good Production 12 Industrial, Marine, Top Coats, Chlorinated Alkyd Enamels, Acrylic Enamels, and Latex 65-75 Best with Heavy Primers CARC High Production Best Finish 1.7 High Production 17 75-85 Industrial Marine Primers, High Build Primers, Steel Structures Latex CARC Good Finish 2.0 Higher Production 20 Industrial Finish Coatings 85-90 Latex, Stripper, Oil *Measured at the gun handle. Nozzle Size Expressed in Millimeters • 1 Millimeter = .040 (Approximately) 0.7 = .028 1.0 = .040 1.2 = .048 1.4 = .056 1.7 = .067 2.0 = .080 DO NOT OPERATE SPRAY GUNS WITHOUT PERSONAL SAFETY EQUIPMENT AirVerter® Gravity Gun HVLP Paint Spray System Gravity Gun Troubleshooting Guide Trouble Paint Will Not Flow Inconsistent Spray Pattern (Spits and Sputters) Leakage at Front of Gun Distorted Spray Pattern Probable Cause 1. 2. 3. 4. Blockage in fluid nozzle Loose fluid nozzle Coating is too thick Loose needle packing Remedy 1. 2. 3. 4. Clean or replace; strain paint Tighten Thin the coating Adjust packing 1. Running out of paint 2. Loose needle packing 1. Fill cup or pot, but never the top ¼ 2. Adjust packing 1. 2. 3. 4. 5. 6. Damaged fluid needle Wrong size fluid needle Dirty fluid nozzle Impurities in paint Loose fluid nozzle Fluid adjustment screwed all the way out 7. Needle not firmly seated in the nozzle 8. Packing too tight 1. 2. 3. 4. 5. 6. 1. Dirty or damaged air cap 2. Dirty or damaged fluid nozzle or needle 3. Fluid nozzle partially clogged 4. Fluid nozzle not centered with air cap 5. Air cap not seated correctly 1. Clean or replace 2. Clean or replace Replace Replace Clean Strain paint Tighten Rotate Fluid Control Knob (GG-015) on rear of gun clockwise 7. Check for nozzle obstruction 8. Loosen and adjust to correct tension 3. Clean 4. Replace air cap 5. Re-seat air cap DO NOT OPERATE SPRAY GUNS WITHOUT PERSONAL SAFETY EQUIPMENT AirVerter® Gravity Gun HVLP Paint Spray System GG-125 High-Wear Maintenance Kit For GG-100 Gravity Gun Part # NSN # GG-024 Description Qty O-Ring 1 O-Ring 1 Seal 1 Spring Seat 1 Needle Return Spring 1 Seal 1 O-Ring 1 Air Valve Spring 1 Needle Seal Cartridge 1 DO NOT OPERATE SPRAY GUNS WITHOUT PERSONAL SAFETY EQUIPMENT