1
liteCam Pro User Guide
liteCam Pro User Guide
Last Updated: September 2015
Copyright © 2001~2011 RSUPPORT Co., Ltd. ALL RIGHTS RESERVED. www.rsupport.com
1
Copyright
liteCam Pro
Guide Version 1.0
ⓒ 2015 RSUPPORT Co., Ltd. All Rights Reserved
The information contained in this manual and future improvements are subject to change
without notice.
Rsupport Co., Ltd. hereafter referred to as “Rsupport”, does not take any responsibility
for any marketability nor compatibility apart from the usage described in the manual.
Under no circumstances will Rsupport be liable to direct, indirect, incidental nor
accidental damages due to errors in the manual.
This manual is the intellectual property of Rsupport and is protected under international
copyright laws. Reproducing or copying all or part of this document without the prior
written consent of Rsupport is a violation of international copyright law.
Windows XP / Vista / 7 / 8 / 10 are registered trademarks of Microsoft Corporation in the
U.S. and other countries. Any additional third party registered trademarks mentioned in
this manual are used for reference and descriptive purposes only and are still the
intellectual property of the third party in question.
Copyright © 2001~2011 RSUPPORT Co., Ltd. ALL RIGHTS RESERVED. www.rsupport.com
2
Table of Contents
SYSTEM REQUIREMENTS ............................................................................................................................ 5
1.
LITECAM PRO INSTALLATION GUIDE ............................................................................................ 6
A.
INSTALLATION .....................................................................................................................................................................6
B.
ACTIVATION ......................................................................................................................................................................8
C.
ENCODER ........................................................................................................................................................................ 12
D.
LAME INSTALLATION ..................................................................................................................................................... 16
2.
SETTINGS PRIOR TO RECORDING ................................................................................................17
A.
AUDIO DEVICE.............................................................................................................................................................. 17
B.
VIDEO OPTIONS ........................................................................................................................................................... 18
C.
VIDEO FILE OPTIONS ................................................................................................................................................. 20
D.
AUDIO FILE FORMAT ................................................................................................................................................... 21
E.
SHORTCUT KEYS .......................................................................................................................................................... 22
3.
RECORDING MODE ..........................................................................................................................24
A.
ONE-CLICK RECORDING ........................................................................................................................................... 24
B.
GENERAL RECORDING ................................................................................................................................................ 24
i.
Select Recording Area ........................................................................................................................................ 25
ii.
Select Frames per Second (FPS) ............................................................................................................ 25
iii.
Select Audio Device ......................................................................................................................................... 25
iv.
Audio Format ........................................................................................................................................................ 25
v.
Click Record Button ......................................................................................................................................... 25
vi.
Finish Recording ................................................................................................................................................. 25
C.
VIDEO RECORDING ..................................................................................................................................................... 25
i.
Select Recording Area ........................................................................................................................................ 25
ii.
Select Frames per Second (FPS) ............................................................................................................ 26
iii.
Select Audio Device ......................................................................................................................................... 26
iv.
Audio Format ........................................................................................................................................................ 26
v.
Click Record Button ......................................................................................................................................... 26
vi.
Finish Recording ................................................................................................................................................. 26
Copyright © 2001~2011 RSUPPORT Co., Ltd. ALL RIGHTS RESERVED. www.rsupport.com
3
AUDIO RECORDING ..................................................................................................................................................... 26
D.
i.
Select Audio Device ............................................................................................................................................. 26
ii.
Audio Format ........................................................................................................................................................ 26
iii.
Audio File Format .............................................................................................................................................. 26
iv.
Click Record Button ......................................................................................................................................... 27
v.
Finish Recording ................................................................................................................................................. 27
ANDROID RECORDING ............................................................................................................................................... 27
E.
i.
Activate USB Debugging Mode .................................................................................................................... 27
ii.
Download and Install USB Drivers ........................................................................................................ 29
F.
TIMER RECORDING...................................................................................................................................................... 29
G.
STOP/PAUSE RECORDING......................................................................................................................................... 32
4.
PREVIEW ............................................................................................................................................33
5.
GENERAL OPTIONS .........................................................................................................................39
A.
FRAMES PER SECOND ................................................................................................................................................ 39
B.
AUDIO FORMAT............................................................................................................................................................. 40
C.
SELECT AN AREA .......................................................................................................................................................... 41
6.
ADVANCE RECORDING OPTIONS .................................................................................................42
A.
TITLE ................................................................................................................................................................................ 42
B.
CREDITS.......................................................................................................................................................................... 43
C.
LOGO ................................................................................................................................................................................ 44
D.
MOUSE EFFECTS ........................................................................................................................................................... 45
E.
PIP ................................................................................................................................................................................... 47
7.
CONVERTING AND EXTRACTING .................................................................................................50
A.
CONVERT VIDEO FILES .............................................................................................................................................. 50
B.
CONVERT AUDIO FILES.............................................................................................................................................. 51
C.
EXTRACT AUDIO FILES .............................................................................................................................................. 52
8.
OTHER ................................................................................................................................................53
A.
WORK AND LOG FOLDER........................................................................................................................................... 53
B.
OPTIONS OF RECORDING WINDOW ...................................................................................................................... 53
Copyright © 2001~2011 RSUPPORT Co., Ltd. ALL RIGHTS RESERVED. www.rsupport.com
4
9.
HELP ...................................................................................................................................................55
System Requirements
Minimum
Recommended
Windows Vista, 7, 8, 10
Microsoft Internet Explorer 8.0
OS
Windows XP, Android 4.1
Microsoft Windows Media Player 11 or
later.
Android 4.1 or higher
CPU
1.5GHz single-core
2GHz dual-core
128MB video memory or more.
Sound Card
Sound card that supports
Graphic card supporting DirectX 9 and
full-duplexing.
WDDM driver.
512MB or more for video memory.
RAM
1GB RAM
1GB RAM or more
Copyright © 2001~2011 RSUPPORT Co., Ltd. ALL RIGHTS RESERVED. www.rsupport.com
5
1. liteCam Pro Installation Guide
A. Installation
In order to get started, you need to download the liteCam Pro installation file. To download, simply
click the download link included in the email sent to you after you have purchased liteCam Pro.
Install liteCam Pro with Administration by running it as administrator.
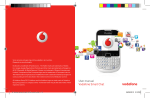
Step 1: If you RUN the installation file, you will be prompted with the liteCam Pro Installation
Wizard as shown below.
Click “Next” button.
Copyright © 2001~2011 RSUPPORT Co., Ltd. ALL RIGHTS RESERVED. www.rsupport.com
6
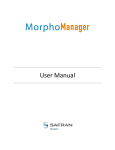
Step 2: You must select “I Accept the Term of the License Agreement” to continue. Click the “Next”
button.
Copyright © 2001~2011 RSUPPORT Co., Ltd. ALL RIGHTS RESERVED. www.rsupport.com
7
B. Activation
Step 3: You will need to enter a “User Name”, an “Email Address” and a “License Code” (16-digit
code received in your confirmation email). The information entered will be sent for program
authorization after installation, so you must provide the correct information. Click the “Next” button.
NOTE: Internet connection is required for liteCam Pro authentication. Please make sure that you
have access to http://www.litecam.com/en/
Copyright © 2001~2011 RSUPPORT Co., Ltd. ALL RIGHTS RESERVED. www.rsupport.com
8
Step 4: Select the setup type you wish to install. You can select between “Complete” or “Custom”
setup types. Then, click “Next”.
Copyright © 2001~2011 RSUPPORT Co., Ltd. ALL RIGHTS RESERVED. www.rsupport.com
9
Step 5: Click Install to begin liteCam Pro installation.
Note: in case you want to change or review your installation settings, click “Back.”
Copyright © 2001~2011 RSUPPORT Co., Ltd. ALL RIGHTS RESERVED. www.rsupport.com
10
Step 6: The installation is will continue. Click “Cancel” to terminate the installation, if needed.
Copyright © 2001~2011 RSUPPORT Co., Ltd. ALL RIGHTS RESERVED. www.rsupport.com
11
C. Encoder
Step 7: RSCC (RSUPPORT Screen Capture Codec) installation. When the installation is complete, a
window will pop-up confirming that RSCC installation and registration has been completed. Click
“OK” to close the window.
Copyright © 2001~2011 RSUPPORT Co., Ltd. ALL RIGHTS RESERVED. www.rsupport.com
12
Step 8: Authorization page. Click “OK” to close the page.
Copyright © 2001~2011 RSUPPORT Co., Ltd. ALL RIGHTS RESERVED. www.rsupport.com
13
Step 9: Authorization has been completed.
Click OK to close the page.
Step 10: Installing the liteCam Pro MP3 encoder (lame-enc.dll).
Copyright © 2001~2011 RSUPPORT Co., Ltd. ALL RIGHTS RESERVED. www.rsupport.com
14
Step 11: liteCam Pro installation is complete. Click Finish to close the installation wizard.
Copyright © 2001~2011 RSUPPORT Co., Ltd. ALL RIGHTS RESERVED. www.rsupport.com
15
D. LAME Installation
LAME is a high quality MPEG Audio layer III (3) encoder. To have an MP3 option, or to save or
convert audio to MP3 format, the LAME encoder must be installed on your computer.
During installation you will see a dialog box which will prompt you to install the MP3 encoder
(LAME).
Click "OK" to be directed to the website where you can download LAME file.
Download the zip file and extract it. Add download link in case they missed pop up
Copy and paste the “lame_enc.dll file” to the folder below (if you did not change the liteCam Pro
directory) C:\Program Files\RSupport\liteCam Pro Folder.
Copyright © 2001~2011 RSUPPORT Co., Ltd. ALL RIGHTS RESERVED. www.rsupport.com
16
2. Settings Prior to Recording
Before recording anything on your screen using General Recording, Video Recording, Audio
Recording, or Android Recording, you will need to set some options that are essential for recording.
A. Audio Device
When recording using General Recording, Video Recording or Audio Recording, you need to select
the audio device that will capture the sound in your recording. You can either choose to record
computer sound, or sound from a microphone that will need to be connected. You will also have the
choice to record both the computer and microphone sounds simultaneously.
Start liteCam Pro> Option> Audio Device
You can select a device that you wish to record sound/audio from.
1. Toggle ON
2. Choose either computer or microphone sound
3. For dual recording, select computer sound and check microphone input, as well.
Copyright © 2001~2011 RSUPPORT Co., Ltd. ALL RIGHTS RESERVED. www.rsupport.com
17
B. Video Options
When recording using General Recording or Video Recording, you can choose video options to use,
such as "Automatic Video Overlay", and "Automatic Hardware Acceleration".
When recording in full screen, select “Icon in the taskbar”. This function will allow you to view the
entire screen of the monitor without any issues.
Also, you can choose which picture format to save your captured screenshots in.
Start liteCam Pro> Option> Video Options
Copyright © 2001~2011 RSUPPORT Co., Ltd. ALL RIGHTS RESERVED. www.rsupport.com
18
Choose the settings you wish to use
1. Automatic Video Overlay
2. Automatic Hardware Acceleration
3. Icon in the Taskbar
4. Captured file format
Copyright © 2001~2011 RSUPPORT Co., Ltd. ALL RIGHTS RESERVED. www.rsupport.com
19
C. Video File Options
Choose the file format you wish to save your recorded files in.
Select the video Codec you wish to use, and select the audio Codec. If your computer file system is
FAT 32, you will need to select “Continuous Recording” to create a new recording file when the
recording file size reaches 4GB.
Note: for computers with FAT 32 file systems, the maximum size of a single file is 4GB.
This option is available for General Recording and Video Recording modes.
Start liteCam Pro> Option> Video Recording Options.
Select File Extension, Video Codec, and Audio Codec
1. File Extension: AVI or MP4
2. Video Codec
3. Audio Codec
4. Continuous Recording (only for FAT 32 File System) Not necessary for NTFS
Copyright © 2001~2011 RSUPPORT Co., Ltd. ALL RIGHTS RESERVED. www.rsupport.com
20
D. Audio File Format
When using Audio Recording mode, select the audio format you wish to save your recorded audio
files in. You can choose between different file formats, liteCam Pro has 3 types of formats, WAV,
WMA, and MP3.
Start liteCam Pro> Options> Audio File Options.
NOTE: You can only select this option when you are using Audio Recording mode.
Copyright © 2001~2011 RSUPPORT Co., Ltd. ALL RIGHTS RESERVED. www.rsupport.com
21
E. Shortcut Keys
Shortcut keys help provide an easier and quicker way of using liteCam Pro while recording using
General, Video, Audio and Android Recording modes.
You can create shortcut keys for the following options: "Start", "Pause", "Stop", "Drawing", and
"Screen Capture".
Start liteCam Pro> Options> Shortcut Keys.
Copyright © 2001~2011 RSUPPORT Co., Ltd. ALL RIGHTS RESERVED. www.rsupport.com
22
Choose the keys you wish to use as shortcuts during recording. Create shortcut keys for “Start”,
“Pause”, “Stop”, “Draw”, and “Capture”.
Copyright © 2001~2011 RSUPPORT Co., Ltd. ALL RIGHTS RESERVED. www.rsupport.com
23
3. Recording Mode
liteCam Pro has 4 different recording modes suited for different purposes. They are General
Recording, Video Recording, Audio Recording, and Android Recording.
■ General Recording is for recording computer screen activities, such as software demonstrations,
text writing, and presentations. When recording your computer screen, it is recommended to use
RSCC (Rsupport Screen Capture Codec). This Codec clearly displays text.
■ Video Recording is for recording non-streaming or streaming videos such as YouTube videos
and movies. When recording videos, it is recommended to use “RSUPPORT MJPEG Codec".
■ Audio Recording is for recording sounds from your computer, microphone or from an external
line. Save files to WAV, WMA, and MP3 formats.
■ Android Recording is for recording the Android screen activities. Android Recording is
compatible with Android mobile devices running Android 4.1 and above.
A. One-Click Recording
It is a simple one-click on the record button that will start liteCam Pro to record any activity on the
screen, or any sound from the computer or microphone. In Audio Recording Mode, the audio device
and audio file format must be set before you start recording.
Select Recording Area you can move the recording area through the “arrow cross” in the middle
of the liteCam Pro window. Drag and drop the window corners of the liteCam Pro window to resize
the recording area.
Note: this is only for General Recording and Video Recording Modes.
Clicking the Recording Button as soon as you click the recording button, the countdown to
recording will start in…3..2..1.
Finish Recording when you have finished recording, click the “Pause/Stop” button in the right
corner of the window to stop the recording.
B. General Recording
Record and capture any activity on your computer screen such as software demonstrations, text
writing, presentations and more.
Copyright © 2001~2011 RSUPPORT Co., Ltd. ALL RIGHTS RESERVED. www.rsupport.com
24
i.
Select Recording Area
Move the recording area through the “arrow cross” in the middle of the liteCam Pro window.
Drag and drop the window corners of the liteCam Pro window to resize the recording area.
From the toolbar located at the top of liteCam Pro, select the video format you wish to use.
ii.
Select Frames per Second (FPS)
20 FPS is the default FPS in Video Recording mode.
To change the FPS, select the FPS button in the toolbar and choose the FPS you want.
iii.
Select Audio Device
Select an audio device to record sound/audio from, which can be from either your computer or
microphone. In Windows Vista, 7, 8, and 10, computer sound is the default option.
iv.
Audio Format
Select the audio recording quality you wish to have.
In the toolbar, select the “Audio Format” button and choose the audio file format you wish to use
while recording.
Mono, 16 bit, 22 KHz is fine. To record in high quality, use Stereo, 16 bit, 44 KHz.
v.
Click Record Button
Recording will start in 3..2..1.
vi.
Finish Recording
When you have finished recording, click the “Pause/Stop” button in the right corner of the window
to stop the recording.
C. Video Recording
Record non-streaming and streaming videos from any website (YouTube, Vimeo, etc.) that cannot
be downloaded as video files. You can also record movies, Skype video chats and calls, and online
web conference videos with audio, and etc.
i.
Select Recording Area
Move the recording area through the “arrow cross” in the middle of the liteCam Pro window.
Drag and drop the window corners of the liteCam Pro window to resize the recording area.
From the toolbar located at the top of liteCam Pro, select the video format you wish to use.
Copyright © 2001~2011 RSUPPORT Co., Ltd. ALL RIGHTS RESERVED. www.rsupport.com
25
ii.
Select Frames per Second (FPS)
20 FPS is the default FPS in Video Recording mode.
To change the FPS, select the FPS button in the toolbar and choose the FPS you want.
iii.
Select Audio Device
Select an audio device to record sound/audio from, which can be from either your computer or
microphone. In Windows Vista, 7, 8, and 10, computer sound is the default option.
iv.
Audio Format
Select the audio recording quality you wish to have.
In the toolbar, select the “Audio Format” button and choose the audio file format you wish to use
while recording.
Mono, 16 bit, 22 KHz is fine. To record in high quality, use stereo, 16 bit, 44 KHz.
v.
Click Record Button
Recording will start in 3..2..1.
vi.
Finish Recording
When you have finished recording, click the “Pause/Stop” button in the right corner of the window
to stop the recording.
D. Audio Recording
Record any sounds/audio on your computer, microphone, or both simultaneously, and convert the
recordings to WAV, MP3, or WMA formats. Save or convert your recorded files as WAV, WMA, or
MP# files, as well.
i.
Select Audio Device
Select an audio device to record sound/audio from, which can be from either your computer or
microphone. In Windows Vista, 7, 8, and 10, computer sound is the default option.
ii.
Audio Format
Select the audio recording quality you wish to have.
In the toolbar, select the “Audio Format” button and choose the audio file format you wish to use
while recording.
Mono, 16 bit, 22 KHz is fine. To record in high quality, use Stereo, 16 bit, 44 KHz.
iii.
Audio File Format
Copyright © 2001~2011 RSUPPORT Co., Ltd. ALL RIGHTS RESERVED. www.rsupport.com
26
On the toolbar, select the “Audio File Format” button and choose the audio file format you wish to
use while recording.
iv.
Click Record Button
Recording will start in 3..2..1.
v.
Finish Recording
When you have finished recording, click the “Pause/Stop” button in the right corner of the window
to stop the recording
E. Android Recording
Android Recording is for recording the Android screen activities. Android Recording is compatible
with Android devices running Android 4.1 and above.
i.
Activate USB Debugging Mode
Enabling USB debugging mode is incredibly easy, however USB debugging is different depending on
your Android device and OS version.
Note: Android Recording only supports Android version 4.1 and above.
Android 4.1: Go to Settings > Go to Developer Options > Slide the Developer Options Switch to
turn on Developer Options > Place a Check Mark on the box beside USB Debugging / Android
Debugging
Copyright © 2001~2011 RSUPPORT Co., Ltd. ALL RIGHTS RESERVED. www.rsupport.com
27
Android 4.2 and Above: Go to Settings > Tap About Phone > Scroll towards the bottom and tap
“Build number” between 5 and 7 times, depending on your device. You will get a short pop-up in
the lower area of your display saying that you are now a developer. > Go back and now access the
“Developer options” menu
* Check ‘USB debugging’ and click OK on the prompt.
Copyright © 2001~2011 RSUPPORT Co., Ltd. ALL RIGHTS RESERVED. www.rsupport.com
28
ii.
Download and Install USB Drivers
If your Android Device USB driver is installed on your PC, then you can plug in your Android device to your PC
through a USB cable. If you do not have a USB Driver installed on your PC, you will need to install it.
Drivers for all others devices are provided by the device manufactures.
- Acer: http://www.acer.com/worldwide/support/mobile.html
- ALCATEL ONE TOUCH: http://www.alcatelonetouch.com/global-en/support/faq/usbdriver.html
- Asus: http://support.asus.com/download/
- Dell:
http://support.dell.com/support/downloads/index.aspx?c=us&cs=19&l=en&s=dhs&~ck=anavml
- Foxconn: http://drivers.cmcs.com.tw/
- Fujitsu: http://www.fmworld.net/product/phone/sp/android/develop/
- Garmin Asus: https://www.garminasus.com/en_US/support/pcsync/
- Google: http://developer.android.com/sdk/win-usb.html#download
Hisense:http://app.hismarttv.com/dss/resourcecontent.do?method=viewResourceDetail&resourceId
=16&type=5
- HTC: http://www.htc.com
- Huawei: http://www.huaweidevice.com/worldwide/downloadCenter.do?method=index
- Intel: http://www.intel.com/software/android
- KT Tech: http://www.kttech.co.kr/cscenter/download05.asp
- Kyocera: http://www.kyocera-wireless.com/support/phone_drivers.htm
- Lenovo: http://developer.lenovomm.com/developer/download.jsp
- LG: http://www.lg.com/us/mobile-phones/mobile-support/mobile-lg-mobile-phone-support.jsp
- Motorola: http://developer.motorola.com/docstools/USB_Drivers/
- MTK: http://online.mediatek.com/Public%20Documents/MTK_Android_USB_Driver.zip
- Oppo: http://www.oppo.com/index.php?q=software/view&sw_id=631
- Pantech: http://www.isky.co.kr/cs/software/software.sky?fromUrl=index
- Pegatron: http://www.pegatroncorp.com/download/New_Duke_PC_Driver_0705.
- Samsung: http://www.samsung.com/us/support/downloads
- Sharp: http://k-tai.sharp.co.jp/support/
- SK Telesys: http://www.sk-w.com/service/wDownload/wDownload.jsp
- Sony Mobile: http://developer.sonymobile.com/downloads/drivers/
- Teleepoch: http://www.teleepoch.com/android.html
- Toshiba: http://support.toshiba.com/sscontent?docId=4001814
- Yulong Coolpad: http://www.yulong.com/product/product/product/downloadList.html#downListUL
- Xiaomi: http://www.xiaomi.com/c/driver/index.html
- ZTE: http://support.zte.com.cn/support/news/NewsDetail.aspx?newsId=1000442
F. Timer Recording
Schedule to record a video, audio, or screen activities at a particular time, and start or end after a
certain length of time. When you have finished recording, you can schedule your computer to
shutdown automatically.
Copyright © 2001~2011 RSUPPORT Co., Ltd. ALL RIGHTS RESERVED. www.rsupport.com
29
Start liteCam Pro> Options> Timer Recording.
Copyright © 2001~2011 RSUPPORT Co., Ltd. ALL RIGHTS RESERVED. www.rsupport.com
30
Choose the options available.
1. Choice 1, set start and end time.
2. Choice 2, set only the start time.
3. Choice 3, set only the end time.
Note: this is only for General Recording and Video Recording Modes.
Copyright © 2001~2011 RSUPPORT Co., Ltd. ALL RIGHTS RESERVED. www.rsupport.com
31
G. Stop/Pause Recording
While recording with liteCam Pro, you will have the option to pause any recording, capture
screenshots, or draw on the recording screen.
Note: in Audio Recording mode, only the pause/stop function is available.
Copyright © 2001~2011 RSUPPORT Co., Ltd. ALL RIGHTS RESERVED. www.rsupport.com
32
4. Preview
Your recorded videos and audio can be viewed in the preview.
In the Preview window you can trim, convert, save as or delete your recording. You can hide or
unhide the recorded file list, and you can import other files or open the work folder.
Work Folder is where all the recording files are saved.
Click the Play icon in the liteCam Pro main window
Copyright © 2001~2011 RSUPPORT Co., Ltd. ALL RIGHTS RESERVED. www.rsupport.com
33
Click "Full Screen" to watch your recorded videos in full screen mode.
Can’t find your recording in Preview? Recover it by clicking “Open” as shown below.
Copyright © 2001~2011 RSUPPORT Co., Ltd. ALL RIGHTS RESERVED. www.rsupport.com
34
Open the work folder where you recordings are saved.
Click “Open Folder” as shown
To trim your recorded video files, click the scissor icon.
Copyright © 2001~2011 RSUPPORT Co., Ltd. ALL RIGHTS RESERVED. www.rsupport.com
35
To convert your recorded video or audio file, click the convert icon.
To upload your recorded video to YouTube, click “Upload to YouTube.”
Before uploading your recordings to YouTube, make sure the following apply:
1. You have an active YouTube account.
Copyright © 2001~2011 RSUPPORT Co., Ltd. ALL RIGHTS RESERVED. www.rsupport.com
36
2. Your video was recorded using General, Video, or Android Recording Mode.
3. You have uploaded a video to your active YouTube account before.
For recordings longer than 15 minutes, change your YouTube account setting options to “Increase
your limit”
Link: https://support.google.com/youtube/answer/71673?hl=en
To hide or unhide your recorded files list, left-click on the Preview screen.
Copyright © 2001~2011 RSUPPORT Co., Ltd. ALL RIGHTS RESERVED. www.rsupport.com
37
Copyright © 2001~2011 RSUPPORT Co., Ltd. ALL RIGHTS RESERVED. www.rsupport.com
38
5. General Options
A. Frames Per Second
FPS measures how much information is used to store and display motion video.
The maximum FPS available to record video in General Recording, Video Recording, and Android
Recording is 30 FPS.
Copyright © 2001~2011 RSUPPORT Co., Ltd. ALL RIGHTS RESERVED. www.rsupport.com
39
B. Audio Format
Different audio formats have different quality. You can choose the quality you wish to use, we
recommend “Mono, 16bit, 22KHz". Recorded file size will depend on the audio format selected.
To choose the audio quality you wish to use while recording:
Mono, 16bit, 11 KHz – Stereo, 16bit, 48 KHz: record channels, bit, and sampling rate.
System Default Settings: record system sounds in Windows Vista, 7, 8, and 10.
No Audio: exclude all sound from recording.
Start liteCam Pro> Options> Audio Format
Copyright © 2001~2011 RSUPPORT Co., Ltd. ALL RIGHTS RESERVED. www.rsupport.com
40
C. Select an Area
Before recording, you need to select the screen size you want to record in. There are many options
to choose from.
You can select the following to record:
Pre-defined: 1024 x 768: select the screen resolution in the recording area.
Custom Resolution: record within a custom area with adjusting width and height.
Rectangle: select a rectangular area to record.
Window: select a specific window to record.
Program: select an active program to record.
Full Screen: select the full screen to record.
Click "Select the area to record" button in the toolbar on the main window.
Copyright © 2001~2011 RSUPPORT Co., Ltd. ALL RIGHTS RESERVED. www.rsupport.com
41
6. Advance Recording Options
A. Title
To add a title to your recording, select "Title" in the settings window.
Choose your favorite font, font size, text color, title location, and alignment to create your title.
Start liteCam Pro> Options> Title.
Copyright © 2001~2011 RSUPPORT Co., Ltd. ALL RIGHTS RESERVED. www.rsupport.com
42
B. Credits
To add credits to the end of your recording, select "Credit" in the settings window.
Choose your favorite font, font size, text color, title location, and alignment to create your ending
credits.
Start liteCam Pro> Options> Credits
Copyright © 2001~2011 RSUPPORT Co., Ltd. ALL RIGHTS RESERVED. www.rsupport.com
43
C. Logo
With liteCam Pro, you can add your own logo to your recording.
To add a logo to your recording, select "Logo" in the settings window and import a file to use.
Next, select the transparency and location of the selected logo.
You can adjust your logo with the following settings:
On/Off: toggle the switch to insert logo or to not include it.
File: import logo file.
Transparency: control the image’s transparency.
Location: indicate where the image is displayed.
Start liteCam Pro> Options> Logo
Copyright © 2001~2011 RSUPPORT Co., Ltd. ALL RIGHTS RESERVED. www.rsupport.com
44
D. Mouse effects
Eliminate or make your mouse pointer more visible in your recordings with Mouse Effects.
You can change your mouse pointer in various ways (shape, color, and size), or right or left-click for
different mouse effects.
To show the mouse pointer effects in your recording, select "Mouse Pointer" in the settings window.
Record Mouse Pointer: include or remove the mouse pointer in your recording.
Default: add mouse pointer effects with shape, color, and size.
Left-Click Effect: add effects to the left button click.
Right-Click Effect: add effects to the right button click.
Mouse effects are only for General Recording and Video Recording Modes.
Start liteCam Pro> Options> Mouse Pointer
Copyright © 2001~2011 RSUPPORT Co., Ltd. ALL RIGHTS RESERVED. www.rsupport.com
45
Copyright © 2001~2011 RSUPPORT Co., Ltd. ALL RIGHTS RESERVED. www.rsupport.com
46
E. PIP
Simultaneously show your active speech in the corner of your recording with the Picture-in-Picture
(PIP) function to include yourself in the video.
To record and use your webcam at the same time:
On/Off: toggle switch to activate PIP webcam recording.
Video Format: select the webcam resolution.
Webcam: Select webcam installed on your PC
Option Button: check the webcam’s property.
Location: where PIP will display in your recording.
PIP Style: select the style of the PIP window.
Preview: test how PIP will appear.
Start liteCam Pro> Options> PIP
Switch “ON” to enable PIP webcam recording.
Copyright © 2001~2011 RSUPPORT Co., Ltd. ALL RIGHTS RESERVED. www.rsupport.com
47
Solution for PIP interference while recording
PIP window can sometimes interfere with recordings.
You can choose to either show or hide the PIP window while recording with the show/hide option.
Follow the steps below.
Start liteCam Pro> Options>PIP
Click on “PIP style”
Copyright © 2001~2011 RSUPPORT Co., Ltd. ALL RIGHTS RESERVED. www.rsupport.com
48
Check “Show PIP Window While Recording”
Copyright © 2001~2011 RSUPPORT Co., Ltd. ALL RIGHTS RESERVED. www.rsupport.com
49
7. Converting and Extracting
All video or audio recorded using liteCam Pro can be converted into other file formats.
You can convert videos to MP4 or WMV file formats, while audio files can be converted to MP3, WAV,
and WMA file formats.
A. Convert Video Files
Convert the videos that you have recorded using liteCam Pro, this option can be used in General
Recording and Video Recording Modes.
Copyright © 2001~2011 RSUPPORT Co., Ltd. ALL RIGHTS RESERVED. www.rsupport.com
50
B. Convert Audio Files
Just like videos, recorded audio can be converted into other file formats.
Audio files can be converted into MP3, WAV, and WMA file formats.
Copyright © 2001~2011 RSUPPORT Co., Ltd. ALL RIGHTS RESERVED. www.rsupport.com
51
C. Extract Audio Files
Any audio in your recorded videos can be extracted and saved as an audio file.
To extract audio from videos: Start liteCam Pro> Option> Extract Audio File.
Copyright © 2001~2011 RSUPPORT Co., Ltd. ALL RIGHTS RESERVED. www.rsupport.com
52
8. Other
A. Work and Log Folder
The work folder is where all recorded files are saved. The default location of this folder is
C:\Users\{UserName}\Documents\liteCam.
You can have your recorded files saved to any folder in the preferences.
The Log folder is where all the logs created during recording. The default location of this folder is
C:\Users\{UserName}\Documents\liteCam\Log
This folder can also be changed at any time.
B. Options of Recording Window
Other options for recording windows are:
Highlight Recording Area: this means that the selected area being recorded will be highlighted
while recording.
Blinking Recording Area: recording area will blink while recording.
Run Preview After Recording: The preview window will open as soon the recording is completed.
Copyright © 2001~2011 RSUPPORT Co., Ltd. ALL RIGHTS RESERVED. www.rsupport.com
53
Copyright © 2001~2011 RSUPPORT Co., Ltd. ALL RIGHTS RESERVED. www.rsupport.com
54
9. Help
The Help window provides all information about liteCam Pro.
You will find the following in Help:
Online Guide: opens the User Manual online.
FAQ: frequently asked questions and issues.
Contact us: opens to the page for reporting your problem or inquiry.
System info: your computer system information, helps if you are experiencing issues with liteCam
Pro.
Auto Update: liteCam Pro will check for any available updates.
Register Product: this option is available for Demo/Trial version only. Full version can be unlocked
by entering the license key via this option.
About liteCam: provides all information about liteCam Pro, including Product, Version, License
type/code and more information.
Copyright © 2001~2011 RSUPPORT Co., Ltd. ALL RIGHTS RESERVED. www.rsupport.com
55
Copyright © 2001~2011 RSUPPORT Co., Ltd. ALL RIGHTS RESERVED. www.rsupport.com
56
For more information about RSUPPORT, please visit
http://www.rsupport.com
Japan :
Korea :
(138-827) 서울시 송파구 위례성대로 10 (방이동 44-
〒105-0001 東京都港区虎ノ門1-2-20
5) 에스타워 11~15층
第3虎の門電気ビル
전화 : +82-70-7011-3900
팩스 : +82-2-479-4429
기술문의 : [email protected]
구매문의 : [email protected]
기타문의 : [email protected]
USA :
TEL : +81-3-3539-5761
FAX : +81-3-3539-5762
お問い合わせ : [email protected]
Sales : [email protected]
Info : [email protected]
China :
333 Sylvan Avenue Suite 110,
Englewood Cliffs, NJ 07632, USA
Phone : +1-888-348-6330
Fax : +1-888-348-6340
Tech : [email protected]
Sales : [email protected]
Info : [email protected]
北京市朝阳区霄云路38号现代汽车大厦2203室I-101
电话 +86-10-8256-1810
传真 +86-10-8256-2978
技术咨询 [email protected]
销售咨询 [email protected]
其他咨询 [email protected]
Copyright © 2001~2011 RSUPPORT Co., Ltd. ALL RIGHTS RESERVED. www.rsupport.com
57