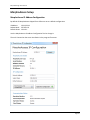
1
User Manual MorphoManager User Manual Table of Contents Introduction ......................................................................................................................................4 Support .............................................................................................................................................4 Overview ...........................................................................................................................................5 What is a client? .......................................................................................................................................... 5 What is a server? ......................................................................................................................................... 5 What is a fingerprint enrollment device? .................................................................................................... 5 What is a MorphoAccess? ........................................................................................................................... 6 What is a Morpho 3D Face Reader? ............................................................................................................ 6 Setting up MorphoManager .............................................................................................................7 Computer hardware requirements: ............................................................................................................ 7 Supported Operating Systems: .................................................................................................................... 7 Installation of MorphoManager software ................................................................................................... 7 Setting up MorphoManager on a single PC ......................................................................................8 Server and Client Installation ............................................................................................................9 Product Registration .......................................................................................................................10 Procedure for registration ......................................................................................................................... 10 Activate Online ....................................................................................................................................................... 11 Activate Offline ....................................................................................................................................................... 12 Advanced Client Configuration .......................................................................................................14 Advanced Server Configuration ......................................................................................................16 Server Manager ...............................................................................................................................18 Running MorphoManager...............................................................................................................18 Login .......................................................................................................................................................... 18 Home Screen ...................................................................................................................................19 Administration ................................................................................................................................20 Operators .................................................................................................................................................. 20 Creating a new Operator ........................................................................................................................... 20 Screen 1 – Operator Details .................................................................................................................................... 20 Screen 2 – Operator Roles ...................................................................................................................................... 21 Sigma Configuration Profile ....................................................................................................................... 22 Creating a new Sigma Configuration Profile (Basic) .................................................................................. 22 Screen 1 – Configuration Details ............................................................................................................................. 22 Screen 2 – Video Phone .......................................................................................................................................... 22 Creating a new Sigma Configuration Profile (Advanced) ........................................................................... 23 Screen 3- Parameters.............................................................................................................................................. 23 MorphoAccess ........................................................................................................................................... 24 Create a MorphoAccess .......................................................................................................................................... 24 Modify a MorphoAccess ......................................................................................................................................... 27 Delete a MorphoAccess .......................................................................................................................................... 27 MorphoAccess Status and Tasks ............................................................................................................................. 28 Troubleshooting and Maintenance ......................................................................................................................... 28 Morpho 3D Face Reader............................................................................................................................ 29 Create a Morpho 3D Face Reader ........................................................................................................................... 29 Modify a Morpho 3D Face Reader .......................................................................................................................... 32 Delete a Morpho 3D Face Reader ........................................................................................................................... 32 Morpho 3D Face Reader Status and Tasks .............................................................................................................. 33 Troubleshooting and Maintenance ......................................................................................................................... 33 User Groups............................................................................................................................................... 35 Create a new User Group........................................................................................................................................ 35 Screen 1 – Details ................................................................................................................................................... 35 Screen 2 – Select Allowed Authentication Types .................................................................................................... 37 Screen 3 – Select MorphoAccess ............................................................................................................................ 38 Screen 4 – Select Morpho 3D Face Reader ............................................................................................................. 38 Screen 5 – Select MSO Identification Client ............................................................................................................ 39 Screen 6 – Time Mask ............................................................................................................................................. 39 Operator Role ............................................................................................................................................ 40 © Refer to End User License Agreement for Copyright Notice Page 2 MorphoManager User Manual Clients ........................................................................................................................................................ 41 Scheduled Reports .................................................................................................................................... 43 Card Template ........................................................................................................................................... 45 Event Logs ................................................................................................................................................. 46 Exception Logs ........................................................................................................................................... 46 System Configuration ................................................................................................................................ 47 Section 1 – Time and Attendance ........................................................................................................................... 47 Section 2 – Wiegand Profile .................................................................................................................................... 48 Section 3 – Contactless Keys ................................................................................................................................... 48 Section 4 – Communications Engine ....................................................................................................................... 49 Section 5 – System Functionality ............................................................................................................................ 50 Section 6 – Automatic Log management ................................................................................................................ 51 Section 7 – Gateways .............................................................................................................................................. 51 Section 8 – Enrollment Options .............................................................................................................................. 52 Section 9 – Connector Service ................................................................................................................................ 52 Section 10 – BioBridge ............................................................................................................................................ 53 User Management ..........................................................................................................................55 Creation and enrollment of a User ............................................................................................................ 55 Screen 1 – User Details ........................................................................................................................................... 55 Screen 2 – Additional Details .................................................................................................................................. 56 Screen 3 – Contact Details ...................................................................................................................................... 58 Screen 4 – MorphoAccess Override Details (If a Wiegand Profile is set)................................................................. 59 Screen 5– Morpho 3D Face Reader Override Details .............................................................................................. 59 Screen 6 – MSO Identification Client Override Details ............................................................................................ 60 Screen 7 – MorphoAccess Override Details ............................................................................................................ 60 Screen 8– Time Masking ......................................................................................................................................... 61 Screen 9– Photo Capture ........................................................................................................................................ 62 Screen 10 – Fingerprint Capture ............................................................................................................................. 63 User Actions ............................................................................................................................................................ 67 Filtering ................................................................................................................................................................... 68 MSO Identification ..........................................................................................................................69 Onsite ..............................................................................................................................................70 Access Logs......................................................................................................................................71 Reports ............................................................................................................................................72 User Activity Report .................................................................................................................................. 72 MorphoAccess Activity Report .................................................................................................................. 72 User Group Activity Report ....................................................................................................................... 72 All Activity (included all users and MorphoAccess). .................................................................................. 72 Inactivity Report ........................................................................................................................................ 72 List Report ................................................................................................................................................. 73 Database Management ...................................................................................................................73 Database Backup Tool ............................................................................................................................... 73 Database Copy Tool ................................................................................................................................... 73 Copying a database ................................................................................................................................................. 74 MorphoAccess Setup ......................................................................................................................76 MorphoAccess IP Address Configuration .................................................................................................. 76 MorphoAccess Wiring ............................................................................................................................... 77 MA 500 / MA 500+ Series: New Block board wiring .................................................................................. 77 MA 500 Series: Old block board wiring ..................................................................................................... 78 Ethernet Interface (LAN 10 Mbps) ............................................................................................................ 79 T568B and T568A RJ45 Wire Positions .................................................................................................................... 79 MorphoAccess TCP\IP Ethernet Wiring ..................................................................................................... 80 Power Supply source ................................................................................................................................. 80 Wiegand output wiring.............................................................................................................................. 81 Wiegand input wiring ................................................................................................................................ 81 Output relay and Tamper-Switch .............................................................................................................. 81 © Refer to End User License Agreement for Copyright Notice Page 3 MorphoManager User Manual Introduction MorphoManager is the latest generation of biometrically powered Access Control and Time & Attendance capture software. The software works with MorphoAccess hardware to capture user’s finger prints, photos, and personal details. The fingerprint information is sent to specified MorphoAccess where access control is required and where users clock on and off throughout the day. MorphoManager also works with Morpho 3D Face Readers to capture user’s facial traits. Support Please contact your installer for support. © Refer to End User License Agreement for Copyright Notice Page 4 MorphoManager User Manual Overview A MorphoManager system consists of four components: • • • • A MorphoManager Server At least one MorphoManager Client A fingerprint/finger vein/3D Face enrollment device. At least one MorphoAccess or Morpho 3D Face Reader. What is a client? A client is a computer that has the MorphoManager Client software installed. There can be more than one client in a MorphoManager system. The client application provides the management of access points, enrolling of personnel, and reporting. A PC that has the enrollment scanner connected and is used as the user registration PC. A client PC may be used to view data and not have an enrollment device connected. What is a server? A server is a computer that has the MorphoManager Server software installed. The server manages the communication between the MorphoAccess/Morpho 3D Face Readers and the PC and interacts with the database. It also handles requests from clients. What is a fingerprint enrollment device? A fingerprint enrollment device captures an image of a user’s fingerprint, extracts the features and sends it to the MorphoManager software. This information is sent to a MorphoAccess for user authentication. There are currently three types of fingerprint enrollment devices: MorphoSmart 300 USB Fingerprint Reader MorphoSmart 1300 USB Fingerprint Reader MorphoSmart FVP USB Fingerprint and Vein Reader The readers are connected to a computer that is running MorphoManager Client software. All enrollment of personnel is performed using MorphoManager software. Device drivers for this hardware are automatically installed when MorphoManager Client software is installed. © Refer to End User License Agreement for Copyright Notice Page 5 MorphoManager User Manual What is a MorphoAccess? MorphoAccess 500+ (MA 500+) Outdoor MorphoAccess 520 (OMA 520) MorphoAccess 100 (MA 100) MorphoAccess VP (MA-VP) A MorphoAccess is used to authenticate users and allow access to doors. They record a log of every presentation. MorphoManager is used to manage user’s access to MorphoAccess. What is a Morpho 3D Face Reader? Morpho 3D Face Reader Like the MorphoAccess devices, a Morpho 3D Face Reader is used to authenticate users while recording a log of every presentation. While they are also managed by MorphoManager, they follow a different method when authenticating users. © Refer to End User License Agreement for Copyright Notice Page 6 MorphoManager User Manual Setting up MorphoManager This section outlines the requirements for MorphoManager systems. Computer hardware requirements: Processor: RAM: Ports: Network: Internet Access: Dual Core CPU 4 GB Three USB ports 100Mbs Ethernet port required for client/server connections. Required for updates. (If no internet access is available, updates can be installed via USB memory stick or CD Rom) Supported Operating Systems: • • • • • • • • • • • Microsoft Windows 8.1 Microsoft Windows 8 Microsoft Windows 7 Microsoft Windows Vista SP1 Microsoft Windows XP SP3 Windows Server 2003 R2 Windows Server 2003 R2 SP2 Windows Server 2008 Windows Server 2008 R2 Windows Server 2012 Windows Server 2012 R2 Installation of MorphoManager software The installation CD contains both the client and server software. There are two configurations for MorphoManager: • Client and Server on the same PC A PC can have both the client and server software installed. The server software needs to be installed first. • Server PC and Client PCs The server software needs to be installed on the server PC and the client software needs to be installed on each client PC that will connect to the server PC over a LAN or VPN connection. The server software needs to be installed first. Updates for MorphoManager can be obtained by visiting: http://support.morphomanager.com/ © Refer to End User License Agreement for Copyright Notice Page 7 MorphoManager User Manual Setting up MorphoManager on a single PC Both the client and the server applications can be installed on one computer. • • • • • • • Load the MorphoManager CD and select the Server install. After the server is installed, install the client. Connect the MSO 300 enrollment device to the PC. Ensure the MorphoAccess/Morpho 3D Face Readers are on the same network as the MorphoManager Server/Client PC and are in the same IP range. Start MorphoManager – double click on the icon on the desktop. When logging in for the first time the following details are used. • Username: administrator • Password: password It is recommended the Administrator password is changed immediately. This can be done by clicking on the Change Password icon on the status bar. © Refer to End User License Agreement for Copyright Notice Page 8 MorphoManager User Manual For added security, many businesses and departments have chosen to dedicate a PC for MorphoManager and often use a dedicated hub to which only the MorphoManager PC’s, MorphoAccess, and Morpho 3D Face Readers are connected. Alternatively, an existing hub can be used, but it is recommended that the IP range of the MorphoManager PC, MorphoAccess, and Morpho 3D Face Readers, are different from the corporate PC’s. Server and Client Installation This configuration can be used with an existing corporate network that already has a server. The MorphoManager client application can be installed on any PC that is attached to the server. The MorphoManager server application can be installed on a separate PC which may or may not be a dedicated server. © Refer to End User License Agreement for Copyright Notice Page 9 MorphoManager User Manual Product Registration The MorphoManager Product Registration process can be accessed by clicking Yes on the registration prompt after logging into Morpho Manager. If the product is not registered, MorphoManager will run for 30 days in trial mode. Procedure for registration MorphoManager can be registered either online or offline. On the first step of the registration wizard enter the end user details and click Next. On the following screen enter the installer details and click Next. © Refer to End User License Agreement for Copyright Notice Page 10 MorphoManager User Manual Activate Online If you are connected to the internet you will be activated online after clicking Next on the Step 2 wizard screen. The following screen should appear: © Refer to End User License Agreement for Copyright Notice Page 11 MorphoManager User Manual When the process is complete the following screen will appear. Morpho Manager is now registered. After clicking Finish you will be taken to the MorphoManager Home Screen. Activate Offline If you do not have the internet, you will be shown the following screen after Step 2 mentioned in the beginning of this registration section. From here you can click Start offline registration. © Refer to End User License Agreement for Copyright Notice Page 12 MorphoManager User Manual The system will prompt you to save a registration file. Choose a location, give the file a name, and click Save. In the Americas email the file for registration processing to [email protected]. For the rest of the world, please email the file to [email protected]. Once it has been completed it will be emailed back to you. Save it where it is accessible to MorphoManager and reopen the registration process by clicking Yes to the registration prompt you receive when logging in to MorphoManager. You can now click the Complete offline registration button. Find the file and click Open. This will complete the offline registration process. © Refer to End User License Agreement for Copyright Notice Page 13 MorphoManager User Manual Advanced Client Configuration The MorphoManager Advanced Client Configuration can be found by clicking on the start menu, then selecting “MorphoManager” and then “MorphoManager Advanced Client Configuration”. Server Connection Type: Local Computer Only: Use this setting when the client and server are installed on the same PC. Manually Specified: The server is installed on a different PC to the client. Enter the hostname or IP address of the server in the hostname box. The port must be the same as the remoting port specified on the server configuration. The port values should only be changed if the default ports are being used by another application. Automatic Discovery: Used when the server is installed on a different PC to the client. The application will attempt to automatically find a MorphoManager © Refer to End User License Agreement for Copyright Notice Page 14 MorphoManager User Manual Port: Remoting channel type: Enable Automatic Login: server on the network. If there is a problem with Automatic Discovery use manually specified instead. The broadcast port must be the same as the broadcast listening port specified on the server configuration. The port values should only be changed if the default ports are being used by another application. Specifies the server port that the MorphoManager Server is accepting client connections on. The default port is: 42100. Specifies whether the client/server communication should be unencrypted (TCP) or encrypted (Encrypted TCP). This setting must match the setting on the MorphoManager Server. The default is unencrypted (TCP). When enabled, the MorphoManager client will use the username and password entered here to login automatically. This can be a security problem, and should be used on clients that are secured by other means or have only one user. It is primarily used for convenience so the user does not have to enter their user name and password if it is unnecessary. Apply the settings required and click on Apply changes and then Close. © Refer to End User License Agreement for Copyright Notice Page 15 MorphoManager User Manual Advanced Server Configuration The MorphoManager Advanced Server Configuration can be found by clicking on the start menu, then selecting “MorphoManager”, followed by “Server”, and then “Advanced Server Configuration”. Remoting Channel Type: Specifies whether client/server communication is to be encrypted. Default setting is unencrypted (TCP). This setting must be applied at all clients. Remoting Port: This is the port that the client will communicate with the server on. It must be the same as the one specified in the client configuration. Remoting Hostname: This is the hostname that the client will connect to. This must be the same as the hostname specified in the client configuration. This should be left blank by default. Remoting Bindto: If you have more than one IP address on your PC, and you want to force MorphoManager to use a specific IP, please enter it here (Advanced users only). Broadcast Listening Port: This is the port that the auto detection of servers operates on. It must be the same as the port specified in the client configuration. © Refer to End User License Agreement for Copyright Notice Page 16 MorphoManager User Manual Database Provider Type: There are two database provider types: • • SQL Server (2005 or later) SQL Server Compact Edition 4.0 SQL server Compact Edition 4.0 is selected by default and is the preferred option for smaller installations. The SQL Server 2005 or later edition is used on larger installations, or where an existing SQL Server is already available. Maximum DB Ready Delay: Maximum amount of time to wait for the database to be available. ADO.Net Connection String: This is the connection string that will be used to connect to the database. Enter the connection string and click Test Connection. Ensure the connection is successful before applying changes. Drop Database Schema: Dropping a database schema will remove all tables and all data from the database. This is a non-recoverable operation and cannot be undone. Revert changes will not undo this operation. A prompt will be displayed confirming this action. Create Database Schema: Creating a database schema should only be performed on a new empty database or an existing database that has had a drop schema operation performed on it. This operation will set up a database and create all the tables and default data for MorphoManager. Apply Changes: When all the settings are correct click Apply Changes to save the changes. Revert Changes: Reverts all changes back to their last saved state. A drop database schema cannot be reverted. © Refer to End User License Agreement for Copyright Notice Page 17 MorphoManager User Manual Server Manager The MorphoManager Server Manager can be found by clicking on the start menu, then selecting “MorphoManager”, followed by “Server” and then “Server Manager”. The server manager is used to start and stop the MorphoManager server. Stopping the server will stop all clients from operating. This should only be performed if instructed by the support staff. Running MorphoManager Login MorphoManager Client software requires a username and password to be entered before starting. By default the username is administrator and the Password is password. Once you have entered the correct username & password, click Login to login. © Refer to End User License Agreement for Copyright Notice Page 18 MorphoManager User Manual Home Screen At the top of the home screen, there is a set of tabs (Home, Administration, User Management, MSO Identification, Onsite/Offsite, Access Logs, and Reports) and a set of buttons on the home screen. Select an item to enter that section. At the bottom of the home screen is a link to MorphoManager updates. If you have access to the internet, you will be directed to this area which will be updated with news and information regarding MorphoManager patches and important messages. The right hand side of the screen displays the system status and system information. System status contains a count of the total number of MorphoAccess and their current status, as well as the total number of Morpho 3D Face Readers with their own current status. It also contains a count of the total number of users within the system and the total number of access logs. System Information contains the installed version number, and your server serial code. Both of these details are required when contacting Identity One support. © Refer to End User License Agreement for Copyright Notice Page 19 MorphoManager User Manual Administration The administration section is used to configure and setup MorphoManager. Error and event logs are also viewable in this section. When creating or editing an item, a coloured text entry box means the information is required and must be filled in before the item can be finished and saved. Operators An operator is a person who uses the MorphoManager Client software. Operators are the only people who can login to the MorphoManager application. The Administrator operator has full access to all functions. Other operators with limited rights can be created. In the panel to the right, you will see that a default Operator has been created as the System Administrator. This operator cannot be deleted or modified. This operator has access to every part of Bio Manager and so keeping the password for this user secure is essential. Creating a new Operator Select the Operator section on the left and click Add Screen 1 – Operator Details © Refer to End User License Agreement for Copyright Notice Page 20 MorphoManager User Manual Username: This will be entered at the login screen (must be greater than 4 characters). First / Middle / Last Name: The first, middle and last name of the operator being added (First and Last names are mandatory fields). Job Title: The job function that this operator performs. Authentication Method: There are two methods for password authentication. Native Username / Password: This method uses the username and password entered in this screen. Active Directory Integration: This method uses the Windows Active directory to authenticate passwords. The username must match an existing user in the active directory. The active directory domain must be specified to use this option. Administrator: Select this option to provide full administrator rights to this user (not recommended). Screen 2 – Operator Roles Select the Operator Roles this operator will be allowed to perform. More than one Operator Role can be selected and the Operator will have access to all of the functions that the roles allow. © Refer to End User License Agreement for Copyright Notice Page 21 MorphoManager User Manual Sigma Configuration Profile The Sigma Configuration Profile will define common settings and parameters for one or more MA Sigma devices. This profile can be applied when adding the Sigma units into the system from the MorphoAccess section of Administration. In the panel to the right, you will see that a System Default has been created. This configuration profile will be set to a basic mode and can be edited. Creating a new Sigma Configuration Profile (Basic) Select the Sigma Configuration Profile section of Administration and click Add. Screen 1 – Configuration Details Name: Name the profile anything up to fifty characters. Description: Give the profile a description of up to one hundred characters. Configuration Profile: Can be either Basic or Advanced, but in this example use Basic. Screen 2 – Video Phone To utilize the Video Phone features of the Sigma you will need to add your server here. Adding a Video Phone Server is not mandatory for creating a configuration profile and you can click Finish with or without adding the Video Phone Server. © Refer to End User License Agreement for Copyright Notice Page 22 MorphoManager User Manual Click Add Server to add the Name, IP Address and Port of your Video Phone Server. Click OK when finished. Creating a new Sigma Configuration Profile (Advanced) Select the Sigma Configuration Profile section of Administration and click Add. This time on Screen 1 you will select Advanced from the Configuration Mode drop down. Screen 2 is the same as the Basic mode described earlier in this section. However, you will now have a third wizard screen that allows you to configure the various parameters for the Sigma. Screen 3- Parameters © Refer to End User License Agreement for Copyright Notice Page 23 MorphoManager User Manual MorphoAccess A MorphoAccess is a physical device that stores fingerprint information for access control and access logs for time and attendance. Create a MorphoAccess Select the MorphoAccess section then click Add in the toolbar. Name: The name of the MorphoAccess. Description: A description of the MorphoAccess. Location: The installed location of the MorphoAccess. Export Value: This value is typically used for Access log exporting when the MorphoManager data needs to be exported to a third-party payroll package. It can have a maximum of 20 characters. When the access logs are exported, the value specified here will be used as the MorphoAccess name in the output exported file. This again depends on the particular requirements of the payroll package and the access log exporter that is configured in the System configuration under T&A General settings. MA Type: Corresponds to the model of the MorphoAccess. This information is automatically retrieved from the MorphoAccess after a successful connection. © Refer to End User License Agreement for Copyright Notice Page 24 MorphoManager User Manual Hostname \ IP address: This value is critical and has the default value of 134.1.32.214. Enter the IP address of the selected MorphoAccess. The IP address will be provided on a configuration document sent with the MorphoAccess. The IP Address on each MorphoAccess must be manually assigned and must be within the IP range of the network. The IP address of the MorphoAccess must not be used by any other device on the network. Port: This is the default that the MorphoManager software is expecting. Time Zone: It is important that this field is entered correctly as it will affect the time displayed on the MorphoAccess and in which time zone access logs are recorded. Morpho Mode: This determines the communication engine utilized to control MorphoAccess units. Only Sigma units can utilize the Sigma mode. However, Sigma units can be run in either Legacy Morpho or Sigma mode. Configuration Profile: This will remain greyed out unless you are using Sigma in the Morpho Mode setting above. When engaged it allows a common settings and parameters profile to be set for the device added. The profile itself is created in the Sigma Configuration Profile section of Administration. Matching Threshold: This value determines the cut off point for a presented finger to match with a stored template. A higher value will lead to more false rejections for people with lower quality fingerprints. Lowering the value allows people with lower quality fingerprints to be authenticated, but if the value is too low there is a possibility of a false acceptance. This is only enabled when the MorphoAccess type has been detected. Site Code: Normally all MorphoAccess on a site will have the same number. On MorphoAccess Match Mode: The matching mode used by the MorphoAccess. This is only enabled when the MorphoAccess type has been detected. There are five options. The fingerprint/finger-vein storage location is shown in parenthesis: • Identification (Device) – Select this option if the MorphoAccess is used for identification by fingerprints only. With this option, a person does not have to provide any input other than their fingerprints to access the MorphoAccess. • Identification (Device) /Authentication by Contactless Card (Card) – Select this option if the terminal will be used for Identification by fingerprints or Smart card options. • Authentication by Keyboard (Device) – This option allows the user to enter a user code or a pin number via the terminal keypad to match against a biometric template. © Refer to End User License Agreement for Copyright Notice Page 25 MorphoManager User Manual • • • Authentication by Wiegand Input (Device) – This option authenticates Wiegand Input to match against a biometric template. Authentication by Data Clock Input (Device)– This option authenticates the Data Clock Input to match against the biometric template. Authentication by Contactless Card (Device)- This option allows Smart Card options with fingerprints stored on the device instead of card. Note: It is always recommended to use the Identification Matching mode. However, depending on how the MorphoAccess will be used any of the above option can be selected. MorphoAccess Mode: This setting is only visible when the MorphoAccess type is detected and the MorphoAccess supports mode selection. Select the appropriate MorphoAccess mode according to how the MorphoAccess will be used. There are two options: • • Onsite Mode: Time and Attendance Mode: Access Control - is used if the MorphoAccess is used to control a door or grant access to an area. Time and Attendance is to be used if the gathered data is to be sent to a Payroll or Rostering package. This is only available if the MorphoAccess mode is set to “Access Control”. This is only available if the MorphoAccess mode is set to “Time and Attendance”. There are three choices: “Start/Stop”, “Start” and “Stop”. “Start/Stop” should be used on MorphoAccess with a start and stop button such as the MA/OMA5XX series and if the Payroll or Rostering software requires a specific “Start” or “Stop” in the data string. For customers using the MA/OMA5XX series with Payroll or Rostering software that doesn’t require a function with specific “Start” and “Stop” data in the export file, select either the “Start” or “Stop” option. This will place the MorphoAccess into a mode of operation where it is constantly ready to accept a fingerprint without the user having to initiate the sequence of identification by pressing the “Start” or “Stop” button first. Mifare Card Mode: If the MorphoAccess supports card reading select the appropriate card mode. © Refer to End User License Agreement for Copyright Notice Page 26 MorphoManager User Manual Page 2 – Real Time Access Log Settings: Realtime Access Log Retrieval: Enable this tick box to retrieve the access logs in real time. MorphoManager will automatically retrieve the new logs instantly for every finger presentation. By default, this setting will be disabled. It can be enabled only after configuring the settings in System Configuration. Log Retrieval Interval: Each MorphoAccess is periodically polled to collect any new data and remove stored data from memory. This is the amount of time between each polling sequence. Enable Relay: Each MorphoAccess has an on board relay that can be used to control an external device on successful presentation of a fingerprint. Use this option to activate the relay when a user is authenticated. Relay Length: If the relay is activated, this value will determine the length of activation time. After all information has been entered click Finish to save the changes or Cancel to discard the changes. You will now see the new MorphoAccess in the window and its status will be Online, provided the PC and MorphoAccess are correctly connected and configured. The Tasks column shows the count of the queued or the failed tasks. Modify a MorphoAccess To modify a MorphoAccess, left click on a MorphoAccess and click Edit on the toolbar. A wizard will open showing the information entered when the MorphoAccess was created. Change any of the values required and click Finish to save changes or Cancel to discard changes. Delete a MorphoAccess Select the MorphoAccess to delete and click Delete on the toolbar. To delete a MorphoAccess, you must remove ALL user group and user access. A MorphoAccess cannot be deleted if any user still has access. This ensures that all user access has been correctly revoked. © Refer to End User License Agreement for Copyright Notice Page 27 MorphoManager User Manual MorphoAccess Status and Tasks When viewing a list of MorphoAccess, the status column indicates the current status of each MorphoAccess. Online means the MorphoAccess is responding to communication requests. Offline means that the MorphoAccess is not responding to communication requests. The tasks column indicates the number of tasks remaining for the MorphoAccess to process. Clicking on the Queued Tasks and Failed Tasks tab in the details section allows these tasks to be reviewed. Clicking on Logs allows review of access logs retrieved from that MorphoAccess. Troubleshooting and Maintenance © Refer to End User License Agreement for Copyright Notice Page 28 MorphoManager User Manual In the example screen above, the “Delete User” task failed. The message below explains the reason for the failed task. Get Logs – will download the currently stored transactions from the MorphoAccess into MorphoManager. Inbuilt into MorphoManager is an automatic retrieval that, by default, occurs every 5 minutes. Set Date/Time – Updated the MorphoAccess clock to the time on the server. This command is run automatically once a day at the time specified in the system configuration. Rebuild – The rebuild function will remove all users from a MorphoAccess and upload the users who are permitted access. This function should only be used if the MorphoAccess is not operating as expected. Unexpected behavior could occur if a MorphoAccess was moved from another site and contained existing users from that site. During normal operation any users who are added or deleted through user management are updated on the MorphoAccess in real time. Set Online – MorphoManager monitors and displays the status of every MorphoAccess. If a MorphoAccess has gone offline, clicking Set Online will attempt to connect to the MorphoAccess and go online. The status of the MorphoAccess will change to “Pending Online” while the connection is occurring. If there is a problem connecting to the MorphoAccess the status will revert to “Offline”. Morpho 3D Face Reader A Morpho 3D Face Reader is a physical device that stores information for access control and access logs for time and attendance, by scanning the physical facial features of a user. Create a Morpho 3D Face Reader Select the Morpho 3D Face Reader section, then click Add in the toolbar. Name: The name of the Morpho 3D Face Reader. © Refer to End User License Agreement for Copyright Notice Page 29 MorphoManager User Manual Description: A description of the Morpho 3D Face Reader. Location: The installed location of the Morpho 3D Face Reader. Asset ID: Optional value for tracking assets. Export Value: This value is typically used for Access log exporting when the MorphoManager data needs to be exported to a third-party payroll package. It can have a maximum of 20 characters. When the access logs are exported, the value specified here will be used as the Morpho 3D Face Reader’s name in the output exported file. This again depends on the particular requirements of the payroll package and the access log exporter that is configured in the System configuration under T&A General settings. Hostname \ IP Address: Enter the IP address of the selected Morpho 3D Face Reader. The IP address will be provided on a configuration document sent with the Morpho 3D Face Reader or by interacting with the device’s touch screen interface for the information. The IP Address on each Morpho 3D Face Reader must be manually assigned and must be within the IP range of the network. The IP address of the Morpho 3D Face Reader must not be used by any other device on the network. Port: This is the default that the MorphoManager software is expecting. It should only be changed by advanced users. Time Zone: It is important that this field is entered correctly as it will affect the time displayed on the Morpho 3D Face Reader and in which time zone access logs are recorded. ID/Verification Mode: Selects whether the device is used to Identify (i.e. one-to-many) or Verify (one-to-one). Biometric threshold: This value determines the cut off point for a present face to match with a stored template. A higher value will lead to more false rejections for people with lower quality facial scans. Lowering the value allows people with lower quality facial scans to be authenticated, but if the value is too low there is a possibility of a false acceptance. This is only enabled when the Morpho 3D Face Reader has been detected. © Refer to End User License Agreement for Copyright Notice Page 30 MorphoManager User Manual System Mode: This setting is only visible when the Morpho 3D Face Reader’s type is detected and the Morpho 3D Face Reader supports mode selection. Select the appropriate Morpho 3D Face Reader mode according to how the Morpho 3D Face Reader will be used. There are two options: • • Mode: Access Control - is used if the Morpho 3D Face Reader is used to control a door or grant access to an area. Time and Attendance is to be used if the gathered data is to be sent to a Payroll or Rostering package. Mode determines if the device is used for Onsite, Offsite, or Onsite & Offsite for Access Control uses, or Start, Stop, Start & Stop for Time & Attendance uses. Page 2 – Real Time Access Log Settings: Relay: Should the device trigger a relay after successful identification (same as MA). Relay Length: Time to activate the relay (in milliseconds). Log Retrieval Interval: The rate at which MorphoManager will poll the device for new presentation logs (in seconds). Enrollment Capture Timeout: Time the device will attempt to capture a 3D Face during enrollment (default 30 seconds). Authentication Timeout: The maximum time the device will attempt to authenticate/verify a user in verification mode. Onscreen Message Timeout: The amount of time that on screen messages will be shown to the user. Preview Type: Specifies whether to show the enrollment preview image in color or 3D face surface mode. © Refer to End User License Agreement for Copyright Notice Page 31 MorphoManager User Manual After all information has been entered click Finish to save the changes or Cancel to discard the changes. You will now see the new Morpho 3D Face Reader in the window and its status will be Online, provided the PC and Morpho 3D Face Reader are correctly connected and configured. The Tasks column shows the count of the queued or the failed tasks. Listing the Morpho 3D Face Reader under the Client The Morpho 3D Face Reader will not work with the client PC until it is actually listed within the client’s configurations. Under the “Client” section in Administration, select edit and click Next until you come across the Enrollment Morpho 3D Face Reader selection. Click Select a Morpho 3D Face Reader and type in the name of the Morpho 3D Face Reader device. When you come across it, you select it and click Next. Afterwards, you click Finish in order to save the Morpho 3D Face Reader into the configuration of the client. Modify a Morpho 3D Face Reader To modify a Morpho 3D Face Reader, left click on a Morpho 3D Face Reader and click Edit on the toolbar. A wizard will open showing the information entered when the Morpho 3D Face Reader was created. Change any of the values required and click Finish to save changes or Cancel to discard changes. Delete a Morpho 3D Face Reader Select the Morpho 3D Face Reader to delete and click Delete on the toolbar. To delete a Morpho 3D Face Reader, you must remove the Morpho 3D Face Reader from the client first. A Morpho 3D Face Reader cannot be deleted if the client has it currently listed in its configurations. © Refer to End User License Agreement for Copyright Notice Page 32 MorphoManager User Manual Morpho 3D Face Reader Status and Tasks When viewing a list of Morpho 3D Face Readers, the status column indicates the current status of each Morpho 3D Face Reader. Online means the Morpho 3D Face Reader is responding to communication requests. Offline means that the Morpho 3D Face Reader is not responding to communication requests. The tasks column indicates the number of tasks remaining for the Morpho 3D Face Reader to process. Clicking on the Queued Tasks and Failed Tasks tab in the details section allows these tasks to be reviewed. Clicking on Logs allows review of access logs retrieved from that Morpho 3D Face Reader. Troubleshooting and Maintenance © Refer to End User License Agreement for Copyright Notice Page 33 MorphoManager User Manual In the example screen above, the “Add User” task failed with the “Delete User” task as well in order. The message below explains the reason for the failed task. Get Logs - will download the currently stored transactions from the Morpho 3D Face Reader into MorphoManager. Inbuilt into MorphoManager is an automatic retrieval that, by default, occurs every thirty seconds. Set Date/Time: Updates the Morpho 3D Face Reader clock to the time on the server. This command is run automatically once a day at the time specified in the system configuration. Rebuild: The rebuild function will remove all users from a Morpho 3D Face Reader and upload the users who are permitted access. This function should only be used if the Morpho 3D Face Reader is not operating as expected. Unexpected behavior could occur if a Morpho 3D Face Reader was moved from another site and contained existing users from that site. During normal operation any users who are added or deleted through user management are updated on the Morpho 3D Face Reader in real time. Set Online: MorphoManager monitors and displays the status of every Morpho 3D Face Reader. If a Morpho 3D Face Reader has gone offline, clicking Set Online will attempt to connect to the Morpho 3D Face Reader and go online. The status of the Morpho 3D Face Reader will change to “Pending Online” while the connection is occurring. If there is a problem connecting to the Morpho 3D Face Reader the status will revert to “Offline”. © Refer to End User License Agreement for Copyright Notice Page 34 MorphoManager User Manual User Groups User groups are used to apply access rights and rules to all members of the group. Users cannot exist in the database without being assigned to a User Group. However, a User Group can exist without having access to any MorphoAccess. This can be useful for segregating users who, for security or other reasons, should not be stored on a MorphoAccess. Create a new User Group Screen 1 – Details Name: Name of the user group. Description: Description of the purpose of the user group. Disable Job Areas: Select this option to override the export value specified in the MorphoAccess. Export Value: This value will be inserted in an export operation. MorphoAccess Access Mode: This value determines the access to MorphoAccess that users in this group will have. All MorphoAccess: Users in this group have access to all MorphoAccess. User Group Only: Users in this group only have access to the MorphoAccess specified for this group and cannot be overridden. User Group and User: Users in the group have access to the MorphoAccess specified for this group by default, but can be © Refer to End User License Agreement for Copyright Notice Page 35 MorphoManager User Manual overridden when editing a person allowing different MorphoAccess access to be specified. User Only: No MorphoAccess access is specified for this group. Access is specified for each user of this group in user management. Morpho 3D Face Reader Access Mode: This value determines the access to Morpho 3D Face Readers that users in this group will have. All Morpho 3D Face Readers: Users in this group have access to all Morpho 3D Face Readers. User Group Only: Users in this group only have access to the Morpho 3D Face Readers specified for this group and cannot be overridden. User Group and User: Users in the group have access to the Morpho 3D Face Readers specified for this group by default, but can be overridden when editing a person allowing different Morpho 3D Face Readers access to be specified. User Only: No Morpho 3D Face Reader access is specified for this group. Access is specified for each user of this group in user management. MSO Identification Access Mode: This value determines the access to MSO Identification devices that users in this group will have. All MSO Identification Clients: Users in this group have access to all MSO Identification Clients User Group Only: Users in this group only have access to the MSO Identification Clients specified for this group and cannot be overridden. User Group and User: Users in the group have access to the MSO Identification Clients specified for this group by default, but can be overridden when editing a person allowing different MSO Identification Client access to be specified. User Only: No MSO Identification Client access is specified for this group. Access is specified for each user of this group in user management © Refer to End User License Agreement for Copyright Notice Page 36 MorphoManager User Manual Time Mask Mode: 24 Hours, 7 Days a Week: No Time mask is specified. All users have access to selected MorphoAccess/Morpho 3D Face Readers/MSO Identification Clients at all times. User Group Only: Users in this group only have access to the MorphoAccess/Morpho 3D Face Readers/MSO Identification Clients during the times specified in the time mask for this group and cannot be overridden. User Group and User: Users in the group have access to the MorphoAccess/Morpho 3D Face Readers/MSO Identification Clients during the times specified in the time mask for this group by default, but can be overridden when editing a person allowing a different time mask to be specified. User Only: No time mask is specified for this group. Time masks are specified for each user of this group in user management. Extended User Details: If enabled, additional user information such as Phone Number(s), Email, and Address can be entered when adding a user. Screen 2 – Select Allowed Authentication Types Select the allowed Authentication types for this user group. There are 6 Authentication types. The authentication types must be enabled in system configuration to be selected here. When enrolling or editing a user, who is a member of this group, only the allowed authentication types will be available to select. One of the presented authentication types can be selected as the default authentication type. The default will be selected when enrolling a new user but can be changed. © Refer to End User License Agreement for Copyright Notice Page 37 MorphoManager User Manual Screen 3 – Select MorphoAccess Select the MorphoAccess that this group will have access to. This section will be displayed if the MorphoAccess Access Mode is not set to All MorphoAccess. The “Select All” button will allow access to all MorphoAccess. The “Clear All” button will remove access to all MorphoAccess. If the MorphoAccess access mode of the user group is set to “User Group and User” then the selection of MorphoAccess can be overridden in user management. Screen 4 – Select Morpho 3D Face Reader Select the Morpho 3D Face Reader that this group will have access to. This section will be displayed if the Morpho 3D Face Reader Access Mode is not set to all Morpho 3D Face Readers. The “Select All” button will allow access to all Morpho 3D Face Readers. The “Clear All” button will remove access to all Morpho 3D Face Readers. If the Morpho 3D Face Reader access mode of the user group is set to “User Group and User”, then the selection of Morpho 3D Face Readers can be overridden in user management. © Refer to End User License Agreement for Copyright Notice Page 38 MorphoManager User Manual Screen 5 – Select MSO Identification Client Select the MSO Identification Client that this group will have access to. This section will be displayed if the MSO Identification Client Access Mode is not set to all MSO Identification Clients. The “Select All” button will allow access to all MSO Identification Clients. The “Clear All” button will remove access to all MSO Identification Clients. If the MSO Identification Client access mode of the user group is set to “User Group and User”, then the selection of MSO Identification Clients can be overridden in user management. Screen 6 – Time Mask The time mask allows you to create access times by selecting from the table with 15 minute steps across 24 hours for each day of the week. Click and drag the mouse over the required areas to select and deselect times. The time area in blue indicates access is allowed. White indicates access is denied. The buttons “Allow All Access” and “Deny All Access” can be used to clear or set access for all days and times. © Refer to End User License Agreement for Copyright Notice Page 39 MorphoManager User Manual Operator Role Creating and modifying Operator roles is an advanced feature that should only be used by experienced operators. Screen 1 – Operator Roles Details Enter the name for this operator role. Screen 2 – Custom Commands Select the custom commands this operator role will allow execute access to. Screen 3 – Entity Access Select the entities this operator role will have access to and the type of access (view, add, edit, delete, import, export). Screen 4 – Report Access Select the reports this operator role will have access to. Screen 5 – User Interface Access Set Select the user interface elements this operator will have access to. © Refer to End User License Agreement for Copyright Notice Page 40 MorphoManager User Manual Clients Clients are computers that have the MorphoManager Client software installed and communicate with a MorphoManager server. Screen 1 - Client Details Name: Description: Location: Name of the computer the client is installed on. A description of the purpose of the client. The physical location of the client computer. Screen 2 - Tabs Select the tabs that are displayed on this client. MorphoManager will need to be closed and restarted for the changes to take effect. Screen 3 - Camera Configuration Setup the camera that is connected to this client. Screen 4- Enrollment Morpho 3D Face Reader Select the Morpho 3D Face Reader to be used for enrollment on this client. Screen 5 – MSO Identification Configuration Settings Unsecure MSO Identification Threshold: This value specifies the threshold score for positive identification on Unsecured MSO devices. By default, the score should be set to 4000. Lowering the score will reduce the security, but allow users with lower quality fingerprints to be identified. Raising the score will increase security, but users with lower quality fingerprints may not be identified. © Refer to End User License Agreement for Copyright Notice Page 41 MorphoManager User Manual Secure MSO Identification Threshold: This value determines the identification threshold for Secured MSO devices. The default value for this setting is 4 (1-10). Lowering the score will reduce the security, but allow users with lower quality fingerprints to be identified. Raising the score will increase security, but users with lower quality fingerprints may not be identified. Identification Auto Reset: If enabled, specifies the amount of time (in seconds) to display the “Identified” screen prior to returning to presentation mode. Not Identified Auto Reset: If enabled, specifies the amount of time (in seconds) to display the “Not Identified” screen prior to returning to presentation mode. Identification Sound: If enabled, a sound will be played via the computer’s speakers indicating a positive identification has occurred. Not Identified Sound: If enabled, a sound will be played via the computer’s speakers indicating a not identified event has occurred. © Refer to End User License Agreement for Copyright Notice Page 42 MorphoManager User Manual Scheduled Reports Scheduled reports enable the periodic generation and delivery of reports based on a predefined set of criteria. SMTP Settings must be configured in system configuration before a scheduled report can be created. To add a new scheduled report, click the Add button. Fill in the details for the scheduled report and click Next. Select the format of the scheduled report. Options are pdf, word document, or excel spread sheet. Select the type of report that will be generated and enter the details for that report type. The scheduled report will use those details each time it automatically generates a scheduled report. Some report types allow for an offset to be entered. This allows reports to be generated for a specific date range relative to the current date e.g. A report can be set to run every week for the last seven days. Click Next to go to the next page when the details are correct. © Refer to End User License Agreement for Copyright Notice Page 43 MorphoManager User Manual Enter the email subject, body of the email and the recipients. To add a recipient, type the email address in the text box and click Add Email Address. To edit an existing email address, select the address to change, type in the new address and click Change Selected Email Address. To remove a recipient, select the email address and click Remove Selected Email Address. This information will be used whenever this scheduled report is generated. Click Finish to save the scheduled report. To change the details of the selected scheduled report, click on Edit in the toolbar. To remove the selected scheduled report, click on Delete. To generate the selected scheduled report now instead of waiting for the predefined generation interval, click on Run Report Now. © Refer to End User License Agreement for Copyright Notice Page 44 MorphoManager User Manual Card Template A card template is used to print ID cards for enrolled personnel. Screen 1 - Details Enter a name for the template and select the layout of the card. Screen 2 - Design Use this screen to design the layout of the card. A region is an item that can be moved around and will be replaced by the actual data when the card is printed (e.g. First Name). A background image can also be added for logos or artwork that is required on the card. To edit a region, click on it or select it from the list below, and change the options using the toolbar items. The region’s alignment (left, center or right), font and type can be changed. The size of the region can be changed by dragging the boxes on the edges of the region. To change a background image region, select the region and click Load Image. To remove a region, select it and click Delete Region. © Refer to End User License Agreement for Copyright Notice Page 45 MorphoManager User Manual Event Logs Here you will find the history of internal actions performed by MorphoManager. A common error is a failed attempt by MorphoManager to communicate with the MorphoAccess. This situation will occur if, for example, there is more than one MorphoAccess and all are in error – this may well point to the network hub being switched off or if power to all MorphoAccess has been interrupted. A Send to Support button is available when discussing an error with the support team. You may be asked about the information on the screen and also asked that the log be emailed to support for further analysis. When clicked, the log file is automatically attached to a new email using the default email client on the PC. Where it can be examined by support staff to help determine the process needed to rectify any fault conditions. No Internet Access The “export logs” action is useful for a situation where the MorphoManager PC is not connected to the Internet, allowing the file to be saved in a location for future reference. To export event logs, click on Save to Disk button and save it in the location needed. The last selection allows for the start and end date and times to be selected. Select the destination for the file and click Save. Exception Logs Exception logs store messages that are created by MorphoManager in the event of an internal action not producing the expected results. The Export Logs and Email Logs to Support icons provide the same functionality as previously outlined in event logs. © Refer to End User License Agreement for Copyright Notice Page 46 MorphoManager User Manual System Configuration Section 1 – Time and Attendance Access Log Exporter These setting are used for manual and automatic access log exporting to a Payroll or Rostering software package. You need to select the format you want the exported data to comply with. You may choose from Commac, Preceda, Timeminder, Powerforce, RosterOn, MYOB , MorphoManager Standard, Kronos, Pay Global (Employee ID/Wiegand Usercode), Sodb and TimeAmerica. If your specific software is not supported, please contact Identity One for help. Automatic Access Log Exporter Click on the tick box for Automatic export access log information and select a destination for the exported file. Enter the default file name and destination for the file. The directory MUST exist on the server computer as the file will be saved to the server’s hard drive. The file will be exported at the interval specified at Export access log data every. © Refer to End User License Agreement for Copyright Notice Page 47 MorphoManager User Manual Section 2 – Wiegand Profile As stated in the image above, this configuration can only be changed when there are NO users present in the system. This section in System Configuration allows you to change the Wiegand profile fixed values in MorphoManager. If necessary to change when installing MorphoManager for the first time, it’s highly recommended that you configure this setting before adding user data. Section 3 – Contactless Keys Authentication types are the methods by which the user is identified on a MorphoAccess. Select the allowed authentication types that will be available for selection in User groups and User Management. Fingerprint The user is authenticated by presenting their finger at a MorphoAccess and matching with fingerprint data stored on the MorphoAccess © Refer to End User License Agreement for Copyright Notice Page 48 MorphoManager User Manual Card Only The user carries a card with a Wiegand code on it and touches it on the MorphoAccess. The user is authenticated if the code read from the card is in the list of accepted Wiegand codes stored on the MorphoAccess. Card and Fingerprint The user carries a card with a Wiegand code on it and touches it on the MorphoAccess. If the code read from the card is in the list of accepted Wiegand codes stored on the MorphoAccess the fingerprint scanner is activated. The user is authenticated by presenting their finger at the MorphoAccess and matching with fingerprint data stored on the MorphoAccess. Card and PIN The user carries a card with a Wiegand code on it and touches it on the MorphoAccess. If the code read from the card is in the list of accepted Wiegand codes stored on the MorphoAccess the keypad is activated. The user is authenticated if the PIN code entered matches the stored PIN code. Card and PIN and Fingerprint The user carries a card with a Wiegand code on it and touches it on the MorphoAccess. If the code read from the card is in the list of accepted Wiegand codes stored on the MorphoAccess the keypad is activated. If the PIN code entered matches the stored PIN code the fingerprint scanner is activated. The user is authenticated by presenting their finger at the MorphoAccess and matching with fingerprint data stored on the MorphoAccess. The “Enable contactless card options” is an advanced feature. Expert knowledge of contactless cards is required for this section. Section 4 – Communications Engine © Refer to End User License Agreement for Copyright Notice Page 49 MorphoManager User Manual Maximum Active Communication Channels: The maximum number of active communication channels. System Event Log: Select the types of information to write to the system event log. Real-time Access Log Recording Settings: These settings are to be configured to use the Real-time Access logs for a MorphoAccess. Section 5 – System Functionality Display extended User details In user details by default only the first of two pages are presented during enrollment and display. The second page allows entry of additional information such as Phone Number, Fax Number, Mobile Number, Email and Address details. Display user defined field 1 (and 2) Selecting this option displays another page in the wizard that collects the information from these fields. Select the fields to display, whether or not information is mandatory and the names of the fields to display. User Group Display Name The name entered here is used instead of "User Group" in all areas of MorphoManager Default Tab This defines the tab selected by default when MorphoManager starts. User Management This allows you to control how many users will appear on your User Management screen. If you have more than the amount in the value filed, you can use filtering to find the additional users. © Refer to End User License Agreement for Copyright Notice Page 50 MorphoManager User Manual Section 6 – Automatic Log management These settings are in place to prevent any log files from becoming unmanageable due to their size. The above values are the default values. When the log count reaches these values the oldest logs are deleted until they are within the values specified. Section 7 – Gateways The Gateway settings are used to receive emails for Scheduled Reports. These settings are specific to the Mail server. For further assistance to configure the gateway settings, please refer to your IT support. © Refer to End User License Agreement for Copyright Notice Page 51 MorphoManager User Manual Section 8 – Enrollment Options Enable juvenile template coding This setting allows the use of juvenile template coding when enrolling children. Captured enrollment Formats Used to enforce which formats are captured during enrollment. Section 9 – Connector Service Automatic Certificate Binding Mode. Enter the settings for the connector service. © Refer to End User License Agreement for Copyright Notice Page 52 MorphoManager User Manual Section 10 – BioBridge Completely optional, BioBridge allows you to extract user data from compatible third-party systems. User/grouping Information can be “synced” by the BioBridge Enrollment Client when you set the configurations for the respective third-party system. You can set “rules” for when data is synced between both parties. One example would be by disabling or deleting enrolled users that were not already enrolled in the MorphoManager client itself. System Choose your BioBridge compatible system from the drop down menu. Configure connection Connection credentials for the third-party software. © Refer to End User License Agreement for Copyright Notice Page 53 MorphoManager User Manual Wiegand Profile Most (but not all) BioBridge compatible systems use a specific Wiegand format to identify users/cardholders. This can be specified on Cards, Card Types or can be specified as a “Wiegand Format”. Please select the Wiegand format in use from the drop down menu. User Not Found This setting determines what action MorphoManager should take when a previously enrolled user is not found in the BioBridge system Grouping Mode The Grouping Mode setting determines how MorphoManager should map BioBridge users into MorphoManager User Groups. This can be done by either automatically trying to map based on the names (Automatic), or by manually selecting which BioBridge group maps to which MorphoManager User Group. Grouping Priority MorphoManager only allows users to belong to one User Group. This setting allows you to prioritize the BioBridge groupings in case that system allows multiple group membership User Group Mappings This displays and allows for modification of how the BioBridge groups map to MorphoManager User Groups (if using Manual Grouping Mode). If no MorphoManager User Group is selected for a particular BioBridge Grouping, those users will not be available for enrollment into MorphoManager. For more details, please refer to the separate BioBridge Quick Start Guide manuals for specific vendors. © Refer to End User License Agreement for Copyright Notice Page 54 MorphoManager User Manual User Management Users are people who will have their biometric data (or minutia) sent to the selected MorphoAccess for identification purposes for either access control or time and attendance. Select the user management tab to access this area. Select any user to view the details and logs of the user in the bottom details area. Detailed information about the enrolled fingers can be viewed on the Finger Biometrics Tab. Fingerprints can be exported from this tab. Creation and enrollment of a User To create a new user, select the click the Add button on the Toolbar. This will display the User Wizard. Screen 1 – User Details Enter the details for the new user. © Refer to End User License Agreement for Copyright Notice Page 55 MorphoManager User Manual User Group: Select the user group that this user will belong to. This is an important selection, as the user group will determine MorphoAccess access and other access control and time & attendance settings. First Name: User’s first Name (Required) Middle Name: User’s Middle Name Last Name: User’s Last Name (Required) Date of Birth: Enter the date of birth of the user. This can be entered in several different ways. E.g. 30th May 1975 could be entered in the following ways 30/5/75, 30-5-75, 30 May 1975, 30 5 1975. Screen 2 – Additional Details © Refer to End User License Agreement for Copyright Notice Page 56 MorphoManager User Manual Job Title: The user’s job title. Employee ID: A company specific code that may be assigned to a user. If used for “Time and Attendance”, this field should match the employee number from the Payroll or Rostering software. MorphoAccess Display Name: The information displayed upon acceptance by the MorphoAccess and defaults to the First and last name of the user. PIN Code: Used when the authentication mode is set to “Card and Pin” or “Card and Pin and Fingerprint”. Authentication: Choose the method for authenticating users Fingerprint The user is authenticated by presenting their finger at a MorphoAccess and matching with fingerprint data stored on the MorphoAccess. Card Only The user carries a card with a Wiegand code on it and touches in on the MorphoAccess. The user is authenticated if the code read from the card is in the list of accepted Wiegand codes stored on the MorphoAccess. Card and Fingerprint The user carries a card with a Wiegand code on it and touches it on the MorphoAccess. If the code read from the card is in the list of accepted Wiegand codes stored on the MorphoAccess the fingerprint scanner is activated. The user is authenticated by presenting their finger at the MorphoAccess and matching with fingerprint data stored on the MorphoAccess. Card and PIN The user carries a card with a Wiegand code on it and touches it on the MorphoAccess. If the code read from the card is in the list of accepted Wiegand codes stored on the MorphoAccess the keypad is activated. The user is authenticated if the PIN code entered matches the stored PIN code. Card and PIN and Fingerprint The user carries a card with a Wiegand code on it and touches it on the MorphoAccess. If the code read from the card is in the list of accepted Wiegand codes stored on the MorphoAccess the keypad is activated. © Refer to End User License Agreement for Copyright Notice Page 57 MorphoManager User Manual If the PIN code entered matches the stored PIN code the fingerprint scanner is activated. The user is authenticated by presenting their finger at the MorphoAccess and matching with fingerprint data stored on the MorphoAccess. Comments: Any additional information that is relevant to that person. Screen 3 – Contact Details This page is only visible if “Display Extended user group details” has been enabled on the selected User Group. Enter the details for the selected user. © Refer to End User License Agreement for Copyright Notice Page 58 MorphoManager User Manual Screen 4 – MorphoAccess Override Details (If a Wiegand Profile is set) The MorphoAccess Identifier is the User’s unique identifier on the MorphoAccess and is also the value output on the Wiegand Output when a user is identified. This option is only available if you have changed the System Configurations to have a particular Wiegand Profile set, rather than leaving the default setting as ‘None’. Screen 5– Morpho 3D Face Reader Override Details This screen is only visible if the Morpho 3D Face Reader access mode is set to “User Group and User” or “User Only” on the selected user group. The settings in this form will only be used if the user requires special access that is different from the Morpho 3D Face Reader that was specified in the User Group. Check the “Override user group Morpho 3D Face Readers” and select the Morpho 3D Face Reader(s) this user will be enrolled on. © Refer to End User License Agreement for Copyright Notice Page 59 MorphoManager User Manual Screen 6 – MSO Identification Client Override Details This screen is only visible if the MSO Identification Client access mode is set to “User Group and User” or “User Only” on the selected user group. The settings in this form will only be used if the user requires special access that is different from the MSO Identification Client that was specified in the User Group. Check the “Override user group MSO Identification Client” and select the MSO Identification Client(s) this user will be enrolled on. Screen 7 – MorphoAccess Override Details This screen is only visible if the MorphoAccess mode is set to “User Group and User” or “User Only” on the selected user group. The settings in this form will only be used if the user requires special access that is different from the MorphoAccess that was specified in the User Group. Check the “Override user group MorphoAccess” and select the MorphoAccess device(s) this user will be enrolled on. © Refer to End User License Agreement for Copyright Notice Page 60 MorphoManager User Manual Screen 8– Time Masking The settings in this form will only be used if the user requires special access that is different from the time masks that were specified in the User Group. To specify a different time mask for this user click the Override time mask check box and select the times that access is permitted. The week is broken into 15 minute blocks and by default they are all selected. By removing blocks, the user will not be granted access to those times. © Refer to End User License Agreement for Copyright Notice Page 61 MorphoManager User Manual Screen 9– Photo Capture Position the person in front of a plain background so that all of their face is visible in the picture, similar to a passport photo. Once the user is positioned correctly click Capture Photo. Click on the image in the top left corner and drag towards the bottom right drawing a square around the part of the photo to keep. This can be done many times until the correct area is selected. Click Accept Changes to accept the changes if no camera is connected just click Next. If the person is not available to have their photo taken, click Person not at Camera, to skip photo capture. © Refer to End User License Agreement for Copyright Notice Page 62 MorphoManager User Manual If the photo is not acceptable, click Update Photo to recapture the photo. Photos can be imported and exported using the corresponding buttons. Additional configuration options for the camera can be changed by clicking on Configure Camera. Screen 10 – Fingerprint Capture If either of the following conditions occurs a “No Device” message box will be displayed when you select a finger to enroll: • • There is no fingerprint reader connected The fingerprint reader connected is the wrong model for the software. If the reader is connected correctly the following screen will be displayed. The system expects two fingers to be enrolled so that the user will still have access should one fingerprint become unreadable due to minor events, such as knife cuts, Band-Aids etc. © Refer to End User License Agreement for Copyright Notice Page 63 MorphoManager User Manual The default fingers that the system suggests you to enroll are both index fingers and are flashing orange. You do not need to use these fingers as you can click on others. Click on a finger and have the user place their finger in the center of the scanner glass. You will then see the print appear on screen. There are four scans performed on each finger; the first three are used to create the biometric template. The system selects the best elements of each print and consolidates those features, allowing a greater range of presentations to be recognized. The fourth print is used for verification purposes. Below each enrollment image a color bar will be displayed indicating the quality of the print as it is being captured. Green indicates quality is above recommended quality. Orange indicates the quality is above the minimum but below the recommended quality. Operators with administrative rights are permitted to accept fingerprints of this quality. Red indicates the quality is below the minimum, the user must re-enroll. Follow the instructions on screen. Green indicates ready to capture. Orange indicates that a finger is presented but the capture has not finished yet. Check the instructions to ensure the finger is placed correctly. When the border is red, the current finger capture is finished. Continue until all boxes are filled. Once the enrollment is complete for both the fingers, you will see this screen. Captured finger quality is displayed on the right. In the event a user is not being recognized at any MorphoAccess with one or both enrolled fingers, click Clear <enrolled finger> finger enrollment to allow re-enrollment. Positive Identification and general performance of MorphoManager is maximized by the quality of the fingerprint captured during enrollment. MorphoManager has been designed to reject poor quality fingerprints; however it is still possible they may slip through. The key to capturing a high quality fingerprint is to visually look for a clearly presented pattern that is centered and square with the right amount of pressure. Don’t hesitate to retry the capture if you are unsatisfied. For assistance refer to the fingerprint capture guide. © Refer to End User License Agreement for Copyright Notice Page 64 MorphoManager User Manual Click Finish to save the user or cancel to discard changes. To get the best performance from your MorphoManager software and MorphoAccess hardware, care must be taken with enrollment of users into the system. Below are examples of fingerprint capture which could result in either false acceptance or false rejection of users at your MorphoAccess. We also suggest that the MorphoAccess be mounted at a height of approximately 1 meter from the ground. Mounting the MorphoAccess at this height will facilitate full finger presentation when using the MorphoAccess. Mounting the MorphoAccess significantly higher or lower on the wall makes presentation of a full fingertip much more difficult. Figure 1 This is an example of a finger that has been cleaned of oil by methylate spirit. Very little information is shown on the print to develop the algorithm. This can happen if you use hand wipes or hand cleaners prior to using the MorphoAccess. If the hand cleaners are used for infection control or similar requirements, either use the hand cleaner after using the MorphoAccess or provide a hand cream solution to replace the natural body oils stripped from the hands. Figure 2 © Refer to End User License Agreement for Copyright Notice Page 65 MorphoManager User Manual This is an example of a print where the person being enrolled has used only light pressure and partial presentation of the tip of the finger. The user will have difficulty presenting the same portion of the finger when clocking “On” or “Off” if this is allowed during enrollment. This type of enrollment could also lead to a significant number of false acceptances which is where a user is identified incorrectly. This is because there is little information in this portion of a fingerprint to develop a good algorithm. Figure 3 Figure 3 shows the finger being presented in two different places on the enrollment device. The MSO300 or 1300 will actually discard any non-matching prints and average those remaining out of the three presentations. If the third print was in a different place again, the software would either accept one as being a match and use that or reject the enrollment. However matching on two prints isn’t as good as three identical prints. Figure 4 © Refer to End User License Agreement for Copyright Notice Page 66 MorphoManager User Manual In this example the captured finger has a large amount of oil on it and pressure was quite high on the reader lens. This will probably work okay but is not ideal. A user needs well defined ridges and troughs as well as intersection points in the print. These sites are the matching points used to develop the algorithm which is the finger template that subsequent finger presentations are matched against at the MorphoAccess. Figure 5 This is an example of the presentation required for the best possible enrollment by a user. This example has good information like visible ridges and intersection points for development of the algorithm by the enrollment device. A full print is presented to the window and even pressure from the finger. The print should use as much of the finger phalange as possible. User Actions There are several additional functions available for user management. Edit: Opens the already saved user details for viewing or editing. Delete: Use with caution as the user’s details will be permanently deleted. This operation cannot be undone. Refresh: Refreshes the user list from the database. This will update the display with the most current data. Disable User: When a user is disabled they no longer have access to any MorphoAccess. All access logs and user information is retained for reporting. Disabled users can be enabled at any time. © Refer to End User License Agreement for Copyright Notice Page 67 MorphoManager User Manual Export Photo: The photo stored in the User record can be saved to disk. Add Photo: A photo from disk can be used as the user’s photo. This is useful if a camera is not connected to the PC. Filtering The display of users can be filtered by clicking the Filter button. Select the required items and click Ok. The list of users will automatically be updated using the new filter information. To return the filters to their original state click Reset Filters. To display all users click Show All. © Refer to End User License Agreement for Copyright Notice Page 68 MorphoManager User Manual MSO Identification The MSO Identification section allows for users fingerprints to be captured and identified using the configured MorphoSmart device Once the user presents their fingerprint to the MSO device an “Identified” or “Not Identified” screen will be shown. Identified: The identified user’s name, photo and identification score (if using an unsecured MSO device)will be displayed. © Refer to End User License Agreement for Copyright Notice Page 69 MorphoManager User Manual Not Identified: If the captured fingerprint is not matched against a previously enrolled finger, the “Not Identified” screen will be shown. Onsite The Onsite section is used to show which users are currently onsite or offsite. The Onsite and Offsite items in the tree view on the left can be expanded to show user groups. To manually set a user onsite/offsite, click on the User in the Main screen and click on Set User Off-Site or Set User On-Site. Depending on the MorphoAccess Onsite mode that has been set, the users will be shown in onsite or offsite. © Refer to End User License Agreement for Copyright Notice Page 70 MorphoManager User Manual Access Logs An access log is a record of transactions recorded by the system. To filter the display of access logs, click Filter. Enter or select the details for filtering and click Ok. To reset the filters to their original state, click Reset Filters. Before the access log can be exported, you need to create an Export profile. This is an initial setup procedure and is performed only once unless you need to export to another type of time and attendance application. The following error will be displayed if the profile(s) have not been created. Refer to the system configuration section for instructions on configuring an access log export profile. Once an access log exporter has been set-up, click on Export Access logs and you are presented with a window showing the destination of the file. Enter a file name and click on Save. The following is an example of Exported Access logs. © Refer to End User License Agreement for Copyright Notice Page 71 MorphoManager User Manual Reports The reports center has a variety of reporting options for displaying information about user activity. List Report: Displays a list of all items in the selected category (MorphoAccess, Operators and Users) User Group Members Report: Displays a list of all users that are members of the selected user group. Activity Reports: These reports will show all activity for the selected item type. User Activity Report • • Select the desired date range. The default Date Range date and time is one week previous. Select the user. Enter the first few characters of both the first and last name. Select Search. Once the user is on the screen, select the user and click Generate Report. MorphoAccess Activity Report • • Select the desired date range. The default Date Range date and time is one week previous. Select the MorphoAccess. Enter the first few characters of the name of the MorphoAccess. Select Search. Once the MorphoAccess is on the screen, select the MorphoAccess and click Generate Report. If you are not sure of the name or spelling of the MorphoAccess, click on Search with an empty search box and all the MorphoAccess will appear. User Group Activity Report • • Select the desired date range. The default Date Range date and time is one week previous. Select the User Group. Enter the first few characters of the name of the group. Select Search. Once the group is on the screen, select the group and click Generate Report. If you are not sure of the name or spelling of the group, click on Search with an empty search box and all the user group will appear. All Activity (included all users and MorphoAccess). • • Select the desired date range. The default Date Range date and time is one week previous. Click Generate Report. Inactivity Report • • Select the desired date Range. The default Date Range is one week previous. Select the User Group. Enter the first few characters of the name of the group. Select Search. Once the group is on the screen, select the group and click Generate Report. © Refer to End User License Agreement for Copyright Notice Page 72 MorphoManager User Manual List Report • • Select the Report type from the options MorphoAccess, Operator, User and User group. Click Generate Report. User Group Members Report • Search and select the User group and click on Generate Report. Permissible Report • • Select the Report type (MorphoAccess or User). Search for the MorphoAccess name or the user name and click on Generate Report. Database Management Database Backup Tool The Backup Tool allows for the backup of SQLCE database. Systems running SQL Server will need to contact Microsoft for backup information. When you start the Database Backup tool, you will be prompted for backup directory. Select the directory you want to back up the database to. The MorphoManager service must be stopped before starting the Database Backup Tool. Browse Click Browse to change the backup directory Start Backup Starts the backup process. Database Copy Tool The Database Copy Tool copies a databases table schema and data from one database to another. This allows for easy upgrading from the default SQL CE database to Microsoft SQL server when the system grows beyond the limits of SQL CE. © Refer to End User License Agreement for Copyright Notice Page 73 MorphoManager User Manual For customer support on Microsoft SQL Server, please contact Microsoft SQL Server TechCenter. Copying a database The following instructions are for upgrading the default SQL CE database to Microsoft SQL Server. • • • • • BACKUP YOUR CURRENT DATABASE. Install and configure Microsoft SQL Server. Create a new database (MorphoManager) Stop MorphoManager Server Start Advanced server configuration Set Database provider type to SQL Server (200 and 2005) Set the ADO.Net connection string for the database you created. Save the existing ADO.NET connection string for later use. Apply changes Test configuration Create the database schema in the new database Start Database Copy Tool Connect String Details © Refer to End User License Agreement for Copyright Notice Page 74 MorphoManager User Manual • • • • Enter the ADO.NET connection string saved from 5.2 into the Source Database Connection String field. Set the correct database type using the dropdown lists. Test Connections Copy Database • • Verify your source and target database connection strings Click Copy Database button All data within the target database will be erased. Review the migration status to ensure no errors were encountered. © Refer to End User License Agreement for Copyright Notice Page 75 MorphoManager User Manual MorphoAccess Setup MorphoAccess IP Address Configuration By default all MorphoAccess shipped from Safran are set to a default configuration. IP Address: 134.1.32.214 Subnet Mask: 255.255.0.0 Default Route: 134.1.6.1 Use the MorphoAccess IP Address Configuration Tool to change it. The tool is located on the server installation in the program files menu. © Refer to End User License Agreement for Copyright Notice Page 76 MorphoManager User Manual Enter the existing IP address of the MorphoAccess and click Connect. Enter the new configuration and click Apply New Configuration. MorphoAccess Wiring MA 500 / MA 500+ Series: New Block board wiring © Refer to End User License Agreement for Copyright Notice Page 77 MorphoManager User Manual MA 500 Series: Old block board wiring © Refer to End User License Agreement for Copyright Notice Page 78 MorphoManager User Manual Ethernet Interface (LAN 10 Mbps) T568B and T568A RJ45 Wire Positions Pin 1 2 3 4 5 6 7 8 Signal Tx (+) (Transmit Data +) Tx (-) (Transmit Data -) Rx (+) (Receive Data +) No Connection No Connection Rx (-) (Receive Data -) No Connection No Connection © Refer to End User License Agreement for Copyright Notice T568B Connection White Orange Orange White Green Blue White Blue Green White Brown Brown T568A Connection White Green Green White Orange Blue White Blue Orange White Brown Brown Page 79 MorphoManager User Manual MorphoAccess TCP\IP Ethernet Wiring Create a straight-through connection when connecting the MorphoAccess into a Hub/Switch Create a cross-over connection when connecting the MorphoAccess directly into a computer. RJ45 Wire Positions T568B T568B T568A T568A MorphoAccess Wiring T568B T568A T568A T568B Result Straight-through Cross-over Straight-through Cross-over For a straight-through connection match the T568B RJ45 Wire Positions to the T568B MorphoAccess TCP\IP Ethernet Wiring. For a cross-over connection, match the T568A RJ45 Wire Positions to the T568B MorphoAccess TCP\IP Ethernet Wiring. For a straight-through connection match the T568A RJ45 Wire Positions to the T568A MorphoAccess TCP\IP Ethernet Wiring. For a cross-over connection, match the T568A RJ45 Wire Positions to the T568B MorphoAccess TCP\IP Ethernet Wiring. Power Supply source MA 500 / MA 500+ Series OMA 1 2 +12V GND/ALIM Ground In In In Positive 12 Volts, power supply Ground power supply Ground security reference 500 Series Power Cable Red Black Yellow/green External power supply: Must conform to CEE/EEC EN60950 standard 9V to 16 Volts ± 5% (regulated) 1.5 Amp minimum (peak) Power may come from a 12Volt Wiegand power supply, conforming to the Security Industry Association’s Wiegand standard March 1995, able to deliver 9 Watts. In standard operating activity, typical power consumption is 4.5 Watts. In extreme temperature conditions, with all options (USB Flash drive, 12V output for Wiegand in), maximum power consumption is up to 9 Watts. These MorphoAccess make use of POE functionality; if Ethernet network is POE compatible, power supply may come from Ethernet wiring. © Refer to End User License Agreement for Copyright Notice Page 80 MorphoManager User Manual Wiegand output wiring MA 500 / MA 500+ Series 1 2 3 4 5 D0 D1 LED1 LED2 GND Out Out In In Wiegand D0 Wiegand D1 Wiegand LED In 1 (Option) Wiegand LED In 2 (Option) Ground for Wiegand OMA 500 Series Wiegand Dataclock cable Green White Brown Gray Black Wiegand input wiring MA 500 / MA 500+ Series 1 2 3 4 5 D0 D1 LED +12V GND In In Out Out Wiegand D0 Wiegand D1 Wiegand LED Out 1 (Option) 12 Volts Power output (150mA max) Ground for Wiegand OMA 500 Series Wiegand Blue Yellow Orange Red Black Output relay and Tamper-Switch MA 500 / MA 500+ Series 1 2 3 4 5 6 7 CRO CRC CR TSW2_1 TSW2-0 ATSW1_1 ASTW1_0 Ground Contact relay normally open Contact relay normally closed Contact relay common Tamper switch Contact 1 Tamper switch Contact 0 Anti theft switch Contact 1 Anti-theft switch Contact 0 Not connected © Refer to End User License Agreement for Copyright Notice OMA 500 Series Switch/relay cable Red Orange Yellow White Green Not available Not available Black Page 81