1
9
Appendix A
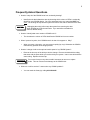
Certain features of the CS2000 require an internal dip switch change.
Unplug unit from wall outlet before attempting to remove back
cover plate. High voltage can cause serious injury if unit is left
plugged into receptacle.
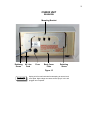
Remove the back panel by unscrewing the two retaining screws with a small Phillips head screw
driver. See Figure 15 on page 9 for the correct location of these screws.
Back cover plate is still attached when unscrewed from unit.
Do not pull on wires. If they should become disconnected,
call the factory. Do not plug unit into wall outlet.
If the factory has not installed the following features for you, continue as outlined below.
Installing the Tech Sequence feature (this will disable the Doctor Sequence feature)
!
STEP 1
Locate the dip switch inside the CS2000 unit in the upper right
corner of the PC board.
!
STEP 2
Move switch number 8 to the ON position. Do not change any of
the other settings on the dip switch.
!
STEP 3
Replace back panel.
!
STEP 4
Plug the CS2000 unit into wall outlet.
!
STEP 5
You must repeat Steps 1 through 4 for each unit in the system.
!
STEP 6
Program your system. See “Programming the CS2000”.
Installing the Timer with buzz alert feature.
!
STEP 1
Locate the dip switch in the upper right corner of the PC board.
!
STEP 2
Move switch number 9 to the ON position. Do not change any of
The other settings on the dip switch.
!
STEP 3
Replace back panel.
!
STEP 4
Plug the CS2000 unit into wall outlet.
!
STEP 5
Repeat Steps 1 through 4 for each unit in the system that you want
This feature installed on.
!
STEP 6
Program your system. See “Programming the CS2000”.