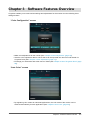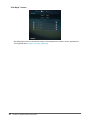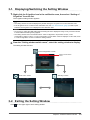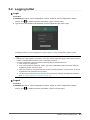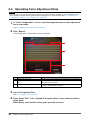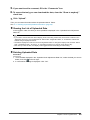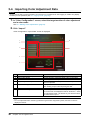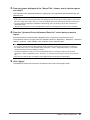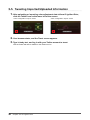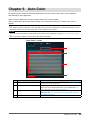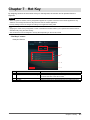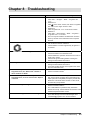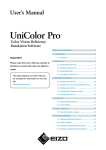
1
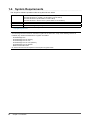
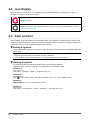
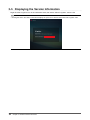
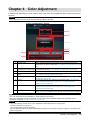
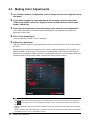
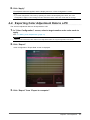
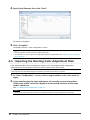
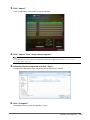
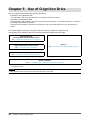
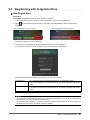
User’s Manual
™
Important
Please read this User’s Manual carefully to familiarize yourself with
safe and effective usage.
•The latest software and User’s Manual are available for download
from our web site:
http://www.eizoglobal.com
No part of this manual may be reproduced, stored in a retrieval system, or transmitted, in any form or by
any means, electronic, mechanical, or otherwise, without the prior written permission of EIZO Corporation.
EIZO Corporation is under no obligation to hold any submitted material or information confidential unless
prior arrangements are made pursuant to EIZO Corporation’s receipt of said information. Although every
effort has been made to ensure that this manual provides up-to-date information, please note that EIZO
monitor specifications are subject to change without notice.
2

CONTENTS
CONTENTS.............................................................. 3
Chapter 8 Troubleshooting............................... 33
Preparation Part............................. 4
Appendix....................................... 34
1-1.Features.......................................................... 5
Trademarks........................................................... 36
Chapter 1 Introduction........................................ 5
1-2.
Glossary................................................................ 35
System Requirements................................... 6
Chapter 2 Setup................................................... 7
2-1.
Installing the Software.................................. 7
2-2.
Icon Display.................................................... 8
2-3.
Start and Exit.................................................. 8
2-4.
Uninstalling the Software............................. 9
●●Exiting G-Ignition............................................. 8
●●Starting G-Ignition............................................ 8
●●Windows 10...................................................... 9
●●Windows 8.1..................................................... 9
●●Windows 8........................................................ 9
●●Windows 7........................................................ 9
Usage Part..................................... 10
Chapter 3 Software Features Overview.......... 11
3-1.
Displaying/Switching the Setting Window....13
3-2.
Exiting the Setting Window.........................13
3-3.
Displaying the Version Information............14
Chapter 4 Color Adjustment............................. 15
4-1.
Making Color Adjustments..........................16
4-2.
Exporting Color Adjustment Data to a PC....17
4-3.
Importing the Existing Color Adjustment
Data.................................................................18
Chapter 5 Use of G-Ignition Drive................... 20
5-1.
Registering with G-Ignition Drive...............21
●●
●●
New Registration.............................................21
Changing Registration Information................ 22
5-2.
Logging In/Out............................................. 23
●●Login............................................................... 23
●●Logout............................................................ 23
5-3.
Uploading Color Adjustment Data............. 24
●●
●●
Viewing the List of Uploaded Data................. 25
Deleting Uploaded Data................................. 25
5-4.
Importing Color Adjustment Data.............. 26
5-5.
Tweeting Imported/Uploaded Information.... 28
Chapter 6 Auto Color........................................ 29
6-1.
Setting the Default Color Mode.................. 30
6-2.
Associating a Color Mode with a
Specific Application.................................... 30
Chapter 7 Hot Key.............................................. 31
7-1.
Assigning Hot Keys..................................... 32
CONTENTS
3
Preparation Part
4
Chapter 1 Introduction
G-Ignition is software for adjusting a monitor from a computer through a USB interface using a mouse and
keyboard.
1-1. Features
●●Color Adjustment
The monitor’s color adjustment function can be controlled from the software.
•• Saving Color Adjustment Data as a File
Adjustment values can be saved as a file and imported into other PCs.
•• Cloud Function/Link with Twitter
You can upload color adjustment data to G-Ignition Drive to share it with other users, and import data that
other users uploaded to G-Ignition Drive. Furthermore, you can exchange information with other users via a
link with Twitter.
•• Supporting Multiple Monitor Configurations
In a multiple monitor configuration, batch color adjustment is possible if the monitors are the same model.
●●Auto Color Function
By registering color modes for individual applications, the color mode of the monitor can be switched
automatically for each application.
Note: Example of use
•• If a color mode is adjusted in order to be dedicated to a specific application, and the adjusted color mode is
associated with the application using the Auto Color function, the dedicated monitor settings are selected at
the same time the application is started up.
●●Setting Hot Keys
By assigning functions of the monitor to keys on the keyboard, the monitor can be operated from the
keyboard. In a multiple monitor configuration, batch registration of hot keys is possible if the monitors
are the same model.
●●Auto-applied Color Profile
When G-Ignition is started, a color profile (temperature 6500 K, gamma 2.2) suitable for the monitor
in use is automatically applied to the OS.
Chapter 1 Introduction
5
1-2. System Requirements
The G-Ignition software operates under the systems shown below.
OS
Microsoft Windows 10 (32 bit edition or 64 bit edition)
Microsoft Windows 8.1 Update 1 (32 bit edition or 64 bit edition)
Microsoft Windows 8 (32 bit edition or 64 bit edition)
Microsoft Windows 7 Service Pack 1 (32 bit edition or 64 bit edition)
Computer
Built-in USB
Monitor
EIZO FORIS series*1
Video card
OpenGL 3.0 or higher operating conditions must be satisfied
*1 For the latest information about the compatible monitors, refer to our web site.
http://gaming.eizo.com
Attention
•• The following software cannot be used with G-Ignition at the same time. If any of the following software is
installed, they will be uninstalled when G-Ignition is installed.
-- ScreenManager Pro
-- ScreenManager Pro for Gaming
-- ScreenManager Pro for LCD
-- ScreenManager Pro for LCD (DDC/CI)
-- ScreenManager Pro for Medical
-- EIZO EcoView NET Client
•• An Internet environment is required to use Help and G-Ignition Drive.
6
Chapter 1 Introduction
Chapter 2 Setup
2-1. Installing the Software
1.Connect the USB cable.
Connect the USB downstream port of the computer and the USB upstream port of the monitor with
the USB cable.
Note
•• For details on setting up the monitor, see the user’s manual for the monitor.
2.After unzipping the downloaded file, double-click “Launcher.exe”.
A Menu screen opens automatically. Click “G-Ignition”.
3.Install the software.
Clicking “Install” starts the installer.
Note
•• The “User Account Control” dialog box may appear.
Click “Yes” to open the menu.
4.Follow the instructions to install the software.
When installation is completed, G-Ignition starts and the icon appears in the Windows notification
area.
When G-Ignition is started, a color profile (temperature 6500 K, gamma 2.2) suitable for the monitor
in use is automatically applied.
Chapter 2 Setup
7
2-2. Icon Display
While G-Ignition is running, an icon is displayed in the notification area. The appearance of the icon
changes according to the operating status.
G-Ignition is active.
G-Ignition is not active. The software cannot recognize the monitor. For details, refer to “Chapter 8
Troubleshooting” (page 33).
2-3. Start and Exit
After installed, G-Ignition resides in the notification area. This software is constantly active while the PC
is being used, and therefore no special operation is required to start the software. G-Ignition needs to be
started only when it has been exited using the exit procedure.
●●Exiting G-Ignition
To exit (release the residence of) G-Ignition, right-click the G-Ignition icon in the notification area, and
select “Exit”.
Note
•• G-Ignition cannot be exited when the setting window is displayed.
•• If you reboot the PC after exiting G-Ignition, it starts automatically when the PC starts up.
●●Starting G-Ignition
To restart G-Ignition that has been exited, perform the following operation.
G-Ignition starts, and the G-Ignition icon is displayed in the notification area.
Windows 10:
Click “Start” - “All apps” - “EIZO” - “G-Ignition Ver. x.x.x”.
Windows 8.1:
Click
on the “Start” screen, then select “G-Ignition Ver. x.x.x” on the “Apps” screen.
Windows 8:
Click “G-Ignition Ver. x.x.x” on the “Start” screen.
Windows 7:
Click “Start” - “All Programs” - “EIZO” - “G-Ignition” - “G-Ignition Ver. x.x.x”.
8
Chapter 2 Setup
2-4. Uninstalling the Software
●●Windows 10
Procedure
1. Select “Start” - “Settings” - “System” - “Apps & features”.
2. Select “G-Ignition” from the list, then click “Uninstall”.
3. Follow the on-screen instructions to uninstall the software.
●●Windows 8.1
Procedure
1. Click
at the bottom of the “Start” screen.
The “Apps” screen appears.
2. Select “Windows System” - “Control Panel” - “Programs” - “Uninstall a program”.
3. Select and double-click “G-Ignition” in the list.
4. Follow the on-screen instructions to uninstall the software.
●●Windows 8
Procedure
1. On the “Start” screen, right-click a position where there are no tiles.
App commands appear at the bottom of the screen.
2. Select “All Apps” - “Windows System” - “Control Panel” - “Programs” - “Uninstall a program”.
3. Select and double-click “G-Ignition” in the list.
4. Follow the on-screen instructions to uninstall the software.
●●Windows 7
Procedure
1. Select “Start” - “Control Panel” - “Programs” - “Uninstall a program”.
2. Select “G-Ignition” from the list, then click “Uninstall”.
3. Follow the on-screen instructions to uninstall the software.
Chapter 2 Setup
9
Usage Part
10
Chapter 3 Software Features Overview
G-Ignition enables you to make various settings and adjustments for the monitor from the following three
setting windows.
“Color Configuration” screen
•• Make color adjustments for the monitor (See “Chapter 4 Color Adjustment” (page 15)).
•• Save the color adjustment data to a file so that it can be imported into other PCs and shared via
G-Ignition Drive (See “Chapter 4 Color Adjustment” (page 15)).
•• Exchange your information with other users in Twitter (See “Chapter 5 Use of G-Ignition Drive” (page
20)).
“Auto Color” screen
•• By registering color modes for individual applications, the color mode of the monitor can be
switched automatically for each application (See “Chapter 6 Auto Color” (page 29)).
Chapter 3 Software Features Overview
11
“Hot Keys” screen
•• By assigning functions of the monitor to keys on the keyboard, the monitor can be operated from
the keyboard (See “Chapter 7 Hot Key” (page 31)).
12
Chapter 3 Software Features Overview
3-1. Displaying/Switching the Setting Window
1.Right click the G-Ignition icon in the notification area, then select “Setting of
G-Ignition” from the list.
The G-Ignition setting window appears.
Note
•• The setting window can also be displayed by double clicking the G-Ignition icon in the notification area.
•• If the G-Ignition icon is not found in the notification area, see “2-3. Start and Exit” (page 8) to start up the
software. The G-Ignition icon is displayed in the notification area.
Attention
•• Do not plug or unplug the USB cable when the setting window is displayed. Doing so may cause the window
to close without the settings being applied.
•• The setting window cannot be switched when “Color Configuration / Import Data” screen, “Color
Configuration / Adjust” screen, or “Color Configuration / Export Data” screen is displayed. In this case, return
to “Color Configuration” screen to switch the setting window.
2.From the “Setting window switch menu”, select the setting window to display.
The setting window switches.
“Color Configuration” screen
Setting window switch
menu
“Auto Color” screen
“Hot Keys” screen
3-2. Exiting the Setting Window
Click
on the upper right of each setting window.
Chapter 3 Software Features Overview
13
3-3. Displaying the Version Information
Right-click the G-Ignition icon in the notification area, then select “About G-Ignition” from the list.
Note
•• Clicking the URL in the version information displays the open source license information that G-Ignition uses.
14
Chapter 3 Software Features Overview
Chapter 4 Color Adjustment
Individual color adjustments can be made for each color mode. Color adjustment data can be imported and
exported.
Attention
•• Color adjustment data can only be imported and exported in User mode.
“Color Configuration” screen
1
2
3
4
5
7
6
8
No.
1
2
3
4
5
6
7
8
Name
Monitor menu
Description
When multiple monitors are connected, select a monitor whose color
adjustments you want to make (See “4-1. Making Color Adjustments” (page
16)).
Apply to all connected
The adjustment results can be applied to all currently connected monitors
monitors of the same model of the same model (See “4-1. Making Color Adjustments” (page 16)).
Monitor View
Displays the model of the monitor you have selected.
Mode Selection pull-down
Select a color mode to be applied to the monitor you have selected (See
menu
“4-1. Making Color Adjustments” (page 16)).
Color Adjustment
Displays the screen used to adjust color items (See “4-1. Making Color
Adjustments” (page 16)).
Export
For exporting the set color adjustment information (See “4-2. Exporting
Color Adjustment Data to a PC” (page 17), “5-3. Uploading Color
Adjustment Data” (page 24)).
Import
For importing color adjustment information (See “4-3. Importing the
Existing Color Adjustment Data” (page 18), “5-4. Importing Color
Adjustment Data” (page 26)).
Information View
Displays information relevant to color adjustments.
When you set each adjustment item, tips for setting the item are displayed.
Note
•• The color mode that was last adjusted is normally applied to the monitor.
•• After color adjustment has been completed, the color mode can be switched automatically depending on the
application used (See “Chapter 6 Auto Color” (page 29)).
Attention
•• If any of the following events occurs, color adjustment is interrupted even if it is in progress:
-- Power to the monitor is turned off
-- The monitor enters power saving mode
The color adjustment process can be restarted after the power to the monitor is turned on again or it is restored from
power saving mode.
Chapter4 Color Adjustment
15
4-1. Making Color Adjustments
1.In a multiple monitor configuration, select a target monitor to be adjusted from
the menu.
2.If you want to apply the same settings to all currently connected monitors
of the same model, select the “Apply to all connected monitors of the same
model” check box.
3.From the pull-down menu, select the target color mode of color adjustment.
Color modes supported by the selected model are displayed. The displayed color modes vary
depending on the model.
4.Click “Color Adjustment”.
“Color Configuration / Adjust” screen is displayed.
5.Adjust each parameter.
Click the numerical value box of each parameter to enter a numerical value, or click the bar to adjust
the value.
Parameters that can be directly adjusted on the monitor, including “Brightness” and “Contrast”, can
also be adjusted from this screen. The items that can be adjusted on this screen are the same as
those that can be adjusted using the monitor’s color adjustment function. (For information about color
adjustment items of each monitor model, see the user’s manual for the monitor.)
Note
•• The Information View section displays tips for the adjustment item over which the mouse cursor is placed.
on the upper part of “Color Configuration / Adjust” screen. Your browser starts and the EIZO web
•• Click
site opens.
•• Clicking “Initialization” returns the settings for all items of the color mode that is being adjusted to the default
settings.
•• Clicking “Cancel” returns the display to the state it was in before the settings of the items have been changed.
The display returns to “Color Configuration” screen.
16
Chapter4 Color Adjustment
6.Click “Apply”.
The adjusted values are applied, and the display returns to “Color Configuration” screen.
Note
•• If you have changed the color mode by operating the monitor while adjusting item values, the “Color
Configuration / Adjust” screen settings are also switched to those of the color mode after the change.
4-2. Exporting Color Adjustment Data to a PC
The set color adjustment data can be exported as a file.
1.In “Color Configuration” screen, select a target monitor and a color mode to
apply.
See “4-1. Making Color Adjustments” (page 16).
Attention
•• Select a color mode from User modes. Color adjustment data can only be exported in User mode.
2.Click “Export”.
“Color Configuration / Export Data” screen is displayed.
3.Click “Export” from “Export to computer”.
Chapter4 Color Adjustment
17
4.Specify the filename, then click “Save”.
File export is completed.
5.Click “Complete”.
The display returns to “Color Configuration” screen.
Note
•• The color adjustment data is saved as a binary file (.dat).
•• For information on how to export color adjustment data to G-Ignition Drive, see “Chapter 5 Use of G-Ignition
Drive” (page 20).
4-3. Importing the Existing Color Adjustment Data
Color adjustment data can be imported from a file on a PC. In a multiple monitor configuration,
adjustment items can be applied collectively if the monitors are the same model.
Note
•• Data exported from ScreenManager Pro for Gaming can also be imported to G-Ignition.
1.In “Color Configuration” screen, select a target monitor and a color mode to
apply.
2.If you want to apply the same settings to all currently connected monitors
of the same model, select the “Apply to all connected monitors of the same
model” check box.
See “4-1. Making Color Adjustments” (page 16).
Attention
•• Select a color mode from User modes. Color adjustment data can only be imported in User mode.
18
Chapter4 Color Adjustment
3.Click “Import”.
“Color Configuration / Import Data” screen is displayed.
4.Click “Import” from “Import from computer”.
Note
•• For information on how to import color adjustment data from G-Ignition Drive, see “Chapter 5 Use of
G-Ignition Drive” (page 20).
5.Select the file to be imported and click “Open”.
The file is imported and the color adjustment data is applied to the monitor.
6.Click “Complete”.
The display returns to “Color Configuration” screen.
Chapter4 Color Adjustment
19
Chapter 5 Use of G-Ignition Drive
Use of G-Ignition Drive enables the following operations:
•• Uploading color adjustment data
Color adjustment data can be uploaded after color adjustments have been made.
•• Importing color adjustment data
Color adjustment data uploaded to G-Ignition Drive by professional gamers or other game players can be imported.
•• Exchanging information via Twitter
Information about uploaded or imported color adjustment data can be shared with other users by tweeting it in
Twitter.
You need to register and log in to G-Ignition Drive to upload your data to G-Ignition Drive.
The following chart shows the flow of procedures required to upload and import data.
New registration
(only required for the initial access)
See “5-1. Registering with G-Ignition Drive” (page 21).
↓
Import *1
Login (required for every access)
See “5-4. Importing Color Adjustment Data” (page 26).
See “5-2. Logging In/Out” (page 23).
↓
Upload
See “5-3. Uploading Color Adjustment Data” (page 24).
↓
↓
Share via Twitter
See “5-5. Tweeting Imported/Uploaded Information” (page 28).
*1 If you want the “Uploaded Color Adjustment Data List” to only display the data you have uploaded, you must log in
to G-Ignition Drive.
Attention
•• Color adjustment data can only be imported and exported in User mode.
20
Chapter5 Use of G-Ignition Drive
5-1. Registering with G-Ignition Drive
●●New Registration
Procedure
1. In “Color Configuration” screen, click “Import” or “Export”.
“Color Configuration / Import” screen or “Color Configuration / Export” screen is displayed.
2. Click
on the upper right of the screen, and select “New Registration” from the menu that
appears.
“Color Configuration / Import” screen
“Color Configuration / Export” screen
The “New Registration” screen is displayed.
3. Type in the e-mail address, nickname, and password, then click “Register”.
A “Full registration request” e-mail message is sent to the registered e-mail address.
Requirements that must be satisfied when entering each item are as follows:
Email Address
Nickname
Password
•• 6 to 256 alphanumeric and symbol characters in e-mail address format.
•• The address entered must not be the same as any already registered in G-Ignition
Drive.
•• Any 1 to 48 characters.
•• The address entered must not be the same as any already registered in G-Ignition
Drive.
•• Any 6 to 48 alphanumeric characters.
Attention
•• Write down the e-mail address and password you entered as a safeguard. If you forget the e-mail address
and password, you will not be able to log in next time.
•• By completing user registration, you agree to the privacy policy defined by EIZO. Click “Privacy Policy” on
the lower part of the screen, check the content and register.
Chapter5 Use of G-Ignition Drive
21
4. Click “Close”.
5. Confirm that an interim registration notification e-mail is received at the entered e-mail address.
6. Access the URL for formal registration that is specified in the e-mail text.
The formal registration screen appears.
Attention
•• When 24 hours has elapsed after the interim registration was completed, the URL for formal registration becomes
invalid.
•• If you have not received the e-mail from G-Ignition, change your e-mail settings so that you can receive e-mails
from “[email protected]”.
●●Changing Registration Information
Procedure
1. On the upper right of “Color Configuration / Import” screen or “Color Configuration / Export”
screen, click
menu.
to display the menu, then select “Change Registration Information” from the
2. Enter new information for items you want to change.
To “Current Password:”, type in the password before change.
If you have forgotten the current password, type in an interim password in “Current Password:”
3. Click “Change”.
A message that says that the changes made to the registration information have been accepted is displayed.
4. Click “Close”.
5. You will receive an e-mail message saying that the changes made to your registration information
have been accepted.
6. Access the URL for formal registration that is specified in the e-mail text.
The formal registration screen appears.
Attention
•• When 24 hours has elapsed after the interim registration was completed, the URL for formal registration becomes
invalid.
22
Chapter5 Use of G-Ignition Drive
5-2. Logging In/Out
●●Login
Procedure
1. On the upper right of “Color Configuration / Import” screen or “Color Configuration / Export”
to display the menu, then select “Login” from the menu.
screen, click
2. Type in the e-mail address and password you have registered, then click “Login”.
The display returns to “Color Configuration / Import” screen or “Color Configuration / Export” screen.
Note
•• Selecting the “Stay logged in” check box in the “Login” screen keeps the logged-in state while G-Ignition
is active. This eliminates the need to carry out the login procedure.
•• If you have forgotten the password, take the following steps to reset the password.
1. Click “Forgot your password?”.
2. In the “Issue Temporary Password” screen, type in the e-mail address that you entered during the
registration process, then click “Send”.
3. When you receive an e-mail message that contains an interim password, access the URL for formal
registration that is specified in the e-mail text.
4. Use the interim password to log in, and set a new password by changing the registered information.
(See “Changing Registration Information” (page 22).)
●●Logout
Procedure
1. On the upper right of “Color Configuration / Import” screen or “Color Configuration / Export”
screen, click
to display the menu, then select “Logout” from the menu.
Chapter5 Use of G-Ignition Drive
23
5-3. Uploading Color Adjustment Data
Attention
•• It is necessary to log in to G-Ignition Drive to upload color adjustment data, or display or delete uploaded data. It is
also necessary to register with G-Ignition Drive before logging in to it for the first time (See “5-1. Registering with
G-Ignition Drive” (page 21), “5-2. Logging In/Out” (page 23)).
1.In “Color Configuration” screen, select the target monitor of color adjustment
and a color mode.
See “4-1. Making Color Adjustments” (page 16).
2.Click “Export”.
“Color Configuration / Export Data” screen is displayed.
1
2
3
No.
1
2
Name
“Filter Data” entry box
Uploaded Color Adjustment Data
List *1
“Upload to G-Ignition Drive” area
Description
Use this box to narrow down the uploaded data to be displayed.
Displays the color adjustment data you have uploaded and the
information about the data.
3
Specify the information about the color adjustment data you want
to upload, and the upload conditions.
*1 The “Uploaded Color Adjustment Data List” is displayed after you have logged in.
3.Log in to G-Ignition Drive.
See “5-2. Logging In/Out” (page 23).
4.From “Game Title” in the “Upload to G-Ignition Drive” area, select and click a
target game.
Alternatively, enter the title of the game you want to select.
24
Chapter5 Use of G-Ignition Drive
5.If you want to add a comment, fill in the “Comments” box.
6.To ensure that only you can download the data, clear the “Show to anybody”
check box.
7.Click “Upload”.
Then you can tweet information about the uploaded data in Twitter.
See “5-5. Tweeting Imported/Uploaded Information” (page 28).
●●Viewing the List of Uploaded Data
In the logged-in state, the data you have uploaded is displayed in the “Uploaded Color Adjustment
Data List”.
Note
•• If you want to narrow down the data to display, enter a text string used as the narrow-down condition in the
“Filter Data” entry box. Only the data whose “Game Title”, “Registration Date”, or “Comments” matches the
entered string is displayed in the list.
•• The data is displayed in order of most recent registration date. To change the display order, click the “Game
Title”, “Registration Date”, “DL Count”, or “Comments” item that you want to use as the sort key.
•• Each time you click the item, the display order toggles between ascending and descending.
●●Deleting Uploaded Data
Procedure
1. From the data displayed in the “Uploaded Color Adjustment Data List”, select the data you want to
delete, and click
on the far right.
2. A confirmation message is displayed. Click “Yes”.
Chapter5 Use of G-Ignition Drive
25
5-4. Importing Color Adjustment Data
Attention
•• To only view the data you have uploaded, you must log in to G-Ignition Drive. After logging in, enable “Only display
the data you have uploaded” (See “5-2. Logging In/Out” (page 23)).
1.In “Color Configuration” screen, select the target monitor of color adjustment
and a color mode.
See “4-1. Making Color Adjustments” (page 16).
2.Click “Import”.
“Color Configuration / Import Data” screen is displayed.
1
2
6
3
7
4
5
No.
Name
1
2
3
4
“Filter Game Titles” entry box
“Game Title” title bar
“Game Title” column
Only show your own uploaded data
5
“Import from G-Ignition Drive” area
6
7
“Filter Data” entry box
Uploaded Color Adjustment Data List
Description
Use this box to narrow down game titles to be displayed.
Use this title bar to switch the display order of game titles.
Lists the game titles of importable data.
Select this check box when you want to view only the data
you have uploaded.
Displays information about the selected color adjustment
data. Clicking “Import” starts importing the data.
Use this box to narrow down the data to be displayed.
Lists the importable data. “DL count” (the count of imports)
and “Comments” are displayed as well as “Nickname”, “Team”,
and “Registration Date”. Use this list for your reference when
you select data to import.
Note
•• For color adjustment data created by professional game teams supported by EIZO, the team names are
displayed in the list.
26
Chapter5 Use of G-Ignition Drive
3.From the games displayed in the “Game Title” column, select a desired game
and click it.
The “Uploaded Color Adjustment Data List” displays the color adjustment data associated with the
selected game.
Note
•• If you want to narrow down the game titles to be displayed, enter the title of the desired game or part of that
title in the “Filter Game Titles” entry box. This only displays games with titles that include the entered string.
•• The game titles are displayed in alphabetical (ascending) order. Left-clicking “Game Title” switches it to
descending order.
•• Selecting the “Only show your own uploaded data” check box only displays the data you have uploaded.
4.From the “Uploaded Color Adjustment Data List”, select data you want to
import.
Information about the selected data is displayed in the “Import from G-Ignition Drive” area.
The evaluation chart on the right shows the evaluation levels for “Brightness”, “Saturation”, “Dark area
visibility”, “Eyecare”, “Video visibility”, and “Contrast” on the respective axes.
Note
•• If you want to narrow down the data to display, enter a text string used as the narrow-down condition in
the “Filter Data” entry box. Only the data whose “Nickname”, “Team”, “Registration Date”, or “Comments”
matches the entered string is displayed in the list.
•• The data is displayed in order of most recent registration date. To change the display order, click the
“Nickname”, “Team”, “Registration Date”, “DL Count”, or “Comments” item that you want to use as the sort
key.
•• Each time you click the item, the display order toggles between ascending and descending.
5.Click “Apply”.
The adjustment values are imported to the selected color mode of the target monitor.
Chapter5 Use of G-Ignition Drive
27
5-5. Tweeting Imported/Uploaded Information
1.After uploading or importing color adjustment data to/from G-Ignition Drive,
click the Twitter icon on the lower left of the screen.
“Color Configuration / Import” screen
“Color Configuration / Export” screen
2.Your browser starts, and the Tweet screen appears.
3.Type in body text, and log in with your Twitter account to tweet.
Visit the Twitter web site for details on the Twitter service.
28
Chapter5 Use of G-Ignition Drive
Chapter 6 Auto Color
By registering color modes for individual applications, the color mode of the monitor can be switched
automatically for each application.
When a specific application is active, the associated color mode is applied.
When an application whose association setting is not configured is active, the “Default color mode” is
applied.
Note
•• In a multiple monitor configuration, hues may differ monitor by monitor depending on individual differences or color
adjustment values even when the same color mode is applied to the monitors.
Attention
•• To run the Auto Color function, the G-Ignition icon must be in the notification area (See “2-3. Start and Exit” (page
8)).
•• It is not possible to register a color mode for the Windows Desktop.
“Auto Color” screen
1
2
3
4
No.
1
2
3
4
Name
Operation switch
Description
Turns ON or OFF the Auto Color function (See “6-1. Setting the
Default Color Mode” (page 30)).
“Default color mode” setting field
When an application for which a specific color mode is not set is
active, the color mode specified in this row is applied (See “6-1.
Setting the Default Color Mode” (page 30)).
Application color mode setting field Specify each application and a color mode to be applied to the
application (See “6-2. Associating a Color Mode with a Specific
Application” (page 30)).
Initialize
Resets the settings.
Chapter 6 Auto Color
29
6-1. Setting the Default Color Mode
Specify a color mode to be used for typical applications.
1.Click “ON” of the operation switch.
2.From the “Color Mode” list of “Default color mode (for unregistered
applications)”, select a color mode you want to assign, and set it.
Note
•• If “Not change the mode” is selected, the same color mode remains displayed and is not changed.
6-2. Associating a Color Mode with a Specific
Application
Note
•• The list displays the names of applications currently active or already registered. If a desired application is not
displayed, start the application. This registers the application and eliminates the need to start it the next and
subsequent times you use it.
•• It is not possible to register a color mode for the Windows Desktop.
•• The color modes shown in the pull-down menu differ depending on the monitor model.
•• For details on the color mode, see the user’s manual for the monitor.
1.From the “Color Mode” pull-down menu for the application to which you want
to assign a color mode, select a color mode.
When a registered application becomes active, the monitor’s color mode automatically switches to
the one associated with the application.
Note
•• Clicking
on the far right of the screen releases the target application setting.
•• If you want to release the settings for all the applications, click “Initialize” on the lower left of the setting
window.
30
Chapter 6 Auto Color
Chapter 7 Hot Key
By assigning functions of the monitor to keys on the keyboard, the monitor can be operated from the
keyboard.
Attention
•• When G-Ignition is resident, hot key assignments applied to G-Ignition cannot be used in other applications. Pay
attention not to assign the same hot keys as those used in another application.
•• Hot key settings cannot be changed according to the application being used.
Note
•• Applying the same hot key assignment to each of the different models enables you to operate all of these monitors
simultaneously using the same hot key.
•• The functions that can be assigned to hot key differ depending on the monitor model.
“Hot Keys” screen
Example: FS2434
1
2
3
4
No.
1
2
3
4
Name
Description
Monitor menu
Select the monitor to which hot keys will be assigned.
Apply to all monitors of the same type The same hot key assignments can be applied to all currently
connected monitors of the same model.
Hot key setting boxes
Enter hot keys to be assigned to functions.
Initialize
Releases all the hot key assignments from the selected monitor.
Chapter7 Hot Key
31
7-1. Assigning Hot Keys
1.In a multiple monitor configuration, select a target monitor from the menu.
2.Assign hot keys.
Move the cursor to the box of the item to which you want to assign a hot key, and press key(s) to be
used for the hot key. If you want to assign a combination of two or more keys, press all of the keys
simultaneously.
To cancel entered key(s), press the “Delete” or “Back Space” key. “None” appears in the box showing
to cancel the entry.
that the key entry has been canceled. You can also click
Note
•• The following keys cannot be set.
-- Modifier keys (Shift, Ctrl, Alt), either in isolation or in combination with other modifier keys only (e.g. “Ctrl +
Shift”)
-- Combinations of keys that are registered to the system (e.g. “Ctrl + Alt + Delete”)
-- The following keys, either in isolation or in combination with a modifier key(s):
Tab, Enter, Esc, Delete, BackSpace, Windows
-- “F12” key in isolation
-- “Shift + Caps Lock” key
•• Only when a modifier key is used, a combination of multiple keys can be set.
•• Clicking “Initialize” on the lower left of the screen cancels all the hot key assignments for the selected monitor.
3.If you want to apply the same hot key assignments to all currently connected
monitors of the same model, check
type” on the far right.
32
Chapter7 Hot Key
of “Apply to all monitors of the same
Chapter 8 Troubleshooting
Problem
Possible cause and remedy
1. The icon is not shown in the notification area
•• Windows 10:
Click “Start” - “All apps” - “EIZO” - “G-Ignition Ver.
x.x.x”.
•• Windows 8.1:
Click
on the “Start” screen, then select “G-Ignition
Ver. x.x.x” on the “Apps” screen to start.
•• Windows 8:
Click “G-Ignition Ver. x.x.x” on the “Start” screen.
•• Windows 7:
Click “Start” - “All Programs” - “EIZO” - “G-Ignition” “G-Ignition Ver. x.x.x” to start.
•• The icon may be located in a hidden area. Click the
arrow by the side of the notification area to expand
the area.
2. The icon is in black and white
•• Check if the USB cable is connected.
•• Turn off the PC and turn it back on.
•• Check whether a monitor supported by G-Ignition is
connected.
3. Auto Color is not functioning
•• To run the Auto Color function, the G-Ignition icon
must be resident in the notification area.
•• Check whether the operation switch is turned “ON” in
“Auto Color” screen.
•• Close the G-Ignition setting window. Closing the
setting window enables the function.
4. Hot Key is disabled
•• Close the G-Ignition setting window. Closing the
setting window enables the function.
•• To run the Hot Key function, the G-Ignition icon must
be in the notification area.
5. When color adjustment data is imported from
G-Ignition Drive, the “Game Title” column or
other columns are blank
•• A communication error may have occurred. Check the
Internet connection status.
6. When color adjustment data is exported to
G-Ignition Drive, an error occurs when “Export”
is clicked
•• If the color mode has been changed to a mode other
than User mode by operating the monitor before the
export process is completed, the export process fails.
Return the color mode of the monitor to User mode,
and then retry the operation.
7. Procedure to log in to G-Ignition Drive fails
•• A communication error may have occurred. Check the
Internet connection status.
•• The e-mail address or password may have been
entered incorrectly. Check whether the entered e-mail
address and password are correct.
8. No e-mail message is delivered from G-Ignition
•• Delivery of e-mail messages may be blocked. Change
the e-mail settings so that e-mail messages from
“[email protected]” can be received.
Chapter 8 Troubleshooting
33
Appendix
34
Glossary
Gain
This is used to adjust each color parameter for red, green and blue. An LCD monitor displays the
color by the light passing through the panel color filter. Red, green and blue are the three primary
colors. All the colors on the screen are displayed by combining these three colors. The color tone
can be changed by adjusting the light intensity (volume) passing through each color’s filter.
Gamma
Generally, the monitor brightness varies nonlinearly with the input signal level, which is called
“Gamma Characteristic”. When the gamma value is low, the middle tone area is displayed brighter,
and darker when high. Changes to the gamma value will not affect contrast. A gamma value
appropriate for the display content should be selected.
Overdrive
This technology enhances response speed by increasing the potential difference at the time of
motion of liquid-crystal pixels, and it is used for liquid-crystal TV sets and others in general. It
provides clear-cut three-dimensional display with little afterimage, by improving response speed of
the intermediate graduation range that frequently appears in moving images.
Resolution
The LCD panel consists of numerous pixels of specified size, which are illuminated to form images.
Temperature
Color temperature is a method to measure the white color tone, generally indicated in degrees
Kelvin. The screen becomes reddish at a low temperature, and bluish at a high temperature, like
the flame temperature.
5000 K: Slightly reddish white
6500 K: White referred to as daylight-balanced color
9300 K: Slightly bluish white
Glossary
35
Trademarks
The terms HDMI and HDMI High-Definition Multimedia Interface, and the HDMI Logo are trademarks or
registered trademarks of HDMI Licensing, LLC in the United States and other countries.
VESA is a registered trademark of Video Electronics Standards Association.
Acrobat, Adobe, Adobe AIR, and Photoshop are registered trademarks of Adobe Systems Incorporated
in the United States and other countries.
AMD Athlon and AMD Opteron are trademarks of Advanced Micro Devices, Inc.
Apple, ColorSync, eMac, iBook, iMac, iPad, Mac, MacBook, Macintosh, Mac OS, PowerBook, and
QuickTime are registered trademarks of Apple Inc.
ColorMunki, Eye-One, and X-Rite are registered trademarks or trademarks of X-Rite Incorporated in the
United States and/or other countries.
ColorVision and ColorVision Spyder2 are registered trademarks of DataColor Holding AG in the United
States.
Spyder3 and Spyder4 are trademarks of DataColor Holding AG.
ENERGY STAR is a registered trademark of the United States Environmental Protection Agency in the
United States and other countries.
GRACoL and IDEAlliance are registered trademarks of International Digital Enterprise Alliance.
Linux is a registered trademark of Linus Torvalds.
NEC is a registered trademark of NEC Corporation.
PC-9801 and PC-9821 are trademarks of NEC Corporation.
NextWindow is a trademark of NextWindow Ltd.
Intel, Intel Core, Pentium, and Thunderbolt are trademarks of Intel Corporation in the U.S. and/or other
countries.
PowerPC is a registered trademark of International Business Machines Corporation.
PlayStation is a registered trademark of Sony Computer Entertainment Inc.
PSP and PS3 are trademarks of Sony Computer Entertainment Inc.
RealPlayer is a registered trademark of RealNetworks, Inc.
Red Hat is a registered trademark of Red Hat, Inc.
TouchWare is a trademark of 3M Touch Systems, Inc.
Twitter is a trademark of Twitter, Inc. in the United States and/or other countries.
Windows, Windows Media, Windows Vista, SQL Server, Xbox 360, and Internet Explorer are registered
trademarks of Microsoft Corporation in the United States and other countries.
YouTube is a registered trademark of Google Inc.
Firefox is a registered trademark of the Mozilla Foundation.
Kensington and MicroSaver are registered trademarks of ACCO Brands Corporation.
EIZO, the EIZO Logo, ColorEdge, DuraVision, FlexScan, FORIS, RadiCS, RadiForce, RadiNET, Raptor,
and ScreenManager are registered trademarks of EIZO Corporation in Japan and other countries.
ColorNavigator, EcoView NET, EIZO EasyPIX, EIZO Monitor Configurator, EIZO ScreenSlicer, G-Ignition,
i • Sound, Re/Vue, Screen Administrator and UniColor Pro are trademarks of EIZO Corporation.
All other company and product names are trademarks or registered trademarks of their respective
owners.
36
Trademarks
http://www.eizoglobal.com
Copyright © 2014-2015 EIZO Corporation All rights reserved.
6th Edition-November, 2015
03V25120F1
(U.M-G-IGNITION)