1
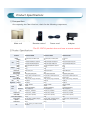
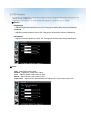
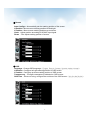
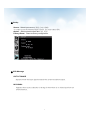
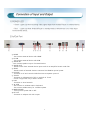
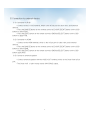
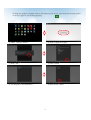
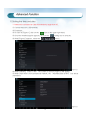
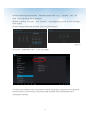
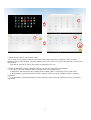
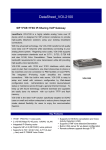
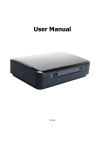
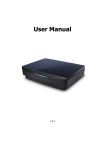
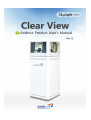
Android Product User’s Manual
Rev 1.2
Precautions
1. In the event that the adapter power is turned off while not being connected
to the network, the Clear View Android’s clock will not run. Therefore, if the time
stops, contents may not play so please keep the power cord connected at all times.
2. The USB memory file format must be Fat32 to update contents.
When formatting NTFS, the Android player will not recognize it
3. When first installing product or when using without connecting power
long periods of time, please set the date and time, and your region for
normal schedule play.
-See “07. Advanced functions”
4. When working with keyboard or mouse, make sure to turn the power off and
then on using the main power button on the back of the product for normal
operation.
1
Table of Contents
01. Product Specs
Composition
Product Specs
3
02. Using remote control and OSD button
Remote control functions
OSD Function
4
03. Connect to external device
POWER LED
In/Out Port
Connect to external device
8
04. Supproted contents
10
05. Contents update
10
06. Using Citylight Player
End Player
Start Player
Update Player
Reset Network Version Player
11
07. Advanced functions
Setting date and time
Rotate screen
14
08. FAQ
17
01.
Product Specifications
1) Composition
Once opening the Clear View box, check for the following components.
Main unit
Remote control
Power cord
Adapter
*The SC-156TL1 product does not have a remote control.
2) Product Specifications
Product
Model
ClearView 461N
ClearView 221N
ClearView 156
SC-460TL1/N, SC-460TL1/NTI
SC-220TL1/N, SC-220TL1/NTC
SC-156TL1
Display
46"
22"
15.6"
Body
1,339(H)x659(W)x377.5(D)mm
440(H)x520(W)x336.1(D)mm
276(H)x411(W)x217(D)mm
Inner
1,023(H)x601(W)x301(D)mm
302(H)x478(W)x320(D)mm
197(H)x348(W)x205(D)mm
Stand
650(H)x659(W)x336.1(D)mm
1,170(H)x520(W)x336.1(D)mm
None
Body
58kg
27.5kg
9.4kg
Stand
27kg
37kg
None
768x1,366 pixel
1,680x1,050 pixel
1920x1080 pixel
Transmittance
6%
15%
15%
Viewing Angle
L(89),R(89),U(89),D(89)
L(80),R(80),U(60),D(80)
L(80),R(80),U(80),D(80)
Exynos 4412 1.7GHz Quad Core
Android 4.1.2
Video, Audio, Image, Flash(swf)
Exynos 4412 1.7GHz Quad Core
Android 4.1.2
Video, Audio, Image, Flash(swf)
Exynos 4412 1.7GHz Quad Core
Android 4.1.2
Video, Audio, Image, Flash(swf)
Top
33,000 lux
5,000 lux
3,000 lux
Bottom
33,000 lux
None
3,000 lux
1xRGB, 1xHDMI
1xRGB, 1xHDMI
1xRGB, 1xHDMI
2xUSB
1xLAN(10/100Mbps),
802.11n(Option)
1xAudio-In, 1xRS232C
2xUSB
1xLAN(10/100Mbps),
802.11n(Option)
1xAudio-In, 1xRS232C
2xUSB
1xLAN(10/100Mbps),
802.11n(Option)
1xAudio-In, 1xRS232C
Output Port
1xAudio-Out, 1xSPDIF
1xAudio-Out, 1xSPDIF
1xAudio-Out, 1xSPDIF
Audio AMP
2x5W (*None Speaker)
2x5W (*None Speaker)
2x5W (*None Speaker)
145W
30W
23W
AC 100~240V ~50/60Hz Adapter
AC 100~240V ~50/60Hz Adapter
AC 100~240V ~50/60Hz Adapter
IR Touch (6point)
Capacitive Touch (1point)
None
None
To use ‘Touch’, you need a PC with
Windows.
None
None
Size
Weight
Resolution
CPU
Media B'D
O/S
Support Media
LED
Brightness
Video
USB
Input
Port
Network
Etc
Power Consumption
Power Input
Option
Certification
Etc
3
02.
Using Remote Control
1) Remote control and OSD button functions
[Remote Control]
② MODE
① POWER
③ ▲ CH+
④ ▶ VOL+
⑤ ENTER
⑥ ▼ CH⑦ ◀ VOL-
[OSD Button]
* The OSD button is on the backside of the product.
POWER
①
VOLUME
SOURCE
UP/+
DOWN/EXIT
③
⑦
②
MENU
SELECT
⑤
① POWER
- Puts Player in standby mode or awakens it.
② MODE , SOURCE/EXIT
- Select an input source from RGB or HDMI. The video connected to the selected input course will appear
on the screen.
* You must select DVI for the Android player screen.
- Return to previous menu from Select Function.
③ ▲ CH+
- Move cursor up at OSD Function.
④ ▶VOL+ , VOLUME UP/+
- Increase volume.
- Increase or change value in OSD Function.
⑤ Enter , MENU/SELECT
- Select input source or apply value changed in OSD function
- Select OSD function.
⑥ ▼ CH- Move curser down at OSD function.
⑦ ◀ VOL- , VOLUME DOWN/- Reduce volume.
- Reduce or change value at OST function.
4
2) OSD Function
The below is a breakdown of functions that appear when pressing the [MENU/SELECT] button of the
remote control or OSD button.
Depending on the product, the OSD function will appear as a reverse image or rotated.
① Picture
-. Brightness
: Adjusts brightness between 0 and 100. Changes to default after factory initialization.
-. Contrast
: Adjusts contrast between 0 and 100. Changes to default after factory initialization.
-. Sharpness
: Adjusts resolution between 0 and 100. Changes to default after factory initialization.
② Color
User : User adjust color value.
Normal : Display as normal color value.
Cool : Adjusts screen color closer to blue.
Warm : Adjust screen color closer to red.
Auto Color : Adjust colors automatically according to the input colors on the PC.
5
③ Screen
Auto Configre : Automatically set the marking position of the screen.
H Position : Move screen marking position left and right.
V Position : Move screen marking position up and down.
Clock : Adjust position according to HSYNC input signal.
Phase : Fine adjust marking position of screen.
④ OSD
Language : Change OSD language. ( English, French, German, Spanish, Italian, Korean)
H Position : Configure left-right marking position of OSD screen.
V Position : Configure up-down marking position of OSD screen.
Transparency : Configure transparency indicated on OSD screen.
OSD Time : When not using, configure the end time of the OSD screen. ( 20s,30s,40s,50s,60s)
6
⑤ Set-Up
Source : Select input source. (RGB, DVI, HDMI)
* In order to see the Android Player screen, you must select DVI.
Aspect : Select screen output ratio. (4:3, 16:9)
Factory Reset : Reset to factory configuration.
⑥ OSD Message
OUT OF RANGE
Appears when the input signal exceeds the screen resolution output.
NO SIGNAL
Appears when source selection is wrong of when there is no video input from an
external device.
7
03.
Connection of Input and Output
1) POWER LED
- Green : Lights up when receiving video signal input from Android Player or external device.
- Red : Lights up when Android Player is standby mode or when there is no video input
from external device.
2) In/Out Port
①
②
③④ ⑤ ⑥
⑦
⑧
⑨
⑩
① HDMI
- Can connect external device with HDMI.
② D-SUB
- Can connect external device with RGB.
③ AUDIO IN
- Can connect speaker output of external device.
④ AUDIO OUT
- Sends sounds from external device input Audio In as amplified sound under 5W.
⑤ SPDIF
- Sends sounds of external devices connected via HDMI as optical power.
⑥ RS-232C
- Connects to PC and controls OSD functions as separate protocol.
⑦ TOUCH
- Connects to USB terminal of PC to use built-in Touch.
* Touch is supported only in select models.
⑧ LAN
- Connects to wired network.
⑨, ⑩ USB
- Can connect to wireless LAN or keyboard.
- Can connect USB memory for contents update.
⑪ MAIN POWER
- Turns product power ON or OFF.
⑫ DC 12V
- Connects to adapter with 12V output.
8
⑪
⑫
3) Connection to external device
3-1) Connection to RGB
- Connect to the D-SUB terminal, which is the in/out port for clear view, and external
devices.
- Press the [MODE] button on the remote control or [SOURCE/EXIT] button on the OSD
button to select RGB.
- Press the [ENT] button on the remote control or [MENU/SELECT] button on the OSD
button to apply RGB.
3-2) Connection to HDMI
- Connect to the HDMI terminal, which is the in/out port for clear view, and external
devices.
- Press the [MODE] button on the remote control or [SOURCE/EXIT] button on the OSD
button to select HDMI.
- Press the [ENT] button on the remote control or [MENU/SELECT] button on the OSD
button apply RGB.
3-3) Connect to external speaker
- Connect external speaker with the AUDIO OUT terminal, which is the Clear View in/out
port.
* The Clear view’s built-in amp sends 10W (5Wx2) output.
9
04.
Supported Contents
1) Movie
- Video Codec : Mpeg4, H.264
- Audio Codec : AAC
- Extension : avi, mp4, mpg(mpeg)
2) Image
- Support jpg, png, bmp
* Does not support files that are 5MB or higher.
3) Flash
- swf (support formats under Adobe flash player 11.1)
4) URL
- Indicate the website screen of the URL registered by the user
- Input site URL in the Management S/W
4) Html
- Indicate file made up of html source
- Extension : htm, html
* Citylight Premium uses the web kit engine and is compatible with HTML5.
05.
Contents Update
1) Insert USB memory generated using Management S/W to the USB terminal on the back of
the product.
2) Once USB memory is recognized, the contents is copied.
3) Once update is complete, the player will run automatically.
* The file format of USB memory must be of Fat32.
when formatting with NTFS, Android Player will not recognize it.
* When generating schedule using Management S/W, “_eyeview” folder will be generated
in the USB memory.
* When re-updating updated product with the same schedule, the USB memory’s
“_eyeview” folder will delete the “done” folder.
10
06.
Using Citylight Player
1) Ending Player
① Connect mouse or keyboard USB terminal make automatically end.
② Once player ends, the screen as seen in [Figure 1] will appear.
[Figure 1]
2) Start Player
① Connect mouse to USB terminal.
② Click on the
icon on the upper right hand of the screen to execute the application
drawer.
③ From the installed apps, select
Citylight and left click to execute.
* Citylight automatically executes at booting so if there is no mouse, turn power off and then
on.
3) Player Update
※ If Citylight Update App is not installed down load from http://clearview.31cts.com.
① Exit first when Citylight Player is in operation.
② Run the App drawer by clicking
icon on the top-right of the screen.
③ Applications that are installed, select
Citylight Update and press left mouse button
to run.
④ You can proceed by pressing “Upgrade Citylight” button in center.
11
⑤ When the update complete remove USB memory and mouse, after that turn the main power
off and on again to see working properly.
① Select “Citylight update”
② Select “Upgrade Citylight”
③ Select “OK”
④ Select “Install”
⑤ The progress of the installation.
⑥ Select “Done” Select
12
4) Player initial setup network version.
① Installed in clear view of the Citylight Player in order to use the network version of the following
information is required to register.
② End Citylight Player. Connect USB keyboard and mouse to the Clear View USB terminal.
③ As shown in [Figure 1] at the top right of the screen, click
④ Displayed in App list
icon.
select “Text Edit”.
⑤ Select “Open” when the menu appears by selecting
icon at the bottom of the screen.
⑥ Press “Browser” button, /mnt/sdcard/_eyeview select folder.
⑦ If you press “Open” button after select “device.xml” file, brings the following files in the Text
Edit.
<?xml version="1.0" encoding="UTF-8" standalone="yes" ?>
<!--This is CityLight Premium device information.-->
<root>
<!--Device informations-->
<device>
<model v="SCD-VP10"/>
<nickName v="android player"/>
<siteName v="citylight"/>
</device>
</root>
⑧ The contents of the device.xml file in the above, mdifiy nickName and siteName to server
information.
- nickName : Current set of nickName for ClearView
- siteName : Access site for Clear View and must be match the site name registered on the
server.
⑨ Press “Save” button on the bottom menu of Text Edit.
⑩ The following contents of XML, Open the “setting.xml” file and save after changing
“<mainServer address=“ part to server URL.
※ When modifying the XML should be modified to suit the type and it will not work properly if there is
wrong TAG.
※ In order to use the network version must be modified in server information of device.xml and
setting.xml.
※ Please check again device.xml and setting.xml files above, if information of clear view set in
Citylight TMS doesn’t appear.
13
07.
Advanced Function
1) Setting the time and date
* If network is connected to Clear View Android, begin from 11).
① Connect mouse to USB terminal.
② End player.
③ As seen in [Figure 1], click on the
icon on the upper right hand.
④ Once the installed app list appears, click on the
⑤ What [Figure 2] appears, select the
setting icon to execute.
menu.
[Figure 2]
⑥ When selecting “Date & Time” the screen as seen in [Figure 3] will appear.
⑦ When Clear View is not connected to network, the “Automatic date & time” box will be
unchecked.
[Figure 3]
14
⑧ When removing check from the “Automatic date & time” box, “Set date” and “Set
time” in the sub menu will be activated.
⑨ When selecting “Set date” and “Set time”, the configuration screen as seen in [Figure
4] will appear.
⑩ After setting current date and time, press the [Done] button.
[Figure 4]
⑪ Choose “Select time zone” to set your region.
[Figure 5]
The time zone should be set to the location in which the product is located. In the event that
the time zone is set incorrectly, the accurate date and time will not be fetched even if
connected to network.
15
2) Rotate screen
* Android Player supports screen rotation of various angles.
① Connect mouse to USB terminal in the back.
② End player.
③ Click on
field on the lower right hand of the screen in [Figure 1].
④ The popup screen will appear as seen in [Figure 6].
[Figure 6]
⑤ From the icons on the right side of menu indicated as “
the desired angle.
Rotate screen 0° vertically
Rotate screen 180° vertically
Rotate screen 0° horizontally
Rotate screen 180° horizontally
16
Rotate”, click on the icon of
FAQ
1. Not booted.
A) Turn off main power switch on the back of the product, wait three seconds, and turn on again.
2. The screen does not show anything or says “NO SIGNAL”.
A) Press on the OSD button or [Source] button of the remote control and check if it is currently set
as “DVI”
3. After booting, contents do not play.
A) Check current time of Android.
* In the event that there is no power to the product or is not connected to the network, the time will
be stopped.
4. Contents do not update.
A) In the event that an updated Clear View is inserted in the USB memory, it will not update.
If you wish to update again, check if there is a folder named “done” in the “_eyeview” folder
after inserting USB memory in the PC.
If there is a “done” delete it and reinsert in the USB terminal.
A) Check if the USB memory’s file format is as Fat32. It will not be recognized if formatted as NTFS.
5. Even if the network is connected, the date and time will not be changed.
A) Check in the system configuration’s “Date & time” menu if the “Automatic date & time” box
is checked.
In the event that it is not checked, even if it is connected to the network, the current date and
time will not be shown automatically.
6. Does not play due to anomalies during update.
A) In the event that problems occur during update or when ending player, it may not play
correctly.
At this time, turn the power off and on, and if it is still not resolved, take the following
actions.
1)
2)
3)
4)
End player after connecting mouse to USB terminal.
Execute APP drawer.
Execute “File Explorer” and select / sdcard
Click on “_eyeview” folder, and after about 2 seconds, a checkbox and a sub icon will
appear on the right.
By dragging using mouse upward, a recycle bin icon will appear.
5) Select the recycle bin icon and delete the “_eyeview” folder.
6) Right click to end File Explorer and then execute “Citylight” in the App drawer.
17
7. What should I do to use wireless LAN?
A) In order to use wireless LAN for the Clear View Android product, purchase a Wi-Fi module
mounted with the RTL8191SU chipset from Real tech and connect it to the USB terminal in the back of
the product.
Afterwards, turn Wi-Fi ON in the system configuration for use.
8. Player in Network versions Citylight TMS do not see the connection information.
A) In order to use the network version, please check the following first.
1) Make sure that Internet drive normally and network cable is connected to the Clear View.
2) /mnt/sdcard/_eyeview/device.xml of the contents, make sure that siteName value is properly
registered.
3) /mnt/sdcard/_eyeview/setting.xml of the contents, make sure that mainServer value is properly
registered.
18