1
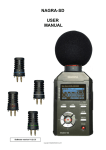
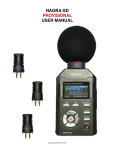
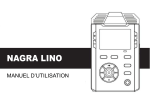
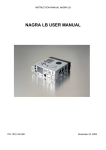
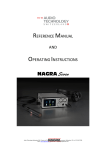
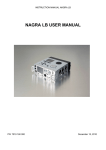
NAGRA-SD
USER
MANUAL
Software version V1.2.0.10
Copyright © AUDIO TECHNOOGY SWITZERLAND SA S.A.2012
1 GUARANTEE ........................................................................................................................................................ 4
2 DELIVERED WITH ............................................................................................................................................................. 4
3 PANEL DESCRIPTION ...................................................................................................................................................... 5
3.1 FRONT PANEL KEY FUNCTIONS .................................................................................................................... 5
3.2 REAR SIDE ........................................................................................................................................................ 6
3.3 LEFT SIDE ......................................................................................................................................................... 6
3.4 RIGHT SIDE ....................................................................................................................................................... 6
3.5 TOP FACE ......................................................................................................................................................... 6
4 INSTALLING BATTERIES ................................................................................................................................................. 6
5 FIRST POWER ON ............................................................................................................................................................ 6
6 RECORD WINDOW DESCRIPTION ................................................................................................................................. 7
6.1 VIEW .................................................................................................................................................................. 7
6.2 INPUT TYPE ...................................................................................................................................................... 7
6.3 INPUT / RECORD LEVEL .................................................................................................................................. 7
6.4 AGC STATUS .................................................................................................................................................... 7
6.5 OUTPUT VOLUME ............................................................................................................................................ 7
6.6 VOR STATUS .................................................................................................................................................... 7
6.7 MODULOMETER ............................................................................................................................................... 7
6.8 PLAY / RECORD FILE NAME ........................................................................................................................... 7
6.9 PLAY / RECORD COUNTER ............................................................................................................................. 7
6.10 TOTAL FILE / FREE RECORD TIME .............................................................................................................. 7
6.11 CUE COUNTER, CUE POSITION ................................................................................................................... 7
6.12 RUN STATUS .................................................................................................................................................. 7
6.13 AUDIO PARAMETERS .................................................................................................................................... 8
6.14 USB STATUS ................................................................................................................................................... 8
6.15 KEYBOARD STATUS ...................................................................................................................................... 8
6.16 BATTERY STATUS.......................................................................................................................................... 8
7 USING THE NAGRA-SD .................................................................................................................................................... 8
7.1 RECORDING IN THE FIELD ............................................................................................................................. 8
7.1.1 ADJUSTING INPUT LEVELS ............................................................................................................ 9
7.1.2 THE AUTOMATIC GAIN CONTROL (A.G.C) .................................................................................... 9
7.1.3 CUE POINTS DURING RECORD ..................................................................................................... 9
7.2 PLAYBACK OF A PREVIOUS RECORDING .................................................................................................... 9
7.2.1 ADJUSTING PLAYBACK LEVELS .................................................................................................... 9
7.3 CUE POINT SELECTION DURING PLAY ....................................................................................................... 10
7.4 STORING SETTINGS IN A TEMPLATE (HIGH, LOW QUALITY) .................................................................. 10
7.5 DELETING AN AUDIO RECORDING RAPIDLY ............................................................................................. 10
7.6 DOWNLOADING TO A COMPUTER............................................................................................................... 10
8 FILES & WORKING FOLDER .......................................................................................................................................... 10
9 MENUS............................................................................................................................................................................. 12
9.1 RECORD SETTINGS ....................................................................................................................................... 14
9.1.1 TEMPLATES .................................................................................................................................... 14
................................................................................................................................................................... 14
9.1.2 MATRIX ............................................................................................................................................ 15
9.1.3 PRE-RECORD ................................................................................................................................. 15
9.1.4 VOR .................................................................................................................................................. 15
9.1.5 INPUT DEVICE ................................................................................................................................ 15
9.1.6 PREFIX NAME ................................................................................................................................. 15
9.2 SYSTEM SETTINGS........................................................................................................................................ 16
9.2.1 TIME & DATE ................................................................................................................................... 16
9.2.2 RECORD LED .................................................................................................................................. 16
9.2.3 BEEP SETTINGS ............................................................................................................................. 16
9.2.4 SPEAKER SETTINGS ..................................................................................................................... 16
9.2.5 AUTO SKIP ...................................................................................................................................... 16
9.2.6 DISPLAY EXTINCTION ................................................................................................................... 16
9.2.7 AUTO POWER OFF ........................................................................................................................ 16
9.2.8 BATTERY TYPE .............................................................................................................................. 16
9.2.9 USB WRITE PROTECTION............................................................................................................. 16
9.2.10 LANGUAGE SETTINGS ................................................................................................................ 16
9.2.11 SD INFORMATION ........................................................................................................................ 16
9.2.12 SD SPEED TEST ........................................................................................................................... 17
9.2.13 FORMAT ........................................................................................................................................ 17
9.2.14 VERSION ....................................................................................................................................... 17
9.2.15 SYSTEM RESET ........................................................................................................................... 17
9.2.16 SYSTEM UPDATE ......................................................................................................................... 17
9.2.17 EXPORT / IMPORT THE CONFIGURATION ................................................................................ 17
Page 2 of 22
Copyright © AUDIO TECHNOLOGY SWITZERLAND S.A. 2012
July 25, 2012
10 MICROPHONES AND SETTINGS. ............................................................................................................................... 18
11 LOW CUT FILTER ......................................................................................................................................................... 18
12 AUDIO COMPRESSION (WHY AND WHEN TO USE IT). ........................................................................................... 19
13 USB ................................................................................................................................................................................ 19
13 CE NORM....................................................................................................................................................................... 20
14 SPECIFICATIONS ......................................................................................................................................................... 20
Page 3 of 22
Copyright © AUDIO TECHNOLOGY SWITZERLAND S.A. 2012
July 25, 2012
1 GUARANTEE
Audio Technology Switzerland certifies that this instrument was thoroughly inspected and tested prior to leaving our
factory.
We guarantee the products of our own manufacture against any defect arising from faulty manufacture for a period of two
years from the date of delivery.
This guarantee covers the repair of confirmed defects or, if necessary, the replacement of the faulty parts, excluding all
other indemnities.
All freight costs, as well as customs duty and other possible charges, are at the customer's expense.
Our guarantee remains valid in the event of emergency repairs or modification being made by the user. However we
reserve the right to invoice the customer for any damage caused by an unqualified person or a false manoeuvre by the
operator.
We decline any responsibility for any and all damages resulting, directly or indirectly, from the use of our products.
Other products sold by Audio technology Switzerland S.A. are covered by the guarantee clauses of their respective
manufacturers.
We reserve the right to modify the product, and / or the specifications without notice.
2 DELIVERED WITH
The package includes:
•
•
•
•
•
•
•
•
1 NAGRA-SD
1 USB cable
1 USB memory key (manual)
1 Working case
1 Carrying strap
1 SD card 2 GB
Plastic machine support stand
Mono microphone input cable with XLR plug
Optional accessories:
•
•
•
•
2070 120 000
7070 121 000
7070 125 000
7070 122 000
Standard Stereo Cardioid clip-on microphone (red)
High quality Omni Directional Mono clip-on microphone (blue)
High quality stereo Cardioid clip-on microphone (green)
High quality Cardioid Mono clip-on microphone (white)
•
2070 005 000
Tripod for table top use
•
•
•
7070 123 000
7070 127 000
7070 128 000
Stereo microphone input cable with XLR plugs
Mono line input cable with XLR plug
Stereo line input cable with XLR plugs
Page 4 of 22
Copyright © AUDIO TECHNOLOGY SWITZERLAND S.A. 2012
July 25, 2012
3 PANEL DESCRIPTION
3.1 Front panel key functions
1 VIEW key
• Swaps between different data displays (default display or file / rec format, date
& time).
• If pressed when the directory of the memory is on the display, all details of the
selected file will be shown (File format, date, time etc.)
2 CUE key
• Press to enter cue points during record, or to select the cue mode during
playback.
3 FILES / MENU key
• A short press selects the directory (folders), a long press selects the menus.
4A
•
B key
To enter 2 markers for a playback loop.
5 DELETE key
• Deletes the selected index.
6 POWER key
• To turn on or off the Nagra-SD (Must be pressed for 3 seconds to avoid
accidental operation).
7 DOWN key ▼
• Stops a recording or playback.
• To move downwards in the directory or menus.
8 LEFT key ◄
• Rewinds during playback when pressed and held.
• Skip backwards during stop or play.
• In the menus, shifts to the left or quits them.
• Selects left channel sensitivity adjustment in stereo mode.
9 UP key ▲
• Starts a playback.
• Put the playback or record in pause mode.
• In the menus or directory, moves upwards.
10 RIGHT key ►
• Forwards during playback when pressed and held.
• Skip forwards to the next index during stop or play.
• In the menus, moves to the right.
• Selects right channel sensitivity adjustment in stereo mode.
11 RECORD key (centre key)
• Put the recorder in standby / EE mode (LED starts blinking slowly).
• Second press starts a record. (LED continuously on).
• Create a new file seamlessly while recording.
• Executes a selection in the menu mode.
12/13 INPUT LEVEL keys
• Decreases (12) or increases (13) the input sensitivity.
• In combination with the ◄ or ► key, adjusts left or right input sensitivity in the stereo mode.
14/15 OUTPUT LEVEL keys
• Increases (14) or decreases (15) the output level for the speaker or the headphone output.
16 PEAK LED
• Lights up when input clipping occurs.
Page 5 of 22
Copyright © AUDIO TECHNOLOGY SWITZERLAND S.A. 2012
July 25, 2012
3.2 Rear side
1 MIC GAIN switch
• Selects high or low sensitivity for the microphone input.
2 FILTER switch
• Turns the low cut filter on or off.
3 AGC switch
• Turns the automatic gain control on or off.
4 FILE TYPE switch
• Selects a mono or a stereo file type.
5 MIC POWER switch:
• Turns on or off the 3V for Electret power.
6 QUALITY switch
• Selects one of the two templates named “High” or “Low” previously
stored in the memory.
7 HOLD switch
• Locks or unlocks the keyboard during all modes, including power off.
8 SPEAKER
• Build-in speaker for playback monitoring (automatically disconnected when
using headphones)
9 BATTERY COVER
• Slide down to open.
3.3 Left side
1 USB CONNECTOR
• For transferring files or external power.
• Software update.
3.4 Right side
1 SD slot
2 HEADPHONE / LINE output
3.5 Top face
LINE input
• Dual 3.5 mm stereo jack for line / mic inputs with mechanical fixings.
4 INSTALLING BATTERIES
Insert 2 “AA” batteries taking care of the correct polarity and close the cover. Rechargeable batteries (NiCd or Ni-mH)
can also be used but they cannot be charged inside the NAGRA SD. The battery type used can be selected in the
menu mode to give the correct battery reserve readings.
5 FIRST POWER ON
Push and hold the “Power” key (6) for 3 seconds, the machine turns on and shows the “STOP” window display, from
where all the internal menu settings can be accessed and modified if necessary. Press the “centre” key (11) to move to
the “PRE-RECORD” window, the led starts blinking slowly.
Note: An SD card must be installed for the “STOP” window to be displayed.
Page 6 of 22
Copyright © AUDIO TECHNOLOGY SWITZERLAND S.A. 2012
July 25, 2012
6 RECORD WINDOW DESCRIPTION
Swapping between the 2 displays A & B is done via the VIEW key (1).
6.1 View
Area that indicates the name and function of the selected display
6.2 Input type
Indicates the currently selected input status (external microphone “EMIC” or
line “LINE” input).
6.3 Input / record level
This sub-window is shown when pressing one of the input level keys (see
third picture).
The record level for microphone input can be adjusted with the keys 12 & 13
in steps of 0.5 dB from +118 dB to +74 dB (45 dB range). Line from -29 dB
to 15 dB.
6.4 AGC status
Indicates if the Automatic Gain Control is turned ON or OFF. The letters
AGC appear inside the pre-record and record icon when active.
6.5 Output volume
The output volume level for headphones, line output or internal speaker (play mode) can be adjusted with the keys (14 &
15). The output volume
bar appears when pressing either of the keys.
6.6 VOR status
The Voice Operated Recording settings are made in the record settings menu. When turned on, the main pre-record
display shows pause instead of stop. The letter “P” is also shown inside the pre-record icon. The AGC is automatically
disabled in VOR mode.
6.7 Modulometer
Full scale from -50 dB to 0 dB with peak hold indicator for left and right channels.
6.8 Play / Record file name
The name of the current file during record or playback.
6.9 Play / Record counter
Display in hours, minutes & seconds since the playback or recording was started.
6.10 Total file / Free record time
Play progress Bar. In playback the counter shows the duration of the current file and in record it shows the remaining SD
capacity left.
6.11 Cue counter, Cue position
The left counter indicates the total number of recorded files. The right counter indicates the number of the file ready to be
played back. During record, the right counter increments every time a cue point is entered.
6.12 Run status
Stop
Monitoring (EE) mode (pre-record buffer)
Record
Play
Forward
Rewind
Pause
AGC active
Pause VOR mode
VOR recording
Page 7 of 22
Copyright © AUDIO TECHNOLOGY SWITZERLAND S.A. 2012
July 25, 2012
6.13 Audio parameters
This area shows (left to right), the current file type, the bit rate, the sampling frequency followed by date and time.
6.14 USB status
A sub window appears when the machine is connected via USB to a PC / MAC (selection of transfer or USB power).
6.15 Keyboard status
A sub window appears when the keyboard is locked by means of the hold key on the rear side.
6.16 Battery status
3 stripes inside the icon indicate full capacity. A fully charged set of dry cells should power the Nagra SD for 10 hours or
more.
7 USING THE NAGRA-SD
Basic Introduction and General Information.
The NAGRA-SD is designed as a flexible hand-held recorder for a variety of applications. It can perform many functions,
which are all covered in this manual. The operating concept is designed around a system of 2 pre-set TEMPLATES in
which all the required operating modes are stored. The user can choose different parameters of the machine and these
personalised settings are stored in a template for future quick access. If no specific user Template profiles are stored
then the NAGRA-SD will operate using the “default” factory settings.
To access the menus of the recorder, press (and hold for 2 seconds) the FILES / MENU key.
This introduction covers various important global subjects. More complex operations can be understood by studying the
different menus in detail. The topics covered are:
•
•
•
•
Recording in the field
Playback a previous recording
Storing settings in a template
Downloading to a computer
7.1 Recording in the field
General preparation:
Before making a recording the type of recording (file format, mono/stereo, input device etc.) need to be chosen. Two
different “set-ups” can be pre-selected and stored in the HIGH and LOW templates in the menu mode. These templates
correspond to the position of the QUALITY switch on the rear panel. So, for example, it may be decided that the HIGH
position of the switch corresponds to 96kHz, PCM linear Stereo recordings, and that the LOW position corresponds to
MPEG 1Layer II mono at 64kbits/sec. If nothing is set in the templates prior to the first recording, then the “default”
settings will be adopted.
The default settings are as follows:
For the LOW quality position: MPEG 1 Layer II, Stereo at 256 kbits/s, 48 kHz sampling.
For the HIGH quality position: PCM-WAV, 16 bits Stereo at 48 kHz sampling.
To change either (or both) of these templates enter the menu mode by pressing and holding the FILES/MENU key. Enter
the RECORD SETTINGS menu followed by the TEMPLATES then select either HIGH or LOW. All the desired settings
for each position can now be selected.
Once completed, the Input device (external microphone / line input) for the recordings needs to be selected. This is also
done in the RECORD SETTINGS menu.
When ready, press the centre key (11) and the NAGRA-SD will go to the “PRE-REC” mode where the audio input can be
heard on the headphones and the levels seen on the display and adjusted using the level keys as necessary. If the AGC
is turned off, the microphone input gain can now be adjusted in 0.5 dB steps using the keys (12 / 13), and the value is
shown in a sub-window on the display.
The centre LED starts blinking slowly. In this mode the Pre-record buffer, when turned on (max. 3 seconds), is also
active.
To begin recording, press the centre key once more (11). The red LED will stay red and the record symbol is shown on
the display. The levels can be seen on the display and adjusted during recording as necessary, assuming the AGC is not
activated.
Page 8 of 22
Copyright © AUDIO TECHNOLOGY SWITZERLAND S.A. 2012
July 25, 2012
To enter markers, during record, press the “CUE” key.
Attention: Cues can NOT be entered when recording RAW files.
To stop recording, simply press and hold the “STOP” key (7) for 3 seconds (until the time line in the sub window is filled
up).
Pressing the REC key again while recording will create a new file seamlessly, and the file number will be incremented
accordingly. Each new recording will be given a file name made up of 8 digits. This file will be stored in the work
directory.
Note:
Although a new file is created seamlessly, there will be a “gap” in the audio if played back on the SD, however if
the files are downloaded to a PC there will be no gap. This gap is caused by the processing time needed to open
the next file while playing back, which is limited in the recorder.
7.1.1 Adjusting input levels
The input levels can be adjusted using the + or – input level keys (12 & 13) in steps of 0.5 dB from 118 dB to 74 dB for
microphone or from 15 dB to -29 dB for line input.
To adjust the stereo balance, press the + or – input level key momentarily to show the sub-window indicating the levels
for both channels followed immediately by pressing momentarily the ◄ or ► arrow key (selects left or right sensitivity).
Press directly the + or – input level key to adjust the selected input sensitivity.
Once the sub-window disappears both channels will be adjusted simultaneously while maintaining the delta between the
channels.
7.1.2 The Automatic Gain Control (A.G.C)
The AGC is not an audio limiter. It operates in the digital domain and allows the operator to make recordings without
under / over modulating when the audio levels are unpredictable.
It makes recording in the field easier and guarantees that a respectable level will be recorded. Automatic adjustment
systems are rarely “better” than the manual modes, but can be considered “safer” in certain circumstances. It is also
strongly recommended to switch on the low cut filter when using the AGC for recordings in noisy environments (example:
Street noise).
7.1.3 Cue points during record
If during a recording, cue points need to be inserted, simply press the CUE key to
enter a position. The lower left corner of the main display shows the number of cue
points entered. In this example 2 cue points are already stored (02/02).
Beware that no cue points can be stored in RAW file types.
7.2 Playback of a previous recording
The NAGRA-SD can playback files irrespective of the current file format mode selected. To playback the last recorded
file, press “PLAY / PAUSE” and the machine starts playback immediately. To stop the playback, press the “STOP” key.
To pause the playback, use the “PLAY / PAUSE” key.
If the recording was made with markers (cue points), during the playback, first press the Cue key (“M” for markers
appears on the display) briefly press the “RIGHT” or “LEFT” keys to jump to the next or previous marker position
respectively.
To playback another file, cancel the Cue (“M” removed), briefly press the “RIGHT” or “LEFT” keys to scroll through the
recorded files available. Once “PLAY” is pressed, the new file will be played immediately.
During a playback of a file, the full “PLAY PROGRESS BAR” corresponds to the total length of the file.
When a new file has been selected for playback, the “TOTAL TIME” counter will indicate its full length and the “PLAY
TIME” counter starts incrementing once the playback begins.
During playback, to “REWIND” press and hold the “LEFT” key, to go “FORWARD” press and hold the “RIGHT” key.
Note:
When playing back consecutive files, there will be a “gap” in the audio at the junction of the two files, if played
back on the SD. However, there is no actual gap in the recording and if the files are downloaded to a PC there
will be no gap between the files when read with an audio player. This gap is caused by the processing time
needed to open the next file while playing back, which is limited in the recorder itself.
7.2.1 Adjusting playback levels
In playback additional boost of 1 to 12 dB is available (steps of 1 dB). This value is also shown on top of the display (HP
followed by a number).
Page 9 of 22
Copyright © AUDIO TECHNOLOGY SWITZERLAND S.A. 2012
July 25, 2012
In record or pre-record, the output volume level can be adjusted by the “+ OUTPUT LEVEL -” buttons in steps of 0.5 dB
from -64 dB up to 0 dB.
7.3 Cue point selection during play
If a file contains cue points, it will be shown in the lower left corner of the main
display.
In this example, it shows 00/04, meaning that the play position is actually before
cue 1, (00) and that 4 cue points are present in this file (04). Before starting or
during playback, press the CUE key once (the letter “M” is shown on the display).
This permits to jump from one cue point to the next using the ◄or ► keys.
7.4 Storing settings in a template (High, Low Quality)
Two templates are used to store the settings for the NAGRA-SD. These templates contain the file format to be recorded.
Templates: 2 templates are available (HIGH & LOW) and each can store the desired file type, sampling frequency and
bit rate.
Note: the selection between the two templates is made using the switch (6) on the rear side of the machine.
To go to the programming position, in “STOP” mode, press and hold the “FILES / MENU” until the menus appear on the
display. Select “RECORD SETTINGS” and press the right key. Select “TEMPLATES” and press the right key. Select one
of the 2 templates and press the right key. Select the type of file format and press the right key, also chose the “SAMPLE
RATE” and “BIT RATE”. To quit the menus, press the left key several times.
Once completed, the desired template can be selected on the rear side of the NAGRA-SD by selecting the “HIGH” or
“LOW” QUALITY as well as the type of recording (“MONO” or “STEREO” FILE TYPE).
7.5 Deleting an audio recording rapidly
Any audio file can be selected from the “STOP” mode. Press the “LEFT” or “RIGHT” keys to locate the desired audio file.
Once the corresponding file is shown on the display, press the “DELETE” key and confirm to delete the file.
7.6 Downloading to a computer
Two methods can be used:
•
•
Remove the SD card from the machine and insert it into a computer (PC or Mac). Use the Explorer to view the
SD card and open the folder (default folder is “RECORD”) to show the recorded files.
Or turn on the Nagra-SD, connect it to a computer (PC or Mac) with a USB cable, select “Connection” on the
Nagra-SD, and press EXE (11). The Nagra-SD shows “USB connected” on the display. Use the Explorer to view
the external memory device and open the folder (default folder is “RECORD”) to show the recorded files. Files
can then be “dragged and dropped” to the computer as desired.
8 FILES & WORKING FOLDER
Pressing the Files/menu key for a short moment shows the audio files of the working directory.
The above pictures show several files or folder names and the actions that can be taken.
The up ▲▼ keys permit to scroll between the different audio files or folders.
Pressing the centre key on the folder icon or pressing the ► key (shows sub-menu) gives access to the different existing
folder(s) present on the SD card.
Pressing the centre key on an audio file starts / stops the playback of the highlighted file.
Pressing the ► key (shows sub-menu) permits to select Play or Stop or Delete the selected file. If deleting is selected, a
confirmation is requested.
Additional folders can only be made with Windows Explorer (or Mac) by connecting the NAGRA-SD to a PC (or by
inserting the SD card in a PC).
Page 10 of 22
Copyright © AUDIO TECHNOLOGY SWITZERLAND S.A. 2012
July 25, 2012
The working folder is by default the “RECORD” folder. If other folders are created by PC or Mac, any of them can be
selected as a working folder as follows:
• From the main menu, by pressing Files / menu, select Files.
• Keep the folder icon highlighted and press the ► key. A sub-window appears showing
“Up level”. Press the EXE key and the different available folders will be shown.
• Highlight the folder that needs to become the working folder and press the ► key.
• Select in the sub-window “W. folder” to validate. The working folder is marked with a
small triangle just below the folder icon (see last picture above).
Once a file is highlighted, pressing the View key, the display shows all the information of the
specific file.
Page 11 of 22
Copyright © AUDIO TECHNOLOGY SWITZERLAND S.A. 2012
July 25, 2012
9 MENUS
Most of the settings and parameters of the NAGRA-SD are made through a selection of Menus.
Press the “FILES / MENU” key and a sub-menu appears giving access to the “RECORD SETTINGS” and “SYSTEM
SETTINGS”. The “UP” or “DOWN” keys will highlight the different choices and the “EXE” key (11) or “RIGHT” key (10)
executes or shifts to the next horizontal menu position.
Page 12 of 22
Copyright © AUDIO TECHNOLOGY SWITZERLAND S.A. 2012
July 25, 2012
Note: While surfing through the different menu windows in some cases the “CENTRE” key or “RIGHT” key can be used
to advance one step but also the “UP” and “DOWN” keys. To go one step back or to escape from a particular
screen press the “LEFT” key.
Page 13 of 22
Copyright © AUDIO TECHNOLOGY SWITZERLAND S.A. 2012
July 25, 2012
9.1 Record settings
9.1.1 Templates
Before the templates can be selected with the QUALITY switch (6) on the rear side, they first need to be stored. 2
templates, “High” and “Low”, for the file type, sampling rate, bit rate can be entered.
Several possibilities exist: WAV-PCM 16 or 24 bits, MPEG1L2, MPEG1L3, MPEG2L2. Select one of the possibilities
using the “UP” or “DOWN” keys and press the “CENTRE” key to confirm and to go to the next step.
Once the compression type is selected, the corresponding sampling rate as well as the bit rate need to be entered.
Page 14 of 22
Copyright © AUDIO TECHNOLOGY SWITZERLAND S.A. 2012
July 25, 2012
9.1.2 Matrix
The input matrix permits the routing the analogue input signal to the left
and or right recording channel. As an example: After having selected
Stereo both from left, making a stereo recording with only one
microphone connected to the left input will record the same signal on
the left and right channels.
Matrix mode
Mono from left
Mono Mix. Left & Right
Record file set
Mono
Mono
Output L
Input L
Input L & R
Output R
Input L
Input L & R
Stereo standard
Stereo both from left
Left only, Mute Right
Stereo mix.
Stereo
Stereo
Stereo
Stereo
Input L
Input L
Input L
Input L & R
Input R
Input L
No signal
Input L & R
9.1.3 Pre-record
The pre-record buffer can be turned off or set to 1 or 3 seconds.
The pre-record function can also be used in conjunction with the
VOR function if desired.
9.1.4 VOR
Access to the parameters of the Voice Operated
Recording mode.
VOR Level: This sub-menu permits to set the minimum
input trigger level before the recording starts, or to turn off
the VOR mode.
VOR Mode:
Pause: The recording will be paused (with default
settings: depending on the stop delay) if the level drops
25 dB below the trigger level. If the input level rises again
above the trigger level, the recording on the same file will
continue.
Split: The recording will be stopped (with default settings:
depending upon the stop delay) if the level drops 25 dB
below the trigger level. If the input level rises again above
the trigger level, recording will re-start and a new file will
be created.
VOR Delay: Selects the length of time that the recording
will continue once the input level drops 25 dB or more below
the trigger level.
9.1.5 Input device
Permits to select the input device (external microphone or line input)
9.1.6 Prefix name
This sub-menu allows the first 4 characters of the file name to be customized.
Once “USER” is highlighted, use the “UP” and “DOWN” keys to select a
character.
Press the “RIGHT” key to move to next character etc. Once all characters have
been entered, press “OK” and press the “EXE” key (11).
Example of a file name: USER0001.
Page 15 of 22
Copyright © AUDIO TECHNOLOGY SWITZERLAND S.A. 2012
July 25, 2012
9.2 System settings
9.2.1 Time & Date
The “TIME & DATE” sub-menu sets the current time and date for the internal
Real Time Clock (RTC) which will be used for each recording. Use the
“RIGHT” key to highlight the item to be set. Use the “UP” or “DOWN” keys to
select the corresponding digits and press the “RIGHT” key to move to the next
digit. Once the settings made, highlight “OK” and press the “CENTRE” key.
Remark: The super capacitor will keep time and date running without batteries
or USB power for approximately 24 hours.
9.2.2 Record LED
A RED recording indicator led is integrated in the centre key (11). Select the
desired function and press the “CENTRE” key. In the “ON” mode, the recording
led will blink slowly while the recorder is in pre-record mode and will light
continuously once the record function is activated.
9.2.3 Beep settings
This menu turns on or off the beep warning signals in the headphones. The
beep signal confirms that any function has been correctly interpreted.
9.2.4 Speaker settings
The built-in monitoring speaker can be turned off or set to auto. In the auto mode, the speaker only active in the playback
mode and will be muted in all other situations. The playback level of the
loudspeaker is controlled with the
output volume buttons.
9.2.5 Auto skip
If “On” is selected, then all files of the same file format will be played back
consecutively without stopping at the end of each file. Selecting “Index loop”
restarts the playback of the same index continuously in a loop function.
9.2.6 Display extinction
To save battery power, the screen can be set to turn off automatically after a
pre-selected time. This time starts to count after the last key press. After
extinction, the display will re-light as soon as a key is pressed.
9.2.7 Auto power off
This menu allows a time delay to be selected, after which the recorder will
power down when no keys have been pressed for the specified period (except
when in record or play modes). Selecting “Off” disables this mode.
9.2.8 Battery type
Selects the type of battery used in the recorder. This ensures that the
remaining power indicator is correct. Dry cells will deliver 3V, rechargeable NimH deliver 2.4V which alters the indication of the battery fuel gauge.
9.2.9 USB write protection
When turned “On”, no files can be copied to the recorder from a PC or Mac via
USB.
9.2.10 Language settings
English, French or German are available for all menu tree positions.
9.2.11 SD information
Gives information about the size, the free memory space as well as the used
memory on the installed SD card.
Page 16 of 22
Copyright © AUDIO TECHNOLOGY SWITZERLAND S.A. 2012
July 25, 2012
9.2.12 SD speed test
This menu allows the record and playback speed of an SD card to be tested. Some low cost SD cards are not particularly
fast and may cause problems during recording particularly at higher sampling frequencies.
9.2.13 Format
Formats the SD card. Attention: All files will be lost.
9.2.14 Version
Shows the hardware and software versions of the Nagra SD.
9.2.15 System reset
Reset all internal parameters to the factory default values.
9.2.16 System update
To update the internal operating software of the Nagra-SD, copy the update file (NagraSD.coe) from our web site
(www.nagraaudio.com) to the root directory of the SD card. This can be done, either by inserting the card into an SD slot
on the PC, or via an USB connection with the Nagra-SD.
In the system update menu, select OK and press the “EXE” key (11). At the end of the update cycle, the Nagra-SD will
automatically switch off. When the Nagra-SD is restarted the new updated version will be used. This can be verified in
the menu.
9.2.17 Export / Import the configuration
This function allows the settings of the “high” and “low” templates to be saved
in a file on the SD card, which can in turn be uploaded into other NAGRA SD
recorders.
Select “Export configuration” and the templates are automatically saved to the
SD card. To load the templates on to another machine, insert the SD card
containing the configuration, select “Load” and confirm. Beware that the previous
stored templates in the machine are overwritten by the new configuration.
Page 17 of 22
Copyright © AUDIO TECHNOLOGY SWITZERLAND S.A. 2012
July 25, 2012
10 MICROPHONES AND SETTINGS.
The Nagra-SD can use the following microphones:
External mono cardioid clip-on mic
External standard stereo cardioid clip-on mic
External mono clip-on mic
External high quality stereo cardioid clip-on mic
(White band)
(Red band)
(Blue band)
(Green band)
The standard Stereo microphone (Red band) contains two cardioid capsules.
The high quality stereo microphone (Green band) has two cardioid capsules, mounted on special shock resistant
neoprene mountings. The capsules are individually selected and matched in both noise and gain characteristics,
according to a strict selection and measurement protocol. This microphone offers a good stereo image, and is very
versatile.
The mono capsule (Blue band) is an omni-directional capsule, which offers two principal differences to the stereo
capsule. Firstly, being an omni-directional capsule it captures much more of the ambience and is ideal for on-the-move
journalism, especially because most interviews are mono. Secondly, in an interview situation it is not necessary to “point”
the microphone at the person speaking. The omni-directional characteristics allow all those being recorded to be
captured equally, hence making the journalist job less intimidating. In addition it offers longer recording times to the
Nagra-SD as the recorded files can be mono.
The mono cardioid microphone (White band) contains one of the same capsules present in the cardioid high quality
stereo mic. It gives monophonic directional characteristics, and will capture less of the ambient surrounding noise than
the blue band mono mic.
The use of the foam windshield is strongly recommended with the clip-on NAGRA microphones, particularly outside
where wind conditions can affect the recordings.
11 LOW CUT FILTER
The Nagra-SD is equipped with an analogue low cut filter
integrated within the microphone preamplifier. This filter can be
turned ON or OFF as desired.
The frequency of the cut is at 100Hz with a gradient of 40 dB /
octave.
This filter can be activated for each microphone type, using the
switch on the rear of the Nagra SD.
It is especially useful for recordings made using directional microphones outside in windy conditions, such as the green
band stereo microphone. In fact, cardioid (speed capsules) such as the NAGRA microphones are susceptible to vortexes
induced by wind moving round the microphone capsule, contrary to omni-directional (pressure) capsules, which are not.
Note however that the NAGRA microphone is equipped with a fine silk screen directly behind the grill / basket carefully
positioned to compensate for these vortexes and “pop” effects. It is also recommended to use the external foam
windshield whenever one works outside when unexpected wind noise may be encountered.
Page 18 of 22
Copyright © AUDIO TECHNOLOGY SWITZERLAND S.A. 2012
July 25, 2012
12 AUDIO COMPRESSION (WHY AND WHEN TO USE IT).
The Nagra-SD is able to record using different Audio
qualities PCM Linear, MPEG Layer II (MP2) and
MPEG layer III (MP3) that have their own particular
advantages, which are explained below.
What to use?
Firstly, the less compression used, the better the
quality of the recording will be. However at higher bit
rates (384 kbits/s) you can easily record music and
probably not notice any difference.
A few guidelines should be considered:
For journalism / interview work it is unnecessary to
use PCM linear. Generally MPEG 1 Layer II is used
and the compression / bit rate is generally defined by
the broadcaster.
For music / effects PCM linear is the best quality although MPEG at a high bit rate is probably good enough and gives
faster download time.
For ultra-long recordings use a very low bit rate, where quality will be “Dictaphone” quality.
Some important things to remember:
•
Some computers will not play MPEG 1 Layer II compressed files without appropriate audio editing software.
Typically some versions of the Windows Media player fall into this category.
•
Audio CD’s will only accept 44.1 kHz linear PCM 16 bit if they are to be played on a standard CD player.
13 USB
The miniature USB port serves two purposes: File download / upload or external DC powering.
Audio can be extracted either through the line output in normal playback mode or alternatively via the USB port to the PC
/ MAC.
Connect the USB cable to the computer and to the recorder and power up. When the USB is connected, a sub-window
appears giving the possibility to select “Power” or “USB communication”. Make a selection and press the “CENTRE”
key.
The USB power position is for simply powering the Nagra-SD through the USB port for normal operation without internal
batteries.
If the USB transfer is selected, the machine will immediately appear as a removable disk in the explorer of the PC/MAC.
The Nagra-SD display shows “USB Connecting”.
On a PC or Mac, the Explorer will display a folder called “RECORD” in which all recorded indexes are stored.
•
Download speed from the machine to the computer is at a fixed bit rate and will take about 1 minute per GB
to copy.
Page 19 of 22
Copyright © AUDIO TECHNOLOGY SWITZERLAND S.A. 2012
July 25, 2012
13 CE NORM
Page 20 of 22
Copyright © AUDIO TECHNOLOGY SWITZERLAND S.A. 2012
July 25, 2012
14 SPECIFICATIONS
GENERAL
Data Storage medium
Recording Method
Compression type
File Format
Sampling Rate
Compress Bit-Rates
Mono/Stereo
Dynamic Range Adjustment
Filters
Automatic Gain Control
SD HC / card FAT 32
Digital (PCM) or Digital compression
ISO MPEG Layer II / III
16 / 24 Bit Wave Format (xxx.WAV) or MPEG Raw (xxx.MP2, xxx.MP3)
From 24 to 96 kHz selectable
32 to 384 kb/s
Switchable
45 dB for 0 dB record
“Flat”, “LFA”
“ON”, “OFF”
INPUTS
Mike Inputs
Mike Powering
Mike Input Sensitivity
Line Inputs
Line Input Sensitivity
3.5 mm stereo jack connector
3V Electret
Minimum 1.5 mV (Electret) for full scale
Minimum 650 µV (Dynamic)
3.5 mm stereo jack connector
33 mV to 6.2 V for 0 dB recording
OUTPUTS
Headphone / Line output
Line Output Level
3.5 mm stereo jack connector
Maximum 0.9 V
RECORDED FILE
THD + N at 1 kHz
0.025 %
Frequency Response
25 Hz – 20 kHz (-3 dB in EE mode)
Total Dynamic Range Line Output
Up to 80 dB
Total Dynamic Range On Recorded File Up to 90 dB
Built-in Speaker
0.1 W
USB
2.0
POWER SUPPLY
Internal Batteries
Consumption
2 x “AA” cells
3 V, maximum 150 mA (> 10 hours)
PHYSICAL
Dimensions
Weight
107 x 63 x 24 mm (4.2 x 2.6 x 1 inch) w/o plug-on mike
250g, (0.5 lb) incl. batteries, w/o plug-on mike
Specifications are subject to modification without notice.
Page 21 of 22
Copyright © AUDIO TECHNOLOGY SWITZERLAND S.A. 2012
July 25, 2012
AUDIO TECHNOLOGY SWITZERLAND SA
Chemin de l’Orio 30A
CH-1032 Romanel-sur-Lausanne
Switzerland
Phone +41 (0)21 643-7240
Fax +41 (0)21 641-7532
E-mail: [email protected]
All rights reserved-© July, 2012
Page 22 of 22
Copyright © AUDIO TECHNOLOGY SWITZERLAND S.A. 2012
July 25, 2012