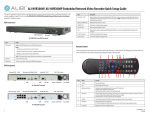
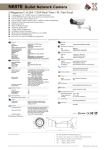
1
-0-
S20712ch / S40714ch
H.264 Video Server
TABLE OF CONTENT
INTRODUCTION .......................................................................................................................................................................... 4
FEATURES .......................................................................................................................................................................................... 4
PACKAGE CONTENTS ............................................................................................................................................................................ 5
SYSTEM REQUIREMENTS ............................................................................................................................................................ 6
VIEW OF S2071/S4071 H.264 VIDEO SERVER ............................................................................................................................... 7
MAKING CONNECTIONS ........................................................................................................................................................... 11
Power ....................................................................................................................................................................................... 12
Lan ........................................................................................................................................................................................... 13
Video In ................................................................................................................................................................................... 13
Audio In ................................................................................................................................................................................... 14
MIC In ...................................................................................................................................................................................... 14
Line Out ................................................................................................................................................................................... 15
Reset (Button) .......................................................................................................................................................................... 15
SD Card .................................................................................................................................................................................... 16
External Devices ....................................................................................................................................................................... 17
Alarm Input ..............................................................................................................................................................................................18
Alarm Output ...........................................................................................................................................................................................18
PTZ (Speed Dome) ....................................................................................................................................................................................18
External Alarm I/O Circuit Diagram .........................................................................................................................................................19
HARDWARE INSTALLATION ....................................................................................................................................................... 20
MOUNTING ..................................................................................................................................................................................... 20
SOFTWARE INSTALLATION ........................................................................................................................................................ 22
READY TO USE .......................................................................................................................................................................... 24
ACCESS TO THE IP CAMERA ................................................................................................................................................................. 24
VIEW OF CAMERA MAIN PAGE ................................................................................................................................................. 26
LIVE VIEW........................................................................................................................................................................................ 26
3Svision Logo ........................................................................................................................................................................... 26
Product Name.......................................................................................................................................................................... 27
Mode ....................................................................................................................................................................................... 27
Language ................................................................................................................................................................................. 27
Video Source ............................................................................................................................................................................ 29
Video Format ........................................................................................................................................................................... 31
View Size.................................................................................................................................................................................. 32
Streaming ................................................................................................................................................................................ 33
Color ........................................................................................................................................................................................ 34
Brightness ................................................................................................................................................................................................35
Contrast ...................................................................................................................................................................................................35
Saturation ................................................................................................................................................................................................35
Set to default............................................................................................................................................................................................35
Alert ......................................................................................................................................................................................... 36
Alert Message .......................................................................................................................................................................... 37
Alert Message Text ................................................................................................................................................................................... 37
Disable .....................................................................................................................................................................................................38
Alert Snapshot..........................................................................................................................................................................................38
Clear .........................................................................................................................................................................................................38
PTZ Control Panel .................................................................................................................................................................... 39
Camera Direction .....................................................................................................................................................................................40
PTZ Device ................................................................................................................................................................................................40
Camera Speed ..........................................................................................................................................................................................41
Zoom ........................................................................................................................................................................................................41
Focus ........................................................................................................................................................................................................41
Aux ........................................................................................................................................................................................................... 41
-1-
S20712ch / S40714ch
H.264 Video Server
Preset .......................................................................................................................................................................................................41
Tour .......................................................................................................................................................................................................... 43
Shortcuts.................................................................................................................................................................................. 44
+ZOOM IN ................................................................................................................................................................................................45
-ZOOM OUT .............................................................................................................................................................................................46
Original Size .............................................................................................................................................................................................46
Full Screen ................................................................................................................................................................................................ 47
Jitter Time ................................................................................................................................................................................................48
Record ......................................................................................................................................................................................................49
Snapshot ..................................................................................................................................................................................................50
Version .....................................................................................................................................................................................................50
Shortcut Bar ............................................................................................................................................................................. 51
Record ......................................................................................................................................................................................................51
Path.......................................................................................................................................................................................................... 51
Snapshot ..................................................................................................................................................................................................53
Shortcut Bar Message ..............................................................................................................................................................................53
SETTING USER PREFERENCES ............................................................................................................................................................... 54
Basic Setting ............................................................................................................................................................................ 55
System ......................................................................................................................................................................................................55
System Setting ....................................................................................................................................................................................55
System Log ..........................................................................................................................................................................................56
Video/Image ............................................................................................................................................................................................ 57
Video .................................................................................................................................................................................................. 57
PreProc/Overlay..................................................................................................................................................................................58
Audio ........................................................................................................................................................................................................60
PTZ ........................................................................................................................................................................................................... 61
User .......................................................................................................................................................................................................... 62
Network ...................................................................................................................................................................................................65
Network Setting ..................................................................................................................................................................................65
Services ...............................................................................................................................................................................................66
Stream Setting .................................................................................................................................................................................... 67
PPPoE Setting (Dial-up Networking Setting) .......................................................................................................................................68
DDNS (Dynamic Domain Name Server) .............................................................................................................................................. 70
UPnP (Universal Plug and Play) ........................................................................................................................................................... 72
SMTP (Mail Server Setting) .................................................................................................................................................................75
Samba ................................................................................................................................................................................................. 76
Notification .........................................................................................................................................................................................77
Multicast ............................................................................................................................................................................................. 78
Date/Time ................................................................................................................................................................................................79
IP Filter .....................................................................................................................................................................................................80
Application Setting .................................................................................................................................................................. 81
Event ........................................................................................................................................................................................................81
Event ...................................................................................................................................................................................................82
Trigger .................................................................................................................................................................................................85
Event Servers (Upload Server) ............................................................................................................................................................ 87
Recording List ...........................................................................................................................................................................................89
Motion Detection .....................................................................................................................................................................................90
Blind Detection.........................................................................................................................................................................................91
Privacy Mask ............................................................................................................................................................................................ 92
Firmware upgrade ...................................................................................................................................................................................94
Factory Default ........................................................................................................................................................................................ 97
Reboot....................................................................................................................................................................................................100
APPENDIX ............................................................................................................................................................................... 101
CHANGE THE INTERNET EXPLORER SETTINGS......................................................................................................................................... 101
SET UP THE ROUTER SETTING WITH IP CAMERA..................................................................................................................................... 102
DDNS APPLICATION ........................................................................................................................................................................ 103
How to apply and setup the DDNS service? ........................................................................................................................... 103
How to check if the DDNS service is successful? .................................................................................................................... 108
MOBILE APPLICATION ...................................................................................................................................................................... 109
Symbain System ..................................................................................................................................................................... 112
iPhone System........................................................................................................................................................................ 115
SUPPORT THE CELLULAR / MOBILE PHONE LIST..................................................................................................................................... 120
-2-
S20712ch / S40714ch
H.264 Video Server
MULTICAST APPLICATION .................................................................................................................................................................. 121
H264 (Main)........................................................................................................................................................................... 124
H264 (Sub) ............................................................................................................................................................................. 125
Motion JPEG .......................................................................................................................................................................... 126
TROUBLESHOOTING AND FAQS .......................................................................................................................................................... 129
-3-
S20712ch / S40714ch
H.264 Video Server
Introduction
Thank you for purchasing the fully functional H.264 Internet Video Server, S2071(2ch) /
S4071(4ch), it has a built-in high power CPU and H.264 encode chip to provides user with a
mechanism for the security or remote monitoring applications. It supports the high resolution
of real time image for each channel, and deliver multi-video streams simultaneously (Motion
JPEG and H.264), The quality of image and bandwidth can be optimized.
After connecting it with an analog camera, all elements of an existing surveillance system can
be upgraded to a new IPI surveillance system. IT can send live video and audio through the
internet and users can monitor the surveillance via a web browser anywhere in the world.
It offers the application which is contain multi-function such as 2 Way audio, DDNS, SAMBA,
FTP, Mail, Multicast, Blind detection, Motion detection, Privacy Mask, Event management and
depending on the security need of on-line users, it provides diverse and multi-level password
setup.
It is easy to install, convenient to operate.
The product of PocketNet is your safety partner.
Features
S2071(2ch) / S4071(4ch) can operate smoothly and to install additional software or hardware
is unnecessary. All you need is a PC that is equipped with IE browser (6.0 or above) and
connect the internet camera to the network to monitor the pre-set places remotely. It provides
you with protection for your personal, home and property security.
Resolution: D1 (704x576@25fps/704x480 @30fps) /
CIF (352x288@25fps/352x240@30fps)
H.264/MJPEG Dual Codec & Streaming simultaneously
Supports 3GPP (WM6 / Symbian / Android / iPhone).
2 Way Audio Supported (external MIC IN x 1, LINE IN x 4, LINE OUT x 1).
Built-in smart detection (Motion / Blind) to monitor abnormal situations automatically and
transmit real-time trigger command actively as preset;
Built-in intelligent dynamic video detection for automatic monitoring of abnormal situations
and sending a real-time trigger signal according to the active settings.
Dynamic IP domain name support for use of the product at locations where fixed IP is not
available
User permission can be set based on different levels to ensure the security of the camera
and protection of the property.
The simple and clear design is suitable for airports, train stations, office buildings, large
gymnasiums, warehouses, factories, shopping malls and schools.
Support SD card.
RS-485 Remote PTZ camera control (Pelco-P, Pelco-D)
-4-
S20712ch / S40714ch
H.264 Video Server
Package Contents
* The manual are both available for S2071 for 2 channels and S4071 for 4 channels.
After unpacking, check that if all the following items have been included:
H.264 Video Server
S2071 for 2 channels
S4071 for 4 channels
Quick Guide
Installation CD (Manual & Software)
Mounting Bracket x2
Screw Pack
Contact your dealer immediately if any items are missing, appear damaged, or if the unit does not work.
-5-
S20712ch / S40714ch
H.264 Video Server
System Requirements
Before installing S20712ch/S40714ch, please make sure your system has the following
recommended minimum hardware requirements.
Internet Environment
Ethernet
10/100M Ethernet
Monitor System Requirements
OS support
Windows 2000, XP, Vista and 7
Browser support Internet Explorer 6.x or later
Hardware
CPU: Pentium 4 2.4 GHz or later
Memory: 512 MB (1GB recommended)
VGA card resolution: 1024 x 768 or higher
-6-
S20712ch / S40714ch
H.264 Video Server
View of S2071/S4071 H.264 Video Server
Outer View
S2071 for 2 channels
S4071 for 4 channels
Front View
Model: S2071
2
4
1
3
Model: S4071
2
1
DESCRIPTION
1 Video In
2 Mic In
3 Line Out
4 Audio In
5 Power Display
5
3
4
5
Connect to the video in here.
Connect to microphone in.
Connect to speaker out.
Connect to the audio in here.
The LED indictor will be green when power on.
-7-
S20712ch / S40714ch
H.264 Video Server
Rear View
2
1
DESCRIPTION
1 Power
2 Alarm In
3 DC Out
4 RS485
5 Alarm Out
6 SD Card
7 LAN
8 Reset
3
4
5
6
7
Connect to DC12V power.
Connect to external Alarm in here.
Connect to external DC out here.
Connect to external RS485 here.
Connect to external Alarm out here.
SD card slot.
Connect to 10/100 RJ45 Network.
Default reset by press here for 5~10 seconds.
-8-
8
S20712ch / S40714ch
H.264 Video Server
Dimension Diagram
-9-
S20712ch / S40714ch
H.264 Video Server
- 10 -
S20712ch / S40714ch
H.264 Video Server
Making Connections
Before connect your Video Server, please make sure your PC has the LAN port available for
connect to the network.
Follow these instructions to connect the S2071/S4071 into your PC and LAN Port.
Power
LAN
Connect to DC12V power.
Connect to 10/100 RJ45 network.
- 11 -
S20712ch / S40714ch
H.264 Video Server
Power
Please connect S2071/S4071 H.264 Video Server to the power supply from the Power Inlet.
The power inlet of S2071/S4071 is non-polarized, it can automatically determine the type of
the incoming current.
The LED indicator of the power where is on the front panel will be green when power on.
Attention: Please take notice of connection of positive and negative electrode. Wrong connection will
damage the camera.
- 12 -
S20712ch / S40714ch
H.264 Video Server
Lan
Connect to the Switch HUB.
Use a network cable and plug it into the LAN port of the S2071/S4071. Plug the other end of
the cable into the LAN port of the HUB.
Video In
Plug the one end of the video source of your analog camera and connect the other end to your
video server. 1~4 channels supported, it will be dependent on the actual product spec.
NOTE:
:
Plug the one end of your control cable into the RS485 socket on the rear of the camera and
connect to the other end to your video server if your analog camera provides the
Pan/Tilt/Zoom Control.
- 13 -
S20712ch / S40714ch
H.264 Video Server
Connect the power source for the analog camera
Plug one end of the power cable in the power socket of your camera and connect the other
end to the AC power source.
NOTE:
:
Make sure your analog camera is use the BNC connector for the video in/out. If not, please
consult your dealer or retailer to purchase or buy the adapter to use.
Audio In
Connect to the Audio In from the audio out of DVD Player or other devices (e.g. MP3, DVD
Player and Amplifier microphone.
NOTE:
:
Before connect microphone, you have to obtain the audio signal through amplifier.
MIC In
Connect the microphone with 3.5mm phone jack to MIC IN.
- 14 -
S20712ch / S40714ch
H.264 Video Server
Line Out
Connect the audio devices (e.g. Speaker) to Line Out.
Reset (Button)
Reset the S2071/S407 H.264 Video Server to default settings, by pressing pin 4 with a sharp
object for 5 seconds.
- 15 -
S20712ch / S40714ch
H.264 Video Server
SD Card
S2071/S4071 supports SD and SDHC Card which the storage range is from 2G~32G. And it
detect them and display the information on Setting > Basic Setting > Storage automatically
- 16 -
S20712ch / S40714ch
H.264 Video Server
External Devices
In addition to the motion detection executed by the internal software application,
S2071/S4071 provides the external connector for infrared detectors, beepers, and smoke
detectors. For more information about these external devices, contact to your local retailer,
dealer or installation service provider. It provides a standard Alarm I/O for you.
It provides the external devices :
4 x DI (Digital Input)
4 x DO (Digital Output)
1 x external
1 x RS485
The detail function illustration as below:
Pin
Function
Pin
Function
01
Alarm Input 01:#1 (A) Max DC 50V
13
Alarm Output 09:#1 (N.C.)
02
Alarm Input 02:#1 (K)
14
Alarm Output 10:#1 (COM) Max DC24V1A
03
Alarm Input 03:#2 (A) Max DC 50V
15
Alarm Output 11:#1 (N.O.)
04
Alarm Input 04:#2 (K)
16
Alarm Output 12:#2 (N.C.)
05
Alarm Input 05:#3 (A) Max DC 50V
17
Alarm Output 13:#2 (COM) Max DC24V1A
06
Alarm Input 06:#3 (K)
18
Alarm Output 14:#2 (N.O.)
07
Alarm Input 07:#4 (A) Max DC 50V
19
Alarm Output 15:#3 (N.C.)
08
Alarm Input 08:#4 (K)
20
Alarm Output 16:#3 (COM) Max DC24V1A
09
DC12V: + (100 mA)
21
Alarm Output 17:#3 (N.O.)
10
DC12V: - (100 mA)
22
Alarm Output 18:#4 (N.C.)
11
RS485 RT: Transmit Date
23
Alarm Output 19:#4 (COM) Max DC24V1A
12
RS485 RX: Receive Date
24
Alarm Output 20:#4 (N.O.)
Attention: Please do not connect the Pin 09 and Pin 10 to other devices.
Incorrect connection may cause short circuit and damage to the camera and people.
- 17 -
S20712ch / S40714ch
H.264 Video Server
Alarm Input
The external device connects one for the Alarm Input (A), and the other for Alarm Input (K).
Due to S2071/S4071 has the protection mechanism, obtain the power supply for your alarm
equipment by connecting from Pin 09 and Pin 10.
Attention: The Pin 09 and Pin 10 can only provide the 100mA power to other device.
If the devices need to get the more power from , it will shut down or broke.
Alarm Output
The external device connects one for Alarm Output (N.C.) or Alarm Output (N.O.), and the
other for Alarm Output (COM).
Connect the power adapter through COM to provide electric power. The alarm output will
work on while any event has triggered.
NOTE:
:
After the alarm device setup is finish up please refer to the chapter of Application Setting >
Event > Trigger to enable the function.
PTZ (Speed Dome)
can support the PTZ camera to install. Attach the control line to RS485 connecter first, and
set up the analog camera. Please make reference to the chapter of Hardware Installation
for the detailed installation description.
NOTE:
:
It supports two type of protocol: Pelco P and Pelco D.
- 18 -
S20712ch / S40714ch
H.264 Video Server
External Alarm I/O Circuit Diagram
Pin 1
Warning! The alarm will be triggered when alarm pin 1 & 2 are
formed as a short circuit. Please do not connect the electric voltage
or current into alarm input pin for the electronic current might burn
the product.
Pin 2
Pin 3
Warning! The alarm will be triggered when alarm pin 2 & 3 are
formed as a short circuit. Please do not connect the electric
voltage or current into alarm input pin for the electronic current
might burn the product.
Attention:
Where connecting of a low or high current loop to the external alarm input/output of the product is required,
the wiring and connection shall be conducted by a qualified electrician. Incorrect wiring may bring about
damage to the product fatal electric shock.
Direct connection of the external alarm input/output terminal to high-current equipment is not allowed and a
customized repeat circuit might be required (provided by the customer) for some cases to isolate the
terminal and the high-current equipment. Where the voltage/current of an external device exceeds the
loading capability (5V) of the Alarm I/O, the product would be damaged seriously.
- 19 -
S20712ch / S40714ch
H.264 Video Server
Hardware Installation
Before getting to start S2071/S4071 H.264 Video Server, please adjust it in accordance with
the following steps first.
It can be installed on your desk or use the attached bracket to hang it from the wall or ceiling.
Mounting
S2071/S4071 H.264 Video Server can be fixed on the wall (Fig. 1) or hung it from the ceiling
(Fig. 2).
Fixed on a wall (Fig. 1)
Fixed on a ceiling (Fig. 2)
The detail function illustration as below:
1. Reverse the video server.
2. Use the screw driver to securing the bracket with 2 screws onto each back side of
the video server.
3. Installation Completed.
- 20 -
S20712ch / S40714ch
H.264 Video Server
NOTE:
You can install S2071/S4071 H.264 Video Server on the holder and hang it on the wall or
ceiling. Please do not install it in locations of poor ventilation. This will result in poor operation.
Make sure that no steel bars or power cables exist behind the position where the product is to
be fixed. Some walls or ceilings may not be strong enough to support the bracket and the
product. Pay attention during installation to avoid injury that might be brought about due to
falling of the product.
Attention:
The horizontal angle is important when you hang the product from the ceiling. Excessive
inclination may bring about abnormal rotation of the camera lens.
- 21 -
S20712ch / S40714ch
H.264 Video Server
Software Installation
After the hardware has been installed, insert the installation CD into the CD-ROM driver and
run the “Cam Finder.exe” following the steps below to search and change the IP address of
S2071/S4071 H.264 Video Server.
NOTE:
:
If the network environment has the router, please refer to Appendix: Set up the Router
Setting with IP Camera for different environment description.
1.
Start the Camera Setting.
Run the Cam Finder.exe from the installation CD.
2.
Set the IP address of the Network Camera.
Click Search to find the IP Camera on the LAN, the factory IP setting 192.168.0.20
appears on the screen.
3.
Change the IP address and related settings for the network environment
When you find the camera, click it and the settings will appear on the right side. You can
change the settings for the new network environment as you need.
NOTE :
Enter new settings in the field of the IP, Netmask and Gateway fields and keep the
settings in other fields unchanged.
- 22 -
S20712ch / S40714ch
H.264 Video Server
4. Submit data
Click Submit to apply the new settings.
5. Confirmation
Click Exit to quit, after all changes have been confirmed.
NOTE :
The Cam Finder can only find the IP addresses of the cameras that share the same hub
on the LAN. For more information about finding IP addresses on the Internet, refer to the
“DDNS Setting”, or “UpnP Setting”.
All UIC camera/network server products can be found and changed using the Cam Finder
software.
When the Cam Finder software cannot be executed, check your antivirus software or
firewall to remove the block.
Field description: You can give a name to your camera (such as “IR_IP” or “IR-IP”). No
spaces allowed (such as “PI IP”).
You can change the settings for IP, Gateway Address and Network Mask to meet the
requirements of your network environment. S2071/S4071 H.264 Video Server uses HTTP
Port1 and does not support Port2 settings.
MAC: Factory default network identity of S2071/S4071 H.264 Video Server.
- 23 -
S20712ch / S40714ch
H.264 Video Server
Ready To Use
Access to the IP Camera
You can access the IP Camera through web browsers, follow the instructions to install the
required plug-in on your computer.
1. Using Web Browsers
Launch your web browser. (eg. Microsoft Internet Explorer, Mozilla Firefox or Netscape…)
and enter the IP address of the IP Camera in the address field.
After fill in "root" in the User Name and Password fields, Click OK.
User Name:
Password:
root
root
NOTE:
:
1. If the web browser cannot be display the Camera Main Page, please make reference to
the chapter of Appendix: Change the Inter Explorer Setting for further detailed
description.
2. You can access the camera as an administrator by default and set up for other users or
privileges from the “Basic Settings” “User”.
- 24 -
S20712ch / S40714ch
H.264 Video Server
2. Installation of Internet Explorer ActiveX Controller
After the Username and Password are confirmed, a control setup screen pops up under
the IE address bar. Click “Install ActiveX Control” to continue.
The security warning screen appears. Click "Install". The ActiveX Control is named
“ActiveX Control". This software is owned by PocketNet and well certified. You can use
it without any doubts about its validity.
When ActiveX Control is installed successfully, you can see the camera image and
interface on your screen.
- 25 -
S20712ch / S40714ch
H.264 Video Server
View of Camera Main Page
Once you have installed the software from the IE and you are ready to start the setup menu.
The Camera utility enables you to change language, video settings. And you can also change
the other setting by “Setting”.
Live View
3Svision Logo
Product Name
Video Format
Language Video Format
View Size Streaming Color
Mode
Alert
PTZ
Control
Alert
Message
Shortcut Bar
Shortcuts
3Svision Logo
Click here to visit the website of POCKETNET Tech. Inc.
- 26 -
S20712ch / S40714ch
H.264 Video Server
Product Name
Display the product name.
The default name follows the product, and it not releases the permission of modification to
customer.
Product Name
Mode
Select the display mode between Live View and Setting.
Setting
Live View
- 27 -
S20712ch / S40714ch
H.264 Video Server
Language
It supports 7 kinds of different languages in web browser and the default setting is English.
Click the pull-down menu to select the language for web browser from English, 简体中文
(Simplified Chinese), 繁 體 中 文 (Traditional Chinese), Español (Spanish), Deutsch
(German), Français (French) and Nederlandse (Dutch).
NOTE:
:
The language selection is not suitable for Shortcuts, because the Shortcut follows the OS
language.
- 28 -
S20712ch / S40714ch
H.264 Video Server
Video Source
Select the video source from Signal Channel (Video 1, Video 2, Video 3 and Video 4), Dual
(S2071) and Quad (S4071).
- 29 -
S20712ch / S40714ch
H.264 Video Server
- 30 -
S20712ch / S40714ch
H.264 Video Server
Video Format
It provides the triplex streaming, but it can use one streaming on the live view. The default
setting is the MPEG.264 (Main).
Click the pull-down menu to select the video format from H264(Main Stream), H264 (Sub
Stream) and Motion JPEG.
Video Format
H.264 (Main)
H.264 (Sub)
Motion JPEG
- 31 -
S20712ch / S40714ch
H.264 Video Server
View Size
It can fix well the resolution when enlarge or reduce the live view image.
Click the pull-down menu to select the video format from 1/2X, 1X, 2X and 4X.
1/2X
1X
4X
2X
NOTE:
:
The quality of the image will become to poor, when you enlarge the view image size.
- 32 -
S20712ch / S40714ch
H.264 Video Server
Streaming
It provides 3 kinds of different streaming protocols.
Click the pull-down menu to select the video format from UDP, TCP, and HTTP to apply or
integrate on different requirement and environment.
The following tables show the difference between UDP, TCP and HTTP.
Differences
Protocol
HTTP
TCP
UDP
Tunneling
Pocket Loss
Easy
Fair
Hard
Fair
Lower
Lowest
Speed
Fair
Fast
Fastest
1. UDP
Provide the fastest but most unreliable transmission service. Video streams are transmitted
through RTP 50000~60000 Port to ensure the fastest image transmission.
NOTE:
:
However, video fragment or mosaics may occur due to poor transmission quality.
- 33 -
S20712ch / S40714ch
H.264 Video Server
2. TCP
Provide reliable data transmission, because the transmission will check the receiver first.
Video streams are transmitted through RTSP 554 Port to avoid video fragment or mosaics,
but this protocol will affect the FPS to reduce.
3. HTTP
Video streams are transmitted through HTTP 80 Port to ensure passing through firewalls.
NOTE:
:
HTTP is recommended if your network is protected with firewalls.
Color
Adjust the value of the color settings for the live view image such as Brightness, Hue,
Contrast and Saturation by click the / button.
You can also adjust the value by drag the slide bar to left or right.
- 34 -
S20712ch / S40714ch
H.264 Video Server
Brightness 100
Brightness 0
Brightness
Adjust the brightness of image.
Contrast
Adjust the contrast of colors.
Saturation
Adjust the saturation of colors.
Set to default
Reset all of the color settings to default figures.
NOTE:
:
50 is the default figures of the value for color setting, the range is 0~100.
After the value is changed and the result will be shown on your screen.
- 35 -
S20712ch / S40714ch
H.264 Video Server
Alert
The alert flash will be changed from green to red in order to warning users immediately when
any event is triggered.
This smart design can prevent the user from omitting from any event.
NOTE:
:
The alert message will display the information at the same time.
Trigger the event
The alert flash will keep in red till you disable it. Click the alert flash again to disable it.
NOTE:
:
The function of Alert needs to match and use with Event Setting, please confirmed the Event
Device and Setting before you start this function.
- 36 -
S20712ch / S40714ch
H.264 Video Server
Alert Message
It will display the event message when receiving the event. And some controls and applications
will be available.
The detail function illustration as below:
Alert Message Text
Disable
Alert Snapshot
Clear
Alert Message Text
Display the message in the field of the Alert Message Text when the event is activated.
The event message format as below:
Event Type
Motion
Alarm
Date
MM/DD/YY
MM/DD/YY
Time
HH:MM:SS
HH:MM:SS
For the detail information, please double click the event message at the alert message text
field and a pop-up window of the alert message will be shown.
NOTE:
:
The event type will be different based on the model.
- 37 -
S20712ch / S40714ch
H.264 Video Server
Disable
Enable/Display the Alert Message
The function of displaying message in field of Alert Message Text can be hidden when Alert
is triggered.
Alert Message Text field will keep previous values before Alert being triggered if there is a
message already recorded.
Alert Snapshot
It will Snapshot the image when event is triggered. The saving name will follow the Alert
Message Text.
NOTE:
:
The saving path will follow the path setting from Shortcut Bar.
Clear
Click clear button to remove all of the event messages from the Alert Message Text.
- 38 -
S20712ch / S40714ch
H.264 Video Server
PTZ Control Panel
After enable the PTZ function the control panel of the PTZ will show on your screen.
The detail function illustration as below:
- 39 -
S20712ch / S40714ch
H.264 Video Server
Camera Direction
PTZ Device
Speed
Zoom
Focus
Aux
Preset
Tour
Camera Direction
PTZ Device
Speed
Zoom
Focus
Aux
Preset
Tour
Control the Pan/Tilt function
Adjust the Pan/Tilt movement speed
Adjust the Pan/Tilt movement speed
Control the Zoom IN/OUT function
Use the manual Focus function
Control the external device
Set up/Enable the Preset
Set up/Enable the Tour
Camera Direction
Adjust the lens of camera by press Up, Dow, Left, Right and Home).
PTZ Device
Select the device to control the RS485 device, the different device can setup the different
protocol.
- 40 -
S20712ch / S40714ch
H.264 Video Server
Camera Speed
Control the rotation speed of the camera form 1(lowest) to 8 (highest).
Function
Parameter
Speed
1 2 3 4 5 6
7
8
Angle/Sec. 3 20 40 60 80 100 120 140
Zoom
To enable the Zoom In/Out function by click the Zoom In or Zoom Out button. The Zoom
distance will follow up the source device, select the speed form 1(lowest) to 4 (highest).
Focus
Click the Near/Far to adjust the focus by manual control. Select the speed form 1(lowest) to
4 (highest).
NOTE:
:
Please confirm whether the lens of your camera supports the application.
Aux
Control the external device through RS485. Enable or disable the device activity by click
On/Off. Select the device from 1 to 8.
NOTE:
:
Please confirm whether the device supports the application.
Preset
Preset the rotation points from the camera. (16 points)
1. Click Set to enter the Preset Setting page.
2. Fill in the Location Name to
continue the preset setting.
- 41 -
S20712ch / S40714ch
H.264 Video Server
3. Click the Up, Down, Left, Right
and Home to adjust the camera
direction.
4. Exit the preset setting page by click Update.
5. After select the number for preset, click Go. The camera will move to the
area automatically as setup by the select number.
- 42 -
S20712ch / S40714ch
H.264 Video Server
Tour
Enable/Disable the tour mode of the camera. The rotation points of the camera must be
setup in advance and provide five tour addresses to use it.
1. Click Set to enter the Tour Setting page.
2. Name the tour. You can set
up 5 tour groups at
maximum.
3. Dwelling time (sec.) at each
tour point.
4. Select a preset location for the camera.
5. Click Update to Exit.
6. Select the number you need then click
Start to activate the tour function.
- 43 -
S20712ch / S40714ch
H.264 Video Server
Shortcuts
Click the right-button of your mouse in Live View mode to display the Shortcuts List.
Choose the option directly depend on different system requirements.
The detail function illustration as below:
- 44 -
S20712ch / S40714ch
H.264 Video Server
+ZOOM IN
Click the right button of your mouse and select +ZOOM IN to enlarge the image. The
navigation screen indicates the part of the image being magnified.
8 Levels of zoom in/out are supported.
- 45 -
S20712ch / S40714ch
H.264 Video Server
-ZOOM OUT
Click the right button of your mouse and select +ZOOM out to reduce the image.
8 Levels of zoom in/out are supported.
NOTE:
:
You can also ZOOm In/Out the image by press the scroll wheel button of your mouse.
Original Size
No matter what the multiple of digital zoom is, you can reset the image size by click the
right button of your mouse and select Original Size.
- 46 -
S20712ch / S40714ch
H.264 Video Server
Full Screen
Click the right button of your mouse and select Full Screen to change the screen to full
screen mode and release it by click the button again. You can also release it by click the
“ESC” button on the keyboard.
NOTE:
:
You can also use the other shortcuts function when it is enable.
- 47 -
S20712ch / S40714ch
H.264 Video Server
Jitter Time
Click the right button of your mouse and select Jitter Time to set up the buffer time to
make audio sync which can helps the video and audio smoother.
It is not a standard settings but according to your bandwidth to adjust the buffer time.
7 kinds of parameters are supported as below: N/A, 150ms, 300ms, 500ms, 1s, 3s and 5s.
The delay time will appear probably in the image if the jitter butter time is highest.
150ms is the default parameter.
- 48 -
S20712ch / S40714ch
H.264 Video Server
Record
Click the right button of your mouse and select Record to start to record the image and
the file will saved at the default path. Stop the recording by click the button again.
You can also start /stop recording by press
and
on the shortcut bar.
The record icon of Shortcut Bar will change the status and the Live View image will display
with the red square signal in the left corner when it is recording.
- 49 -
S20712ch / S40714ch
H.264 Video Server
Snapshot
Click the right button of your mouse and select Snapshot to Snapshot the image and the
file will save at the default path.
You can also take snapshot by press
on the shortcut bar.
Version
Show the ActiveX Control version by click the right button of your mouse and you will see
the version on the bottom.
NOTE:
:
The version will depend on the actual product spec of shipment.
- 50 -
S20712ch / S40714ch
H.264 Video Server
Shortcut Bar
Enable/Disable the application function from Shortcut Bar.
Record
Snapshoo
Path
Shortcut Bar Message
Record
Record the streaming image.
Click the thumbnail of the Record on the shortcut bar to record the image in Live View and
the file will save at the default path.
The icon of the Record will display with red square signal in the bottom of the left corner
when record.
The Record can detect the status of web browser and it will keep the recording image file
completely when the Network disconnection suddenly.
Path
Click the thumbnail of the Path Setting on the shortcut bar to change the saving folder
path.
Please see the detail setting as below: Path, Filename Prefix and Recording Limit
NOTE:
:
Due to the path setting will saved the modification into ActiveX Control and the *.ini file.
No matter what the type of the IP Camera is changing, the path will follow the same folder
to save it.
- 51 -
S20712ch / S40714ch
H.264 Video Server
1. Path
To assign a folder for saved the Record and Snapshot, and the file would be saving to
the default folder. You can also change the other folder to save the files as you want.
Function
Record
Snapshot
Default Path
C:\Video
C:\Snapshot
2. Filename Prefix
To set up a prefix of the filename which you are recorded or snapshotted, and it will
follow up the format to save it.
Please see the detail information as below:
Type
Record
Snapshot
Prefix
Rec_
Snapshot_
Fixed Format
YY/MM/DD-HH:MM:SS.avi
YY/MM/DD-HH:MM:SS.jpg
3. Record Limit
The Record Path Setting supported only and it has limit of file size.
S2071/S4071 H.264 Video Server will create the fixed recording file according to this
setting.
It provides two kinds of setting for record file size as below:
Record File Size
Record Duration
Record File Size
50 MB is the default size of the record file and the limit is 2048MB.
Record Duration
50S econds is the default duration of the record file and the limit is 99999 Seconds.
The default duration is the 50 Seconds, and the limit is the 99999 Seconds.
NOTE:
:
No matter what the type is, the value will keep the same figure.
- 52 -
S20712ch / S40714ch
H.264 Video Server
Snapshot
Snapshot the Live View image
Click the thumbnail of the Snapshot on the shortcut bar to Snapshot the image in Live View
and the file will save at the default path.
The icon of the Snapshot will flash the status when Snapshot.
Shortcut Bar Message
Display the information of record or Snapshot in the Shortcut Bar Message.
All of the status for Shortcut Bar Message, please see the illustration as below:
Login
Record file path: [C:\Video]; Snapshot file path: [C:\Snapshot]
Record
Start recording to : C:\Video\REC__%Y%m%d-%H%M%S.avi
Recording to C:\Video\REC__%Y%m%d-%H%M%S.avi is stopped
Fail to record: C:\Video\REC _%Y%m%d-%H%M%S.avi
Snapshot
Snapshot: C:\Snapshot\Snapshot__20091102-181620-804.jpg has been saved.
Fail to snapshot in path C:\Snapshot
NOTE:
:
The setting of the path and filename will follow the Path Setting.
- 53 -
S20712ch / S40714ch
H.264 Video Server
Setting User Preferences
The Setting menu let you change the following settings:
Basic Setting
Application Setting
System
Video/Image
Audio
PTZ
User
Network
Date/Time
IP Filtering
Storage
Event
Recording List
Motion Detection
Blind Detection
Privacy Mask
Firmware Upgrade
Factory Default
Reboot
* After each setting, click Save to save and apply them.
- 54 -
S20712ch / S40714ch
H.264 Video Server
Basic Setting
The Basic Setting menu lets you view the Basic Setting for S2071/S4071 H.264 Video Server
and change the following setting:
System
System
System Log
Video Image
Video
PreProc/Overlay
Audio
PTZ
User
Network
Network Setting
Services
Stream Setting
PPPoE
DDNS
UPnP
SMTP
SAMBA
Notification
Multicast
Date/Time
IP Filtering
System
System Setting
Device Name: Give the name of your camera here. Complete the setting by Click Set.
MAC Address, IP Address, Network Mask, and Gateway: Network information
Model: Display the product model name.
Hardware Version, Firmware Version and Firmware Build time: Firmware information.
Current Viewers: The number of viewers who are currently accessing the video stream.
- 55 -
S20712ch / S40714ch
H.264 Video Server
System Log
S2071/S4071 H.264 Video Server allows administrator to view all of the login information,
including boot record, video streaming mode, login IP, changes, and the date/time
information. You can save the entries to a Word document by manual.
Notice all of the information is deleted when you turn off the S2071/S4071 H.264 Video
Server.
Fill in the IP address of
Syslogd Service.
System Log
Max Size:
Critical Log:
Warning Log:
Information Log:
Syslog Service
Syslogd Service:
Server:
Port:
Set the Number allowed for the log file, 100000 is the default.
Click Display to show the most important log file.
Click Display to show the warning log file.
Click Display to show the information logo file.
Click Start to send the log file to server.
Fill in the IP address that the Syslogd Service is.
Set the port number.
- 56 -
S20712ch / S40714ch
H.264 Video Server
Video/Image
Video
Video/Image Source
S2071:
Set video source from Video 1, Video 2 and Video 1-2
Set video source from Video 1, Video 2, Video 3, Video 4, Video 1-4
S4071:
H264
Resolution:
Set the resolution of the image from
D1 (704x480/NTSC, 704x576/PAL)/
CIF (352x240/NTSC, 352x288/PAL)
Frame Rate (FPS): Set the frame rate from 1, 3, 5, 10, 15, 20, 25 and 30.
Quality:
It provides two kinds of the quality as below:
Bitrate:
512, 640, 768, 1024, 1280, 1536, 2048, 2560 and 3072
Fix Quality: Best, Better, Normal, Fast and Fastest.
GOP:
Set the frames for GOP from 1, 5, 10, 15, 30, 60, 120 and 150.
H264 (Sub)
Resolution:
Set the resolution of the image from
CIF (352x240/NTSC, 352x288/PAL)/
QCIF (176x120/NTSC, 176x144/PAL)
Frame Rate (FPS): Set the frame rate from 1, 3, 5, 10, 15, 20, 25 and 30.
Quality:
It provides two kinds of the quality as below:
Bitrate:
384, 512, 640, 768, 1024, 1280, 1536, 2048, 2560 and
3072
Fix Quality: Best, Better, Normal, Fast and Fastest.
GOP:
Set the frames for GOP from 1, 5, 10, 15, 30, 60, 120 and 150.
Motion JPG
Resolution:
Set the resolution of the image
D1 (704x480/NTSC, 704x576/PAL)/
CIF (352x240/NTSC, 352x288/PAL)
Frame Rate (FPS): Set the frame rate from 1, 3, 5, 10 and 15.
Quality:
Set the quality from 512, 640, 768, 1024, 1280, 1536, 2048, 2560
and 3072
- 57 -
S20712ch / S40714ch
H.264 Video Server
PreProc/Overlay
Video Source
S2071:
S4071:
Set video source from Video 1, Video 2 and Video 1-2
Set video source from Video 1, Video 2, Video 3, Video 4, Video 1-4
- 58 -
S20712ch / S40714ch
H.264 Video Server
Overlay Setting
Language:
Display mode:
Foreground color:
Set the language for the overlay.
Set the display mode from Date, Time and Txt or not.
Selects the foreground color for Date, Time and Text to display.
Click the color block in order to show the palette. Move the arrow
point and click on the color what you like.
Background color: Selects the background color for Date, Time and Text to display.
Click the color block in order to show the palette. Move the arrow
point and click on the color what you like.
Display text:
Fill in the text what you want to show on the screen, e.g. Lobby IP
Cam.
Date/time position: Set the value of the X/Y-axis for the location that the Date/Time will
show on the screen. (Anyone on the four corners is available.)
Text position:
Set the value of the X/Y-axis for the location that the text will show
on the screen. (Anyone on the four corners is available.)
Alpha Blending:
Set the Alpha Blending for the transparency of the overlay from
0%, 50% and 90%.
- 59 -
S20712ch / S40714ch
H.264 Video Server
Audio
Audio
Audio Mode
Set the Audio mode from Full-Duplex, Half Duplex, Simplex-Speaker Only,
Simplex-Microphone Only and Audio Off.
Full duplex: Microphone and Amplifier using allowed of at the same time, or turning
them off.
Half duplex: Microphone or Amplifier using allowed of by manual switch.
Simplex microphone only: Microphone use only is allowed.
Simplex amplifier only:
Speaker use only is allowed.
Audio off:
Turn the audio off; i.e. both of the microphone and speaker will be off.
Audio Source
S2071:
Set audio source from Audio 1, Audio 2 and Audio 1-2.
Audio in
Codec: Select the type of Codec for audio encryption from G726/32, G711a, G711u and
AMR.
Gain: Set the Gain from 0, 25, 50, 75 and 100.
Code
Compression Bitrates (Kbit/s)
Note
G711a
64
PCM (For American System)
G711u
64
PCM (For European System)
G726/32K
32
ADPCM
Audio out
Codec: Select the type of Codec for audio decryption from G726/32, G711a and G711u.
Gain: Set the Gain from 0, 25, 50, 75 and 100.
Code
G711a
G711u
G726/32K
AMR
Mic input
S2071:
S4071:
Compression Bitrates (Kbit/s)
64
64
32
4.75
Note
PCM (For American System)
PCM (For European System)
ADPCM
Set Microphone input from Audio 1, Audio 2 and Audio 1-2.
Set Microphone input from Audio 1, Audio 2, Audio 3, Audio 4, Audio 1-4.
- 60 -
S20712ch / S40714ch
H.264 Video Server
PTZ
PTZ Camera Port Setting
Camera Driver: S2071/S4071 supports the PTZ control of those analog PTZ cameras
use the drivers of Pelco-D, Pelco-P. Refer to the user manual of your
PTZ cameras, and you will know which driver to select. Moreover,
select the serial number (address) of the targeted PTZ camera for
controlled setting. If the selection is none, please upload the PTZ
driver first.
PTZ Driver Manager
In the Camera Driver column, list all the drivers that are installed in the video server.
Select Delete to eliminate any selected driver.
PTZ Driver Upload
Upload the PTZ drivers from www.3Svision.com for more camera drivers which are
supported.
Serial Port Setting
Port:
Port Mode:
Baud rate:
Data bits:
Stop bits:
Parity:
COMO
RS485
Select the measure of the symbol rate from 2400, 4800 and 9600.
Select the number of bits used to represent one character of data from
7 and 8.
Select the bit used in asynchronous communications to indicate the
end of a piece of data from 1 and 2.
Select the parity from None, Even and Odd.
- 61 -
S20712ch / S40714ch
H.264 Video Server
User
S2071/S4071 H.264 Video Server provides the administrator to set the privileges for
administrator, operator and viewer that ensure the security and control of the camera.
According to the requirements of the users, administrator owns the authority to define the
privilege for each user.
The privileges of the administrator, operator, and viewer are listed as below:
User
Administrator
Operator
Viewer
v
v
v
System
v
v
Video / Image
v
v
Live View
Live View
Setting
Basic Setting
Audio
v
v
PTZ
v
v
User
root
Network
v
Date / Time
v
IP Filtering
v
Application Setting
Event
v
v
Motion Detection
v
v
Privacy Mask
v
v
Firmware Upgrade
root
Factory Default
v
Reboot
v
- 62 -
S20712ch / S40714ch
H.264 Video Server
User List
Use this menu to set the following setting:
Add:
Add a new user and to define a different privilege.
Update: Change the privilege or password of a user.
User name changed is not allowed.
Delete: Delete a user here.
Fill in the username,
password and
privilege as required.
- 63 -
S20712ch / S40714ch
User Setting
Anonymous login:
H.264 Video Server
Click Enable to allow anyone user to login.
For the special demand, login to the browse without username
and password is allowed.
The selection of Disable is recommended for the security.
Maximum number of simultaneous viewers
Depending on the bandwidth and requirements, a limit up to 20 viewers who are
allowed to view the camera simultaneously can be defined.
The root can not be deleted but can be updated.
Activate the anonymous view and
camera rotation functions; define
the number of viewers who are
allowed for on-line review
simultaneously.
Attention:
The default user name and password have been set as “root”.
The root user cannot be deleted but can be changed. For the safety consideration, it is
recommended to change the root’s password when the first time login. You can press the
reset bottom to reset to factory default.
- 64 -
S20712ch / S40714ch
H.264 Video Server
Network
Network Setting
IP Assignment
DHCP
DHCP (Dynamic Host Configuration Protocol) is a protocol that enables automatic
assignment of TCP/IP information to the client. Each DHCP client connects to the
DHCP server to access its network setting information, including IP address, gateway,
and DNS server.
The IP address of the camera is 192.168.0.20 by default when DHCP is "OFF". When
you select "DHCP ON" and access the DHCP network environment, the camera will
automatically send a DHCP packet to request an IP address. This IP address is
assigned automatically from the DHCP server on the network. No additional settings
are required for this page unless you need to change the network configuration. The
DHCP status of the camera is "OFF" by default.
Other settings:
For IP address, Subnet mask, Default gateway, DNS 1, and DNS 2, the DHCP server
will assign these values automatically when DHCP is in "ON" status; otherwise, you
need to key in the values manually.
NOTE:
:
The system will be set the Link-Local Address by automatically when there is no any IP
address is assigned from the DHCP server.
- 65 -
S20712ch / S40714ch
H.264 Video Server
Services
It can become the small FTP server to download the AVI or JPEG file from SAMBA or
SD Card. The default status is enabling the function. Due to the function only provide
the SAMBA and SD Card applications, not release to all FTP setting for user.
The default account and password is ftp, and you can only modify the password by
yourself.
- 66 -
S20712ch / S40714ch
H.264 Video Server
Stream Setting
Set the video streaming port here. (HTTP and factory default are recommended)
Streaming
HTTP: Port 80 can pass through most firewalls. Video streams are transmitted
through HTTP Port (80 by default) to ensure passage through firewalls.
RTSP: Port 554 uses a fixed port (i.e. TCP) or can be defined by users to ensure
reliable data transmission. Video streams are transmitted through RTSP Port
(554 by default) to avoid video fragment or mosaics due to poor transmission
quality.
RTP:
Port 50000 to 60000 are UDP ports and can be defined by users. They provide
the fastest but also most unreliable transmission service. Video streams are
transmitted through UDP Port (50000~60000 by default) to ensure the fastest
image transmission. However, video fragment or mosaics may occur due to
poor transmission quality.
NOTE:
:
Please refer to the chapter of Stream for further detailed description.
- 67 -
S20712ch / S40714ch
H.264 Video Server
PPPoE Setting (Dial-up Networking Setting)
Point-to-Point Protocol over Ethernet is a protocol that supports access to a high-speed
wideband network using a PC and a wideband modem (such as xDSL, Cable, Wireless
modem). The user need only to equip the PC with an Ethernet card and apply to an ISP
and an ADSL provider (such as Chunghwa Telecom) for ADSL service to roam the
Internet through ordinary twisted copper wires.
PPPoE setting must be executed in the LAN environment for your PC to connect to ADSL.
Follow the steps below to complete the setting:
1.
Dial: You can select whether or not to dial when you boot the machine.
2.
Use DHCP or fixed IP for connection to the LAN environment.
3.
Key in the IP address of the camera and enter "PPPoE Setting" following the route
Setting Basic Setting Network PPPoE.
4.
Key in the xDSL "Username" and "Password" acquired from your ISP. Click Save to
confirm the setting.
5.
Where the ADSL modem and the camera is connected via a switch-hub, you can
press “Reboot” or restart the machine manually to try PPPoE dialing when the setting
of the camera has been completed.
6.
A different IP address is obtained after each dial-up network connection. You can get
the new IP address from Setting Basic Settings System. If you want to know the
new IP address anytime, you must enter Setting Basic Settings Notification to
set some settings. There are three ways to get information: 1. SMTP 2. FTP 3. HTTP.
For details, refer to the Notification Setup Menu.
NOTE:
:
You can use the DDNS function to access the camera. Refer to the DDNS Setting for
more information
- 68 -
S20712ch / S40714ch
H.264 Video Server
PPPoE
Dial:
You can select whether or not to dial when you boot the Camera.
(On boot or Off).
Username: Enter the username provided by your ISP.
Password: Enter the password.
PPPoE Information
IP Address:
The IP address is acquired when the dialing has been executed
successfully.
Subnet Mask:
The subnet mask information is acquired when the dialing has been
executed successfully.
Default Gateway: The gateway information is acquired when the dialing has been
executed successfully.
DNS:
The ISP domain name is acquired when the dialing has been
executed successfully.
- 69 -
S20712ch / S40714ch
H.264 Video Server
DDNS (Dynamic Domain Name Server)
The IP address (Ex. 210.168.0.22) is like a telephone number, while the website address
is like a name in an address book. The DDNS allows the user to access the website by
entering the name of the website without memorizing a bunch of cold numbers.
When you apply for an Internet service, you will have at least one IP address from your
ISP that is either fixed or dynamic. Most of the ADSL service providers will give you a
dynamic IP for ADSL environments, which means your IP address will constantly change
each time you connect to the Internet. As a result, users from WAN environments will
have much difficulty finding the correct IP address. The DDNS (Dynamic DNS service) is
created for exactly this kind of moment. By updating your WAN IP address each time you
connect to the Internet, the DDNS helps you locate your website and access your website
easily. You can find a lot of free DDNS service providers on the Internet, such as
www.no-ip.com and www.DynDNS.org.
Some gateway-routers can directly communicate with DDNS. In this case, you may
directly enter your DDNS account on the setting page in the Internet router, and then the
router will update your WAN IP status whenever it is changed and report to the DDNS. If
your router does not support direct communication with the DDNS, you can download a
small application program on the DDNS service page to help you update your WAN IP.
- 70 -
S20712ch / S40714ch
H.264 Video Server
DDNS
Active:
Enables/disables DDNS
DDNS Server: Currently we only support http://dyndns.org. This is a free domain name
server provided by DynDNS. You may log on this website for relevant
information and apply for free domain names.
Username:
Your account for the domain name you applied for
Password:
Your password for the domain name you applied for
Domain Name: The domain name you applied for.
- 71 -
S20712ch / S40714ch
H.264 Video Server
UPnP (Universal Plug and Play)
If you connect your camera to a router, IP allocator, or wireless AP, your camera will
possibly be blocked by the NAT and can’t be located on the Internet. To penetrate the
firewall, activate the supportive item- UPnP. The Link URL shows the external IP address
and the port of the router. Enter the IP address in the Internet Explorer to penetrate the
NAT.
UPnP Device
Active:
Device Name:
yes (enable)/no (disable)
the name of the UPnP device
UPnP Traversal
Active:
yes (enable)/no (disable)
Port Range:
the range of the usable ports, from 32768 to 65535 as default
Link URL:
After the network camera penetrates the firewall successfully, the
actual external IP address and port will be shown.
- 72 -
S20712ch / S40714ch
H.264 Video Server
To Activate the UPnP function in Windows OS
Windows XP
1. Windows component installation.
4
1
5
6
2
3
Step 1
Select Control Panel.
Step 2
Select Add/Remove Programs.
Step 3
Select Add/Remove Windows Components.
Step 4
Select Networking Services.
Step 5
Click Detail.
Step 6
Select Universal Plug and Play.
- 73 -
S20712ch / S40714ch
H.264 Video Server
2. Open Windows firewall option
2
1
3
Step 1
Step 2
Step 3
Select Windows Firewall in the Control Panel.
Select Exceptions.
Select UPnP Framework.
3. View the connection device using “My Network Place”
2
1
Step 1
Step 2
Open the folder of My Network Place.
The LAN camera will appear on the screen
Double click it.
- 74 -
S20712ch / S40714ch
H.264 Video Server
SMTP (Mail Server Setting)
S2071/S4071 H.264 Video Server provides you to transmit images to a particular email
address when a motion detection event occurred or a sensor is triggered.
A mail server setting for the camera is required, if you want to use this function.
SMTP Setting
Enter the following information sequential to complete the settings as below:
SMTP server:
SMTP From:
SMTP Authentication:
User name:
Password:
The SMTP server IP address.
The email of the sender, i.e. [email protected]
Enables/disables
The user name is from SMTP server.
The password is from SMTP server.
NOTE:
:
S2071/S4071 H.264 Video Server support the mail account of SSL (Secure Sockets
Layer) cryptographic protocol only, and the normal free webmail service belong the TLS
(Transport Layer Security) cryptographic protocol.
- 75 -
S20712ch / S40714ch
H.264 Video Server
Samba
S2071/S4071 H.264 Video Server provides you to upload the snapshots to a specified
shared folder when an event is triggered.
A Samba setting is required, if you want to use this function.
Samba Setting
Enter the following information sequential to complete the settings as below:
Active:
Samba Authentication:
Username:
Password:
Path:
Recycle Record:
Remaining SAMBA Capacity:
Shared Folder Size (MB):
Enable/Disable
Enable/Disable
The username
The password
To specify the IP address of the computer that you want
to share with and the file name, i.e. 192.168.0.X/xxx
Enable for the last record file to mantle the first record
file.
The remaining capacity can be record.
The total capacity of the folder. Always remember to set
the size of the folder to avoid exhaustion of disk
capacity.
- 76 -
S20712ch / S40714ch
H.264 Video Server
Notification
For a dynamic IP, you need to update the IP address every time when you connect to the
camera via internet. This setting allows you to update the IP address by automatic
notification of IP address change.
Select one of the following three notice options to update the IP address:
SMTP Notification
SMTP Notification:
notification via SMTP mail server
SMTP SendTo:
the recipient, i.e. [email protected]
SMTP Subject:
mail subject
FTP Notification
FTP Server:
FTP Server name.
FTP Port:
FTP port. The default setting is 21 (recommended).
FTP Upload path:
The path to upload files.
FTP Login name:
The name to log in the FTP.
FTP Login Password: The password to log in the FTP.
HTTP Notification
Server:
The address of the server, i.e. http://.
Port:
The port to access HTTP. The default setting is 80 (recommended).
Parameter: The setting of the parameters, refer to the installation setting of your HTTP
server.
Refer to the installation setting of your HTTP server for the setting of the parameters
(such as Username, Password, and Proxy).
- 77 -
S20712ch / S40714ch
H.264 Video Server
Multicast
This function allows multiple people to watch video streaming without limited in the
number of users, but is only applicable to the LAN environment. Video streaming format
(H.264) is depended on the selected image format setting in Basic Setting →
Video/Image → Video Format.
H264 (Main Stream)
It allowed multiple users to view the H.264 video stream free from limited in the number
of users. However, this is only effective within the LAN.
H264 (Sub Stream)
It allowed multiple users to view the H.264 video stream free from limited in the number
of users. However, this is only effective within the LAN.
Motion JPEG
It allowed multiple users to view the Motion JPEG video stream free from limited in the
number of users. However, this is only effective within the LAN.
NOTE:
:
Please refer to the chapter of Appendix: Multicast Application for different environment
- 78 -
S20712ch / S40714ch
H.264 Video Server
Date/Time
Server Time (the date/time of the server)
PC Time (the date/time of your PC)
Time Setting (date/time setting)
It provides 3 ways for you to synchronized the time as below:
1. To synchronize the time from PC’s time:
To preset time synchronized for the camera from your PC time.
2. Get the time from an NTP server:
To synchronize the time from the NTP (Network Time Protocol)
Click NTP in the Time Setting.
Enter the IP address in the NTP server. (1~3)
Press the SAVE to apply it.
Once the NTP time obtain, the S2071/S4071 H.264 Video Server will updated the time.
NOTE:
:
The default NTP servers as below:
NTP Server 1: 198.123.30.132
NTP Server 2: 192.43.244.18
NTP Server 3: 133.100.9.2
3. Change the time by manually:
Click User Input in the Time Setting.
Select the format of date to display, i.e. “yyyy/mm/dd” format.
Select the format of date to display, “hh:mm:ss” by 24 hours format.
Select the time zone.
Select Adjust to adjust the time.
- 79 -
S20712ch / S40714ch
H.264 Video Server
IP Filter
S2071/S4071 H.264 Video Server provides you to allowed or deny the visitors from
particular/target address by IP Filter Setting.
General
IP Filtering: Enable/disable
Policy:
Allow/deny
Filter IP Address (Overview of the setting for IPs)
Add:
Enter the IP address that you allowed or denied it.
Remove:
Remove the IP address existed.
Remove All: Remove all of the IP address existed.
Attention:
Setting rules as below:
1. Actions that may cause a limited connection are to be denied.
2. Improper use of this function may cause disconnection from Internet. You might need to use hardware
reset to reset to the factory default. Please refer to the “Factory Default” for details.
- 80 -
S20712ch / S40714ch
H.264 Video Server
Application Setting
The Application Setting menu lets you view the Application Setting for S2071/S4071 H.264
Video Server and change the following setting:
Event
Event
Trigger
Event Server
Recording List
Motion Detection
Blind Detection
Privacy Mask
Firmware Upgrade
Factory Default
Reboot
Event
S2071/S4071 H.264 Video Server is the equipment with intelligent security management
function.
It ensure the security monitoring by authorized users to define the Trigger Events which
is base on the particular times and situations, and set the respond to the event for the
Camera.
It proposed to avoid exceed in five to preview in Event Seeing.
- 81 -
S20712ch / S40714ch
H.264 Video Server
Event
Event List
Add Event: Click Add Event to enter the Trigger Even Setting.
- 82 -
S20712ch / S40714ch
H.264 Video Server
Add Schedule: Click Add Schedule to add a new schedule.
- 83 -
S20712ch / S40714ch
H.264 Video Server
General:
Name:
Name the trigger event.
Response to event trigger: Time setting for the trigger event
Always:
Always monitoring
During time:
Check the date you want to monitor (Sun.~Sat.) and the duration of monitoring.
For example, if you want to set the camera to monitor from 7 pm after work to 7 am
next morning from Monday to Friday, check the boxes from Monday to Friday, enter
“19:00” in the “Start From” field, and enter “12:00” in the “Duration” field.
Never:
Do not set the time.
Trigger by: Sources of trigger events (Note: You can set only one trigger event once.)
Alarm input:
The alarm is triggered by the security equipment connected from the DI terminals
behind the machine, such as door/window detectors, infrared sensors.
Motion Detection:
The alarm is triggered when motion is detected. The camera will send an alarm
when any objects appear in the set detection area.
On boot:
The alarm is triggered by reboot. The camera will send an alarm when the system
is rebooted due to power shortage, sabotage, or other reasons.
Blind Detection
The alarm is triggered when motion is detected. The camera will send an alarm
when any objects appear in the set detection area.
Net Loss
The alarm is triggered when the network is disconnected. The camera response
process by the selection which you have set.
Response process: trigger event response (Note: Multiple selections are available)
Active alarm out:
An event is detected by the security equipment connected from the DI terminal behind
the machine, such as high-decibel alarms, light projectors. You can set the alarm
duration in the “Duration” field.
Upload video/image The camera will save the Motion JPEG of the event to the Upload Server (FTP/SMTP)
to server:
or the Recording Storage Device (Samba).
Include pre-trigger buffer: When an event is detected, the camera will record the
previous video image up to 10 seconds.
Include post-trigger buffer: When an event is detected, the camera will record the
post video image up to 10 seconds.
Continue video upload: When the event is continue, the camera will record the video
image up to 10 seconds.
For example: If the pre-trigger 5 seconds, post-trigger 5 seconds and continue video
upload 5 seconds have been selected, the total file size will be 15 seconds.
The camera will save the capture photo of the event to the Upload Server
(FTP/SMTP) or the Recording Storage Device (Samba).
Send HTTP
notification:
The alarm will be sent to the HTTP server you specified. To use this function, set the
coordinative HTTP server in the Event Server setting page in advance.
Send TCP
notification:
The alarm will be sent to the TCP Server you specified. To use this function, set the
coordinative TCP server in the Event Server setting page in advance.
Send NAP
notification:
The alarm will be sent to the NAP Server you specified. To use this function, set the
coordinative NAP server in the Event Server setting page in advance.
NOTE:
:
The setting pages of Add Event and Add Schedule are the same. There is only one difference between
them is the Add Schedule setting without the setting for Trigger by.
Delete:
Delete the event cluster setting.
Modify:
Modify the event cluster setting.
- 84 -
S20712ch / S40714ch
H.264 Video Server
Trigger
Whenever the camera detected abnormal events during the scheduled time, it will
respond by active trigger automatically.
There are 2 types for the trigger response: Alarm messages sending and emailing.
Recorded the image to the specify server.
Once you have completed this setting, you may requested to test by manually in this
section to ensure all of the functions are working properly.
Normal Open has been set to the default status of the digital input pin, but you can change it
to Normal Ground by setting in Setting > Application > Event > Trigger.
1. It will be Open status of the alarm input pin which is connected to external device when the
alarm input has been set to Normal Open. Therefore, when the external device is triggered
to close status, the alarm input pin will be triggered.
2. On the contrary, It will be Close status of the alarm input in which is connected to external
device when the alarm input pin has been set to Normal Grounded. Therefore, when the
external device is triggered to open status, the alarm input pin will be triggered.
NOTE:
:
Before you install the hardware for alarm I/O, please set up the Trigger Setting at first.
(Setting > Application Setting > Event > Trigger)
- 85 -
S20712ch / S40714ch
H.264 Video Server
Trigger mail
After you enter the email address and subject in the filed, click the Set to test the mail
sending completely.
Trigger FTP
Click the Set to upload AVI files to FTP server to test completely.
HTTP Server
After you enter the message in the Message field, click the Set to upload the message
to HTTP server to test completely.
You can make custom parameters settings completely through
Application Setting > Event > Event Server.
TCP Server
After you enter the message in the Message field, click the Set to upload the message
to TCP server to test completely.
Trigger SAMBA
After you enter the Path in the field and click the Set to share the folder from your PC.
- 86 -
S20712ch / S40714ch
H.264 Video Server
Event Servers (Upload Server)
You can make a setting to upload files to the server completely.
Please make a setting for servers in the Event Server Setting by following setting:
- 87 -
S20712ch / S40714ch
H.264 Video Server
Event Server List
Add FTP
Enter the information of the FTP server you specified.
Name:
The name of the FTP
Network Address: IP address of the FTP
Login:
Log-in name
Password:
Log-in password
Upload Path:
Uploading path
Port:
Port
Passive:
Check to set the FTP status as passive
Add HTTP
Enter the information of the HTTP server you specified.
Name:
HTTP name
Network Address: HTTP IP address
Login:
Log-in name
Password:
Log-in password
Proxy:
Proxy server name
Proxy Port:
Proxy server port
Proxy Login:
Proxy server log-in name
Proxy Password: Proxy server log-in password
Add TCP
Enter the information of the TCP server you specified.
Name:
TCP server name
Network Address: TCP IP address
Port:
TCP port
Add UDP
Enter the information of the UDP server you specified.
Name:
UDP server name
Network Address: UDP IP address.
Port:
UDP port
Modify
Modifies the setting value
Delete
Removes the setting value
- 88 -
S20712ch / S40714ch
H.264 Video Server
Recording List
Use this setting to management the recording list.
- 89 -
S20712ch / S40714ch
H.264 Video Server
Motion Detection
Click the Area to open the setting frame and the setting frame will show on your screen.
You can adjust the frame size by move and drag the edge of the frame on the arrow of
your mouse, after adjusted click the left button of your mouse.
1
Video Source:
S2071:
Set video source from Video 1, Video 2 and Video 1-2
S4071:
Set video source from Video 1, Video 2, Video 3, Video 4, Video 1-4
Area:
There are 3 frames available for setting: Area 1, Area 2 and Area 3.
Click Area to open the detectable area then click the signal checkbox to enable the
function.
Detect Level:
There are 5 levels for you to adjust the area: Lower, Low, Mid, High and Highest.
- 90 -
S20712ch / S40714ch
H.264 Video Server
Blind Detection
Bland Detection means that you can set the inside/outside area for detect.
Bland Detection trigged if any object activity in the area that you have set.
Click the Area to open the setting frame and the setting frame will show on your screen.
You can adjust the frame size by move and drag the edge of the frame on the arrow of
your mouse, after adjusted click the left button of your mouse.
1
Video Source:
S2071:
Set video source from Video 1, Video 2 and Video 1-2
S4071:
Set video source from Video 1, Video 2, Video 3, Video 4, Video 1-4
Area:
There are 3 frames available for setting: Area 1, Area 2 and Area 3.
Click Area to open the detectable area then click the signal checkbox to enable the
function.
Sensitive:
Adjust the Sensitive of the area by entering the degrees in the field of Sensitive.
The setting range is 0~100. 0 is the least sensitive and 100 is extremely sensitive.
Time threshold:
Adjust the stay time to detect the object in the area.
The setting range is 0~100 seconds.
- 91 -
S20712ch / S40714ch
H.264 Video Server
Privacy Mask
To ensure the confidential, S2071/S4071 H.264 Video Server provides the Privacy Mask
for you to mask the image in the masked zone.
The following diagram illustrates how to set the Privacy Mask.
1. Click the Area to set the mask zone for you to open the setting frame and the setting
frame will show on your screen.
(There are 3 frames available for setting: Area 1, Area 2 and Area 3.)
2. Adjust the frame size by move and drag the edge of the frame on the arrow of your
mouse, after adjusted click the left button of your mouse.
3. Selects the color for Privacy Mask by click the Color block in order to show the palette,
move the arrow point and click on the color what you like.
4. After the setting is completed, click Save to apply it and the screen will refresh within a
few second automatically.
Color:
Click the black color to select the color from color-cord table, or input the color-cord to
change the color.
Area:
There are 3 frames available for setting: Area 1, Area 2 and Area 3.
Click Area to open the detectable area then click the signal checkbox to enable the
function.
- 92 -
S20712ch / S40714ch
H.264 Video Server
1
- 93 -
S20712ch / S40714ch
H.264 Video Server
Firmware upgrade
Contact with your dealer for more information about firmware upgrade. Please follow the
steps below to upgrade the firmware.
Attention: Important! Read Carefully!!
1. Please close all of the application that you are using on your PC.
2. Select Firmware Upgrade and the Firmware Upgrade Setting page will show on your
screen.
3. Click Browse to select the location where the firmware file is.
4. Click Submit to upgrade the firmware immediately.
Select the location where the firmware file is.
- 94 -
S20712ch / S40714ch
H.264 Video Server
5. The progressing status of the firmware upgrade will show on your screen.
6. S2071/S4071 H.264 Video Server reboots automatically after the firmware has been
upgrade completed. Reconnect to the server after 60 seconds.
- 95 -
S20712ch / S40714ch
H.264 Video Server
NOTE:
:
Please be careful and make sure there is no any interrupted during the process of the
firmware upgrade because of the firmware is burned into the Flash Rom then.
System will probably damaged seriously and need to rest to the factory default for repair
it if the power cable has been removed or becomes loose during the upgrade.
It is not recommend you to upgrade the firmware in a wireless network environment
because of the unstable packet transmission may conduce to data loss.
It is not necessary for you to restart the camera by manual after the firmware upgrade
completed. The camera will reboot automatically after 60 seconds (Reboot OK), and it
will open the IE Browser and filled in the IP address (The original IP address remains
undeleted).
- 96 -
S20712ch / S40714ch
H.264 Video Server
Factory Default
You can use this setting to reset S2071/S4071 H.264 Video Server to the factory default
value without any changes. Including the IP address all of you have set will be invalid.
Factory Default
Resets all parameters, except the IP parameters:
Use this setting to reset the S2071/S4071 H.264 Video Server to the factory default
value and all of the changes you have set will be invalid except the IP address and all of
the settings which is relation to network will remain the valid. (Cable and wireless
network setting are included)
Click the Set to start the factory reset and a warning pop-up window will appear to ask
whether you really want to reset to the factory default value or not.
Click OK to complete the reset.
Resets all parameters:
Use this setting to reset the S2071/S4071 H.264 Video Server to the factory default
value. All of the changes will be invalid. (IP address is included)
Click the Set to start the factory reset and a warning pop-up window will appear to ask
whether you really want to reset to the factory default value or not.
Click OK to complete the reset.
- 97 -
S20712ch / S40714ch
H.264 Video Server
Backup
Back all parameters:
Use this setting to backup all of the changes you have set.
Click Backup and a file download inquired windows will pop up.
Back up the file named param.bin.
Attention: Don't
change the file name; otherwise, the backup may fail.
- 98 -
S20712ch / S40714ch
H.264 Video Server
Restore backup parameters:
Use this setting to restore the changes that you have set.
Click Browse to select a backup file and click Submit to confirm it.
Select a backup file to restore.
- 99 -
S20712ch / S40714ch
H.264 Video Server
Reboot
Use the setting to reboot the camera automatically by click Reboot.
- 100 -
S20712ch / S40714ch
H.264 Video Server
Appendix
Change the Internet Explorer Settings
Change the security setting of IE browser to allow the ActiveX Control be plug-in to the IE
browser.
Please follow the steps as below:
1. Open the IE browser from Desktop or State Menu.
2. Select the Tools Internet Options Security Custom Level
3. Select the bookmark of Security and click Customer Level to check the Security Level.
4. Make sure the security setting is Medium, and the commonly used default security level.
5. Click OK to save the parameter then quit the window. Please restart the IE Browser again.
- 101 -
S20712ch / S40714ch
H.264 Video Server
Set up the Router setting with IP Camera
Use DHCP if you want to use S2071/S4071 H.264 Video Server via the Internet (LAN).
However, the IP must be set to fixed when you want to use the camera on a WAN. For this
application, it is required to set up the function of the virtual server on the ADSL router.
Please follow the steps as below to complete the setting:
1. Enter the camera setting page to set a fixed IP.
(Refer to the Network Setting) Ex.: 192.168.0.49
2. Enter the ADSL router main setting page. Ex.: Zonet ADSL router
3. Enter the Virtual Server setting page.
a. Set “mapping of HTTP Port (80) and Definition Port (554) to 192.168.0.49 ”.
b. Restart ADSL router.
When the setting is completed, you can operate the camera from the WAN IP Address via
the ADSL router.
NOTE:
:
The setting screen of the virtual server is not the same for all of the ADSL routers.
Please refer to the manual of the ADSL router that you purchased for more information about
the setting.
- 102 -
S20712ch / S40714ch
H.264 Video Server
DDNS Application
How to apply and setup the DDNS service?
The DDNS (Dynamic DNS) is an application for network service. It can help you to solve the
problem of dynamic IP change in network device. You can assign a name for favorable
website to correspond with device IP address through DDNS.
(e.g.: www. IP Camera.com and www.VideoServer.com).
After the setting is completed, you can connect the IP device through you have assigned the
name.
Firstly, please apply for an account from a DDNS supplier. These DDNS suppliers provide
some free services for the users on the world. This chapter will demonstrate a step by step
method of how to set up a DDNS account, for the example we illustrate here is DynDNS.
Please follow the illustration as below:
NOTE:
:
You can find some free DDNS suppliers on Internet.
- 103 -
For example: DynDNS, No-IP and Oray.
S20712ch / S40714ch
H.264 Video Server
1. Please enter the website address of “DynDNS” (http://www.dyndns.com/) through Browser.
2. Please click Create Account.
(Skip step 2~9 if you have an account with DynDns.org already.)
3. Please fill in all the required information in the table such as: Username, Password,
Email and Security Image Number etc. When you have finished, please select Agree
Box then click Create Account.
- 104 -
S20712ch / S40714ch
H.264 Video Server
4. A confirmation letter will send to your mailbox after you click Create Account. Please
acknowledge the confirmation letter by clicking on the link provided in the mail to continue
with the steps
5. You can login to DynDns.org, please input the username and password on main webpage.
And click “Service” button to set up the DDNS function.
- 105 -
S20712ch / S40714ch
H.264 Video Server
6. Please click Dynamic DNS then select Dynamic DNS Free service.
7. Click Get Started button to add the new Hostname.
8. Set up the Hostname and IP Address by yourself. You can enter your favorite domain
name as your Hostname, and input correct IP address (e.g. the IP address need to input
the real IP address from IP Camera, please see the NOTE illustration below). Finally, click
Add Host to finish with the setting.
NOTE:
:
The IP almost appear after IP setting.
(PPPoE/DHCP/Fix IP). Click Setting > System > IP Address
- 106 -
S20712ch / S40714ch
H.264 Video Server
9. After add new hostname, click Next to enter the next step.
(Note: as you are using Dynamic DNS Free service; so you can ignore the information of
Shopping Cart.
10. Please click Activate Services button to enable DDNS service.
11. The completion of the registration page is shown below.
service to your devices.
- 107 -
You can now use the DDNS
S20712ch / S40714ch
H.264 Video Server
How to check if the DDNS service is successful?
1. If you can not connect the IP devices through the domain name, which you have set up,
you can test the DDNS service on your PC.
2. Please open the “command mode” from “Start Menu”.
Start Menu > Program > Accessories > Command mode
3. Input the command: c:\>ping (Your domain name e.g. www.IP Camera.com) [ENTER].
If the command mode displays “Reply from ……….” On the screen, then your DDNS is
working correctly.
4. If the command mode displays “timed out”. Then your DDNS is not working.
double check your account information is entered correctly.
Please
5. If the command mode displays “Ping request could not find host…”. Then you need to
re-visit DDNS website to confirm all the required information is correctly filled in.
Alternatively, you can set up another account with start
- 108 -
S20712ch / S40714ch
H.264 Video Server
Mobile Application
Our Video server can support the 3GPP(RTSP) connection through the mobile phone. Please
check your ISP to provide the mobile networking service which working on your mobile phone
first. And modify the setting of Video server to enable the application. Please see the detail
illustration as below:
NOTE:
:
The 3GPP, which meaning the compression format, is not the same 3G. You can use the
2.5G/3G to connect to Internet through ISP.
Step1: Make sure the Video server is alive on Internet (WAN Environment)
Try to remote connect Video server via public IP. If you use the Router, please check
the Port Setting of NM-743 and the Virtual Server Setting of Router.
Step2: Check your Video server setting
Open the web browser then input the IP address from the video server.
Input the user name & password to Login
- 109 -
S20712ch / S40714ch
H.264 Video Server
Click the “Setting” on right-upper to enter the setting mode.
Step3: Check the RTSP streaming setting H.264 Type
Click “Video/Image“ of Basic Setting “Video“ Set up the sub streaming
resolution (e.g. Please see the suggestion parameter as below picture) Click Save
to finish the setting.
NOTE:
:
H.264 types remove the 3GPP selection, because it only fixed the resolution setting. And you
need to input the streaming type on the URI link. The sub streaming can provide the QCIF
resolution (176 x 122) to mobile application.
Step4: View limit Setting
According to the requirement, you can pass the live view limit.
Please see the illustration as below.
- 110 -
S20712ch / S40714ch
With Password
H.264 Video Server
Without Password
With password
Don’t need to enable the “anonymous login” function, but you need to input the account
information every login. The application can keep the video server privacy.
e.g. Input rtsp://xxx.xxx.xxx.xxx:554/cam1/h264-2?user=root&pwd=root in mobile phone.
The “-2” mean the sub stream.
Without password:
Enable anonymous login.
Click the “User“ of Basic Setting Click the “Enable“ from anonymous login of User Setting Click the Save to finish the setting.
e.g. Input rtsp://xxx.xxx.xxx.xxx:554/cam1/h.264-2 in mobile phone.
NOTE:
:
The video server can support 4 channels streaming to use it. Modify the cam number of
URI link to change the channel. E.g. Channel 2: rtsp://xxx.xxx.xxx.xxx:554/cam2/h.264-2
Step5: Try to connect Video server through the mobile phone
Check the mobile phone can support the streaming media player and internet service,
and then see the example operation as below:
NOTE:
:
Suggest using the wireless solution. It can provide the highest network speed and save the
mobile network cost.
- 111 -
S20712ch / S40714ch
H.264 Video Server
Symbain System
Example: Nokia N71. Follow these steps to set up the viewing function
1. Enter multimedia data from the main screen.
2. Select a streaming link
3. Add a new link.
- 112 -
S20712ch / S40714ch
H.264 Video Server
4. Enter the link name.
5. Enter the IP address of the camera
e.g. (Without Password)
rtsp://xxx.xxx.xxx.xxx:554/cam1/h264-2
e.g. (With Password)
rtsp://xxx.xxx.xxx.xxx:554/cam1/h264-2?user=root&pwd=root
6. Select OK to save the setting.
NOTE:
:
Some mobile phone can only support the without password application
7. Select this stream name of bookmark to proceed with linking
- 113 -
S20712ch / S40714ch
H.264 Video Server
8. Select “Yes” to connect.
9. Connecting.
10. Loading the image
11. Show the video stream on the mobile screen.
NOTE:
:
If the software cannot receive the stream from the video server, please try to check the
Internet setting of software is correctly.
- 114 -
S20712ch / S40714ch
H.264 Video Server
iPhone System
Example: iPhone 3GS. Follow these steps to set up the viewing function
1. Download and install the free video streaming software through iPhone(App Store) or
iTune. (e.g. iPhone(App Store))
2. Tap “App Store” icon to open the software
3. Tap “Search” icon then input the “Streamer” to search the software.
- 115 -
S20712ch / S40714ch
H.264 Video Server
4. Tap “Streamer” to enter the download page
5. Tap FREE button to change the selection.
6. Tap INSTALL to install the software.
- 116 -
S20712ch / S40714ch
H.264 Video Server
7. Go back the main screen then select Steamer icon to open the software
8. Tap “Bookmarks” icon.
9. Tap “+” signal to add the bookmark.
- 117 -
S20712ch / S40714ch
H.264 Video Server
10. Input your URI link of the video server (e.g. rtsp://xxx.xxx.xxx.xxx/cam1/mpeg), and tap
Save button to save the link.
NOTE:
:
The software can only support the Without Password mode.
The video server need to set more then QVGA(320 x 240) resolution.
11. Tap the link to connect to the video server
- 118 -
S20712ch / S40714ch
H.264 Video Server
12. Show the video stream on the mobile screen
13. Tap the screen to display the detail information, and the APP can support the audio
application.
NOTE:
:
If the software cannot receive the stream from the video server, please try to check the setting
is correctly.
- 119 -
S20712ch / S40714ch
H.264 Video Server
Support the Cellular / Mobile Phone List
Please suggest the list to buy the applicable cellular / Mobile Phone which to use.
Brand
Nokia
HTC
Type
6630
E61
N70
N73
N82
N93
Brand
Vibo
Type
Win II
Touch Diamond2
Touch Viva
Touch Cruise
Touch HD
Touch 3G
Magic
Hero
iPhone
3G
3GS
NOTE:
:
The application almost supports all cellular / mobile phone on the market. The list is the
reference data for user.
- 120 -
S20712ch / S40714ch
H.264 Video Server
Multicast Application
The Multicast function is a technique for one-to-many communication over an IP
infrastructure in a network. The PC can be given the network package after login the
account, so the function can use one network package to copy many packages to PCs. It
allows multiple people to watch video streaming without limitation on the number of users, but
is only applicable in the LAN environment. The function must need to combine with the
application of IGMP service (e.g. Layer 3 Switch.).
The Regular Mode: (Through TCP/UDP/HTTP)
The Multicast Mode: (Through Multicast)
NOTE:
:
The function is not limit with the Layer 3 Switch, and you can also select the IGMP Server to
use the application.
- 121 -
S20712ch / S40714ch
H.264 Video Server
1
2
3
N.O. Item
Illustration
1
H264 (Main)
Display the multicast setting of H264 (Main)
2
H264 (Sub)
Display the multicast setting of H264 (Sub)
3
Motion JPEG
Display the multicast setting of Motion JPEG
- 122 -
S20712ch / S40714ch
H.264 Video Server
The function will display the different streaming mode from IP device. No matter how
many modes to display, the content is the same setting to the user. There are three kinds
of package type for User: Video, Audio and Event. Please see the detail setting as
below:
NOTE:
:
The function can only enable one streaming to use the application.
- 123 -
S20712ch / S40714ch
H.264 Video Server
H264 (Main)
The function has some limit parameter, so please follow our limit parameter to set up it. All
restrictions exist in the rear of each option.
NOTE:
:
Suggest using the default parameter to use the multicast function.
Please make reference to the chapter of Basic Setting > Network > Multicast for further
detailed description.
Enable
Click On or Off selection to enable or disable the function.
Video Address
Set up the IP address to transfer the Video package. The default setting is 224.1.1.1.
Video Port
Set up the Port to transfer the Video package. The default setting is 1234.
Video TTL
Set up the TTL time to transfer the Video package. The default setting is 5
Audio Address
Set up the IP address to transfer the Audio package. The default setting is 224.1.1.1
Audio Port
Set up the Port to transfer the Audio package. The default setting is 1236.
Audio TTL
Set up the TTL time to transfer the Audio package. The default setting is 5
Event Address
Set up the IP address to transfer the Event package. The default setting is 224.1.1.1
Event Port
Set up the Port to transfer the Event package. The default setting is 1238.
Event TTL
Set up the TTL time to transfer the Event package. The default setting is 5
- 124 -
S20712ch / S40714ch
H.264 Video Server
H264 (Sub)
The setting is the same with the H264 (Sub).
NOTE:
:
Suggest using the default parameter to use the multicast function.
Please make reference to the chapter of Basic Setting > Network > Multicast for further
detailed description.
Enable
Click On or Off selection to enable or disable the function.
Video Address
Set up the IP address to transfer the Video package. The default setting is 224.1.1.2.
Video Port
Set up the Port to transfer the Video package. The default setting is 1234.
Video TTL
Set up the TTL time to transfer the Video package. The default setting is 5
Audio Address
Set up the IP address to transfer the Audio package. The default setting is 224.1.1.2
Audio Port
Set up the Port to transfer the Audio package. The default setting is 1236.
Audio TTL
Set up the TTL time to transfer the Audio package. The default setting is 5
Event Address
Set up the IP address to transfer the Event package. The default setting is 224.1.1.2
Event Port
Set up the Port to transfer the Event package. The default setting is 1238.
Event TTL
Set up the TTL time to transfer the Event package. The default setting is 5
- 125 -
S20712ch / S40714ch
H.264 Video Server
Motion JPEG
The setting is the same with the MJPEG.
NOTE:
:
Suggest using the default parameter to use the multicast function.
Please make reference to the chapter of Basic Setting > Network > Multicast for further
detailed description.
Enable
Click On or Off selection to enable or disable the function.
Video Address
Set up the IP address to transfer the Video package. The default setting is 224.1.1.3
Video Port
Set up the Port to transfer the Video package. The default setting is 1234.
Video TTL
Set up the TTL time to transfer the Video package. The default setting is 5
Audio Address
Set up the IP address to transfer the Audio package. The default setting is 224.1.1.3
Audio Port
Set up the Port to transfer the Audio package. The default setting is 1236.
Audio TTL
Set up the TTL time to transfer the Audio package. The default setting is 5
Event Address
Set up the IP address to transfer the Event package. The default setting is 224.1.1.3
Event Port
Set up the Port to transfer the Event package. The default setting is 1238.
Event TTL
Set up the TTL time to transfer the Event package. The default setting is 5
- 126 -
S20712ch / S40714ch
H.264 Video Server
Please see the detailed steps to Set up the Multicast function as below:
1. First, check the LAN environment has the device of IGMP service.
IGMP
2. Enter the device then enable the service.
3. Login the video server then enter the Setting mode.
4. Click Multicast button from Network.
5. According to the requirement, select the streaming type to enable the function.
- 127 -
S20712ch / S40714ch
H.264 Video Server
6. Click On button from Enable Selection to enable the Multicast function.
7. Go back the Live View Mode then click the pull-down menu of Stream to select the Multicast
8. Wait a 5~10 sec to re-display the live image via Multicast
NOTE:
:
Please check the firewall and antivirus setting about IGMP to avoid the function fail.
- 128 -
S20712ch / S40714ch
H.264 Video Server
Troubleshooting and FAQs
Question
Answer and Solution
Function
What encoder and decoder
are used by the camera for
sounds and images?
How many users are allowed
to
view
the
camera
simultaneously?
The camera uses MJPEG or H264 compression technology to provide
quality images. MJPEG is a standard image compression technology
applicable to different browsers without the need to install additional
software. H264 is a next-generation image compression standard and can
provide high image quality at low bandwidth.
The sound decoder uses PCM (Stereo, 16bit, 8kHz) compression
technology.
The maximum number of viewers depends on the bandwidth of the client
accessing the camera. About 5~6Mbps are used to process data of the
camera, so the maximum number of viewers changes in proportion to FPS
and the resolution of the image. Obviously, the higher the number of
viewers, the lower the performances at each client end.
Is it possible to catch the
image from the camera in a Yes, you can use the snapshot function from the main control page.
real-time manner?
Camera Installation
The camera is not waterproof, so a special waterproof cover must be
Can the camera be used
available for outdoor use. Please note that the waterproof cover may affect
outdoors?
the built-in pickup function of the camera.
• Check that the attached standard transformer is not damaged. Plug the
Link LED does not light up.
power cable and reboot the machine.
• If the problem remains, contact your dealer for help.
What network cable is used
The camera uses a 10 or 100 Base-T Category 5 UTP network cable.
for the camera?
If you have a firewall in your network environment, please select HTTP
How to install and operate the
mode (Port80). Generally the port 80 is always open for the browser to
camera behind a firewall?
access the Internet.
Username = root
What are the username and
Password= root
password for the first use and
Please change your password immediately after entering the system to
after reset to factory default?
ensure information security.
Please proceed as follows:
I forgot the username and
1. Hold the Reset button for 4 seconds after booting to reset the password
password I used for the
to preset.
setting. What should I do?
2. Change the username and the password.
Use IP Finder to locate the IP address of the camera.
I forgot the IP address of the
Please connect the camera and the PC on which the IP finder is executed
camera. What should I do?
to the same hub.
- 129 -
S20712ch / S40714ch
IP Finder cannot find the
camera.
Internet Explorer does not
display the camera screen
correctly.
IP Finder cannot
network parameters.
store
I cannot enter the login screen
and camera page from
Internet Explorer. What should
I do?
H.264 Video Server
• When the camera still can’t be located over 1 minute, re-activate the
camera.
• Do not connect the camera to more than one router. The IP Finder will
not be able to detect the camera.
• If the IP of PC on which the IP Finder is executed is not correctly set, the
IP Finder will not be able to locate the camera. Please confirm that the IP
address has been properly set.
• The anti-virus applications on the PC or the firewall might block the IP
Finder from execution. If you cannot execute the IP Finder, please
disable your anti-virus applications or firewall.
Please be sure that the version of your Internet Explorer is 6.0 or later.
Should you have any difficulties, please log on the Microsoft website to
update your browser.
Microsoft website: http://www.microsoft.com/windows/ie.
• Do not use spaces. Use underline “_” or dash “-“.
• Your connection might have problems. Please ensure that the network
parameters and the camera connection are correctly set.
Access to Camera
• The IP address of the camera is possibly being used by another PC or
device. Please disconnect the network cable from the camera and
execute PING to confirm if the IP address has been used.
• It is possibly due to the network cable. Please use the cross-line network
cable to connect the PC and the camera, and see if the log-in screen
appears.
• Be sure that the network connection and the settings are properly
configured.
• Be sure to enter correct IP address in the Internet Explorer. If you use
dynamic IP address, the address might have been changed after your
last check.
• Internet traffic might slow down the webpage access. Please wait.
• Be sure that you are using http port. The default setting is Port 80. It will
be converted to the private camera IP address.
• The port assigned for your camera might not able to access the Internet.
Contact your ISP to acquire a usable port.
• The proxy server might be blocking you from connecting to the camera.
Do not set the proxy server.
• Please be sure that the default gateway address is correct.
• Your router might need Port conversion. Refer to the user manual of
your router for details.
• The package filtering function of the router might have blocked the
access to the external Internet. Refer to the user manual of your router
for details.
• If you are using DDNS, please remember to set the default gateway and
server address.
• If none of the procedures above is working, please reset to the factory
default values and re-install.
• If the problem still persists, there might be some problems with the
product. Contact the dealer who sold you the product for more help.
- 130 -
S20712ch / S40714ch
No image appears on the
main control screen.
Check whether the Active X
control of the camera has
been
installed
in
your
computer.
Internet Explorer displays the
following
message:
Downloading the ActiveX
control is prohibited under the
current security setting."
The camera can operate only
in the LAN rather in the
Internet environment.
The number of frames
transmitted are less than the
defined value.
When the audit function is
activated, the video streaming
area becomes black or the
transmission becomes slower.
Images cannot be transmitted
via e-mail or FTP.
I can't control the camera to
move up, down, right, left or to
the center or preset point.
H.264 Video Server
• When using PC to connect to the camera for the first time, a security
warning window will tell you that you need to download the ActiveX
control. When you are using Windows 2000 or Windows XP, you might
need a properly- authorized user account to install the application
• Network traffic might slow down the video streams. If the video is
extremely slow, select a lower resolution for a lower bandwidth
requirement.
Select C:\Windows\Downloaded Program Files to check if the file “Media
Viewer Class” is registered. The status bar should indicate the file has
been installed. If you do not see this file, be sure that your Internet Explorer
security is properly set (the default value is moderate). Re-connect to the
camera main page and download the file again. Incomplete download or
installation of the camera ActiveX control is the major reason for this
problem. Check the security setting of your Internet Explorer. Close and
re-open Internet Explorer, and enter the main page to see if you can log in.
Change the IE security setting to allow downloading unsigned ActiveX
control.
IE→Tools→Internet Options→Security→Custom Level. Change "Inactive" to
"Tips" for the ActiveX control if required.
• A firewall mechanism might have been activated. Check the setting of
your system or ask your network administrator. To access the camera
from the Internet, you may need to change the setting of the firewall.
• Make sure that your camera does not conflict with other servers on the
same LAN.
• Check the router and make sure that its setting allows it to access your
camera from the Internet.
• Congestion of the network or objects of the image may affect the number
of frames transmitted. The number of frames may be less than the
defined value when they are transmitted via a congested network.
• The number of frames transmitted may become less when multiple
users are viewing the video stream.
• The network hub might be another reason for this problem, especially
when multiple camera video streams are viewed simultaneously.
• When you connect your PC to the camera, no sufficient bandwidth is
available to support more frames with the current resolution of video
streams. Reduce the resolution to QCIF(176x144) or CIF (320x240) and
deactivate the audio function.
• The audio signal needs 32 to 64 kbps of your bandwidth. You can
deactivate the audio function to improve the image quality. Your Internet
service may have not sufficient bandwidth to support audio transmission.
• Make sure the IP address of the gateway and domain server (DNS) have
been defined correctly.
• Where FTP still fails, contact your ISP or network administrator to check
the FTP server.
• When communication to the camera stops, click "Refresh" on your IE
browser to refresh the transmission.
• It might be that other users are controlling the movement of the camera.
• The horizontal/vertical movement of the camera has reached its limit.
• The horizontal/vertical remote control option of the camera might have
been deselected.
- 131 -
S20712ch / S40714ch
H.264 Video Server
Delay might occur when you are accessing a video stream and remotely
I can't control the camera to
moving the camera horizontally. Where significant delay is identified when
move up, down, right, or left
you move the camera horizontally or vertically deactivate the audio
smoothly.
streams and/or reduce the size of the video stream...
Camera Image Quality
• The lens might be contaminated with dust, fingerprints, or other dirt. Use
Camera has a problem
a special cleaning cloth to clean the lens or adjust the focus manually.
focusing.
• Focusing might be impossible in some cases. If the object is too close to
the lens, more it away from your camera.
• Please confirm that the image your are watching has the best quality.
Adjust the setting of your display card (color quality) to at least 16 bits
Color of the video stream is
(24 bits or more are recommended).
too deep or light.
• Incorrect camera video setting. You may need to adjust some
parameters, such as brightness, contrast, color, and saturation.
• Incorrect power cord frequency may cause flashing of the image.
Confirm that your camera uses NTSC or PAL system.
Video stream flashes.
• The image flashes if the objects are black. In this case, adjust the
illumination brighter around your camera.
This is noise problem during
Noise may be produced if you install your camera at a very dark place.
transmission of the image.
Adjust the illumination around your camera.
How to reboot my camera?
I can't replay recorded files.
Others
If you only need to re-boot the system and don't want to change any
setting, enter the Setting page and select the Reboot option at the bottom
of the screen. The system will reboot automatically.
Confirm that you have installed Microsoft®’s DirectX 9.0 or above and use
Windows Media Player 9 or above.
2010.09.01. Ver: 10
- 132 -