1
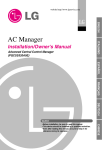
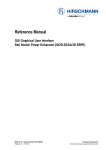
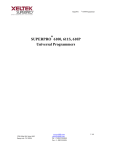
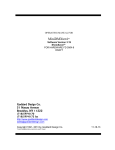
Web Guide
PQCSW320A0E
ITALIANO
AC Smart
Advanced Control Smart
ENGLISH
LG
ESPAÑOL
FRANÇAIS
DEUTSCH
Note
• Please read this installation/use manual before installing
the product.
• Install the product with an expert installation engineer with
proper qualifications.
• Even after reading this manual, please store this manual
so that you can refer to it during operations.
AC Smart
TABLE OF CONTENTS
Introduction of AC Smart Web ..........................................................................................3
Features of AC Smart Web ..............................................................................................3
Installing the AC Smart Web .............................................................................................4
Setting the AC Smart........................................................................................................4
Setting the Client PC ........................................................................................................9
AC Smart Web functions .................................................................................................13
Logging into AC Smart web seerver...............................................................................13
AC Smart Web screen....................................................................................................15
AC Smart Web menu......................................................................................................16
Control/Monitoring menu ................................................................................................17
User management menu ................................................................................................32
Set Zone menu ...............................................................................................................36
Password setting menu ..................................................................................................38
Quick Guide and Installation/Operation Manual Guide
This manual (Quick Guide) summarizes and describes important information for the user to use AC
Smart effectively. For detail information related to the installation and use of AC Smart, refer to the
installation/user manual included in the CD provided.
2
AC Smart
Introduction of AC Smart Web
Introduction of AC Smart Web
Features of AC Smart Web
The features of the AC Smart Web are as follows:
■ Remote management
You can use the web server function of the AC Smart to monitor and control the indoor unit, the
ventilator and the On/Off device connected to the AC Smart via the network even at the place other
than the location where the AC Smart is installed by logging into the AC Smart.
■ Individually or integratively running & monitoring
You can control and monitor the following items by invidually selecting the air conditioner, selecting
the air conditioners by group and selecting all air conditioners at the AC Smart.
• Running status, running mode, wind flow, wind direction, lock, set temperature, individual lock and
temperature range of the air conditioner
■ Registering the user
The administrator can register one or more user and assign each user the zone to manage. Because
the user can control only the zone assigned to him/her, one or more user can safetly distribute and
manage the management area.
Web Guide
3
ENGLISH
The AC Smart offers the web server function for the user to remotely access. The administrator can
use the web server function to monitor and control the indoor unit, the ventilator and the On/Off device
by remotely accessing the AC Smart even at the location far away from the installed place.
Installing the AC Smart Web
Installing the AC Smart Web
The AC Smart offers the web server function for the user to remotely access. The administrator can
use the web server function to monitor and control the indoor unit, the ventilator and the On/Off device
by remotely accessing the AC Smart even at the location far away from the installed place.
Setting the AC Smart
In order to use the web server function of the AC Smart, the network related function should be set to
the AC Smart. This section describes how to set the AC Smart and the client PC to use the AC Smart
web function.
■ Check the LAN cable connection
In order to use the web server function of the AC Smart, above all things, make sure that the LAN
cable is connected to the LAN port located at the rear side of the AC Smart.
If the LAN cable is not connected to the LAN port of the AC Smart, connect the LAN cable to the LAN
port as shown at the below figure.
AC Smart LAN port
LAN cable
4
AC Smart
Installing the AC Smart Web
■ Setting the AC Smart network
1. Select ‘Environment setting’ from the AC Smart menu. Press ‘Environment setting’ menu from the
sub-menus at the left side. ‘Network’ screen is displayed for setting the network. Click the [ ]
button next to ‘Adapter network setting’.
When "Network" menu is clicked,
"Network" screen is displayed.
Click the [ ] button
2. It is switched to the screen to set the network information. When you double click ‘ENDS4ISA1’
icon, the ‘CS8900 Ethernet Driver’ setting screen to set the network is displayed.
Web Guide
5
ENGLISH
When the LAN cable is connected to the LAN port of the AC Smart, the AC Smart should be driven to
set the network information.
After booting the AC Smart, set the network information by referring to the following steps.
Installing the AC Smart Web
3. Press ‘IP address’ tab and select whether to get the IP address with the DHCP or to directly enter
the IP address. When you directly enter the IP address, enter the additional information as shown
at the below table.
Set the IP address
Item
IP address
Subnet mask
Default gateway
Description
Enter the IP address to be set at the AC Smart.
Enter the subnet mask for the IP address.
Enter the IP address of the gateway.
4. Press ‘Name server’ tab to select whether to set the IP address of the additional DNS (Domain
Name Server). When you enter the IP address of the DNS, enter the additional information as
shown at the below table.
Set the name server
6
AC Smart
Installing the AC Smart Web
Item
Primary DNS
Primary WINS
Secondary WINS
Enter the IP address of the primary DNS server.
ENGLISH
Secondary DNS
Description
Enter the IP address of the secondary DNS server.
Enter the IP address when the WINS is used.
Enter the secondary IP address when the WINS is used.
5. Press [OK] button to apply the current network information setting to the system. ‘CS8900 Ethernet
Driver setting’ screen is ended and it returns to the previous adapter network setting screen.
Finally, when you press [X] button at the top right on the screen, setting the adapter network is
finished.
Click [X] button to return to
the initial screen
Click [OK] button to
end setting
Web Guide
7
Installing the AC Smart Web
6. When you press [Save] button, all network settings are saved and it returns to the ‘Environment
setting’ menu.
Press [Save] button to end
setting the network
8
AC Smart
Installing the AC Smart Web
Setting the Client PC
Note: Web browser
The Microsoft Internet Explorer should be used as the web browser for connecting to the AC Smart.
■ Setting the temporary Internet file
1. Execute the Internet Explorer, and click ‘Tools’ _ ‘Internet option’ from the main menu.
Select "Internet option"
Web Guide
9
ENGLISH
After finishing to prepare for the web server function at the AC Smart, the client computer to connect
to the web server should be set. Here, setting the client computer is explained with the example of the
version 6.0 of the Internet Explorer.
Installing the AC Smart Web
2. Click [Setting] button from ‘Temporary Internet file’ at ‘General’ tab.
Click [Setting] button
from "Temporary
Internet file"
3. ‘Setting’ screen is displayed. Check ‘Automatically(A)’ item and click [OK] button.
Check 'Automatically' item and
click [OK] button
10
AC Smart
Installing the AC Smart Web
4. It returns to the previous Internet option screen. Press [Confirm] button to end setting the
temporary Internet file.
ENGLISH
Click [OK] button
Web Guide
11
Installing the AC Smart Web
■ Releasing the popup window shut-off
If the pop-up is set at the Internet Explorer, the pop-up setting should be cancelled.
When the message showing that the pop-up is shut off while using the function after connecting to the
AC Smart is displayed, release the pop-up for the current site.
Release the pop-up shut-off by selecting ‘Tools’ -> ‘Pop-up shut-off’ -> ‘Always allow the pop-up of the
current site’.
When the pop-up shut-off
message is displayed, release
the pop-up shut-off.
12
AC Smart
AC Smart Web functions
AC Smart Web functions
This section describes how to log into the web server of the AC Smart and the AC Smart Web function
menu.
1. Execute the Internet Explorer. Enter the IP address of the AC Smart into the address window of the
Internet Explorer and press the Enter key.
After enter the AC Smart IP
address, press the Enter key
Ex) http://10.185.42.98
Web Guide
13
ENGLISH
Logging into AC Smart web seerver
AC Smart Web functions
2. The Login screen is displayed to connect to the AC Smart. The language (Korean, English) and the
temperature unit (Centigrade, Fahrenheit) to display can be set at the top right of the screen.
Enter the user ID and the password and click [Login] button.
Select the language and the
temperature unit to display
After entering the ID and the
password, click [Login] button
Note: When initially logging in
When the user initially logs into the web server of the AC Smart, the account for the user is net set.
Initially, the user should log in after setting the user account by accessing as administrator mode
1. In order to access as administrator mode, check the ‘Administrator’ check box. The ID is
automatically set to ‘admin’.
2. Enter the password. The password of the administrator mode is fixed to ‘digital21’.
Note: When logging out
When you log out after accessing to the web server of the AC Smart, we recommend to exit by
clicking [Logout] button at the top right of the screen if possible, not by clicking [X] button.
When you use the [X] button to log out, because the connection is terminated after 5 minutes, you
cannot log in with the same account for 5 minutes.
14
AC Smart
AC Smart Web functions
AC Smart Web screen
Logout button
AC Smart
web server
menu
Function
execution
screen
Message bar
AC Smart web server menu
It displays the menu for the function offered by the AC Smart web server. When you log in as general
user, you can select the ‘Control/Monitoring’ menu only, but not other menus.
Function execution screen
The function suitable for each menu can be executed at the Function execution screen.
Message bar
The message bar shows various information according to the operation and the status of the AC
Smart web function.
Logout button
When you press the [Logout] button, the AC Smart web server is logged out and it is switched to the
Login screen.
Web Guide
15
ENGLISH
When you log into the web server of the AC Smart, the following screen is displayed.
AC Smart Web functions
AC Smart Web menu
The menu to use at the web server function of the AC Smart depends on the login right (administrator,
general user).
When logged in as administrator, it consists of ‘Control/Monitoring’, ‘User management’ and ‘Zone
setting’ menus. However, when logged in as general user, it consists of ‘Control/Monitoring’ and
‘Password setting’ menus.
Menus when logged in as administrator
Menus when logged in as general user
16
AC Smart
AC Smart Web functions
Control/Monitoring menu
ENGLISH
When you click ‘Control/Monitoring’ menu, the following screen is displayed.
The status and the running mode of the group
or the unit included at the zone/group selected
at the tree are displayed.
The zone/group
registered at the
AC Smart is
displayed as tree
type.
The status of zone/group/unit can be monitored and controlled.
■ Information display
The information display of the Control/Monitoring menu consists of the followings.
System tree
The system tree shows the zone/group registered at the AC Smart as
tree structure.
When a zone or a group is selected at this system tree, the group and
the unit included at the said zone/group are displayed at the status
display area at the right.
Because you cannot move to the lower item by double clicking at the
status display screen shown at the right figure different from the status
display screen of the AC Smart, you should click the object at the system
tree.
Web Guide
17
AC Smart Web functions
Status display of Zone/group/unit
The status and the running mode of the group or the unit included at the zone/group selected at the
system tree are displayed at the right of the Control/Monitoring menu. Besides, you can refresh the
status information and stop all units.
The path selected at the The information display type is
Stop all registered units.
system is displayed.
displayed with icon or list.
The status of
Zone/group/
unit is
refreshed.
The Control/Monitoring menu shows the status of Zone/group/unit (indoor unit, ventilator, On/Off
device) with the following icon.
Status
Normal running
Alarm occurred
Not running
18
AC Smart
Zone
Group
Icon
Indoor unit
Ventilator
On/Off device
AC Smart Web functions
The indoor unit and the ventilator show the running mode in operation with the following icons.
Icon
Description
Icon
Description
Cool mode
Ventilating
Automatic
running
Dehumidifyi
ng
Electric
heating
Automatic
running
Icon
Description
Heating
Indoor unit
Ventilator
-
-
General
running
Displaying the zone/group/unit information with list type
The zone/group/unit information is basically displayed with the icon-type. However, when you change
‘Icon’ at the combo box at the top right of the screen to ‘List’ or ‘Detailed list’, the icon-type information
can be changed to the list-type information.
Zone, Group list
When you select the zone and the group and then ‘List’ and “Detailed list’, the following list is
displayed.
Item
Name
Total number of units
Description
Name of selected group
Total number of units
Number of running units
Number of currently running units
Number of alarmed units
Number of currently erronuos units
Average indoor temperature
Average set temperature
Average indoor temperature of the room where the unit is installed.
Average set temperature of the room where the unit is installed.
Web Guide
19
ENGLISH
Unit type
AC Smart Web functions
Unit list
When you select the unit and then ‘List’, the following list is displayed.
<List>
The following information is displayed at the list.
Item
Name
Product type
Running/Mode
Error
Indoor temperature
Set temperature
Lock
Description
Unit name
Display the unit type.
- Indoor unit: Unit to control the indoor temperature by cooling/heating
- Ventilator: Unit to keep the fresh air by the air circulation
- On/Off device: Device operated by turning on/off the power
Display whether the unit is running or not and the running mode.
Display the error code if occurred.
Display the current indoor temperature.
Display the desired temperature set by the user.
Display whether the Lock All function of the unit is set or not.
- Locked: The lock function is set.
- Unlocked: The lock function is disabled
When you select the unit and then ‘Detailed list’, the following list is displayed.
<Detailed list>
20
AC Smart
AC Smart Web functions
The detailed list shows the following information.
Item
Product type
Unit name
Unit type.
- Indoor unit: Control the indoor temperature by cooling/heating
- Ventilator: Keep the fresh air by ventilating
- On/Off device: Device to be operated by turning on/off the power
Mode
The running mode of the unit.
Run
Whether the unit operates or not.
Error
Display the error code if occurred.
Wind direction
Wind flow
ENGLISH
Name
Description
Display whether to set the wind direction to the unit or not.
Wind flow set to the unit.
Indoor-set temperature
The indoor temperature of the room where the unit is installed and the desired
temperature set by the user are displayed.
Lock all
Display whether thet Lock all function of the unit is set or not. The Lock all
function prevents the user from invidually and directly manipulating all functions
of the unit at the room where the unit is installed.
- Lock: Lock function is set
- Unlock: Lock function is disabled
Individual lock
Display whether the Individual lock function of the unit is set or not. The
Individual lock function prevents the user from individually and directly
manipulating a specific function of the unit at the room where the unit is
installed.
- M: Mode locked
- T: Temperature locked
- F: Wind flow locked
Web Guide
21
AC Smart Web functions
■ Monitoring and controlling
The area for controlling and monitoring is located at the bottom of the Control/Monitoring menu. You
can display and directly control the detailed information about the selected zone/group/unit at the
Control/Monitoring menu.
The Control/Monitoring information about the zone/group is displayed differently from the information
about the unit. The Control/Monitoring information about the zone/group displays the average
temperature and the number of units according to the status of the unit belongings to the said
zone/group. However, the monitoring information about the unit displays the setting and the operating
status of the said unit.
Zone/Group monitoring informatioin
Set the desired
temperature.
The average temperature
and the set temperature of
the room are displayed.
Information about the
currently selected group
or zone.
Set Mode, Wind flow and
Lock function.
Run or stop the
unit according to
the setting.
Set the
Apply the
detailed set function.
function.
<Control/Monitoring about Zone/Group >
The following information is displayed as monitoring information of zone/group.
Item
Average indoor temperature
Average set temperature
All
Average indoor temperature of the room with the running unit.
Average set temperature of the room with the running unit.
Total number of units belonging to the zone/group specified by the user.
Running
Number of running units belonging to the zone/group specified by the user.
Alarm
Number of erronous units belonging to the zone/group specified by the user.
Cooling
Number of units running at the cooling mode.
Heating
Number of units running at the heating mode.
Automatic
Lock
Number of units running at the automatic mode.
Number of locked units.
Unlock
Number of unlocked units.
Other
Number of units set to other status.
Unit monitoring information
22
Description
AC Smart
AC Smart Web functions
The average temperature
and the set temperature of
the room are displayed.
Information about the
currently selected group
or zone.
Set Mode, Wind flow and
Lock function.
ENGLISH
Set the desired
temperature.
Run or stop the
unit according to
the setting.
Set the
Apply the
detailed set function.
function.
<Monitoring the unit>
The following information is displayed as monitoring information of unit.
Item
Indoor temperature
Set temperature
Description
Indoor temperature of the room with the installed unit.
Set indoor temperature of the room with the installed unit.
Display the running mode of the unit.
• Cooling: displayed when the unit is at the cooling running.
• Heating: displayed when the unit is at the heating running.
• Automatic: displayed when the unit is automatically running.
Mode
Note: What is the automatic running?
It is the operation automatically running the unit at the optimized
environment by measuring and comparing the indoor/outdoor
temperature.
Wind direction
Display the set direction of wind.
• Automatic: Displayed when the direction is set to flow up/down.
• Stop: Displayed when the wind direction function is stopped.
Lock
Display whether the user uses the remote controller to lock all functions of each
unit or not.
• Lock: Displayed when the lock function is enabled.
• Unlock: Displayed when the lock function is disabled.
Alarm
It is displayed as ‘0’ when any alarm is not generated from the current unit. The
alarm code of the said alarm is displayed when the alarm is occurred.
Wind flow
Details
Display the current wind flow.
‘Monitoring’ window is displayed for showing the detailed status information.
Web Guide
23
AC Smart Web functions
Detailed unit information
The control/monitoring about the unit shows more detailed
information about the unit.
When you press [Details] button, ‘Indoor unit status’ is
displayed showing the detailed information about the said
unit as shown at the left figure.
<Indoor unit status screen>
The following information is displayed at ‘Indoor unit status’ screen.
Item
Description
Mode lock
Display whether the mode lock function for the user to use the remote controller
to prevent the running mode of each unit from being changed is set or not.
- Lock: Lock function is enabled
- Unlock: Lock function is disabled
Wind flow lock
Display whether the fan lock function for the user to use the remote controller to
prevent the fan operation of each unit from being changed is set or not.
- Lock: Lock function is enabled
- Unlock: Lock function is disabled
Set temperature lock
Display whether the temperature lock function for the user to use the remote
controller to prevent the desired temperature of each unit from being changed is
set or not.
- Lock: Lock function is enabled
- Unlock: Lock function is disabled
Set lower temperature
The lower temperature is displayed when the tempareture setting range is set.
Set upper temperature
The upper temperature is displayed when the tempareture setting range is set.
24
AC Smart
AC Smart Web functions
Zone/Group/Unit control
The following function can be directly controlled at the zone/group/unit control.
ENGLISH
Item
Description
Indoor temperature
Indoor temperature of the room with the running unit.
Set temparature
Set indoor temperature of the room with the running unit.
Set temperature
Set the desired indoor temperature to be the reference of the indoor
temperature.
The desired indoor temperature is set together when the running mode is set.
[Run], [Stop]
Mode
Wind flow
Lock
Run or stop the unit.
Set the running mode of the unit.
• [Cooling], [Heating] [Automatic]
Set the wind flow of the unit.
• [Mild], [Normal], [Strong]
Set the lock function for preventing the indoor user from individually controlling
the unit.
• [Lock all], [Unlock all]
[Details]
‘Detailed control’ screen is displayed to control the unit in detail.
[Apply]
The set items can be applied to the AC Smart and the unit.
Detailed control
When you press [Details]
button, ‘Detailed control’ screen
is displayed as shown at the left
figure. Detailed functions of
indoor unit and ventilator as well
as mode, wind flow and lock
functions can be set at ‘Detailed
control’. Also, the function for
turning on/off the device
connected to the AC Smart can
be also set.
<Detailed control screen>
Web Guide
25
AC Smart Web functions
■ Controlling the AC Smart
Keep the following steps to set the function of the unit.
1. ‘Control/Monitoring’ screen is displayed when ‘Control/Monitoring’ menu is selected. Specify the
target to control the function at the system tree and the status display.
Specify the target to control
Select a zone or group
from the system tree
2. Press the button for each function and press [Apply] button. Refer to the following table for the
description about each function.
After setting the function,
click [Apply] button
26
AC Smart
AC Smart Web functions
Item
Set temperature
Description
Set the desired temperature of the room to keep.
Set the power of the unit to be turned on.
Stop
Set the power of the unit to be turned off.
Mode
Set the running mode of the indoor unit included at a specific group.
• [Cooling]: Run at the cooling mode. The desired temperature can be selected
from 18~30 at the set temperature. If the desired temperature is higher than
the indoor temperature at the cooling running, it is run at the ventilating mode.
• [Heating]: Run at the heating mode. The desired temperature can be selected
from 18~30 at the set temperature. If the desired temperature is lower than the
indoor temperature at the heating running, it is run at the ventilating mode.
• [Automatic]: The optimized condition is automatically maintained by
determining the indoor condition.
Wind flow
Lock
Set the wind flow of the indoor unit.
• [Mild]: Set the wind flow of the indoor unit to be mild.
• [Normal]: Set the wind flow of the indoor unit to be normal.
• [Strong]: Set the wind flow of the indoor unit to be strong.
Enable/Disable the lock function for the user to individually control the unit.
• [Lock all]: Enable the lock function for the user not to change all functions.
• [Unlock all]: Disable the lock function for the user to change all functions.
3. After the function setting is applied, the result is displayed on the status bar.
The setting result is
displayed on the status bar.
Web Guide
27
ENGLISH
Run
AC Smart Web functions
■ Controlling the AC Smart in detail
The detailed function for the indoor unit, the ventilator and the on/off device can be set. Keep the
following steps to set the detailed function.
1. When you select ‘Control/Monitoring’ menu, the following ‘Control/Monitoring’ screen is displayed.
Specify the target to control the function from the system tree and the status display, and click
[Details] button.
Specify the target to control
Select a zone or group from the system tree
Click [Details] button
2. ‘Detailed control’ screen is displayed. After clicking the button of the function to set, click [OK]
button. The set detailed control is applied to the AC Smart. Refer to the following table for the
description about each function.
28
AC Smart
AC Smart Web functions
Note: Refreshing
Indoor unit
Item
Set temperature
Description
Set the desired indoor temperature.
Run
Set the indoor unit to run/stop.
• Run: Run the indoor unit.
• Stop: Stop the indoor unit.
Mode
Set the running mode of the indoor unit.
• [Cooling]: Run at the cooling mode. The desired temperature can be selected
from 18~30 at the set temperature. If the desired temperature is higher than
the indoor temperature at the cooling running, it is run at the ventilating mode.
• [Heating]: Run at the heating mode. The desired temperature can be selected
from 18~30 at the set temperature. If the desired temperature is lower than the
indoor temperature at the heating running, it is run at the ventilating mode.
• [Automatic]: The optimized condition is automatically maintained by
determining the indoor condition.
• [Dehumidifying]: Run the indoor unit to dehumidify. Setting it for the rainy
season or the high humidity can effectively eliminate the moisture. When this
mode is set, the desired temperature cannot be set.
• [Ventilating]: Run the indoor unit to ventilate. The ventilating run supplies the
fresh air. The ventilation alone can be used in Spring and Autumn. When this
mode is set, the desired temperature cannot be set.
Wind flow
Wind direction
Lock
Set the fan speed of the indoor unit. It can be controlled by considering the
indoor pollution.
• [Mild]: Set the fan speed to slow.
• [Normal]: Set the fan speed to normal.
• [Strong]: Set the fan speed to fast.
• [Automatic]: Set the fan speed to maintain the optimized condition by
automatically measuring the indoor pollution.
Set whether the fan is automatically rotated or not.
• [Enable]: Enable the automatic rotation function of the fan.
• [Disable]: Disable the automatic rotation function of the fan.
Enable/Disable the lock function for the user to individually control the indoor
unit.
• [Lock all]: Enable the Lock all function for the user not to control all functions
of the indoor unit.
• [Unlock all]: Disable the Lock all function.
• [Mode lock]: Enable the mode lock function for the user not to control the
running mode of the indoor unit.
Web Guide
29
ENGLISH
In general, a new information is updated and automatically displayed on the screen 5 seconds after
ordering the control command. But, the information reflecting the control command may not be
displayed because the control command is not transferred to the indoor unit in 5 seconds. In this
case, the updated information can be displayed by pressing [Refresh] button.
AC Smart Web functions
Item
Description
Lock
• [Mode unlock]: Disable the mode lock function.
• [Wind flow lock]: Enable the Wind flow lock function for the user not to control
the wind flow of the indoor unit.
• [Wind flow unlock]: Disable the Wind flow lock function.
• [Set temperature lock]: Enable the Set temperature lock function for the user
not to control the set indoor temperature.
• [Set temperature unlock]: Disable the Set temperature lock function.
Set Upper/Lower temperature
• Lower set temperature: Set the allowable lowest temperature.
• Upper set temperature: Set the allowable highest temperature.
Ventilation
Item
Description
Run
Set the ventilator to run/stop.
• [Run]: Run the ventilator.
• [Stop]: Stop the ventilator.
Mode
Specify the running mode of the ventilator.
• [Electric heating]: Both supplying and exhausting are ventilated by the electric
exchanger. This mode is used in Summer and Winter with much difference of
temperature and humidity between the indoor and the outdoor.
• [Normal]: The exhausted air is ventilated not via the electric exchanger. This
mode is used in Spring and Autumn with less difference of temperature and
humidity between the indoor and the outdoor.
• [Automatic]: Exhausting and supplying air are automatically controlled by
measuring the indoor temperature and the outdoor temperature, by which the
balance of the indoor air is maintained to keep the optimized condition.
Wind flow
Lock
Set the fan speed of the indoor unit. It can be controlled by considering the
indoor pollution.
• [Mild]: Set the fan speed to slow.
• [Strong]: Set the fan speed to fast.
• [Maximum]: Set the fan speed to maximumt.
• [Automatic]: Set the fan speed to maintain the optimized condition by
automatically measuring the indoor pollution.
Enable/Disable the lock function for the user to individually control the ventilator.
• [Lock all]: Enable the user to operate the ventilator.
• [Unlock all]: Disable the user to operate the ventilator.
Specify the additional running mode of the ventilator.
• [Enable Plasma]: Enable the plasma function. It may not be set according to
the ventilator type.
User mode
Note: What is the plasma?
It is the air cleaning function with an anion to refresh. It considers
health as well as environment by eliminating the influenza virus, the
representative flu virus, as well as virus and mold at the house.
30
AC Smart
AC Smart Web functions
Item
On/Off device
Item
-
Description
Turn on/off the device connected to the AC Smart.
• [Run]: Run the On/Off device.
• [Stop]: Stop the On/Off device.
Web Guide
31
ENGLISH
User mode
Description
• [Disable Plasma]: Disable the Plasma function.
• [Heater On]: Enable the heater function to warm the supplied air in Winter.
• [Heater Off]: Disable the heater function.
• [Saving On]: Reduce the consuming power by running the ventilator with the
best efficient condition.
• [Saving Off]: Disable the power saving function.
• [Quick On]: It runs at the maximum performance to prevent the polluted air or
moisture within the room from being spread to the other space. It is better to
use this mode when the indoor pollution is severe.
• [Quick Off]: Stop the running Quick On mode.
AC Smart Web functions
User management menu
You can register a new user or change and delete the existing user information for the user other than
the system administrator to access and control the web server of the AC Smart at the ‘User
management’ menu.
Note: User management menu
The User management menu is displayed only when logging into the web server of the AC Smart
as ‘administrator’. You should log in as administrator to register, change or delete the user.
The set user information is displayed.
Chang the user
information.
Delete the user
information.
Register a new
user information.
The following information is displayed at the User management menu.
Item
The name of the registered user is displayed.
Password
The user password is displayed.
User description
Whether a zone is set or not
32
Description
User name
AC Smart
The description about the registered user is displayed.
It displays whether a zone is assigned to the registered user or not. When you
press the
button, it moves to the ‘Set Zone’ menu for assigning a zone to
the user.
AC Smart Web functions
Note: Zone setting
Registering the user
Keep the following steps to register a new user.
1. Click the [Register User] button at ‘User management’ menu. ‘Register’ screen is displayed for
entering the user registration information.
2. Enter the user information. Refer to the following table for the description about the information to
enter.
Item
Description
User name
P/W
Enter the name of the user to register.
Enter the user password to register.
User description
Enter the description about the user to register.
3. Click the [Confirm] button. ‘Register’ screen disappears and the set user information is displayed at
the table.
2. Enter the user
information.
3. Click [Confirm]
button
1. Click [Register
User] button
Web Guide
33
ENGLISH
If a user is registered and a zone to control or monitor is not assigned to the user, even when the
user logs in, ‘Control/Monitoring’ menu does not show the status information of Zone/Group/Unit.
AC Smart Web functions
Changing the user information
Keep the following steps to change the user information.
1. Select the user to change the information from the user information list.
2. Click the [Change] button.
3. When ‘Register’ screen is displayed, enter the user information to change. The ID cannot be
changed.
Item
P/W
User description
Description
Enter the user password to change.
Enter the description about the user to change.
4. Click the [Confirm] button. ‘Register’ screen disappears and the changed user information is
displayed at the table.
1. Select the user to change
the information.
3. Enter the user information.
4. Click [Confirm] button
2. Click [Change] button
34
AC Smart
AC Smart Web functions
Deleting the user information
Keep the following steps to delete the user information.
2. Click the [Delete] button. ‘Confirm’ screen is displayed for confirming to delete the user information.
3. Click the [Confirm] button. ‘Register’ screen disappears and the user information to delete is
deleted from the table.
1. Select the user to delete
the information
3. Click [Confirm] button
2. Click [Change] button
Web Guide
35
ENGLISH
1. Select the user to delete the information from the user information list.
AC Smart Web functions
Set Zone menu
You can set the other user other than the system administrator to control only the air conditioner
included at a specific zone at ‘Set Zone’ menu. The user assigned with the specific zone can monitor
and control only the assigned zone and cannot view the other zone.
Note: 'Set Zone' menu
The ‘Set Zone’ menu is displayed only when logging into the web server of the AC Smart as
‘administrator’. You should log in as administrator to assign a specific zone to monitor and control to
the user.
The registered user
list is displayed.
The list of zone assigned
to the user is displayed.
Set the assigned zone to the notassigned zone or vise versa.
36
AC Smart
The list of zone not assigned
to the user is displayed.
Apply the zone
assignment
setting.
Cancel the zone
assignment
setting.
AC Smart Web functions
Setting the zone
Keep the following steps to assign the zone to the registered user.
zone, ‘Assigned zone list’ is displayed.
2. When assigning a new zone, select the zone to assign from ‘Not assigned zone list’ and press the
[ ] button to move the said zone to the ‘Assigned zone list’. When canceling the assigned zone,
select the zone from the ‘Assigned zone list’ and press the [ ] button to move the said zone to the
‘Not assigned zone list’.
3. When setting is finished, press the [Apply] button to save the setting to the web server of the AC
Smart.
1. Specify the user to
assign the zone
2. Click [ ] or [ ]
button to set the
zone to assigned
or not assigned
3. Click [Apply] button
Web Guide
37
ENGLISH
1. Specify the user to assign or change a zone from ‘User list’. If the user already has the assigned
AC Smart Web functions
Password setting menu
The user can change his/her own login password. When you click ‘Set password’ from the AC Smart
Web function menu, the screen to change the user password is displayed.
Note: 'Set Password' menu
The ‘Set Password’ menu is displayed only when logging into the web server of the AC Smart as
‘general user’. You should log in as general user to change the user’s password as general user.
Enter the current password
Enter the password to
newly set
Enter the password to newly
set for confirming the set
password
In order to change the password, enter the current password and the new password as shown at the
above figure, and click the [Apply] button.
When setting the password is normally applied, the setting is displayed at the message bar.
38
AC Smart