1
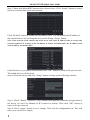
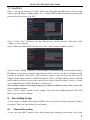
4/8/16-CH NVR Quick Start Guide 7.2 On WAN Step 1: Set up the network of NVR. Enter into MenuSetupNetwork tab as shown below. Input IP address, Subnet Mask, etc., or enable PPPoE and then input user name and password received from your ISP. Step 2: Click “Test” button to test the effectiveness of the network. After that, click “Apply” to save settings. Step 3: Enter into MenuIP Cameras tab. Click “Add” button to add IP cameras. Step 4: Check “Enable” checkbox, select channel, manufacturer, product model and input IP address, server port, username and password of the device (see the User Manual of IP Camera for details). Then click “OK” button to return to the previous tab. Here the IP address of the camera must be a WAN IP address. If it is a LAN IP address, please forward the IP address and server port in the virtual server setup of the IP cameras‟ router or virtual server and then find its WAN IP address to fill in here. Note: IP address and port forwarding settings may be different in different routers. Please refer to the router’s manual for details. Step 5: Click “Apply” button to save settings. Then exit the configuration tab. This will take you to see the live images. 8. Recording Setup A user needs to install and format a HDD, and set all the recording parameters before recording. There are four kinds of record modes. 8.1 Manual Recording A user can press REC button on the front panel after quitting system setup. Press this 7