Transcript
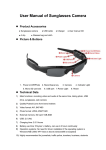
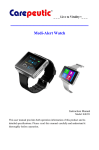
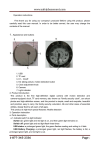
1. Structure
G、On/Off button / Recording Button without
motion detection
HD Clock Camera
User Manual
KL217L
Note: most of time, you only need to use F and
G buttons.
A、Clock adjustment knob
B、Camera lens
C、Indicator Light
D、USB
E、SD card slot
F、Taking Picture / Recording Button with
motion detection
2.Features:
• Clock
• Video/Audio recording (Without motion
detection)
• Video/Audio recording (With motion detection)
• Taking digital photo
• Use as Web Camera
• Do recording during charging
3.Operation Instruction
• Click on that camera icon, and you are ready
to use your clock as web camera.
14
J、Video with Time and Date Stamped on it
This clock camera can record video with real
time and date stamped on the video.
• Insert the CD into your PC and open the folder.
15
• Make sure the camera is OFF (do NOT turn
on camera).
• Connect the clock to computer with the USB
cable. (Close any pop up message if any).
• During charging, the red indicator light flashes.
• When it is fully charged, the red indicator light
stops, and the green indicator is on solid.
• Disconnect the clock from computer.
• Note: in order to maximize the battery capacity,
please continue to charge for 30 minutes after
the green indicator light is on solid.
• Lower battery power: During recording, when
the battery power is low, the green indicator
light flashes slowly, the camera will save files
2
3
You can find one of the files “Write Time”.
• Insert SD memory card into the SD card slot
on clock.
• No need to turn on camera.
• Connect your clock to PC with USB cable.
Close any pop up message (if any) from your
computer screen.
• Now, from your CD folder on PC, double click
on the file "Write Time" and click on "UPDATE"
icon and then close the folder and exit after
finishing time updating.
• Disconnect your clock from PC. You can now
do video recording with time and date stamped
on it.
from clock or the battery power is completely
disconnected from clock, you will have to do
time updating again with the procedure above.
And time and date you updated is the time and
date from your PC. So make sure your computer’s
time and date are the same as the time and date
on your clock.
1
turn on the camera, the red indicator light will be
off and the green indicator light will be on solid.
• Connect the camera with your computer through
USB cable.
• After 5 seconds, click on “My Computer” icon
in your computer (desktop).
• Inside your “My Computer” folder, you should
see a camera icon.
A、Charging Battery
Note: Whenever you take out the SD card
16
and shut down automatically. It is time to do
recharging.
C、Video/Audio Recording(Without motion
detection)
B、Turn On/Off Camera
• Under Standby status (after turning on the
camera), press the G button once (On/Off /
Recording Button).
• The green indicator light flashes 6 times and
off.
• The camera is now doing video recording.
• During recording, if you want to know the
recording status (to see if the recording is
going on normally), you can press the F button
once; and the green indicator light will flashes
(6) times and off. That means the recording
is going on normally.
• To stop recording, press the G button once
• Insert SD card into the SD card slot. (Note: the
golden finger print on SD card should face up).
• Press and Hold the G button (On/Off button)
for 3 seconds to turn on the camera.
• Both red and green indicator light is on. After
seconds, red indicator light is off and green
indicator is on solid. The camera is in Standby
Status.
• Under the Standby status, if no operation is
selected for 3 minutes (idol), the camera will
shut down automatically to save power.
4
5、Lower Battery Power
When the battery power is low, the green
indicator light will flash quickly. You should
recharge the battery.
4、Reset
When something goes wrong in operation or
any other unknown reasons and there is no any
response from the camera, you can do RESET
by:
• Press F button and G button at the same time.
• Green and red indicator lights are off.
17
18
again, the green indicator light is on solid, it is
now back to Standby status again.
• To turn off the camera completely, just press
and Hold the G button for 3 seconds, the red
indicator light flashes 3 times and off.
D、Video/Audio Recording(With motion
detection)
• Under the Standby Status (after turning on the
camera), press and Hold the F button for 3
seconds (The Motion Detection Button).
• The red and green indicator lights flashes 6
times and off.
• The camera is now doing video recording under
Motion Detection function.
5
Item
Video format
AVI
Video encoding
M-JPEG , range: 3 meters
Video resolution
640*480/720*480/1280*960VGA
Video frame rate
30 fps
Media playing software
Attached software of the operating system or
mainstream audio and video media playing software
Picture format
JPG 1280*960
Picture pixels
5.0 MP pixels 1.3MP CMOS
The ratio of image
4:3
Supporting system
Windows Me/2000/XP/ 2003/Vista /7
Battery capacity
400mAh
Working hour
About 75 minutes
Charge pressure
DC-5V
Interface type
MINI 5pin USB
Storage support
Micro SD card, support up to 16GB
Battery type
High-capacity lithium polymer
Charging time
About 4 hours
19
7
6
7、Caution:
6、Specifications
• Under Motion Detection mode, if you want
to know the recording status (to see if the
recording is going on normally), you can press
the F button once; and the green indicator
light will flashes (6) times and off. That means
the recording is going on normally.
• To stop Motion Detection function, press the
G button once, the green indicator light is on
solid, it is now back to Standby status again.
• Note: under motion detection function, whenever
motion is detected, the camera will record the
video for 3 minutes and then stop if no more
motion being detected. And the recording will
start again whenever motion is detected again.
• To turn off the camera completely, just press
and Hold the G button for 3 seconds, the red
• Do not spray any liquid on the clock case or
battery. It’ll cause damage to the device and
battery. Stop using the device when the clock
is wet.
• Do not try to open the battery cover when it
is in use or during charging or with the USB
cable plugged into computer.
• Do not try to remove the battery with your bare
hand, use a screw driver or tool kit to take out
battery if necessary and be careful not to cause
any damage to the battery. Try not to take out
battery so often once it’s loaded.
• Do not try to open the battery cover or touch
the battery when your hand is wet. It’ll cause
20
damage to the device and battery.
• Do not put the clock close to fireplace or heated
spots or under sunshine.
• Do not try to punch or disassemble the clock.
• Do not mix new battery with used battery (if
any).
• Do not let children under age 12 to change or
play with the battery.
8、Trouble Shooting:
• Your Media Player Cannot play video in
your computer: If your computer media player
cannot play the video, you can also download
the media player that can play the AVI format
video: http://www.videolan.org (download the
21
indicator flashes 3 times and off.
E、Taking Digital Photo
• Under the Standby Status (after turning on the
camera), press the F button once.
• The green indicator light flashes once (taking
one photo) and then on solid (back to Standby
status automatically). So every time you press
the F button once, it takes one photo and then
back to Standby status automatically.
• To turn off the camera completely, just press
and Hold the G button for 3 seconds, the red
indicator flashes 3 times and off.
F、Do Video Recording during charging(Only
8
VLC software for Windows (16MB). After you
download and installed the VLC software on
your computer, right click on the video file that
you recorded and choose “Play With” VLC
software. And you should be able to open and
play your video.
• Image is not clear or sharp enough: there is
a transparent protection cover on the screen.
You can remove it if you want to. Please also
clean up the glass of camera, make sure there
is no fingerprint on glass of camera.
• Video with Time and Date on it: Refer to
section J for updating time and date on video.
When you do updating the “Write Time” file
from your CD, you are actually saving a “time.
txt” file into your SD memory card with clock.
22
with AC Adaptor charging)
Note: this clock can do recording during charging
only with AC adaptor charger, it cannot do recording
during USB cable charging (via PC).
If you want to do video recording during AC
charging, you can do it as below:
• No need to turn on clock camera. But make
sure SD card is loaded.
• Connect the clock to the AC adaptor charger,
it can only support recording during charging
by AC charger.
• The green indicator light on clock is on and the
red indicator light is flashing, the camera is in
charging status.
• To do recording during charging,Press the G
9
So if you do not want to open your CD to find
the “Write Time” file, you can create your own
“time.txt” file and save it into your clock with SD
card. To do so, open your NOTEPAD from your
computer’s PROGRAM under ACCESSORIES:
o Enter the time and date with the format (year
2013 December 25, Hour 21 minute 5 second 0):
2013 12 25 21:05:00
o There is one space between Year Month Day
Hour:
o The hour is military time hour.
o Make sure the time and date are the same as
the time and date on clock.
o Save the file into your clock (SD card) with
name and format as “time.txt”.
Note: you must save file with “.txt” text format.
23
button once,the green indicator light with flash
6 times and off, the machine is now doing video
recording.
• To stop recording, press the G button once
again, the green light is on solid again.
• After finishing charging or recording, disconnect the clock from the AC charger.
• Note: do not try to open the SD card folder now,
you need to disconnect the clock from computer
first.
• After disconnecting the clock from the AC
charger, the green indictor light is still on solid.
To turn off the camera completely, just press
and hold the G button for 3 seconds.
10
o Disconnect the clock from your computer. You
are now ready to record video with time and
date on it.
• Driver STK02N 2.4.exe disappears after
installing the software twice: Yes, that is true.
After you installed the driver, if you install it
second time, the second time installation actually
removes the driver from your computer. So
you have to install the driver third time in order
to have the driver back to computer.
• SD card slot: please make sure the "golden
finger print" on SD card is facing up; otherwise,
it may stuck inside the SD slot. Using a pin-point
tool to press the SD card gently when you try to
24
G、Cycle of Recording function
This clock camera has Cycle of recording function:
When SD card memory is full, the camera will
overwrite the earliest recorded video file with
the newest video file automatically, so as to have
continuous recording.
H、Play Video/View Photo on computer
• Connect the clock to computer with the USB
cable.
• Do NOT turn on camera.
• Wait for seconds, your computer screen will
pop up a message box “Removable Disk”
asking you to open the folder. Click on “Open
Folder”.
• You can now open the folder to view / copy /
play / paste your video or audio files.
• Play Video: simply double click on the video
file to play video on your computer. If your
Window Media Player is not your default media
player, right click on the video file and choose
“Play with Window Media Player” to play the
video. (If your computer does not have Window
Media Player or your media player does not
support AVI format video file, refer to the
Troubleshooting page for further information).
Note: if the U-Disk folder does not pop up from
your PC screen automatically, click on “My
Computer” icon on your PC to find this
12
11
take out the SD card.
Limited Warranty
• The hinge on clock: the angle between clock
and stand should be between 85 to 90 degrees.
If the angle is less than 80 degrees, the camera
will only capture the image from ceiling and the
hinge cannot hold the clock.
Please contact seller for warranty. Limited
warranty from manufacturer only for original
purchaser against defect related to manufacturing
or workmanship under normal use. Due to the
hygiene or rehabilitation nature of this product,
it is non-returnable.
NOTE: Please follow the State’s law. Do not use
this product illegally.
SecuVox® is a registered trademark, all rights
reserved, © Q.L.M.
www.ideatomorrow.com
25
26
device folder. If you still cannot find the device
folder from your “My Computer” folder, try to
disconnect and connect the USB cable to your
PC again.
I、Use as Web Camera
• Insert CD Software into your computer. Open
your CD folder.
• Click on the Driver file, STK02N 2.4.exe ,and
follow its instruction to do installation. (There
is no need to do any other setup).
• Click on Finish icon after installation.
• Insert SD card into the clock.
• Plug USB cable into the clock.
• Press and Hold the G button for 3 seconds to
13