1
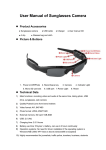
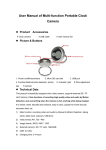
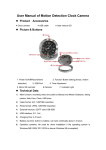
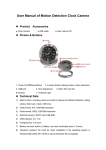
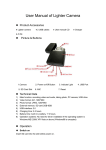
www.safetybasement.com Operation instructions First thank you for using our company’s products! Before using this product, please carefully read this user manual. In order to be better served, the user may change the contents of the manual. 1. Appearance and buttons 1. USB 2. TF card 3. K1:On/off 4. K2: taking picture, motion detection button 5. Clock adjustment knob 6. Camera 7. Light indicator 2. Product introduction: This product is the first high-definition digital camera with motion detection and camera-equipped clock, TF card memory, also known as "family security clock", can shoot photos and high-definition screen, and this product is simple, small and exquisite, beautiful and practical, easy to carry, the family security, education, life and other areas of essential utilities, deeply liked by all users of all ages. This product is high-tech special features: Mobile detection 3. Operation instruction a. Parts description a 1.indicator:part(7) is light indicator Switch on: green light and red light is on, and then green light remains on. Switch off: green light and red light flash three times USB status: a prolonged green light, the green flashes reading and writing to U disk USB Battery Charging: a prolonged green light, red light flashes, the battery is full, a prolonged green light, and red light is out. 1-877-345-2336 Page 1 www.safetybasement.com Video mode: Start recording indicator: the green light flashes six times, then lights turn off. Video Pause: prolonged green light Low battery: green light flashes quickly Charging: a prolonged green light and the red light flash slowly. Full power: a prolonged green light and red light is out. a 2.button:K1 :touch the button to turn on ,turn off, start, stop, video recording K2: for the camera, open and view the current state of motion detection. a 3.socket: USB socket(1) is used to connect computer or charger. It is the Interface for data transfer and charging a 4.camera :(6) it is used to get the image signal a 5. Clock adjustment knob: it is used to adjust the watch time. 1. USB 2. TF card 3. K1:On/off 4. K2: taking picture, motion detection button 5. Clock adjustment knob 6. Camera 7. Light indicator 1-877-345-2336 Page 2 www.safetybasement.com b. on/off Hold down for a few seconds Power key (K1) to boot up the camera (both the green and red light will flash). After the initialization the red light will turn off, a steady green light will remain to enter the default camera allowing you to take pictures, mobile detection standby mode. To turn unit off, hold down for a few seconds the Power key (K1) to save the file and shutdown (Lamps off three times while flashing). c. mode change The clock provides quick access to the mode functions: d. video mode: When the unit is turned off, insert the TF card (Figure 2), Hold down the power (K1) key for a few seconds, the green and red light will flash for a few seconds then red light will turn off and green steady light will remain. At this time the camera at the default camera mode, ready for photo mode, motion detection mode state; To enter VIDEO mode briefly press the Power key (K1). The green light will flash for about six times then turn off. You are now in video camera. briefly press " K2 "button to view the current working state. The green light will flash six times then out; short press" K1 "key, a prolonged green light, to save the file and stop the camera and return to camera mode, camera mode, motion detection mode standby. As a precautionary measure files will be saved every 30 minutes; then it will proceed to the next section of the video recording. e. photo mode Insert TF card (Figure 2), turn on unit, after system initialization the unit will get into ready mode; short press K2 key to take photographs , green light flashes once and store a photograph and return to the default camera mode. Repeat as needed to take photos. f. Motion Detection The unit has an outstanding home security functions: motion detection function, when there movement in the view of the camera the unit will immediately begin to record, recording every step of the moving object. Once the object leaves the cameras angle of view the unit will automatically turn off to save disk space. This mode makes sure there is no empty recording and wasted disk space. To set unit in motion detection mode, first Insert TF card (Figure 2) and turn on the unit. Once unit is initialized hold down for a few seconds the "K2" button. Both lights will flash for a few seconds [about six flashes] then will turn off., at this time the camera will be ready for the Motion Detection function. Short press "K2" button to view the current working status, dual-lamp flashes six times then out; 1-877-345-2336 Page 3 www.safetybasement.com short press "K1" key, a prolonged green light, the file is saved and video stops and return to camera mode, camera mode, motion detection standby mode . g. PC connection In the off state, insert the TF card(figure 2),Then insert the included USB cable into the USB port of the camera, and then connect to the other end to the PC's USB interface. Your computer should automatically recognize the camera and pull up a folder. If this does not happen for any reason then you can go to "My Computer" to find a "Removable Disk" drive to view folders where you can then transmit, copy or delete files. Note: This confidential USB connection in the off state to enter the "Removable Disk") h. Computer network camera features First you need to install the camera driver which is on the included CD. Run the STK02N 2.4.exe to install the camera driver, then you can use it. Turn on the unit and use your favourite software to turn this unit into a webcam. Open the webcam image: Double-click My Computer → I .charge Connect to computer USB interface or charger. During the charging, the red light flashes. Once fully charged a prolonged green light will show. The red light will stop flashing at this point. The recorder comes with a built-in-high-capacity lithium polymer battery. For the first five times, make sure the battery is fully charged before re-use. This helps toactivate the battery maximum capacity and maintain the standard working time. In order to maximize the capacity of storage battery, please continue to charge for 30 minutes to 1 hour after the low battery light is indicated. j. setup time Camera provides a video file to display the time recording function, you can set the time according to actual needs, the time format for the year. Date. Day: minutes: seconds. Set it up as follows: connect the computer to find a removable disk and then move the mouse right-click pop-up menu on the "New" → "Text Document" to the document named "time" (the letters must be lowercase), Its extension is ". txt". You can also build such a folder on your desktop in accordance with the method described above and then copy it to a disk folder. Open the time folder, set the time format such as: 2000.01.01 00:00:00, year, month, day and hour, minute, seconds, separated by spaces. Then save it. Time set is completed. Note: Time came into effect after the boot. 1-877-345-2336 Page 4 www.safetybasement.com k. parameters Item Video format Video encoding Video resolution Video frame rate Media playing software parameters AVI M-JPEG 640*480 VGA 30fps Attached software of the operating system or mainstream audio and video media playing software JPG 1280*960 5M pix 4:3 Windows me/2000 xp 2003/vista:M 300mAh About 120 minutes DC-5V MINI 4pin USB micro SD card High-capacity lithium polymer Picture format Picture pixels The ratio of image Supporting system Battery capacity Working hour Charge pressure Interface type Storage support Battery type m. warning Application: please strictly abide by relevant federal and state laws when using this product. This product should not be used for any illegal purposes. The user is fully responsible for its using purpose Battery: if you have not used this product for a while please fully charge it first before re-using again. File security: This product is not a professional storage device. It does not guarantee the integrity and security of saved files. Please back up your important documents on the computer or other storage device timely. Video quality: This product is not a professional video recording device. It does not guarantee the effect of the video file to have the professional quality Operating temperature:0~40 ℃ Operating humidity: 20% -80% .This product is not waterproof. So it cannot work under the humid environment for long. Shooting brightness: Do not expose the camera directly to strong light, such as the sun light, to avoid damage to optical devices. Cleaning: Do not use it under the environment with high dust density to avoid the contamination of camera lens or other components. Other matters: This product belongs to sophisticated electronic products; please do not make it have a strong impact, vibration: Do not in strong magnetic fields, strong electric field to use. Waste treatment: Please note that environmental protection, and not to randomly discard this product. Do not throw this product into fire Supplementary note: other non-specified matters, please contact your local dealer. 1-877-345-2336 Page 5 www.safetybasement.com 1-877-345-2336 Page 6