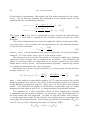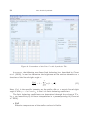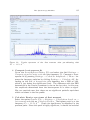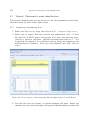
1
FAMIAS User Manual
Wolfgang Zima
Instituut voor Sterrenkunde, K.U. Leuven
B-3001 Leuven, Belgium
e-mail: [email protected]
http://www.ster.kuleuven.be/∼zima/famias
1. Introduction
famias (Frequency Analysis and Mode Identification for AsteroSeismology) is
a collection of state-of-the-art software tools for the analysis of photometric
and spectroscopic time series data. It is one of the deliverables of the Work
Package NA5: Asteroseismology of the European Coordination Action in Helioand Asteroseismology (HELAS).
Two main sets of tools are incorporated in famias. The first set allows to
search for periodicities in the data using Fourier and non-linear least-squares
fitting algorithms. The other set allows to carry out a mode identification
for the detected pulsation frequencies to determine their pulsational quantum
numbers, the harmonic degree, , and the azimuthal order, m. The types of
stars to which famias is applicable are main-sequence pulsators hotter than the
Sun. This includes the Gamma Dor stars, Delta Sct stars, the slowly pulsating
B stars and the Beta Cep stars - basically all pulsating main-sequence stars,
for which empirical mode identification is required to successfully carry out
asteroseismology.
This user manual describes how to use the different features of famias and
provides two tutorials that demonstrate the usage of famias for spectroscopic
and photometric mode identification.
1.1 Overview
The following key features are provided by famias:
• Search for periodicities in photometric/spectroscopic time series using
Fourier analysis and multi-periodic least-squares fitting techniques.
• Spectroscopic mode identification using the moment method (Briquet &
Aerts 2003) and Fourier parameter fit method (Zima 2006)
• Photometric mode identification using the method of amplitude ratios
and phase differences based on pre-computed model grids (Balona &
Stobie 1979; Watson 1988; Cugier et al. 1994; Daszyńska-Daszkiewicz
et al. 2002).
• Efficient usage of multi-core processors with parallel computing.
20
Overview
The user interface of famias is structured into different tabs that contain
the modules dedicated to the different tools. The tabs can be selected by clicking on their descriptive name. The two main modules are for the spectroscopic
and photometric analysis. Each of these modules is subdivided into tools for
data management, frequency searching and mode identification.
In the following, the different available tabs are briefly described.
Spectroscopy Tabs
• Data Manager
Edit the time series of spectra or moments, perform statistics, compute
line moments, examine the spectra, extract spectral lines, etc.
• Fourier Analysis
Compute a Fourier analysis (Discrete Fourier Transformation) for each
pixel of a spectrum (pixel-by-pixel) or for the different line moments in
order to detect periodicities and their statistical significance.
• Least-Squares Fitting
Compute a non-linear multi-periodic least-squares fit across a line profile
(pixel-by-pixel) or for the different line moments and pre-whiten the data.
• Line Profile Synthesis
Compute a time series of theoretical line profiles of a radially or nonradially pulsating star.
• Mode Identification
Identify pulsation modes by means of the Fourier parameter fit method
or the moment method.
• Results
The results of the mode identifications are displayed and logged in this
tab.
• Logbook
Log of all actions that were carried out in the spectroscopy module.
Photometry Tabs
• Data Manager
Edit and modify the photometric time series.
• Fourier Analysis
Compute a Fourier analysis (DFT) and determine the statistical significance of detected frequency peaks.
Introduction
21
• Least-Squares Fitting
Compute a non-linear multi-periodic least-squares fit and pre-whiten the
data.
• Mode Identification
Carry out a photometric mode identification with the method of amplitude
ratios and phase differences in different photometric passbands.
• Results
The results of the mode identification are displayed and logged in this
tab.
• Logbook
Log of all actions of the photometry module.
Figure 1: Screenshot of famias.
22
Requirements
1.2 What Data Can Be Used?
The spectroscopic as well as the photometric data that can be analysed with
famias must fulfill specific quality criteria and must have been fully reduced.
More specifically, this implies the following requirements:
• Requirements for spectroscopic data
– Time series of fully reduced and normalised spectra, including barycentric time and velocity correction
– Dispersion better than 40000
– Signal-to-noise ratio higher than 200
– Unblended absorption line
• Requirements for photometric data
– Time series of fully reduced differential photometric data, including
barycentric time correction
– Multi-colour data in Strömgren, Johnson/Cousins, or Geneva filters
for mode identification
– Milli-mag precision
1.3 Requirements
famias has been written in the programming language C++. For the graphical
user interface, the open source version of the Qt 4 library (from Trolltech1 ) has
been adopted. This combination enabled the development of a software tool
that requires high computational speed in combination with the ability to create
cross platform versions for Linux and Mac OS X. famias also features a builtin help system with an extended manual describing the tools and providing
introductory tutorials.
The homepage of famias2 provides the possibility to download the software,
read the on-line documentation, and to submit bug reports.
1 http://www.trolltech.com
2 http://www.ster.kuleuven.be/∼zima/famias
2. The Main Window
After the start-up of famias, the Data Manager Tab of the Spectroscopy
Module is shown. If you wish to work with photometric data, you have to
switch to the Photometry Module. In this chapter, the main menu entries of
famias are described.
2.1 The File Menu
This menu contains entries for opening and saving project files and importing
time series of spectra or photometric measurements. A session with famias
can be saved as a project file. Such a project file contains all the data included
in the current session of famias. The following entries are available in this
menu.
• New Project
Creates a new, empty project. All entries of the current famias session
will be cleared.
• Open Project
Opens an existing project. All current entries in famias will be cleared
and replaced by the opened project.
• Recent Projects
Shows a list of previously opened project files.
• Save Project
Saves the current session of famias as a project file with the current file
name (if existent). In a project the complete content of all modules of
famias is saved. This includes time series data, diagrams, results from
the analyses and the logbook.
• Save Project as
Saves the current session of famias as a project file with a new file name.
• Import Set of Spectra
Opens a dialogue to import a time series of spectra. The selected file must
be in ASCII format and list the filenames of the spectra, the observation
24
The File Menu
times (Heliocentric Julian Date), and optionally the weights of the spectra
and their signal-to-noise ratio. The separate spectrum files must also have
ASCII format and require the following two column structure: wavelength
or Doppler velocity in km s−1 and normalised intensity. File headers can
be skipped during the import of the files.
Figure 2: Screenshot of the dialogue for importing a time series of spectra.
Figure 2 shows a screenshot of the dialogue for importing spectra. The
left column shows the raw data file. You can indicate the number of
header lines to be skipped (Skip first X lines). At the top of the right
part of the window you can select the column number which contains the
data type selected in the box below. If your spectrum files have headers,
you can skip them by choosing the number of lines to skip. The time
must be in units of days (Heliocentric Julian Date), and the weights are
point weights per spectrum. Click on Ignore if no column with weights
is available. All weights are then automatically set to 1. Optionally,
a column with the signal-to-noise ratio per spectrum can be imported.
These values are used to estimate the uncertainties of the line moments
in famias. The SNR can also be estimated within famias (see p. 32).
If your selections are valid and the file structure is acceptable for importing, the text on the lower right will read File OK. Otherwise, you have
to check the structure of your data file. Still, if there is a problem with
the structure of the spectrum files, famias might give an error message
during importing, indicating in which file the read-in error occurred.
After you click on OK, you must select the dispersion scale of your spectra
(units of Ångstrom or Doppler velocity (km s−1 )). If the import was
successful, you will see the imported data in the Data Manager Tab of
the spectroscopy module.
The Main Window
25
• Import Light Curve(s)
Opens a dialogue to import a time series of photometric data. You can
import several files simultaneously by making a multi-selection in the file
import window (by pressing the Shift or Ctrl-key when selecting files).
Imported files are required to be in ASCII format and must consist of
two or three columns separated by spaces or tabulators. The following
two columns are mandatory: time in days (Heliocentric Julian Date) and
differential magnitude. A third column can consist of weights for the
single measurements. A file header can be skipped during import.
Figure 3: Screenshot of the dialogue for importing light curves.
Figure 3 shows a screenshot of the dialogue for importing light curves.
The left column shows the raw data file. You can indicate the number of
header lines to be skipped (Skip first X lines). At the top of the right
part of the window you can select the column number which contains
the data type selected in the box below. The time must be in units of
days. You must select a passband for the magnitude, and the weights are
point weights per data point. Click Ignore if no column with weights is
available. All weights are then automatically set to a value of 1.
If your selections are valid and the file structure is acceptable for importing, the text box on the lower right will display File OK. Otherwise, you
will have to check the structure of your data file.
If the import was successful, you will see the imported data in the Data
Manager of the photometry module.
• Quit
Exit famias.
26
The Help Menu
2.2 The Edit Menu
The items in this menu provide the possibility to clear the input fields, plots,
and stored data of selected tabs of famias.
• Clear Spectroscopy Tabs
Clear all data in the selected tabs of the spectroscopy module.
• Clear Photometry Tabs
Clear all data in the selected tabs of the photometry module.
2.3 The Tools Menu
This menu provides some useful tools that are related to asteroseismology and
mode identification.
• Stellar Rotation
Compute the equatorial rotational velocity, rotation period or rotation frequency, theoretical critical Keplerian break-up velocity or critical v sin i,
and the critical minimum inclination for a given stellar mass, radius,
v sin i, and inclination angle.
• Pulsation Parameters
Compute the horizontal-to-vertical amplitude ratio, the frequency in the
stellar frame of reference, and the rotation frequency and the ratio of the
rotation to the pulsation frequency for a given pulsation mode, stellar
mass, radius, v sin i, and inclination angle.
2.4 The Help Menu
The Help Menu provides access to the famias-manual, enables to submit bug
reports and provides general information about the software.
• famias Help
This opens the built-in user manual of famias. The manual is regularly
updated with new versions of famias.
• Update Information
This shows a list containing update information about the current and
previous versions of famias.
• Report a Bug
Provides a link to the webpage of famias, where bug reports can be
submitted on-line.
The Main Window
27
• Copyright and User Agreement
View general copyright information for famias and the user agreement.
• About FAMIAS
Provides some general information about famias.
• About Qt
Provides an information box about the version of Qt that was used for
the current version of famias. The graphical user interface of famias
has been programmed with the Trolltech Qt-library.
3. The Plot Window
A plot can be zoomed in by pressing the left mouse button while moving the
mouse to draw a zoom box. Pressing the right mouse button zooms out. Keep
the middle mouse button pressed to pan the plot.
The following commands are available in the menu Plot:
• Refresh Plot/Show All
Refresh the contents of the current plot.
• Set Viewport Set the viewport of the current plot.
• Detach Plot
Open current plot in a new window.
• Print Plot
Print the current plot.
• Export Plot To PDF
Write the current plot into a PDF file. If this is a multi-plot (e.g., zeropoint, amplitude and phase from least-squares fitting), the sub-plots will
be written into separate files.
The following commands are available in the menu Data:
• Overplot
If this option is checked, the plot window is not cleared when a new plot
is drawn.
• Show Original and Fit
If a least-squares fit has been computed for these data, this option shows
the original data (spectrum, line moments or light curve) and the multiperiodic least-squares fit.
• Show Residuals
Only available if the current data set consists of residuals (pre-whitened
in the Least-Squares Fitting Tab). The original data minus the leastsquares fit are shown.
• Show Phase Plot
Plot the data phased with the indicated frequency.
4. The Spectroscopy Modules
After the start-up of famias, the Data Manager Tab of the Spectroscopy
Module is shown. The Spectroscopy Module contains the tools that are required to search for frequencies in time series of spectra and to carry out a
spectroscopic mode identification. Additionally, synthetic line profile variations
of a multi-periodic pulsating star can be computed. The tools are located in
tabs that have the following denominations: Data Manager, Fourier, LeastSquares Fitting, Line Profile Synthesis, Mode Identification, Results, and
Logbook. These tools are described in the following sections.
4.1 Data Manager
The Data Manager Tab provides information about the data that have been
imported and permits to edit the data, calculate statistics, compute moments
of a spectral line, set the weights of individual spectra, or extract a line using
sigma-clipping. The window is structured into three data boxes and one plot
window. A menu is located above each box. In the Data Sets Box you can
select the time series of spectra you want to work with. The Time Series Box
shows the time, number of dispersion bins, weight, and optionally the signal-tonoise ratio of all spectra of the selected data set. The Spectrum Box shows the
dispersion and intensity of the spectrum currently selected in the Time Series
Box. The Plot Window shows the currently selected spectrum, statistics of a
spectrum (mean or standard deviation), or a time series of moments (if selected
in the Data Sets Box). A screenshot of the Data Manager Tab is shown in
Figure 1.
Once you have successfully imported a set of spectra, its name will be added
to the list of data sets (Data Sets Box). The times of measurements, number
of wavelength bins, and the weight of each spectrum will be listed in the Time
Series Box. The Plot Window will remain empty until you click on one of the
spectra in the Time Series Box. In this case, the dispersion (in Ångstrom or
km s−1 , dependent on your selection) and intensity of the selected spectrum will
be listed in the Spectrum Box and the spectrum will be plotted as a blue line
in the Plot Window. You can select multiple wavelength bins in the Spectrum
Box. They will be displayed as red crosses in the Plot Window.
30
Data Manager
4.1.1
Data Sets Box
This box shows a list of the different data sets that have been imported or
created. The data can consist of a time series of spectra (green background)
or of line moments (yellow background). To select a data set, click on it or
select it in the combo box at the top right of the information bar. The selected
data set is used for all operations of famias. The following commands can be
selected in the Data Menu:
• Remove Data Set
Removes the currently selected data set from the list.
• Rename Data Set
Renames the currently selected data set.
• Export Data Set
The currently selected data set will be exported as ASCII-file(s) to the
disk. The suffix of the files has to be entered by the user. For a time
series of spectra the exported files will have the following structure: One
file, called times.suffix consisting of a list of three columns, namely
spectra filenames, times and weights. Each spectrum of the time series
will be written into a separate ASCII file and called number.suffix,
where number is a running counter. If a data set of line moments is
exported, a single ASCII file having the following four columns is created:
time, moment value, uncertainty, and weight.
• Combine Data Sets
Combines the selected data sets to a new single time series. The data
sets to be combined must have the same units of dispersion. Moreover,
all times of measurement have to differ.
• Change Dispersion Scale
Select wavelength in Ångstrom or Doppler velocity in km s−1 as dispersion
scale of the current data set of spectra. A conversion between the two
scales can be carried out in the Modify Menu of the Time Series Box.
4.1.2 Time Series Box
The content of this list depends on the selected data set. If a time series of
spectra is selected in the Data Sets Box, the list will consist of three (or four)
columns: times of measurement, number of wavelength bins, and weight (and
optionally signal-to-noise ratio). If a moment time series is selected in the
Data Sets Box, the list will consist of times of measurement, moment value,
and weight.
The Spectroscopy Modules
31
Click on an item of the list to display dispersion and intensity of the selected
spectrum in the Spectrum Box. The selected spectrum will also be displayed
in the Plot Window. Multiple spectra can be selected by clicking with the
left mouse button on several items in the list while pressing the Ctrl-key or the
Shift-key. All items can be selected by pressing Select All. Only items that
have been selected in this list (with blue background) are taken into account
for the data analysis (e.g., Fourier analysis or least-squares fitting).
The following commands are available in the Data Menu:
• Edit Data
Opens a table of times and weights in a new window with the possibility
to edit these values. Modifications can be written to the current data
set.
• Copy Selection to New Set
A new data set with currently selected spectra is created and written to
the Data Sets Box. Use this option to create subsets of your data.
• Remove Selection
The currently selected spectra are removed from the time series/data set.
• Extract Dispersion Range
A new data set with the currently selected spectra and the indicated
dispersion range is created and written to the Data Sets Box. Use this
option, e.g., to cut out certain spectral lines from your data set.
The following commands are available in the Calculate Menu:
• Mean Spectrum
The weighted temporal mean for each pixel of the selected spectra is
computed and displayed in the Plot Window. Important: All spectra
must have the same dispersion scale, i.e., they must be interpolated on a
common scale (use the tool Interpolate Dispersion in the Modify Menu).
• Median Spectrum
The weighted temporal median for each pixel of the selected spectra is
computed and displayed in the Plot Window. Important: All spectra
must have the same dispersion scale, i.e., must be interpolated on a
common scale (use the tool Interpolate Dispersion in the Modify Menu).
• Std. Deviation Spectrum
The weighted temporal standard deviation (σ) for each pixel of the selected spectra is computed and displayed in the Plot Window. Important:
32
Data Manager
all spectra must have the same dispersion scale, i.e., must be interpolated
on a common scale (use the tool Interpolate Dispersion in the Modify
Menu).
• Compute Signal-to-Noise Ratio
Opens a dialogue for computing the signal-to-noise ratio (SNR) of the
selected spectra by making use of sigma-clipping to determine the continuum range. The calculated SNR of each spectrum can be used to set the
weights of the data. In order to compute the SNR of the spectra, a sufficiently large range of continuum must be present in the selected spectra.
Description of the SNR-dialogue (see Figure 4): Initially, the Time and
SNR Box displays only the list of times of the selected spectra. Once a
SNR computation has been performed, it also displays the SNR of each
spectrum. Clicking on a time will show the according spectrum in the
Current Spectrum Box.
Figure 4: Screenshot of the dialogue for computing the SNR of the spectra.
In the Settings Box, the sigma-clipping factor and the number of iterations can be indicated and must be adapted for different data sets.
Sigma clipping iteratively removes outliers of a Gaussian distribution. In
this case, the sigma clipping algorithm tries to find the continuum and to
exclude the spectral lines.
The Spectroscopy Modules
33
After clicking on Calculate, the position of the pixels detected as continuum is marked as red crosses in the Current Spectrum Box. The three
plots at the right side show information about all spectra of the time series in order to check the overall results. The top plot shows the number
of bins detected as continuum of each spectrum. The middle plot shows
the SNR of all spectra and the overall mean SNR. The bottom plot shows
the mean intensity value of the pixels detected as continuum. The latter
values should be around 1. Outliers in this plot can indicate that the
continuum has not been detected properly in some spectra. In this case,
the settings for the sigma-clipping must be adapted.
If Write SNR as normalised weights is clicked, the time series is written
into a new data set having normalised weights W =(SNR)2 . Also, each
spectrum of the time series is assigned its SNR-value (fourth column in
the Time Series Box).
• Compute Weights from SNR
This function computes the weights of each spectrum according to its
SNR. The values of the SNR must already have been imported together
with the spectra. The weights are calculated from (SNR)2 and normalised
such that the mean value is 1.
• Compute Moments
Opens a dialogue for computing line moments of the selected spectra.
The dispersion scale of the spectra must be in Doppler velocity expressed
in km s−1 . The moments time series can either be written into a new
data set to the Data Sets Box or directly to the disk as ASCII files (if
the option Write Moments 0 to 6 in a file has been checked).
The nth normalised moment <v n > of a line profile I(v, t), corrected for
the velocity of the star with respect to the sun, at the time t is defined
by
∞
v n I(v, t) dv
−∞
n
<v >I (t) =
,
(1)
∞
I(v, t) dv
−∞
where v denotes the line-of-sight Doppler velocity of a point on the stellar
surface and the denominator of this expression is equal to the equivalent
width of the line. The 1st moment is the radial velocity placed at average
zero, the 2nd moment describes the line variance, and the 3rd moment
describes the skewness of the profile. If the shape of the line profile
changes periodically due to stellar pulsations, the line moments also vary
with the period of pulsation (or a sub-multiple thereof). For more details,
we refer to Aerts et al. (1992).
34
Data Manager
famias can compute the uncertainties of the different line moments if
the SNR of the spectra is known. The uncertainty is used to derive the
χ2 -value of the theoretical moments when applying the moment method
and consequently, to determine the statistical significance of obtained
solutions of the mode identification. We provide here the formalism to
calculate the uncertainties of the moments.
The formal uncertainty of each wavelength bin of a line profile σI(v,t) can
be derived from the signal-to-noise ratio SNR of the spectrum by
σI(v,t) =
If
Δ<v 0 >(t)
and
Δ<v n >(t)
2
2
=
=
SNR
I(v, t)
∞
−∞
∞
−∞
.
(2)
σI(v,t) dv
2
v n σI(v,t) dv
(3)
2
(4)
v n I(v, t) dv
2
then the variance σ 2 of the moment <v n > is
2
σ<v
n> =
Δ<v n >(t)
∞
I(v, t) dv
−∞
2
+
Δ<v 0 >(t)
∞
−∞
∞
−∞
I(v, t) dv
2
.
(5)
Description of the line moments dialogue (see Figure 5):
Select the dispersion range for the computation of the line moments. The
range must be large enough to include the complete line profile, i.e., from
continuum to continuum. Optionally, the complete dispersion range can
be selected for the computations by checking Complete range.
The mean SNR of all spectra or the individual SNR of each spectrum is
required to compute the statistical uncertainties of the moments. The
mean SNR of all selected spectra at the continuum can be estimated
by computing the standard deviation spectrum and taking the inverse of
the standard deviation at the position of the continuum. When selecting
Individual SNR, each spectrum must be assigned a specific SNR (column
4 in the Time Series Box).
The following procedure is strongly recommended for the calculation of
line moments: compute the SNR of each spectrum with the function
Compute signal-to-noise ratio in the Calculate Menu. Then extract the
line profile with the function Extract line in the Modify Menu. Use the
resulting spectra for computing the moments by selecting the complete
The Spectroscopy Modules
35
Figure 5: Screenshot of the dialogue for computing the line moments.
dispersion range and the option Individual signal-to-noise ratio. Note
that the function Extract line determines integration boundaries for the
moments that are different from one spectral line to another in order to
avoid the noisy continuum in the moment computations. The use of this
function is thus indispensable when the line profile is moving a lot in time.
If the user wants the nth moment to be written to the Data Sets Box,
the moment index n must be indicated in the combo box below. The
moments 0 to 6 can be exported as ASCII files, by selecting the check
box Write Moments 0 to 6 in a file and indicating a file suffix. The
output files will be written into the directory selected in the following
dialogue and called Moment*.suffix.
The following commands are available in the Modify menu:
• Interpolate Dispersion
Linear interpolation of all selected spectra onto a common grid of dispersion values. This is necessary for most data operations such as computing
line statistics, Fourier analysis, least-squares fitting and mode identification with the FPF method. In the dialogue window, three different options
for the interpolation can be selected. In all three cases, the interpolated
spectra will be written to a new data set.
– Interpolate onto scale of first spectrum: all spectra will be interpolated onto the dispersion scale of the first spectrum of the currently
selected spectra.
– Choose a file to interpolate: interpolate onto the scale read from an
ASCII file. In the dialogue window you can select in which column
the dispersion values are listed.
– Compute grid for interpolation: interpolate on a grid of equidistant
dispersion values. The minimum, maximum and step values must
be indicated by the user.
36
Data Manager
• Convert Dispersion
Convert the dispersion scale of the selected spectra from Ångstrom to
km s−1 or vice versa, dependent on the dispersion scale of the current
spectra. The value of the zero-point for the conversion must be indicated
in the dialogue window. The converted spectra will be written into a new
data set.
• Extract Line
Opens a dialogue for determining the position of a line profile using sigma
clipping. This tool is especially useful when line moments have to be
calculated for a time series where the wavelength position line profile
shifts significantly due to pulsation. Since ideally, for the computation
of the moments, the continuum should not be included, the line has to
be extracted. This tool determines the position of the left and right line
limits through a sigma clipping algorithm, which detects the continuum.
Description of the extract line dialogue (see Figure 6):
The Times of Observations Box shows the list of times of the selected
spectra. Clicking on a time will show the according spectrum in the
Current Spectrum Box.
Figure 6: Screenshot of the dialogue for extracting a spectral line.
The Spectroscopy Modules
37
In the Settings Box, the sigma-clipping factor and the number of iterations can be indicated and must be adapted for different data sets.
Sigma clipping iteratively removes outliers of a Gaussian distribution. In
this case, the sigma clipping algorithm tries to find the pixels belonging
to the continuum and thus to determine the limits of the line. These
limits can be expanded with a number of pixels indicated with Expand
limits.
Alternatively, the limits can be set at certain dispersion values indicated
in the spin boxes. The limits can be changed for each spectrum individually or applied to all spectra when clicking on Set current limits for all
spectra.
After clicking on Calculate, the position of the pixels detected as continuum are marked as red crosses in the Current Spectrum Box. The
two plots on the right-hand side show information about all spectra of
the time series in order to check the overall results. The top plot shows
the number of bins detected as line of each spectrum. The bottom plot
shows the left and right dispersion limits of each spectrum. Outliers in
this plot (marked red in the plots and in the Times of Observation Box)
can indicate that the line position has not been detected properly in some
spectra. When clicking on OK, the extracted line will be written into a
new data set.
• Shift Dispersion
Shift the zero-point of the dispersion of the selected spectra with a fixed
value (positive or negative). The shifted spectra will be written into a
new data set.
• Subtract Mean
Subtract the temporal mean from all selected spectra, i.e., compute the
difference of each spectrum from the mean spectrum. The dispersion
scale of all spectra must be interpolated on each other to use this function.
The new spectra will be written into a new data set.
• Add Noise
Add white Gaussian noise to the selected spectra. The continuum SNR
must be indicated in the dialogue window. The new spectra will be
written into a new data set.
4.1.3 Spectrum Box
This box shows a list of the currently selected spectrum in the Time Series Box.
It consists of two columns, dispersion and intensity. The dispersion can be in
38
Data Manager
units of Ångstrom or km s−1 , dependent on the selected data set. Multiple
bins can be selected by clicking with the left mouse button on several items in
the list while pressing the Ctrl-key or the Shift-key. All items can be selected
by pressing Select All. Selected items are displayed in the plot window as red
crosses.
The following commands are available in the menu Data:
• Edit Data
Opens a table of dispersion values and intensity in a new window with
the possibility to edit these values. Modifications can be written to the
current spectrum.
• Remove Selection
Remove the selected bins from the spectrum/data set. Use this function
to remove bad pixels with deviating intensities from the spectra. After
removal of a pixel, interpolation of the spectra onto a common velocity
grid might be necessary.
4.1.4 Plot Window
The plot window shows the currently selected spectrum with selected wavelength bins, a time series of moments, or the statistics of a time series of
spectra (mean, standard deviation).
For more information about the plot window, we refer to p. 28.
The Spectroscopy Modules
39
4.2 Fourier Analysis
With this module, a discrete Fourier transform (DFT) can be computed to
search for periodicities in the data set selected in the Data Sets Box of the
Data Manager Tab. The data can consist of a time series of spectra (twodimensional) or of a time series of moments (one-dimensional). For the latter,
we refer to the photometry manual (see p. 96). To compute a Fourier analysis
for a time series of spectra, you must indicate the dispersion range (in Ångstrom
or km s−1 ) that should be taken into account, the frequency range, and what
the calculations are based on (pixel-by-pixel line profile or moments). The
Fourier spectrum is displayed in the plot window and saved as data set in the
List of calculations. A screenshot of the Fourier Tab is displayed in Figure 7.
Figure 7: Screenshot of the Fourier Tab.
40
Fourier Analysis
4.2.1 Settings Box
In this box, the settings for the Fourier analysis are defined.
• Dispersion range
Minimum/Maximum values of the dispersion range in Ångstrom or km s−1 ,
dependent on the input data. The range specifies which wavelength bins
of the spectrum will be taken into account for the computation of the
Fourier spectrum. The Complete range is selected if the corresponding
box is checked.
• Frequency range
Minimum/maximum values of the frequency range. The Fourier spectrum
will be computed from the minimum to the maximum value.
• Nyquist frequency
Estimate of the Nyquist frequency (mean sampling frequency). For nonequidistant time series, a Nyquist frequency is not uniquely defined. In
this case, the Nyquist frequency is approximated by the inverse mean of
the time-difference of consecutive measurements by neglecting large gaps.
• Frequency step
Step size (resolution) of the Fourier spectrum. Three presets are available:
Fine (≡ (20ΔT )−1 ), Medium (≡ (10ΔT )−1 ), and Coarse (≡ (5ΔT )−1 ).
The corresponding step size depends on the temporal distribution of the
measurements, i.e., the time difference ΔT of the last and first measurement. It is recommended to select the fine step size to ensure that no
frequency is missed. The step value can be edited if desired.
• Use weights
If the box is checked, the weight indicated for each spectrum is taken into
account in the Fourier computations. Otherwise, all weights are assumed
to have equal values.
• Compute spectral window
If the box is checked, a spectral window of the current data set is computed. A spectral window shows the effects of the sampling of the data
on the Fourier analysis and thus permits to estimate aliasing effects. The
spectral window is computed from a Fourier analysis of the data taking
the times of measurements and setting all measurement intensities to the
value 1. The shape of the spectral window does not depend on the selected dispersion range and should be plotted for a frequency range that
is symmetric around 0 for visual inspection.
The Spectroscopy Modules
41
• Compute significance level
If the box is checked, the significance level at a certain frequency value
is computed and shown in the plot window as a red line. The following
parameters can be set:
– Frequency
Frequency value of the peak of interest. The data will be prewhitened with this frequency and the significance level will be computed from the pre-whitened Fourier spectrum.
– S/N level
Multiplicity factor of the signal-to-noise level. The displayed significance level will be multiplied by this factor.
– Box size
Box size b for the computation of the noise-level in units of the
frequency. The displayed significance level is computed from the
running mean of the pre-whitened Fourier spectrum. For each frequency value F , the noise level is calculated from the mean of the
range [F − b/2, F + b/2].
You must choose what data the calculations are based on and then press
Calculate Fourier. The significance level will be shown as a red line in
the plot window together with the Fourier spectrum of the data (blue
line).
This option cannot be selected when computing a Fourier spectrum across
the line profile. In this case, no signal-to-noise criterion (e.g., significance
of a peak when SNR ≥ 4) can be applied, because the computed Fourier
spectrum is an average of all Fourier spectra across the line profile. To
determine the significance of a frequency peak across the line profile, one
should use the function Pixel with highest amplitude at f= in combination with Compute significance level. By doing so, only the dispersion
bin having the largest amplitude of the indicated frequency is taken into
account for the computation of its SNR.
• Calculations based on
Defines what the calculation of the Fourier analysis is based on. The
following settings are possible:
– Pixel-by-pixel (1D, mean Fourier spectrum)
Computes a Fourier spectrum which is the mean of all Fourier spectra across the selected dispersion range. The resulting Fourier spectrum is therefore one-dimensional with frequency on the x-axis and
mean amplitude on the y-axis. The signal-to-noise ratio of a peak
42
Fourier Analysis
cannot be determined since a frequency can have different amplitudes across the line profile. For this, use the option Pixel with
highest amplitude at f= in combination with Compute significance
level.
– Pixel-by-pixel (2D, only export)
Computes a Fourier spectrum for each pixel (= bin) across the selected dispersion range. The output is a two-dimensional Fourier
spectrum where the amplitude is a function of frequency and dispersion. Due to the generally large data size of such a Fourier
spectrum (some megabytes), it can only be exported to an ASCII
file. A contour plot of these data can easily be created by the user,
e.g., with the program gnuplot with the commands set pm3d map
and splot.
– Pixel with highest amplitude at f =
Computes a Fourier spectrum at the pixel where the given frequency
has the highest amplitude. The purpose of this task is to determine
the significance of a frequency peak in a line profile. You must
indicate a frequency value to carry out this operation. This task
computes for each pixel across the selected dispersion range a Fourier
spectrum and determines at which position in the profile the given
frequency has the highest amplitude.
– Equivalent width
Computes the equivalent width of the line profile (inside the indicated dispersion range) and calculates its Fourier spectrum.
– 1st moment (radial velocity)
Computes the first moment <v 1 > of the line profile (inside the
indicated dispersion range) and calculates its Fourier spectrum.
– 2nd moment (variance)
Computes the second moment <v 2 > of the line profile (inside the
indicated dispersion range) and calculates its Fourier spectrum.
– 3rd moment (skewness)
Computes the third moment <v 3 > of the line profile (inside the
indicated dispersion range) and calculates its Fourier spectrum.
– 4th moment
Computes the fourth moment <v 4 > of the line profile (inside the
indicated dispersion range) and calculates its Fourier spectrum.
– 5th moment
Computes the fifth moment <v 5 > of the line profile (inside the
indicated dispersion range) and calculates its Fourier spectrum.
The Spectroscopy Modules
43
– 6th moment
Computes the sixth moment <v 6 > of the line profile (inside the
indicated dispersion range) and calculates its Fourier spectrum.
• Calculate Fourier
Computes the discrete Fourier transform (DFT) according to your settings
and displays it in the plot window as a blue line. The mean of the
time series is automatically shifted to zero before the Fourier transform
is computed. The peak having highest amplitude in the given range is
marked in the plot window. A dialogue window reports the frequency
having the highest amplitude in the selected frequency range and asks
if it should be added to the frequency list of the Least-Squares Fitting
Tab.
4.2.2
List of Calculations
Previous Fourier calculations can be selected from the list. Each computed
Fourier spectrum is saved and listed here. If a project is saved, the list of
computed Fourier spectra is also saved but compressed to decrease the project
file size (only extrema are saved). The following operations are possible via the
Data Menu:
• Remove Data Set
Removes the currently selected data set from the list.
• Rename Data Set
Renames the currently selected data set.
• Export Data Set
Exports the currently selected data set to an ASCII file having the following three-column format: frequency, amplitude, power.
4.2.3 Fourier Spectrum Plot
Shows the most recently computed Fourier analysis or the selection from the list
of calculations. The Fourier spectrum is shown as a blue line, the significance
level, if included, is shown as a red line. The frequency and amplitude of the
peak having the highest frequency are indicated.
For more information about the plot window, we refer to p. 28.
44
Least-Squares Fitting
4.3 Least-Squares Fitting
This module provides tools to compute a non-linear multi-periodic least-squares
fit of a sum of sinusoidals to your data. The fitting can be applied for every bin
of the spectrum separately (pixel-by-pixel) or for the different line moments.
The fitting formula is
Ai sin 2π(Fi t + φi ) .
Z+
(6)
i
Here, Z is the zero-point, and Ai , Fi , and φi are respectively amplitude, frequency and phase (in units of 2π) of the i-th frequency.
The least-squares fit is carried out with the Levenberg-Marquardt algorithm.
For a given set of frequencies, either their zero-point, amplitude and phase
can be optimised (Calculate Amplitude & Phase), or additionally also the
frequency value itself (Calculate All). The latter is only available for onedimensional time series (i.e., the line moments). The data can be pre-whitened
with the computed fit and written to the Data Sets Box of the Data Manager
Tab. A screenshot of the Least-Square Fitting Tab is displayed in Figure 8.
Before a mode identification can be carried out, a least-squares fit to the
data must be calculated. In order to apply the Fourier parameter fit method, the
fit must be based on the pixel-by-pixel values. To apply the moment method,
the fit must be based on the first moment.
4.3.1 Settings
Defines the settings for the calculation of the least-squares fit.
• Dispersion range
Minimum/Maximum values of the dispersion range in Ångstrom or km s−1
(dependent on the input data). The range specifies which wavelength bins
of the spectrum will be taken into account for the computation of the
least-squares fit.
• Use weights
If this box is checked, the weight indicated for each spectrum is taken
into account in the least-squares fit. Otherwise, all weights are assumed
to have equal values.
• Pre-whiten data
If this box is checked, the data will be pre-whitened with the computed
least-squares fit and written into a new data set. If the calculations are
based on pixel-by-pixel, a new time series of spectra will be created. In
The Spectroscopy Modules
45
Figure 8: Screenshot of the Least-Squares Fitting Tab.
this case, the zero-point profile will not be taken into account for the
pre-whitening to preserve the mean shape of the line profile. When a
least-squares fit of a line moment is computed, the pre-whitened time
series of moments is written into a new data set (one-dimensional timeseries).
• Calculations based on
This drop-down box defines what the computation of the least-squares
fit is based on. The following settings are possible:
– Pixel-by-pixel (MI: FPF)
For each pixel (= dispersion bin) across the selected dispersion
range, a separate least-squares fit is computed by improving zeropoint, amplitude, and phase. For this option, the frequency value
cannot be improved. The results of the fit for each frequency are displayed in the plot window. The integral of the amplitude across the
line in the indicated dispersion range is written to the frequency list.
46
Least-Squares Fitting
This option has to be chosen if the Fourier parameter fit mode identification method should be applied. The computed least-squares
fits can be imported from the Mode Identification Tab.
– Equivalent width
Computes the equivalent width of the line profile (inside the indicated dispersion range) and calculates a least-squares fit. The
results are written to the frequency list.
– 1st moment (radial velocity, MI: moment)
Computes the first moment <v 1 > of the line profile (inside the
indicated dispersion range) and calculates a least-squares fit. This
option has to be chosen if the moment method should be applied for
the mode identification. The computed least-squares fit and time
series of moments can be imported from the Mode Identification
Tab.
– 2nd moment (variance)
Computes the second moment <v 2 > of the line profile (inside the
indicated dispersion range) and calculates a least-squares fit.
– 3rd moment (skewness)
Computes the third moment <v 3 > of the line profile (inside the
indicated dispersion range) and calculates a least-squares fit.
– 4th moment
Computes the fourth moment <v 4 > of the line profile (inside the
indicated dispersion range) and calculates a least-squares fit.
– 5th moment
Computes the fifth moment <v 5 > of the line profile (inside the
indicated dispersion range) and calculates a least-squares fit.
– 6th moment
Computes the sixth moment <v 6 > of the line profile (inside the
indicated dispersion range) and calculates a least-squares fit.
• Compute signal-to-noise ratio
Computes the amplitude SNR of each selected frequency and displays it in
the list of frequencies. The noise is computed from the Fourier spectrum
of the pre-whitened data. The Box size is the width of the frequency
range which is taken into account for the calculation of the noise. For a
box width of b, the noise of a given frequency F is the mean value of the
Fourier spectrum of the residuals in the range [F − b/2, F + b/2].
How the SNR is computed depends on the selected calculation basis. In
the case of pixel-by-pixel, for each frequency, the dispersion bin where this
The Spectroscopy Modules
47
frequency has the highest amplitude is determined. The SNR is derived
from this bin alone. For the moments, the SNR is computed from the
ratio of AF and the noise of pre-whitened Fourier spectrum at the position
of F .
• Calculate Amplitude + Phase
Computes a least-squares fit with the Levenberg-Marquardt algorithm
using the above mentioned fitting formula. The zero-point, amplitude
and phase are calculated, whereas the frequency is kept fixed.
If the computations are based on pixel-by-pixel, the determined (improved) values of zero-point, amplitude, and phase are plotted for each
frequency in the plot window. The uncertainties are derived from the
error matrix of the least-squares fitting algorithm. The residuals (=mean
standard deviation of the residuals) and the integral of the amplitude
across the selected dispersion range are written to the frequency list.
For the moments, the following optimised values are written into the
frequency list: the zero-point and its uncertainty, the standard deviation
of the residuals, for each selected frequency its amplitude and phase,
and their formal uncertainties derived from the error matrix of the leastsquares fitting algorithm.
• Calculate All
Computes a least-squares fit with the Levenberg-Marquardt algorithm
using the above mentioned fitting formula. The zero-point, amplitude,
phase and frequency are improved. This option cannot be selected for
computing a least-squares fit across the profile (pixel-by-pixel). For the
moments, the following optimised values are written to the frequency list:
the zero-point and its uncertainty, the standard deviation of the residuals,
the frequency, amplitude and phase and their formal uncertainties derived
from the error matrix of the least-squares fitting algorithm.
4.3.2 List of Frequencies
The List of Frequencies Box displays the results of the least-squares fit. Frequencies that should be included in a least-squares fit can be entered in the
column Frequency and selected by clicking on the check box in the column
Use. The following values are shown in this box after a least-squares fit has
been calculated:
48
Least-Squares Fitting
• Least-squares fit across the profile with the option Pixel-bypixel
The mean standard deviation of the residuals (pre-whitened spectra)
across the selected dispersion range (Residuals) and, for each selected
frequency, the integral of the amplitude across the dispersion range and
its uncertainty are shown. If Compute signal-to-noise ratio has been selected, the amplitude SNR of each frequency is shown in the column SNR.
This value refers to the SNR of the dispersion bin where the particular
frequency has its highest amplitude.
• Least-squares fit with the option Moments (Equivalent width
and 1st through 6th moment)
The zero-point, its formal uncertainty and the standard deviation of the
residuals are shown at the top. The improved values of frequency, amplitude and phase and their formal statistical uncertainties are shown in
the list. The phase and its uncertainty is in units of 2π. The last column
lists the SNR for each frequency (only shown when the box Calculate
signal-to-noise ratio has been checked). The SNR is computed from the
Fourier spectrum after pre-whitening with all selected frequencies. For
each frequency, the assumed noise-level is computed from the mean amplitude around the frequency value with the box size indicated in the field
Calculate signal-to-noise ratio.
• Export frequencies
Exports all frequency, amplitude and phase values of the List of frequencies to an ASCII file. The file format is compatible with the program
Period04 (Lenz & Breger 20051 ).
• Import frequencies
Imports an ASCII list of frequencies having the following four-column
format separated by tabulators: frequency counter, frequency value, amplitude, phase (see example below). Bracketed values are unchecked
frequencies. This format is compatible with the program Period04 (Lenz
& Breger 20051 ).
F1
F2
F3
F4
(5.2861
6.2566
5.885284
(10.583572
0.029179815
0.017759398
0.029203887
0.022958049
1 http://www.univie.ac.at/tops
0.534 )
0.7461502
0.47617591
0.55097456 )
The Spectroscopy Modules
49
4.3.3 Least-Squares Fit plot
The plot window displays zero-point, amplitude and phase and their uncertainties of the current least-squares fit across the line profile (only active when
pixel-by-pixel was selected for the calculations). The frequency can be selected
in the combo box at the top.
• Export current LSF
Export the current least-squares fit across the line profile to ASCII-files.
You must indicate a file name with an extension (like name.ext). For
each frequency x, a separate output file, called name Fx.zap is created.
The files consist of the following columns: dispersion value, zero-point,
standard deviation of the zero-point, amplitude, standard deviation of the
amplitude, phase (in units of 2π), standard deviation of the phase.
For more information about the plot window, we refer to p. 28.
50
Line Profile Synthesis
4.4 Line Profile Synthesis
This module can be used to compute a time series of synthetic line profiles
of a multi-periodically radially or non-radially pulsating star. The synthetic
line profiles are written as a new data set to the Data Manager Tab. The
Fourier parameter fit method in famias uses the same implementation for the
computation of the synthetic line profiles. A screenshot of the Line Profile
Synthesis Tab is displayed in Figure 9.
4.4.1
Theoretical background
We now briefly describe the approach for computing the line profiles. For a
more detailed description, we refer to Zima (2006). The following is slightly
modified from this publication.
We assume that the displacement field of a pulsating star can be described
by a superposition of spherical harmonics. Our description of the Lagrangian
displacement field is valid in the limit of slow rotation taking the effects of the
Coriolis force to the first order into account (Schrijvers et al. 1997). Since
deviations from spherical symmetry due to centrifugal forces are ignored, our
formalism is reliable only for pulsation modes whose ratio of the rotation to
the angular oscillation frequencies Ω/ω < 0.5 (Aerts & Waelkens 1993). This
limitation excludes realistic modeling of rapidly rotating stars and low-frequency
g-modes. For higher frequency p-modes, such as observed in many δ Scuti and
β Cephei stars, the given criterion is fulfilled and a correct treatment is provided.
The intrinsic line profile is assumed to be a Gaussian. This is a good
approximation for strong spectral lines of metals where the rotational broadening dominates over other line-broadening mechanisms. A distorted profile is
computed from a weighted summation of Doppler shifted profiles over the visible stellar surface. Additionally, we take into account a parametrised variable
equivalent width due to temperature and brightness variations across the stellar
surface.
We assume an unperturbed stellar model to be spherically symmetric, in
hydrostatic equilibrium, and unaffected by a magnetic field or rotation. The
position of a mass element of such a star can be written in spherical coordinates
(r, θ, φ) defined by the radial distance to the stellar centre r, the co-latitude
θ ∈ [0, π], i.e., the angular distance from the pole, and the azimuth angle
φ ∈ [0, 2π]. Any shift of a mass element from its equilibrium position is given
by the Lagrangian displacement vector ξ = (ξr , ξθ , ξφ ). This displacement
modifies the initial pressure p0 , the density 0 , and the gravitational potential
Φ0 as a function of r, θ, φ, and the time t. The linear, adiabatic perturbations
of these parameters are governed by the four equations of hydrodynamics, i.e.,
Poisson’s equation, the equation of motion, the equation of continuity, and
51
The Spectroscopy Modules
the energy equation, which translates into the condition for adiabacity in the
absence of non-adiabatic effects in the stellar envelope.
This set of differential equations is solved by assuming that all perturbed
quantities depend on Y m (θ, φ) eiωt , where Y m (θ, φ) denotes the spherical
harmonic of degree and of azimuthal order m, ω is the angular pulsation
frequency, and t the time. The spherical harmonic can be written as
Y m (θ, φ) ≡ N m P
|m|
(cos θ) eimφ .
(7)
|m|
denotes the associated Legendre function of degree
Here, P
imuthal order m, given by
P m (x) ≡
+m
m d
(−1)m
(1 − x2 ) 2
(x2 − 1) ,
2 !
dx +m
and az-
(8)
and
N m = (−1)
m+|m|
2
(2 + 1) ( − |m|)!
4π ( + |m|)!
(9)
is a normalisation constant. The definition of N m changes from author to
author, which must be taken into account when comparing derived amplitudes.
In our formalism a positive value of m denotes a pro-grade mode, i.e., a
wave propagating in the direction of the stellar rotation around the star.
We model uniform stellar rotation, including first-order corrections due to
the Coriolis force, which gives rise to toroidal motion. The resulting displacement field in the case of a slowly rotating non-radially pulsating star cannot be
described by a single spherical harmonic anymore. It consists of one spheroidal
and two toroidal terms, which only have a horizontal component, and is given
for an angular frequency ω in the stellar frame of reference and a time t by
ξ=
√
4π as,
1, k
∂
1 ∂
,k
∂θ sin θ ∂φ
Y m (θ, φ) e−iωt
+ at,
+1
0,
1 ∂
∂
,− ,
sin θ ∂φ ∂θ
−i(ωt+ 2 )
Ym
+1 (θ, φ) e
+ at,
−1
0,
1 ∂
∂
,− ,
sin θ ∂φ ∂θ
−i(ωt− 2 )
Ym
−1 (θ, φ) e
π
(10)
π
(Martens & Smeyers 1982, Aerts & Waelkens 1993, Schrijvers et al. 1997).
Note that the term proportional to Y m
−1 is not defined for radial and sectoral
modes. Here, as, denotes the amplitude of the spheroidal component of the
displacement field, whereas at, +1 and at, −1 are the corresponding amplitudes
52
Line Profile Synthesis
of the toroidal components. We neglect the first order correction of the amplitude as due to rotation, whereby the amplitudes of the toroidal terms can be
approximated by the following relations:
at,
+1
= as,
at,
−1
= as,
Ω − |m| + 1 2
(1 − k),
ω
+1
2 +1
Ω + |m| 2
1 + ( + 1)k .
ω
2 +1
(11)
√
The
4π in Eq. (10) is introduced in order to scale the normalisation
√ factor
4πN00 = 1, such that as represents the fractional radius variation for radial
pulsation.
The ratio of the horizontal to vertical amplitude, which attains quite different values for p- and g-modes, can be approximated by the following relation
in the limit of no rotation
GM
ah
(12)
= 2 3
k≡
as
ω R
where ah and as are the horizontal and vertical amplitude, G is the gravitational
constant, M is the stellar mass, and R is the stellar radius.
We assume that the intrinsic line profile is a Gaussian, which may undergo
equivalent width changes due to temperature variations. The distorted line
profile is calculated from an integration of an intrinsic profile over the whole
visible stellar surface, which - for computational purposes - numerically results
in a weighted summation over the surface grid.
We define the intrinsic Gaussian profile in a surface point having the lineof-sight velocity V as
I(v, Teff , log g) =
1+
δF
F
1−
Wint (Teff ) −( V −v )2
σ
√
.
e
σ π
(13)
Here, v is the velocity across the line profile, δF/F takes the surface flux of the
emitting segment into account, Wint (Teff ) is the equivalent width as a function
of the effective temperature (see Eq. (14)); and σ is the width of the intrinsic
profile. The distorted line profile is calculated by summation over all visible
segments on the surface grid of (θ, φ) weighted over the projected surface.
The response of a line’s equivalent width to local temperature changes
is dependent on the involved element, its excitation, and the temperature in
the zone where the line originates. In order to take this effect into account,
a variable equivalent width of the intrinsic line profiles must be considered for
calculating the distorted profile. Since there is no phase shift between δWint (T )
and δT , we can write, following Schrijvers & Telting (1999),
Wint (Teff ) = W0 (1 + αW δTeff ),
(14)
53
The Spectroscopy Modules
where αW is a parameter denoting the equivalent width’s linear dependence on
δTeff , which can be approximated for δTeff
1. In famias, this parameter is
denotes as d(EW)/d(Teff).
For calculating the local temperature, surface gravity, and flux variations,
we closely followed Balona (2000) and Daszyńska-Daszkiewicz et al. (2002).
Since the flux variation δF/F is mainly a function of Teff and log g, we can
write in the limit of linear pulsation theory
δTeff
δg
δF
= αT
+ αg
=
F
Teff
g
δR
1
3ω 2
=
αT f eiψf − αg 2 +
R0
4
4πG<ρ>
,
(15)
where αT and αg given by
αT =
∂ log F
∂ log Teff
g
and αg =
∂ log F
∂ log g
Teff
(16)
are partial derivatives of the flux, which can be calculated from static model
atmospheres for different passbands. Here, R0 is the unperturbed radius, G
denotes the gravitational constant, <ρ> is the mean density of the star, f the
absolute value of the complex fR +ifI , and ψf the phase lag of the displacement
between the radius and temperature eigenfunctions. Then f describes the
ratio of flux to radius variations, which can be transformed into the ratio of
temperature to radius variations due to the fact that the flux is proportional to
T 4.
4.4.2 Stellar Parameters
In this box, the global stellar parameters that should be used for the computation
of the synthetic line profiles are defined.
• Radius
Stellar radius in solar units. In combination with the stellar mass, this
parameter determines the k-value of the pulsation mode, i.e., the ratio of
the horizontal to vertical displacement amplitude.
• Mass
Stellar mass in solar units. In combination with the stellar radius, this
parameter determines the k-value of the pulsation mode, i.e., the ratio of
the horizontal to vertical displacement amplitude.
54
Line Profile Synthesis
Figure 9: Screenshot of the Line Profile Synthesis Tab.
In famias, the following non-linear limb darkening law, described by Claret
et al. (2000), is used to determine the brightness of the surface elements as a
function of the line-of-sight angle α:
I(µ)
=1−
I(1)
4
k
ak (1 − µ 2 ).
(17)
k=1
Here, I(µ) is the specific intensity on the stellar disk at a certain line-of-sight
angle θ with µ = cos θ and ak is the k-th limb darkening coefficient.
The limb darkening coefficients are determined through the values of Teff ,
log g, and metallicity by bi-linear interpolation in a precomputed grid (Claret et
al. 2000).
• Teff
Effective temperature of the stellar surface in Kelvin.
The Spectroscopy Modules
55
• log g
Value of the logarithm of the gravity at the stellar surface in c.g.s. units.
• Metallicity
Stellar metallicity [m/H] relative to the sun.
• Inclination
Angle between the line of sight and the stellar rotation axis, which is
assumed to be the symmetry axis for pulsation, in degrees.
• v sin i
Projected equatorial rotational velocity in km s−1 . The model assumes
rigid rotation.
4.4.3 Line Profile Parameters
In this box, parameters of the synthetic line profile are defined.
• Central wavelength
Central wavelength of the line profile in units of Ångstrom. This parameter determines the limb darkening coefficients, which are linearly
interpolated in precomputed grids using the formalism by Claret (2000).
• Equivalent width
Equivalent width of the line profile in km s−1 .
• d(EW)/d(Teff )
Ratio between the equivalent width variations of the local intrinsic Gaussian line profile and the local temperature variations. This parameter can
have positive as well as negative values (in the latter case the equivalent
width decreases with increasing temperature). In combination with the
non-adiabatic parameter f , this parameter controls the temporal equivalent width variations of the line profile.
• Intrinsic width
Width of the intrinsic Gaussian line profile in km s−1 . This is the width
of the line profile, unbroadened by stellar rotation and pulsation.
• Zero-point shift
Shift of the line profile with respect to zero Doppler velocity in km s−1 .
The synthetic line profiles are computed for the assumption that the
barycentre of the line profile is at zero Doppler velocity.
56
Line Profile Synthesis
4.4.4
Pulsation Mode Parameters
In this list, the parameters of the pulsation modes are defined.
• Use
If a box is checked, the corresponding pulsation mode is taken into account for the computation of the synthetic line profiles.
• Frequency
Value of the pulsation frequency in d−1 in the observer’s frame of reference.
• Degree
Spherical degree
of the pulsation mode ( ≥ 0).
• Order m
Azimuthal order m of the pulsation mode (|m| ≤ ). A positive value of
m denotes a pro-grade pulsation mode.
• Vel. Amp.
Velocity amplitude of the pulsation mode in km s−1 . The amplitude is
normalised in such a way that it represents the intrinsic velocity for a
radial pulsation mode.
• P
Phase φ of the pulsation mode in units of 2π.
• ||f ||
Absolute value of the complex non-adiabatic parameter f . For a definition, we refer to Eq. (30) on p.103. In combination with the parameter
d(EW)/d(Teff) this parameter controls the equivalent width variations
of the line profile.
• P (f )
Phase lag ψf between the radius and temperature eigenfunctions, in units
of radians.
4.4.5 General Settings
In this box, some general parameters for the computation of the synthetic line
profiles can be defined.
• No. of segments
Total number of segments (visible and invisible) on the stellar surface.
The Spectroscopy Modules
57
The segments are uniformly distributed across the surface, i.e., each segment covers approximately the same surface area. The segments lie on a
spiral that has its endpoints at the poles of the sphere. At each segment,
a local intrinsic Gaussian profile is defined and shifted by the local Doppler
velocity. The overall synthetic line profile is computed by summing up
over all visible local profiles. The higher the number of segments is, the
better the precision of the computation gets at the cost of computational
speed (linear increase).
• Dispersion range
These values define the dispersion grid in Doppler velocity (km s−1 )
for the computation of the synthetic line profiles. A minimum, maximum, and a step value must be indicated. Internally, a fixed step size of
1 km s−1 is taken, and the minimum and maximum limits expanded by
20 km s−1 to ensure that the profile is computed correctly at the limits. These synthetic profiles are then linearly interpolated onto the grid
defined by the dispersion range.
• Time range
Defines the minimum, maximum, and step values of the grid of times
that should be used for the computation of the line profiles.
• Import times from file
This allows the user to import a file that contains a list of time values
that should be used for the line profile computation.
• Data set name
Name of the data set of synthetic line profiles that is written to the Data
Manager Tab.
• Save parameters
Saves the parameters you entered in this tab to a file.
• Load parameters
Loads the parameters for computing synthetic line profiles from a file.
• Compute line profiles
Computes the synthetic line profiles and writes them into a new data set
to the Data Manager Tab.
58
Mode Identification
4.5 Mode Identification
This module is dedicated to the spectroscopic mode identification with the
Fourier parameter fit (FPF) method and the moment method. Its main functions are: importing the observational data for the mode identification (leastsquares fit across the line profile or line moments), setting stellar and pulsational
parameters, defining the free parameters for the optimisation (=mode identification), and setting the parameters of the optimisation procedure. The results
of the mode identification are written to the Results Tab and to log-files on the
disk. A screenshot of the Mode Identification Tab is displayed in Figure 10.
Observational data can be imported and the parameters to be optimised
can be chosen. Two different approaches for the identification of pulsation
modes are available: the FPF method (Zima 2006) and the moment method
(Balona 1986a,b, 1987; Briquet & Aerts 2003). Both methods assume the following: oscillations in the limit of linearity (sinusoidal variations), slow rotation
(neglecting second order rotational effects), a limb darkening law according to
Claret (2000), a symmetric intrinsic line profile, which is a Gaussian for the FPF
method, and a displacement field that can be described by a sum of spherical
harmonics. The FPF method furthermore permits to model a variable equivalent line width caused by local temperature variations on the stellar surface.
Both methods rely on the fact that the bin-intensities across an absorption
line profile vary with the period of the associated non-radial pulsation mode.
Whereas the FPF method makes use of the intensity information of each dispersion bin across the line profile, the moment method uses integrated values
across the profile. This is the main difference between the two methods and
leads to a difference in the capability of identifying pulsation modes. For the
FPF method there is in principle no upper limit for the identification of ( , m),
but a very small value of v sin i as well as a large pulsation velocity relative to
the projected rotational velocity can make mode identification impossible. In
the latter two cases, the moment method is better suited, but this method is
only sensitive for low-degree pulsation modes with ≤ 4. In the way as they are
implemented in FAMIAS, both methods take into account the uncertainties of
the observations and the goodness of the fit (=mode identification) is expressed
as a chi-square value. The optimisation is carried out using genetic optimisation. Such an approach permits to search for local minima, and consequently
the global minimum, in a complex large multi-parameter space.
For excellent reviews of spectroscopic mode identification techniques we
refer to Aerts & Eyer (2000), Balona (2000), and Mantegazza (2000).
The Spectroscopy Modules
59
Figure 10: Screenshot of the Mode Identification Tab.
4.5.1
The FPF method
This method relies on the rotational broadening of a line profile and thus delivers
good and reliable results for v sin i > 20 km s−1 . The main assumptions of
the models have been described above. For a more detailed description of this
method, we refer to Zima (2006).
For each detected pulsation frequency and each dispersion bin across the
line profile, a multi-periodic non-linear least-squares fit of sinusoids is computed
(use the Least-Squares Fitting Tab of famias). This delivers the observational
values of zero-point (Zo ), amplitude (Ao ) and phase (Po ) as a function of the
position in the line profile. These observational values are fitted with theoretical
values derived from synthetic line profiles.
The FPF method comes in different flavours in famias, the main differences
concerning the temporal distribution of the synthetic line profiles and the number of pulsation modes taken into account simultaneously. The FPF method
makes use of the fact that the zero-point, amplitude and phase (ZAP) across
60
Mode Identification
the line profile depend on the ( , m)-values of the associated pulsation modes.
By comparing the theoretical values of ZAP with the observed ZAP-values, one
can, in principle, determine the degree and azimuthal order of a pulsation mode.
The reduced χ2ν , which is regarded as goodness of the fit, is calculated from
complex amplitudes in order to combine amplitude and phase information as
follows
χ2ν =
1
2nλ − N
nλ
i=1
(AoR,i − AtR,i )2
(AoI,i − AtI,i )2
.
+
2
2
σR,i
σI,i
(18)
Here, nλ is the number of pixels across the profile, N is the number of free
parameters, Ao and At denote observationally and theoretically determined
values, respectively, AR = Aλ cos φλ and AI = Aλ sin φλ are the real and
imaginary part of the complex amplitude, and σ is the observational error.
Since the amplitude and phase of a given wavelength bin are treated as
independent variables, the variances are calculated from
2
= σ(Aλ )2 cos2 φλ + σ(φλ )2 A2λ sin2 φλ ,
σR,λ
(19)
2
= σ(Aλ )2 sin2 φλ + σ(φλ )2 A2λ cos2 φλ .
σI,λ
(20)
4.5.2 Optimisation settings for the FPF method
In the drop-down menu Select MI method, the following selections are possible
as optimisation settings:
• Compute vsini, EW, intrinsic width, and velocity offset (fit
Z) With this setting, the pulsationally independent parameters v sin i,
the equivalent line width, the intrinsic width σ, and the Doppler velocity
offset are determined from a fit of a rotationally broadened synthetic
line profile to the observational zero-point profile. This method only
provides reliable results if the line profile is not significantly broadened by
pulsation. The determined values can be used as starting values for the
mode identification.
• FPF Method: fit AP
For each selected pulsation frequency, a single-mode displacement field
and the corresponding line profiles are computed for 10 phase bins evenly
distributed over one pulsation cycle. The theoretical values for AP are
computed from a mono-periodic least-squares fit to these synthetic line
profiles. A chi-square value is computed by taking into account the observed and theoretical Fourier parameters and their observational uncertainties (for details see Zima, 2006). The zero-point across the line profile,
The Spectroscopy Modules
61
which gives a strong constraint on v sin i, the intrinsic line width and the
equivalent width, is ignored in this case. Therefore, this option should
only be chosen if already good constraints on these global parameters are
known.
This method assumes that the different pulsation modes do not have a
significant influence on each other’s ZAP values. Such an assumption is
valid if the ratio of the radial velocity amplitude to the projected rotational
velocity for all frequencies is < 0.2. For higher values, the ZAP-values
across the line profile might be distorted and impossible to model with a
single-mode displacement field. In this case, the approach FPF Method
(complete time series): fit AP (see below) or the moment method are
better suited.
• FPF Method: fit ZAP
This option is identical to FPF Method: fit AP with the exception that
also the observed and theoretical zero-points are taken into account for
computing the fits.
• FPF Method (complete time series): fit AP
With this option, multi-periodicity and the complete series of observational times are considered for applying the FPF method. Synthetic line
profiles are computed from a multi-mode displacement field, taking all selected pulsation modes into account. For each time step of the observed
time series, one profile is computed. The theoretical AP across the profile
are derived from a multi-periodic least-squares fit. Since multi-periodicity
is considered for this method, it can in principle be applied to stars for
which the radial velocity amplitude to the projected rotational velocity is
of the order of 1.
This method is computationally much slower since not only 10 synthetic
profiles but the complete time series have to be modelled. The zero-point
across the line profile, which gives a strong constraint on v sin i, on the
intrinsic line width and on the equivalent width, is ignored in this case.
Therefore, this option should only be chosen if already good constraints
on these global parameters are available.
• FPF Method (complete time series): fit ZAP
This option is identical to FPF Method (complete time series): fit AP
with the exception that also the observed and theoretical zero-points are
taken into account for computing the fits.
62
Mode Identification
4.5.3
Practical information for applying the FPF method
• The dispersion range of the least-squares fit (ZAP across the line profile)
that is imported to the Mode Identification Tab should cover the range
where the amplitude reaches significant values. In general, the continuum
should therefore be excluded and the line wings can in many cases be excluded. The least-squares fit should include all significant frequencies also combination and harmonic frequencies since they can have a significant effect on the Fourier parameters of the other pulsation frequencies.
During the mode identification, combination and harmonic frequencies
should not be set as free parameters unless one has a reason to assume
that they are pulsation modes intrinsic to the star.
• The stellar parameters radius, mass, Teff , log g, and metallicity should
be quite well-known. Radius and mass can be set as variable during the
fit and have an influence on the k-value (ratio of horizontal to vertical
displacement amplitude) of the pulsation modes. The three other parameters determine the limb darkening coefficients and slightly affect the
fitted v sin i and intrinsic line width.
• Before starting the mode identification, one should determine starting
values for v sin i, the intrinsic width, the equivalent width, and the velocity
zero-point offset. This can be done by selecting Compute vsini, EW,
intrinsic width, and velocity offset (fit Z) in the field Optimisation
Settings. For this optimisation no pulsation mode should be selected
and v sin i, the equivalent width, the intrinsic width and the zero-point
shift should be set as a variable in a reasonable range. This mode of
optimisation fits a theoretical rotationally broadened line profile to the
observational zero-point profile. Any pulsational broadening of the latter
is neglected during the fit and can lead to an overestimation of v sin i or
the intrinsic width.
• The most reliable results for the mode identification will be obtained when
following an iterative scheme. In general, one can fix the equivalent width
and the zero-point shift, once they have been determined with sufficient
precision in the previous step. The values of v sin i and the intrinsic
width should be set as variable in a range that is determined by the fit
in the previous step (taking the chi-square values into account). The
inclination should be set as variable in the complete possible (realistic)
range between about 5 and 90 degrees taking a step of about 10 degrees.
It does, in general, not make sense to set the lower range to 0 since this
would imply infinitive equatorial velocity if v sin i > 0 km s−1 . For each
pulsation mode, a separate mode identification should be acquired first
The Spectroscopy Modules
63
(using FPF Method: fit AP or FPF Method: fit ZAP). The degree,
the azimuthal order and amplitude should be set to reasonable ranges.
• If the pulsation frequency has a significant amplitude in the least-squares
fit of the first moment, its phase value can be used for the mode identification. In this case, the phase can be set as variable in the range φ<v1 > ,
φ<v1 > +0.5 with a step of 0.5. If the frequency is not detected in the first
moment, the phase value has to be set as free in the range between 0 and
1 with a step-size of ≤ 0.01. After a first run of the mode identification
with and m as free parameters (see field Optimisation Settings), one
normally has a constraint on the phase value φ and it should be set to φ,
φ + 0.5 with a step of 0.5 (different pulsation modes have their best fit
at phase values that differ by half a period - this is due to the fact that
we limit the inclination angle to a range between 0 and 90 degrees and
not between 0 and 180 degrees). The further mode identification should
be carried out by setting the search method to and m: grid search.
• Equivalent width variations of the line profile due to local temperature
variations at the stellar surface can be taken into account by considering
the parameters ||f || and Phase (f) (see Eq. (15)) in combination with
the parameter d(EW )/d(T ef f ) which can be positive or negative (see
Eq. (14)). The parameter space is significantly enlarged by setting these
parameters as variable, so it is important to already have some constraints
on and m before attempting to fit the equivalent width variations.
• Multi-mode identification gives only good results if already some constraint about and m of the pulsation modes has been obtained. Otherwise the genetic optimisation algorithm may end up in a local minimum
due to the large parameter space.
• The number of segments on the stellar surface (see field General Settings) should have a value of at least 1000. The lower this number, the
lower the precision of the computations. For slowly rotating stars having
low-degree modes ( < 4), a value between 1000 and 3000 in general
is sufficient. For more rapidly rotating stars (v sin i > 50 km s−1 ) and
high-degree modes, this value should be between 3000 and 10000.
4.5.4 The moment method
This method uses the first (radial velocity) and second (line width) moments
of a line profile as a discriminator for mode identification. The version of the
moment method we adopted, has been described in detail by Briquet & Aerts
(2003) and has been slightly modified in famias. The complete time series of
64
Mode Identification
observed moments is fitted with theoretical moments to determine and m.
The main assumptions for the computation of the theoretical moments have
been described above. We take into account the uncertainties of the observed
moments that can be computed numerically if the signal-to-noise ratio of the
spectra is known. The observational uncertainties are used to compute a chisquare value which provides a statistical criterion for the significance of the
mode identification.
The formalism for the calculation of the statistical uncertainty of the moments has been described on p. 34. The reduced χ2ν goodness-of-fit value is
computed from
χ2ν
1
=
2N
N
i=1
<v 1 >o −<v 1 >t
σ<v1 >o
2
+
<v 2 >o −<v 2 >t
σ<v2 >o
2
,
(21)
where N is the number of measurements of the time series, and the indices o
and t denote observed and theoretical values, respectively.
To speed up the computations of the theoretical moments, a grid of integrals
is precomputed for all possible and m-combinations for 0 ≤ ≤ 4 and all
inclinations between 0 and 90◦ . This computation is performed once the mode
identification has been started and may take a few minutes. The precomputed
integrals depend on the limb darkening coefficients and the number of segments
on the stellar surface. They are thus only recomputed in a subsequent mode
identification if the latter parameter or the parameters Teff, log g, Metallicity,
or Central wavelength have been modified.
4.5.5 Practical information for applying the moment method
• The dispersion range that is imported to the Mode Identification Tab
should cover the complete range of the line profile (from continuum to
continuum). The best approach would be to extract the line profile (see
p. 36) and select the complete dispersion range when computing the leastsquares fit. The least-squares fit should include all significant frequencies
as well as combination and harmonic frequencies. During the mode identification, the latter should not be set as free parameters unless one has
a reason to assume that they are pulsation modes intrinsic to the star.
• The stellar parameters radius, mass, Teff , log g, and metallicity should
be quite well known. Radius and mass can be set as variable during the
fit and have an influence on the k-value (ratio of horizontal to vertical
displacement amplitude) of the pulsation modes. The three other parameters determine the limb darkening coefficients and thus mainly affect the
fitted v sin i and intrinsic line width.
The Spectroscopy Modules
65
• The inclination should be set as variable in the complete possible (realistic) range between about 5 and 90 degrees taking a step of about 5
degrees. It does in general not make sense to set the lower range to 0
since this would imply infinite equatorial velocity if v sin i > 0 km s−1 .
• After importing the line moments, the phase of each pulsation mode is
set as free parameter between φ<v1 > , and φ<v1 > +0.5 with a step of 0.5
(different pulsation modes have their best fit at phase values that differ
by half a period. This is due to the fact that we limit the inclination
angle to a range between 0 and 90 degrees and not between 0 and 180
degrees).
• To obtain the most reliable results with the moment method, one should
set all detected pulsation frequencies (except combinations/harmonics) as
free parameters during the fit. This is due to the fact that the complete
time series of observed moments is fitted with theoretical moments. The
number of segments on the stellar surface (see General Settings Box)
should have a value of at least 1000. The lower this number, the lower the
precision of the computations becomes. For slowly rotating stars having
low-degree modes ( ≤ 4), a value between 1000 and 3000 is in general
sufficient. For more rapidly rotating stars (v sin i ≥ 50 km s−1 ) this value
should be between 3000 and 5000.
• The chi-square values of the fits are derived numerically from the computation of the line moments taking into account the SNR of the spectra.
If the SNR is not known for the single spectra, one can provide a mean
SNR (in the box Line Profile Parameters). This mean value can be
obtained by computing the inverse of the standard deviation at the continuum close to the line profile. In this case, the chi-square value is based
on the assumption that all spectra have the same SNR and may thus not
be reliable. If the SNR of each spectrum is known and listed in the Data
Manager, one should select the option Individual signal-to-noise ratio
in the box Line Profile Parameters.
4.5.6 Setting of parameters
During the mode identification several values can be set as fixed or free parameters. These values are listed in the boxes Stellar Parameters, Pulsation Mode
Parameters, and Line Profile Parameters. If the check box associated with
the parameter is unchecked, the parameter is fixed at a constant value during
the optimisation. In this case a value must be entered in the input box of the
column Min/Const. A parameter can be set to be variable (free) during the optimisation if the check box has been checked. In this case, two additional input
66
Mode Identification
boxes appear and values for the search range (Min, Max, Step) have to be entered. Some parameters, such as Teff or log g cannot be set as free parameters
since they determine the limb darkening coefficient. The more parameters are
set as variable simultaneously and the finer the step, the larger the parameter
space becomes. This must be taken into account when setting the optimisation
parameters to avoid ending up in a local minimum (see Section 4.5.10 for more
details).
4.5.7 Stellar Parameters
This box defines the global stellar parameters that should be used for the optimisation.
• Radius
Stellar radius in solar units. In combination with the stellar mass, this
parameter determines the k-value of the pulsation mode, i.e., the ratio of
the horizontal to vertical displacement amplitude.
• Mass
Stellar mass in solar units. In combination with the stellar radius, this
parameter determines the k-value of the pulsation mode, i.e., the ratio of
the horizontal to vertical displacement amplitude.
• Teff
Effective temperature of the star in Kelvin. Together with the parameters log g and Metallicity, this parameter defines the limb darkening
coefficients by linear interpolation in a precomputed grid (Claret et al.
2000).
• log g
Value of logarithm of the gravity at the stellar surface. Together with the
parameters Teff and Metallicity, this parameter defines the limb darkening coefficients by linear interpolation in a precomputed grid (Claret et
al. 2000).
• Metallicity
Stellar metallicity [m/H] relative to the Sun in logarithmic units. Together with the parameters log g and Teff, this parameter defines the
limb darkening coefficients by linear interpolation in a precomputed grid
(Claret et al. 2000).
• Inclination
Angle between the line of sight and the stellar rotation axis in degrees.
The Spectroscopy Modules
67
The models assume that the axis of rotation is aligned with the symmetry
axis of the pulsational displacement field.
• v sin i
Projected equatorial rotational velocity v sin i in km s−1 .
4.5.8 Pulsation Mode Parameters
This box defines the parameters of the pulsation modes that should be identified.
The observed data can be imported by clicking on the button. The imported
frequencies can be selected with the combo box. Each frequency that should
be taken into account for the mode identification must be selected by clicking
on the check box next to the frequency value.
• Button Import Data
Import the observational data for the mode identification. You must first
compute a least-squares fit across the line profile (for FPF method) or the
first moment (for moment method) in the Least-Squares Fitting Tab.
– For the moment method
Select in the combo box Calculations based on of the Least-Squares
Fitting Tab the option 1st moment and compute the least-squares
fit by clicking on Calculate Amplitude + Phase or Calculate All.
The import button in the Pulsation Mode Parameters Box of the
Mode Identification Tab will now display Import data for moment
method. After clicking, the spectra on which the least-squares fit
was based, and the selected frequencies and their phases are imported and displayed in the Pulsation Mode Parameters Box. The
frequencies can be selected from the combo box next to the import
button.
– For the FPF method
Select in the combo box Calculations based on of the Least-Squares
Fitting Tab the option Pixel-by-pixel and compute the least-squares
fit by clicking on Calculate Amplitude + Phase. The import button
in the Pulsation Mode Parameters box of the Mode Identification
Tab will now display Import data for FPF method. After clicking,
the parameters zero-point, amplitude, and phase across the line profile and the selected frequencies are imported and displayed in the
Pulsation Mode Parameters Box. The frequencies can be selected
from the combo box next to the import button.
68
Mode Identification
• Frequency
Value of the pulsation frequency as it was imported from the LeastSquares Fitting Tab. This value cannot be modified (only by importing
a new least-squares fit).
• Degree
Spherical degree of the pulsation mode ( ≥ 0). Defines the search
parameter space for the associated pulsation mode. The step size must
have a value of ≥ 1.
• Order m
Azimuthal order m of the pulsation mode (|m| ≤ ). Defines the search
parameter space for the associated pulsation mode. The step size must
have a value of ≥ 1.
• Vel. Amp.
Velocity amplitude of the pulsation mode in km s−1 . The amplitude is
normalised in such a way that it represents the intrinsic velocity for a
radial pulsation mode.
• Phase
Phase φ of the pulsation mode in units of 2π.
• ||f ||
Absolute value of the complex non-adiabatic parameter f . For a definition, we refer to Eq. (30) on p.103. In combination with the parameter
d(EW)/d(Teff) this parameter controls the equivalent width variations
of the line profile.
• P (f )
Phase lag ψf between the radius and temperature eigenfunctions, in units
of radians.
4.5.9 Line Profile Parameters
In this box, the parameters of the line profile are defined.
• Central wavelength
Central wavelength of the line profile in units of Ångstrom. This parameter determines the limb darkening coefficients, which are linearly interpolated in precomputed grids using the formalism by Claret et al. (2000).
The limb darkening coefficients slightly influence the derived values of
v sin i and the intrinsic width, but generally have negligible effect on the
mode identification.
The Spectroscopy Modules
69
• Equivalent width
Equivalent width of the line profile in km s−1 .
• d(EW)/d(Teff )
Ratio between the equivalent width variations of the local intrinsic Gaussian line profile and the local temperature variations. This parameter can
have positive as well as negative values (in the latter case the equivalent width decreases with increasing temperature). For a definition see
Eq. (14).
• Intrinsic width
Width of the intrinsic Gaussian line profile in km s−1 .
• Velocity offset
Offset of the line profile with respect to zero Doppler velocity in km s−1 .
The synthetic line profiles are computed for the assumption that the
barycentre of the line profile is at zero Doppler velocity. In general, this
is not the case for the observed line profiles.
The following parameters are only available for the moment method.
• Centroid velocity
Centroid velocity of the line profile. In ideal cases, this is the mean radial
velocity (<v 1 >) of the star. It is in any case best to use the zero-point of
the least-squares fit to the first moment (which is automatically done in
famias), especially if the time series consists only of few measurements
or the radial velocity amplitude is large.
• Mean signal-to-noise ratio
This value is used for the computation of the statistical uncertainties of
the line moments if the SNR of the individual spectra is not known. In this
case, the determined χ2ν -values might not be reliable if some individual
spectra deviate strongly from this value.
• Individual signal-to-noise ratio
If the SNR is known for each spectrum, this option should be chosen to
determine the statistical uncertainties of the line moments. The values
of the SNR can be imported with the spectra (additional column in the
list of times) or computed in famias in the Data Manager → Calculate
→ Compute Signal-To-Noise Ratio (see p. 32).
4.5.10 Optimisation Settings
In this box, the settings for the optimisation procedure are defined. The optimisation is carried out with a genetic algorithm (Michalewicz 1996). These
70
Mode Identification
settings are crucial for the mode identification and must be chosen very carefully.
The most important aspect is to avoid ending up in a local minimum. Since
the computations of theoretical line profiles and moments is generally very time
consuming, one must find a compromise between the coverage of the parameter
space and CPU time efficiency. Although famias provides default values for
different optimisation problems, the best way to proceed is trial-and-error, i.e.,
to test different optimisation settings and to proceed iteratively.
• Select MI method
Selection of the mode identification method. See above for a description
of the different possibilities. In the case of the moment method, only the
option Moment method is available.
• No. of starting models
Generation size during the genetic optimisation. Larger values for a larger
parameter space.
• Max. number of iterations
Stop criterion for the genetic optimisation. This number defines after
how many iterations (=generations) the optimisation will stop.
• Max. iterations w/o improvement
Stop criterion for genetic optimisation. The optimisation stops if no
improvement of the best found model has been achieved after n iterations.
• Convergence speed
Defines how quickly the algorithm is forced to converge. Value must be
between 0 and 1. Higher values cause quicker convergence at the cost of
parameter space exploration and thus precision.
• No. of elite models
This number defines how many of the best models will be copied unaltered
to the following generation. This parameter ensures quicker convergence.
•
& m: free parameters/grid search
Defines if the and m values are free parameters in the given range, or if
they are subsequently fixed (grid search) while the other parameters are
being optimised.
• Number of CPUs to use
Number of processors that are used in parallel during the optimisation.
The Spectroscopy Modules
71
4.5.11 General Settings
• No. of segments
Total number (visible + invisible) of segments on the stellar surface to
compute the line profiles. Higher numbers provide higher accuracy but
slower computational speed (linear dependence).
• Extension
Extension of output and log files. The output directory can be chosen in the Settings menu (see below). The default output directory
is the directory of the project file. During the mode identification, a
log-file, called logMI.extension, is written to the disk. It contains
a list of all computed models, their χ2ν -values and parameter values.
After a mode identification has stopped, the results are written to the
file bestFitsLog.extension. The best 20 fits (ASCII files and plots
containing theoretical and observed zero-point, amplitude, and phase or
moments) are written to files in the directory defined in Settings (see
below).
• Set fields to default
Set the optimisation, line and stellar parameters to default values dependent on the selected mode identification method. The proposed values are
just a guidance and have to be adapted for many optimisation problems.
• Settings
Opens a menu that provides the following functions: silent mode, save/load
parameters, set output path for the logfiles and clear all fields of the Mode
Identification Tab. The silent mode toggles the updating of the progress
bars. For some optimisations, the computational performace decreases
significantly, if the progress bars are updated.
• Reset
Resets the previous optimisation. Must be pressed if a new optimisation
procedure should be started.
• Start mode identification
Starts the mode identification. The optimisation process can be stopped
at any time by clicking again on this button. The results of the mode
identification will be written into the Results Tab. After an optimisation
process has stopped, again clicking this button will continue the optimisation at the stage where it stopped. To begin a new process, click the
button Reset.
72
Mode Identification
• Progress bars and counter
The progress bars show the total progress and the progress in the current
iteration. Below the bars, a counter gives the total number of computed
models.
The Spectroscopy Modules
73
4.6 Results
This window shows the results of the current and previously derived spectroscopic mode identifications. A list of the parameters of the best fitting models,
the fits of the theoretical models to the observations, and diagrams where the
free parameters are plotted against the corresponding χ2ν -values are displayed.
The results of previously performed mode identification process are logged.
Once a mode identification has been started, this window is updated regularly
with the actual status of the optimisation. A screenshot of the Results Tab is
displayed in Figure 11.
Figure 11: Screenshot of the Results Tab.
Press the button Update to update the list of best models and the plots
with the current status of the mode identification.
74
Results
4.6.1
Best models
This table lists the parameters of the 20 best fitting models. The first column
always shows the χ2ν -value. The other columns contain the parameters that
have been set as free for the mode identification. Two display options are
possible and can be selected in the combo box above:
• Best models
List the free parameters of the models having the lowest χ2ν -values.
• Best (l,m)-combinations
List the free parameters of the models having the lowest χ2ν -values and
different ( ,m)-combinations. For each possible combination of and m,
the best model is shown.
4.6.2 Chi-square plots
This plot-window displays the χ2ν -values (log-scale) of all models that have
been computed in the current optimisation as a function of the free parameters.
The uncertainty of the fit for the different parameters can thus be estimated.
The free parameter can be selected in the combo box above. By selecting
Model # in the combo box, the temporal evolution of the χ2ν -values during the
optimisation is plotted.
4.6.3 Comparison between fit and observation
This box shows the fit of the theoretical values to the observations. The content
depends on the selected mode identification method and is described below.
The model can be selected by clicking on the corresponding row in the table
of best models. The observed values are shown as blue line or symbols, the
statistical uncertainty as a green line, and the modelled values as a red line.
• Compute vsini, EW, intrinsic width, and velocity offset (fit
Z)
The observed (blue line with uncertainty range as green line) and synthetic
(red line) zero-point profile are displayed.
• FPF methods
Three panels are displayed: zero-point (top panel), amplitude (middle
panel), and phase (bottom panel) in units of 2π are shown as a function
of Doppler velocity (km s−1 ). The fit is shown as a red line, whereas
the observed values are shown as a blue line with the uncertainty range
indicated by green lines. The fit for a certain frequency can be selected
in the combo box above.
The Spectroscopy Modules
75
• Moment method
The complete time series of observed and modeled moments is shown.
The two panels show the first and second moment, respectively.
4.6.4 List of calculations
This box lists all previously performed optimisations. By clicking on an item in
the list, the corresponding parameters are shown in the other windows of this
tab.
4.7 Logbook
The logbook provides the list of actions that have been performed with famias
and corresponding information. Each time an operation is carried out in famias,
a new log-entry is written to the List of actions. Clicking on an entry of this
list shows the corresponding information in the text box.
Entries of the List of actions can be renamed or deleted by using the menu
Data. The text box can be modified and saved in famias by clicking on the
button Save.
76
Tutorial: Spectroscopic mode identification
4.8 Tutorial: Spectroscopic mode identification
This tutorial demonstrates how to perform a mode identification of a time series
of synthetic spectra with famias. The synthetic spectra can be found in the
installation directory of famias in the directory tutorial/*.coasttutorial.
The synthetic data simulate spectroscopic observations of a multi-periodic
δ Scuti star which consist of one absorption line having realistic observation
times and signal-to-noise ratio. The time-series contains 490 spectra that consist of 91 and 77 pixels, respectively, and cover a wavelength range between
5381 and 5385 Ångstrom. These spectra have been computed using the tool
Line Profile Synthesis of famias. The input parameters of the model can be
found in the file tutorial/coasttutorial.star.
References to functions of famias are written in the following manner:
Main Window → File → Import Set of Spectra, which could be translated
as: Select in the Main Window the function Import Set of Spectra in the
menu File. In each tab, there are named boxes, which can also be referred
to. For instance, Fourier Tab → Settings → Calculations based on: 1st
moment implies that you have to select the Fourier Tab and choose the option
1st moment in the combo box denominated Calculations based on in the box
called Settings.
4.8.1 Import spectra
Follow the following procedure to import the spectra to famias.
1. Import the spectra by selecting Main Window → File → Import Set of
Spectra. In the file manager that opens, select the directory tutorial
located in the installation directory of famias and double-click on the
file times.coasttutorial. This file contains the observation times and
file names of all spectra of this time series. Figure 12 shows a screenshot
of famias after importing the tutorial time series of spectra.
2. The Import file dialogue that opens shows the contents of this file.
Click OK to import this file. In the following dialogue that opens, select
Ångstrom as dispersion scale and click OK.
3. After successful import, the spectra are displayed as data set in the Data
Manager Tab. Click into the Time series list to display specific spectra
in the plot window.
The Spectroscopy Modules
77
Figure 12: Data Manager after importing the tutorial time series of spectra.
4.8.2 Select dispersion range
The synthetic data consist of one absorption line. In general, one has to select
a suited spectral line for analysis. Such a line should be an unblended metallic
line. Balmer and He-lines are not well suited for the mode identification, since
they cannot be well approximated with an intrinsic Gaussian line profile. To
study a specific line with famias, follow the following procedure: Click on one
spectrum of the time series. Zoom in on the line in the plot window. Click on
Time Series → Select All and then select Time series → Data → Extract
Dispersion Range. You can modify the dispersion range in the dialogue window
that opens. After you clicked OK, a new data set has been written that only
contains the selected dispersion range.
4.8.3 Convert from wavelength to Doppler velocity
To compute moments and to carry out a mode identification, the dispersion
scale of the spectra has to be converted from Ångstrom to km s−1 . To do
so, select all spectra, click on Time series → Modify → Convert Dispersion
78
Tutorial: Spectroscopic mode identification
and enter the value of the central wavelength in the dialogue window, which is
5383.369 Ångstrom in this case. The converted spectra are written as a new
data set.
4.8.4 Compute signal-to-noise ratio and weights
Computing the SNR of the spectra is important for weighting the spectra, for
calculating the statistical uncertainty of the moments, and for enabling the
calculation of chi-square with the moment method. There are two ways to
estimate the SNR of your spectra.
The simple way is to compute the mean SNR of all spectra. To do so,
compute the standard deviation of your spectra (see Section 4.8.7). The mean
SNR is the inverse value of the standard deviation at a dispersion position of
the continuum.
A more sophisticated and better approach is of course to calculate the SNR
of each spectrum separately. If these values have been determined with an
external program, they can be imported with the list of times and file names.
The weight of each spectrum can then be computed with the function Time
series → Calculate → Compute weights from SNR. To compute the SNR with
famias, select the function Time series → Calculate → Compute Signal-toNoise Ratio. Adapt the parameters Factor for sigma clipping and Number of
iterations in such a way that only continuum is selected in all spectra. Click
on Write signal-to-noise ratio as normalised weights to write a new weighted
data set.
4.8.5
Compute moments
1. Compute the SNR and weights as described in Section 4.8.4. Before computing the moments, the spectral line should be extracted by excluding
the continuum. We refer to Section 4.1.2 for a detailed description how to
extract a spectral line with famias. If the line borders do not move significantly due to the pulsation (=low radial velocity), one can cut out the
line, assuming fixed left and right limits. The position of these limits can
be determined by interpolating the dispersion scale of the spectra onto
a common scale (see Section 4.8.6), computing the mean spectrum with
Time series → Calculate → Mean Spectrum, and noting the Doppler
velocity of the left and right borders of the line (transition to the continuum). Select the original data set (non-interpolated) and extract the line
with Time series → Data → Extract dispersion range. The extracted
spectra are written into a new data set. Select this data set and press
Select All.
The Spectroscopy Modules
79
2. Call the dialogue for computing the moments by pressing Time series
→ Calculate → Compute Moments. Select Individual signal-to-noise
ratio and the moment that you want to compute in the combo box below.
Press OK and leave the centroid velocity at the proposed value (=mean
barycentre of the line).
3. The time series of moments is written as a new data set. It is advisable
to check for systematic trends, especially in the equivalent width and the
first moment.
4.8.6 Interpolate on common dispersion scale
The tutorial spectra have different dispersion scales. Therefore, they have to
be interpolated onto a common dispersion scale to carry out several tasks,
such as to compute a two-dimensional Fourier transform or a least-squares fit
across the line profile (pixel-by-pixel), and to apply the FPF method. This is not
mandatory when only line moments are used. To carry out a linear interpolation
on a common dispersion scale, select all spectra and click on Time series →
Modify → Interpolate Dispersion. It is advisable to interpolate onto the
spectrum having the highest resolution in order not to lose information. In our
case, the first spectrum of the time series has the highest resolution. Therefore,
select the function Interpolate onto scale of first spectrum and click OK. The
following dialogue window shows the dispersion values of the mask. To start
the interpolation, click on OK.
4.8.7 Compute line statistics
The temporal weighted mean of the spectra can be computed with the function Time series → Calculate → Mean Spectrum. To check for line profile
variability and estimate the SNR, the standard deviation at each pixel of the
spectrum can be computed with the function Time series → Calculate → Std.
Deviation Spectrum.
4.8.8 Searching for periodicities
It is advisable to search for periodicities in the data in the pixels across the
line profile as well as in the line moments. For the first approach, a data
set should have the following properties: interpolated on a common dispersion
scale, converted to km s−1 , and weighted. For the analysis of the line moments,
the data should be converted to km s−1 , weighted, and the SNR should be
computed for each spectrum. The two approaches can reveal pulsation modes
having different characteristics.
80
Tutorial: Spectroscopic mode identification
The search for periodicities should be carried out in the following iterative
schematic way:
1. Compute a Fourier spectrum in a frequency range where you expect pulsation.
2. Compute the significance level at the frequency having the highest amplitude and include this frequency in the least-squares fitting if it is significant.
3. Compute a multi-periodic least-squares fit of the original data with all
detected frequencies. In case that no unique frequency solution exists
due to aliasing, compute least-squares fits for different possible frequency
sets. The solution resulting in the smallest residuals should be regarded
as best solution.
4. Exclude frequencies from the fit that do not have a SNR above 4 (3.5 for
harmonics/combination terms).
5. Pre-whiten the data with all significant frequencies.
6. Continue with the first point using the pre-whitened data until no significant frequency can be found.
Line moments
1. Select data set
Select the spectra that were prepared for the analysis of the line moments
and go to the Fourier Tab.
2. Calculate Fourier spectrum of equivalent width
Select the option Fourier Tab → Settings → Calculations based on →
Equivalent width and click on Calculate Fourier. The plot window now
displays the Fourier spectrum of the equivalent line width. A dialogue
opens, indicating the highest frequency peak at F1 = 3.148 d−1 and
asking if this frequency should be added to the frequency list of the
Least-Squares Fitting Tab. Since we first want to check the significance
of this frequency, click on No.
3. Compute significance level
Select the option Settings → Compute significance level. The field at
frequency should now contain the value 3.148038. Compute the Fourier
spectrum once more by clicking on Calculate Fourier. The plot window
now also displays the significance level as a red curve and the dialogue
window indicates the SNR of the highest peak. Since it has a SNR of
4.1, click on Yes to include it in the frequency list.
The Spectroscopy Modules
81
Figure 13: Fourier spectrum of the first moment after pre-whitening with
F2 = 11.53 d−1 .
4. Compute least-squares fit
Go to the Least-Squares Fitting Tab and select the field Settings →
Compute signal-to-noise ratio and the frequency F1. Compute a leastsquares fit by pressing Settings → Calculate Amplitude + Phase. Improve the frequency solution by clicking Settings → Calculate All. According to the List of frequencies, this frequency has a SNR of 3.96,
which is just below the significance limit. The difference with the SNR
determined in the Fourier transform is due to the fact that, in this case,
the amplitude determined from the least-squares fit is taken as signal.
We can conclude now that there are no significant periodic equivalent
width variations in the line profile.
5. Calculate Fourier spectrum of first moment
Select the option Fourier Tab → Settings → Calculations based on →
1st moment and click on Calculate Fourier. The highest peak is at the
frequency F2 = 11.53 d−1 . Check for significance as described in the
previous point. Since this peak is highly significant, it should be included
82
Tutorial: Spectroscopic mode identification
in the List of frequencies. A screenshot of famias showing the Fourier
spectrum of the first moment is displayed in Figure 13.
6. Compute least-squares fit and pre-whiten data
Select the detected frequency F2 in the Least-Squares Fitting Tab, compute a least-squares fit and pre-whiten the data (Settings → Pre-whiten
data). The residuals are written as a new data set in the Data Manager Tab. The List of frequencies shows the results of the computed fit
and the derived uncertainties of the parameters. The value of the field
Residuals is computed from the standard deviation of the residuals. The
frequency is always indicated in units of the inverse of the input timestring. The units of the amplitude depend on the selected calculation
basis. The equivalent width is in units of km s−1 . The n-th moments is
in units of (km s−1 )n . The phase is in units of 2π.
7. In the Data Manager Tab, select the time series of residuals and check
the computed fit (red line).
8. If you want to compute a Fourier spectrum or a least-squares fit of line
moments, you have two possibilities. The first option is to compute the
moments of the line profile in the Data Manager Tab (see Section 4.8.5)
and then analyse this one-dimensional time series. The other possibility is
to choose a time series of spectra and then to select the option Settings
→ Calculations based on → n-th moment in the Fourier Tab and the
Least-Squares Fitting Tab. In this case, the corresponding time-series
of moments is computed automatically for the selected dispersion range.
If you then pre-whiten your data, the residuals are written as time series
of moments to the Data Manager Tab (yellow background in the list of
Data sets. You can calculate a Fourier transform of these residuals to
search for further peaks. If you want to compute another least-squares fit
with an additional frequency, you have to select the original time-series
of spectra (green background in the list of Data sets).
9. Compute Fourier spectrum of residuals
Compute a Fourier spectrum of the residuals. A frequency at F3 =
17.5 d−1 is significant and should also be included in the least-squares
fit. Also select this frequency in the Least-Squares Fitting Tab → List
of frequencies and compute a least-squares fit for both frequencies simultaneously. You have to select the original data set that was prepared
for computing the moments. Pre-whiten the data and compute a Fourier
spectrum of the residuals. No significant peaks are left.
10. Analyse the first three moments
Analyse also the second and third moments since modes of higher degree
The Spectroscopy Modules
83
Figure 14: Results of the least-squares fit to the first moment.
might only have significant amplitudes for these diagnostics. The analysis
of the second moment should reveal F2 , 2F2 , 2F3 , and an additional frequency at F4 = 23.998 d−1 . The third moment only has F2 as significant
peak.
11. We can conclude that three significant independent frequencies are present
in the first three moments of the tutorial data. Only two of them are visible in the first moment and thus analysable with the moment method.
Figure 14 displays a screenshot of famias showing the results of the
least-squares fit to the first moment.
Pixel-by-pixel across the line profile
1. Select data set
Select the data set that was prepared for the frequency analysis across
the line profile (pixel-by-pixel) and go to the Fourier Tab.
2. Calculate Fourier spectrum
Select the option Fourier Tab → Settings → Calculations based on
84
Tutorial: Spectroscopic mode identification
→ Pixel-by-pixel (1D, mean Fourier spectrum) and click on Calculate
Fourier.
3. Compute significance level
The plot window now shows the mean of all Fourier spectra across the
line profile. A dialogue opens, indicating the highest frequency peak
at F1 = 11.53 d−1 . Since we first want to check the significance of
this frequency, click on No. To determine the significance of F1 , check
the field Settings → Compute significance level and select the option
Settings → Calculations based on → Pixel with highest amplitude at
f=. The latter option is necessary, since the significance level cannot be
determined from the mean Fourier spectrum across the line profile. Click
Calculate Fourier to compute the Fourier spectrum and its significance
level at the dispersion position, where the given frequency has its highest
amplitude. Since this frequency is highly significant, add it to the List of
frequencies in the Least-Squares Fitting Tab.
4. Compute least-squares fit
In the Least-Squares Fitting Tab, select the option Settings → Calculations based on → Pixel-by-pixel (MI:FPF), check the box next to the
detected frequency, and press Calculate Amplitude + Phase to compute
the least-squares fit. Zero-point, amplitude, and phase will be displayed
in the plot panel at the right-hand side. The blue lines denote the derived
fit, whereas the green lines indicate the statistical uncertainty range of
the fit.
5. The List of frequencies shows the results of the computed fit. The field
Results shows the mean standard deviation of the residual spectra. The
frequency is indicated in inverse units of the input time-string. The IAD is
the integrated amplitude distribution, and is calculated from the integral
of the amplitude across the line profile inside the selected dispersion range.
6. Pre-whiten spectra
Pre-whiten the data with the determined least-squares fit by checking the
box Settings → Pre-whiten data and clicking Calculate Amplitude +
Phase. The pre-whitened spectra are written as a new data set to the
Data Manager Tab.
7. Select the time series of residual spectra in the Data Manager Tab and
click on several spectra to check the quality of the fit (red line).
8. Compute Fourier spectrum of residuals
Compute a Fourier spectrum of the residuals by selecting the time series
The Spectroscopy Modules
85
of residual spectra in the Data Manager Tab and proceeding as described
in point 2.
9. When computing further multi-periodic least-squares fits, the original
time series of spectra has to be selected.
Figure 15: Results of the least-squares fit across the line profile.
10. The period analysis of the tutorial data set reveals three frequencies,
F1 = 11.53 d−1 , F2 = 17.50 d−1 , and F3 = 2F1 = 23.06 d−1 . The
frequency F3 is a harmonic of F1 .
4.8.9 Mode identification
famias provides two different approaches for the spectroscopic mode identification, the moment method and the Fourier parameter fit method. In the
following, we will describe in detail the approach for each method separately.
• Setting the parameters
Parameters on the Mode Identification Tab that have a check box next
to the parameter name can be set as variable during the optimisation. In
86
Tutorial: Spectroscopic mode identification
this case, a minimum, maximum, and step value have to be indicated.
If the box is unchecked, the parameter is set as constant during the
optimisation with the value indicated.
• Stellar parameters
You need to provide estimates for the stellar radius, mass, Teff , log g, and
metallicity in the field Stellar Parameters. The indicated radius and mass
mainly affect the numerical calculation of the horizontal to vertical pulsation amplitude and can be set as variable during the optimisation. The
three other parameters determine the limb darkening coefficient, which
is interpolated linearly in a pre-computed grid (Claret et al. 2000). The
inclination and v sin i can be fixed, when they are known. Otherwise,
they can be estimated during the mode identification and should be set
as variable in a reasonably large range (see Figure 16).
• Line Profile Parameters
The only parameter which has to be known a priori is the Central wavelength of the considered line profile. This parameter determines the
adopted limb darkening coefficient. If one deals with a cross correlated
profile, this value of course does not have a physical meaning. In this
case, it is best to enter the mean value of the cross correlated range into
this field. The other parameters in this field can be determined during
the mode identification.
In the case of the moment method, also the centroid velocity and the
signal-to-noise ratio have to be set. See Section 4.5.9 for details about
these parameters.
• Pulsation Mode Parameters
This field controls the settings for the parameters of each imported pulsation frequency. A frequency will be taken into account for the optimisation
if the check box next to the field Frequency [c/d] is checked.
• Optimisation Settings
This field controls how the mode identification is applied as well as the
settings for the genetic optimisation. For a detailed explanation of the
settings, we refer to Section 4.5.10.
• General Settings
For the tutorial spectra, you can leave the number of segments that are
taken into account for the computation of the line profile at the value
of 1000. For rapidly rotating stars and high-degree pulsation modes, a
higher value is required. For details, we refer to Section 4.5.11. famias
The Spectroscopy Modules
87
proposes default parameter settings for the optimisation if you press Set
fields to default.
Figure 16: Settings of the Mode Identification Tab.
Fourier parameter fit method
1. Determine pulsation frequencies
Determine all pulsation frequencies, including harmonics and combinations, that have significant amplitude across the line profile (=pixel-bypixel) as described in the previous section. Select all frequencies in the
List of frequencies and compute a least-squares fit across the line profile
with the option Settings → Calculations based on → Pixel-by-pixel
(MI:FPF).
2. Selection of dispersion range
After you have imported the current least-squares fit to the mode identification tab, the dispersion range that is taken into account for the mode
identification can no longer be modified. Therefore, you have to define
the dispersion range already when you compute the least-squares fit. An
optimal range excludes the continuum and the line wings. Only the range
88
Tutorial: Spectroscopic mode identification
Figure 17: Results of the fit to the zero-point profile.
where the amplitude across the profile reaches significant values should
be selected. You can either modify the dispersion range in the field Settings or zoom into the selected region in the plot window. In the latter
case, the left and right dispersion values of the zoomed range are automatically written to the Settings-field. Uncheck the box Settings →
Complete range and compute a least-squares fit. In the tutorial example
a range between −70 and 45 km s−1 would be optimal.
3. Import frequencies to Mode Identification Tab
Switch to the Mode Identification Tab and import the current multiperiodic least-squares fit by clicking on Pulsation Mode Parameters →
Import data for FPF method (from current LSF). In the field Pulsation
Mode Parameters you can now switch between the different imported
pulsation frequencies.
4. Determine pulsationally independent parameters
For the tutorial spectra, the stellar parameters have been saved in a file
called coasttutorial.star. You can import this file by selecting General Settings → Settings → Import stellar parameters. We will first de-
The Spectroscopy Modules
89
Figure 18: Results of the mode identification for F1 = 11.53 d−1 .
termine starting values for the pulsationally independent parameters, i.e.,
v sin i, the equivalent width, the intrinsic width, and the velocity zeropoint shift of the profile. The search range of these parameters should
be sufficiently large with a reasonable step-size. For the tutorial example, good starting values would be [min;max;step]: v sin i ∈ [1; 100; 1],
equivalent width ∈ [1; 20; 0.1], intrinsic width ∈ [1; 20; 1], and zero-point
shift ∈ [−20; 20; 0.1]. The step width should generally not be smaller
than the precision to which a parameter can be determined. The best
approach is to begin with a relatively large search range and step size,
and to iteratively narrow the range. See Figure 16 for a screenshot of the
Mode Identification Tab with the settings before the first optimisation.
Select the option Select MI method → Compute vsini, EW, intrinsic
width, and velocity offset (fit Z) and press on General Settings → Set
fields to default to set default parameters for the genetic optimisation
and to let famias propose free parameters for the optimisation. In this
case, v sin i, the equivalent width, the intrinsic width, and the zero-point
shift are set as free.
90
Tutorial: Spectroscopic mode identification
Press General Settings → Start mode identification to start the optimisation. The results are written to the Results Tab. Figure 17 shows the
results of the fit to the zero-point profile. The field Best Models shows
the 20 best solutions. You can click into the table to display the fit in
the plotting window Comparison between Fit and Observation. Here,
the observational zero-point profile is displayed as blue line, its statistical uncertainty as green lines, and the modeled profile as red line. The
chi-square plots can be used to estimate the uncertainty of the fit.
It is evident in Figure 17 that the best solution can still be improved. It
is a good idea to note the parameter values for the best solutions and
refine the search range of these parameters in the Mode Identification
Tab to the following values [min;max;step]: v sin i∈ [30; 50; 1], equivalent
width ∈ [7; 9; 0.01], intrinsic width ∈ [7; 15; 1], and zero-point shift ∈
[−13; −11; 0.01]. Reset the optimisation procedure by pressing General
Settings → Reset and start another optimisation.
This optimisation should result in a much lower chi-square value and thus
a better constraint on the free parameters. We will take the obtained
solution as a starting point for the mode identification. Generally, the
equivalent width and the zero-point shift are quite well constrained and
can be set as constant during the optimisation. Figure 18 shows the
parameter range we selected for the mode identification.
5. Identify pulsation modes
Select the Fourier parameter fit method with the option to fit zero-point,
amplitude, and phase across the line profile through the combo box Optimisation Settings → Select MI method → FPF Method: fit ZAP.
Select the option Optimisation Settings → l & m: grid search to obtain
more reliable results of the optimisation procedure. Click on General
Settings → Set fields to default. The inclination i is now also set as free
parameter. Enter the following values as range: i ∈ [5; 90; 10]. Select
the frequency 11.53 d−1 in the field Pulsation Mode Parameters and
mark the check box next to the frequency value. The parameter ranges
should be as follows: degree ∈ [0; 3; 1], order m ∈ [−3; 3; 1], vel.amp
v ∈ [0; 30; 1], and phase ψ ∈ [0.4715; 0.9715; 0.5]. The value of the phase
is taken from the least-squares solution of the first moment of this frequency (see Section 4.5.4 for details). The maximum value of the velocity
amplitude should be set at least an order of magnitude higher than the
amplitude of the first moment. In general, you should extend the range
of a parameter, if the lowest chi-square value was found at one of the
search border (minimum or maximum of the range). Start the optimisation by pressing Start mode identification. The other pulsation mode at
The Spectroscopy Modules
91
17.5 d−1 can be analysed in the same manner. You can compare your
results with the input values by loading the file coasttutorial.star
into the Line Profile Synthesis Tab.
All computed mode identifications are saved in the Results Tab → List
of Calculations and are logged in the Logbook of famias.
Figure 19: Settings of the Mode Identification Tab for the moment method.
Moment method
1. Determine pulsation frequencies
Determine all frequencies that have significant amplitude in the first moment, including harmonics and combination frequencies (see previous
section). Compute a multi-periodic least-squares fit using the option
Least-Squares Fitting Tab → Settings → Calculations based on →
1st moment (radial velocity, MI: moment).
2. Import frequencies to Mode Identification Tab
Switch to the Mode Identification Tab and click on Pulsation Mode
Parameters → Import data for moment method (from current LSF).
92
Tutorial: Spectroscopic mode identification
After the import, you can switch between the two pulsation frequencies in
the field Pulsation Mode Parameters with the top left combo box. Mark
the check box next to the frequency value for both imported frequencies.
3. Identify pulsation modes
The starting parameters and settings should be adopted as displayed in
Figure 19. Start the mode identification by clicking on General Settings
→ Start mode identification. The results are written to the Results
Tab.
5. The Photometry Modules
The Photometry Module contains tools that are required to search for frequencies in photometric time series and to perform a photometric mode identification. The tools are located in tabs that have the following denominations: Data
Manager, Fourier, Least-Squares Fitting, Mode Identification, Results, and
Logbook. These tools are described in the following sections.
5.1 Data Manager
The Data Manager Tab gives information about light curves that have been
imported, allows to edit them, and select the data sets for analysis. The window
is divided into two data boxes and one plot window. A menu is located above
each box. In the Data Sets Box you can select the light curve you want to
analyse. The Time Series Box displays the time of measurement, magnitude,
and weight of the selected data set. The Plot Window displays the currently
selected light curve and data points that have been selected in the Time Series
Box. A screenshot of the Data Manager is displayed in Figure 20.
5.1.1
Data Sets Box
This box contains a list of the different data sets that have been imported or
created. To select a data set, click on it or select it in the combo box at the
top right of the information bar. The following commands can be selected in
the Data Menu:
• Remove Data Set
Removes the currently selected data set from the list.
• Rename Data Set
Renames the currently selected data set.
• Export Data Set
Exports the currently selected light curve as an ASCII-file to the disk.
The suffix of the files has to be entered by the user. The exported files
have the following three columns: time, magnitude, and weights.
94
Data Manager
Figure 20: Screenshot of the Data Manager Tab.
• Combine Data Sets
Combines the selected data sets to a new single time series. The data sets
to be combined must have the same units of the dispersion. Moreover,
all times of measurement have to differ.
• Change Assigned Filter
Change the filter that is assigned to the current time string. The correct
filter has to be assigned to assure correct working of the mode identification.
5.1.2
Time Series Box
This list shows the measurements of the currently selected light curve. It consists of three columns: times of measurement, magnitude, and weight. Multiple
measurements can be selected by clicking with the left mouse button on several
items in the list while pressing the Ctrl-key or the Shift-key. All items can be
selected by pressing Select All. Only items that have been selected in this list
The Photometry Modules
95
(with blue background) are taken into account for the data analysis (e.g.,
Fourier analysis or least-squares fitting). Selected items are marked with a
red cross in the Plot Window.
The following commands are available in the Data Menu:
• Edit Data
Opens a table of times and weights in a new window with the possibility
to edit these values. Modifications can be written to the current data
set.
• Copy Selection to New Set
A new data set with currently selected measurements is created and written to the Data Sets Box. Use this option to create subsets of your
data.
• Remove Selection
The currently selected measurements are removed from the time series/data set.
5.1.3 Plot window
The plot window shows the currently selected light curve as blue symbols.
Selected measurements are marked with a red cross.
For more information about the plot window, we refer to p. 28.
96
Fourier Analysis
5.2 Fourier Analysis
With this module, a discrete Fourier transform (DFT) can be computed to
search for periodicities in the data set selected in the Data Sets Box of the
Data Manager Tab. The Fourier spectrum is displayed in the plot window and
saved as data set in the List of calculations. A screenshot of the Fourier Tab
is displayed in Figure 21.
5.2.1
Settings Box
In this box, the settings for the Fourier analysis are defined.
• Frequency range
Minimum/Maximum values of the frequency range. The Fourier spectrum
will be computed from the minimum to the maximum value.
• Nyquist frequency
Estimation of the Nyquist frequency (mean sampling frequency). For
non-equidistant time series, a Nyquist frequency is not uniquely defined.
In this case, the Nyquist frequency is approximated by the inverse mean
of the time-difference of consecutive measurements by neglecting large
gaps.
• Frequency step
Step size (resolution) of the Fourier spectrum. Three presets are available:
Fine (≡ (20ΔT )−1 ), Medium (≡ (10ΔT )−1 ), and Coarse (≡ (5ΔT )−1 ).
The corresponding step size depends on the temporal distribution of the
measurements, i.e., the time difference ΔT of the last and first measurement. It is recommended to select the fine step size to ensure that no
frequency is missed. The step value can be edited if desired.
• Use weights
If the box is checked, the weight indicated for each data point is taken into
account in the Fourier computations. Otherwise, all weights are assumed
to have equal values.
• Compute spectral window
If the box is checked, a spectral window of the current data set is computed. A spectral window shows the effects of the sampling of the data
on the Fourier analysis and thus permits to estimate aliasing effects. The
spectral window is computed from a Fourier spectrum of the data taking
the times of measurements and setting all intensities to the value 1. The
shape of the spectral window should be plotted for a frequency range that
is symmetric around 0 for visual inspection.
The Photometry Modules
97
• Compute significance level
If the box is checked, the significance level at a certain frequency value is
computed and displayed in the plot window as a red line. The following
parameters can be set:
– Frequency
Frequency value of the peak of interest. The data will be prewhitened with this frequency and the noise level will be computed
from the pre-whitened Fourier spectrum.
– S/N level
Multiplicity factor of the signal-to-noise level. The displayed noise
level will be multiplied by this factor.
– Box size
Box size b for the computation of the noise-level in units of the
frequency. The significance level is computed from the running mean
of the pre-whitened Fourier spectrum. For each frequency value F ,
the noise level is calculated from the mean of the range [F −b/2, F +
b/2].
• Calculate Fourier
Computes the discrete Fourier transform (DFT) according the user’s settings and displays it in the plot window as a blue line. The mean intensity
value of the time series is automatically shifted to zero before the Fourier
analysis is computed. The peak having highest amplitude in the given
range is marked in the plot window. A dialogue window reports the frequency having the highest amplitude in the selected frequency range and
asks if it should be added to the frequency list of the Least-Squares
Fitting Tab.
5.2.2
List of Calculations
Previous Fourier calculations can be selected from the list and viewed. Each
computed Fourier spectrum is saved and listed here. If a project is saved, the
list of computed Fourier spectra is also saved but compressed to decrease the
project file size (only extrema are saved). The following operations are possible
via the Data Menu:
• Remove Data Set
Removes the currently selected data set from the list.
• Rename Data Set
Renames the currently selected data set.
98
Fourier Analysis
Figure 21: Screenshot of the Fourier Tab.
• Export Data Set
Exports the currently selected data set to an ASCII file having the following three-column format: frequency, amplitude, power.
5.2.3 Fourier Spectrum Plot
Shows the most recently computed Fourier analysis or the selection from the list
of calculations. The Fourier spectrum is shown as a blue line, the significance
level is shown as a red line. The frequency and amplitude of the peak having
the highest frequency are indicated.
For more information about the plot window, we refer to p. 28.
The Photometry Modules
99
5.3 Least-Squares Fitting
This modules provides tools for the computation of a non-linear multi-periodic
least-squares fit of a sum of sinusoidals to your data. The fitting formula is
Z+
Ai sin 2π(Fi t + φi )
(22)
i
Here, Z is the zero-point, and Ai , Fi , and φi are amplitude, frequency and
phase (in units of 2π) of the i-th frequency, respectively.
The least-squares fit is carried out with the Levenberg-Marquardt algorithm.
For a given set of frequencies, either their zero-point, amplitude and phase
can be optimized (Calculate Amplitude & Phase), or additionally also the
frequency value itself (Calculate All). The data can be pre-whitened with the
computed fit and written to the Data Sets Box of the Data Manager Tab.
Before a mode identification can be carried out, a least-squares fit to the
data must be calculated. To carry out a photometric mode identification, light
curves from different filters must be imported to famias, and amplitudes and
phases of the pulsation frequencies must be determined by least-squares fitting.
These values can then be copied to the Mode Identification Tab to carry out
the mode identification method using amplitude ratios and phase differences.
5.3.1 Settings
Defines the settings for the calculation of the least-squares fit.
• Use weights
If this box is checked, the weight indicated for each data point is taken
into account in the least-squares fit. Otherwise, all weights are assumed
to have equal values.
• Pre-whiten data
If this box is checked, the data will be pre-whitened with the computed
least-squares fit and written as a new data set to the Data Manager Tab.
• Compute signal-to-noise ratio
Computes the amplitude signal-to-noise ratio (SNR) of each selected frequency and displays it in the List of Frequencies. The noise is computed
from the Fourier spectrum of the pre-whitened data. The Box size is
the width of the frequency range which is taken into account for the calculation of the noise. For a box width of b, the noise of frequency F
is the mean value of the Fourier spectrum of the residuals in the range
[F − b/2, F + b/2]. The SNR is the ratio of Af and the noise level of the
pre-whitened Fourier spectrum at the position of f .
100
Least-Squares Fitting
Figure 22: Screenshot of the Least-Squares Fitting Tab.
• Calculate Amplitude + Phase
Computes a least-squares fit with the Levenberg-Marquardt algorithm
using the above mentioned fitting formula. The zero-point, amplitude
and phase are calculated, whereas the frequency is kept fixed.
The following optimized values are written to the frequency list: zeropoint and its uncertainty, the standard deviation of the residuals, for each
selected frequency its amplitude and phase and their formal uncertainties
derived from the error matrix of the least-squares fitting algorithm.
• Calculate All
Computes a least-squares fit with the Levenberg-Marquardt algorithm
using the above mentioned fitting formula. The zero-point, amplitude,
phase and frequency are improved. The following optimized values are
written to the frequency list: zero-point and its uncertainty, the standard
deviation of the residuals, for each selected frequency its frequency value,
amplitude and phase and their formal uncertainties derived from the error
matrix of the least-squares fitting algorithm.
The Photometry Modules
101
• Copy values to MI
Computes a least-squares fit by improving amplitude and phase (equivalent to Calculate Amplitude + Phase) and copies the derived values
(frequencies, amplitudes, and phases and their uncertainties) to the Mode
Idenitification Tab. For different filters, a least-squares solution with
identical frequency values must be computed to ensure that the phases
in the different filters can be compared.
5.3.2 List of Frequencies
The List of Frequencies Box shows the results of the least-squares fit. Frequencies that should be included in a least-squares fit can be entered in the
column Frequency and selected by clicking on the check box in column Use.
The following values are shown in this box after a least-squares fit has been
calculated:
The zero-point, its formal uncertainty and the standard deviation of the
residuals are shown at the top. The improved values of frequency, amplitude
and phase and their formal statistical uncertainties are shown in the list. The
phase and its uncertainty, in units of 2π. The last column lists the SNR of
each frequency (only shown when option Calculate signal-to-noise ratio has
been checked). The SNR is computed from the Fourier spectrum, pre-whitened
with all selected frequencies. For each frequency, the assumed noise-level is
computed from the mean amplitude around the frequency value with the box
size indicated at the option Calculate signal-to-noise ratio.
• Export frequencies
Exports all frequency, amplitude and phase values of the List of frequencies to an ASCII file. The file format is compatible with the program
Period04 (see example on p. 48).
• Import frequencies
Imports an ASCII list of frequencies having the following four-column
format separated with tabulators: frequency counter, frequency value,
amplitude, phase (see example on p. 48).
102
Mode Identification
5.4 Mode Identification
This module can be used to perform a photometric mode identification based
on the method of amplitude ratios and phase differences of pulsation modes in
different photometric passbands (Balona & Stobie 1979; Watson 1988; Cugier
et al. 1994). This method permits to determine the harmonic degree of
pulsation modes in general up to = 6. This upper limit is due to partial
geometric cancelation of the observable pulsation amplitude over the stellar
disc.
The determination of the -degrees is based on static plane-parallel models of stellar atmospheres and on linear non-adiabatic computations of stellar
pulsation. In the present version of famias, these are provided in the form of
pre-computed grids and interpolated linearly to obtain values appropriate for
the observed parameters. The theoretical values of the amplitude ratio and
phase difference in a certain filter depend strongly on pulsational input. This
points out a very important difference between spectroscopic and photometric
mode identification: the former is model independent, the latter is not. To be
able to compare the results, famias incorporates grids computed from different
pulsational codes and from different atmosphere models. The present version
of famias includes grids from two different scientific institutions (see details
below). It is planned to include model grids from more groups in the future,
whenever they are provided.
5.4.1 Theoretical background
In famias, we apply the approach proposed by Daszyńska-Daszkiewicz et al.
(2002) to compute the theoretical photometric amplitudes and phases due to
pulsation. For more details see instruction on the Wroclaw HELAS Webpage1 .
In the limit of linear pulsation, zero-rotation approximation and assuming static
plane-parallel atmospheres, we can write the flux variations in the passband λ
caused by a oscillation mode having a frequency ω and a degree as
ΔFλ
λ
λ
= εY m (i, 0)bλ Re{[D1,
f + D2, + D3,
]e−iωt },
(23)
Fλ0
where
1 ∂ log(Fλ |bλ |)
,
4 ∂ log Teff
= (2 + )(1 − ),
λ
=
D1,
D2,
λ
=−
D3,
2
3
(24)
λ
∂ log(Fλ |b |)
ω R
+2
.
0
GM
∂ log geff
1 http://helas.astro.uni.wroc.pl/deliverables.php
103
The Photometry Modules
or equivalently
λ
=
D1,
1 βT,λ
1
αT,λ +
,
4
ln 10 bλ
D2, = (2 + )(1 − ),
2
3
ω R
+2
GM
λ
=−
D3,
(25)
αg,λ +
1 βg,λ
.
ln 10 bλ
Here, ε is the pulsation mode amplitude expressed as a fraction of the equilibrium radius of the star, Y m (i, 0) describes the mode visibility with the inclination angle, i, and ( , m) being the spherical harmonic degree and the azimuthal
order, respectively, G is the gravitational constant, M is the stellar mass, and
bλ is the disc averaging factor defined as
bλ =
1
0
h0λ (µ)µP (µ)dµ.
(26)
λ
λ
and D3,
terms describe temperature and gravity effects, respectively,
The D1,
and both include the perturbation of the limb-darkening. The D2, term stands
for geometrical effects. For computing bλ , we use a non-linear limb darkening
law, defined by Claret et al. (2000) as
I(µ)
=1−
I(1)
4
k
ak (1 − µ 2 ),
(27)
k=1
where I(µ) is the specific intensity on the stellar disk at a certain line-of-sight
angle θ with µ = cos θ and ak is the k-th limb darkening coefficient.
The parameters αT,λ and αg,λ are the partial flux derivatives over effective
temperature and gravity, respectively, that are calculated from static model
atmospheres for different passbands
αT,λ =
∂ log Fλ
∂ log Fλ
and αg,λ =
,
∂ log Teff
∂ log g
(28)
whereas, the parameters βT,λ and βg,λ are partial derivatives of the bλ factor
βT,λ =
∂ log bλ
∂ log bλ
and βg,λ =
.
∂ log Teff
∂ log g
(29)
The f parameter is a complex value which results from linear non-adiabatic
computations of stellar pulsation and describes the relative flux perturbation at
the level of the photosphere
δTeff
1
m −iωt
}.
0 = ε 4 Re{f Y e
Teff
(30)
104
Mode Identification
According to Eq. (23), the complex amplitude of the light variations is
expressed as (Daszyńska-Daszkiewicz et al. 2002)
λ
λ
Aλ (i) = −1.086εY m (i, 0)bλ (D1,
f + D2, + D3,
),
(31)
and the amplitudes and phases of the light variation are given by
Aλ = |Aλ | =
and
where
A2λ,R + A2λ,I
ϕλ = arg(Aλ ) = arctan(AI /AR )
λ
λ
fR + D2, + D3,
),
Aλ,R = −1.086εY m (i, 0)bλ (D1,
λ
fI .
Aλ,I = −1.086εY m (i, 0)bλ D1,
Calculating amplitude ratio and phase differences the εY m (i, 0) term goes away
making these observables independent of the inclination angle, i, and the azimuthal order, m, in the case of zero-rotation approximation.
5.4.2 Approach for mode identification in famias
famias computes the theoretical amplitude ratios and phase difference according to the above described scheme in different photometric passbands. To
identify the spherical harmonic degree, , the user must provide its frequency,
amplitude and phase in different filters, ranges for Teff and log g, a number of
stellar model parameters such as mass and metallicity, and the source of the
stellar models. famias then derives the theoretical values from pre-computed
model grids and displays the results of the mode identification on the Results
Tab.
At the time this manual was written, we had pre-computed grids of the
parameters αT,λ , αg,λ , βT,λ , βg,λ , bλ at our disposal. These atmospheric
parameters have been computed by Leszek Kowalczuk and Jadwiga DaszyńskaDaszkiewicz using Kurucz and NEMO atmospheres. The grids are available
for the following photometric systems: Johnson/Cousins U BV RI, Strömgren
uvby, and Geneva, and for different values of metallicity parameter [m/H] and
microturbulence velocity, ξt . All these results can be found on the Wroclaw
HELAS Webpage2 .
These model grids contain stellar evolution tracks for different masses computed by the Warsaw-New Jersey code (Paczyński 1969, 1970) and pulsational
2 http://helas.astro.uni.wroc.pl/deliverables.php
The Photometry Modules
105
models from ZAMS to TAMS with some step in time (or effective temperature) computed for mode degree from 0 to 6. The full description of the
evolutionary and pulsational models is given at the Wroclaw HELAS Webpage.
Furthermore, we used pulsational models from two different sources available. First, a grid for main-sequence stars with masses from 1.8 to 12 M computed by Jadwiga Daszyńska-Daszkiewicz, Alosha Pamyatnykh, and Tomasz
Zdravkov using the non-adiabatic Dziembowski code (Dziembowski 1971, 1977),
which can be downloaded also from the above mentioned web site. Second, a
grid for δ Sct stars computed with ATON (Ventura et al. 2007) and MAD by
Montalban & Dupret (2007).
The grids included in the present version of famias cover the following
range:
• 1.6 ≤ M ≤ 12
• 3500 ≤Teff ≤ 47500 K
• 1 ≤log g≤ 5
• −5 ≤ [m/H] ≤ 1
• 0 ≤ vmicro ≤ 8 km s−1 (for some metallicities).
In more detail, the mode identification is carried out in the following way:
• The user must provide the pulsation frequency F , its amplitude Aλ , the
uncertainty of the amplitude σAλ , the phase φ, and the uncertainty of
the phase σφ .
• The following values and options for the stellar models must be indicated:
ranges for Teff and log g, stellar mass, metallicity, micro turbulence, source
of the atmosphere grid, and the source of the non-adiabatic observables.
• The evolutionary stellar model grid for the indicated mass is searched for
models that lie in the given range of Teff and log g.
• For each found model, the atmospheric parameters αT,λ , αg,λ , βT,λ ,
βg,λ , and bλ, are determined by bi-linear interpolation in the grid of the
indicated filter set, metallicity, and micro turbulence.
• The program searches in the lists of the found non-adiabatic pulsation
models for different -values. For each , the frequency that is closest to
the observed value is searched for. The values of the real and complex
non-adiabatic parameters, fR and fI , respectively, are taken from this
frequency value.
106
Mode Identification
• The theoretical amplitudes and phases are computed from Eq. (31) for
each selected filter.
• The amplitude ratios and phase differences are computed with respect to
a selected filter (ideally the one with the largest observed amplitude).
famias creates an error message if no atmospheric or evolutionary models
have been found in the grids for the indicated parameters.
Figure 23: Screenshot of the Mode Identification Tab.
5.4.3
Observed values
This box contains the frequencies, amplitudes, and phases of the observed pulsation frequencies in different photometric filters. These values can be imported
from the Least-Squares Fitting Tab or entered manually.
• Frequency selection
Different frequencies can be selected with this combo box. Each item
in the combo box is related to a frequency value and its amplitudes and
phases in different filters. Frequencies can be added by importing from
The Photometry Modules
107
the Least-Squares Fitting Tab or by selecting in the Action menu the
option Add frequency.
• Action menu
This menu allows to add or remove frequency sets.
• Frequency value
Frequency value in d−1 .
• Filter system
Select the filter system for which the mode identification should be carried
out. Three different systems are available: Johnson/Cousins U BV RI,
Strömgren uvby, and Geneva.
• Table of amplitudes and phases
This table contains for each filter the observed values of Aλ and σAλ in
mmag, and of φ, and σφ in units of 2π. You do not have to fill out all
fields. Empty fields (or = 0) are not used for the computation of the
amplitude ratios and phase differences. Theoretical values are anyway
computed for all filters.
5.4.4
Stellar model parameters
• Teff
Observational value of the effective temperature in Kelvin and its uncertainty.
• log g
Observational value of the logarithm of the gravity in c.g.s and its uncertainty.
• Mass
Stellar mass in solar units. The available values depend on the selected
non-adiabatic model source. You can only obtain a mode identification
for one selected mass-value at a time.
• Atmosphere grid
Model source of the grid of the atmospheric parameters αT,λ , αg,λ , βT,λ ,
βg,λ , and bλ .
• Overshooting
This box indicates if models with core overshooting should be taken into
account.
108
Mode Identification
• Metallicity
Stellar metallicity value [m/H]. The available range depends on the
selected non-adiabatic model source.
• Micro turbulence
Micro turbulence value of the stellar atmosphere models.
• Non-adiabatic obs. source
Select here the source for the grid of non-adiabatic observables.
• Identify mode
Start the mode identification. famias computes the observed amplitude
ratios and phase differences as well as the corresponding values for all
found pulsation models. The results are written to the Results Tab.
The Photometry Modules
109
5.5 Results
This module contains the results of the photometric mode identifications. It
gives the observed and theoretical values of the amplitude ratio and phase
difference in different filters in a text window as well as in diagrams.
5.5.1 List of Calculations
Each time a mode identification is carried out, its results are saved as a new
data set in this list. Click on an item to display the results in the field Mode
identification and the corresponding diagrams in the field Mode identification
plots.
Figure 24: Screenshot of the Results Tab.
5.5.2
Settings
This box can be used to set the reference filter and to set which -values should
be displayed in the plot window.
110
Results
• Reference filter
This is the reference filter r for the amplitude ratio and phase difference
with respect to filter x. The amplitude ratios are computed as Ax /Ar .
The phase difference is calculated as φx − φr . Exceptions are the mode
identification plots, where the phase difference is plotted against the amplitude ratio. There, the indices r and x are exchanged.
• Box of -values
You can select here which -values should be displayed in the plot window.
• Update
This updates the Mode identification box and plot window with the
current settings.
5.5.3
Mode Identification Report
This field displays the main information about the observed and theoretical
parameters for the obtained mode identification. It lists the input values and
settings for the models, the observed amplitude ratios and phase differences,
and for each pulsation model that matches the search criteria, its degree and
corresponding amplitude ratio and phase differences.
Amplitude ratios in the filters x and y are denoted as A(x)/A(y). Phase
differences are indicated as P (x − y) and in units of degrees. For the observed
values, the 1σ standard deviation is indicated.
5.5.4 Mode Identification Plots
Three kinds of plots, that can be selected via the combo box above, are available
in this field. They are described in detail below. In each plot, the observed
values are displayed as black crosses with error bars. The theoretical values are
displayed as lines. Each colour represents another value of the degree and
coincides with the colour-scheme in the field Settings. Generally, more than
one theoretical pulsation model is found that matches the input criteria (e.g.,
Teff and log g). All these models are displayed as apart lines in the plots (as
well as listed in the field Mode Identification).
• Amplitude ratio
x
This plot displays the amplitude ratio A
Ar relative to the reference filter r
(see Settings) as a function of the central wavelength of the corresponding
filter x. The values of each fitting theoretical model are drawn as apart
lines. Plots of this kind are suited to identify modes in SP B or β Cep
stars, i.e., stars where the amplitude ratio depends strongly on the degree
of the mode.
The Photometry Modules
111
• Phase difference
This plot displays the phase difference P (x − r) relative to the reference
filter r (see Settings) as a function of the central wavelength of the
corresponding filter x. Values of different fitting theoretical models are
plotted as apart lines.
• Phase diff / Ampl. ratio
Ar
as a function of the phase
These plots display the amplitude ratio A
x
difference P (r − x) for each filter x of the selected filter system relative
to the reference filter r. Each plot displays the results for another combination of r and x. In these plots, the lines of a certain colour represent
the range of all found models that fulfil the search criteria.
5.6 Logbook
The logbook shows the list of actions that have been performed with the photometric set of tools of famias and corresponding information. Each time an
operation is carried out in famias, a new log-entry is written to the List of
actions. Clicking on an entry of this list shows the corresponding information
in the text box.
Entries of the List of actions can be renamed or deleted by using the menu
Data. The text box can be modified and saved in famias by clicking on the
button Save.
112
Tutorial: Photometric mode identification
5.7 Tutorial: Photometric mode identification
This tutorial demonstrates the use of famias for the photometric mode identification based on multi-colour light curves.
5.7.1 Importing and preparing data
1. Select the Photometry page and click on File → Import Light curve.
2. Select one or several files that contain the photometric data. A data
file must be in ASCII format and consist of at least two columns, separated by a space or tabulator. Columns of observation time in d−1 and
magnitude are required. An additional column listing the weights of the
measurements is optional. Once you have selected your files, click on
Open.
Figure 25: Data manager after importing Geneva light curves of an SPB star.
3. For each file that you import, an import-dialogue will open. Select the
columns that you want to import and specify the photometric passband of
The Photometry Modules
113
the observations. For a more detailed description of the import-dialogue
see Section 2.1. The successfully imported data sets will be listed in the
Data Manager.
4. You can use the tools in the Data Manager to edit your data (delete
data points, change weights, etc.). See Section 5.1.2 for further details.
5.7.2 Searching for periodicities
The search for periodicities should be carried out in the following iterative
schematic way:
1. Compute a Fourier spectrum in a frequency range where you expect pulsation.
2. Compute the significance level at the frequency having the highest amplitude and include this frequency in the least-squares fitting if it is significant.
3. Compute a multi-periodic least-squares fit of the original data with all
detected frequencies. In case that no unique frequency solution exists due
to aliasing, compute least-squares fits for different possible frequencies.
The solution resulting in the lowest residuals should be regarded as best
solution.
4. Exclude frequencies from the fit that do not have a SNR above 4 (3.5 for
harmonics and combination terms).
5. Pre-whiten the data with all significant frequencies.
6. Continue with the first point using the pre-whitened data until no significant frequency can be found.
In famias follow the following procedure:
1. Select data set
In the Data Manager or the use combo box (top right), select the data
set you want to analyse.
2. Calculate Fourier spectrum
Switch to the Fourier Tab. Select a reasonable frequency range and
click on Settings → Calculate Fourier to compute a Fourier spectrum.
A dialogue box will pop up and ask you, if you would like to include the
highest frequency peak in the Least-Squares Fitting Tab. Before doing
so, it is a good idea to check for the statistical significance of this peak.
114
Tutorial: Photometric mode identification
3. Compute significance level
Mark the check box Settings → Compute significance level. The frequency value of the highest peak is automatically written to the corresponding text field. Modify this value, if you are interested in the significance of another frequency peak. Click on Calculate Fourier to compute
another Fourier spectrum. The significance level will be shown in the plot
as a red line. If the examined frequency peak is significant, include it in
the List of Frequencies of the Least-Squares Fitting Tab.
Figure 26: Fourier spectrum of the Geneva U -band.
4. Compute least-squares fit
Switch to the Least-Squares Fitting Tab and mark the check boxes of
all frequencies in the List of Frequencies that you want to include in the
fit. Also mark the check box Settings → Compute signal-to-noise ratio
to determine the statistical significance of the selected frequency peaks.
Click on Calculate Amplitude + Phase to compute a least-squares fit to
the data by improving amplitude and phase values. Click on Calculate
All to compute a fit by improving frequency, amplitude, and phase. The
List of Frequencies box shows the results of the fit. The frequency is
The Photometry Modules
115
displayed in inverse units of the input time and the phase is indicated in
units of the period.
5. Pre-whiten light curve
To pre-whiten the light curve with the obtained fit, mark the check box
Pre-whiten data and compute another fit. The pre-whitened light curve
is written to the Data Manager Tab as a new data set.
6. Compute Fourier spectrum of residuals
Select the pre-whitened light curve and compute a Fourier spectrum
thereof to search for further frequencies. If you want to compute another
least-squares fit with additionally found frequencies, you must select the
original light curve.
5.7.3
Mode identification
The photometric mode identification as it is implemented in famias uses the
method of amplitude ratios and phase differences in different photometric passbands. You therefore have to provide for each pulsation frequency that should
be identified its amplitude and phase for different filters. These values can be
determined with a multi-periodic least-squares fit of sinusoids to the data under
the assumption that the variations are sinusoidal. To be able to compare the
phase values determined for the different filters, the same frequency values have
to be taken into account in the least-squares fits for all filters. Important note:
the frequency has to be in units of d−1 .
1. Insert frequencies
You can either enter input the observed values of frequency, amplitude,
and phase manually or copy directly the results from the least-squares fit.
• Manual input
Switch to the Mode Identification Tab (see Figure 27). In the field
Observed Values, select the option User input in the top combo
box. You can input the frequency value in the field Frequency.
Select the filter system of your observations and input the observed
amplitude and phase in the corresponding fields. To add values for
an additional frequency, use the function Action → Add frequency.
• Automatic input
To use this function, you need to import light curves from different
filters and assign to each light curve the correct filter name (during
import or in the Data Manager). Mark the frequencies in the LeastSquares Fitting Tab → List of Frequencies that have significant
116
Tutorial: Photometric mode identification
amplitude in all filters that you want to use for the mode identification. Press Copy values to MI to compute a least-squares fit and
copy the frequency, amplitude, and phase to the Mode Identification Tab. In this least-squares fit, the frequency is kept constant
whereas amplitude and phase are improved.
Repeat this procedure for the light curves taken in other filters without modifying the frequency values or the number of marked frequencies.
Figure 27: Mode Identification Tab of famias. The observed amplitude and phase
are listed in the left field, whereas the options for the stellar models can be set in the
right field.
For each imported frequency, a new item is added in the top combo
box of the field Mode Identification Tab → Observed Values.
To carry out a mode identification, it is only obligatory to provide the
observed frequency value. It is not necessary to input observed amplitude
and phase values. The theoretical amplitude ratios and phase differences
are in any case always computed for all filters of the selected filter system.
The Photometry Modules
Figure 28: Results of the tutorial data. The best identification is achieved for
(red lines).
117
=0
2. Set stellar model parameters
In the Mode Identification Tab, the parameters of the stellar models
and the source of the non-adiabatic observables that should be used for
the mode identification have to be set. See Section 5.4.4 for detailed
information about these parameters.
3. Start mode identification
Start the mode identification by pressing the button Identify mode. The
results will be written to the Results Tab.
4. Interpretation of results
The Results Tab displays the results of the mode identification in text
form and in several plots. The text field Mode Identification lists the
input parameters and the observed and theoretical amplitude ratios and
phase differences. Its contents are described in detail in Section 5.5.
As can be seen in Figure 28, the observed amplitude ratios are most
consistent with theoretical models that have a degree = 0.