1
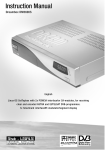
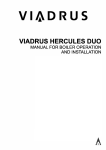
Instruction Manual
Warranty card
HDD installation card
Linux OS Set-top box with PCMCIA interface for
CA modules, for receiving clear and encoded
ASTRA and EUTELSAT DVB programmes.
• Connector for internal hard disk
• Compact Flash reader
• Graphical display
1. Remote control
Shift/Set-up function
TV control mode
On / standby
Dreambox control mode
Numeric keypad
Page back
Mute mode
Page forwards
Volume +/-
Bouquet selection
Channel information
Direction keys
Audio menu
Option keys
red, green, yellow, blue
LAME!
Main menu
OK (selection)
VCR menu (video recorder)
VCR control
Help menu
TV mode
Videotext
Radio mode
3
1. Remote control
4
2. Views
2.2 Rear view
CI-module
2.1 Front view
Video recorder
TV connector
Smartcard reader
Mains power supply
230 V / 50 HZ
Compact Flash
Audio Out
analog
Display
RS 232
USB Port
Mini DIN
Ethernet
AC3 audio Out
Channel up/down
Send/receive diodes
LNB Out
LNB In
Power on/of
2. Views
3. Table of contents
Chapter
1.
2.
3.
4.
4.1
4.2
5.
5.1
5.1.1
5.1.2
5.2
5.3
6.
7.
8.
8.1
8.2
8.3
8.4
8.4.1
8.4.2
8.4.3
8.4.4
8.4.5
8.4.6
8.4.7
8.4.8
8.4.9
8.4.10
8.4.11
8.4.12
9.
10.
11.
12.
13.
14.
15.
16.
16.1
16.2
Page
Remote control . . . . . . . . . . . . . . . . . . . . . . . . . . . . . . . . . . .
Dreambox views . . . . . . . . . . . . . . . . . . . . . . . . . . . . . . . . . .
Table of contents . . . . . . . . . . . . . . . . . . . . . . . . . . . . . . . . . .
Safety instructions . . . . . . . . . . . . . . . . . . . . . . . . . . . . . . . .
Periods of non-use . . . . . . . . . . . . . . . . . . . . . . . . . . . . . . . . .
Additional safety instructions . . . . . . . . . . . . . . . . . . . . . . . .
Getting started . . . . . . . . . . . . . . . . . . . . . . . . . . . . . . . . . . . .
HiFi amplifier . . . . . . . . . . . . . . . . . . . . . . . . . . . . . . . . . . . . . .
Analog . . . . . . . . . . . . . . . . . . . . . . . . . . . . . . . . . . . . . . . . . . .
Digital . . . . . . . . . . . . . . . . . . . . . . . . . . . . . . . . . . . . . . . . . . .
RS 232 serial interface . . . . . . . . . . . . . . . . . . . . . . . . . . . . . .
Ethernet . . . . . . . . . . . . . . . . . . . . . . . . . . . . . . . . . . . . . . . . . .
Disposal notes . . . . . . . . . . . . . . . . . . . . . . . . . . . . . . . . . . . .
Important notes on operation . . . . . . . . . . . . . . . . . . . . . . .
Main menu . . . . . . . . . . . . . . . . . . . . . . . . . . . . . . . . . . . . . . .
Info menu . . . . . . . . . . . . . . . . . . . . . . . . . . . . . . . . . . . . . . . .
Games menu . . . . . . . . . . . . . . . . . . . . . . . . . . . . . . . . . . . . . .
File menu . . . . . . . . . . . . . . . . . . . . . . . . . . . . . . . . . . . . . . . .
Set-up menu . . . . . . . . . . . . . . . . . . . . . . . . . . . . . . . . . . . . . .
Channels – channel search . . . . . . . . . . . . . . . . . . . . . . . . . .
Channels – satellites . . . . . . . . . . . . . . . . . . . . . . . . . . . . . . .
Channels – satellites – LNB’s . . . . . . . . . . . . . . . . . . . . . . . . .
Network . . . . . . . . . . . . . . . . . . . . . . . . . . . . . . . . . . . . . . . . . .
OSD . . . . . . . . . . . . . . . . . . . . . . . . . . . . . . . . . . . . . . . . . . . . .
LCD . . . . . . . . . . . . . . . . . . . . . . . . . . . . . . . . . . . . . . . . . . . . .
Remote control . . . . . . . . . . . . . . . . . . . . . . . . . . . . . . . . . . . .
Video . . . . . . . . . . . . . . . . . . . . . . . . . . . . . . . . . . . . . . . . . . . .
Skin . . . . . . . . . . . . . . . . . . . . . . . . . . . . . . . . . . . . . . . . . . . . .
Language . . . . . . . . . . . . . . . . . . . . . . . . . . . . . . . . . . . . . . . .
Timer . . . . . . . . . . . . . . . . . . . . . . . . . . . . . . . . . . . . . . . . . . . .
Hard disk . . . . . . . . . . . . . . . . . . . . . . . . . . . . . . . . . . . . . . . . .
Common Interface . . . . . . . . . . . . . . . . . . . . . . . . . . . . . . . . .
Upgrade . . . . . . . . . . . . . . . . . . . . . . . . . . . . . . . . . . . . . . . . .
EPG (electronic program guide) . . . . . . . . . . . . . . . . . . . . . .
Infobar . . . . . . . . . . . . . . . . . . . . . . . . . . . . . . . . . . . . . . . . . .
Channel lists . . . . . . . . . . . . . . . . . . . . . . . . . . . . . . . . . . . . .
Standby, power down Dreambox and reset . . . . . . . . . . .
Hard disk installation instructions . . . . . . . . . . . . . . . . . . . .
DreamUp – operating software update . . . . . . . . . . . . . . . .
DreamUp – preparing the software . . . . . . . . . . . . . . . . . . . .
DreamUp – establish connection . . . . . . . . . . . . . . . . . . . . .
3
4
5
7- 9
8
8-9
10-11
10
10
10
11
11
11
11
12-22
14
15
15
15-22
16
16-17
17-18
18-19
19
19-20
20
20
20-21
21
21-22
22
22-23
23
23-24
24-25
25-27
28
28-35
36
37
38-39
3. Table of contents
5
3. Table of contents
16.3
16.4
16.5
16.6
17.
17.1
18.
19.
20.
DreamUp – backup function . . . . . . . . . . . . . . . . . . . . . . . . .
DreamUp – delete operating software . . . . . . . . . . . . . . . . .
DreamUp – flash operating software . . . . . . . . . . . . . . . . . . .
Reset Dreambox to factory settings . . . . . . . . . . . . . . . . . . .
Set-up TV control . . . . . . . . . . . . . . . . . . . . . . . . . . . . . . . . .
Programming sequence . . . . . . . . . . . . . . . . . . . . . . . . . . . . .
TV model list . . . . . . . . . . . . . . . . . . . . . . . . . . . . . . . . . . . . .
Technical data . . . . . . . . . . . . . . . . . . . . . . . . . . . . . . . . . . . .
Glossary of terms . . . . . . . . . . . . . . . . . . . . . . . . . . . . . . . . .
40-41
42-43
43-46
46
47
47
48-55
56-58
59-66
Warranty card . . . . . . . . . . . . . . . . . . . . . . . . . . . . . . . . . . . . 67
HDD installation card . . . . . . . . . . . . . . . . . . . . . . . . . . . . . . 68
6
3. Table of contents
4. Safety instructions
4. Safety instructions
For your protection, please read the safety instructions thoroughly before
starting to use your DM 7000. The manufacturer accepts no responsibility for
damage which occurs as a result of incorrect handling or from failure to
observe the safety instructions.
• The unit must be positioned such that it is sufficiently ventilated.
• The cover of the unit must not be covered, and there must be sufficient
distance from other equipment. The ventilation ports of the device must
always remain unobstructed, so that the warm air can be carried away
from the interior of the unit.
• Do not place any vases or other containers with fluids in them on the unit.
Water must not be allowed to drip or to spray onto the unit.
• No burning objects, such as candles or oil lamps, may be placed on the
unit.
• The unit must only be operated in moderate climactic conditions.
• Never open the unit yourself! There is a risk of electric shocks. Should it
become necessary to open the unit, this must be carried out by qualified
personnel.
• Never introduce foreign metal objects into the slots or the ventilation
ports.
• Installation or exchange of a hard disk drive may only be carried out by
qualified personnel, or a dealer trained for the purpose.
4. Safety instructions
7
4. Safety instructions
WARNING!
Conversion or modification of the unit leads to loss of
warranty if not carried out by a specialist dealer and
certified in writing.
WARNING!
We recommend that disk drives should be installed
by the dealer.
The guarantee lapses if a hard disk
is incorrectly installed.
4.1 Periods of non-use
• If the unit is not operated for longer periods of time, it should be
completely disconnected from the mains power supply.
• The unit should also be disconnected from the mains supply during
electrical storms.
4.2 Additional safety instructions
• Connection to the external unit (LNB)
Remove the power cable of the DM7000 from the mains socket before you
connect or remove the cable of the LNB.
• Connection to the television
Remove the power cable of the DM 7000 from the mains socket before
you connect the SCART cable to your television.
• The unit must immediately be disconnected from the mains power supply
if the power cable or socket show any signs of damage.
• The unit must immediately be disconnected from the mains power supply
if it is exposed to dampness or if dampness penetrates it.
• The unit must immediately be disconnected from the mains power supply
if substantial external damage is discovered.
8
4. Safety instructions
4. Safety instructions
Do not expose your Dreambox to direct sunlight, lightning or rain.
Earthing: The LNB cable must be earthed.
The earthing system must conform to SABS 061.
Cleaning: Remove the power cable of the Dreambox from the mains socket
before you clean the Dreambox. Use a slightly damp cloth without cleaning
agents.
Connect your Dreambox only to sockets which are suitable for the purpose.
Do not allow overloads to occur.
General:
Environmental temperature +15°C ... +35°C
Atmospheric humidity < 80%
Dimensions (W x D x H): 374 mm x 230 mm x 63 mm
Weight: 1.8 kg without HDD
4. Safety instructions
9
5. Getting started
5. General notes
Check that everything has been delivered.
You should have received the following:
1
1
1
1
1
2
2
1
1
receiver
power cable
remote control
Instruction Manual
(latest version available from http://www.dream-multiedia-tv.de )
guarantee card
batteries (1.5V microcell)
hard disk installation frames (supplied within the unit from the factory)
IDE connection cable
power cable for the hard disk
Optionally available:
1 infrared keyboard
-
Check the battery polarity carefully and install the batteries supplied in the
battery compartment of the remote control.
Before you connect the receiver, please read the safety instructions under
point 6. Safety Instructions.
Connect the external unit (dish, LNB) with an F plug to the LNB input on
the receiver.
Connect the receiver with a Scart cable to your television (Scart socket
TV), and to a video recorder or DVD player (Scart socket VCR).
Plug the mains cable into the receiver and then into a suitable 230V / 50Hz
power socket.
5.1 Hifi amplifier
5.1.1 Analog
To connect your Dreambox to a hifi amplifier, please use a suitable phono
cable. Connect this to the receiver at AUDIO R/L and to a free input (e.g. AUX
or CD) on your hifi amplifier.
5.1.2 Digital
If your amplifier has a suitable optical input, connect the DIGITAL AUDIO
socket on the receiver to the optical input of the amplifier with an optical
cable. Sampling frequencies of 16, 22.05, 24, 32, 44.1 and 48 kHz are
available. This output also provides the Dolby Digital signal (AC3) when
this is broadcast.
10
5. Getting started
5. Getting started, 6. Disposal notes, 7. Important notes on operation
5.2 RS 232 serial interface
The RS 232 interface is used to update the operating software and for
pre-programming with a PC.
5.3 Ethernet
The Ethernet interface can be used to update the operating software and for
pre-programming with a PC.
6. Disposal notes
The packaging of the DM 7000 consists exclusively of recyclable materials.
Please dispose of these appropriately.
Take care that dead batteries from the remote control and electronic scrap
are not disposed of in ordinary rubbish, but are properly disposed of (return
to the specialist dealer, or special waste disposal).
7. Important notes on operation
The operation of the Dreambox is greatly simplified with an OSD (On Screen
Display). All available options are displayed with 4 coloured dots (red, green,
yellow, blue) and can be activated with the remote control.
The options change depending on the menu, and are labelled appropriately in
each menu.
You can leave all menus and channel lists with the LAME! key.
The menus are in general operated with the on your remote control.
To enter a sub-menu, confirm it with the OK key.
Direction keys
OK-key
5. Getting started, 6. Disposal notes, 7. Important notes on operation
11
8. Main menu
8. Main menu
This OSD (On Screen Display) is used to navigate to the individual submenus.
Here you can enter the File menu.
Here you can enter the Info menu.
Here you can switch your Dreambox into
deep standby mode.
Here you can enter the Setup menu.
Here you can enter the Games menu.
12
8. Main menu
8. Main menu
Here you can switch the Scart connection
between video input and output.
Here you can enter the Timer menu.
Switches to TV mode.
Switches to radio mode.
8. Main menu
13
8. Main menu
8.1 Info menu
With the direction keys on your remote control you can enter the following
sub-menus:
14
8. Main menu
8. Main menu
8.2 Games menu
In this menu, you can choose between the Snake and Tetris games, or call up
the videotext decoder.
8.3 File menu
You can use this to manage the files on the hard disk.
8.4 Set-up menu
With the direction keys on your remote control you can enter the following
sub-menus.
8. Main menu
15
8. Main menu
8.4.1 Channels – channel search
Automatic search:
8.4.2 Channels - satellites
16
8. Main menu
Manual search:
8. Main menu
With this menu you can edit the satellites, or add one or more. Satellites are
added with „New“. Editing is done in the respective selection. Leave this
menu with „Close“.
Under the „LNB“ item you can edit and add LNBs.
If you activate „increase voltage“, the voltage to the LNBs is increased by
0.5 volts. This is necessary for longer antenna connections, or for antenna
cables with excessive attenuation.
After entering your set-up, store your settings with „Save“, or cancel.
8.4.3 Channels - Satellites - LNBs
The following sub-menus provide individual adjustment of the LNBs / satellite
systems, e.g. when a switch is used.
8. Main menu
17
8. Main menu
After entering your set-up, store your settings with „Save“, or cancel.
8.4.4 Network
Here you set up the configuration for your network.
IP: Enter the IP address of your Box here
(e.g. 192.168.0.5).
Network mask: (e.g. 255.255.255.0)
Name server: Enter a name server here
18
8. Main menu
8. Main menu
(e.g. 194.25.0.60, 194.25.0.68, 194.25.0.52 of Deutsche Telekom
(http://www.telekom.de/dtag/ipl1/cda/level4s_a/0,3682,17684,00.html)).
Gateway: Enter the standard gateway here (e.g. 192.168.0.1)
(e.g. 192.168.0.1, the IP address of your router).
After entering your set-up, store your settings with „Save“, or cancel.
8.4.5 OSD
This allows you to configure the OSD (On Screen Display).
Transparency: Select the transparency of the OSD.
Brightness: Select the brightness of the OSD.
Contrast: Select the contrast of the OSD.
After entering your set-up, store your settings with „Save“, or cancel.
8.4.6 LCD
This allows you to set up the display of your Dreambox.
8. Main menu
19
8. Main menu
This allows you to adjust brightness, contrast and stand-by brightness.
After entering your set-up, store your settings with „Save“, or cancel.
8.4.7 Remote control
This allows you to configure your remote control.
You can adjust the repeat rate and the delay rate.
After entering your set-up, store your settings with „Save“, or cancel.
8.4.8 Video
This allows you to configure your video set-up.
Colour format: Choose between RGB, SVideo and FBAS.
Aspect ratio: Choose between 4:3 letterbox, 4:3 panscan or 16:9 (PIN8).
After entering your set-up, store your settings with „Save“, or cancel.
8.4.9 Skin
This allows you to choose between different OSD skins.
20
8. Main menu
8. Main menu
Skins: Select your favourite skin here.
After entering your set-up, store your settings with „Save“, or cancel.
A new skin does not become active until you reboot!
8.4.10 Language
This allows you to choose the language for the OSD.
Language: select the language for the OSD.
After entering your set-up, store your settings with „Save“, or cancel.
A change of language does not become effective until you call up the
menu again!
8.4.11 Timer
This allows you to set up your recording list.
8. Main menu
21
8. Main menu, 9. Common Interface
Enter the channels manually with the record options, or edit your recording
list. You can also delete recording options from the EPG list here with
„remove“.
After entering your set-up, store your settings with „Save“, or cancel.
8.4.12 Hard disc
This allows you to configure your installed hard disc.
First select the hard disk found and press „OK“ to view information about the
disk, or to re-format the disc.
Model: the hard disk found.
Capacity: capacity of the hard disc connected.
Connection: port master or slave.
Status: remaining space available on the hard disc.
To configure a new hard disc or to delete all data from the disc, please select
„Format“. Otherwise, select „Close“.
9. Common Interface
Here you can find the options for your Common Interface.
22
8. Main menu, 9. Common Interface
9. Common Interface, 10. Upgrade, 11. EPG
Reset: This allows you to reset the Common Interface.
Init: This allows you to re-initialise the Common Interface.
10. Upgrade
This provides the option to update the firmware of your Dreambox over the
Internet.
This error message appears if you have not set the gateway and name server
for the Internet in the network set-up (see 8.4.4 Network).
11. EPG (electronic program guide)
9. Common Interface, 10. Upgrade, 11. EPG
23
11. EPG, 12. Infobar
You can access the EPG lists with the red option button on your remote control.
You can then use the „OK“ key to see further information about the
broadcast.
With the green option button, you can add the programme to your timer list.
(see 8.4.11 Timer)
12. Infobar
The Info bar appears on change of programme, and shows the following data.
You can call up the Info bar at any time with the „OK“ key of your remote
control.
Channel name
Channel number
Current programme
Current time
24
11. EPG, 12. Infobar
Time elapsed
Total running time
Next programme
12. Infobar, 13. Channel lists
EPG available
(red)
Channel options
(green)
Videotext
(blue)
Audio
(yellow)
Aspect ratio
16 : 9 / 4 : 3
Encrypted
Dolby Digital
Broadcast
„Encrypted“ is highlighted in orange when the programme is being broadcast
encrypted.
„Aspect ratio“ is highlighted in orange when the programme is being broadcast in 16:9 format. Otherwise it is in 4:3 format.
„Dolby Digital Broadcast“ is highlighted in orange when the programme is
being broadcast in Dolby Digital.
13. Channel lists
In the channel lists you can use the green option button
to choose between different display formats of the Channel list:
-
simple Channel list
three-column Channel list
Channel list with bouquet list
12. Infobar, 13. Channel lists
25
13. Channel lists
Here you can see a Channel list with a list of bouquets.
With the yellow option button on your remote control
you can switch between the left and right windows.
With the red option button on your Remote control you can access the
service menu. Here you can add the channel to the favourites list or to the
playlist.
26
13. Channel lists
13. Channel lists
Here you see a single-column Channel list.
The blue option button takes you to the favourites menu.
Here you see a three-column Channel list.
13. Channel lists
27
14. Standby, Power down Dreambox and Reset, 15. HDD installation instr.
14. Standby, Power down Dreambox and Reset
To put your Dreambox into standby mode, briefly press the power key at the
top right of your remote control once.
To put your Dreambox into deep standby, go to the main menu, select the
“power down” option, and confirm this with the „OK“ key.
All settings are now stored and the Box goes into deep standby, or press the
power key on the remote control for 5 seconds.
For a reset, press all 3 buttons on the Dreambox at the same time.
15. Hard disk installation instructions
This section describes how to install a hard disk into your Dreambox 7000.
Please be sure during this process to observe the procedures for ESD in
working with electronic equipment. Make sure that you are earthed. Do not
unscrew the unit in your living room or in other rooms with carpet or other
floor coverings which take on an electrostatic charge. All connection cables
should be disconnected from the unit. Open the unit only with the tools
described here. Avoid physical contact with the components on the main
circuit board. If too many questions arise, ask your nearest dealer or television technician for assistance.
Please observe the guarantee notices on page 8 of this Manual.
28
14. Standby, Power down Dreambox and Reset, 15. HDD installation instructions
15. Hard disk installation instructions
This picture shows the items you need for installation of the hard disk.
housing cover
cross-slot screws (3x)
DREAMBOX 7000-S
torx screws (4x)
hard disk frames
hard disk screws (4x)
power cable
IDE cable
hard disk
torx screwdriver (T10 bit)
1 cross-slot screwdriver
Parts list
1 Dreambox (includes the housing cover, 4 torx screws (left, right),
3 cross-slo screws (rear))
1 cross-slot screwdriver
1 torx screwdriver (T10 bit)
1 hard disk (see hard disks tested at www.dream-multimedia-tv.de )
1 IDE cable
1 power cable
2 hard disk frames (provided in the Dreambox, from works)
4 hard disk screws of your choice
15. Hard disk installation instructions
29
15. Hard disk installation instructions
With the cross-slot screwdriver, unscrew the three cross-slot screws on the
rear of the unit.
With the torx screwdriver, unscrew the two torx screws on the right-hand side
of the unit.
With the torx screwdriver, unscrew the two torx screws on the left-hand side
of the unit.
Draw the case covering away from the unit towards the rear.
30
15. Hard disk installation instructions
15. Hard disk installation instructions
Remove the hard disk frames, extracting them upwards.
Here you see the Dreambox with the hard disk frames removed. The
connections for the IDE cable and the power cable of the hard disk can
be recognised.
Attach the IDE cable and the power cable to your hard disk. Alternatively, you
can do this after you have mounted the hard disk frames.
15. Hard disk installation instructions
31
15. Hard disk installation instructions
You now need the cross-slot screwdriver, the hard disk frames, your hard
disk, and the four screws of your choice.
Fasten the hard disk frames to your hard disk.
32
15. Hard disk installation instructions
15. Hard disk installation instructions
Set the hard disk by jumper to master operation.
Please consult the Instruction Manual of your hard disk for information on
how to set the hard disk for master operation.
Attach the IDE cable and the power cable to your Dreambox.
15. Hard disk installation instructions
33
15. Hard disk installation instructions
Insert the hard disk into the slot in the housing frame provided for the
purpose, and lead the IDE cable and the power cable through below the
hard disk.
Take care to lead the cable as close as possible to the hard disk.
34
15. Hard disk installation instructions
15. Hard disk installation instructions
Slide the case covering again from the rear over the unit.
Pay attention to the small plastic clips on the front panel when you slide the
case covering onto it. The plastic clips must not remain exposed.
Screw the case covering fast again with the four torx screws (left and right)
and the three cross-slot screws (rear of case).
Attach the cables you need to your Dreambox. Attach the power cable last.
Format the hard disk from the OSD menu.
15. Hard disk installation instructions
35
16. DreamUp – operating software update
16. DreamUp – operating software update
You can obtain the DreamUp software and the operating software from
www.dm7000.de .
!!! Please study these instructions thoroughly
before you begin !!!
In order to connect the Dreambox with your computer, you need a PC with a
network card and a serial interface (COM1 or COM2), and a crossover patch
cable and a null modem cable. Alternatively, you can connect the PC with the
Dreambox, without a crossover patch cable, with a normal patch cable via
your router, hub or switch. If you do not have a patch cable, you can also
connect to the Dreambox with just a serial cable (uploads and downloads
take longer). In these instructions, we assume that create a connection with
the Dreambox over both interfaces, serial and Ethernet. If many questions
arise, ask your dealer for assistance, or contact our technical hotline at
www.dream-multimedia-tv.de.
Please remove all cables from your Dreambox.
Plug only the serial cable and the patch cable into
your Dreambox.
The power cable is unplugged.
How to find out the IP address of your computer under Windows (W98,
W2K, XP):
Click on Start -> Run -> type in the command „Command“ -> press return.
A DOS command window will open, Type in the command „ipconfig/all“ and
press return. The IP address of your computer will then be displayed.
Note down the IP address and the subnet mask (can´t do any harm).
36
16. DreamUp – operating software update
16. DreamUp – operating software update
16.1 DreamUp – preparing the software
Start the DreamUp software on your computer.
Select the COM interface which you have connected with your Dreambox.
Make sure that the checkbox “Use Network” is checked.
Enter the IP address of your computer that you noted down to the right of
„Local IP (PC)“.
To the right of „Remote IP (Box)“ enter, for example, 10.0.0.85.
This IP address is assigned to your Dreambox by the software.
Make sure that this IP address is not allocated in your home network, unless
you are working with a crossover patch cable.
You have now configured the software to your needs.
16. DreamUp – operating software update
37
16. DreamUp – operating software update
16.2 DreamUp – establish connection
Now click on „Connect“.
The software informs you with a status message that it is prepared for a
connection. Only now should you plug the power cable into your Dreambox.
38
16. DreamUp – operating software update
16. DreamUp – operating software update
When you have supplied power to your Dreambox, the software prepares
everything necessary for flashing your Dreambox. Observe the status.
This is how it looks when the software has established the connection with
your Dreambox.
Check whether the Ethernet connection is working by clicking on „Ping“.
If a connection exists, a result appears. If this is not the case, check the
patch cable and your network configuration.
16. DreamUp – operating software update
39
16. DreamUp – operating software update
16.3 DreamUp – backup funktion
You can store the existing operating software together with the set-up of your
Dreambox, by clicking on „Backup“.
After the click, the following window opens. This allows you to select a file
name for the image you are going to save, and store it.
40
16. DreamUp – operating software update
16. DreamUp – operating software update
After you have clicked on „Save“, the operating software is backed up.
Observe the status.
When the backup is complete, you will receive a message from the software,
as follows.
Acknowledge this message by clicking „OK“.
16. DreamUp – operating software update
41
16. DreamUp – operating software update
16.4 DreamUp – delete operating software
Click on „Erase“ to delete the existing operating software (image).
(This is no MUST)
A request for confirmation will appear, which you answer with a click on
„Yes“.
Observe the status.
42
16. DreamUp – operating software update
16. DreamUp – operating software update
Here you see the message that the erase has been successfully completed.
Click on „OK“.
16.5 DreamUp – flash operating software
Click on „Flash”. You will now be asked for the operating software (image)
which you want to record.
16. DreamUp – operating software update
43
16. DreamUp – operating software update
Select your image and click on „Open“.
The operating software will then be uploaded to your Dreambox.
Observe the status.
44
16. DreamUp – operating software update
16. DreamUp – operating software update
When the upload is complete, the flash of your Dreambox will be erased.
Observe the status.
The uploaded image will be checked.
Observe the status.
16. DreamUp – operating software update
45
16. DreamUp – operating software update
After the flashing is complete, you will receive a message from the software
that everything has been completed successfully. Click on „OK“.
16.6 Reset Dreambox to factory settings
Your Dreambox is now updated with the selected operating software.
Close the program by clicking on „Exit“.
Remove the power cable, the patch cable and the serial cable from your
Dreambox.
Wait 20 seconds.
Plug the TV Scart plug and the coaxial cable (satellite system) into your
Dreambox. Plug the power cable into your Dreambox.
As soon as the Dream logo appears on your TV, press and hold down the
upper left key on your Dreambox, and do not release it until „flash erase“
appears in the display of your Dreambox.
Your Dreambox then resets itself, and returns to the TV broadcaster „ARD“.
46
16. DreamUp – operating software update
17. Set-up TV control
17. Set-up TV control
A four-digit TV device code is selected from the TV model list in the table in
Chapter 18 and entered.
TV mode -> <<Set-up>> -> number -> number -> number -> number
Shift-/Setup-Funktion
TV-Steuerung
Zehnertastatur
4.1 Programming sequence
1. Briefly press the TV key once.
2. Press SHIFT/setup key for 3 seconds the TV key should blink twice.
3. Enter the TV code with the numeric keypad on the remote control.
Each number input is acknowledged by the TV key blinking once.
After the fourth digit has been input, a valid code is acknowledged by the TV
key blinking twice.
4. The remote control then automatically leaves programming mode.
5. If no code is input for 10 seconds, the remote control automatically leaves
programming mode.
17. Set-up TV control
47
18. TV model list
18. TV model list
A.R. Systems
Accent
Admiral
Adyson
Agashi
Agazi
AGB
Agef
Aiko
Aim
Akai
Akiba
Akura
Alba
Alcyon
Allorgan
Allstar
Amplivision
Amstrad
Anglo
Anitech
Ansonic
Apollo
Arc en Ciel
Arcam
Aristona
Arthur Martin
ASA
Asberg
Asora
Asuka
Atlantic
Atori
Auchan
Audiosonic
Audioton
Ausind
Autovox
Awa
Ayomi
Baird
Barco
Basic Line
Bastide
Baur
Bazin
Beko
Beon
Best
Bestar
Binatone
Black Star
Blacktron
Blackway
Blaupunkt
Blue Sky
Blue Star
Bondstec
Boots
BPL
Brandt
Brinkmann
Brionvega
Britannia
Brother
Bruns
BSR
48
18. TV model list
0067
0067
0117
0247
0246
0294
0546
0117
0246
0067
0391
0546
0248
0248
0248
0517
0106
0236
0067
0247
0039
0039
0039
0400
0458
0503
0429
0246
0067
0193
0135
0067
0039
0248
0067
0039
0193
0067
0247
0106
0117
0041
0268
0139
0410
0248
0247
0333
0247
0400
0067
0367
0067
0247
0277
0312
0312
0221
0248
0312
0277
0247
0312
0531
0448
0067
0246
0294
0117
0193
0382
0123 0448 0243 0294
0246
0039 0067 0401 0065 0463 0102 0391 0221 0294 0247
0238
0586
0312
0389
0265
0066
0401
0578
0485
0312
0039
0698
0067
0510
0067
0039
0448
0609
0463 0221 0065 0039 0102 0248 0193
0247 0661 0246 0294
0442 0294 0067
0400 0385 0401 0067 0246 0277 0193
0324 0247
0430
0546
0294
0106
0132
0531
0429
0586
0430
0376
0106
0350 0400
0294 0248 0401 0463 0442 0067
0294 0067
0039 0067 0404 0193 0353 0441 0289 0277 0042
0139 0226 0363 0228
0247
0042
0100 0134 0117
0294 0246 0312 0247
0246 0236 0289 0350
0430
0139 0247 0400 0367 0294 0248 0458
0400 0294
0236 0267 0106 0379 0247 0277 0366
0066 0039 0187 0404 0442 0067
0373 0102 0247 0238
0193
0039 0404 0067 0597 0193 0312
0225 0542 0067 0221 0391 0379 0535 0040
0067
0448
0400
0400 0404
0225 0230 0243 0357 0358 0348
0312 0485 0067 0517 0698
0067
0139 0429 0235 0267 0363 0226 0228 0317 0365
0067 0549
0117
0247
0324
18. TV model list
BTC
Bush
Capsonic
Carad
Carena
Carrefour
Cascade
Cathay
CCE
Centurion
Century
CGE
Cimline
City
Clarivox
Clatronic
Clayton
CMS Hightec
Concorde
Condor
Contec
Continental Edison
Cosmel
Crezar
Crosley
Crown
CS Electronics
CTC
Cybertron
Daewoo
Dainichi
Dansai
Dansette
Dantax
Datsura
Dawa
Daytron
Decca
Deitron
Denko
Desmet
Diamant
Digiline
Dixi
Domland
Drean
DTS
Dual
Dumont
Dux
Dynatron
Elbe
Elcit
Elekta
Elin
Elite
Elman
Elta
Emerson
Emperor
Erres
Etron
Euro-Feel
Europa
Europhon
Expert
Exquisit
0248
0248
0549
0294
0640
0485
0066
0039
0067
0067
0067
0117
0104
0039
0039
0448
0248
0609
0415
0247
0039
0246
0246
0531
0039
0243
0117
0039
0277
0277
0248
0039
0248
0067
0442
0400
0238
0067
0039
0102
0067
0294
0350
0067
0067
0039
0424
0067
0039
0379
0117
0067
0067
0465
0117
0294
0246
0248
0132
0039
0243
0312
0067
0067
0294
0067
0067
0236
0067
0265 0193 0379 0039 0066 0312 0067 0385 0401 0404
0294 0391 0517 0238 0324 0247 0698
0067
0067
0100
0067
0243 0277 0268
0114 0336 0106 0277 0193 0448 0400
0265 0248
0100
0294 0400 0401 0247 0106 0277 0067 0039 0132 0350
0277 0312 0350 0067 0400 0039 0132 0441 0448
0039 0187 0041 0066
0139 0267 0226 0228 0429 0363 0235 0317 0517
0367
0277 0104 0114 0106 0193 0243
0400 0106 0067 0389 0609 0448 0238 0517
0246 0248
0067 0246 0404 0248 0247
0246
0294 0065 0246
0404 0067
0546 0067 0247
0067
0067 0277 0247
0247 0373 0289 0366 0549 0067 0382 0424 0429 0333
0134 0132 0243 0247 0100 0102
0042
0268 0289 0400 0193 0067 0248 0221 0441 0640
0277 0546 0132 0193
0312
0067 0135 0134 0578 0391 0379 0193 0039
0067
0294
0117 0277 0067 0401 0100 0312 0350
0042
0039 0193
0546 0132 0243 0247 0277 0193
0430 0289 0193
0277
18. TV model list
49
18. TV model list
Fenner
Ferguson
Fidelity
Filsai
Finlandia
Finlux
Firstline
Fisher
Flint
FNR
Formenti
Fortress
Fraba
Friac
Frontech
Fujitsu
Fujitsu General
Funai
Galaxi
Galaxis
GBC
GE
Geant Casino
GEC
Geloso
General
General Technic
Genexxa
Germanvox
Goldhand
Goldline
GoldStar
Goodmans
Gorenje
GPM
Gradiente
Graetz
Granada
Grandin
Gronic
Grundig
Halifax
Hampton
Hanimex
Hanseatic
Hantarex
Hantor
Harwood
HCM
Hema
Hemmermann
Hifivox
Hikona
HiLine
Hinari
Hisawa
Hit
Hitachi
Hitsu
Hornyphone
Hoshai
Huanyu
Hygashi
50
18. TV model list
0404 0039
0317 0365 0268
0246 0401 0193
0247
0238 0376 0389
0135 0134 0067
0132 0441 0661
0324 0351 0246
0441 0379 0561
0134 0247 0066
0379 0102
0067 0485 0102
0132
0117 0243 0246
0123 0117
0400 0067
0039 0067 0132
0277 0294 0379
0236 0102 0132
0039
0294 0324
0132 0067
0400 0448 0067
0243 0193 0039
0590 0139 0317
0193 0430
0102 0193 0391
0243 0277 0039
0139 0317 0501
0039
0248 0067 0442
0243
0246
0367
0067 0400 0039
0066 0102 0067
0265 0065 0510
0400
0248
0067 0083
0391
0067 0430 0256
0546 0503 0365
0312 0248 0430
0247 0132
0225 0221 0517
0294 0246 0247
0246 0247
0324
0067 0312 0379
0324 0247 0549
0039 0243 0067
0067
0039 0442 0067
0294 0039 0312
0247 0039
379
0531 0139 0226
0248
0294 0067
0238 0066 0067
0312 0248 0430
117
0255 0066 0379
0546 0102 0067
039 0485 0248
0067 0042
0248 0485
0404 0246
0247 0246
0139 0590 0655
0294 0067
0578
0376
0522
0067
0268
0238
0391
0247 0102 0193 0106 0546 0100 0117
0404 0415 0277 0039 0193 0132 0247
0102 0265 0698 0238
0400 0585 0117 0187 0391 0193 0333
0248
0350 0193 0106
0247 0039
0247 0193
0132
0404 0248
0365 0373
0235 0546 0067 0247 0379
0193 0404
0247 0277 0246 0193 0391
0039 0294 0546 0404 0517 0401 0586 0373
0590 0247 0365
0389 0042 0102 0138 0238 0247 0106 0066
0590
0067 0039 0350 193 0485 0609 0640
0100 0106 0235 0267 0067 0586
0193 0391 0424 0243 0350 0458 0400 0039
0132
0442 0247 0248 0448 0067
0429
0248 0039 0193 385 0473 0517 0265 0324
0485
0503 0193 0373 0226 0228 0247 033 0224
0135 0586 0180 0578
18. TV model list
Hyper
Hypersonic
Hypson
Iberia
ICE
Ices
Imperial
Indesit
Indiana
Ingelen
Inno Hit
Innovation
Interactive
Interbuy
IInterfunk
Internal
Intervision
Irradio
Isukai
ITC
ITS
ITT
ITV
Jea
JEC
JVC
Kaisui
Kamp
Kapsch
Karcher
KB Aristocrat
Kendo
Kennedy
Kingsley
Kneissel
Kolster
Konka
Kontakt
Korpel
Korting
Kosmos
Kotron
Kraking
Kyoshu
Kyoto
Lemair
Lenco
Lenoir
Lesa
Leyco
LG
Liesenkotter
Lifetec
Lloyd’s
Loewe
Logik
Logix
Luma
Lumatron
Lux May
Luxor
Madison
Magnadyne
Magnafon
Mandor
Manesth
Manhattan
Marantz
Marelli
0039 0246 0247 0277
0391
0067 0294 0247 0312 0485 0430 268
067
294 0247 0067 0401 0248 0246 039
248 0246
0067 0277 0400 0448 0193 0561 104 0114 0106
267 0243
0067
0517 0640
0039 0102 0067 0248 0247 0106 546 0277
0549
0441
0039 0294 0277
0067 0042 0117 0542 0357 0193 391 0400 0531
0067
0312 0247 0485 0067 0401 0549 400 0424 0517
193 0294 0277
039 0067 0248 0277 0106
248 0067 0312
247
067 0401 0248 0312 0294 0246
193 0510 0379 0391 0503 0578 597 0376 0238
294 0067 0277
066
065
0683 0083 0066 0401 0248
0248 0312 0067 0246 0485 0247 039
0246
0236 0193 0391 0289 0134
0067 0400 0312 0132 0640 0294
0193
0265 0277 0132 0067 0458 0400 441 0640
0236 0243 0193 0465
0246
0465 0289 0400 0268 0067 0441 640
0067
0248 0401 0067
0517
0067
0117 0400 0350
0067
0442 0294
0268
0294 0442
0415 0193
0441
0039 0134 0193 0067
0039
277
0294 0102 0067 0324 0609
067 0400 0039 0247 0277 0246 193 0391
0067 0357 0358
0039 0294 0549 0067 0404 0248 698
0039
0542 0067 0117 0400
0041 0401
0698
0236 0067 0193 0289 0441 0404 039
0236 0067 0193 0289 0391 0247 0294
0067 0039
0224 0267 0510 0522 0379 0391 238 0578 0193
0067
0117 0277 0546 0132 0193
0546 0243 0106 0132 0246
0294
0067 0265 0247 0294 0350 0065 324
0067
0067
0117
0379 0226
0139
0248 0132
0376
18. TV model list
51
18. TV model list
Mark
Masuda
Matsui
Mediator
Medion
Megas
Melvox
Memorex
Memphis
Mercury
Metz
Micromaxx
Minerva
Minoka
Mitsubishi
Mivar
Monaco
Motion
MTC
Multistandard
Multitec
Multitech
Murphy
NAD
Naiko
Nakimura
National
NEC
Neckermann
NEI
Nesco
Network
Neufunk
New Tech
New World
Nicamagic
Nikkai
Noblex
Nobliko
Nogamatic
Nokia
Nordmende
Novatronic
Oceanic
Okano
Omega
Onwa
Opera
Orbit
Orion
Orline
Ormond
Osaki
Osio
Oso
Osume
Otto Versand
Pael
Palladium
Palsonic
Panama
52
18. TV model list
0067 0247 0246 0404 0039
0248
0265 0039 0385 0041 0102 0066 067 0586 0517 0247 0324
401 0463 0473 0609 0485 379 0546 0065 0193 0238 225 0221
0365
0067 0586 0042
0067 0698 0549
0640
0430
0039
0367 0102 0039 0415
0067 0039
0117 0225 0243 0221 0397
0067 0698
0517 0225 0100 0106 0221 0267
0442 0067 0389
0138 0180 0542 0067 0117 0066 267
0400 0106 0246
0039
0106
0400 0379 0542
0132
0067 0698
0247 0379 0039 0246 0277 0132 400 0067
0134 0246 0102 0193
0391
0067
0404 0067
0267 0244 0256
0066 0350 0485 0039 0404 0247 0067
0067 0221 0400 0535 0040 0230 0586 0193 0357 0448 0379
0117 0243 0277 0247 0441
0067 0367 0401
0277
0367
0067 0039 0586 0640
0067 0039 0586 0373 0247
0248
0246
0102 0248 0067 0247 0294 0065 0367 0246 0039 0066
0067 0294
0132 0106 0100 0246
0429 0531 0139 0226
0391 0193 0510 0379 0578 0522 0389 0503 0238 0404 0661
0376
0139 0531 0317 0429 0226 0373 0228 0243 0605 0590 0225
0067 0365
0067 0135
0597 0193 0430 0391 0324 0238
0400 0067 0294 0102
0294
0401 0248 0463
0067
0067
0265 0324 0350 0385 0041 0067 0039 0351 0132 0473 0586
0685 0294 0442
0067 0248
0415 0698
0102 0248 0247 0294 0067 0442 0404
0067
0248
0187 0102 0066 0248
0040 0535 0066 0123 0542 0067 0586 0225 0379 0221 0391
0265 0139 0243 0324 0256 0277 0333 0350 0247
0246
0400 0067 0221 0535 0040 0230 0448 0586 0277 0357 0379
0117 0193 0243 0247 0441 0685
0294 0442 0067
0039 0247 0294 0246 0067 0277
18. TV model list
Panasonic
Panavision
Pathe Cinema
Pathe Marconi
Pausa
Perdio
Perfekt
Pershin
Philco
Philharmonic
Philips
Phoenix
Phonola
Pioneer
Pionier
Plantron
Playsonic
Poppy
Portland
Prandoni-Prince
Precision
Prima
Prinz
Profex
Proline
Prosonic
Protech
Provision
Pye
Pymi
Quadra Vision
Quasar
Quelle
Questa
R-Line
Radialva
Radiola
Radiomarelli
RadioShack
Radiotone
Rank
RCA
Recor
Rediffusion
Redstar
Reflex
Revox
Rex
RFT
Roadstar
Robotron
Royal Lux
Saba
Sagem
Saisho
Salora
Sambers
Samsung
Sandra
Sanela
Sansui
Sanyo
Save
SBR
0256
0578
0067
0193
0235
0039
0102
0067
0430
0117
0247
0586
0067
0067
0067
0400
0067
0247
0039
0404
0277
0247
0039
0102
0039
0351
0067
0067
0067
0067
0039
0430
0277
0067
0277
0243
0066
0067
0139
0067
0117
0067
0039
0100
0590
0067
0391
0067
0067
0067
0236
0117
0039
0117
0400
0317
0226
0485
0265
0224
0243
0067
0246
0268
0067
0238
0193
0067
0067
0680 0280 0244 0243 0391 0267 0397 0546 0067 0193
0441
0268 0246 0430 0350 0379
0243 0531 0139 0226 0228 0363 0429 0267
0350 0193 0067
0114 0104 0448 0106 0243 0277 0193 0400 0067
0067
0117
0586
0458
0042
0350
0042
0400
0353
0400
0117
0373
0221 0117 0373
0415 0246 0193 0102
0246
0391 0139
0294 0039
0546 0391 0243 0106
0294
0379
0193
0102
0244
0247
0224
0067 0042 0655
0246 0400 0404 0609 0401
0039 0277 0379 0132 0294 0448 0367 0698
0586 0042 0117
0040 0041 0531 0139 0542 0379 0221 0391 0066 0247
0104 0114 0357 0336 0100 0134 0135 0187 0225 0230
0294 0698
0248 0193 0067
0586 0042 0353
0546 0277 0067
0067 0458 0400 0609 0448 0294 0442
0655 0365
0578 0066
0400
0441 0277 0193 0289
0400 0458 0102 0294
0294 0248 0448
0442
0243
0228
0640
0546
0379
0546
0586
0247
0117
0365
0312
0039
0193
0106
0617
0429 0193 0139 0531 0546 0373 0391 0528
0235 0655 0578
0041 0247 0193 0294
0389 0391 0546 0578
0132
0039 0247 0400 0294 0246 0102 0238
0401
0187 0066 0041 0400 0102 0246 0247 0134 0243 0039
0067 0585
0586 0042
18. TV model list
53
18. TV model list
Schaub Lorenz
Schneider
SEG
SEI
Seleco
Sencora
Sentra
Serino
Sharp
Shorai
Siam
Siarem
Siemens
Sierra
Siesta
Silva
Silver
Singer
Sinudyne
Sogera
Solavox
Sonitron
Sonneclair
Sonoko
Sonolor
Sontec
Sony
Sound & Vision
Soundwave
Ssangyong
Standard
Starlite
Stenway
Stern
Strato
Sunkai
Sunstar
Sunwood
Superla
Supertech
Supra
Susumu
Sutron
Swissline
Sydney
Sytong
Tandberg
Tandy
Tashiko
Tatung
Teac
TEC
Tech Line
Technema
Technisat
Tedelex
Teleavia
Telecor
Telefunken
Telefusion
Telegazi
Telemeister
Telesonic
Telestar
Teletech
Teleton
Televideon
54
18. TV model list
0379
0067
0373
0247
0117
0236
0039
0065
0485
1223
0324
0067
0193
0221
0067
0400
0246
0066
0117
0117
0067
0350
0391
0238
0067
0067
0238
0067
1535
0132
0067
0039
0248
0039
0312
0236
0067
0324
0401
0067
0546
0039
0404
0365
0039
0277
0246
0246
0397
0248
0066
0102
0067
0247
0067
0350
0685
0247
0139
0067
0139
0336
0067
0067
0350
0067
0067
0039
0247
0350
0578
0586
0247
0294
0132
0289
0042
0277
0039
0040
0193
0333
0401
0277
0193
0441
0379
0248
0066
0546
0549
0391
0132
0379
0424
0193
0193
0243
0382 0366 0289 0353
0698
0067 0246 0698 0517
0324 0236 0067
0248 0039
0640
0123 0187 0066 0324 0683 0083
0117 0132 0243
0230 0225 0243 0357 0358 0187 0067
0586 0042
0067
0391
0132 0277 0430 0465 0039
0265 0132 0243 0324 0193 0391 0546 0379 0040 0236
0102 0193 0578
0400 0247
0039
0597
0400
1040
0248
0350
0294 0312 0247
0193 0430 0535 0040 0578
0324
1681 0535 0040 0041 0030 0066 0132 0681 0104
0404
0448
0039
0193
0248
0289
0294
0385
0067
0039
0246
0067
0039
0247 0350 0067 0404
0067 0294
0193
0039
0351 0485 0248 0265 0067 0517
0039
0246 0586
0247
0441
0102
0247
0546
0542
0039
0698
0139
0247
0246
0247
0485
0277
0367
0277
0389
0067
0294
0501
0226 0391
0123
0193
0041
0039 0442 0379
0365 0367 0289
0531
0193
0531
0373
0317
0248
0528
0226
0226
0247
0501
0067
0429 0235 0363 0520
0289 0424
0429 0317 0104 0114 0131 0365 0292
0655
0193 0289 0248 0294
0067
0277 0367 0067 0698
0236 0193 0379 0289 0066
0193 0246
18. TV model list
Televiso
Temco
Tempest
Tensai
Tenson
Tevion
Texet
Thomson
Thorn
Tokai
Tokyo
Tomashi
Toshiba
Towada
Trans Continens
Trident
Tristar
Triumph
Uher
Ultravox
Unic Line
United
Universum
Univox
Vestel
Vexa
Videologique
VideoSystem
Videotechnic
Videoton
Vidikron
Viper
Visiola
Vision
Vistar
Vortec
Voxson
Waltham
Watson
Watt Radio
Wega
Wegavox
Weltblick
White Westinghouse
Winco
Windstar
Xrypton
Yamishi
Yokan
Yoko
Yorx
Zanussi
0430
0324
0039
0134
0350
0549
0247
0317
0373
0268
0102
0246
0312
0065
0379
0247
0546
0248
0546
0106
0117
0067
0067
0376
0041
0104
0139
0367
0067
0039
0246
0067
0246
0193
0132
0367
0246
0067
0236
0067
0117
0247
0067
0243
0243
0039
0067
0350
0442
0312
0067
0312
0067
0247
0248
0236
0248
0039
0067
0404
0429
0067
0104
0067
0065
0248
0538
0132
0067
0247
0067 0247 0324 0350 0039 0135 0404 0401 0277
0039
0139
0520
0114
0367
0531
0590
0067
0193
0363 0501 0365 0226 0228 0235 0267
0655
0134 0365 0542 0389 0404 0065
0247 0404 0039
0273 0066 0100 0132 0247
0247
0376 0586 0067 0273
0067 0236 0350 0333 0404 0448 0400 0289
0132 0404 0277 0246 0193 0243 0067
0503
0135
0542
0336
0367
0117
0193
0067
0248
0225
0324
0243
0661
0067
0247
0503
0066
0357
0698
0193
0391 0277 0522 0510 0400 0230 0448
0187 0100 0193 0294 0134 0067 0441
0358 0040 0535 0106 0379 0247 0531
0268
0247
0350 0247
0350
0391
0106
0448
0350
0132
0066
0067
0317
0193
0379
0117
0448
0415 0067
0248 0243 0609 0549 0424 0039 0698
0193 0246
0067
0350
0246 0067 0367
0485 0248 0067 0247
0067 0248 0294 0039 0400 0246
0247
18. TV model list
55
19. Technical Data
19. Technical Data
-
250 MHz IBM PowerPC Processor (350 Mips)
Linux open source (most parts under GPL)
supports Linux Standard API (Direct-FB, Linux-FB, LIRC)
1 x DVB Common Interface slot
2 x Smartcard-Reader
Integrated compact Flash reader (front slot) for e.g. camera memory cards
MPEG2 hardware decoding (DVB compatible)
future support for MPEG4 decoding
Tuner variant NIMs (DVB-S, DVB-T, DVB-C)
100 MBit full duplex Ethernet Interface
USB port 1.2, keyboard, mouse, webcams (not yet) and other devices
V.24/RS232 connection
large area LCD display
64 MByte RAM (working storage)
built-in IDE UDMA66 Master/Slave connection
hard disk for all common sizes
unlimited channel list for TV/Radio
change of channel in less than one second
fully automated channel search
support for bouquet lists (indirect unlimited)
EPG support (electronic program guide)
Videotext support
applications such as Web browser or mail clients
support for multiple LNB switching (DiSEqC)
adaptable OSD in many languages (skin support)
SPDI/F optical connection AC-3 / DTS
2 x Scart connections (completely software controlled)
MINI-DIN: connection for external IR (send/receive) and I2C for
external rotor control
internal send/receive diodes (video recorder)
DBS-Tuner:
Input frequency range 950 .... 2150 MHz
Input level range - 65 dBm .... - 25 dBm
noise figure 12 dB max.
DBS tuner input F socket
input impedance 75 Ohms
AFC capture range +/- 3 MHz
Demodulation shaped QPSK
Symbol rate 2 …. 45 Mbaud/s, SCPC / MCPC
FEC Viterbi and Reed-Solomon
Viterbi rates 1/2, 2/3, 3/4, 5/6, 7/8, automatic adjustment
Roll-off factor 35 %
56
19. Technical Data
19. Technical Data
Demultiplexing according to ISO 13818-1
Common Interface power consumption max. 0,3A/5V
Video decoding:
Videocompression MPEG-2 and MPEG-1 compatible
Video standard PAL G/ 25 Hz
Picture format 4:3 / 16:9
Picture material 16:9, automatic adjustment for 16:9 TV equipment (via Scart)
Letterbox filtering for 4:3 TV equipment
Audio coding:
Audio compression MPEG-1 & MPEG-2 Layer I and II
Audio Mode Dual (main/sub), stereo
Sampling frequencies 32 kHz, 44.1 kHz, 48 kHz, 16 kHz, 22.05 kHz, 24 kHz
Analog output:
output level L/R 0.5 Vss to 600 Ohms
THD > 60 dB (1 Khz)
Crosstalk < -65 dB
Digital output:
output level 0.5 Vss to 75 Ohms
sampling frequencies 32 kHz, 44.1 kHz, 48 kHz
S/PDIF output optical (AC3)
Video parameters:
input level FBAS 1 Vss +/- 0.3 dB into 75 Ohm
Teletext filtering according to ETS 300 472 standard
TV Scart:
Output: FBAS,RGB,S-VHS over OSD selectable
VCR Scart:
Input: FBAS,RGB,S-VHS
Output: FBAS,S-VHS
RS 232 serial interface:
Type RS232 bi-directional
Bitrate 115.2 kBit/s max.
Connector SUB-D-9 socket
Function update of the operating software and pre-programming
19. Technical Data
57
19. Technical Data
Ethernet:
100 MBit bi-directional
Function update of the operating software and pre-programming
USB:
USB 1.2 connection
Mini-Din:
I2C for control of external devices (Option rotor control)
IR functions send / receive
UDMA66 IDE interface:
Internal, for connection of HDD max. 500mA
various sizes
Compact Flash reader
LNB power supply:
LNB power 500mA max. ; short-circuit proof
LNB voltage vertical < 14V without load, > 11,5V at 400mA
LNB voltage horizontal < 20V without load, > 17.3V at 400mA
LNB switch-off in standby mode
Number of active satellite positions:
DiSEqC 1.0/1.2 SAT POSITION / SAT OPTION
DiSEqC – Rotor control
Power consumption:
< 20W (in operation, horizontal polarisation / 400mA LNB power)
< 11W (in operation, without LNB)
< 2W (deep standby mode)
Input voltage:
180V… 250V / 50Hz AC voltage +/- 15%
General:
Environmental temperature +15°C...+15°C
Atmospheric humidity < 80%
Dimensions (W x D x H): 374 mm x 230 mm x 63 mm
Weight: 1.8 kg without HDD
58
19. Technical Data
20. Glossary of terms
20. Glossary of terms
AC3
Dolby Digital, sound system
AGC
Automatic Gain Control. . This always provides the best picture quality. It
does not, however, guarantee a perfect picture, as the AGC is dependent on
the input signal. The poorer the input signal, the less the AGC can manage.
Analog
An ordinary signal transmission procedure, where the fluctuations of the
signal exactly correspond to the sound and picture waveforms of the source.
Aspect ratio
Ratio of lengths of picture sides, e.g. 4:3 or 16:9
Bouquets
A bouquet is (like a bouquet of flowers) a package of programmes from a
single Pay-TV provider.
CA
Conditional Access. Control the user´s access to services and programmes
which are encrypted for copyright or commercial reasons.
CI
Common Interface - Conditional Access Module. The basic idea of the
Common Interface (CI) is as follows. There is a uniform, standard interface for
the many television and radio programmes, Internet and software products
for which charges are levied.. To enable you to receive encrypted programmes with the satellite receivers Irdeto, Cryptoworks, Conax, Nagravision,
Viaccess, this is equipped for the age of Common Interface. Of course, all
Common Interface options are available to you with the multi-access modules
for the sat-receivers with CI. Pay-TV programmes are normally encrypted; the
screen is black, and there is no sound. After the subscription fees or a onetime charge for the smartcard have been paid, the associated TV offerings
can be seen decrypted. The CI-CA module compares the code in the box
with the one broadcast. If they match, the relevant programmes are decrypted and thus become visible. There are CI-CA modules for different encryption systems (Cryptoworks, Conax, Nagravision, Viaccess and soon also from
Irdeto). In order to watch Pay-TV programmes, as well as the CI-CA modules,
you need a Sat-Receiver with Common Interface, a multi-access module with
a CI slot and the corresponding smartcard from the programme supplier.
Coding systems
see Encryption systems.
20. Glossary of terms
59
20. Glossary of terms
CF
Compact Flash. Standard for a storage medium (memory card) with Flash
memory which retains information even without power. CF is a scaled-down,
minimally altered version of PCMCIA memory cards with the ATA interface.
This makes it possible to operate them over a simple PCMCIA adapter
without controller logic. The cards come in three variants (I, II and III),
according to their thickness. However, most devices prefer type I.
DAB
Digital Audio Broadcasting. The system offers additional capacity for data
transmission, Data compression is by MPEG-2.
Data reduction
Compression of picture and sound signals. Redundant information is omitted.
Digital
The signal transmission method of the future. Signals are transformed into
binary code (0´s and 1´s) and broadcast in this form. See, by contrast, Analog.
The latest digital satellite receivers implement the future in this way.
DiSEqC
Digital Satellite Equipment Control (pronounced: die-sec). Developed by
Philips for Eutelsat. Anyone who wants to receive analog and digital
programs from Astra, Eutelsat, and potentially other satellites cannot avoid
DiSEqC. The set-top box delivers control signals in digital form with which
multiple antennae can be selected. In contrast to previous analog control
signals (14 / 18 volt and 22 kHz), the DiSEqC system provides a much larger
number of switching possibilities for control and monitoring of the equipment
components of a receiving set-up. DiSEqC is a trademark of the European
Satellite Organization (EUTELSAT).
Dolby Digital 5.1
Dolby Digital is a sound transmission system which makes it possible to
reproduce digital surround sound on a home cinema system.
Downlink
The transmission segment from the satellite to the receiving antenna on the
ground is described as the downlink. Television boradcasters often use
satellite transmission from the filming location to the broadcasting station.
The advantage: It is the quickest way to transport large data volumes over
long distances.
DTS
Digital Theatre System, sound system
60
20. Glossary of terms
20. Glossary of terms
DVB - S / T / C
Digital Video Broadcasting. Transmission of video and sound signals in digital
form. DVB-S indicates satellite transmission, DVB-T terrestrial transmission
and DVB-C cable transmission. A project initiated in Europe which promotes
standardisation of satellite, terrestrial and cable transmission of digital television signals. Numerous organisations and institutions participate in the DVB
project, now including many from countries outside Europe. Digital receivers
which are developed and manufactured in accordance with the DVB standards can be identified by bearing the DVB logo. Digital satellite receivers of
course bear this logo.
DVD
Digital Versatile Disc.
EPG
Electronic Programme Guide. The electronic programme guide shows you
information on the broadcast selected.
Gateway
Entrance, gate. This is a computer which links two networks together. In the
more precise sense, it refers to connections between two different online
systems, e.g. CompuServe and the Internet, or between mailbox networks
(Fido, Maus ...) and the Internet.
I2C
The 2 should be a superscript (I squared). A bus which was developed by
Philips at the end of the 70´s for entertainment electronics. It was used as the
basis for the System Management Bus (SMB) and Display Data Channel
(DDC).
IDE
Integrated Drive Electronics. Type of hard disk in which the electronics for
controlling the mechanism etc. is integrated in the disk drive itself, and the
controller thus does not need to be involved in this, as previously with the AT.
It is rather primitive in comparison with SCSI, but also (somewhat) cheaper,
and has therefore become established.
IP
Internet Protocol. Level 3 protocol in the TCP/IP communications standard. It
mediates data packets in “insecure” mode. THe Internet is based on this protocol.
20. Glossary of terms
61
20. Glossary of terms
IR
Infrared. A wavelength which lies below that of visible light. It is used for data
transmission, e.g. for very small computers (PDAs) and for remote control
units.
LCD
Liquid Crystal Display is a technology which is used in notebooks and other
computers for presenting images and symbols. In contrast to LED (Light
Emitting Diode) and gas plasma technologies, LCD allows a much higher
resolution than cathode ray tube technology (CRT).
LNB /LNC
Low Noise Blockconverter / Low Noise Converter (feed system). Converts the
downlink satellite frequencies to 1.Sat-ZF. Receiver component on or in the
satellite antenna, which receives the high frequencies of the satellites,
amplifies them, and converts them to the lower medium frequency.
LOF
Fixed frequency around which the high input frequency of the satellite signal
is translated (L.O.F. = Local Oscillator Frequency).
MCPC
Multiple Channel Per Carrier. Transmission system which uses a single
transponder for multiple channels. (see also SCPC).
MHz
Megahertz. Number of oscillations of a signal per second. Unit: Hertz. One
kilohertz (kHz) corresponds to a thousand oscillations per second, one megahertz (MHz) to a million oscillations per second, and one gigahertz (GHz) to a
billion oscillations per second.
Mini-DiSEqC
Two universal single LNBs, for digital and analog, reception can be controlled
with the help of the „Tone-Burst“ analog switching signal (also known as
Mini-DiSEqC). 14/18 volts and 22 kHz are then controlled over a special
DiSEqC multi-switch.
MIPS
Millions of Instructions Per Second. Measurement of millions of machine
instructions carried out per second. Wags say it stands for „Misleading
Interpretation of Processor Speed“. Also a company of this name which
produces processors and other chips (in RISC architecture).
62
20. Glossary of terms
20. Glossary of terms
MPEG2
Data reduction method for picture and sound. In contrast to the analog
method (where 25 full pictures with all information are transmitted per
second) the MPEG method only takes account of the actual changes in the
picture.
NVoD
Near Video on Demand. The same film is transmitted on different channels at
certain time intervals, such as quarter hour, half hour or hour.
OSD
On Screen Display. When operating the receiver, the functions are displayed
as an on-screen menu, blended into the television picture. The OSD of most
satellite receivers offers various languages for its on-screen menu.
PCMCIA
Abbreviation for Personal Computer Memory Card International Association,
a standard.
PCR
Program Clock Reference, a time marker is set at least every 100 milliseconds
for each signal transported in the transport stream, in order to synchronise
the system time of the decoder.
PID
Packet Identification. This means that individual packages received in the
transport stream muct be identified. The identificatoin is a four-digit code,
separated by audio and video. Thus, for example, over-writing of SCPS
signals is prevented.
PPV
Pay per view. This allows subscribers to a bouquet to book individual films or
other transmissions.
QPSK / QAM
Quadrature Phase Shift Keying is a modulation method for digital television
programmes received via satellite. In cable networks, different demands are
placed on the transmission of digital signals. A different modulation process
is therefore required, “Quadrature Amplitude Modulation” (QAM). Since a
set-top box can only command one of the two procedures, it is necessary to
know the route by which digital television programmes are to be received.
20. Glossary of terms
63
20. Glossary of terms
RGB
Red, Green, Blue. Colour model in which the colour is defined by the proportions of red, green and blue. Other colour models: CMY, HSV, HLS. Also the
name for a particular monitor signal, since monitors have electron beams for
red, green and blue, and can thus be directly controlled.
RS232
A widely used interface between computers and other serial devices such as
modems, printers and mice. Software updates can be fed in over the RS232
connection (for Windows computers, the COM interface).
Scart
21-pole cable connection for pcture and sound transmission, for example
from the satellite receiver of video recorder to the television. The usual connection between television and video recorder, it is also used to connect the
set-top box with both of these units. Picture and sound can be placed back
and recorded in this way.
Smartcard
Similar to a credit card, used with the CA module of the set-top box, it makes
possible participant identification and access control for an encrypted Pay-TV
or TV channel.
SNR
Signal to Noise Ratio.The difference between the signal level and the noise on
an information channel..
SCPC
Single Channel Per Carrier – transmission system (digital or analog) which
uses a separate carrier for each each channel on a transponder (see also
MCPC).
S/PDIF
Sony/Philips Digital Interface Format. Definition of an interface and a protocol
for digital audio data, used in consumer equipment.
Symbolrate
Parameter for digital reception. Represents the data transmission rate for an
MCPC or SCPC signal, and is stated in Megasymbols per second (MS/s). The
symbol rate represents the speed with which data is transmitted. The receiver
must synchronise itself to this speed. MCPC channels usually operate with a
symbol rate of 27,500, and SCPC channels with symbol rates between 4,000
and 7,000.
64
20. Glossary of terms
20. Glossary of terms
Transponder
Satellite transponder/channel with defined frequency bandwidth. In analog
technology, one TV programme and a number of sound channels can be
transmitted per transponder. In digital technology (QPSK), the transmission
capacity is 6-10 TV programmes with sound channels.
UDMA
Ultra Direct Memory Access. A technology for DIE disk drives, which offers
twice the speed of the EIDE transmission mode.
USB
Universal Serial Bus. An open, public domain, plug-and-play capable serial
bus for connecting devices which operate at up to 12 Mbits/second, and also
for slower devices such as keyboard, mouse and monitor. Developed by Intel
with Microsoft, IBM, Compaq, DEC, NEC and Northern Telecom. It has only
one type of plug, allows connection of up to 127 devices, asynchronous and
isochronous (precisely times) data transfer, flexible data packets, and connection while running (Hotplug).
Encryption systems
1. Seca: The encryption system developed by the company Societé
Européenne de Controle d’Acces (Seca) for Canal plus was first used in
France for the Canal numerique package.
2. Irdeto: Dutch producer of the encryption system of the same name for
digital Pay TV, currently used in Italy, Greece, and the Benelux countries as
well as in many other countries. Irdeto now belongs to the Mindport group.
3. Viaccess: The encryption developed by France Telecom, is used principally
for the French packages AB-Sat and TPS (both on Eutelsat 13 degrees east).
It is, however, also used by SRG for encryption of its digital SAT programme
range (restriction of the technical coverage for licensing reasons).
4. Cryptoworks: A CA system developed by Philips.
5. Nagra: With Seca (Canal+) the second digital coding method used in Spain.
The programme package Via Digital on Hispasat (30 degrees west) is coded
in Nagra, as are Pay TV programmes in the cable network of the Spanish
Telefonica.
6. Conax: since the reorganisation of the Pay TV providers in Scandinavia, the
general coding standard for the Scandinavian Telenor. The satellite receivers,
with Common Interface, are thus ready for the digitial age. Already, almost all
20. Glossary of terms
65
20. Glossary of terms
manufacturers offer the technology of tomorrow. Here, everyone can decide
for himself when the receiver should be outfitted with various encryptions.
The greatest flexibility is achieved with the multi-access modules from
various manufacturers. Here, there is the option of one or two Common
Interface slots. They can also be added later, without difficulty. The multiaccess modules provide the greatest possible security that they will in the
future continue to reign supreme in the world of encrypted digital programmes.
VoD
Video on Demand. In contrast to Pay TV, where a subscription is taken out for
a complete programme, here only individual broadcasts and films are ordered
and paid for. Until now, it was necessary to go the video store in order to find
your favourite film from a wide range. Video on demand offers this selection
at home and over the television. The film selected is received with the set-top
box.
VCR
Video Cassette Recorder (Video recorder)
ZF
Satellite intermediate frequency = output frequency range of the LNC, e.g.
950 to 1050 MHz. Created by mixing the satellite reception frequency with the
oscillator frequency (L.O.F.)
Brand names here are protected by copyright and are the property of the respective name-bearers.
66
20. Glossary of terms
Garantieschein, Warranty card, Carte de garantie
WICHTIG!
Bei Reklamationen, Garantiefällen u.Ä. das Gerät bitte zu dem Händler schicken/geben, bei
dem es erworben wurde. NICHT AN DREAM MULTIMEDIA TV GMBH SCHICKEN!
Falls Ihre DREAMBOX mit einer HDD nachgerüstet wurde, legen Sie bitte unbedingt den
ausgefüllten und gestempelten EINBAUSCHEIN HDD dem GARANTIESCHEIN bei!
IMPORTANT!
In case of complaints or warranty claims, please return the unit to the dealer from whom it
was purchased. DO NOT RETURN IT TO DREAM MULTIMEDIA TV GMBH!
If your Dreambox has been equipped with a HDD, it is most important that you include the
HDD installation card, filled in and stamped, with the warranty card!
IMPORTANT!
En cas de réclamations, de revendication de prestations de garantie et autres semblables,
veuillez expédier/remettre l'appareil au revendeur chez qui vous l'avez acheté.
PRIERE DE NE PAS L'EXPEDIER A DREAM MULTIMEDIA TV GMBH!
Si votre DREAMBOX a été ultérieurement dotée d'un disque dur (HDD), veuillez impérativement joindre la CARTE DE MONTAGE HDD remplie et cachetée à la CARTE DE GARANTIE!
Gerätetyp / Device type / Type d'appareil:
Ser.-Nr. / Ser. No. / N° de série:
Service Bericht / Service Report / Rapport de maintenance:
Adresse des Endkunden / Address of customer / Adresse du client final:
Name / Name / Nom:
Straße / Street / Rue:
PLZ / Postcode / Code postal:
Ort / Town / Ville:
Land / Country / Pays:
Adresse des Händlers / Address of dealer / Adresse du revendeur:
Name / Name / Nom:
Straße / Street / Rue:
PLZ / Postcode / Code postal:
Ort / Town / Ville:
Land / Country / Pays:
Stempel / Stamp / Cachet:
Unterschrift / Signature:
Kaufdatum / Date of purchase / Date d'achat:
Einbauschein HDD, HDD installation card, Carte de montage HDD
Gerätetyp / Device type / Type d'appareil:
Ser.-Nr. / Ser. No. / N° de série:
Service Bericht / Service Report / Rapport de maintenance:
Einbaudatum / Installation date / Date de montage:
Festplattentyp / Hard disk type / Type de disque dur:
Neue Siegelnummer / New seal number / Nouveau numéro de sceau:
Sonstiges / Other / Divers:
Adresse des Endkunden / Address of customer / Adresse du client final:
Name / Name / Nom:
Straße / Street / Rue:
PLZ / Postcode / Code postal:
Ort / Town / Ville:
Land / Country / Pays:
Adresse des Händlers / Address of dealer / Adresse du revendeur:
Name / Name / Nom:
Straße / Street / Rue:
PLZ / Postcode / Code postal:
Ort / Town / Ville:
Land / Country / Pays:
Stempel / Stamp / Cachet:
Unterschrift / Signature:
Kaufdatum / Date of purchase / Date d'achat: