1
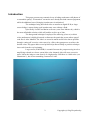
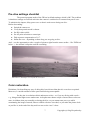
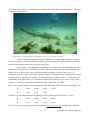
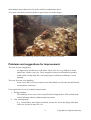
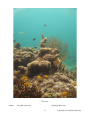
Using KonicaMinolta 5D DSLR underwater in
Ewa-Marine flexible housing.
Table of Contents
Introduction.......................................................................................................................................... 2
An important note on weight balance...................................................................................................3
The choice of camera model.................................................................................................................3
Lens selection....................................................................................................................................... 4
Color correction filters......................................................................................................................... 4
Camera settings.................................................................................................................................... 5
Assembly details...................................................................................................................................6
Pre-dive settings checklist.................................................................................................................... 7
Color restoration................................................................................................................................... 7
Problems and suggestions for improvement.........................................................................................9
Want to see a larger size picture?....................................................................................................... 10
1
Copyright (c) Oleg Kosyakovsky
Introduction
This paper presents an economical way of taking underwater still photos of
a reasonable quality. “Economical” means the user already has land camera equipment,
while the additional cost of bringing it underwater is minimized.
The technique being described relies on autofocus digital SLR (or largesensor bridge-) camera being used in underwater case without a flash.
Specifically I used Ewa-Marine soft case (www.Ewa-Marine.de), which is
the most affordable solution, while still enables to dive up to 20m.
The baseground technique I employed for achieving (close to) realistic
colors underwater is highly discussed on Internet; the particular person whose paper I
read first is Alex Mustard. The idea is to record as much useful color data as possible
through cutting off excessive color cast(s) by a filter, then postprocess to achieve the
desired colors. My paper adds several practical tips that will help to put this technique
into work from the very beginning.
Large sensor (read DSLR) is essential because the postprocessing involves
amplifying red and (to a lesser extent) blue color channels; this will cause excessive
noise, unless the image to start from is of a high quality. Still there is visible noise (see
Illustration 1), but it's not something I cannot live with.
Illustration 1: The smooth areas exhibit some noise because of color restoration
2
Copyright (c) Oleg Kosyakovsky
An important note on weight balance.
The use of soft case results in the air volume and the floating balance being highly
dependent on the depth. The deeper you go, the heavier you become. And, from my experience,
even if you leave only the minimal possible amount of air in the housing, you need extra weights
and some effort to submerge when on the surface. But then, at 2-3 meters depth, the balance
becomes negative, and you need an effort to go up.
What I'm trying to convey, is that the proposed setup is better be used for scuba diving
only. The extreme effective weight variations are dangerous for free diving. I felt I got tired quite
quickly when trying to snorkel / free-dive with this setup. Given the effort required to reach the
surface, this doesn't sound attractive. So, get your scuba certificate, and you are set :).
Illustration 2: Scuba diving allows to stay beneath and wait for the right moment
The choice of camera model.
The Ewa-Marine UX-P enables pressing buttons located on the back or top-right of the
camera. Horizontal mode-switch wheels are no-go, and vertical control wheels could only be turned
while on the surface.
I have Sony A100 and KonicaMinolta 5D DSLR-s. The A100 has too much stuff being
dependent on left-side wheel; this makes it undesirable for the purpose. The ISO and "Function"
3
Copyright (c) Oleg Kosyakovsky
buttons of the 5D come to the rescue, the latter enabling to access settings of focus mode. Still you
cannot control shooting mode (Av/Tv/P/etc) and white balance. Front wheel controlling aperture,
shutter time and exposure compensation could be turned from time to time, but it's quite a
procedure, you cannot perform it too frequently. Additionally, it's beneficial to have ISO 800 as an
option, this is where the 5D shines.
It's possible that Sony A200, A300, A350 cameras suit better; need to check.
I first tried to shoot with HP945 bridge compact. The thing could be mounted into the
housing, but there were 2 major problems:
● EVF is nearly impossible to see, while I prefer to keep that backside LCD off to avoid
heating.
● Zoom buttons are unintentionally pressed by the housing itself.
So I just left this idea and went for the SLR.
Lens selection.
I used KM 18-70 f/3.5-5.6 fixed at 18mm. I wanted its close-focus ability, though I'm not sure I was
ever able to approach the subject as close. Otherwise an internal-focus lens is preferable, since one
could place it closer to the port glass. Theoretically wider lens (equivalent of up to 24mm) should
be better, but you should be trained more than me to come even closer to your subjects. If the theory
comes out true, Carl Zeiss 16-80 f/3.5-4.5 should be the ideal choice for Sony/Minolta system.
Color correction filters
Internet sources suggested having color correction filter to reduce the amount of numerical white
balance correction. Do a search for "Alex Mustard" and several topic-related keywords.
I had access to R25 (red), FL/D (fluorescent == magenta), 81C (orange or brown). My red filter eats
too much light to be usable. Theoretically I should have been using FL/D in mostly green waters
and 81C in mostly blue waters. A local diving club manager (and UW photo enthusiast) advised me
to stick with magenta filter. I just followed his advice. That turned out to be right - at the
postprocessing green multiplier was always the smallest among the three.
4
Copyright (c) Oleg Kosyakovsky
Camera settings.
This and several following sections were originally written for my own use – to
guarantee following the correct procedure at the morning before each dive :). This explains their
“user-manual” style.
● Power save effectively off - so that other settings aren't lost.
● Focus point illumination for as long as possible - sometimes it's hard to see the viewfinder
image, and the illumination provides at least the minimal hint.
● Immediate preview off - you don't want the screen to flash after an exposure.
● Shooting mode - portrait program - reasonably favors fast shutter while still closing the
aperture 0.3-0.7 stops if possible.
● Metering mode - matrix worked fine for me.
● Exposure compensation - -0.7 - determined experimentally for my camera sample.
● ISO 400 - there's not much light.
● AntiShake on all the time.
● Focus point selection - central - while not so good for composition (forget about focusrecompose), it employs your most reliable sensor, and then focus point illumination shows
you where the center of the frame is. The latter reason is essential; the viewfinder isn't
clearly visible in Ewa-Marine cases.
● Release priority - AF - focus-conformation indicator is hard to see, so I had to press-andhold the shutter release while relying on the camera to first focus then fire.
● White balance - auto - just to have anything.
● Output - RAW or RAW+JPEG, I sticked with the latter, though the JPEG-s had no use.
5
Copyright (c) Oleg Kosyakovsky
Assembly details
Arrange a weight of 300-350 gr of the size and shape that could be placed in the housing
below the camera. Wrap it well to ensure it has no sharp edges. I used 4 large fishing lead
weights stuck together by a gluing band.
● Pre-assemble your AV110 adapter and remember what length do you allow when attaching
it to the camera. At its longest (physical) length the lens should protrude a bit beyond the
adapter (yes, I mean it).
● Load the camera with fully charged original battery and memory card large enough, so that
you don't have to open the housing on the site. 4GB card enabled ~324 RAW+JPEG shots
on the 5D, enough for 2 dives I had on a daily trip.
● Partly wrap a sack of silica gel into some cellophane or so (for protection) and attach it
below the lens with a rubber ring - to non-rotating part of the lens.
● Attach the adapter; see the paragraph above regarding the length and protrusion.
● Stick an eraser or anything alike between the lens and adapter rail, so that zoom ring is
locked at the widest setting.
● Insert the camera and the weight into the housing.
● Wipe thoroughly the opening of the housing and close it.
● Ensure the lens is centered in the port. Recheck this frequently during the dive.
Illustration 3 shows the camera with lens adapter attached; Illustration 4 shows the whole setup.
●
Illustration 3: Lens adapter attached;
silica gel is still missing
Illustration 4: Camera installed in the
case - ready to go; note the wrap with
weights at the bottom
6
Copyright (c) Oleg Kosyakovsky
Pre-dive settings checklist
The portrait program mode of the 5D has its default settings, which is OK. The problem
is that these settings are restored each time the camera is switched on or returns from power-save.
To minimize the impact, delay power-save so that it won't occur during one dive.
Before descending:
● Switch the camera on.
● Verify that portrait mode is chosen.
● Set ISO value to 400.
● Set AF point selection to center/spot.
● Dial exposure compensation of -0.7 .
● Inflate the case – depending on how deep you are going to dive.
And ... use the opportunity to take a couple of pictures right from the water surface – like TODO:ref
below :) - the unusual viewpoint could be rewarding.
Illustration 5: Raindrops as seen from the sea surface
Color restoration.
Disclaimer: I'm describing my way of doing this, but with no claim that it's even close to optimal.
Moreover, I consider amount of time spent on this being unacceptable.
So, the aim is to obtain realistic underwater colors – as if you are diving with a torch –
e. g. bring normal light-source underwater. At depths more than a couple of meters these colors are
more vivid than what you normally see during the dive, so you cannot trust your eyes while
examinating the images. Instead, either a reliable reference is needed, or you make the picture look
as you like it; in the end of the day no diver can see the “true” colors.
7
Copyright (c) Oleg Kosyakovsky
To have a color reference, I included gray air tanks of the buddy divers into the pictures – from time
to time (see Illustration 6).
Illustration 6: Leopard shark is the main subject, diver serves for color correction
Then an interactive RAW developer (UFRAW in my case) could be used to “measure”
red, green and blue coefficients required to make the tank neutral-gray. Same coefficients could be
used for other pictures taken at the same time and place.
But of course, you cannot have a reference for each and every shot. My approach was to
arrange a set of coefficient combinations, and for each picture choose the one that suits better. In
order to do so, I filled a table with coefficient reading available (see above) and chose 3-4
gradations of correction per each of the channels. Despite having fluorescent (magenta) filter, green
channel had to be reduced in all pictures. So I assumed green coefficient to be 1.0, while those for
red and blue were larger than 1.0. I denoted the smallest red coefficient as R1, the next one as R2,
and so on. I ended up with all the combinations of R1...R4 and B1...B3 (B4).
Here are the sample numbers for shooting around Phi Phi Island, Thailand (green coefficient = 1.0):
R=
3.000
4.000
6.600
B=
1.200
1.425
1.500
8.990
And these are the sample numbers for shooting in Eilat, Israel (green coefficient = 100.0):
R=
350.0
630.0
700.0
900.0
B=
103.0
110.0
125.0
160.0
Tool-wise I relied on my own raw-processing flow (www.lazyconv.com) configured for multiple
8
Copyright (c) Oleg Kosyakovsky
white-balance-preset directories for all the red-blue combinations above.
As a result I was able to find acceptable-to-good colors for all the images.
Illustration 7: Colors of the scorpion fish here match what others achieve with flash
Problems and suggestions for improvement.
The need for more megapixels:
It's argued a lot, but the more is the better. Then, since it is very difficult to frame
underwater, I had to crop a lot. The 6 megapixel camera I used enabled to produce
usable slides (10 Mp input file), but having larger resolution would help to avoid
upsizing.
The need for better color handling:
In my case I didn't even try to match colors individually on each shot, but still burned
too much time on this job.
I'd recognize three areas for technical improvement:
1. Diving technique
The challenge for me was to freeze myself before taking the shot. This includes both
vertical (floating balance) and horizontal movement
2. Gear rearrangement
E. g. I would like to have higher resolution, but need to invest into things other than
sensor too in order ti make use of it.
9
Copyright (c) Oleg Kosyakovsky
3. Optimization of postprocessing.
I can leave with the (color) results I managed to achieve, but time spent should be
reduced significantly.
Gear issues in more details.
a) Vignetting from the lens port.
Sometimes on right side, sometimes in the top-right corner.
The reasons:
● the lens cannot be perfectly centered in the port; should have invested more into
determining absolutely the shortest lens adapter length
● sometimes the adapter assembly turns aside a bit, causing extreme vignetting;
longer adapter rails (or shorter lens) together with older-model baseplate (that
has guides for the rails) would help
b) Reduce the amount of correction.
This would reduce the noise and improve overall quality.
Use stronger fluorescent filter; faster lens may be required to avoid hurting AF
operation too much.
c) Keep the lens closer to the port window glass.
To reduce the impact of the glass on the picture.
Internal-focusing lens is required to achieve this.
Want to see a larger size picture?
To answer the question whether this method can deliver quality results, just turn the page...
10
Copyright (c) Oleg Kosyakovsky
--- The end. --Author:
Oleg Kosyakovsky.
[email protected]
11
Copyright (c) Oleg Kosyakovsky