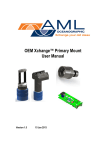
1
C•Xchange™ User Manual Version 2.52 19 September 2014 Revision History Revision Date Description Author Version 2.2 20 June 2013 Format revision and updates Jehan Zouak Version 2.3 18 November 2013 Spec updates Jehan Zouak Version 2.4 13 Feb 2014 Updated for Platinum/Quartz C•Xchange and UV•Xchange compatibility. Ian Lougheed Version 2.5 25 March 2014 Added Technical Drawing and UV•X compatible serial number note Jehan Zouak Version 2.51 31 July 2014 Added note about copper tape. Chris B. Version 2.52 19 September 2014 Updated technical drawing Jehan Zouak AML Oceanographic | C•Xchange™ User Manual Table of Contents General Description of the Sensor ..............................................................................................2 Where Do I Start? .......................................................................................................................3 Shipping and Receiving ..............................................................................................................4 Receiving a Sensor .................................................................................................................4 Returning a Sensor to the Factory ..........................................................................................6 Using the Sensor.........................................................................................................................7 Pressure Ratings ....................................................................................................................7 Installing the Sensor ...............................................................................................................7 Removing the Sensor .............................................................................................................8 Pre-Deployment Procedures...................................................................................................8 Post-Deployment Procedures .................................................................................................8 Compatibility with UV•Xchange™ Biofouling Control ..............................................................9 A Note About Copper Tape...................................................................................................10 Maintaining the Sensor .............................................................................................................10 Periodic Maintenance ...........................................................................................................10 Inspecting and Replacing the O-Ring ...................................................................................11 Communications .......................................................................................................................13 C•Xchange™ Commands .....................................................................................................13 Specific Commands of Interest .............................................................................................14 Technical Specifications .......................................................................................................14 Support .....................................................................................................................................15 Troubleshooting ....................................................................................................................15 Contact AML Oceanographic ................................................................................................16 Ordering Codes .........................................................................................................................17 Warranty ...................................................................................................................................18 Technical Overview Drawings ...................................................................................................19 1 AML Oceanographic | C•Xchange™ User Manual General Description of the Sensor C•Xchange™ is the oceanographic industry’s only field-swappable conductivity sensor. These sensors can be exchanged between different Xchange instrument types as well as allowing quick, easy, and on-site replacement of the sensor should the sensor be damaged. C•Xchange™ sensors store all pertinent manufacturing and calibration data internally. This allows the sensor to be swapped between any C•Xchange™ enabled instruments without manually updating the calibration coefficients. Calibration sheets can be printed on demand by any instrument connected to AML's SeaCast software. Re-calibrations only require the sensor, not the instrument, to be shipped to the service centre. There are two styles of C•Xchange™ sensor: Straight mount and right angle mount. Correct choice of sensor orientation ensures optimum flushing of water through the conductivity cell. C•Xchange™ sensors are engraved with a unique serial number and the conductivity range of the sensor, as shown in the image below. Multiple measurement ranges are available. Serial Number Range Straight mount Right angle mount 2 AML Oceanographic | C•Xchange™ User Manual Where Do I Start? AML Oceanographic X-Series instruments ship with a CD containing the following: An instrument manual providing an overview on how to use and maintain the instrument; A SeaCast manual providing instructions on how to use the software to configure the instrument and review instrument data; Xchange™ sensor manuals (C•Xchange™, SV•Xchange™, P•Xchange™, T•Xchange™, and Turbidity•Xchange™) providing overviews on how to install and maintain each of the Xchange™ sensors; If you are configuring an instrument for field use or lab testing, begin with the SeaCast manual. If you are performing instrument maintenance, begin with the instrument manual. If you are planning to swap an Xchange™ sensor, read the Xchange™ manual corresponding to your sensor. 3 AML Oceanographic | C•Xchange™ User Manual Shipping and Receiving Receiving a Sensor When receiving a new sensor, perform the following steps to ensure the sensor will be ready for deployment when required: 1. Inspect the shipping container, looking for signs of damage. Damage to the shipping container could indicate damage to the sensor inside. 2. Inspect for damage o Check the sensor for cracks, bends, or other signs of damage. o Check the connector for corrosion, dirt, and salt deposits. 3. Connect the sensor to an instrument, ensuring it is installed tightly onto its mount. The blue locking sleeve should be tight, and sitting less than 1mm from the instrument end cap. 4. Connect the instrument to a computer using the data cable. Launch SeaCast and verify that the instrument tab is displaying accurate C•Xchange™ sensor information. The sensor’s serial number and last calibration date should be displayed. 5. On the View Data page within SeaCast, select “Monitor,” and allow the instrument to sample some data, as shown in the following figures. The sensor should read very close to 0 mS/cm conductivity in air and a valid conductivity reading in water. This will confirm the sensor is working. 4 AML Oceanographic | C•Xchange™ User Manual 5 AML Oceanographic | C•Xchange™ User Manual Returning a Sensor to the Factory If shipping for repair or recalibration, obtain an RMA number from the service centre. Pack the instrument in its original shipping box to prevent damage during shipping. Request an RMA number using the contact options given in the Support section on page 13 of this manual or on our website at http://www.amloceanographic.com. 6 AML Oceanographic | C•Xchange™ User Manual Using the Sensor Pressure Ratings C•Xchange™ is rated for operation to a maximum depth of 6000m. However, the instrument a C•Xchange™ sensor is used on will likely be depth limited by both its pressure case and other installed sensors. Do not exceed the lowest of these pressure ratings. Installing the Sensor C•Xchange™ sensors attach to Xchange instruments equipped with a Primary Xchange sensor mount. Primary sensor mount Secondary sensor mount Primary and secondary Xchange sensor mounts Procedure: 1. Select a C•Xchange™ sensor with a conductivity range suitable for your deployment. 2. Ensure that the Primary Xchange™ sensor mount is clean and dry. Pay close attention to the electrical connector and its pins. 3. Check the sensor’s O-ring for cleanliness (see "Inspecting and Replacing the O-Ring"). 4. Align the sensor to the sensor mount. 7 AML Oceanographic | C•Xchange™ User Manual 5. Place the sensor into the mount. 6. Rotate the sensor until it drops down into the mount enough to allow the blue locking sleeve threads to engage the mount threads. 7. Screw down the blue locking sleeve until it stops. The bottom of the sleeve should be 1 mm or less from the instrument end cap. f Removing the Sensor 1. If the sensor has been used in salt water, rinse it in fresh water while it remains installed on the instrument. 2. Dry the sensor before removal to protect the connector. 3. Unscrew the blue locking sleeve. 4. Lift the sensor out of the mount. 5. Ensure that the Primary Xchange™ mount is dry and clean, using compressed air if necessary. 6. Immediately install the blanking plug (pictured below) or a replacement sensor into the open Xchange™ mount. C•Xchange™ & SV•Xchange™ Blanking plug Pre-Deployment Procedures Upon Receipt 1. Refer to “Receiving a Sensor” in this manual to verify the condition of the equipment. 2. Ensure that the installed C•Xchange™ sensor has the correct conductivity range for the deployment. If necessary, swap with another calibrated C•Xchange™ sensor with the correct range. 3. Verify the sensor calibration is valid for the duration of the deployment. If not, swap the sensor for one with valid calibrations or send it to a service centre for recalibration Before departure 1. Ensure the sensor is properly mounted on the instrument. The blue locking sleeve should be fully threaded onto the sensor mount of the instrument, sitting less than 1mm from the instrument end cap. 2. Test the instrument in water to ensure the sensor is functioning properly. Post-Deployment Procedures 1. Rinse C•Xchange™ thoroughly with distilled water. Tap water may be used if no distilled water is immediately available. 2. Ensure the sensor is clean, dry, and that the glass cross tubes have not been cracked before storage. 8 AML Oceanographic | C•Xchange™ User Manual Compatibility with UV•Xchange™ Biofouling Control UV•Xchange™ is a biofouling control device that irradiates sensing surfaces with UV-C light. UV-C radiation inhibits cell division, stopping biofouling before it can start. Biofouling control is critical during long-term deployments with conductivity sensors. As fouling accumulates inside the glass measurement tubes, the volume of water being measured is reduced, causing the conductivity readings to bias low. UV•Xchange™ is extremely effective at protecting C•Xchange™ from long-term biological growth. It is required to preserve measurement integrity for long-term in-situ deployments. C•Xchange™ sensors produced after March 2014 incorporate two key updates to maximize effectiveness of UV•Xchange™ protection. Updated sensors have serial numbers greater than 503300. The updates are as follows: 1. Glass cross tubes changed from borosilicate to fused quartz glass. o Fused quartz is UV-transparent, allowing UV light to irradiate electrode and internal glass surfaces. o Borosilicate glass is UV-opaque, which may limit the effectiveness of UV•Xchange™ when used to protect an older C•Xchange™ sensor. o Fused quartz glass cross tubes are visibly thicker than borosilicate tubes. Left: Borosilicate glass cross tubes. Right: Fused quartz glass cross tubes. Note the thicker glass tubes on the right (fused quartz) sensor. 2. Electrode plating change. o The electrodes use a new type of plating that is tougher and more resistant to biofouling. o The old plating is dark, flat black in colour. Never make contact with the electrode surface while cleaning the sensor. This can damage the plating and alter the sensor's calibration. o The new plating is light brown/gray in colour. These electrodes may be cleaned with gentle contact using a q-tip or lint-free cloth. Do not apply pressure or use metallic brushes to clean these electrodes. 9 AML Oceanographic | C•Xchange™ User Manual The changes described in this section do not otherwise alter the functionality or performance of C•Xchange™. Specifications remain unchanged. For more detailed information related to biofouling control, refer to the UV•Xchange™ User Manual. A Note About Copper Tape A common strategy to prevent biofouling on a submerged surface is to coat the surface with copper tape. This method is often utilized on instrument bodies, cages, endcaps, and some sensor housings. However, copper tape should not be applied to C•Xchange as the metallic tape will interfere with the external sensing field of the sensor. UV•Xchange alone is sufficient to maintain measurement integrity of C•Xchange. Maintaining the Sensor Periodic Maintenance Periodic maintenance will prolong the life of the sensor. The following steps are recommended: Cleaning o If the sensor is dirty or oily, soak it in warm water with a small amount of grease-cutting soap (dish soap is acceptable). o Carefully clean the insides of the glass cross tubes. Black Platinum electrodes should never be touched. Silver Platinum electrodes may be gently brushed with a clean Q-tip to remove extra residue. o Rinse thoroughly with distilled water to remove any residual soap or dirt. Before each use: o Inspect the O-ring under the blue locking sleeve of the sensor. o If O-ring is damaged, replace it with another. Type 2-116-N70D. o If O-ring is dry or has been replaced due to damage, apply a small amount of silicone grease. o Ensure that the sensor is clean and undamaged. o Ensure that the sensor is properly installed on the instrument After each deployment: o Clean and rinse the sensor using distilled or fresh water. o Dry the sensor completely; store it in a cool, dry place. Yearly o Send the sensor to a service centre for diagnostics and re-calibration. o Install connector and sensor blanking plugs in the instrument. Long term storage preparation o Ensure the instrument has been thoroughly cleaned and dried. o Remove all Xchange sensors from the instrument and dry the connectors. o Lubricate the underwater connectors (not Xchange mounts) with silicone spray. o Lubricate o-rings with silicone grease. o Install connector and sensor blanking plugs in the instrument 10 AML Oceanographic | C•Xchange™ User Manual Inspecting and Replacing the O-Ring C•Xchange™ has a primary O-ring seal which must be clean and lubricated. Any fibres or dirt on or around the O-ring and grooves may allow water into the connector, risking damage to the sensor and the sensor mount. To access the O-ring, perform the following steps: Remove the sensor from the instrument There is a black or white retaining ring above the blue locking sleeve on the sensor stem. Spread or stretch the retaining ring open enough to allow it to slide up the sensor stem. Slide the blue locking sleeve up the stem to expose the O-ring. The O-ring should be slick with grease. If it is dry, apply silicone grease. Inspect the O-ring for dirt. Clean and reapply grease, if necessary. Inspect the O-ring for nicks and cracks. If any are found, the O-ring must be replaced. Use 2-116-N70D Buna Nitrile O-rings. Apply silicone grease to the new O-ring before using it. 11 AML Oceanographic | C•Xchange™ User Manual Caution: Do not use a sharp instrument to remove the O-ring. If the O-ring groove is scratched, the O-ring will not provide a waterproof seal. The O-ring can be removed easily with bare hands as shown below. Pinch O-ring to remove 12 AML Oceanographic | C•Xchange™ User Manual Communications C•Xchange™ Commands When using SeaCast, the full instrument command set is not usually necessary. However, the operator can issue text commands to the instrument as well as to specific sensors on an instrument. This can be done from SeaCast or any terminal emulation program such as HyperTerminal. There is additional command set functionality on C•Xchange™ equipped instruments. To use these commands, direct communication with the C•Xchange™ sensor must be established. There are two ways to accomplish direct communication with the C•Xchange™ sensor: 1. On a Micro•X instrument with a primary sensor mount, C•Xchange™ commands can be given directly to the instrument by typing commands into the terminal emulation program. 2. On all other X-Series instruments, the TALK command is used to direct communications to the C•Xchange™ sensor. Use the following procedure to accomplish this: Enter Talk Mode o Establish communications with the instrument. o Send the “DETECT” command to the instrument. The instrument will return a list of sensors detected on each slot of the instrument. The slot number for the C•Xchange™ sensor will always be “1.” o Send the TALK 1 command to the instrument. This command directs subsequent communications directly to the sensor board. Exit Talk Mode o Press the CTRL and C keys simultaneously. 13 AML Oceanographic | C•Xchange™ User Manual Specific Commands of Interest Command DIS OPTIONS DIS COND CAL SET xxxxx FORMAT ab Description Displays the current settings for the C•Xchange™. Displays the calibration information for the C•Xchange™. Changes the numerical output format of the sensor. Where xxxxx=sensor type (SV, CONDUCTIVITY, TEMPERATURE, PRESSURE). a = number of digits ahead of the decimal place. b = number of digits after the decimal place I.e. SET SV FORMAT 42 changes the scan output format to 1475.25 SEE BELOW Sets the C format to 1 digit ahead of the decimal place and 4 digits after the decimal place. Note: This format is only useful for freshwater range C•Xchange™ sensors. Sets the C format to 2 digits ahead of the decimal place and 3 digits after the decimal place. This is the typical format for the saltwater C•Xchange™ sensors. Sets the C format to 2 digits ahead of the decimal place and 2 digits after the decimal place. SET COND FORMAT 14 SET COND FORMAT 23 SET COND FORMAT 22 *For the full set of commands, please refer to the Commands section of an Instrument manual. Technical Specifications Sensors Type Range Accuracy Precision Resolution Response Time Right Angle 0-70 mS/cm 0.01 mS/cm 0.003 mS/cm 0.001 mS/cm 25 ms at 1 m/s flow Right Angle 0-2 mS/cm 0.01 mS/cm 0.003 mS/cm 0.001 mS/cm 25 ms at 1 m/s flow Right Angle 0-90 mS/cm 0.003 mS/cm 0.0018 mS/cm 0.001 mS/cm 50 ms at 1 m/s flow Straight 0-2 mS/cm 0.01 mS/cm 0.003 mS/cm 0.001 mS/cm 25 ms at 1 m/s flow Straight 0-70 mS/cm 0.01 mS/cm 0.003 mS/cm 0.001 mS/cm 25 ms at 1 m/s flow Mechanical Materials Housing Status Type Depth Rating Diameter Length Standard Ultem 6000m 61 mm (2.4”) 108 mm (4.25”) Sampling Capabilities Samples up to 25 times per second. 14 AML Oceanographic | C•Xchange™ User Manual Support Troubleshooting Instrument fails to detect the sensor: Is the sensor properly mounted on the instrument? Blue mounting collar should be firmly tightened and less than 1mm from the instrument endcap. Inspect the connectors on both the sensor and the instrument for corrosion or damaged contacts. Cycle power to the instrument. Conductivity data is noisy (readings are jumping around more than expected): Ensure there are no bubbles trapped in the sensor. o To remove bubbles: Flow water through the sensor in excess of 2 m/s to flush the bubbles out of the sensor. If there is sufficient room, move the sensor through the water vigorously by hand. o To prevent bubbles: Pre-wet the sensor using one of the following methods: - Use water with a few small drops of dish soap and isopropyl alcohol in it. Soak the sensor for 5 minutes. - Use distilled water only and soak the sensor for 20 minutes. Inspect the connector on both the sensor and the instrument for corrosion or damaged contacts. Are there small scale thermal or salinity eddies or stratification of the water being tested? These can cause reading fluctuations, particularly in fast-response sensors such as C•Xchange. In this case, rapid changes in readings are likely a reflection of true conditions. Is there a nearby source of electromagnetic interference? Examples are arcing brushes on electric motors, radio transmitters, switching power supplies, and faulty cathode ray tube monitors. Check the power supply to the sensor for noise. The power supply should have less than 30mV of noise. SeaCast fails to recognize the sensor: Download the latest version of SeaCast at http://www.amloceanographic.com. 15 AML Oceanographic | C•Xchange™ User Manual Contact AML Oceanographic Service To request an RMA or technical support Email: [email protected] Phone: 1-250-656-0771 Phone : 1-800-663-8721 (NA) Fax: 1-250-655-3655 Sales For all general sales inquiries Email: [email protected] Phone: 1-250-656-0771 Phone : 1-800-663-8721 (NA) Fax: 1-250-655-3655 Website http://www.AMLoceanographic.com Customer Portal My AML Oceanographic is AML's online data centre. This secure area within our website is designed to offer one easy location for interested individuals and organizations - distributors, customers, prospects, and other members of our community - to manage their interactions with AML. My AML Oceanographic will allow you to: View and manage your assets (instruments and sensors) Consult instrument diagnostic summaries View and download calibration and conformity certificates View and manage your technical support cases Consult and download sales estimates, sales orders, and invoice copies View account balances and generate account statements Assess inventory availability at AML To access the Customer Portal, please navigate to the Support button - located on the top right of the AML Oceanographic home page - select Customer Centre from the options on the drop down menu and follow the instructions provided. Mailing and Shipping Address AML Oceanographic 2071 Malaview Ave. Sidney, BC, Canada V8L 5X6 16 AML Oceanographic | C•Xchange™ User Manual Ordering Codes XCH-CND-RA002 XCH-CND-RA070 XCH-CND-RA090 XCH-CND-ST002 XCH-CND-ST070 C•Xchange™ Right Angle, Ultra Freshwater (0-2mS/cm) Range C•Xchange™ Right Angle, Oceanographic (0-70mS/cm) Range C•Xchange™ Right Angle, Oceanographic (0-90mS/cm) Range C•Xchange™ Straight, Oceanographic (0-70mS/cm) Range C•Xchange™ Straight, Ultra Freshwater (0-2mS/cm) Range 17 AML Oceanographic | C•Xchange™ User Manual Warranty AML Oceanographic warrants the instrument for a period of two years from the date of delivery. AML will repair or replace, at its option and at no charge, components which are found to be defective. The warranty applies only to the original purchaser of the instruments. The warranty does not apply if the instrument has been damaged, by accident or misuse, and is void if repairs or modifications are made by any other than authorized personnel. This warranty is the only warranty given by AML. No warranties implied by law, including but not limited to the implied warranties of merchantability and fitness for a particular purpose shall apply. In no event will AML be liable for any direct, indirect, consequential, or incidental damages resulting from any defects or failure of performance of any instrument supplied by AML. 18 AML Oceanographic | C•Xchange™ User Manual Technical Overview Drawings 19 THE INFORMATION CONTAINED IN THIS DRAWING IS THE SOLE PROPERTY OF AML OCEANOGRAPHIC LTD. ANY REPRODUCTION IN PART OR WHOLE WITHOUT THE WRITTEN PERMISSION OF AML OCEANOGRAPHIC LTD IS PROHIBITED REVISION TABLE REV DESCRIPTION DATE BY SV Xchange 31.8 1.25 87.1 3.43 C Xchange Right Angle 44.5 1.75 108.4 4.27 62.7 2.47 FLOW DIRECTION C Xchange Straight 44.5 1.75 131.1 5.16 FLOW DIRECTION 57.3 2.26 36.1 1.42 ALTERNATE FLOW DIRECTION P Xchange 48.8 1.92 11.4 R.45 72.5 2.86 ENDCAP FACE LEVEL WHEN INSTALLED ON INSTRUMENT OR BULKHEAD. T Xchange 65.5 2.58 11.4 R.45 89.5 3.53 ENDCAP FACE LEVEL WHEN INSTALLED ON INSTRUMENT OR BULKHEAD. TITLE: Xchange Sensor / Device Overview DRAWN 2071 Malaview Avenue W., Sidney B.C. Canada V8L 5X6 (250) 656 0771 Fax: (250) 655 3655 TOLERANCES: ANGLES: FRACTIONS: HOLE SIZES: 0.00: 0.000: 1 1/32 0.005(0.13) 0.015(0.38) 0.005(0.13) UNLESS OTHERWISE SPECIFIED: ORIGINAL SCALE:1:1 DATE I.L. 3rd ANGLE PROJECTION REV SNS-GA-03351-A 26FEB2010 DIM'S ARE IN INCHES (MM) SURFACE FINISH: 63 DRAWING NO.: SIZE B MATERIAL: N/A SLD FILE NO.: N/A AML NO. N/A SHEET NO. Sheet1 of 2 THE INFORMATION CONTAINED IN THIS DRAWING IS THE SOLE PROPERTY OF AML OCEANOGRAPHIC LTD. ANY REPRODUCTION IN PART OR WHOLE WITHOUT THE WRITTEN PERMISSION OF AML OCEANOGRAPHIC LTD IS PROHIBITED REVISION TABLE REV DESCRIPTION BY DATE A ADDED TUX AND UVX DO 25MAR2014 Tu Xchange 28.7 1.13 133.3 5.25 109.6 4.31 ENDCAP FACE LEVEL WHEN INSTALLED ON INSTRUMENT OR BULKHEAD. UV Xchange 140.3 5.52 25.8 1.02 117.0 4.61 ENDCAP FACE LEVEL WHEN INSTALLED ON INSTRUMENT OR BULKHEAD. 25.8 1.02 96.6 3.80 72.8 2.87 ENDCAP FACE LEVEL WHEN INSTALLED ON INSTRUMENT OR BULKHEAD. TITLE: Xchange Sensor / Device Overview DRAWN 2071 Malaview Avenue W., Sidney B.C. Canada V8L 5X6 (250) 656 0771 Fax: (250) 655 3655 TOLERANCES: ANGLES: FRACTIONS: HOLE SIZES: 0.00: 0.000: 1 1/32 0.005(0.13) 0.015(0.38) 0.005(0.13) UNLESS OTHERWISE SPECIFIED: ORIGINAL SCALE:1:1 DATE I.L. 3rd ANGLE PROJECTION REV SNS-GA-03351-A 26FEB2010 DIM'S ARE IN INCHES (MM) SURFACE FINISH: 63 DRAWING NO.: SIZE B MATERIAL: N/A SLD FILE NO.: N/A AML NO. N/A SHEET NO. Sheet2 of 2