1
09/04 Rev. 3.00-02
MANUAL
Jumbo Stacker
Setup, Service
General ......................................................... 2
Intended purpose ...................................... 2
Mode of operation ..................................... 2
System requirements ................................ 3
Safety notes .............................................. 3
Setting up ...................................................... 4
Positioning the stacker .............................. 4
Setting the material width .......................... 8
Adjusting the stacker height ...................... 8
Connecting the stacker ............................. 9
Applying the antistatic-clip ......................... 9
Setting the printer parameters ................. 10
Operation .................................................... 12
Starting .................................................... 12
Stacker full .............................................. 12
Service ........................................................ 13
Replacing conveyor belts ........................ 13
Adjusting the material zero-line ............... 15
Technical specifications .............................. 16
Index ........................................................... 18
2
09/04 Rev. 3.00-02
MANUAL
Setting Up, Operation, Service
Jumbo Stacker
General
Intended purpose
The Jumbo Stacker (called "stacker" below) is an add-on unit for label printers of the TTX x50 and 64-xx series as well as to the AP 5.4. The stacker is
designed to stack label material after this has been printed by a label printer
of the above type and has been cut.
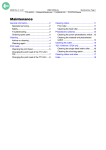
Fig. 1: The Jumbo Stacker applied to a 64-04 printer.
Mode of operation
The stacker is positioned in front of the printer (see Fig. 1) in such a way that
the cut labels fall onto the conveyor belt of the stacker. The conveyor belt
transports the labels to the pusher mechanism, which pushes them onto the
stack and keeps them there. Once the maximum stack length has been reached, a limit contact is actuated and the printer stops.
Apart from this final disconnection, the stacker operates independently of the
printer.
Fig. 2: The stacker during operation. The ribbon transports the cut labels from
the knife (1) to the stack
3
09/04 Rev. 3.00-02
MANUAL
Setting Up, Operation, Service
Jumbo Stacker
System requirements
The stacker can be used with the following printer types:
Printer types
– AP 5.4
– TTX 450/650/674/675/950/1050 – S45/65/95/105
– 64-04/05/06/08
Knife
The used printer must be fitted with a knife.
Single Start
The used printer must be fitted with the Single Start option. This is a connection at the printer rear side, which stops the printer if the stacker is full.
AP 5.4 printers are generally equipped with a single start connector (3-point
jack plug).
¯
Connecting the stacker to an AP 5.4 requires an adapter cable
(Part no. A6338).
Printer
Part number
TTX 450/650/950/1050
S45/65/95/105
99806
64-04/05/06/08
A1863
Tab. 1: Part numbers of the Single-Start option.
Label material
Cardboard materials are suitable for stacking.
P Details about the material to be used can be found in paragraph Technical
specifications on page 16.
Safety notes
¯
Use only printers with a Single Start option! If there is no limit disconnection
by the single start option, there may be a material jam when the stack is complete, leading to severe damage to the stacker!
¯
The limit switch may only be connected to Security Extra Low Voltage (SELV)
circuits. Any connecting of the limit switch to other than SELV circuits is
considered as improper use and is prohibited!
4
09/04 Rev. 3.00-02
MANUAL
Setting Up, Operation, Service
Jumbo Stacker
Setting up
To set the stacker up, please perform the following steps, which are described in the following paragraphs:
1. Place the stacker by means of the positioning plate in front of the printer.
The positioning plate is shipped together with the printer.
P See in paragraph Positioning the stacker on page 4.
2. Adjust the material width.
P See in paragraph Setting the material width on page 8.
3. Connect the stacker to a mains socket and to the single start connector at
the printer.
P See in paragraph Connecting the stacker on page 9.
4. Set the printer to single start mode.
P See in paragraph Setting the printer parameters on page 10.
Positioning the stacker
The stacker has to be braught in an exact position in front of the printer in order to function properly. The positioning plate shipped with the printer keeps
the stacker in its ideal position, even in continuous operation. Depending on
the printer type, there are two different types of those plates (see Tab. 1:).
Positioning plates
Printer
Positioning plate
TTX 350/450/650/674/675
64-04/05
TTK
Type 1
TTX 950/1050
64-06/08
Type 2
Tab. 1: The positioning plate need to match the printer.
5
09/04 Rev. 3.00-02
MANUAL
Setting Up, Operation, Service
Jumbo Stacker
Printer
Positioning plate
AP 5.4
Type 3
Tab. 1: The positioning plate need to match the printer.
6
09/04 Rev. 3.00-02
MANUAL
Setting Up, Operation, Service
Jumbo Stacker
Using positioning plate type 1:
1
1. Locate the positioning plate (1) between
printer and stacker as illustrated (Fig. 1).
2. Lift the printer at the front end (Fig. 2).
3. Shift the positioning plate under the printer, so that both plastic discs (2) are
above the big holes (3) in the plate
(Fig. 3, seen from below).
4. Put the printer down.
5. Lift the stacker and place its two „forefeet“ into the holes in the positioning
plate as illustrated (Fig. 4).
2
3
4
7
09/04 Rev. 3.00-02
MANUAL
Setting Up, Operation, Service
Jumbo Stacker
Using positioning plate type 2:
1
1. Shift the positioning plate (1) under the
printer as illustrated (Fig. 1). The
screw (2) is supposed to snap into the
notch (3, see fig. 2)
2. Lift the stacker and place its two „forefeet“ into the holes in the positioning
plate as illustrated (Fig. 3).
Using positioning plate type 3:
The application is the same as for positioning
plates type 1.
2
3
8
09/04 Rev. 3.00-02
MANUAL
Setting Up, Operation, Service
Jumbo Stacker
Setting the material width
1
1. Position the stacker in front of the printer
in such a way that the two side panels
(3) of the stacker lie against the knife (4,
see fig. 1).
¯ The positioning plates shipped with the
stacker keep the device automatically in
this position.
2. Put the locking lever (5) of the stacker to
"Unlock" (3 o' clock position).
3. Seitenteil (6) so verschieben, dass das
Etikettenmaterial (7) mit etwas seitlichem
Spiel auf dem Förderband zu liegen
kommt (Abb. 3).
2
4. Push the side part (6) so that the label
material (7) ends up lying on the conveyor belt with some lateral clearance
(Fig. 1).
5. Put the locking lever to "Lock" (12 o'
clock position).
Adjusting the stacker height
The stacker must be located so that the conveyor belt begins a little below the labels coming out. You may need to adjust the height of
the feet to the underside of the stacker:
3
1. Undo lock nuts (Fig. 4).
2. Turn foot out (higher) or in (lower).
3. Tighten the lock nut again.
4
9
09/04 Rev. 3.00-02
MANUAL
Setting Up, Operation, Service
Jumbo Stacker
Connecting the stacker
1. Switch the power switch (1) off (switch at the "0" position).
2. Connect the power cable to the stacker terminal (2) and to the power socket.
Fig. 1: Connect the power cable to the stacker terminal (2) and to the power socket. Connect
the single start cable to the printer (3).
3. Connect the signal cable of the stacker to the Single Start terminal (3) of the
printer (Fig.: TTX 450).
¯
Connecting the stacker to an AP 5.4 (3-point jack plug) requires an adapter
cable (Part no. A6338).
Applying the antistatic-clip
Cardboard < 45 mm In order to process cardboard labels up to a length of max. 45 mm it is strongly recommended to apply the antistatic-clip delivered with the Jumbo Stakker. The clip avoids sticking of the statical charged labels and ensures proper
placement of the labels on the conveyor belts.
£ Plug the antistatic-clip (1) from the front on the aluminum profiled section (2)
of the cutter. Place the clip centered above the label; the stabilizers (3) show
downwards.
Fig. 2: Plug the antistatic-clip (1) centered above the label. The stabilizers (3) show downwards.
10
09/04 Rev. 3.00-02
MANUAL
Setting Up, Operation, Service
Jumbo Stacker
Setting the printer parameters
To ensure that the printer stops printing on the stacker full signal, you must
make the following settings in the Parameter menu of the printer. The names
of the parameters differ slightly according to the printer used.
TTX x50 / Wildcats
Set printers of the TTX x50 / Wildcats series as follows:
1. Connect the printer and switch on.
OFF
2. Press the FEED+CUT key.
INFO
3. Press the CUT key 3 times.
SYSP
4. Press the ON/OFF key.
EMUL
5. Press the CUT key several times until the display shows
EXTR
6. Press the ON/OFF key. Press the CUT or FEED key until the display shows
STAC
7. Press the ON/OFF key to confirm. Press the FEED+CUT key several times
until the display returns to
OFF
64-xx / Chess x
Set printers of the 64-xx / Chess x series as follows:
1. Connect the printer and switch on.
OFFLINE
0 JOBS
2. Press the Prog. key.
PRINT OUT INFO
3. Press the Online key. Then press the Cut key 3 times.
SYSTEM PARAMETER
4. Press the Cut key several times until the display shows
SYSTEM PARAMETER
External signal
11
09/04 Rev. 3.00-02
MANUAL
Setting Up, Operation, Service
Jumbo Stacker
5. Press the Online key. Press the Cut or Feed key several times until the display shows
External signal
Stacker full
6. Press the Online key to confirm. Press the Prog. key several times until Offline mode is displayed again (see step 1).
Print speed
The stacker always operates at a constant speed. The maximum speed at
which printing can take place depends on the material and dimensions of the
labels.
£ Adjust the print speed to the stacker. To do this, change the values of the following parameters:
Printer
Parameter
64-xx / Chess x
PRINT PARAMETERS/ Print speed
TTX x50 / Wildcats, TTK / Texxtile PRTP/PSPD
Tab. 2: Use those parameters to set the print speed.
P More details about the individual parameters can be found under "Information
printouts and parameters" in the User Manual.
12
09/04 Rev. 3.00-02
MANUAL
Setting Up, Operation, Service
Jumbo Stacker
Operation
CAUTION!
Danger of pulling in and tearing off hair, jewellery, loose parts!
– Don´t let any hair / jewellery or other loose parts hang into the stacker.
Starting
1. Switch the stacker on at the power switch ("I" position).
2. Start the print job.
P More details about starting a print job can be found in the User Manual for the
printer.
Stacker full
Fig. 1: When the stack (1) has risen to the maximum length (2), the printer stops.
If the stack of labels has reached the maximum stack length, the printer stops
the print job and displays the following status report:
TTX x50 / Wildcats
ST04
(ST04 = stacker full)
£ Empty the magazine and press the ON/OFF key. The print job is then continued.
64-xx / Chess x
Status
Stacker full
5060
£ Empty the magazine and press the Online key. The print job is then continued.
P Details about the status reports can be found under "Status reports" in the respective printer manual.
13
09/04 Rev. 3.00-02
MANUAL
Setting Up, Operation, Service
Jumbo Stacker
Service
CAUTION!
The electrical voltages inside the
housing can kill!
– Switch the machine off and pull
out the plug before opening the
housing.
Replacing conveyor belts
To be able to replace the conveyor belts, you
must first extract the square axle (2) at the side.
Tools
– Flat pliers
– Small screwdriver
Disassembly / assembly
1. Set the stacker to the maximum width.
2. Remove securing ring (1).
3. From the side, pull square axle (2)
out (3).
P Continued on next page.
14
09/04 Rev. 3.00-02
MANUAL
Setting Up, Operation, Service
Jumbo Stacker
4. Undo knurled screw (4).
5. Turn adjusting plate (5) to the side.
6. Remove conveyor belts (6) from the
guide rollers and thread past the adjusting plate (7).
15
09/04 Rev. 3.00-02
MANUAL
Setting Up, Operation, Service
Jumbo Stacker
Adjusting the material zero-line
1
The stackers interior side plate (1) should be in
line with the material zero-line of the printer.
The lateral position can be adjusted by slightly
shifting the left „forefoot“(2) of the stacker.
To do so, proceed as follows:
1. Loosen (3) the screws until the foot (2)
can be shifted.
2. Adjust the position of the stacker until the
interior side plate is in line with the material zero-line.
3. Re-tighten the screws.
2
16
09/04 Rev. 3.00-02
MANUAL
Setting Up, Operation, Service
Jumbo Stacker
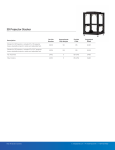
Technical specifications
Dimensions
Length: 763 mm
Width: 333 mm
Height:
– from floor plate: 197 mm
– with feet: approx. 235 to 260 mm
Weight
8.8 kg
Type of material
Cardboard with the following attributes:
– Rectangular label shape
– Edge radius maximum: 8 mm
¯
If the labels to be stacked provide any of the following attributes, the stacker
function first has to be tested:
– Perforation
– Grooves
– Special size
The test results listed below (see Tab. 4:) show, that some label materials are
stackable, although they do not match the specifications.
Material specifications
Min.
Max.
Width
36 mm
132 mm
Length
35 mm
130 mm
Weight
160
g/m2
240 g/m2
Tab. 3: Specifications, the used cardboard material should match.
No. Mat. Mat.
Mat. Punch type
thick- length width
ness
PrePerforation Stackfold
able
across
1
0.25
54
102
CNL-1
2
0.25
102
102
CNL-1
3
0.25
38
102
CNL-2
4
0.25
190
88
BE / EURO
5
0.22
52
85
CNL-1
6
0.24
95
83
CNL-1 / EURO Yes
Yes
7
0.25
102
80
BE and EURO
Yes
8
0.25
25
80
CN-1
Yes
9
0.25
152
76
BE
Yes
10
0.19
76
76
BE, hole, special
Yes
Length- +
Crosswise
Yes
Lengthwise
Yes
Yes
Yes
Yes
Lengthwise
Yes
Crosswise
Yes
Yes
Tab. 4: Stackability of different cardboard materials. Applied material rolls: Inner diameter
100 mm, outer diameter 200 mm; Label facing outside.
17
09/04 Rev. 3.00-02
MANUAL
Setting Up, Operation, Service
Jumbo Stacker
No. Mat. Mat.
Mat. Punch type
thick- length width
ness
Perforation StackPrefold
able
across
11
0.25
64
76
CNL-1
Yes
12
0.25
32
76
CN-1
Lengthwise
(centered)
No
13
0.16
38
76
CN-1
Lengthwise
(centered)
No
14
0.25
60
76
CN-1
Lengthwise
Yes
15
0.27
76
73
CNL-2 , Stub-1
Yes
16
0.25
102
70
BE / Euro
Yes
17
0.25
114
65
CN-2
18
0.25
203
60
Rectangle
(special)
19
0.25
38
60
CN-1
20
0.22
54
52
CNL-1
Yes
21
0.22
60
51
CN-1
Yes
22
0.35
102
51
BE
Yes
23
0.25
108
51
CN-2
Yes
24
0.3
60
45
CN-2
Yes
25
0.25
152
45
CN-2
26
0.25
88
45
BE
Yes
27
0.22
38
45
CNL-1
Yes
28
0.2
38
38
CN-1
Yes
29
0.27
42
48
Special
Yes
Crosswise
Yes
No
Length- +
Crosswise
Yes
Yes
Yes
Tab. 4: Stackability of different cardboard materials. Applied material rolls: Inner diameter
100 mm, outer diameter 200 mm; Label facing outside.
Stack length
max. 310 mm
Noise level
65 dB(A)
Mains voltage
230 V +/-10%
Mains frequency
50 Hz
Power consumption 85 W
Fuse
2 A slowblow
Ambient conditions Operating temperature: +5 to +35 ºC
Storage temperature: -20 to +70 ºC
Air humidity: 45 to 75%, non-condensing
18
09/04 Rev. 3.00-02
MANUAL
Setting Up, Operation, Service
Jumbo Stacker
Index
A
P
Antistatic-clip 8
Parameter
EXTR/STAC 9
SYSTEM PARAMETER/External signal 9
Perforation 15
Positioning plates 4
Power consumption 16
Print speed, maximum 10
Printer parameters 9
Printer types, permitted 2
C
Connecting the power cable 8
D
Dimensions 15
F
Fuse 16
G
Grooves 15
H
Höhe anpassen 7
I
Intended purpose 2
K
Knife 2
L
Locking lever 7
M
Material
-Length 15
-Weight 15
-Width 15
Material width, Adjustment 7
Material zero-line, adjustment 14
Material-Nulllinie justieren 14
Mode of operation 2
N
Noise level 16
R
Replacing conveyor belts 12
S
Safety notes 3
Single Start 2
Single Start option 2
Single Start terminal 8
Special size 15
Specifications 15
ST04 11
Stack length, maximum 16
Stacker full 11
Stacker height, Adjustment 7
Starting 11
System requirements 2
T
Type of material 15
W
Weight 15