1
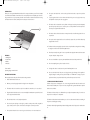
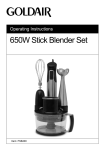
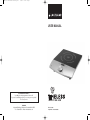
Induction Hob 15859 IB B:Layout 1
1/9/11
11:58
Page 1
USER MANUAL
The Lakeland Guarantee....
is probably the simplest guarantee in the world!
If you are not satisfied at any time, you receive your money back!
This is our promise.
Lakeland
Alexandra Buildings, Windermere, Cumbria LA23 1BQ
Tel: 015394 88100 Web: www.lakeland.co.uk
I N D U CT I O N H O B
Model: 15859
Helpline No: 015394 88100
Induction Hob 15859 IB B:Layout 1
1/9/11
11:58
Page 3
INTRODUCTION
Thank you for choosing the Lakeland Induction Hob, which is compact, sleek and easy to use. The hob is suitable
for use with induction-suitable cookware and cooks food more quickly and economically than gas or electric. To
help you make the most of your purchase, please take a few moments to read these instructions before using
the induction hob for the first time, and keep them in a safe place for future reference.
8.
9.
Do not place the induction hob on an iron surface, a polished wood surface, or any other very delicate
surface.
To protect against electric shock, never immerse the induction hob, power cord or plug in water or any
other liquid. Do not let the power cord or plug get wet.
10. The induction hob is not intended for use by children or infirm people unless they have been adequately
supervised by a responsible person to ensure they can use it safely. Children should be supervised to
ensure they do not play with the induction hob.
11. The induction hob should be sited at least 10cm away from a wall, so the airflow through the hob is not
compromised.
12. Do not place metal or magnetic articles such as credit cards, computer discs, etc. which are affected by
magnetic fields on the hob.
13. The induction hob heats very rapidly, so place the food into the pan first before turning the hob on. Heating
an empty pan can discolour the metal and may warp the base.
FEATURES
1. Heating Panel
2. Control Panel
3. Air Inlet
4. Air Outlet
Power: 1800W
Operating Voltage: 220-240V 50Hz
IMPORTANT SAFEGUARDS
When using the induction hob please follow these basic safety precautions.
1.
Please read all instructions before use.
14. Place all pans centrally on the glass. Do not use a pan with a base larger than 22cm as the heat created
may cause the plastic casings to deform.
15. Do not use a heat diffuser or place any other material between the hob and the pan when in use.
16. Do not insert anything into any of the air outlets on the hob.
17.
If the glass hob surface is cracked, turn the power off immediately and do not use.
18. Do not use the induction hob if the power cord or plug show any signs of damage, or if the appliance is
dropped, damaged or working incorrectly. Call the helpline on 015394 88100 to arrange a repair or
replacement. Never try to repair the induction hob yourself as this may cause electric shock.
2.
Make sure your electricity supply matches the voltage shown on the appliance.
3.
This induction hob is for household use only. It is not suitable for commercial use, or for use outdoors.
COOKING USING THE INDUCTION HOB
Induction cooking uses an electromagnetic coil to convert energy into heat. When the hob is turned on, and
when an induction suitable pan is in place on the hob, a magnetic field is generated this heats the pan and
therefore the food inside it.
4.
Using the induction hob with accessories not recommended by the manufacturer may result in fire, electric
shock or injury and should be avoided.
This induction hob has a simple to use dial that allows you to adjust the temperature setting. You can also set
the panel to show either power or temperature.
5.
Place the induction hob on a level, sturdy and dry surface.
This induction hob has a timer function that allows you to cook for a certain amount of time before switching off.
This prevents food boiling dry or burning.
6.
Do not let the power cord hang over the edge of your table or worktop, where a child could grab it or
people could trip over it. The power cord must not become tangled or touch any hot surfaces.
7.
Do not place the induction hob on or near a hot gas or electric burner, or in or near a heated oven.
The induction hob has fully integrated safety features including pan detection, boil dry protection and auto shutoff.
Induction Hob 15859 IB B:Layout 1
1/9/11
11:58
Page 5
SUITABLE COOKWARE FOR THE INDUCTION HOB
Only use flat-bottomed pans that are induction suitable with this hob. If you are unsure whether the cookware
you have is suitable for use with this hob please contact the pan manufacturer or hold a magnet to the base of
the pan. If you find that the magnet sticks, the pan can be used on the hob. If the cookware is unsuitable for use,
the hob will not detect the pan.
Error code E2: Heat surface sensor failed.
The hob needs to be returned for a replacement or repair. Please contact 015394 88100.
The induction hob is suitable for pans with a base diameter of 12cm–22cm.
Error code E4: Power surface is lower than 140V.
Use a power source with a stable voltage of 230V.
Metal cooking utensils are not recommended since they can be heated through the induction hob if left in the
pan during cooking.
HOW TO USE THE INDUCTION HOB
1.
Place the induction hob on a level, sturdy and dry surface.
2.
Plug the induction hob into the mains. When the induction hob is plugged in there will be a beep. This
beep indicates that the unit is connected to the power supply.
3.
Place the pan centrally over the cooking area on the hob.
4.
Turn the hob on by pressing the on/off button. The display will show the word ‘on’ and the fan will start up.
5.
Press the menu button to choose either power (P) or temperature (°C). A light will indicate which you have
chosen. The unit will make a small sound as the electromagnetic coil is activated and the magnet ‘grips’
the pan and starts to heat. The display will show the current power setting or temperature setting that you
have chosen. You can change the power/temperature by turning the dial.
6.
To set the timer, set your dish to cook on the desired power/temperature setting. Then press the menu
button to go to the timer symbol. The time is shown in hours and minutes, and the display will show 0:00
to indicate that no time has been set. Turn the dial to set the desired length of cooking time. The hob will
wait 6 seconds after you have set the time and then start heating. The display will then start to rotate
between showing the power/temperature you have selected and the time left to cook. Once it reaches the
final minute of cooking the timer will count down in seconds. At the end of the timed session the hob will
turn off and the fan will run for a minute to cool the hob. During timer cooking you can adjust the heat up
or down. To stop the timer, turn the hob off, then back on again and it will reset to 0:00.
7.
To turn off the hob press the on/off switch. The fan will run automatically for a minute to cool the hob.
TROUBLE SHOOTING
If there is a problem with the hob an error code will show in the display.
Error code E0: No induction suitable pan found.
Check that you are using a flat-bottomed induction suitable pan with a base of 12cm–22cm diameter.
Error code E1: Temperature sensor failed.
The hob needs to be returned for a replacement or repair. Please contact 015394 88100.
Error code E3: Power source is over 270V.
Use a power source with a stable voltage of 230V.
Error code E5: Overheating.
Check that the pan has not boiled dry, as this is a cause of overheating. Remove the pan and let the hob cool
down and then restart.
Error code E6: Automatic shut off.
Check that the air intakes are not blocked and that the induction hob is situated at least 10cm away from the
wall. Allow the hob to cool before restarting. If the problem persists, contact 015394 88100.
CARE AND CLEANING
Unplug the hob and allow it to cool before cleaning. A ceramic hob cleaner may be used to clean the glazed
cooking surface. Do not immerse in water.
Induction Hob 15859 IB B:Layout 1
1/9/11
11:58
Page 7
RECIPES
CARROT AND CORIANDER SOUP
POTAGE BONNE FEMME
Serves 4 people
Serves 6 people
This simple soup tastes delicious and is very easy to make. For the freshest flavour, toast whole spices and grind them
This classic French soup turns equal quantities of very ordinary, everyday vegetables into an extraordinarily tasty dish.
yourself. However, ready-ground spices taste great too, and make this soup even more effortless to make.
Eat with fresh, crusty bread on the side, as you will be needing it to mop up the juices!
Ingredients
Ingredients
1 onion or 5 shallots
1 large onion
Olive oil for frying
3 medium sized carrot
2 tsps coriander seeds
1 large or two small leeks
1 tsp cumin seeds
1 large or two small floury potatoes (such as Maris Piper, King Edward or Desiree)
½ tsp fenugreek seeds (optional)
1 litre vegetable or chicken stock
½ tsp fennel seeds (optional)
Large knob of butter
8 large carrots (approx 1 kilo weight)
Salt & pepper for seasoning
1 litre vegetable stock
Salt & pepper for seasoning
Method
Coriander leaves (optional)
Step 1:
Prepare the vegetables. Peel and chop the carrots into 1cm rounds, and chop the leek into 1cm rounds too. The
Method
potatoes should be cut into approximately 2cm sized dice, and roughly chop the onion too. You are aiming to have all
Step 1:
the different vegetable pieces about the same size.
Finely chop the onion or shallots, and sweat gently in some olive oil in a saucepan, adding a pinch of salt to help prevent
the onion catching and burning until then soften and become slightly translucent.
Step 2:
Place a large knob of butter in a saucepan, and melt gently without burning it. As it melts, put all the vegetables in the
Step 2:
pan, and stir to thoroughly coat with the butter. Add a good few grinds of salt and black pepper and stir again to spread
While the onion is frying, toast the coriander seeds, cumin seeds, and the fenugreek and fennel seeds (if using) in a dry
the seasoning through the vegetables. Turn the heat down and cook gently for 8 minutes, stirring the vegetables every
frying pan for a minute or so, shaking the seeds to move them about, so that they toast but do not burn. Tip the toasted
so often so the flavours combine and nothing gets burnt on the base of the pan. The leeks will break up but this does
seeds into a pestle and mortar and grind to a powder.
not matter.
Step 3:
Step 3:
Add the ground, toasted seeds into the onions in the saucepan and stir to coat thoroughly. Cook for approximately one
Add the vegetable or chicken stock, whichever you prefer. Bring to the boil, then turn the heat down. Simmer until the
minute, then add in the carrots, peeled and chopped into chunks. Stir for a moment to coat the carrots in the spicy
carrots are soft and the potato chunks are cooked through, but not falling apart, approximately 15-20 minutes.
onions, and then add in the stock. Bring to boil and simmer for about 20 mins or until carrot chunks are soft.
Step 4:
Step 4:
Taste the soup to check the seasoning, and add more salt and pepper as required. Ladle the soup into bowls, and
Use a stick blender to blend the soup until smooth. Taste and add salt and pepper to season. Serve with a few fresh
enjoy with freshly buttered bread.
coriander leaves on top as a garnish, or alternatively, beat some greek yoghurt until smooth and runny, and swirl a small
amount on top of each serving.
Induction Hob 15859 IB B:Layout 1
1/9/11
11:58
Page 9
COURGETTE AND STILTON SOUP
CHICKEN PROVENCAL
Serves 6 people
Serves 6 people
This is another very easy to make yet delicious soup. The stilton gives a rich, intensity that perfectly complements the
freshness of the courgettes.
This tasty recipe is intensely flavoured and delicious. Using a food processor to chop the vegetables makes this recipe
extremely quick to assemble. Herbes de Provence herb mixes are widely available, but if you don’t have it, mix up equal
quantities of Rosemary, Thyme, Marjoram and Basil and use that instead. Also, if you prefer chicken breast to thigh, use
that instead, but reduce the cooking time, so that the breasts do not become dry. Serve with a green salad and fresh
Ingredients
bread, or with green beans.
1 onion
I stick celery
Ingredients:
Olive Oil
6 chicken thighs
6 teaspoons Herbes de Provence
4 medium sized courgettes
1 onion
750mls Chicken stock
750ml vegetable stock
3 cloves garlic
Juice of half a lemon
200g stilton cheese
1 red pepper
Salt and pepper
10 fresh plum tomatoes (or ordinary, well flavoured tomatoes)
Olive oil
Salt and pepper to season
Tomato Puree
Method
Step 1:
Finely chop the onion and sweat gently in a little olive oil, taking care not to allow the onions to burn. Add the finely
Method
Step 1:
In a casserole dish, quickly brown the chicken thighs on all sides in a little olive oil and remove to a separate plate. Peel
chopped celery stick to the onions. Chop the courgettes into rounds about 5mm thick and add to the pan, stirring to
and quarter the onion and place them in a food processor with the garlic cloves. Whiz until finally chopped. Add a little
coat the courgettes with the onion and celery mix. Fry gently for a few minutes.
more oil to the casserole dish and gently fry the onion, adding a little salt to prevent the onions from burning.
Step 2:
Step 2:
Add the vegetable stock, and a good few grinds of pepper. Do not add salt at this stage, as Stilton is a salty cheese.
Remove the stalk and seeds from the red pepper, and halve the tomatoes. Place them in the food processor and whiz
If your celery stalk had any leaves on it, add those to the pan too as they add flavour. Bring to the boil and then simmer
them together until finely chopped also. Once the onions have started to soften and become translucent, add the
for 20 minutes.
tomato and red pepper mixture to the casserole dish and squirt in the tomato puree. Stir to combine. Add in the Herbes
de Provence mix and season with a good grind of salt and pepper.
Step 3:
Remove the celery leaves from the soup, and using either a hand-held stick blender, or a liquidiser, whiz the soup to a
smooth consistency. If you used a liquidiser, return the soup to the pan. With the heat on low, crumble the stilton into
Step 3:
Place the chicken thighs in the tomato mixture and pour in enough chicken stock just to cover them. You are unlikely
to need all the chicken stock to do this, unless your pan is very large, but keep the spare chicken stock to hand, in case
the soup and beat with a whisk or fork until the cheese has melted and is fully blended into the soup.
you need to top up the pan.
Step 4:
Step 4:
Taste the soup and add salt and pepper as needed.
Bring the mix to the boil, then turn down to a gentle simmer with the casserole lid on and leave to cook for 45 minutes,
returning to the pan half way through the cooking time to turn the thighs over, and stir the tomato mix, checking that it
is not getting dry. If it is, top up with more chicken stock, or a little boiling water.
Step 5:
At the end of the cooking time, squeeze in half a lemon, stir to combine and taste to check the seasoning. Add more
salt and pepper to your taste, and serve.
Induction Hob 15859 IB B:Layout 1
1/9/11
11:58
Page 11
BEEF IN RED WINE SAUCE
BEEF & ALE CASSEROLE WITH HERBY DUMPLINGS
Serves 4-6 people
Serves 4-6 people
This recipe for beef in red wine is a rich, satisfying dish, full of flavour. Serve with fluffy mashed potatoes, or basmati
This delicious traditional dish can be made ahead of time and reheated just before serving. The flavours improve this
rice for a simple but delicious meal.
way! The dumplings are cooked on top of the casserole just before serving.
Ingredients:
Ingredients:
Olive oil
1 orange (zest and juice)
Olive Oil
2 portabello mushrooms
1 large onion
4 sprigs of fresh thyme or 1 tsp dried
500g braising steak, in bite-sized chunks
175g self-raising flour
500g diced casserole steak
1 sprig rosemary or ½ tsp dried
2 onions, sliced
Large handful fresh parsley
250g baby carrots
1 bay leaf
1 tbs plain flour
5 tbs cottage cheese
250g baby parsnips
200g broad beans, shelled
600ml quality ale or stout
2 tsp ready-made horseradish sauce
250g button mushrooms
Salt and pepper
2 tbs redcurrant jelly
A little milk
1 large garlic clove
4tbs brandy (optional)
1 tbs wholegrain mustard
1 bottle fruity red wine
Handful chopped parsley
1 bay leaf
6 carrots, cut diagonally into bite-sized slices
Method
200g baby turnips (or small turnips, trimmed and quartered)
Step 1:
Scrub and trim the baby carrots and parsnips, and wipe over the button mushrooms. If the mushrooms are varying in
Method
size, halve or quarter as required so that they are all approximately the same size. Put to one side.
Step 1:
Step 2:
Remove to a plate, add a little more oil, and fry the 2 onions with some salt over a gentler heat until they are a golden
Slice the onion and fry in a little oil in the casserole dish, until they start to brown gently. Add in the diced casserole
brown colour, but not burnt.
Heat a few tablespoons of oil in a large casserole dish and brown the braising steak until they are a good colour.
steak, with a little more oil if required and fry for approximately 5 minutes, moving the pieces about so that they brown
on all sides. Add the prepared carrots, parsnips and button mushrooms, season with a good few grinds of salt and
Step 2:
pepper and toss so that they are well coated. If you want a little extra intensity of flavour, warm the brandy then pour
Sprinkle the flour over the onions and cook for 1 minute, stirring well. Pour in the ale and bring it to the boil, stirring
into the casserole. Light the warm brandy with a long match, and allow the alcohol to burn off.
with a with a wooden spoon to ensure that any bits of flour and onion stuck to the bottom of the pan are lifted. Season
with a good few grinds of salt and pepper.
Step 3:
Pour in the bottle of red wine, then add orange juice and orange zest, stirring to combine. Add the thyme, rosemary
Step 3:
and the bay leaf. Bring to the boil, then reduce to a very gentle simmer. Put the lid on the casserole. Simmer for 1
Add the redcurrant jelly, the wholegrain mustard, and the bay leaf, then replace the meat in the casserole an add the
hour, stirring every so often to ensure nothing sticks.
carrots, turnips and mushrooms. Stir, then turn down to the gentlest simmer, put on the lid, and cook for 2 hours. The
casserole may be left to cool at this point, and be reheated with the dumplings when you are ready to serve.
Step 4:
Remove the casserole lid and allow to cook for another 30 minutes with the lid off before adding in the broad beans.
Step 4:
Cook for a further 30 minutes, uncovered, stirring every so often. Taste and adjust the seasoning to your taste, then stir
The dumplings take 20 minutes to cook in the casserole. To make them, put the flour in a food processor along with
in a handful of chopped parsley, retaining a little to sprinkle over the top of the beef just before serving.
about four or five sprigs of fresh parsley and some salt and pepper. Pulse briefly to chop the parsley. Mix the cottage
cheese with the horseradish sauce and a little milk (approx 2 tbs) to loosen and pour this into the processor. Whiz to
make a soft dough. You may need to add a little more milk to achieve this.
Step 5:
Turn out the dumpling dough onto a lightly floured surface and divide into 8 pieces. Flour your hands and shape each
into a ball. Place these dumplings on top of the casserole but do not push them under the surface. Put the lid on the
casserole and turn up the heat a little. Cook for 20 minutes until the dumplings are cooked through, and then serve.
Induction Hob 15859 IB B:Layout 1
1/9/11
11:58
Page 13
MOROCCAN LAMB STEW WITH COUS-COUS
CHICKPEA AND SPINACH CURRY
Serves 6 people
Serves 4 people
Traditional Moroccan dishes are made in a clay Tagine, but this version tastes just as good made on the hob.
Channa Sag (chickpeas and spinach) is a traditional Indian vegetable dish that is hearty enough to make a meal in itself.
Ingredients:
Ingredients:
Approx 750g deboned shoulder of lamb
1 large onion
½ tsp turmeric
Olive oil
1 large carrot
400ml tin of coconut milk
2 onions
3cm piece of fresh ginger
400g tin of chickpeas
2 carrots
4 cloves of garlic
Bunch of fresh coriander
Approx 2 cm piece of fresh ginger
2-3 green chillies (or 1-2 tsps chilli powder)
100g raw, unsalted cashew nuts
1 tsp cumin seeds
Vegetable oil
70g ground almonds
10-12 threads of saffron
½ tsp ground cumin
250g washed spinach leaves
1 tsp ground cinnamon
½ tsp ground coriander
1 lime
Salt and pepper
2-3 green chillies
Salt and pepper
5 dried apricots
1 tbs clear honey
Method
300g Cous-cous
Step 1:
50g Flaked almonds, toasted
Finely chop the onion and carrot. Peel and mince the garlic cloves and the ginger. Fry everything together gently in a
1 tbs Harissa paste
saucepan in a little vegetable oil until the onions become translucent. Adding a little salt helps stop the onions catching
and browning.
Method
Step 1:
Step 2:
Cut the lamb into bite sized pieces and set aside. Finely slice the onions and dice the carrots. In a casserole with a
Add the finely chopped chillies, (or chilli powder to your taste), along with the cumin, coriander and turmeric. Stir and
lid, or a large saucepan, fry them together in the olive oil, along with a little salt to stop the onions catching. Then add
cook for a minute. Drain the tin of chickpeas and add to the pan, then add the cashew nuts and the ground almond.
the lamb, and fry until browned on all sides.
Stir to combine then add water to just cover. Bring to the boil and simmer on a very low heat for 20 minutes or so, until
the almonds have thickened the sauce.
Step 2:
Pour in enough water to cover the meat, and add a good few grinds of salt and pepper. Add the cumin seeds, the
Step 3:
ground cinnamon and the saffron. Finely grate the ginger using a grater and add it to the mix. Stir to combine. Bring
Add the spinach leaves and pour in the coconut milk, stir to combine. Chop half the coriander leaves and add with the
the liquid to the boil then turn down to a low simmer and cook with the lid on for a hour.
juice from the lime. Bring the mixture back to the boil.
Step 3:
Step 4:
Chop the apricots into chunks and add to the mix. Stir in the clear honey and simmer with the lid off for 15 minutes
Taste to check the seasoning and add salt and pepper as necessary. Sprinkle the rest of the coriander leaves over the
more (or until the lamb is tender). You may need to add more water to the stew. Just before serving, taste to check the
curry and serve with basmati rice.
seasoning, and add more salt or pepper as necessary.
Step 4:
Remove a few spoonfuls of the cooking juices and mix with the harissa paste. Put in a small jug for serving. Make the
cous-cous with vegetable stock according to the packet instructions, adding salt and pepper to taste. When fluffy, fold
through the toasted flaked almonds, and serve with the harissa dressing on the side.
Induction Hob 15859 IB B:Layout 1
1/9/11
11:58
Page 15
CHILLI CON CARNE
Step 4:
Serves 8 people
Drain the 2 cans of kidney beans and add them to the mix. Stir well to combine, and finally, add a glass of red wine,
approximately 200ml. Bring the chilli to the boil, stir, then turn down to a gentle simmer. Cook on a low heat for 45
Everybody loves a Chilli, and this one tastes great when it has been gently simmered to allow all the flavours to blend
minutes to an hour, stirring occasionally.
thoroughly. Set the timer on your induction hob once you turn the chilli down to simmer, and you can forget about it
until it’s done! Don’t be put off by the long list of ingredients. It makes for a great depth of flavour if you can use them
all, but don’t worry if you don’t have them all to hand. Every chilli is slightly different, every time you make it!
Step 5:
Chilli often tastes better the next day, when the flavours have had a chance to blend and mature. If you are not eating
it immediately, reheat the chilli, stirring to ensure that it is piping hot throughout. Serve with rice, tortilla chips and sourcream sprinkled with a little cumin on the side.
Ingredients:
1 large onion
1 tsp ground coriander
3 large cloves garlic
2 tsp dried basil
1 red pepper
2 tsp dried oregano
500g lean steak mince
Nutmeg (whole or ground)
2 x 400g tins chopped plum tomatoes or
Cinnamon (whole or ground)
700g bottle or passata
2 x bay leaves
2 x 400g tins red kidney beans
HP Sauce
4 tbs tomato puree
Worcestershire sauce
Olive oil
Red wine
1-2 tsp chilli powder (to taste) or a large fresh red chilli
Salt & pepper
2 tsp ground cumin
Method
Step 1:
Finely chop the onion and crush the garlic in a garlic press. Pour approximately 4 tbs of olive oil into a large saucepan
or casserole dish and add the chopped onions and garlic while the oil is cold. Add a large pinch of salt, stir to mix, and
turn the heat on. Gently cook the onions and garlic together until they soften. Do not allow to burn.
Step 2:
Finely chop the red pepper and add to the onion mix, stirring to combine. If you are using fresh chilli, chop it finely and
add it at this point. Cook for a few minutes, then break up the steak mince and add to the pan, stirring to brown the
meat, and break it up into fine pieces. When thoroughly browned, add the 2 tins of tomatoes, or the whole bottle of
passata. Stir to combine.
Step 3:
Add all the flavourings. Stir thetomato puree into the mix. If you have them, add a good squirt of HP sauce and a few
shakes of Worcestershire sauce also. Add the ground chilli powder along with the cumin, coriander, basil, and oregano
and stir to combine. Add the bay leaves and a cinnamon stick approximately 5cm long, or use ½ teaspoon of readyground cinnamon. If you have fresh nutmeg, grate about a quarter of a nutmeg into the mix, or add ¼ teaspoon readyground.
1/9/11
11:58
Page 17
RECYCLING YOUR ELECTRICALS
Along with many other high street retailers, Lakeland has joined a scheme whereby customers can take their
unwanted electricals to recycling points set up around the country. Visit www.recycle-more.co.uk to find your
nearest recycling point.
ELECTRICAL CONNECTIONS
THIS APPLIANCE MUST BE EARTHED
This appliance is fitted with a fused three-pin plug to BS1363 which is suitable for use in all homes fitted with
sockets to current specifications. If the fitted plug is not suitable for your socket outlets, it should be cut off and
carefully disposed of. To avoid an electric shock, do not insert the discarded plug into a socket.
Fitting a new plug
If for any reason you need to fit a new plug, the flexible mains lead must be connected as shown here. The wires
in the mains lead fitted to this appliance are coloured in accordance with the following code:
Earth(green/yellow)
E
L
Neutral(blue)
13amp FUSE
Induction Hob 15859 IB B:Layout 1
13amp fuse
N
Live(brown)
Connect BLUE to Neutral (N)
Connect GREEN & YELLOW to Earth (E)
Connect BROWN to Live (L)
13 amp fuse to be used
If the colours of the wires in the mains lead of this appliance do not correspond with the coloured markings
identifying the terminals in your plug, proceed as follows. The wire which is coloured green and yellow MUST
be connected to the terminal which is marked with the letter E (Earth) or coloured green. The wire which is
coloured blue MUST be connected to the terminal which is marked with the letter N (Neutral) or coloured black.
The wire which is coloured brown MUST be connected to the terminal which is marked with the letter L (Live)
or coloured red.
Before refitting the plug cover, check that there are no cut or stray strands of wire inside the plug. Use a 13 amp
BS1362 fuse. Only BSI or ASTA approved fuses should be used. If you are at all unsure which plug or fuse to
use, always refer to a qualified electrician.
Note: after replacing or changing a fuse on a moulded plug which has a fuse cover, the cover must be refitted
to the plug; the appliance must not be used without a fuse cover. If lost, replacement fuse covers can be
obtained from an electrical shop. This appliance complies with the following EEC Directives: 73/23 EEC (Low
Voltage Directive) and 89/336 EEC (EMC Directive).
0001