1
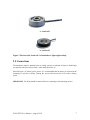
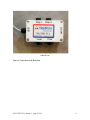
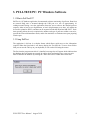
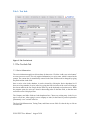
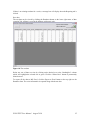
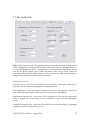
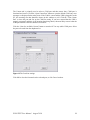
PULLTEST Version 2.0 YieldPoint Inc. April 2010 Copyright © 2005 by YieldPoint Inc. The Information contained herein is the exclusive property of YieldPoint Inc., except as otherwise indicated and shall not be reproduced, transmitted, transcribed, stored in a retrieval system, or translated into any human or computer language, in any form or by any means, electronic, mechanical, magnetic, optical, chemical, manual, or otherwise without expressed written authorization from the company. The distribution of this material outside the company may occur only as authorized by the company in writing. YieldPoint hardware and software products are not designed to be used in the diagnosis and treatment of humans. Windows 95/98, NT and XP are registered trademarks of Microsoft Corporation. Modbus is a registered trademark of Modicon Inc. The Bluetooth® word mark and logos are owned by the Bluetooth SIG, Inc. Warranty and Service Policy Product Warranty YieldPoint Inc warrants the instruments described in this manual to be free from defects in materials and factory workmanship to the original buyer. This warranty is contingent upon proper use of the equipment, and does not cover equipment that has been modified or has been subjected to abusive physical or electrical stresses. YieldPoint Inc., agrees to repair or replace, at its sole discretion, any instrument that fails to perform as specified within 6 months after date of the original shipment from the factory, or 3 months after the date of installation, whichever date comes first. Yieldpoint Inc., reserves the right to make substitutions and modifications in the specifications of equipment that do not materially or adversely affect the performance of the equipment. New equipment may be returned within 30 days of shipment with prior approval. New items which are less than thirty days old after shipment may be returned for credit, less a minimum restocking and testing charge of twenty percent of the list price upon factory approval only, provided the customer pays all shipping and handling charges. Specially ordered, or modified goods, or goods which have been used or have been unpacked, or goods which have been shipped more than thirty days prior are not returnable. The information contained in this manual is subject to change without notice. YieldPoint Inc. makes no warranty of any kind with regard to this material, including, but not limited to, the implied warranties of merchantability and fitness for a particular purpose. Further, YieldPoint Inc., assumes no responsibility for any errors that may appear in this manual and makes no commitment to update, or keep current, the information contained in this manual. Service Policy Units within the warranty period returned for repair, test, and recalibration are serviced at no charge in accordance with the terms of the warranty policy. The Customer pays all transportation and other charges to the factory. Units out of warranty returned for repair, test, and/or recalibration are handled on a time and material basis. If requested, or if costs exceed 50% of current list price, YieldPoint Inc., advises the customer prior to making the repairs. Such repairs are performed at the customer‟s expense. Typical test, recalibration, and repairs are 25% of the instrument‟s current list price. Transportation charges both ways are at the customer‟s expense. Please be sure all returns are shipped with the following information included: 1.Your company Name with Billing and Shipping Addresses. 2.A complete description of your problem, or re-calibration data. 3.The contact person at your company, with their telephone and facsimile numbers. 4.Non-Warranty returns additionally need your Purchase Order Number. Please pack your returned instruments in their original shipping cartons, or in equivalent strong protective shipping cartons. PULLTEST User Manual. August 2010 2 Table of Contents 1 PULLTEST 4 1.1 1.2 What isPULLTEST? Units conversions 4 2 COMPONENTS & CONNECTIONS 5 2.1 2.2. 2.3 2.3.1. Data Acquisition Units Displacement Sensors Pressure Cell Load Cells 3 PC WINDOWS SOFTWARE 5 5 6 6 9 3.1. 3.2 3.3. 3.4 3.5 3.6 3.7 3.8 What is PullTest/PC? Using Pulltest The Test Info Tab. The Pull Test Tab The Pull Test (Time) Tab The Reporting Tab. The Config Tab. The Comms Tab PULLTEST User Manual. August 2010 9 10 11 12 13 14 16 17 3 1. Introduction 1.1.What is PullTest? PullTest is a system for accurately and efficiently monitoring pull test on bolts and anchors. A Data Acquisition (DAQ) unit converts signal from displacement, load and pressure transducers directly to the USB port of a PC or the BlueToothTM port of a PC or Pocket PC. This enables the test to be monitored in real time so that pass/fail criteria can be applied in the field, resulting in more proactive test programme management through optimization of the number, type and location of tests. PullTest has been designed to be low cost and low weight (8 lbs). The user can select to minimize weight and inconvenience further by using a Pocket PC (HP iPAQ) to read and store the data, as opposed to the standard laptop PC interface. More importantly the Pocket PC provides a backup precaution in case the laptop computer fails. In fact, all aspects of PullTest design incorporate redundancy features which include: displacement measurement based on two independent sensors an interchangeable backup load is provided, and load can also be calculated based on a measurement of the in-line pressure. This design strategy ensures that the system will continue to operate even under the most testing scenarios. Reporting tools enable plots to be prepared easily and efficiently, so that a presentation can be made to a customer or client within minutes of the test program being completed. 1.2 Units Conversions form Metric to Imperial PullTest works with and stores data in metric units. However options exist to work in imperial units without inconvenience. Should conversion factors be required they are listed below. Metric To Imperial Imperial to Metric 1 inch =25.4mm 1kN = 0.1004 tons (2240lbs) 1kN = 0.1124 short tons 1 metric tonne =1.102 short tons 1 MPa = 145psi 1kPa = 0.145psi 1mm = 0.03937” 1 ton(2240lbs) =9.964 kN 1 short Ton = 8.896kN 1 short ton = 0.9071 short tons 1psi=0.006894MPa 1psi = 6.894kPa Table 1: Units conversions PULLTEST User Manual. August 2010 4 2. COMPONENTS and CONNECTIONS 2.1. Data Acquisition Units. PullTest hardware components combine analog sensors to monitor load and displacement and a 4 channel, 12-bit data Acquisition unit. The Data Acquisition unit (DAQ) streams data to a USB port of a PC. 2.2 Displacement Sensors The two displacement sensors operate using a magnetostrictive principle that measures the relative position of a flexible waveguide and a ring-magnet.. This transducer has the advantage that there is no physical connection across the loading jack, so that if the bolt ruptures the sensor will not be damaged. The specification sheet for the displacement sensors is provided in Appendix A1. PullTest enables either a single displacement sensor or a pair of displacement sensors(average result plotted) to be used to monitor the pull test. The two displacement sensors are fully interchangeable and can be plugged into either port 1 or 2 on either DAQ unit. PullTest/PC must be modified depending on which port is used. Figure 1. The magnetostrictive displacement sensor. The extended red probe is the waveguide. 2.3 In–Line Pressure Cell. PULLTEST User Manual. August 2010 5 The load applied to the bolt can also be calculated based on the line pressure multiplied by the area of the ram (see section 3 below). The pressure cell is rated for a range 0-69MPa or 010000psi. Pressure Cell Figure 2. The in-line Pressure Cell 2.4 Load Cells. Two load cells are provided with the PullTest system. Load cell 1 Load Cell 1 is a rated for 50000lbf with an output of 10mV FS. The sensing element incorporates bonded foil strain gages of the highest quality and is sealed for protection against most industrial environments. To obtain accurate results with the load cell it is imperative that the lower surface be evenly load. Therefore a stainless steel disc with a central hole is provided on which the load cell must sit. It is recommended that a sacrificial washer be used at the upper surface of the load cell to avoid damaging the finish. The specification and calibration sheets for the load cell is provided in Appendix A2 Load cell 2 Load Cell 2 is a rated for 80000lbf with an output of 10mV FS. This load cell is generally less accurate (2% non-linearity compared with 0.25% for load cell 1) than load cell 1 and is provided as a lightweight backup load cell. For accurate load measurement it is imperative to ensure that load cell 2 is aligned concentrically to the bolt shaft, and that eccentric loading is avoided. The specification and calibration sheets for the load cell is provided in Appendix A2 PULLTEST User Manual. August 2010 6 a. Load cell 1 b. Load cell 2 Figure 3 The load cells. Load cell 2 is intended as a lightweight backup 2.5 Connections The transducers must be attached to the two DAQ systems as indicated in Figure 4. Both DAQs are turned on/off by the rocker switch - white dot depressed is on. Each DAQ has a 9V battery power source. It is recommended that the battery be replaced at the beginning of each day‟s testing. Turning the system off between tests will conserve battery power. IMPORTANT: The DAQ should be turned off before connecting or disconnecting sensors. PULLTEST User Manual. August 2010 7 Disp 1 Disp 2 USB On/Off Load Pres USB DAQ Unit Figure 4. Connections to the DAQ Unit PULLTEST User Manual. August 2010 8 3. PULLTEST/PC: PC Windows Software 3.1 What is PullTest/PC? PullTest is a PC database application for automated real-time monitoring of pull tests. Data from an external DAQ unit is streamed through the USB port at a rate of approximately 10 readings/second. During a test the application allows the user to observe the detailed pull test response, either as load versus displacement, or load + displacement versus time,. All graphs can be saved or printed as JPEGs, and data can be exported to both MS Word and MS Excel. . Realtime reporting allows the user to optimize the number and type of pull tests within a test series, provide the client with immediate results, and it also minimises or eliminates time spent preparing a final report. 3.2 Using PullTest The application is laid out in a tabular format which allows rapid access to the information required. When the form loads it will always display the Test Info tab. To move from field to field you can use the Tab key on your keyboard, or click on the field using the mouse. The first time the program runs after it is installed, a message box will appear which indicates that the database does not contain any records. In order to begin performing tests, a new test series must be added to the database by clicking the “Add a new series” button on the main form. PULLTEST User Manual. August 2010 9 Tab 1: Test Info Figure 5: The Test Info tab. 3.3 The Test Info Tab. 3.3.1 Series Information: The series information applies to all tests done for that series. Click the “Add a new series button” to create a new test series. The only required information is a series name, which is entered at the prompt. The current date is automatically entered in the Date field but can be changed by typing the preferred date in the field. Once a series exists in the database, it can be selected by clicking the Series dropdown list. If there are a large number of series in the list, typing the first few letters of the series will bring up the closest match in the list. Simply hit the Enter key on the keyboard to select that series. When the program opens, the series are sorted in descending order on the Date field, so that the most current test series is displayed first. The Company and Mine fields are both dropdown lists. Choose an existing entry in the list, or type in a new one. After typing in a new company or mine, hit the Enter key on the keyboard to permanently “save” an item in the list. The Level, Drift/Intersection, Testing Team, and Notes are text fields. Use the tab key or click on a field to edit. PULLTEST User Manual. August 2010 10 3.3.2 Test Information: Each test series can contain a maximum of ten individual tests. The test information can be entered before or after a test is run. Use the Test Number dropdown list to select a particular test, or click on the Previous or Next buttons to navigate through tests. Most fields in the Test Information section are dropdown lists with pre-set entries, however, they will accept any user text entered. The Test Complete field is a non-editable field which automatically changes to „Yes‟ once a test has been run. 3.4 The Pull Test Tab Current Test Number Figure 6. The Pull Test tab The Pull Test tab displays the real time graph for an individual test. On this graph, Load is plotted directly against Displacement. The name of the series is displayed at the top of the graph, and the dropdown list at the top indicates which test number is being run. Once the correct test is selected and the serial or usb is connected to the PC, click the “Start Test” button to begin. The remaining buttons will now be enabled. Data can be plotted and saved at PULLTEST User Manual. August 2010 11 different intervals, and can be shown in Metric or Imperial units. Both of these settings are found on the Preferences tab. To “zero out” the Load data or the Displacement data, click the corresponding Zero button in the lower right corner. At any time during or after a test, click the Pull Test(Time) tab to view the current test being simultaneously plotted as Load and Displacement against Time. Click the Pull Test tab to return to the original graph. To end a test, click the Stop Test button. The data is saved and the incoming data is no longer plotted on the graph. The saved data is now viewable on the Reporting tab, but a copy of the individual pull test graph can be saved as a JPEG by clicking on the Save button in the lower left corner, or printed directly to a printer by clicking the Print button. To continue with a new test in the same series, simply click the Next Test button and the graph is ready to start a new test. Click here for information on zooming in on graphs 3.5 The Pull Test (Time) Tab Figure 7. The Pull Test (Time) tab The Pull Test (Time) tab displays the real time graph for an individual test. On this graph, Load and Displacement are plotted individually against time in Seconds. Load is shown on the left axis in blue, and Displacement is shown on the right axis in red. If a test exceeds 90 seconds, the graph will begin to scroll to the right to show the most current incoming data. The name of the series is displayed at the top of the graph, and the dropdown list at the top indicates which test number is being run. PULLTEST User Manual. August 2010 12 Once the correct test is selected and the serial or USB is connected to the PC, click the “Start Test” button to begin. The remaining buttons will now be enabled. Data can be plotted and saved at different intervals, and can be shown in Metric or Imperial units. Both of these settings are found in the Config tab. To “zero out” either the Load data or the Displacement data, click the corresponding Zero button in the lower right corner. At any time during or after a test, click the Pull Test tab to view the current test being simultaneously plotted as Load versus Displacement. Click the Pull Test (Time) tab to return to the original graph. To end a test, click the Stop Test button. The data is saved and the incoming data is no longer plotted on the graph. The saved data is now viewable on the Reporting tab, and a copy of the individual pull test graph can be saved as a JPEG by clicking on the Save button in the lower left corner, or printed directly to a printer by clicking the Print button. To continue with a new test in the same series, simply click the Next Test button and the graph is ready to start a new test. 3.6 The Reporting Tab. Click a test series line to view the information for that test Uncheck a test series to hide it from view Save, Print, Export to MS Word View test data datasheet Figure 8 The Reporting tab shows the graph of all the completed tests for a series. Data can be plotted in Imperial or Metric units. Series information is shown below the graph. To view individual test information, click on the test data line in the graph. PULLTEST User Manual. August 2010 13 To remove a test from the plot, uncheck the corresponding test number in the graph legend. To show a hidden test, re-check the corresponding test number. Both graph axes can be moved by clicking on the axis with the left mouse button and dragging the axis in the desired direction while the mouse button is held down. The axis can also be scrolled using the wheel button if your mouse has one. Zooming in on graphs: To zoom in on an area in the graph, use the mouse to „draw‟ a rectangle around the area to be viewed. Start with your mouse pointer positioned at the top left of where you would like your selection to begin. Click and drag using the left mouse button and move your mouse diagonally down and to the right. You will see a grey outline of a rectangle to use as your guide. Once you have the desired area selected, release the left mouse button and the graph will zoom in to that area. To return the graph to its original view, draw the rectangle in reverse. To see a demonstration of this, double-click the short movie clip below. Figure 9. A video clip indicating how to use the Reporting Tab. This graph can be saved as a JPEG by clicking the Save button, printed directly to a printer by hitting the Print button, or exported to MS Word by clicking the Export to Word button. PULLTEST User Manual. August 2010 14 If there is no existing test data for a series, a message box will display when the Reporting tab is clicked. Raw data: The raw data can be viewed by clicking the Datasheet button on the lower right corner of then reporting Tab. All data is saved in the database with metric units. Export Series and test data to MS Excel Figure 10. The raw data Delete one row of data at a time by clicking on the desired row at the „ReadingNo1‟ column which will highlight the selected row in green. Click the “Delete Row” button to permanently delete that row. To export all the data to MS Excel, click the Export to Excel button at the top right on the Datasheet form. The series information is exported along with the test data. PULLTEST User Manual. August 2010 15 3.7 The Config Tab. Figure 11 The Preferences Tab. The graphing preferences determine which port the displacement sensor is plugged into , and whether the load value is based on a pressure cell plugged into port 3 or a load cell plugged into port 4. Although data is streamed drom the DAQ unit at 0.1mm intervals the interval between saved values and plotted values can be varied. Finally the calibration coefficents for the load and pressure cell s are input on the RHS. The should only be changed if the transducers are replaced or the recalibrated. Graphing Preferences: The Figure shows a top view of the DAQ/PC with the location of the 4 ports indicated. It is imperative that each transducer be plugged into the appropriate port. Units dropdown list – select either Metric or Imperial from the list. This preference applies only to the values plotted on the graph. Metric values are always written to the database. Displacement dropdown list – select Port1, Port 2 depending on which port the displacement sensor is plugged into. Select average to use an arithmetic average from both displacement sensors. Load/Pressure dropdown list – select either Load cell (Port 4) or Pressure cell(port 3) depending on which transducer the load value is based on. PULLTEST User Manual. August 2010 16 Set Timer Defaults: Plotting and saving intervals can be the same value, or set to different values. Plot Interval – select the frequency in seconds in which the graph will plot a point of data when running a test. Save Interval – select the frequency in seconds in which the program will save a point of data to the database. Load Cell/Pressure Cell Parameters: Default Load Cell – select Load Cell 1(port 4) or Load Cell 2(port 4) from the dropdown list. The Area of the Ram depends on the capacity of the ram used for testing. Load Cell Coefficients. and Span values are pre-entered for the Load and Pressure equipment, based on the specification and calibration data provided in Appendices A2 and A3 3.8 The Comms Tab Figure 12. The comms Tab PULLTEST User Manual. August 2010 17 The Comms tab is primarily used to select a COM port and then ensure that COM port is functional and correct. Click the “Open Comm Port” button to open the default COM. Any error messages are displayed in the main screen. If the COM is correct and the USB is plugged in to the PC, the incoming raw data should be shown in this window as well. Click the “Close Comm Port” to close the port and free up the COM for testing. If you have ensured that the USB is properly connected, and there is no incoming data being shown, the most likely reason is that the COM port number selected as default is not correct. Click the “Scan for Available Comms” button to scan the PC for any usable COM ports. Select the port to be used from the dropdown list. Figure 12 The Com Port settings Click OK to close the form and use the selected port, or click Cancel to abort. PULLTEST User Manual. August 2010 18