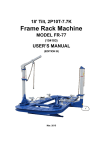
1
LAUNCH
Trademark Information
LAUNCH is a registered trademark of LAUNCH
TECH. CO., LTD. (short for LAUNCH ) in China and
other countries. All other LAUNCH trademarks,
service marks, domain names, logos, and company
names referred to in this manual are either
trademarks, registered trademarks, service marks,
domain names, logos, company names of or are
otherwise the property of LAUNCH or its affiliates. In
countries where any of the LAUNCH trademarks,
service marks, domain names, logos and company
names are not registered, LAUNCH claims other
rights associated with unregistered trademarks,
service marks, domain names, logos, and company
names. Other products or company names referred
to in this manual may be trademarks of their
respective owners. You may not use any trademark,
service mark, domain name, logo, or company name
of LAUNCH or any third party without permission
from the owner of the applicable trademark, service
mark, domain name, logo, or company name. You
may contact LAUNCH by visiting LAUNCH at
http://www.cnlaunch.com, or writing to LAUNCH,
Xinyang Building, Bagua 4th Road, Shenzhen,
Guangdong Province, P. R. C., to request written
permission to use Materials on this manual for
purposes or for all other questions relating to this
manual.
TCR-101/201Collision Repair System
General Notice
Other product names used herein are for
identification purposes only and may be
trademarks of their respective owners.
LAUNCH disclaims any and all rights in those
marks.
Copyright Information
Copyright © by LAUNCH TECH. CO., LTD. All rights
reserved. No part of this publication may be
reproduced, stored in a retrieval system, or
transmitted in any form or by any means, electronic,
mechanical, photocopying, recording or otherwise,
without the prior written permission of LAUNCH. The
information contained herein is designed only for the
use of this unit. LAUNCH is not responsible for any
use of this information as applied to other units.
Neither LAUNCH nor its affiliates shall be liable to
the purchaser of this unit or third parties for
damages, losses, costs, or expenses incurred by
purchaser or third parties as a result of: accident,
misuse, or abuse of this unit, or unauthorized
modifications, repairs, or alterations to this unit, or
failure to strictly comply with LAUNCH operating and
maintenance instructions.
LAUNCH shall not be liable for any damages or
problems arising from the use of any options or any
consumable products other than those designated
as Original LAUNCH Products or LAUNCH
Approved Products by LAUNCH.
PDF 文件使用 "pdfFactory Pro" 试用版本创建 www.fineprint.com.cn
TCR-101/201Collision Repair System
LAUNCH
8.
Before each pulling, inspect the chain to make
sure it is in good condition.
9. Clamps must be firm attached to the vehicle
before each pulling operation is carried out.
10. Make sure the chains and the clamps are firmly
attached to the vehicles.
11. Keep away from the front of the column and the
pulling direction of the chain to ensure safety.
This unit is made for the purpose of persons who
have special techniques and certifications.
Disclaimer
l To take full advantage of the unit, you should be
familiar with the engine.
l All information, illustrations, and specifications
contained in this manual are based on the latest
information available at the time of publication.
The right is reserved to make change at any time
without notice.
Warnings
Safety Precautions
1.
2.
3.
4.
1.
Do not attempt to use Collision Repair System
before reading the User’s Manual and Pars
Manual.
Keep the working area clean and free from
obstacles when operating the system. Keep the
oil pipes and air pipes in order so that they won’t
be pressed during operation.
Check and make sure that the cylinders, oil pipes
and pumps in the jacks are in perfect working
2.
3.
4.
order. Check and make sure that the cylinders,
oil pipes and pumps in the pulling systems are in
perfect working order. Once the damage is
found on the pipes, they should be replaced
without delay.
If a problem is found in the hydraulic system,
repair should be done only be technicians with
proper training. Avoid making alterations to the
limit valve on the pump. Contact Launch Tech in
a timely manner once a problem is found.
Keep away from the bench when it is in motion.
Keep the pump 0.5m away from the bench. Stay
away from the supported bench unless when the
mechanical local is engaged.
Keep the jack steady when the system is in
operation. Better to keep it slow by hand to
avoid damage to the equipment and vehicle
through operation by foot.
When lifting the bench, pin down the other end of
the tower to avoid slip.
Position the vehicle at the appointed position and
place the brake to parking position.
Clamping
1.
2.
3.
4.
5.
Air source for the pump should be kept away from
dust and water. Oil/water separator should be
fitted to the air pipes. Once every three months,
the filter in the oil /water separator should be
replaced. Keep the pressure within .6-0.8MPa.
Be fore each use, remaining water should be
discharged from the separator.
6. Before lowering the jack, please disengage the
mechanical locking system.
7. Make sure the pulling system is firmly connected
Make sure there is no oil on the jaws of the clamps
before they are used.
Inspect if there is distortion or cracking on the
parts of the clamp. Replace the parts if such
problems are found.
Keep the bolts on the clamps and jaws tight.
Never use the pin holes at the tower as the holes
for the positioning of the vehicles.
Measuring and Pulling
1.
2.
3.
4.
to the bench. Before each operation, inspection
should be carried out.
Measuring instruments should be handled with
special care so that they won’t be damaged or
distorted.
Keep the eyes at a parallel position for accurate
readout.
Inspect if the hooks are damaged.
Inspect to make sure that the guiding and locking
system are at the same direction and they are not
2
PDF 文件使用 "pdfFactory Pro" 试用版本创建 www.fineprint.com.cn
TCR-101/201Collision Repair System
LAUNCH
5.
6.
7.
distorted.
Make sure that the pulling force does not go
beyond the limit. Under normal circumstances,
the rated load of the tools is 5 tons, chain jointer 8
tons and chain hook 10 tons.
Do not knock on the tools and the chains when
pulling is in progress.
Keep the positioning wedge tight and the pins in
place before pulling.
8.
Keep away from the same direction as the pulling
force of the chains.
9. Keep weight on the tower to prevent improper
operation leading to damage.
10. Fix the axel at the other end to the bench when
the pulling force is strong.
3
PDF 文件使用 "pdfFactory Pro" 试用版本创建 www.fineprint.com.cn
TCR-101/201Collision Repair System
LAUNCH
Table of Contents
……………………………………………………………………………1
Features
………………………………………………………………………………………………1
Specifications …………………………………………………………………………………………1
General Information
Structure ……………………………………………………………………………………………1
Bench …………………………………………………………………………………………………3
Pulling System ………………………………………………………………………………………4
Measuring System ………………………………………………………………………………………5
Tool Kit …………………………………………………………………………………………………7
jack ……………………………………………………………………………………………………9
Operation… …………………………………………………………………………………………10
Preparation before mounting……………………………………………………………………………10
Vehicle Mounting and Clamping ……………………………………………………………………10
Measuring………………………………………………………………………………………………11
Repair Operation ………………………………………………………………………………………13
Maintenance ………………………………………………………………………………………15
Troubleshooting …………………………………………………………………………………16
Appendix 1:Pulling Capacity Of The Clamps …………………………………………18
Appendix 2:Measuring parts and their installation………………………………………19
1
PDF 文件使用 "pdfFactory Pro" 试用版本创建 www.fineprint.com.cn
TCR-101/201Collision Repair System
LAUNCH
General Information
Features
l
l
l
l
l
Highly precise decks ensure the accurate measure for the complete image of the damaged area.
Dual towers to produce 360o pulling.
Equipped with imported hydraulic parts and rods to facilitate pulling to all directions.
Movable XYZ dimensioning for accurate and easy operation
TCR-201 Collision Repair System has Auto tilting drive-on capacity and hydraulic locking device
available.
l Optional clamps and accessories to meet the demands for the repair of any collision.
l Body reference data keeping updated with the latest in the world.
Specifications
Items
TCR-101
TCR-201
Length
5328mm
5328mm
Width
2000mm
2000mm
Height
320mm
535mm
Weight
2100kg
2300kg
Hydraulic Power
69Mpa
69Mpa
Power Pulling Capacity
98000N
98000N
360°
360°
0.6~0.8 MPa
————
0.6~0.8 MPa
Sedan
Sedan, van, SUV
Radius of Pulling
Air Pressure
Lifting Capacity
Adaptable Vehicles
5000kg
Structure
TCR Collision Repair System mainly consists of four parts: Bench (1 set), Pulling System (2 sets), Measuring
System (1 set), and Tool Kit (1 set), as shown in Fig. 1
1
PDF 文件使用 "pdfFactory Pro" 试用版本创建 www.fineprint.com.cn
TCR-101/201Collision Repair System
LAUNCH
a) Structure of TCR-101 Collision Repair System
b) Structure of TCR-201 Collision Repair System
Fig. 1 Structure of Collision Repair System
1.Bench 2.Pulling System 3.Measuring System 4.Tools kit
2
PDF 文件使用 "pdfFactory Pro" 试用版本创建 www.fineprint.com.cn
TCR-101/201Collision Repair System
LAUNCH
Bench
The bench is the base part in Collision Repair System used for the purpose of fixing and repairing vehicles just
like an operation table. It mainly consists of 2 parts, Bench Frame and Main Clamps, as shown in Fig 2. Damaged
vehicles can be fixed on the bench through clamps and auxiliary support.
The main clamps can be fixed on any part of bench frame through pressing plates and bolts.
The main clamps position the vehicles by taking hold of undamaged side. It can be adjusted upward under duty.
The adjustable scope ranges from 300 to 380mm. When unscrewing the clamp nuts with special socket wrench, the
main clamp chops can move flexibly. On the contrary, the main clamps can clamp vehicle skirt edge, so vehicles’
position is fixed. The main clamps are adjustable under duty in the vertical direction. For badly damaged chassis,
you can make main clamps directly push upward the damaged part to straighten the vehicle.
Auxiliary support is only available on the TCR-201 model for auxiliary clamping, supporting and fixing of the
undamaged parts so that they have protection in the process. The adjustable scope ranges from 280mm to 370mm.
With adjustable block, the adjustable scope can reach 380mm to 470mm. On top of the auxiliary support, small
clamp and positioning pin can function together with craft hole or thread hole on the vehicles to perform auxiliary
supporting and positioning functions.
3
PDF 文件使用 "pdfFactory Pro" 试用版本创建 www.fineprint.com.cn
TCR-101/201Collision Repair System
LAUNCH
1. Bench Frame
Fig.2 Bench
2.Main Clamp 3. Auxiliary Clamp
Pulling System
Pulling System is mainly used for straightening damaged areas on vehicles. It consists of hydraulic cylinder,
pneumatic pump and pulling tower, as shown in Fig 3. The pull force needed by straightening is provided by
hydraulic cylinder and pneumatic pump.
Pulling System can slide along track and can be fixed at any position for 360-degree access to straighten vehicle.
According to the vehicle part to be straightened, you can position the pulling system by pulling out the fixing plate,
inserting fixing pin and wedging with wedge mass. One end of the chain is fixed in the groove on the upper part of
the inner tower column; the other end is connected with clamps which connect the damaged area via idle wheel. The
maximum working force is 10t. Manual pump and hydraulic cylinder’s maximum oil pressure is 10000PSI. Hydraulic
cylinder is connected with air hydraulic pump or Manual pump. Instructions on the operation and maintenance of the
hydraulic cylinder and the pneumatic pump are to be found in the manual coming as a part of the product. Pulling
upward can be offered via hanging arm equipped on the upper tower. Hanging arm is locked in the tower by a pin.
4
PDF 文件使用 "pdfFactory Pro" 试用版本创建 www.fineprint.com.cn
TCR-101/201Collision Repair System
LAUNCH
Fig 3 Pulling System
1. Guide Idle Wheel 2. Fixing Mass 3. Fixing Pin
4. Fixing Plate 5.Wedge Mass 6. Hydraulic Cylinder
7. Collar Idle Wheel 8.Pin
9. Hanging Arm
Measuring System
Measuring System allows the 3-dimention measurement of the chassis so as to find out the distortion in the
damaged area of the vehicle. By referring the data of original vehicle, you can decide the direction and the value for
the repair.
Measuring system consists of measuring ladder and chassis gauge as shown in Fig. 4.
Measuring System features convenient operation, flexibility and practical usage. The upper surface of bench will
be the base of installation and measurement.
5
PDF 文件使用 "pdfFactory Pro" 试用版本创建 www.fineprint.com.cn
TCR-101/201Collision Repair System
LAUNCH
Fig.4
Mechanism Measuring System
1. Measuring Ladder
2. Chassis Gauge
Measuring Ladder
Measuring ladder consists of horizontal bar and vertical bar. Chassis gauge can be put on the measuring
ladder. It can slide along measuring ladder in the longitudinal direction. Measuring Ladder is located on the
machining area of Bench. It is fixed with G-shape clamp.
Chassis Gauge
Chassis gauge mainly consists of chassis slide seat, chassis cross bar, measuring seat, standard measuring
rod, rod extension and measuring parts as shown in Fig. 5. Chassis gauge can slide along measuring ladder as
a whole. Measuring seat can slide along chassis crossbar with standard measuring rod. This will allow
3-dimension measurement of the chassis characteristic points.
The end of the chassis slide seat pointing to the front of vehicle (with red mark) is the place of longitudinal
reading. The place with red mark on the measuring seat is the place of latitudinal reading. The top surface of
measuring rod is the place of height reading.
There are three set of standard measuring rods and measuring rod seats, which can cover most of measuring
points within the scope 130mm to 600mm. Measuring parts include measuring cup, round measuring pointer,
L-type measuring pointer and elbow fittings suitable for all kinds of type measuring positions as shown in Fig. 6.
The elbow fitting together with measuring cup and round measuring pointer, can measure the position of the
characteristic points in the horizontal direction. It will give better convenience for the measurement of some
special positions.
6
PDF 文件使用 "pdfFactory Pro" 试用版本创建 www.fineprint.com.cn
TCR-101/201Collision Repair System
LAUNCH
Fig. 5
Chassis Gauge
1. Standard Measuring Rod 2. Measuring Parts 3. Measuring Rod 4. Measuring Seat 5. Chassis Cross Bar 6.
Chassis Slide Seat A. Place for Height Reading B. Place for Longitudinal Reading C. Place for Latitudinal Reading
Fig.6
1. Round Rod 2. L-shaped Rod 3. Measuring Set
4. Bend Link Rod 5. Tape Rod
Tool Kit
The tool kit of Collision Repair System mainly consists of vehicle loading ramp, clamps and special tools and can
meet the needs for collision repair.
Vehicle Loading Ramp
Vehicle loading ramp is used to guide vehicle move on Bench.
7
PDF 文件使用 "pdfFactory Pro" 试用版本创建 www.fineprint.com.cn
TCR-101/201Collision Repair System
LAUNCH
Clamps
Clamps are defined as tools that work to hold damaged area on the vehicle. Clamps fall in different types in
accordance with the damaged areas.
Repair System.
They are flexible to use.
There are dozens of clamp types in TCR Collision
Convenient clamping and safety should be taken into consideration when using the clamps and
caution should be taken not to damage the structural parts.
Some typical clamps are shown in Fig. 7. Among
them 1 and 2 are mainly for coating, and 3 and 4 are mainly used for frames such as bumper.
Fig 7 Typical Clamps
1. Clamp Splint with Chain 2. Dual Chains Clamp Splint 3. Big Hook 4. Small Hook
Special Tools
Special tools are shown in fig 8.
Special tools include socket wrench and hex. wrench. Socket wrench is specially used to fasten jigs and clamps.
Hex. wrench is mainly used to fasten clamps. Special tools can increase your efficiency.
Fig 8 Special Tools
1.Socket Wrench
2. Hex. Wrench
8
PDF 文件使用 "pdfFactory Pro" 试用版本创建 www.fineprint.com.cn
TCR-101/201Collision Repair System
LAUNCH
Tool Rack
Tool rack is used to hold accessories of the equipment, as shown in Fig 9. It is equipped with foot wheels for
convenient movement. Some special rigs are found on the tool rack, such as pothook and small case.
Fig 14 Tools Storage Cart
1. Pot hook
2. Wheel
3. Box
Jack(for TCR-201 only)
Structure
The jack consists of main lift frame, oil cylinder and air hydraulic pump, as shown in Fig. 10.
1. Main Jack
6. Oil cylinder
2. Check Valve
7. Air Cylinder
Fig 10 TCR-201 Jack
3. Air Hydraulic Pump
4. Two-position Five-way Valve
8. Ratchet
Operations
9
PDF 文件使用 "pdfFactory Pro" 试用版本创建 www.fineprint.com.cn
5. Pawl
TCR-101/201Collision Repair System
LAUNCH
the operation instruction of Working Platform Lift Frame is described as following.
Ø
Ø
Ø
Ø
Connect the outlet of the air pump with the inlet connector of the two-position five-way valve. After bleeding
the residue air in the oil pipe, connect the other end of the oil pipe with the cylinder. Check the part to make
sure that the connection is reliable and there is no leakage.
Set the air pressure value of the air pump to 5.8 bar. Turn on the electronic source switch so that the air pump
will supply air.
Push out the handle of two-position five-way valve then depress the switch of air-hydraulic pump toward
PRESSARE (PUMP). This will enable the bench to move up. Release the switch of air-hydraulic pump at this
time, the bench will stop and keep at a certain position.
To lower the bench, push in the handle of two-position five-way valve to release the pawl from the ratchet, then
depress the switch of the air-hydraulic pump toward RELEASE position. If the air cylinder can’t lift the pawl of
the mechanical self-lock jig, extend the oil cylinder and lift the bench by 5~10cm, then repeat the above steps
to move the bench.
Operations
Preparation before Mounting
Set the repair plan
According to the damages on the vehicle, set the parts and the directions to be pulled and protected during the
pulling process. When necessary, remove some parts, for example, the battery.
Find out the chassis data and the body data suitable for the damaged vehicles
Ø
Ø
Find out the category, model, manufacturer, and year of the damaged vehicle and trace the number of the
vehicles from the catalogue.
Find the respective chassis data and vehicle’s body data through the number of the vehicle in the reference.
Vehicle Mounting and Clamping
Mounting
Drive or pull the vehicle to be repaired via winch onto the bench along mounting ramp.
ramp to finish the process.
Remove the mounting
Vehicle Clamping
l
Clamping of vehicles with front or rear damages
a. Mount the clamp bases (It is not necessary to remove the clamp bases after each mounting.
b. Mount the four clamps on the clamp bases, and adjust the height of the clamps to 350mm.
c. Move the scissors lift to one end of the vehicle, and lift it up. Use a couple of clamps to clamp the skirt edge
of the vehicle. Then move the lift frame to the other end of vehicle. Use another couple of clamps to clamp
the vehicle’s respective skirt edge and finish the clamping as shown in Fig 11.
10
PDF 文件使用 "pdfFactory Pro" 试用版本创建 www.fineprint.com.cn
TCR-101/201Collision Repair System
LAUNCH
l
Fig 11
Mounting and clamping vehicles with damage on one side
The process of mounting and clamping is similar to the ones with damages on the front or rear. The
difference is when edge is damaged, clamping can’t be done or the edge can only hold one clamp. Under this
condition, use two clamps to hold the edge of vehicle not damaged and use the accessory clamps to support,
clamp, and fix the good parts. According to the condition of the vehicle edge, lift and lower the clamp, and
clamp the damaged side. Then pull and straighten the damaged side. When the repair of the damaged side is
completed, clamp this side so pull the other damaged parts.
l Mounting and clamping vehicles without skirt edge
If there is no skirt edge on the vehicle to be repaired, you can weld two couples of steel slats symmetrically
on the suitable position of its chassis. After loading the vehicle, you can clamp it via the four steel slats.
l Mounting and clamping crossbeam type vehicles
The skirt edge of the crossbeam type vehicle is weak, so it is not suitable for clamping. If necessary you
may clamp skirt edge to perform as assistant support. Generally the clamped parts of crossbeam type vehicle
are the suspension fulcrum and the front part of the crossbeam. You shall use crossbeam special clamp
(optional) to clamp the front of crossbeam and use outer suspension bracket (optional) to support the
suspension fulcrum. You can use accessory clamp and accessory support to fix the crossbeam type vehicle.
Note:
l
l
l
l
In the process of loading the vehicle, keep the longitudinal centerline of the vehicle to the
longitudinal centerline of the bench.
After mounting the vehicle, try to locate its gravity center in the middle part of the bench.
If the vehicle is longer than the bench, move the vehicle so that the damaged part is located on the
bench so that pulling can be performed.
After mounting the vehicle, use small clamp, position pin, and positioning jacketing as assistant
support.
Measuring
When using measuring system, you shall have a good understanding of the data table in the measuring system at
11
PDF 文件使用 "pdfFactory Pro" 试用版本创建 www.fineprint.com.cn
TCR-101/201Collision Repair System
LAUNCH
first.
Description Of The DataTable
The vehicle body data provided with the equipment includes chassis data table and body data table.
All kinds of measuring items in chassis data and their ways of installation are shown in Appendix 1.
Measuring System Positioning
After mounting the damaged vehicle, take a roughly measure and work out a repair plan. During the repair process,
you shall take a precise measure of the part to be repaired, so that you can judge if it is well done.
When using the measuring system, you should perform calibration first. The operation method is listed below.
Ø Locate two points in the undamaged area on the front or on the rear of the chassis by referring to the data
Ø
Ø
table suitable for the vehicle. In general the rear point is the front fulcrum of the rear suspension (When the
point is damaged you may choose other points). In the data table the front fulcrum of the rear suspension
fulcrum is marked with O. According the absolute latitudinal distance and altitudinal distance, you can
determine another point on the vehicle.
Put the measure ladder on the bench, and mount the four sets of chassis rulers on the measuring ladder. In
general the rear set of chassis rulers shall use the short crossbeam ones. According the installation type
illustrated in the data table, you can install the measuring rob and the measuring elements well.
Adjust chassis measuring ruler, measuring sliding seat and measuring position to make the numbers in
accordance with the numbers illustrated in data table. And brick by brick adjust the measuring ladder’s
position to make the measuring elements correspond to the positioning point (2-mm error is allowed).
Tighten the tacking screws.
Notes:
The data table given is in accordance with vehicles of some special type and some special
year. Due to the rapid progress and the improving of the manufacture technology, vehicle
made by the same manufacturer but in a different year may have different data.
When using data table, note that the measuring precision of the system is 2 mm., but in most
cases tolerance of the vehicle manufacturer is under 3 mm. More over because of the
manufacture technology, the tolerance of the chassis and vehicle body is 10 mm at times.
l
l
Operation of measuring system
Installation of the chassis measuring ruler and the gantry measuring frame
After the calibration of the measuring system, you shall install the gantry-measuring frame and other
chassis-measuring ruler and measuring elements, etc. The installation approaches are described below.
Ø
Ø
Ø
Remove the measuring sliding seat, measuring seat and measuring rod.
Place the chassis crossbeam assembly on the measuring ladder.
Place the measuring sliding seat, measuring seat and measuring rod on the chassis crossbeam.
Measurement of the Chassis
l
Measuring the characteristic points of the chassis
Ø According the character of the chassis measuring point and the measuring method
illustrated in the data table, you can select the appointed measuring rod and measuring
12
PDF 文件使用 "pdfFactory Pro" 试用版本创建 www.fineprint.com.cn
TCR-101/201Collision Repair System
LAUNCH
elements and fix them together.
Ø Adjust the position of the chassis ruler, measuring sliding seat, and measuring rod to make
the elements touch the measuring point.
Ø Read the portrait, landscape, and height number illustrated by the chassis ruler. And
compare them with the number illustrated in the data table. If the error is in the range of 2 mm,
the point position is correct. Otherwise it is incorrect.
l Measuring vehicle when there is no available data
If no data table is available for the vehicle to be repaired, follow the method below.
Ø Find two sets of symmetrical points in the area not damaged. The distance between the two sets of
symmetrical points shall as apart as possible. Calibrate the measuring system with reference to the two
couples of symmetrical points.
Ø Measure the vehicle by traditional means or on the basis on some of the key structural dimension or
installation dimension. Making use of the Experience may be equally important in the measurement of
the vehicle.
Note:
The distance between the two sliding seats on chassis measuring ruler is well adjusted before it leaves
the factory. Do not loose the screws on the track. If the clearance between the chassis-measuring ruler
and measuring ladder is too long after long use, loose the screws to adjust the clearance. The chassis
on the left and right measuring ruler shall be symmetric based on the center line of the chassis ladder.
The adjustment error shall not be greater than ±0.5 mm.
Repairing Operation
Preparations
l Remove the battery to avoid possible erosion from leakage of the acid.
l Remove the parts in the way during the repairing process.
l Measure the vehicle and set the repairing plan.
Connection of the pulling system and the bench
At first set the suitable connection point in accordance with the part to be repair. The following principles shall be
observed: During the process repairing, when some part being applied stronger force, the chain shall be kept
parallel to the towers’ crossbeam to protect the tower from being damaged. After the connection position being
ascertained, the positioning mass shall be pulled out. Insert the positioning pin, and then wedge it with wedging
mass. This will fit the pulling system with the bench tightly.
Connection of the hydraulic system and pulling system
Fit together the manual pump, oil pipe and oil cylinder. Check the oil level in the manual pump. If the level is too
low, fill hydraulic oil (refer to the detail method in the user’s manual). Remember to exhaust the air in the oil pipe.
Connection of pulling tower and calibration point
Select the clamps to be used in accordance with the damaged parts. For the rigid parts the pulling hook, pulling
plate and big clamps shall be selected in general. Connect the clamps and the chains reliably. Fix the other end of
13
PDF 文件使用 "pdfFactory Pro" 试用版本创建 www.fineprint.com.cn
TCR-101/201Collision Repair System
LAUNCH
the chain in the chamber on the upper part of the inner tower beam.
Repairing Operation
Turn off the switch of the manual pump. Rock the handle of the manual pump repeatedly so that oil comes from
the pump and the cylinder is extended.
During the repairing process, adjust the height and position of the chain as well as the connection position in the
pulling system.
Typical pulling operation
l
When some of the damaged parts need to be pulled downward, change the chain direction via idle wheel
as shown in Fig. 12.
l
l
l
The straightening of the rear of the vehicle is shown in Fig. 13.
When the top of the vehicle body needs to be pulled upward, use the hanging bar as shown in Fig. 14.
When the top of the vehicle body needs to be pulled upward, use the pulling tower to perform the task as
shown in Fig. 15.
Fig. 12
Fig. 13
Pulling Downward
Pulling of the Rear Parts
14
PDF 文件使用 "pdfFactory Pro" 试用版本创建 www.fineprint.com.cn
TCR-101/201Collision Repair System
LAUNCH
Fig. 14
Pulling the Top Upward
Fig. 15
Pulling the Top Upward
Notes:
l Some parts shall be supported and fixed according to the feathers of straightening. For example, when
pulling downward some damaged points on the chassis, you shall support or fix the start point of the
crook. When the top part is straightened, the front end of the vehicle or the rear end of the vehicle
chassis shall be fixed. And when the front end of the vehicle is pulled toward left or right, you must fix
the front end of the chassis.
l Measuring system shall be moved to the undamaged area to avoid the chain and accessories in the
measuring system from being destroyed.
l Keep away from the back of the pulling tower during the process of straightening.
Maintenance
l
After each use, clean up replace the clamps and the measuring parts.
l
The hydraulic oil in the cylinder, air hydraulic pump and manual pump shall be replaced once every half a year
15
PDF 文件使用 "pdfFactory Pro" 试用版本创建 www.fineprint.com.cn
TCR-101/201Collision Repair System
LAUNCH
l
l
l
in the way as illustrated in the manual.
Change the hydraulic oil after using for three months. After the hydraulic pump is cleaned up, fill in hydraulic
oil.
Add lubricant to the rails of the tower on a regular basis to ensure its flexible movement.
When the pneumatic pump and oil cylinder are not in use, keep the dust caps on so that dust won’t get into the
pump and cylinder.
Troubleshooting
Symptom
Cause
Solution
1. Sealer is broken
2. Serious wear of piston
1. Replace the cylinder sealer
2. If leak is still serious after the sealer is replaced, there
may be serious damage at the piston, which should be
replaced
2
Oil leakage at cylinder
coupler
Improper
connection
between the couplers
Remove the coupler or quick coupler, wrap on sealing tape
before fasten the coupler back on. If the leakage is still
seriously, change the coupler.
3
Oil leakage
coupler
Improper
connection
between the couplers
Remove the coupler or quick coupler, wrap on sealing tape
before fasten the coupler back on. If the leakage is still
seriously, change the coupler.
1. Improper sealing at the
couples.
1. Remove the coupler or quick coupler, wrap on sealing
tape before fasten the coupler back on. If the leakage is still
seriously, change the coupler.
1
4
Oil leakage at cylinder
piston
at
pump
Oil leakage at pipes
2. Pipe burst.
5
6
7
Cylinder piston can reach
the place
Cylinder can not retract.
Weak in lifting and pulling
force
2. Replace the oil pipe.
Low oil level in the pump
Check the pump and add oil.
1. Air resistance found in
cylinder.
2. The couplers are not
tightly fastened so that the
check valves are not fully
contacted.
This has
resulted in the difficulty in oil
return.
1. Low pressure at air
source.
2. Leakage at air pipes,
hydraulic
pipes
and
adaptors.
3. Block at the inlet of
hydraulic pump
4. Check valve not
1 (a) Press repeatedly to release pressure and return air to
oil box. (b) Use jack in place of cylinder support. Screw down
the cylinder coupler so that the piston returns completely to
the cylinder.
After pushing out oil and air, replace the
couplers and pipes.
2 Tighten quick couplers.
1. Check the air pressure to make sure it is between 0.6MPA
and 0.8MPA.
2. Handle in the ways described above.
3. Contact Launch Tech.
4. Contact Launch Tech.
16
PDF 文件使用 "pdfFactory Pro" 试用版本创建 www.fineprint.com.cn
TCR-101/201Collision Repair System
LAUNCH
completely
because
substance.
8
Hydraulic pedal does not
respond
9
No pressure
hydraulic pedal
at
the
10
Pressure is not held in
hydraulic pump.
11
Oil leakage under the pump
pedal
of
blocked
foreign
1. Air passage is not open.
2.
Control valve is
damaged.
3. Too much water and dirt
in the pump.
1. Oil outlet is blocked.
2. Check valve or overflow
valve is blocked or
damaged.
1、Air turned off or line blocked,
1. Open the air passage.
2. Contact Launch Tech.
3. Contact Launch Tech.
Contact Launch Tech.
1. Oil leakage
2. Check valve or overflow
valve is blocked or
damaged.
Contact Launch Tech.
Sealing pad damaged
Replace the sealing pad.
17
PDF 文件使用 "pdfFactory Pro" 试用版本创建 www.fineprint.com.cn
TCR-101/201Collision Repair System
LAUNCH
Appendix 1: Pulling capacity of the clamps
Order
1
Item
Universal plate
Specifications
Pulling capacity
01
4 tons when the pulling is in the
same direction with the jaw
3 tons hen it is vertical
2
Chassis hook
02
5 tons
3
Clamp with chains
03
3 tons
4
Large hook
04
5 tons
5
Chain clip
5104
8 tons
6
Wide clip
06
8 tons
7
Dual clamp
08
3 tons
8
Functional wheel
09
5吨
9
Long pad
10
5 tons
10
Horizontal plate
12
5 tons
11
Vertical plate
13
5 tons
12
Fiber suspension
φ1000(Hood)
2 tons
13
Beam plate
11
5 tons
14
Suspension chain
14
8 tons
15
Chain
3m
10 tons
16
Universal shock absolver
seating
15
5 tons
17
Strong Clamp
M1
5 tons
18
C type Clamp
M2
5 tons
19
Narrow clamp
M4
5 tons
18
PDF 文件使用 "pdfFactory Pro" 试用版本创建 www.fineprint.com.cn
TCR-101/201Collision Repair System
LAUNCH
Appendix 2: Measuring parts and their installation
Measuring tools
Example
Remarks
Measurement of interior points or
holes
Measurement of interior points or
holes on a vertical plane
Measurement of larger holes
Measurement of larger holes on a
vertical plane
Measurement of the position of
bolt
Measurement of the position of
bolt on a vertical plane
Measurement of 90º right angle
square
19
PDF 文件使用 "pdfFactory Pro" 试用版本创建 www.fineprint.com.cn
TCR-101/201Collision Repair System
LAUNCH
Measuring tools
Example
Remarks
Measurement of interior points or
holes
Measurement of interior points or
holes on a vertical plane
Measurement of the position of
bolt
Measurement of 90º right angle
square
Measurement of 90º right angle
square
Measurement of 90º right angle
square
Mechanical measurement for leveled
plane
20
PDF 文件使用 "pdfFactory Pro" 试用版本创建 www.fineprint.com.cn
LAUNCH
Warranty
THIS WARRANTY IS EXPRESSLY LIMITED TO
PERSONS
WHO
PURCHASE
LAUNCH
PRODUCTS FOR PURPOSES OF RESALE OR
USE IN THE ORDINARY COURSE OF THE
BUYER’S BUSINESS.
LAUNCH electronic product is warranted against
defects in materials and workmanship for one year
(12 months) from date of delivery to the user. This
warranty does not cover any part that has been
abused, altered, used for a purpose other than for
which it was intended, or used in a manner
inconsistent with instructions regarding use. The
exclusive remedy for any automotive meter found to
be defective is repair or replacement, and LAUNCH
shall not be liable for any consequential or incidental
damages. Final determination of defects shall be
made by LAUNCH in accordance with procedures
established by LAUNCH. No agent, employee, or
representative of LAUNCH has any authority to bind
LAUNCH to any affirmation, representation, or
warranty concerning LAUNCH automotive meters,
except as stated herein.
TCR-101/201Collision Repair System
E-mail: [email protected].
If your unit requires repair service, return it to the
manufacturer with a copy of the sales receipt and a
note describing the problem. If the unit is determined
to be in warranty, it will be repaired or replaced at no
charge and returned freight pre-paid. If the unit is
determined to be out of warranty, it will be repaired
for a nominal service charge plus return freight.
Send the unit pre-paid to:
Attn: Overseas Department
LAUNCH TECH. CO., LTD.
Xinyang Building,
Bagua 4th Road,
Shenzhen, Guangdong Province,
China
Disclaimer
THE ABOVE WARRANTY IS IN LIEU OF
ANY OTHER WARRANTY, EXPRESSED
OR
IMPLIED,
INCLUDING
ANY
WARRANTY OF MERCHANTABILITY
OR FITNESS FOR A PARTICULAR
PURPOSE.
Order Information
Replaceable and optional parts can be ordered
directly from your LAUNCH authorized tool supplier.
Your order should include the following information:
1. Quantity
2. Part number
3. Item description
Customer Service
If you have any questions on the operation of the
unit, please contact us:
Tel: 86-755-82401364 or 86-755-82269604
PDF 文件使用 "pdfFactory Pro" 试用版本创建 www.fineprint.com.cn