1
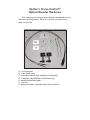
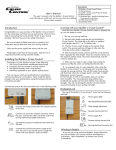
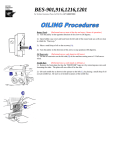
TM
User’s Manual
This user’s manual is for the
Quilter’s Cruise ControlTM with Optical Encoders,
and will help you install your unit on your
short-arm quilting frame system properly.
Installing the Quilter’s Cruise ControlTM
The Quilter’s Cruise ControlTM with optical encoders consists of the following:
1. The Cruise Control Brain
2. The Optical Encoders with wiring harness
3. Hardware applicable to your specific quilting frame
I. Set up your short-arm quilting frame in accordance with the manufacturer’s instructions. If you purchased a Stylus Assembly, place it on top of your machine carriage following the instructions on page 4.
II. Using the hardware provided and following the frame-specific instructions, included
with your unit, install your optical encoders on your quilting frame.
III. Insert the 6-pin black plug on the Optical Encoder wiring harness into the matching
port on the Cruise Control Brain.
IV. There are several cords on the unit. The permanently attached longer cord is the
power cord. Plug this directly in the wall outlet. The double-ended cord will plug into your
sewing machine’s foot pedal port and the matching port on the Cruise Control Brain. (If
you have purchased a Remote Hand Switch, plug this into the receptacle below the power
cord.)
Cruising with the
Quilter’s Cruise ControlTM
Now that your Quilter’s Cruise ControlTM system is properly set up, you are ready to
cruise!
I. Turn on the main power to the Cruise Control Brain. This button is located on the
end with the cords. If you look on the Brain, you should notice a green light. If you do
not, check to ensure you have power to the unit from your wall outlet.
II. There are 3 stitch lengths available: short, medium, and long. Select your desired
stitch length.
III. Turn on your sewing machine.
IV. Flip the “Cruise” switch located on the face of the Cruise Control Brain. Very slowly,
the machine will begin stitching.
V. Start moving the sewing machine, and the Cruise Control Brain regulates the stitch
length. Move the machine slowly, and the machine stitches slowly. Move the machine fast,
and the machine stitches fast.
VI. When you are ready to stop, simply stop moving the machine and switch the Cruise
Control Brain to “Stop” or flip the switch on your Remote Hand Switch.
VII. When you need to wind a bobbin, simply follow your sewing machine
manufacturer’s instructions for threading the machine/bobbin, then push and hold the
“Wind Bobbin” button on your Cruise Control Brain. There is no need to unplug anything!
VIII. As a general rule, it is very important when using the Quilter’s Cruise ControlTM
not to abruptly start and stop when moving the sewing machine.
For best results, as with an automobile, start out and slow down smoothly. You may
experience long stitches if you accelerate too quickly and very short stitches if you stop too
abruptly. This will not damage the Quilter’s Cruise ControlTM unit, but the quality of your
quilting will suffer.
When switching stitch length (short, medium, long), be sure to have the “Cruise/Stop”
button switched to the “Stop” position.
Using the
Wind Bobbin Feature
I. For Juki-compatible units: Thread the machine to wind the bobbin. Simply depress
the “Wind Bobbin” push button and hold.
II. For Brother-compatible units: To use the wind bobbin feature of the Quilter’s
Cruise ControlTM with the Brother 1500, the following sequence must be performed. If the
sequence is not followed, the red light on the sewing machine will flash.
After threading the machine to wind the bobbin: [1] Turn off the Quilter’s Cruise
ControlTM main power switch (the green light on the unit should be OFF). [2] Press the
“Wind Bobbin” push button and hold. [3] Flip the “Stop/Cruise” switch from “Stop” to
“Cruise.” The bobbin will begin winding. When finished, reverse the procedure.
Quilter’s Cruise ControlTM Accessories
Using the Driveway
If you purchased a Driveway with your Quilter’s Cruise ControlTM, before you place the
machine carriage onto your short-arm quilting frame, place the Driveway(s) between the
frame rails. This will protect your pantograph patterns for years of use.
A Driveway consists of two sheets that are approximately 21” wide and 51” long.
Additional Driveways are available for purchase on our website.
Using the Remote Hand Switch
I. The Remote Hand Switch: You may wish to control the power to the Cruise Control
Brain from a location other than directly behind the end of the sewing machine, such as
from the opposite side of your quilting frame or from the side where the stylus arm is located. It provides a convenient power “kill” switch from any location around the quilting
frame. Simply plug the Remote Hand Switch connector into the port below the power cord
on the Cruise Control Brain.
II. For Juki-compatible units: To use the remote switch, plug it into the port on the end
of the Brain. When the hand control is plugged in, the “Stop/Cruise” switch on the Brain
should remain in the “Stop” position. When not using the remote hand control switch,
disconnect it from the Brain and store it in a safe place.
III. For Brother-compatible units: To use the remote switch, plug it into the port on the
end of the Brain. [Be sure that it is in the “off” position; the white dot is up.] When the
hand control is plugged in, the “Stop/Cruise” switch on the Brain should remain in the
“Cruise” position. When not using the remote hand control switch, turn the switch to the
“Stop” position, disconnect the cord from the Brain, and store it in a safe place.
Assemble the Stylus
Some of the following assembly steps may have been done for you. Please read all
instructions prior to assembly.
1. Thread the wing-nut onto the stylus from the pointed end of the stylus.
2. There is a small plastic cap to screw/push onto the top of the stylus above the wing
nut.
3. Thread the stylus onto the stylus arm from the pointed end of the stylus.
4. Insert the heat shrink over the lower portion of the stylus near the point, see figure
1. Holding the heat shrink in place with the tip of your forefinger and your thumb, gently
apply heat with a hair dryer set on high heat. Be careful not to burn yourself!
5. Rotate the stylus to apply heat evenly all around. This will
permanently adhere the heat shrink to the stylus, giving you a
smooth surface to grasp when “driving” the sewing machine on
the frame when following a Road Map or tracing patterns. The
finished assembly should look like the one in Figure 1.
6. Using isopropyl alcohol (rubbing alcohol) and a cotton
ball, clean the surface of the stylus plate and the carriage where
you will be placing the stylus plate. Remove the backing from one
side of the Velcro® and place one on each end of the stylus plate
on the side that does not have the tabs turned up. Remove the
backing from the opposite side of the Velcro®, carefully position
the stylus plate on top of the top carriage, and press firmly.
If you prefer to affix the plate to your carriage with screws, you Figure 1
should check first with your frame manufacturer regarding its warranty on the carriages. Drilling holes into your carriage may void the manufacturer's warranty.
LiTen Up, Inc. and Quilter’s Cruise ControlTM are not responsible for voided warranties on
quilt frames.
7. Insert the stylus arm into the 2 rectangular holes on opposite sides of the stylus
plate. Tighten the thumb screws until gently snug.
8. Place your sewing machine on top of the stylus plate, with the feet positioned inside
the 4 rubber cups provided. Follow the instructions in “Cruising with the Quilter’s Cruise
ControlTM found in your User’s Manual.
IV. Tighten the Stylus Plate thumb screws onto the stylus arm until gently snug.
V. Lower the stylus into position by turning the stylus until the end-point is in the desired position.
VI. Tighten the wing-nut down onto the stylus arm until gently snug.
VII. Following the previous instructions for Cruising, hold the stylus and “trace” your
stencil/pattern/Road Map. Using this method to stitch your quilting pattern, you may guide
the sewing machine by holding the stylus, not the sewing machine. The stylus arm is rigid
enough to ensure precision “tracing” of stencil, pantograph, and other quilt designs and
templates/Road Maps.
Quilter’s Cruise ControlTM
Optical Encoder Hardware
The hardware you’ve been given directly corresponds to your
short-arm quilting frame. Below is a picture with the various
parts we provide.
B
A
C
E
D
F
G
A: wiring harness
B: strain relief pads
C: encoder plates (B-Line and Pennywinkle only)
D: L-brackets (SuperQuilter and Grace only)
E: double-faced foam pads
F: wire ties
G: optical encoders, shoulder bolts, acrylic spacers
Serial No.
WARRANTY
12 Months Parts/12 Months Labor
LiTen Up, Inc. warrants this product (the Quilter’s Cruise Control)
to be free of defects in material and workmanship for a period of 12
months covering parts and labor from the date of original purchase.
To obtain repair or replacement within the terms of this warranty,
please return the product with proof of warranty coverage (this card),
description of defect, transportation prepaid, to:
LiTen Up, Inc.
Quilter’s Cruise Control
PO Box 2913
Lancaster, CA 93539
www.quilterscruisecontrol.com
[email protected]
This warranty does not apply to any product that has been
damaged through alteration, mishandling, misuse or neglect. The
extent of LiTen Up, Inc.’s liability under this warranty is limited to the
repair or replacement provided above and in no event shall the
company’s liability exceed the purchase price paid by the purchaser for
the product.
This Warranty gives you specific legal rights, and you may also
have other rights, which vary from state to state.
Customer Satisfaction Guarantee. If, for any reason, you are dissatisfied with your
Quilter’s Cruise ControlTM, contact us at [email protected]. Within 14 days
from the date of purchase, you may return the order, in its entirety, and we will refund your
purchase price, provided the product has not been altered, mishandled, or misused. We
welcome your comments and suggestions, because we want you to enjoy every quilting
experience you have.
LiTen Up, Inc.
Quilter’s Cruise ControlTM
PO Box 2913
Lancaster, CA 93539
www.quilterscruisecontrol.com
[email protected]