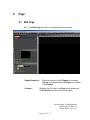
1
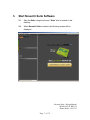
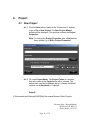
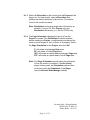
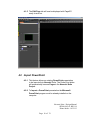
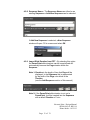
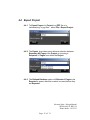
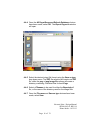
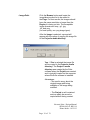
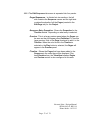
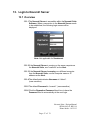
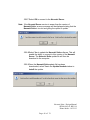
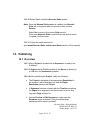
Design
Manual
Suite Version 2.8
Noventri Suite - Design Manual
SF200-0162-01 REV 04
Diane Smith – 10/22/13
Page 1 of 74
Table of Contents
1.
2.
3.
4.
Overview ....................................................................................................4
Install Noventri Suite / Sever Software.......................................................5
Start Noventri Suite Software .....................................................................7
Project ........................................................................................................8
4.1
New Project ............................................................................................8
4.2
Import PowerPoint ................................................................................10
4.3
Open Project.........................................................................................14
4.4
Export Project .......................................................................................15
4.5
Save Project .........................................................................................17
4.6
Save As Project ....................................................................................17
4.7
Close Project ........................................................................................17
4.8
Recent Files..........................................................................................17
4.9
Exit .......................................................................................................18
4.10 Project Properties .................................................................................18
4.11 Options .................................................................................................19
4.12 Undo / Redo .........................................................................................19
5.
Page.........................................................................................................20
5.1
Edit Page ..............................................................................................20
5.2
Add Page..............................................................................................21
5.3
Delete Page..........................................................................................22
5.4
Preview Panel.......................................................................................22
5.5
Page Properties....................................................................................22
5.6
View Options ........................................................................................23
6.
Regions ....................................................................................................24
6.1
Add Regions .........................................................................................24
6.2
Navigate Between Regions ..................................................................24
6.3
Delete Regions .....................................................................................25
6.4
Move Regions.......................................................................................25
6.5
Resize Regions ....................................................................................26
6.6
Select Multiple Regions ........................................................................26
7.
Image Region...........................................................................................27
7.1
Add Image Region................................................................................27
7.2
Image Region Properties ......................................................................28
8.
Text Region..............................................................................................41
8.1
Add Text Region...................................................................................41
8.2
Text Region Properties .........................................................................42
9.
Clock Region............................................................................................48
9.1
Add Clock Region.................................................................................48
9.2
Clock Region Properties .......................................................................49
Noventri Suite - Design Manual
SF200-0162-01 REV 04
Diane Smith – 10/22/13
Page 2 of 74
10.
Sequence .................................................................................................52
10.1
Edit Sequence Tab ...........................................................................52
10.2
Add Sequence ..................................................................................54
10.3
Delete Sequence ..............................................................................55
10.4
Creating a Sequence ........................................................................55
10.5
Timeline Navigation ...........................................................................56
10.6
Sequence Properties.........................................................................58
10.7
Sequence Transitions .......................................................................60
10.8
Play Sequence on Preview Panel .....................................................62
11.
Preview Monitor .......................................................................................62
11.1
Enable Preview Mode .......................................................................63
11.2
Start the Preview...............................................................................63
11.3
Hide Preview.....................................................................................64
11.4
Disable Preview ................................................................................64
11.5
Scale Preview ...................................................................................65
12.
Monitor .....................................................................................................65
12.1
Auto Adjust........................................................................................65
13.
Login to Noventri Server ..........................................................................67
13.1
Overview...........................................................................................67
14.
Publishing.................................................................................................69
14.1
Overview...........................................................................................69
14.2
Publish Project (Server)....................................................................70
14.3
Publish Project (USB Drive) (Sneakernet)........................................71
15.
Server ......................................................................................................72
15.1
Overview...........................................................................................72
15.2
Server Connection ............................................................................72
15.3
Disconnect........................................................................................73
Noventri Suite - Design Manual
SF200-0162-01 REV 04
Diane Smith – 10/22/13
Page 3 of 74
1.
Overview
1.1
Noventri Suite makes it easy to create Projects to be displayed
on monitors in resolutions up to 1920x1200.
1.2
To display the created Projects on the monitors, a Player for each
monitor needs to be installed. A computer can be used as a Player
however the Noventri Suite is designed specifically for use with
the new Eco-Series line of Noventri Players.
1.3
Each Project that is created in the Suite can contain any number
of Pages (limited only by the resources of the computer being
used).
1.4
Each Page created in the Suite is capable of containing multiple
Image, Text, and Clock Regions.
1.5
Each Region supports transparency and can overlap other
Regions to create interesting effects.
1.6
Timeline interface enables the creation of a Sequence of Pages
with Transitions. A Project can contain any number of Sequences
(limited only by the resources of the computer being used).
1.7
An easy-to-use Scheduler allows Sequences to be played any
time, day or night, or as needed.
Note: This feature can only be used with the Noventri
Eco-Series line of Players.
1.8
Playback the Sequences on either the main computer monitor or
a secondary monitor. Any number of Eco-Series Players can
also be added.
Noventri Suite - Design Manual
SF200-0162-01 REV 04
Diane Smith – 10/22/13
Page 4 of 74
2.
Install Noventri Suite / Sever Software
2.1
Noventri Suite and Noventri Server software can be downloaded
directly from our web site: www.noventri.com/forum.
2.2
The Noventri software can be installed on any number of
computers.
2.3
If an existing Noventri Suite or Noventri Server software
installation already exists on the computer, it will be updated when
a newer version is installed.
2.4
If Noventri Suite and Noventri Server software are to be installed
on the same computer, they must be the same version.
Warning -
Updating the Noventri Server software will cause any
connected Players to automatically have their firmware
updated.
2.5
If Noventri Suite software version is older than the Noventri
Server software version, the Noventri Suite will not be able to
connect to the Noventri Server.
2.6
To begin the installation process...
At the Noventri web site www.noventri.com/forum
Login to the Noventri Forum.
2.7
Select Downloads.
2.8
Select Software.
2.9
The most current Noventri Suite/Server Software Download will
be shown. Select it, and Save File.
2.10
The Noventri Suite and Server Software .exe file will be
downloaded to the Download directory of the computer.
2.11
When the download is complete, select the .exe file to install and
select Run.
Noventri Suite - Design Manual
SF200-0162-01 REV 04
Diane Smith – 10/22/13
Page 5 of 74
2.12
After reading the warning, check the I understand and Agree
check box, and select Next.
2.13
After reading the Agreement select I Agree.
2.14
Install Noventri Suite, Noventri Server, or both by checking them,
and then selecting Next.
2.15
Select the desired location to install the software and select Next,
then Install.
2.16
Once it has been installed select Finished.
Noventri Suite - Design Manual
SF200-0162-01 REV 04
Diane Smith – 10/22/13
Page 6 of 74
3.
Start Noventri Suite Software
3.1
Start the Suite using the shortcut “Suite” that is located on the
desktop.
3.2
When Noventri Suite is started, the following screen will be
displayed.
Noventri Suite - Design Manual
SF200-0162-01 REV 04
Diane Smith – 10/22/13
Page 7 of 74
4.
Project
4.1 New Project
4.1.1 Click the New button located in the Toolbar row of buttons
or go to File > New Project. The New Project Wizard
window will be displayed. This window contains the Project
Properties.
Note: To change the Project Properties after a Project has
been created, go to Edit > Project Properties.
4.1.2 Fill in the Project Name. The Project Folder is a location
that will contain all the Projects that will be created. The
default path used by the Suite is below, however a different
location can be Browsed to, if desired.
Default...
C:\Documents and Settings\[USER]\My Documents\Noventri Suite Projects
Noventri Suite - Design Manual
SF200-0162-01 REV 04
Diane Smith – 10/22/13
Page 8 of 74
4.1.3 Select the Resolution of the monitor that the Project will be
played on. For best results, select a Resolution that
matches the native resolution of the monitor. This can be
found in the monitor’s manual.
Note: Resolutions in the drop down menu followed by an
asterisk (*) are for SF-100e Players only and
Resolutions followed by (++) are for SF-200 only.
4.1.4 The Page Orientation changes the layout of how the
Project is created. The Orientation should be selected
before creating the Project, or adjustments may have to be
made to some images or text, for them to fit properly. Select
the Page Orientation for the Project, then click OK.
0° will create a Landscape Page area.
90° will create a Portrait Page area.
180° will create an upside down Landscape Page area.
270° will create an upside down Portrait Page area.
Note: This Page Orientation should match the orientation
of how the monitor is installed. If an Eco-Series
player is being used, the Orientation selected here
must also match the Orientation of the Player.
(see the Noventri Suite Manage manual)
Noventri Suite - Design Manual
SF200-0162-01 REV 04
Diane Smith – 10/22/13
Page 9 of 74
4.1.5 The Edit Page tab will now be displayed with Page001
ready to work on.
4.2 Import PowerPoint
4.2.1 This feature allows an existing PowerPoint presentation
to be Imported into Noventri Suite. The PowerPoint slides
will automatically become Pages in the Noventri Suite
Project.
4.2.2 To Import a PowerPoint presentation the Microsoft
PowerPoint program must be already installed on the
computer.
Noventri Suite - Design Manual
SF200-0162-01 REV 04
Diane Smith – 10/22/13
Page 10 of 74
4.2.3 To begin, select File > Import PowerPoint.
If a Project is not opened –
The New Project Wizard for PowerPoint window will be
displayed...
If a Project is already opened –
The Import PowerPoint File window will be displayed....
Noventri Suite - Design Manual
SF200-0162-01 REV 04
Diane Smith – 10/22/13
Page 11 of 74
4.2.4 If the New Project Wizard for PowerPoint window is
displayed, fill in the New Project information as normally
done. (Project Name, Project Folder, Resolution, and
Page Orientation)
(see the New Project section of this manual)
4.2.5 Select a PowerPoint File – Both the New Project Wizard
window, and the Import PowerPoint window, will have a
Select a PowerPoint File box to fill in.
Fill in the path to the PowerPoint file, or browse to it using
the Browse button.
4.2.6 The PowerPoint slides will be added as Pages into the
Project.
Note: If Importing a PowerPoint into an existing Project,
the PowerPoint slides will be tacked on after the
existing Suite Pages.
4.2.7 Add to Sequence/Add PowerPoint to Sequence –
Selecting this check box will allow the PowerPoint slides to
be automatically added to a Sequence in the Project.
Note 1: If this Add to Sequence/Add PowerPoint to
Sequence option is not selected, the PowerPoint
slides will still automatically be added as Pages into
the Project, however they will have to manually be
add to a Sequence.
Note 2: A Sequence is a way of specifying the order and
duration that Pages are displayed.
(see the Sequence section of this manual)
Noventri Suite - Design Manual
SF200-0162-01 REV 04
Diane Smith – 10/22/13
Page 12 of 74
4.2.8 Sequence Name – The Sequence Name can either be an
existing Sequence or Add New Sequence can be selected.
If Add New Sequence is selected, a New Sequence
window will open. Fill in a name and select OK.
4.2.9 Import Slide Duration from PPT – By selecting this option
the PowerPoint slide durations can be imported and will
automatically become the Page duration within the
Sequence.
Note 1: Duration is the length of time that Page will be
displayed. In the Sequence this is represented
by the width of the Page color block in the
Timeline.
(see the Add Sequence section of this manual)
Note 2: If the PowerPoint slide duration is not set in
PowerPoint, it will be inserted into the Sequence
with a default Duration of 1 min.
Noventri Suite - Design Manual
SF200-0162-01 REV 04
Diane Smith – 10/22/13
Page 13 of 74
4.2.10 Custom Duration – By selecting this option the PowerPoint
slide Durations will be ignored and the Custom Duration
that is chosen here will become the Page Duration within
the Sequence.
4.2.11 Transition – Selecting the Transition to be used between
each PowerPoint slide.
4.2.12 When all the PowerPoint selections are correct, select OK.
Project editing can then continue as normal.
4.3 Open Project
4.4.1 To Open an existing Project click the Open button located
in the Toolbar row of buttons, select File > Open Project, or
use Ctrl+O. Then browse to the Project location (*.sfp) and
click Open.
Noventri Suite - Design Manual
SF200-0162-01 REV 04
Diane Smith – 10/22/13
Page 14 of 74
4.4 Export Project
4.4.1 To Export Pages of a Project to a PDF file or to
individual png, or jpg files - select File > Export Project.
4.4.2 The Export drop down menu allows a selection between
Exporting All Pages of the Project or choosing a
Sequence of Pages from within the Project.
4.4.3 The Refresh Database option will Refresh all Pages to be
Exported to assure that their content is current before they
are Exported.
Noventri Suite - Design Manual
SF200-0162-01 REV 04
Diane Smith – 10/22/13
Page 15 of 74
4.4.4 Once the All Pages/Sequence/Refresh Database choices
have been made, select OK. The Export Pages As window
will open.
4.4.5 Select the desired output file format using the Save as type
drop down menu. The PDF file selection will create one PDF
file, while the png or jpeg Image file options will create a
directory containing individual files for each Page.
4.4.6 Select a Filename to be used for either the Exported pdf
file, or the name of the directory used for the image files.
4.4.7 Once the File name and Save as type choices have been
made, select Save.
Noventri Suite - Design Manual
SF200-0162-01 REV 04
Diane Smith – 10/22/13
Page 16 of 74
4.5 Save Project
4.5.1 To Save a Project at any time, click the Save button located
in the Toolbar row of buttons, select File > Save, or use Ctrl+S.
4.6 Save As Project
4.6.1 To Save a Project to a new location with the same name or
a new name, select File > Save As or use, Ctrl+Shift+S.
Type in the new file name, and navigate to the new location.
Click Save. Save As cannot be used to Save a Project into
the same directory where the original Project is located.
4.6.2 The new Project that was just created will now be the
Project that is Open and the Project that was started with
will now be Closed.
Note: The new Project that is created with Save As is a copy of
the original Project that can now be independently
changed or deleted without affecting the original Project.
4.7 Close Project
4.7.1 To Close a Project that is Open, select File > Close
Project or use Crtl+W. If the Project has not been Saved,
you will be prompted to do so.
4.8 Recent Files
4.8.1 Listed under File > Recent Files will be a list of the last nine
Projects that were Saved. Clicking one of the file names is
a quick way to Open that Project.
Noventri Suite - Design Manual
SF200-0162-01 REV 04
Diane Smith – 10/22/13
Page 17 of 74
4.9 Exit
4.9.1 To Exit from Noventri Suite, select File > Exit or use Alt-F4.
4.10 Project Properties
4.10.1 To access the Project Properties, go to Edit > Project
Properties, or right-click the mouse in the Composition
panel and select Project Properties.
4.10.2 Modify the Resolution of the monitor where the Project will
be displayed. For best results, select a Resolution that
matches the native resolution of the monitor. This can be
found in the monitor’s manual.
4.10.3 Modify the Page Orientation of the Project. This will
change the Orientation of the current Project.
0° will create a Landscape Page area.
90° will create a Portrait Page area.
180° will create an upside down Landscape Page area.
270° will create an upside down Portrait Page area.
Note: This Page Orientation should match the orientation
of how the monitor is installed. If an Eco-Series
Player is being used, the Orientation selected here
must also match the Orientation that is selected for
the Player.
Noventri Suite - Design Manual
SF200-0162-01 REV 04
Diane Smith – 10/22/13
Page 18 of 74
4.11 Options
4.11.1 To access Project Options, go to Edit > Options, or rightclick the mouse in the Composition panel and select
Options.
4.11.2 The Default Project Directory is set to the path below,
however the Browse button can be used to select a different
location if desired.
Default...
C:\Documents and Settings\[USER]\My Documents\Noventri Suite Projects
4.11.3 Monitor to use for Preview checkbox allows the Project to
be viewed in preview mode.
(see the Preview Monitor section of this Manual)
4.11.4 Click the Apply button to save the changes.
4.12 Undo / Redo
4.12.1 To Undo actions, select Edit > Undo or use Ctrl+Z.
To Redo actions, select Edit > Redo or use Ctrl+Y.
Noventri Suite - Design Manual
SF200-0162-01 REV 04
Diane Smith – 10/22/13
Page 19 of 74
5.
Page
5.1 Edit Page
5.1.1 The Edit Page tab screen is separated into four panels.
• Pages/Sequence −
• Preview −
Shows a tree list of all the Pages for the open
Project and allows additional Pages to be added
to the Project.
Displays the full view of the Page being worked on,
the Project’s resolution and its orientation.
Noventri Suite - Design Manual
SF200-0162-01 REV 04
Diane Smith – 10/22/13
Page 20 of 74
• Properties −
Shows the Page or Region properties depending
on what area is selected. Page Properties allow a
Page to be renamed, it’s assigned color changed, or
Dynamic Page Creation selected.
• Composition −
This is the main panel where Page content is
created. An empty Page will appear as a black area.
The black area is the screen size and the gray,
hatched area outside of the black screen is for
reference only.
5.2 Add Page
Note: When first creating a Project, a blank Page will be created
called Page001 and will show up in the Pages sub panel.
5.2.1 The Edit Page sub panel will display any Pages created
in the Project. New Pages will be added in the form of
Page###. They will show in the Composition panel as a
black area with ruler bars.
5.2.2 To add a new Page, click the Page button located in the
Toolbar row of buttons, go to Edit > Add Page or right-click
the mouse in the Composition panel and choose Add
Page.
Noventri Suite - Design Manual
SF200-0162-01 REV 04
Diane Smith – 10/22/13
Page 21 of 74
5.3 Delete Page
5.3.1 Pages can be deleted by selecting the Page to be deleted
and then pushing the Delete key on the keyboard, selecting
Edit > Delete, or right-clicking the mouse in the
Composition panel and choosing Delete.
5.4 Preview Panel
5.4.1 The Preview panel will show a small-scaled version of
the Page that the monitor will display. Below that will be the
Resolution and the Page Orientation of the Project.
5.5 Page Properties
5.5.1 The Properties panel enables the Page name to be
changed, it’s reference color to be changed, or Dynamic
Page Creation to be selected.
•
To change the Page name, type the desired name in
the Name box and click the Apply button. The new
Page name entered will now show in the Pages sub
panel list.
Noventri Suite - Design Manual
SF200-0162-01 REV 04
Diane Smith – 10/22/13
Page 22 of 74
•
A different color is assigned to each Page. This color
will be used later to identify the different Pages. The
Color can be changed by clicking the color box,
choosing the new color to be used, and then
clicking OK.
•
The Use Dynamic Page Creation check box allows
the Dynamic Page feature to be selected.
(See the Dynamic Pages Manual)
5.6 View Options
5.6.1 To zoom in & out in the Composition Panel, click the Zoom
In/Zoom Out buttons located in the Toolbar row of buttons,
or go to View > Zoom In/Zoom Out.
5.6.2 To fit the Page to the screen size, click the Fit to Window
button located in the Toolbar row of buttons, or go to View >
Fit to Window.
5.6.3 To see the Page at 100% zoom level, click the Zoom 100%
button located in the Toolbar row of buttons, or go to View >
Zoom 100%.
5.6.4 To refresh the current Page go to View > Refresh.
Noventri Suite - Design Manual
SF200-0162-01 REV 04
Diane Smith – 10/22/13
Page 23 of 74
6.
Regions
6.1 Add Regions
6.1.1 To add a Region, decide which of the following Region
type is desired. Then reference the appropriate section of
this manual.
• Image −
The following image types are supported:
HTML, .bmp, .gif, .jpg, .tiff, and .png (for best
results, use .png image types).
(see Image Region section of this Manual)
• Text −
Can be entered in the text box, pulled from a
file/database and can be creatively formatted.
(see Text Region section of this Manual)
• Clock − Allows the displaying of the date and/or clock
on the Page.
(see Clock Region section of this Manual)
6.2 Navigate Between Regions
6.2.1 In the Composition panel Regions to be changed can be
selected with the mouse, and changes can then be made in
the Properties panel.
Once multiple Regions exist on a Page there are several
other ways to navigate between them.
• Select a Region that is over or under another Region by
right-clicking over the area where two Regions
overlap and choose Layer Select. A list will be shown
of all the Region layers at that specific location.
• To select between all Regions on a Page, go to Edit >
Layer Select. This will give a list of all the Regions
on the Page and allow one to be selected.
Noventri Suite - Design Manual
SF200-0162-01 REV 04
Diane Smith – 10/22/13
Page 24 of 74
6.2.2 If a Region is in front of or behind another Region, it can be
sent forward or backward,
• Click to select that Region, then right-click and choose
Send Backward or go to Edit > Send Backward.
• Click to select that Region, then right-click and choose
Send Forward or go to Edit > Send Forward.
Note: The Shift + Up Arrow / Shift + Down Arrow hot-keys
can also be used.
6.3 Delete Regions
6.3.1 The Regions of a Page can be deleted three different ways.
• Click to select the Region, then right-click the Region and
choose Delete.
• Press the Delete key on the keyboard after selecting the
Region.
• Click to select the Region, then go to Edit > Delete from
the file menu.
6.4 Move Regions
6.4.1 Regions can be moved within the Page by clicking to select
them, then using the arrow keys or dragging them to the
desired location.
Note: If the position of the Region is locked, the curser will
change to a lock. This can be turned off in the
Positioning tab of the Properties panel.
Noventri Suite - Design Manual
SF200-0162-01 REV 04
Diane Smith – 10/22/13
Page 25 of 74
6.5 Resize Regions
6.5.1 Regions can be resized within the Page by selecting them
in the Composition panel and then dragging the edges to
the desired size.
Note: If the position of the Region is locked, the curser will
change to a lock. This can be turned off in the
Positioning tab of the Properties panel.
6.6 Select Multiple Regions
6.6.1 Multiple Regions can be selected by clicking on the
Regions one at a time while holding down the Ctrl key on
the keyboard. They can then be moved, copied, or deleted
as a group.
Noventri Suite - Design Manual
SF200-0162-01 REV 04
Diane Smith – 10/22/13
Page 26 of 74
7.
Image Region
7.1 Add Image Region
7.1.1 To add an Image to the Page, click the Image button located
in the Toolbar row of buttons, or go to Edit > Add
Image Region, or right-click in the Composition panel and
choose Add Image Region.
Now move the cursor to the Composition panel. Notice that
the cursor changes to crosshairs. Using the mouse, click and
drag an area for the image to go into. Do not be concerned
about the shape and size of the area at this time, it will be
adjusted later.
Noventri Suite - Design Manual
SF200-0162-01 REV 04
Diane Smith – 10/22/13
Page 27 of 74
7.2 Image Region Properties
7.2.1 Type the desired Region Name for the Region.
7.2.2 To allow an Image Region to stretch across the entire Page,
select the Fit to Page button. Other positioning options are
available and will be discussed later under the Positioning
tab.
Noventri Suite - Design Manual
SF200-0162-01 REV 04
Diane Smith – 10/22/13
Page 28 of 74
7.2.3 Image Tab
Note: To view the entire Properties panel, it may be
necessary to adjust the panel size by grabbing the top
or right separating bar with the mouse and dragging it.
• Image List –
In general this option allows list of images to be
selected, this can be a Directory with image files, or
a Text List of image paths. So after selecting Image
List, select either the Directory or the Text List
option.
However, depending on whether or not Dynamic
Pages are being used, displayed results can vary.
With Dynamic Page Creation....
The Image List option is best used only with
Dynamic Page Creation (when the Page is
displayed, the images in the Image List will each be
displayed before going to the next Page).
(See the Dynamic Pages Manual)
Noventri Suite - Design Manual
SF200-0162-01 REV 04
Diane Smith – 10/22/13
Page 29 of 74
Without Dynamic Page Creation....
The Image List option without Dynamic Page
Creation has limited use.
a.
First of all, if a Directory with image files, or a
Text List of image paths, is being used
Randomize must be selected for the image to
ever change to another one in the list.
b.
Initially a random image from the list will be
displayed, and that same image will continue to
be displayed every time for that Page.
c.
The only way to have that random image
replaced with a different random image from
the list is to force the content to be
regenerated.
This can be accomplished by...
- Adding or removing any image from the
Image Directory.
- Making any change to the Text List .txt file.
- Adding a Database text Region to the Page.
(every time the Database updates, a new
Random Image will be selected)
(See the Data Base Manual – coming soon)
d.
Keep in mind that the image selection is
always Random and therefore the same image
may be displayed that was being displayed
previously.
Directory – For this option set up a directory that
contains the Image files to be displayed.
Then specify the path to this directory
for the Image Path.
Noventri Suite - Design Manual
SF200-0162-01 REV 04
Diane Smith – 10/22/13
Page 30 of 74
Text List -
For this option set up a text file (.txt) that
contains a list of the Image files (with
their full path name) to be displayed.
Then specify the path to this text file for
the Image Path.
Randomize - This must be selected when not using
Dynamic Pages and change is desired
from one Image in the Image List to
another.
• Database Image - The Database Image options allows the image to be
pulled from a Database.
(See the Data Base Manual – coming soon)
• HTML –
This option allows an HTML image to be displayed.
Noventri Suite - Design Manual
SF200-0162-01 REV 04
Diane Smith – 10/22/13
Page 31 of 74
Warning: When using Website Images, make sure
you are legally allowed to use them.
See the Warning that will display
automatically when you select HTML.
Noventri Suite - Design Manual
SF200-0162-01 REV 04
Diane Smith – 10/22/13
Page 32 of 74
Website Address -
Enter the Website Address of the
image to be displayed.
Delay -
Websites often have objects in motion,
or they change imbedded images over
time, so using this delay option allows
the Website Image to be captured at the
moment desired. The time selected
represents the time the snapshot
is taken after the Web Page is initially
opened.
Override Dimensions -
Websites automatically default to a
certain size to accommodate most
monitors. Select this option to Override
the Website default and adjust it
manually. Crop can also be used for
similar results.
(see the Crop Tab section of this manual )
Update Interval -
Selecting this option will force a new
snapshot of the Website Image at the
interval specified. This new snapshot
will only be visible once the Project is
playing.
Refresh Now -
Selecting Refresh Now will update the
Composition view with a regenerated
Website Image using it’s current
selected properties.
Noventri Suite - Design Manual
SF200-0162-01 REV 04
Diane Smith – 10/22/13
Page 33 of 74
• Image Path -
Click the Browse button and locate the
image/directory/text list to be added to
the Page. For best results, the Images should
have the same resolution or larger than the
Region it is being out into. The acceptable
image formats are .bmp, .gif, .jpg,
.tiff, and .png
(for best quality, use .png image types).
After the Image is selected, a prompt will
appear with the option of copying the image file
to the Project’s media directory.
Yes - If Yes is selected the image file
will be copied to the Project’s media
directory. The Project’s media
directory was created by the Suite
software when the Project was created,
and is typically located on the computer
where the Suite software is installed.
Advantages:
− No need to worry about the
original image path being
available or the image being
modified.
− The Project is self-contained
and can easily be moved or
copied without losing content.
Noventri Suite - Design Manual
SF200-0162-01 REV 04
Diane Smith – 10/22/13
Page 34 of 74
No - Selecting No will cause the image
file to not be copied to the Project’s
media directory.
Note: Selecting No means the Image
needs to stay available at it’s original
location for the Server to access.
Advantages:
− The image can be changed at
its original source (as long as the
file name remains the same)
without having to make changes
to the Project.
− Saves space by not having
large images in multiple
locations.
Note 1: For best performance, image files
should not be stored in directories that
are accessed frequently, such as the
root of C:\ and D:\ or Noventri
directories. We recommend keeping
images in the Noventri Suite Projects
directory.
Note 2: Another option is that the Image can
be copied to the Server by selecting
Migrate image content on publish,
which is also found in the Image
Region Properties panel.
(See the Migrate image content on publish
section of this Manual)
Note: Not applicable for Sneakernet.
Noventri Suite - Design Manual
SF200-0162-01 REV 04
Diane Smith – 10/22/13
Page 35 of 74
• Adjustments -
Specifies how the Image fits within the
Region.
Scale will change the size of the Image to fit
the size of the Region. Images
scaled up that are smaller than the
Region outline may cause poor image
quality.
Crop will keep the Image in its original size,
but may cut the edges of the Image to fit
the smaller Region outline.
For full manual Crop capability see the
Crop Tab section of this Manual.
Tile will keep the Image in its original size and
tile right/down as needed to fit the
Region.
This is intended for small images used
for backgrounds.
Preserve Aspect – this option is only available
when Scale is selected. Selecting this
option will keep the image ratio in tact.
Unchecking this box will allow the image
to be stretched to fit the size of the
Region.
• Orientation -
Specifies how an Image is to be rotated
within the Region.
0° will place the image in Landscape.
90° will place the image in Portrait.
180° will place the image in upside down Landscape.
270° will place the image in upside down Portrait.
• Background Color - Clicking the color square will display
the Color palette. Select a new color for the
transparent areas in the Image. This will allow
the selected color to fill the background of the
Region.
Noventri Suite - Design Manual
SF200-0162-01 REV 04
Diane Smith – 10/22/13
Page 36 of 74
• Migrate image content on publish – If selected, allows a
copy of the image to be put on the Server when the
Project is Published, or if not selected, allows the
Server to access the image at it’s present location.
Note: The present location may be the original
location of the Image or in the Project’s media
directory, depending on what was selected
when the Image Path was entered.
(See the Image Tab, Image Path section of this Manual)
Note: Not applicable for Sneakernet.
Checked: Selecting the Migrate image
content on publish option will place a
copy of the image on the Server.
This is typically the Noventri Suite
Project’s directory located on the
computer where the Server is installed.
Advantages:
− No need to worry about the original
Image path or the Project’s media
directory being available.
− The Image will not be accidentally
modified or moved.
Unchecked: The Image will be accessed by
the Server at it’s current location. The
Image will not be copied to the Server
with the Project when it is published.
The Image location must remain
available or the Image will not be
displayed.
Advantages:
− Change the image at its source (as
long as the file name remains the same)
without having to republish the Project.
− Saves space by not having large
images in multiple locations.
Noventri Suite - Design Manual
SF200-0162-01 REV 04
Diane Smith – 10/22/13
Page 37 of 74
7.2.4 Crop Tab
• Image Dimensions – Displays the original dimensions of the Image.
• Hashed Border - Within the Properties panel is a small view of
the Image that has a Hashed Border around
it. Select any hashed edge of the image to drag
the border to it’s desired position. Selecting
inside the hashed border lets the entire hashed
border move to the desired location.
Noventri Suite - Design Manual
SF200-0162-01 REV 04
Diane Smith – 10/22/13
Page 38 of 74
• Crop Rectangle – Displays and allows adjustments to the displayed
area of the Image.
Width/Height – The new desired dimension of the
image. This size can be adjusted by
using the up/down arrows or by typing
in the new dimension.
X/Y – The new desired X/Y coordinates for the mage.
(i.e. what part of the original image that makes
up the new image)
This location can be adjusted by using the
up/down arrows or by typing in the new
coordinate.
Note: The top left corner of the original image
size is always X = 0 and Y = 0.
Fit to Image – Selecting this will reset the image’s
new size and location back to the image’s
original size and location.
Noventri Suite - Design Manual
SF200-0162-01 REV 04
Diane Smith – 10/22/13
Page 39 of 74
7.2.5 Positioning Tab
Note: This same Positioning Tab panel is used for all
Region types (Image, Text, and Clock).
• Lock Position - When the Content location is correct
within the Region and the Region location is correct
within the Page, the position can be Locked by
selecting the Lock Position checkbox, go to Edit >
Lock Position, or right-click on the Region and
select Lock Position, to prevent it from accidentally
being moved.
• Region Location - Can position the top left corner of the
Region exactly where desired by entering the X and
Y coordinates. Use the ruler bars in the
Composition panel as reference.
Noventri Suite - Design Manual
SF200-0162-01 REV 04
Diane Smith – 10/22/13
Page 40 of 74
• Region Size - Will modify the height and width of the
Region. The Region size should not be larger than
the Page resolution.
• CONTENT - Allows the Content to be justified within the
Region by clicking one of the black boxes.
• REGION - Allows the Region inside the Page to be
justified by selecting one of the represented icons.
8.
Text Region
8.1 Add Text Region
8.1.1 To add Text to the Page, click the Text button located
in the Toolbar row of buttons , go to Edit > Add Text
Region, or right-click in the Composition panel and choose
Add Text Region. Now move the cursor to the
Composition panel. Notice that the cursor changes to
crosshairs. Using the mouse, click and drag an area for the
text to go into. Do not be concerned about the shape and
size of the area at this time, it will be adjusted later.
Noventri Suite - Design Manual
SF200-0162-01 REV 04
Diane Smith – 10/22/13
Page 41 of 74
8.2 Text Region Properties
8.2.1 Type the desired Region Name for the Region.
8.2.2 To have the Text Region stretch across the entire
Page, select the Fit to Page button. Other positioning
options are available and will be discussed later under the
Positioning tab.
Noventri Suite - Design Manual
SF200-0162-01 REV 04
Diane Smith – 10/22/13
Page 42 of 74
8.2.3 Text Tab
Note: To view the entire Properties panel it may be
necessary to adjust the panel size by grabbing
the top or right separating bar with the mouse
and dragging it.
• Text File - In general this option allows a .txt file to be
selected that contains a list of Text messages.
However, depending on whether or not Dynamic
Pages are being used, displayed results can vary.
Noventri Suite - Design Manual
SF200-0162-01 REV 04
Diane Smith – 10/22/13
Page 43 of 74
With Dynamic Page Creation....
The Text File option is best used only with Dynamic
Page Creation (when the Page is displayed, the Text
messages in the Text File will each be displayed
before going to the next Page).
(See the Dynamic Pages Manual)
Note: Not applicable for Sneakernet.
Without Dynamic Page Creation....
The Text File option without Dynamic Page
Creation has very limited use.
a.
First of all Randomize must be selected for the
Text message to ever change to another one in
the list.
b.
Initially a random Text message from the list
will be displayed, and that same image will
continue to be displayed every time for that
Page.
c.
The only way to have that random Text
message replaced with a different random Text
message from the list is to force the content to
be regenerated.
This can be accomplished by...
- Making any change to the Text List .txt file.
- Adding a Database text Region to the Page.
(every time the Database updates, a new
Random Text message will be selected)
(See the Data Base Manual – coming soon)
d.
Keep in mind that the Text message selection
is always Random and therefore the new Text
message may be the same Text message that
was just being displayed.
Noventri Suite - Design Manual
SF200-0162-01 REV 04
Diane Smith – 10/22/13
Page 44 of 74
Text File -
For this option set up a text file (.txt) that
contains a list of the Text messages to
be displayed. Then specify the path to
this text file for the Text File Path.
Example File:
Text File Line 1
Text File Line 2
Text File Line 3\nText File Line 4
Note: \n can be used for a line return
Randomize - This must be selected if Dynamic
Pages is not being used and changing
from one Text message in the
Text File list to another is desired.
Database - This allows Text messages to be pulled
from a Database.
(See the Data Base Manual – coming soon)
• Text/ Text File Path -
Text typed in the Text box will show up
in the Region. For the Text File Path,
select the Browse button and locate the
.txt Text File that has already been
created.
Note: \n can be used for a line return within the
text message.
Noventri Suite - Design Manual
SF200-0162-01 REV 04
Diane Smith – 10/22/13
Page 45 of 74
• Style -
Choose from Bold, Italic, or Underline font style by
clicking the desired checkbox.
• Crop -
Can be used to trim out the text that exceeds the Text
Region borders.
• Word Wrap - Lets the typed text wrap within the Region’s border
so that the Text massage fits within the Region.
• Font -
Lets a Font be selected from the currently installed
Windows fonts. If extra fonts are downloaded and
installed, make sure they also get installed on the
computer where the server will be running, or they will
not be displayed.
• Direction - Coming soon – For languages that need to be
displayed from right to left.
• Size -
Allows the font size of the text to be selected.
There are pre selected font sizes between 6 – 72 pts,
but other sizes can be specified by typing it into the
Size textbox.
• Custom Tracking – Allows the spacing between characters to be
adjusted. This can be done using the up/down arrows or by
typing in the number. Negative numbers allow the characters
to overlap or even reverse in order.
• Custom Leading – Allows the spacing between lines in the Text message
to be adjusted. This can be done using the up/down arrows or
by typing in the number.
• Text Color - Clicking the color box will display the Color palette.
Select a color and click OK.
Noventri Suite - Design Manual
SF200-0162-01 REV 04
Diane Smith – 10/22/13
Page 46 of 74
• Background Color - Clicking the color square will display the
Color palette. Select a new color for the transparent
areas in the Image. This will allow the selected color
to fill the background of the Region.
8.2.4 Text Effects Tab
• Shadow - If the checkbox is checked, the text in the
Region will have a shadow applied to it .
• NW N NE W E SW S SE - Positions the text by selecting
one of the radio buttons.
• X Offset - Will change the up/down offset amount of the
shadow.
Noventri Suite - Design Manual
SF200-0162-01 REV 04
Diane Smith – 10/22/13
Page 47 of 74
• Y Offset - Will change the left/right offset amount of the
shadow.
• Shadow Color - Can be changed by clicking the Color
box. This will open the Color palette. Select color,
and click OK to apply.
8.2.5 Positioning Tab (text)
Note: The same Positioning Tab panel is used for all
Region types (Image, Text, and Clock).
(see the Positioning Tab instructions in Image Tab
section of this Manual)
9.
Clock Region
9.1 Add Clock Region
9.1.1 To add a Clock to the Page, click the Clock button located
in the Toolbar row of buttons, go to Edit > Add Clock
Region, or right-click in the Composition panel and choose
Add Clock Region. Now move the cursor to the
Composition panel. Notice that the cursor changes to
crosshairs. Using the mouse, click and drag an area for the
clock to go into. Do not be concerned about the shape and
size of the area at this time, it will be adjusted later.
Noventri Suite - Design Manual
SF200-0162-01 REV 04
Diane Smith – 10/22/13
Page 48 of 74
9.2 Clock Region Properties
9.2.1 Type the desired Region Name for the Region.
9.2.2 The Text Region can be to stretch across the entire
Page, by selecting the Fit to Page button. Other positioning
options are available and will be discussed later under the
Positioning tab.
9.2.3 Clock Tab
Noventri Suite - Design Manual
SF200-0162-01 REV 04
Diane Smith – 10/22/13
Page 49 of 74
Note: To view the entire Properties panel it may be
necessary to adjust the panel size by grabbing the top
or right separating bar with the mouse and dragging it.
• Time Format - Lets a format be selected from the choices
available in the dropdown menu.
• Use the Player’s time zone - This checkbox allows a time
zone to be chosen for the Clock Region being
used.
Checked: This will use the player’s time zone, which
can be set in the Manage tab by selecting a
player, then clicking Edit Timezone button on
the right side panel.
Advantages:
- If a player is located across different time
zone areas, they can display the local time that
was set for each individual player.
Unchecked: This will make the Edit Timezone
button appear in the Clock Properties.
Choose a Timezone from the dropdown
menu and check the Daylight Savings Time
checkbox if it applies.
Advantages:
- The Clock Region will display the time
zone that has been selected here rather than
the time zone set for each individual player.
• Font - Select a Font from the currently installed Windows
fonts. If extra fonts are downloaded and installed,
make sure they get installed on the computer where
the Server will be running or they will not be
displayed.
Noventri Suite - Design Manual
SF200-0162-01 REV 04
Diane Smith – 10/22/13
Page 50 of 74
• Size - Allows the font size of the text to be selected.
Selectable font sizes are 6 - 72 pts, but other sizes
can be specified by typing it into the Size textbox.
• Style - Choose from the Bold or Italic font style by clicking
the desired checkbox.
• Text Color - Clicking the color box will display the Color
palette. Select a color for the text and click OK.
9.2.4 Text Effects Tab
• Shadow - If the checkbox is checked, the clock in the
Region will have a shadow applied to it .
• NW N NE W E SW S SE - Positions the text by selecting
one of the radio buttons.
• X Offset - Will change the up/down offset amount of the
shadow.
• Y Offset - Will change the left/right offset amount of the
shadow.
• Shadow Color - Can be changed by clicking the Color
box. This will open the Color palette. Select a color,
and click OK to apply.
Noventri Suite - Design Manual
SF200-0162-01 REV 04
Diane Smith – 10/22/13
Page 51 of 74
9.2.5 Positioning Tab
Note: The same Positioning Tab panel is used for all
Region types (Image, Text, and Clock).
(see the Positioning Tab instructions in Image Tab
section of this Manual)
10. Sequence
10.1 Edit Sequence Tab
Noventri Suite - Design Manual
SF200-0162-01 REV 04
Diane Smith – 10/22/13
Page 52 of 74
10.1.1 The Edit Sequence tab screen is separated into four panels.
• Pages/Sequences - Is divided into two sections, the left
side contains the Sequence names and the right side
contains thumbnails of all the Pages (created in the
Edit Page tab) for this Project.
• Sequence Entry Properties - Shows the Properties for the
Timeline entries. Depending on what entry is selected.
• Preview - This is a larger preview panel where the Pages can
be seen as they will appear when Published. To see this
large preview, click on the Page thumbnail to add it to the
Timeline. When the color block in the Timeline is
selected or the Play button is selected, the Pages will
appear in the Preview panel.
• Timeline - Shows the Pages that have been added to the
Sequence in the order they will be displayed. Play
back Duration time, the Transition between Pages,
and Preview control is also configured in this area.
Noventri Suite - Design Manual
SF200-0162-01 REV 04
Diane Smith – 10/22/13
Page 53 of 74
10.2 Add Sequence
Note: When the Sequence tab is first being viewed, a blank
Sequence called Sequence01 is automatically
created.
10.2.1 The Edit Sequence sub panel will display any Sequences
created in the Project. New Sequences will be added in
the form of Sequence##.
10.2.2 To add a new Sequence, click the Sequence button located
in the Toolbar row of buttons or go to Edit > Add
Sequence.
10.2.3 To change the name of the Sequence, select it in the sub
panel with the mouse and then left-click again to edit the
Sequence name.
Noventri Suite - Design Manual
SF200-0162-01 REV 04
Diane Smith – 10/22/13
Page 54 of 74
10.3 Delete Sequence
10.3.1 Sequences can be deleted by selecting the Sequence then
going to Edit > Delete or by using the Delete key on the
keyboard.
10.4 Creating a Sequence
10.4.1 Sequences are created with Pages from a single Project.
The order of the Pages in the Sequence determine the
order they are to be viewed. The Pages for the Project will
be listed in the Pages sub panel with a color representing
each one.
Noventri Suite - Design Manual
SF200-0162-01 REV 04
Diane Smith – 10/22/13
Page 55 of 74
10.4.2 Add a Page
• To add a Page to the Sequence, click on the Page
thumbnail in the Pages sub panel. It will be added to the
Sequence by appearing in the Timeline panel as a color
block (its representative color).
• The width of the color block is the Duration of time that
the Page will be displayed. This can be adjusted by selecting
the color block in the Timeline, and dragging the
right side vertical border to the length of time desired.
• To add a Page between Entries already in the Timeline,
select the Entry in the Timeline (just before where the new
Entry should be entered). Then click the Page thumbnail of
the Page to be added in Pages sub panel list. The Page will
be added after the currently selected Sequence Entry.
10.5 Timeline Navigation
10.5.1 View Pages
• To see a Page that has been added to the Sequence, click
on the Page color block in the Timeline and it will be visible
in the Preview panel.
Noventri Suite - Design Manual
SF200-0162-01 REV 04
Diane Smith – 10/22/13
Page 56 of 74
• To scroll through the Pages that are in the Sequence,
select the Forward / Back buttons located under the
Timeline panel.
Note: If a Dynamic Page is used, all of it’s Rotations will be
cycled through.
(see the Dynamic Pages manual)
10.5.2 Duration and Position
• Total Sequence Duration: - Is the total time Sequence
will be played before it loops to the beginning and
starts over again.
• Playback Position - Shows the time location of the marker
to help determine it’s location within the Timeline.
10.5.3 Scroll –
The Timeline Scroll bar located under the
Timeline allows large Sequences to be easily
moved into the Timeline viewing area.
10.5.4 Zoom -
The Timeline Zoom bar located under the
Transitions allows large Sequences to be
easily viewed in their entirety or zoomed into
so that only the entries being worked on are in
the Timeline viewing area.
Noventri Suite - Design Manual
SF200-0162-01 REV 04
Diane Smith – 10/22/13
Page 57 of 74
10.6 Sequence Properties
10.6.1 Sequence Entry Properties - Shows the Properties for the
Timeline entry that is selected.
10.6.1.1
Page Duration -
Shows the time duration for the
Page that is selected in the
Sequence Timeline.
10.6.1.2
Set Play Boundaries – Allows a Sequence entry to
be displayed only for a specific
span of dates/times.
10.6.1.3
Start Date/Time – Play Boundaries setting for
when the selected Sequence
entry will begin to play as part of
the Sequence.
10.6.1.4
Expiration Date/Time – Play Boundaries setting
for when the selected
Sequence entry will stop being
played as part of the Sequence.
Noventri Suite - Design Manual
SF200-0162-01 REV 04
Diane Smith – 10/22/13
Page 58 of 74
10.6.1.5
Delete Entry –
If this option is not selected.
Once the selected Sequence
entry is past it’s entered Play
Boundaries, it will remain in the
Sequence for reference.
If this option is selected.
Once the selected Sequence
Entry is past it’s entered Play
Boundaries, it will remain
visible in the Sequence for 27
hours. However the next time
the Project is opened (after the
27 hours), the Sequence entry
will be automatically deleted
from the Sequence.
10.6.1.6
Transition Duration – This option allows the
Duration of the Transition for
the selected Sequence entry to
be controlled. It can be set
anywhere between .25-5 seconds.
Note: This option is only for SF-200 Players.
Noventri Suite - Design Manual
SF200-0162-01 REV 04
Diane Smith – 10/22/13
Page 59 of 74
10.7 Sequence Transitions
10.7.1 The small squares between the Page color blocks in the
Timeline represent the Page Transitions.
10.7.2 The default Transition is the Snap and is represented by
the small square that is dark.
10.7.3 If a computer is being used as the Player, the default Snap
Transition is the only Transition available.
10.7.4 If an Eco-Series line of Noventri Players is being used
any of the Transitions available in the Transitions panel
can be used.
10.7.5 Select the Page color block to change the Transition that
will occur between that Page and the next Page. Once the
Page color block is selected, select a Transition icon from
the Transitions panel.
Noventri Suite - Design Manual
SF200-0162-01 REV 04
Diane Smith – 10/22/13
Page 60 of 74
10.7.6 Available Transitions
Note: When Previewing the Sequence in the Preview panel
or on the Preview monitor, all Transitions will be
shown as Snap no matter what has been selected.
Selected Transitions will only be visible when driven
by an Eco-Series Player.
• Diagonal Bars
• Wipe
• Vertical Blinds
• Tile
• Dissolve
• Snap (default)
Note: The Dissolve for the SF100 is a dramatic Dissolve
effect while the Dissolve for the SF200 is a very
smooth Dissolve effect.
10.7.7 To zoom in or out on the Timeline view, use the zoom
control adjuster located below the Transition panel.
Noventri Suite - Design Manual
SF200-0162-01 REV 04
Diane Smith – 10/22/13
Page 61 of 74
10.8 Play Sequence on Preview Panel
10.8.1 To play the Sequence in real time, select the Play button
located under the Timeline panel.
10.8.2 The Preview panel will loop through the Sequence until
pause is selected. To continue playing after stopping, select
pause again.
10.8.3 When playing the Sequence, forward and backward
selection between Pages can be done by selecting the
Forward or Back buttons.
10.8.4 A blue marker above the color blocks moves as the Preview
is playing. It can also be used to move to a certain point on
the Timeline.
11. Preview Monitor
Note1:
When using Preview Mode, Transitions will not be
visible and Data Base changes will not be reflected.
Note2:
Selecting this option will temporarily prevent any
changes from being made to the Project but will allow
the Pages to be viewed in actual size on the monitor.
Noventri Suite - Design Manual
SF200-0162-01 REV 04
Diane Smith – 10/22/13
Page 62 of 74
11.1 Enable Preview Mode
11.1.1 To turn the Preview mode on, go to Edit > Options, or rightclick the mouse in the Composition panel and choose
Options, then check the Monitor to use for Preview
checkbox.
11.1.2 Once the Monitor to use for Preview is enabled, choose
a monitor to preview it on. The dropdown menu will show all
the monitors that Windows has available. Choose one, then
select the Apply button.
Important: Once the Preview Monitor is being used, the only
way to stop the Preview is to right-click the mouse
and choose Hide or Disable.
11.2 Start the Preview
11.2.1 While In Edit Page
• To preview a Page, select the Page to preview in the Page
sub panel or click anywhere on the Page in the
Composition. A preview of the Page will now be displayed
on the monitor selected.
Noventri Suite - Design Manual
SF200-0162-01 REV 04
Diane Smith – 10/22/13
Page 63 of 74
11.2.2 While In Edit Sequence
• To preview the Sequence, select a color block from the
Timeline by clicking on it or select Play button below to play
through the whole Sequence. A preview of the Page will
now be displayed on the monitor selected.
11.3 Hide Preview
11.3.1 To hide Preview mode, right-click the mouse and choose
Hide. The Suite will still remain in Preview mode so another
Page can be selected to preview.
11.4 Disable Preview
11.4.1 To disable Preview mode, right-click the mouse and choose
Disable. To turn Preview mode on again, go to Edit >
Options and enable it again.
Noventri Suite - Design Manual
SF200-0162-01 REV 04
Diane Smith – 10/22/13
Page 64 of 74
11.5 Scale Preview
11.5.1 If the monitor being used for the Previews is a different
resolution than the resolution that the Project was created
in, the Preview can be Scaled to fit the monitor better. To
scale or unscale the Pages while previewing them, rightclick the mouse and choose Scale.
Note: If the Pages were created at a resolution smaller than
the preview monitor’s resolution, Scaling Preview may
result in poor quality images.
12. Monitor
12.1 Auto Adjust
12.1.1 Most monitors have an Auto Adjust button or setting that will
automatically adjust the screen to fit the displayed image.
12.1.2 If a monitor is not displaying correctly, it most likely needs to
be adjusted. Consult the monitor’s User Manual for
instructions.
12.1.3 In some cases, the monitor’s Auto Adjust will not line up an
image properly. This is possibly due to an image that is too
dark or contains too much black area around the outside.
For best results, use Auto Adjust with a picture that has
some kind of a border around the outside of the image for
reference.
Noventri Suite - Design Manual
SF200-0162-01 REV 04
Diane Smith – 10/22/13
Page 65 of 74
12.1.4 Once the monitor is adjusted to an image at a specific
resolution, all subsequent images at that same resolution will
also be lined up.
Note: Noventri can provide a Project created for the
specific resolution of the monitor being used. This
Project contains several Images at each Resolution,
specifically designed to be recognized by monitors,
and used for adjustments.
Noventri Suite - Design Manual
SF200-0162-01 REV 04
Diane Smith – 10/22/13
Page 66 of 74
13. Login to Noventri Server
13.1 Overview
13.1.1 The Noventri Server is accessible within the Noventri Suite
Software. When a connection to the Noventri Server needs
to be established, the following login screen will be
displayed.
Note: Not applicable for Sneakernet.
13.1.2 If the Noventri Server is running on the same computer as
the Noventri Suite, use “localhost” as the Host.
13.1.3 If the Noventri Server is running on a different computer
than the Noventri Suite, use the computer name or IP
address as the Host.
13.1.4 The default administrator Username is “Admin”.
(case sensitive)
13.1.5 The default Password is “noventri”. (case sensitive)
13.1.6 Click the Remember Password check box to have the
Password filled in automatically at the next login.
Noventri Suite - Design Manual
SF200-0162-01 REV 04
Diane Smith – 10/22/13
Page 67 of 74
13.1.7 Select OK to connect to the Noventri Server.
Note: If the Noventri Server version is newer than the version of
Noventri Suite, an error message will be displayed stating that the
Noventri Suite is too old and giving the option to update.
13.1.8 Select Yes to update the Noventri Suite software. This will
enable the ability to connect to this version of the Noventri
Server. The Noventri Suite update file will then be
download to the computer.
13.1.9 Once the Noventri Suite update file has been
downloaded, select Yes in the Update Needed window to
Install the update.
Noventri Suite - Design Manual
SF200-0162-01 REV 04
Diane Smith – 10/22/13
Page 68 of 74
13.1.10 Select Yes to Install the Noventri Suite update.
Note: Once this Noventri Suite update is installed, the Noventri
Suite will no longer be able to connect to older revision
Servers.
Select No to return to the current Suite version.
When ever Noventri Suite is started from now on this option
to update it will be shown.
13.1.11 Follow the install instructions.
(see Install Noventri Suite and Noventri Sever section of this manual)
14. Publishing
14.1 Overview
14.1.1 After a Project is created with a Sequence it is ready to be
Published.
14.1.2 A Project can be Published either to the Server or directly to
a USB drive for Sneakernet operation.
14.1.3 Before publishing the Project, verify the following:
•
The Project is designed at the appropriate Resolution for
the monitor it will be displayed on, and the Player
Resolution matches the Project.
•
A Sequence has been created with the Timeline containing
the Pages to be displayed, and the duration is set for how
long each Page will play for.
•
Use the Preview in Edit Sequence to make sure the
Sequence plays as desired. (Only the default snap
transitions will be used in preview)
Noventri Suite - Design Manual
SF200-0162-01 REV 04
Diane Smith – 10/22/13
Page 69 of 74
14.2 Publish Project (Server)
Note1:
For a Project to play a Sequence must be
created before it can be Published.
(see the Sequence section of this Manual)
Note2:
After Publishing a Project a Schedule then
has to be created before it can play.
(see the Schedule Manual)
14.2.1 The Noventri Suite will need to have access to the
Noventri Server software (installed and running on the
same computer or on another computer) to be able to
Publish.
14.2.2 After creating a Project, it will need to be sent to the
Noventri Server using the Publish button.
14.2.3 Go to Publish > Publish Project to Server to send the
finalized content to Noventri Server.
Note: This feature is only for the Noventri Eco-Series line of Players.
14.2.4 If the Noventri Server is not already connected to, a
Noventri Login Screen window will open.
(see Login to Noventri Server section of this manual)
Noventri Suite - Design Manual
SF200-0162-01 REV 04
Diane Smith – 10/22/13
Page 70 of 74
14.2.3 The Project has now been Published (copied) to the
location specified and is available for the Noventri
Server software to relay to the Noventri Eco-Series
Players.
14.3 Publish Project (USB Drive) (Sneakernet)
Note: For a Project to play a Sequence must be created
before it can be Publish.
14.3.1 Remove the USB Drive from the Noventri Eco-Series
player and insert it into an available USB connector on the
computer where the Suite is installed.
14.3.2 Select Publish > Publish to Thumb Drive.
14.3.3 Safely remove the USB Drive from the computer and insert
it back into the Noventri Eco-Series Player.
Noventri Suite - Design Manual
SF200-0162-01 REV 04
Diane Smith – 10/22/13
Page 71 of 74
15. Server
15.1 Overview
15.1.1 Server allows Projects that have already been Published
(now located on the Server) to be accessed.
Note: Not applicable for Sneakernet.
15.2 Server Connection
15.2.1 Select Server > Projects on Server.
15.2.2 If the Noventri Suite is not already connected to the
Noventri Server, the Noventri Login Screen window will
be displayed.
(see Login to Noventri Server section of this manual)
15.2.3 The Projects on Server window will now be displayed.
15.2.3.1
This window will show all the Projects that
have been Published and are located on the
Noventri Server.
Noventri Suite - Design Manual
SF200-0162-01 REV 04
Diane Smith – 10/22/13
Page 72 of 74
15.2.3.2
Download allows a recreation (copy) of the
Published Project to a chosen location.
15.2.3.3
Delete allows a Published Project to be
deleted off the Server.
15.3 Disconnect
15.3.1 Disconnect allows the Noventri Suite to disconnect from the
Noventri Server that it is currently communicating with.
15.3.2 Select Server > Disconnect.
Noventri Suite - Design Manual
SF200-0162-01 REV 04
Diane Smith – 10/22/13
Page 73 of 74
NOVENTRI
301-790-0103 | www.noventri.com
20940 Twin Springs Dr., Smithsburg, MD 21783 USA
© Copyright 2010 Noventri. All rights reserved.
Noventri Suite - Design Manual
SF200-0162-01 REV 04
Diane Smith – 10/22/13
Page 74 of 74