1
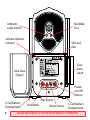
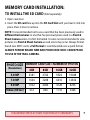
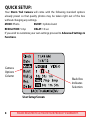
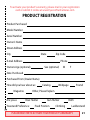
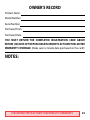
Model EC1500
Model EC1500
User's Manual
July 2015. Published by Premier Outdoor Equipment, LLC, Windom, Minnesota.
© 2015 Premier Outdoor Equipment, LLC All rights reserved.
2
PLEASE REGISTER TO ACTIVATE YOUR PRODUCT’S WARRANTY.
Camera Diagram.........................................................4
Items Required for Startup...................................5
Battery Installation................................................6
Memory Card Installation.....................................7
Quick Setup...................................................................8
Advanced Settings & Functions...........................9
viewing screen information & functions......12
storm Mounting & Field Setup............................14
CAMERA CARE ..............................................................16
Trouble Shooting....................................................17
Warranty Information.........................................20
Product Registration Card.................................21
WARNING! Prolonged exposure from looking directly into any infrared
light could cause cataracts or permanent retinal damage. Do not look directly
into the camera during test mode! Failure to follow this warning may cause
serious injury or blindness!
WARNING! Do not expose camera interior components, batteries, or SD
card to rain or water. Make sure camera and hands are completely dry before
handling. Failure to follow this warning may result in serious damage to the
camera and/or its parts, personal electrical shock or death!
WARNING! Only batteries as designated in this manual should be used.
Failure to follow this warning may result in leaking batteries, serious damage
to the camera, and personal injury or death!
PLEASE REGISTER TO ACTIVATE YOUR PRODUCT’S WARRANTY.
3
Red Walk
Test
Ambient
Light Sensor
Camera Options
Column
SD Card
Slot
Case
Door
Latch
Case Door
(Open)
Power
On/Off
Button
C-Cell Battery
Comparment
4
Plus Arrow
Set Button
Minus Arrow
C-Cell Battery
Comparment
PLEASE REGISTER TO ACTIVATE YOUR PRODUCT’S WARRANTY.
Items Required for Startup:
• 6 C-Cell Alkaline Batteries (Sold separately)
• SDHC Storage Card (up to 32GB; 4GB or higher recommended)
(Sold separately)
NOTE: Eyecon™ Trail Cameras can accept SD cards up to 32GB, but testing
shows that maximum performance is obtained at 16GB.
• 1 External SD memory card reader for viewing photos/videos.
(Sold separately)
• OPTIONAL: 1 Model ECA100 Extenda-Life rechargeable lithium battery
pack. (Sold separately)
NOTE: Your Storm Trail Camera is designed with a dual power supply.
The camera will operate using six C size alkaline batteries or the ECA100
Extenda-Life battery pack, or a combination of both. If both alkaline and
the Extenda-Life pack are used together the camera will run on the external
Extenda-Life pack until depleted and then automatically switch to the
internal alkaline C batteries. It will always run on the external pack first when
both battery sources are installed in the camera.
To see which battery source the camera is using, the battery indicator is
located on the startup screen. If there is an L on the left side of the battery
indicator this means the camera is running on the ECA100 Extenda-Life
Lithium pack. If a C has replaced the L this means the camera has switched
over to the internal alkaline C batteries and you should remove the ExtendaLife pack for recharging.
PLEASE REGISTER TO ACTIVATE YOUR PRODUCT’S WARRANTY.
5
Battery Installation:
if using C-Cell Batteries
1.Turn battery door lock to open position to release door located on the
bottom of the camera.
2. Insert (3) C-cell batteries, negative (–) side inserted first into one side.
3. Close the battery door and position lock to locked position.
4. Repeat on opposite side.
If using Eyecon™ Extenda-Life Battery Pack
1. Remove plastic plug on the back side of the camera. NOTE: Save this plug
for future use. It should ALWAYS be in position when the Extenda-Life
Battery Pack is not being used.
2.Insert Extenda-Life Battery Pack by sliding it into position until it “clicks”
into place.
6
PLEASE REGISTER TO ACTIVATE YOUR PRODUCT’S WARRANTY.
Memory Card Installation:
To install the SD card (Sold separately)
1. Open case door.
2. Insert the SD card face up into the SD Card Slot until you hear it click into
place. Press it once to remove.
NOTE: It is recommended not to use a card that has been previously used in
different trail cameras or one that has previously been used in a Point &
Shoot Camera unless it is first formatted. It is also not recommended to view
pictures in a Point & Shoot Camera as read errors may occur. Always format
brand new SDHC cards; a Full Format is recommended over a quick format.
Always format brand new and prior used SDHC cards prior
to use in the trail camera.
PHOTO SIZE
MEMORY CARD SIZE = NUMBER OF PHOTOS
(Resolution)
4GB
8GB
16GB
32GB
5.0 MP
2381
4762
9524
19048
7.0 MP
1604
3208
6416
12832
9.0 MP
1032
2064
4128
8256
Video (30 Sec)
433
866
1733
3466
PLEASE REGISTER TO ACTIVATE YOUR PRODUCT’S WARRANTY.
7
Quick Setup:
Your Storm Trail Camera will come with the following standard options
already preset so that quality photos may be taken right out of the box
without changing any settings.
MODE: Photo
BURST: 3 photo-burst
RESOLUTION: 5 mp
DELAY: 10 sec
If you wish to customize your own settings proceed to Advanced Settings &
Functions.
Camera
Options
Column
Black Box
Indicates
Selection
User Setup Screen
8
PLEASE REGISTER TO ACTIVATE YOUR PRODUCT’S WARRANTY.
Advanced Settings & Functions:
Press and quickly release the power button to activate the camera and view
the full color user setup screen.
You will see two options on the screen: “Camera Setup” and “View Photos,”
with one of these flashing. Press either the + or – arrows until “Camera Setup”
is flashing. Next press the SET button to enter the camera setup page to allow
you to customize your own settings different from the default preset options
CLOCK: This will set the Time, Date and Year that will be stamped onto the
bottom of your photos.
CLOCK: Use either the + or – arrows and scroll up until the “Clock” has a
black box around it. Press the SET button until the “Hour” setting turns red.
Use the + or – arrows again to set the correct Hour, press the SET button
and move on to get the “Minutes” to turn red. Arrow up or down the correct
Minutes and hit SET until the “AM” OR “PM” turns red. Use either the + or –
arrows to change the setting. Press the SET button and you have now locked
in all of your clock settings and returned to the camera options column.
To set the DATE: Use the + or – arrows and scroll down until a black box
appears around “Date.”
To set the MONTH: Press the SET button until the “Month” appears in red.
Use the + or – arrows to change the Month setting.
To set the DAY: Press the set button again until you see “Day” appear in red.
Use the + or – arrows to change the Day setting.
To set the YEAR: Press the set button until you see “Year” appear in red.
Use the + or – arrows to change the Year setting. Press the SET button and
you have now locked in all of your date settings and returned to the camera
options column.
PLEASE REGISTER TO ACTIVATE YOUR PRODUCT’S WARRANTY.
9
MODE: Mode selects whether you would like the camera to take still photos
or take video clips. Options are: Photo (still) or Video.
To set the MODE: Scroll down by pressing either the + or – arrows until a
black box appears around “Mode.” Press the set button until either Photo
or Video appears in a white box with black letters. Press the + or – arrows to
select either the Photo or Video setting. Press the set button again to lock
in the setting that would switch back to the black box with white letters. You
have now locked in your camera Mode setting and returned to the camera
option column.
BURST: Burst selects how many photo images you would like the camera to
take in a row before set trigger delay kicks in. Options are: 1, 3, or 5.
To set the BURST: Use the + or – arrows to scroll down until the “Burst”
appears with a black box around it. Press the set button until one of the
three Burst options changes to a white box with black letters. Use the + or –
buttons to select the desired Burst setting. Press the set button again with
your choice selected with a black box and white letters. You have now locked
in your “Burst” setting and have returned to the camera options column.
VID LG: This setting selects the length you would like each video to be.
Options are: 10 seconds, 30 seconds or 1min.
To set the VIDEO LENGTH: Use the + or – arrows to scroll down until a black
box appears around “Video LG.” Press the set button until one of the three
Video Length options changes to a white box with black letters. Use the + or
– arrows to select the desired Video LG setting. Press the set button until the
setting you have selected switches back to the black box with white letters.
You have now locked in your Video Lg setting and have returned to the
camera options column.
10
PLEASE REGISTER TO ACTIVATE YOUR PRODUCT’S WARRANTY.
RES: This setting selects the resolution at which you would like the camera
to take the pictures. A higher resolution photo requires more storage. Options
are: 5MP, 7MP, or 9MP.
To set the RESOLUTION: Use the + or – arrows to scroll down until a black
box appears around the photo “Resolution” setting. Press the set button
until one of the three Res options changes to a white box with black letters.
Use the + or – arrows to select the desired Res setting. Press the set button
again until the setting you selected switches back to the black box with white
letters. You have now locked in your Res setting and have returned to the
camera options column.
DELAY: This setting selects the trigger delay at which you want to run your
camera. This is the amount of time between each set of bursts. Options are: 10
seconds, 30 seconds, 1 minute or 5 minutes.
To set the DELAY: Use the + or – arrows to scroll down until a black box
appears around the activation “Delay” setting. Press the set button until one
of the three Delay setting changes to a white box with black letters. Use the
+ or – arrows to select the desired Delay setting. Press the set button until
the setting you selected switches back to the black box with white letters.
You have now locked in your Delay setting and have returned to the camera
options column.
To exit the Camera Setup Menu, use either the + or – arrows until “Back to
Main Menu” has a black box around it. Press the SET button to return to the
original full color user setup screen. Next you will see two options to choose
from. Press either the + or – arrows until “View Photos” starts to flash. Then
press the SET button to enter and view your photos. NOTE: If the camera has
not taken any photos or videos, a screen will appear that says “No Image.”
PLEASE REGISTER TO ACTIVATE YOUR PRODUCT’S WARRANTY.
11
Viewing Screen Information & Functions
VIEW IMAGES AND VIDEO: In the bottom right hand corner of the
viewing screen there will be a black box which will display the total number of
still images or videos on the SD card. NOTE: In the upper right hand corner of
the screen there is an icon that represents either Photo or Video.
To scroll through your images or videos, simply press either the + or – arrows
depending on where you want to start. If you want to start from the first
image taken, press the – arrow. If you want to scroll backwards from the last
image taken to the first, then press the + arrow.
If you have a combination of stills and videos, a “Video icon” will appear on the
left side of the screen each time a video is selected.
Lock Current File: To save or lock an image or video that is currently
showing on the screen, press the SET button. Next, scroll down using
either of the + or – arrows until “Lock Current File” turns blue. Press the SET
button again and a “Lock Icon” will appear on the photo in the upper right
hand corner. This photo will stay protected and cannot be deleted until
you unlock it.
Delete Current File: To delete the current photo or video that you are
viewing, press the SET button. Next, scroll down using either of the + or –
arrows until “Delete Current File” turns blue. Press the SET button again to
delete the current photo. NOTE: Once you delete a photo or video, it is gone
for good and cannot be retrieved.
12
PLEASE REGISTER TO ACTIVATE YOUR PRODUCT’S WARRANTY.
Delete All Files: Press the SET button and scroll down using either of the +
or – arrows until “Delete All Files” turns blue. Press the SET button again for
another screen to appear. You will be asked, “Confirm Deleting All Files.” At this
point you decide either to delete or cancel.
If you choose to cancel, use either of the + or – arrows until “NO” turns blue.
Press the SET button again to cancel the delete process and bring you back to
the main viewing screen and current photo.
If you choose to continue with the delete process, use either of the + or –
arrows until the “YES” turns blue. Press the SET button again to delete all of
the photos and videos that were not previously locked.
NOTE: Any photo or video that is locked cannot be deleted. Any photos or
videos that were deleted cannot be retrieved and are gone for good. Make
sure “YES” is what you want to do.
Exit Photo Viewer: Press the SET button and scroll down using either of the +
or – arrows until “Exit Photo Viewer” turns blue. Press the SET button again to
exit Photo Viewer and return to the full color user setup screen.
PLEASE REGISTER TO ACTIVATE YOUR PRODUCT’S WARRANTY.
13
STORM Mounting & Field Setup
The Storm comes with a 6 ft nylon mounting strap which allows for quick and
easy mounting. The camera back is unique in that it has 12 vertical large bark
biters and 5 different adjustment slots. This allows for several strap placement
options or another strap can be added depending on your application. Either
way, you can be guaranteed that the Storm will mount to just about anything.
a. The ideal mounting height for deer or big game should be waist high or
around 36 to 40 inches from the ground. For shorter game like bear or turkeys
knee high will work better.
b. The motion detection angle of your Storm is about 50 degrees which also
matches the camera (FOV) Field of View. The motion detection distance in
ideal conditions is between 60-70 ft. This can be greatly affected by weather
conditions, animal body size, and speed at which an animal passes through
the detection zone.
Arming the Camera: There are two different ways your
Storm can be armed. The camera will automatically arm itself if the user does
not press any of the camera buttons once powered on, which includes an
automatic 15 sec on screen countdown. Or it can be force armed by pressing
the + and – arrows at the same time until the screen goes blank.
To wake the display simply press the power on button, do NOT hold the
button down or the camera will shut off. Note: if the camera is in the process
of taking still photos or videos it must first complete the process before it will
wake up. The red walk test light will become active just prior to the screen
coming on.
14
PLEASE REGISTER TO ACTIVATE YOUR PRODUCT’S WARRANTY.
RED WALK TEST MODE: The red walk test light on your Storm
is used to help determine that your camera is set at the proper height and is
pointed in the right direction. The red walk test light can only be activated
by a combination of heat and motion. After 90 seconds the walk test becomes
inactive and will not be seen until the user wakes the camera up again.
NOTE: Your camera will still be able to record images during those 90 seconds
if the delay settings are set to less than 90 seconds.
PLEASE REGISTER TO ACTIVATE YOUR PRODUCT’S WARRANTY.
15
CAMERA CARE
Moisture, vibration, and extreme temperature can cause severe damage
to your trail camera and should be avoided. Keeping your camera free from
moisture and vibration and using in the correct temperatures will assure you
many years of maintenance free service and operation.
MOISTURE: Although all Eyecon™ Trail Cameras have a very durable
plastic composite case which also makes them water resistant even under
the most extreme weather conditions, care must be taken to prevent water
damage.
• NEVER mount your trail camera upside down or leave the case open for an
extended period of time.
• NEVER change batteries, camera settings or SD cards in heavy rain.
• If your camera would happen to get water inside, remove the batteries
immediately and allow the camera to dry out for several days before activating it.
VIBRATION: Like any electronic device your Eyecon™ Trail Camera is
designed with many small electronic components that are very sensitive to
vibration. Failure to follow careful handling & transport may cause extreme
and irreparable damage to your camera.
• NEVER drop the camera on a hard surface
• ALWAYS transport your camera in a method to avoid bouncing around or
vibration.
TEMPERATURE:
Recommended storage and operating temperature: -10°F to 120°F.
NOTE: Battery life and functions may discontinue or experience shortness in
extreme cold/warm temperatures.
• NEVER store your camera in a vehicle or other contained environment with
extremely high temperatures for an extended period of time!
16
PLEASE REGISTER TO ACTIVATE YOUR PRODUCT’S WARRANTY.
NOTE: The Storm is designed with a low battery voltage shut down to ensure
maximum camera performance. For example if your camera was in use for
several weeks or months and you push the power button to wake it up you
may notice a Flashing Battery Warning that says, “Change Batteries.” There
will also be a picture of a battery icon with a Red X in the center. The only way
to clear the battery warning is to remove and replace the batteries.
Trouble Shooting
Camera not responding: If your camera at anytime does not respond
when the buttons are pushed or you cannot turn it off, your camera may be
locked up. The best way to resolve this problem is to open one of the battery
doors for a period of 10 seconds. This will cut the main power supply to the
camera and will take care of the problem. If you are using both the external
ECA100 Extenda-Life lithium Battery Pack and internal Alkaline supply,
you will need to do the same for both.
Bad SDHC card: Over time a SDHC or any storage device could become
corrupt. If your camera fails to acknowledge the SD card we recommend that
you replace the card with a new SD card or one from a different EYECON™
Trail Camera that you know works. This will help determine whether the
problem is the SD card or the camera. We do NOT recommend using cards
that have been used in cameras from different companies and/or different
styles of cameras.
NOTE: It is recommended not to use a card that has been previously used in
different trail cameras or one that has previously been used in a Point &
Shoot Camera unless it is first formatted. It is also not recommended to view
PLEASE REGISTER TO ACTIVATE YOUR PRODUCT’S WARRANTY.
17
pictures in a Point & Shoot Camera as read errors may occur. Always format
brand new SDHC cards; a Full Format is recommended over a quick format.
Always format brand new and prior used SDHC cards prior
to use in the trail camera.
Image Quality: Your Storm Trail Camera is designed to give you optimum
trigger speed along with great night photo clarity. There may be some
instances where an animal is moving extremely fast or low light conditions
may be bad causing a smearing/blurry object within your image. This is a
natural part of photo taking and may occur from time to time.
FIRMWARE UPDATES: To ensure maximum performance and reliability from
your camera periodically check our website for the most current firmware
updates and installation for your camera at www.eyecontrailcameras.com
18
PLEASE REGISTER TO ACTIVATE YOUR PRODUCT’S WARRANTY.
PLEASE REGISTER TO ACTIVATE YOUR PRODUCT’S WARRANTY.
19
Warranty and Registration
Eyecon Trail Camera’s 1 Year Limited Warranty: For a period of 365 days
after purchase, Eyecon Trail Cameras will, at its discretion, repair or replace this
product for any reason of any defect or malfunction. This warranty is only valid
if the product is used for the purpose intended and has not been tampered
with and/or physically damaged in any way. Products that have been damaged
due to negligence or misuse do not qualify for warranty replacement.
To ACTIVATE Warranty:
• You MUST register your QuikShot Trail Camera within 30 days of
purchase to receive any warranty protection!
• You MUST keep a copy of your receipt as Proof of Purchase for any
warranty protection!
To OBTAIN a Warranty Claim:
1.You MUST call our customer service department at 844-745-7723
or 507-832-8322 and follow all troubleshooting requests first.
2. If Warranty Claim is approved, a RA Number will be given to you; keep this
for your records.
3. Remove your SD card and batteries (any items other than original camera
casing will be destroyed and not returned with new item)
4. Include a copy of your original receipt, your RA#, and a check or credit
card number for $20.00 shipping/handling in the box.
5. Ship the box prepaid to: Eyecon Trail Cameras, Camera Returns, 1905 1st
Avenue N., Windom, MN 56101. Make sure to put the RA# in bold letters
on the outside of the box.
20
PLEASE REGISTER TO ACTIVATE YOUR PRODUCT’S WARRANTY.
To activate your product’s warranty, please mail in your registration
card or submit it online at www.EyeconTrailCameras.com
PRODUCT REGISTRATION
Product Purchased
Model Number
Serial Number
Owner’s Name
Street Address
City
State
Zip Code
E-mail Address
Phone
Owners Age (optional)
Sex (optional)
M
F
Date Purchased
Purchased From (Dealer Name)
How did you hear about us:
Magazine
Are you a:
Catalog
Webpage
Friend
Other, Please Explain
Bow Hunter
Treestand Preference:
Gun Hunter
Fixed Position
Climbing
Both
Ladderstand
PLEASE REGISTER TO ACTIVATE YOUR PRODUCT’S WARRANTY.
21
Remember to activate your product’s warranty?
See warranty information and registration
instructions on page 16 and then complete and
mail in the registration card on page 17
or submit it online at:
www.EyeconTrailCameras.com
22
PLEASE REGISTER TO ACTIVATE YOUR PRODUCT’S WARRANTY.
OWNER’S RECORD
Product Name
Model Number
Serial Number
Purchased From
Purchased Date
YOU MUST RETURN THE COMPLETED REGISTRATION CARD ABOVE
WITHIN (30) DAYS OF THE PURCHASE IN ORDER TO ACTIVATE THE LIMITED
WARRANTY COVERAGE. (Make sure to include date purchased on the card!)
NOTES:
PLEASE REGISTER TO ACTIVATE YOUR PRODUCT’S WARRANTY.
23
PO Box 454 • Windom, MN 56101
844-745-7723 • 507-832-8322