1
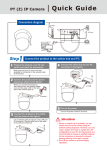
Connection diagram
TV
Composite video Output
ɓ!!
ɓ!
Power Socket
ɓ!
Hub
ɓ!
RS-485 Control
D-
RJ-45
Step
1
Connect the product to the switch hub and PC.
Prepare the product, your PC and
switch hub ready for connection.
Make sure that your PC has a LAN port available
for connection to the network cable of the
product.
2
D+
4
Connect the switch hub to your PC
(as shown in the figure).
Prepare another network cable and plug in
both LAN PORTS of switch hub and PC.
Connect the product into power
source (as shown in the figure).
ɓ!
Hub
The product can operate only on AC100~240
input voltage. Please confirm your power source
before you connect with your power adaptor.
ɓ!
Power Socket
ɓ!
PC
5 Turn on the power.
Turn on the power of the PC and hub.
3 Connect the product to the switch hub
(as shown in the figure).
Plug the other end of the network cable in the
LAN port of the hub.
ɓ!
Hub
Attention!!
Where no switch hub is available, you can search
and set up the camera using the network peering
approach. However, you may need a jumper and
need to change the LAN configuration on your PC
for this purpose. It is recommended to request a
qualified engineer for the connection or execute the
network peering referring to the user's manual.
Step
1
Enter the Main Page
Install Internet
Explorer ad-hoc
components
Start
Open a new Internet Explorer window.
1
2
Step
1
Install ActiveX
When the username and password are confirmed, a
control setup screen pops up under the IE address bar.
Click “Install ActiveX Control” to install the controls.
Enter the IP address and login
Enter the new IP address and
key in the username “root” and password “root”.
Enter the IP address that
you have just set.
Click Install ActiveX Control
2
When the login screen appears,
key in root in the User Name
and Password fields. Click OK.
The security warning screen aps.
Click Install.
The ActiveX Control is named ActiveX Control. This
software is well certified. You can use it without any
doubts on its validity.
1
3 Enter the control screen
You can enter the control screen when the username
and password are confirmed.
Click Install
3 Camera operation and interface
When ActiveX Control is installed successfully, you
can see the camera image and interface.
Select the HTTP mode if you
cannot see the image.
Control the camera direction.