1
Freescale Semiconductor
Application Note
3-Phase PM Synchronous
Motor Vector Control Using a
56F80x, 56F8100, or
56F8300 Device
Design of Motor Control Application
Libor Prokop, Pavel Grasblum
Note: The PC master software referenced in this document is also
known as Free Master software.
1.
Introduction
AN1931
Rev. 3, 1/2005
Contents
1. Introduction ..............................................1
2. Advantages and Features of Freescale’s
Hybrid Controller ................................2
2.1 56F805, 56800 Core Family................... 2
2.2 56F8346, 56800E Core Family .............. 3
2.3 Peripheral Description ............................ 4
3. Target Motor Theory ................................6
3.1 Permanent Magnet Synchronous Motor
(PMSM)................................................... 6
3.2 Mathematical Description of PM
Synchronous Motor................................. 7
3.3 Digital Control of PM Synchronous
Motor..................................................... 11
4. System Concept ......................................19
4.1 System Specification ............................ 19
4.2 Vector Control Drive Concept.............. 20
4.3 System Blocks Concept ........................ 22
5. Hardware Implementation ......................32
5.1 Hardware Set-Up .................................. 32
This application note describes the design of a 3-phase Permanent
Magnet Synchronous Motor (PMSM) drive based on Freescale’s
56F80x or 56F8300 dedicated motor control device. The software
design takes advantage of Processor ExpertTM (PE) software.
6. Software Design .....................................34
PM synchronous motors are very popular in a wide application
area. The PMSM lacks a commutator and is therefore more
reliable than the DC motor. The PM synchronous motor also has
advantages when compared to an AC induction motor. Because a
PMSM achieves higher efficiency by generating the rotor
magnetic flux with rotor magnets, a PMSM is used in high-end
white goods (such as refrigerators, washing machines,
dishwashers); high-end pumps; fans; and in other appliances
which require high reliability and efficiency.
7.1 Scaling of Quantities ............................ 51
7.2 PI Controller Tuning............................. 54
7.3 Subprocesses Relation and State
Transitions............................................. 55
7.4 RUN / STOP Switch and Button
Control................................................... 55
This application creates a speed closed-loop PM synchronous
drive using a vector control technique. It serves as an example of
a PMSM control design using a Freescale hybrid controller with
PE support. It also illustrates the use of the PE’s dedicated motor
control libraries.
This application note includes basic motor theory, system design
concept, hardware implementation and software design,
including the PC master software visualization tool.
© Freescale Semiconductor, Inc., 2005. All rights reserved.
PRELIMINARY
6.1 Main Software Flow Chart ................... 34
6.2 Data Flow ............................................. 39
6.3 State Diagram ....................................... 46
7. Implementation Notes ............................51
8. Processor Expert (PE) Implementation ..57
8.1
8.2
8.3
8.4
Beans and Library Functions ................ 57
Beans Initialization ............................... 57
Interrupts............................................... 57
PC Master Software.............................. 58
9. Hybrid Controller Memory Use .............60
10. References ............................................60
Advantages and Features of Freescale’s Hybrid Controller
2.
Advantages and Features of Freescale’s Hybrid Controller
The Freescale 56F80x (56800 core) and 56F8300 (56800E core) families are well suited for digital motor
control, combining the DSP’s calculation capability with the MCU’s controller features on a single chip. These
hybrid controllers offer many dedicated peripherals, such as Pulse Width Modulation (PWM) unit(s), an
Analog-to-Digital Converter (ADC), Timers, communication peripherals (SCI, SPI, CAN), on-board Flash and
RAM.
The following sectins use a specific device to describe the family’s features.
2.1 56F805, 56800 Core Family
The 56F805 provides the following peripheral blocks:
•
•
•
•
•
•
•
•
•
•
•
•
•
Two Pulse Width Modulator modules (PWMA and PWMB), each with six PWM outputs, three
Current Sense inputs, and four Fault inputs; fault-tolerant design with dead time insertion, supporting
both center-aligned and edge-aligned modes
Twelve-bit Analog-to-Digital Converters (ADCs), supporting two simultaneous conversions with dual
4-pin multiplexed inputs; the ADC can be synchronized by PWM modules
Two Quadrature Decoders (Quad Dec0 and Quad Dec1), each with four inputs, or two additional Quad
Timers, A and B
Two dedicated general purpose Quad Timers totaling six pins: Timer C with two pins and Timer D
with four pins
CAN 2.0 B-compatible module with 2-pin ports used to transmit and receive
Two Serial Communication Interfaces (SCI0 and SCI1), each with two pins, or four additional GPIO
lines
Serial Peripheral Interface (SPI), with configurable 4-pin port, or four additional GPIO lines
Computer Operating Properly (COP) / Watchdog timer
Two dedicated external interrupt pins
Fourteen dedicated General Purpose I/O (GPIO) pins; 18 multiplexed GPIO pins
External reset pin for hardware reset
JTAG / On-Chip Emulation (OnCE)
Software-programmable, Phase Lock Loop-based frequency synthesizer for the hybrid controller core
clock
Table 2-1 Memory Configuration for 56F80x Devices
56F801
56F803
56F805
56F807
Program Flash
8188 x 16-bit
32252 x 16-bit
32252 x 16-bit
61436 x 16-bit
Data Flash
2K x 16-bit
4K x 16-bit
4K x 16-bit
8K x 16-bit
Program RAM
1K x 16-bit
512 x 16-bit
512 x 16-bit
2K x 16-bit
Data RAM
1K x 16-bit
2K x 16-bit
2K x 16-bit
4K x 16-bit
Boot Flash
2K x 16-bit
2K x 16-bit
2K x16-bit
2K x 16-bit
3-Phase PMSM Motor Vector Control, Rev. 3
2
Freescale Semiconductor
Preliminary
56F8346, 56800E Core Family
2.2 56F8346, 56800E Core Family
The 56F8346 provides the following peripheral blocks:
•
•
•
•
•
•
•
•
•
•
•
•
•
•
Two Pulse Width Modulator modules (PWMA and PWMB), each with six PWM outputs, three
Current Sense inputs, and three Fault inputs for PWMA/PWMB; fault-tolerant design with dead time
insertion, supporting both center-aligned and edge-aligned modes
Two 12-bit Analog-to-Digital Converters (ADCs), supporting two simultaneous conversions with dual
4-pin multiplexed inputs; the ADC can be synchronized by PWM modules
Two Quadrature Decoders (Quad Dec0 and Quad Dec1), each with four inputs, or two additional Quad
Timers, A and B
Two dedicated general purpose Quad Timers totaling three pins: Timer C with one pin and Timer D
with two pins
CAN 2.0 B-compatible module with 2-pin ports used to transmit and receive
Two Serial Communication Interfaces (SCI0 and SCI1), each with two pins, or four additional GPIO
lines
Serial Peripheral Interface (SPI), with configurable 4-pin port, or four additional GPIO lines
Computer Operating Properly (COP) / Watchdog timer
Two dedicated external interrupt pins
61 multiplexed General Purpose I/O (GPIO) pins
External reset pin for hardware reset
JTAG / On-Chip Emulation (OnCE)
Software-programmable, Phase Lock Loop-based frequency synthesizer for the hybrid controller core
clock
Temperature Sensor system
Table 2-2 Memory Configuration for 56F8300 Devices
56F8322
56F8323
56F8345
56F8346
56F8347
Program Flash
16K x 16-bit
16K x 16-bit
64K x 16-bit
64K x 16-bit
64 x 16-bit
Data Flash
4K x 16-bit
4K x 16-bit
4K x 16-bit
4K x 16-bit
4K x 16-bit
Program RAM
2K x 16-bit
2K x 16-bit
2K x 16-bit
2K x 16-bit
2K x 16-bit
Data RAM
4K x 16-bit
4K x 16-bit
4K x 16-bit
4K x 16-bit
2K x 16-bit
Boot Flash
4K x 16-bit
4K x 16-bit
4K x 16-bit
4K x 16-bit
4K x16-bit
3-Phase PMSM Motor Vector Control, Rev. 3
Freescale Semiconductor
Preliminary
3
Advantages and Features of Freescale’s Hybrid Controller
Table 2-2 Memory Configuration for 56F8300 Devices (Continued)
56F8355
56F8356
56F8357
56F8365
56F8366
56F8367
Program Flash
128K x 16-bit
128K x 16-bit
128K x 16-bit
256K x 16-bit
128K x 16-bit
128K x 16-bit
Data Flash
4K x 16-bit
4K x 16-bit
4K x 16-bit
16K x 16-bit
4K x 16-bit
4K x 16-bit
Program RAM
2K x 16-bit
2K x 116-bit
2K x 16-bit
2K x 16-bit
2K x 16-bit
2K x 16-bit
Data RAM
8K x 16-bit
8K x 16-bit
8K x 16-bit
16K x 16-bit
4K x 16-bit
8K x 16-bit
Boot Flash
4K x 16-bit
8K x 16-bit
8K x 16-bit
16K x 16-bit
8K x 16-bit
8K x 16-bit
2.3 Peripheral Description
In addition to the fast Analog-to-Digital converter and the 16-bit Quadrature Timers, the most interesting
peripheral, for PMSM control, is the Pulse Width Modulation (PWM) unit. The PWM module offers a high
degree of freedom in its configuration, allowing efficient control of the PM synchronous motor.
The PWM has the following features:
•
•
•
•
•
•
•
•
•
•
•
•
•
•
•
Three complementary PWM signal pairs, or six independent PWM signals
Supports complementary channel operation
Dead time insertion
Separate top and bottom pulse width correction via current status inputs or software
Separate top and bottom polarity control
Edge-aligned or center-aligned PWM signals
15 bits of resolution
Half-cycle reload capability
Integral reload rates from 1 to 16
Individual software-controlled PWM outputs
Mask and swap of PWM outputs
Programmable fault protection
Polarity control
20mA current sink capability on PWM pins
Write-protectable registers
PM synchronous motor control utilizes the PWM block set in the complementary PWM mode, permitting
generation of control signals for all switches of the power stage with inserted dead time. The PWM block
generates three sinewave outputs mutually shifted by 120 degrees.
3-Phase PMSM Motor Vector Control, Rev. 3
4
Freescale Semiconductor
Preliminary
Peripheral Description
The Analog-to-Digital Converter (ADC) consists of a digital control module and two analog Sample and Hold
(S/H) circuits. ADC features include:
•
•
•
•
•
•
•
•
•
•
•
•
•
•
12-bit resolution
Maximum ADC clock frequency is 5MHz with 200ns period
Single conversion time of 8.5 ADC clock cycles (8.5 x 200ns = 1.7µs)
Additional conversion time of 6 ADC clock cycles (6 x 200ns = 1.2µs)
Eight conversions in 26.5 ADC clock cycles (26.5 x 200ns = 5.3µs) using simultaneous mode
ADC can be synchronized to the PWM via the sync signal
Simultaneous or sequential sampling
Internal multiplexer to select two of eight inputs
Ability to sequentially scan and store up to eight measurements
Ability to simultaneously sample and hold two inputs
Optional interrupts at end of scan, if an out-of-range limit is exceeded, or at zero crossing
Optional sample correction by subtracting a preprogrammed offset value
Signed or unsigned result
Single-ended or differential inputs
The application utilizes the ADC block in simultaneous mode and sequential scan. It is synchronized with
PWM pulses. This configuration allows the simultaneous conversion within the required time of required
analog values, all phase currents, voltage and temperature.
The Quad Timer is an extremely flexible module, providing all required services relating to time events, and
offers the following features:
•
•
•
•
•
•
•
•
•
•
•
Each timer module consists of four 16-bit counters / timers
Counts up / down
Counters are cascadable
Programmable count modulo
Maximum count rate equals peripheral clock / 2 when counting external events
Maximum count rate equals peripheral clock when using internal clocks
Counts once or repeatedly
Counters are preloadable
Counters can share available input pins
Each counter has a separate prescaler
Each counter has capture and compare capability
The PMSM vector control application utilizes four channels of the Quad Timer module for position and speed
sensing. A fifth channel of the Quad Timer module is set to generate a time base for speed sensing and a speed
controller.
3-Phase PMSM Motor Vector Control, Rev. 3
Freescale Semiconductor
Preliminary
5
Target Motor Theory
The Quadrature Decoder is a module providing decoding of position signals from a Quadrature Encoder
mounted on a motor shaft. It has the following features:
•
•
•
•
•
•
•
•
Includes logic to decode quadrature signals
Configurable digital filter for inputs
32-bit position counter
16-bit position difference counter
Maximum count frequency equals the peripheral clock rate
Position counter can be initialized by software or external events
Preloadable 16-bit revolution counter
Inputs can be connected to a general purpose timer to aid low speed velocity
The PM synchronous motor vector control application utilizes the Quadrature Decoder connected to Quad Timer
module B. It uses the decoder’s digital input filter to filter the encoder’s signals, but does not make use of its
decoding functions, freeing the decoder’s digital processing capabilities to be used by another application.
3.
Target Motor Theory
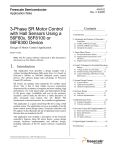
3.1 Permanent Magnet Synchronous Motor (PMSM)
The PMSM is a rotating electric machine with a classic 3-phase stator like that of an induction motor; the rotor
has surface-mounted permanent magnets; see Figure 3-1.
Stator
Stator winding
(in slots)
Shaft
Rotor
Air gap
Permanent magnets
Figure 3-1 Cross Section of a PM Synchronous Motor
In this respect, the PMSM is equivalent to an induction motor, where the air gap magnetic field is produced by
a permanent magnet, so the rotor magnetic field is constant. PM synchronous motors offer a number of
advantages in designing modern motion control systems. The use of a permanent magnet to generate
substantial air gap magnetic flux makes it possible to design highly efficient PM motors.
3-Phase PMSM Motor Vector Control, Rev. 3
6
Freescale Semiconductor
Preliminary
Mathematical Description of PM Synchronous Motor
3.2 Mathematical Description of PM Synchronous Motor
The model used for vector control design can be understood by using space vector theory. The 3-phase motor
quantities (such as voltages, currents, magnetic flux, etc.) are expressed in terms of complex space vectors.
Such a model is valid for any instantaneous variation of voltage and current and adequately describes the
performance of the machine under both steady-state and transient operation. The complex space vectors can be
described using only two orthogonal axes. The motor can be considered a 2-phase machine. Using a 2-phase
motor model reduces the number of equations and simplifies the control design.
3.2.1 Space Vector Definition
Assume isa, isb, isc are the instantaneous balanced three-phase stator currents:
i sa + i sb + i sc = 0
EQ. 3-1
It is then possible to define the stator current space vector as follows:
2
i s = k ( i sa + ai sb + a i sc )
EQ. 3-2
Where:
a and a2
=
a
The spatial operators
j2π/3
= e
a2
=
j4π/3
e
k
=
The transformation constant, chosen as k=2/3
Figure 3-2 shows the stator current space vector projection:
3-Phase PMSM Motor Vector Control, Rev. 3
Freescale Semiconductor
Preliminary
7
Target Motor Theory
β
Phase B
is β
Phase A
Phase C
Figure 3-2 Stator Current Space Vector and Its Projection
The space vector defined by EQ. 3-2 can be expressed utilizing two-axis theory. The real part of the space
vector is equal to the instantaneous value of the direct-axis stator current component, isα, and whose imaginary
part is equal to the quadrature-axis stator current component, isβ. Thus, the stator current space vector, in the
stationary reference frame attached to the stator, can be expressed as:
i s = i sα + ji sβ
EQ. 3-3
In symmetrical 3-phase machines, the direct and quadrature axis stator currents isα and isβ are fictitious
quadrature-phase (2-phase) current components, which are related to the actual 3-phase stator currents as
follows:
1
1
i sα = k i sa – --- i sb – --- i sc
2
2
EQ. 3-4
3
i sβ = k ------- ( i sb – i sc )
2
EQ. 3-5
Where:
k
=
2/3 is a transformation constant
3-Phase PMSM Motor Vector Control, Rev. 3
8
Freescale Semiconductor
Preliminary
Mathematical Description of PM Synchronous Motor
The space vectors of other motor quantities (voltages, currents, magnetic fluxes, etc.) can be defined in the
same way as the stator current space vector.
For a description of the PM synchronous motor, consider the symmetrical 3-phase smooth-air-gap machine
with sinusoidally-distributed windings. The voltage equations of stator in the instantaneous form can then be
expressed as:
u SA = R S i SA +
d
ψ
d t SA
EQ. 3-6
u SB = R S i SB +
d
ψ
d t SB
EQ. 3-7
u SC = R S i SC +
d
ψ
d t SC
EQ. 3-8
Where:
uSA, uSB and uSC
iSA, iSB and iSC
ψSA, ψSB, ψSC
=
The instantaneous values of stator voltages in phase SA, SB and SC
= The instantaneous values of stator currents in phase SA, SB and SC
=
The instantaneous values of stator flux linkages in phase SA, SB and SC
Due to the large number of equations in the instantaneous form, including EQ. 3-6, EQ. 3-7 and EQ. 3-8, it is
more practical to rewrite the instantaneous equations using the two-axis theory (Clarke transformation). The
PM synchronous motor can be expressed as:
Where:
α,β
uSα,β
iSα,β
ΨSα,β
ΨM
RS
u Sα = R S i Sα +
d
Ψ
d t Sα
EQ. 3-9
u Sβ = R S i Sβ +
d
Ψ
d t Sβ
EQ. 3-10
Ψ Sα = L S i Sα + Ψ M cos ( Θ r )
EQ. 3-11
Ψ Sβ = L S i Sβ + Ψ M sin ( Θr )
EQ. 3-12
dω
p 3
= --- --- p ( Ψ Sα i Sβ – Ψ Sβ i Sα ) – T L
dt
J 2
EQ. 3-13
=
The stator orthogonal coordinate system
= The stator voltage
=
The stator current
=
The stator magnetic flux
=
The rotor magnetic flux
=
The stator phase resistance
3-Phase PMSM Motor Vector Control, Rev. 3
Freescale Semiconductor
Preliminary
9
Target Motor Theory
LS
ω / ωF
p
J
TL
Θr
=
The stator phase inductance
=
The electrical rotor speed / fields speed
=
The number of poles per phase
=
The inertia
=
The load torque
=
The rotor position in α,β coordinate system
EQ. 3-9 through EQ. 3-13 represent the model of PMSM in the stationary frame α, β fixed to the stator.
Besides the stationary reference frame attached to the stator, motor model voltage space vector equations can
be formulated in a general reference frame which rotates at a general speed ωg. If a general reference frame is
used, with direct and quadrature axes x,y rotating at a general instantaneous speed, ωg=dθg/dt, as shown in
Figure 3-3, where θg is the angle between the direct axis of the stationary reference frame (α) attached to the
stator and the real axis (x) of the general reference frame, then EQ. 3-14 defines the stator current space vector
in general reference frame:
i sg = i s e
– jθg
= i sx + ji sy
EQ. 3-14
β
y
x
g
Figure 3-3 Application of the General Reference Frame
The stator voltage and flux-linkage space vectors can be similarly obtained in the general reference frame.
Similar considerations hold for the space vectors of the rotor voltages, currents and flux linkages. The real axis
(rα) of the reference frame attached to the rotor is displaced from the direct axis of the stator reference frame
by the rotor angle, θr. Since it can be seen that the angle between the real axis (x) of the general reference frame
and the real axis of the reference frame rotating with the rotor (rα) is θg-θr in the general reference frame, the
space vector of the rotor currents can be expressed as:
i rg = i r e
–j ( θ g – θr )
= i rx + ji ry
EQ. 3-15
3-Phase PMSM Motor Vector Control, Rev. 3
10
Freescale Semiconductor
Preliminary
Digital Control of PM Synchronous Motor
Where:
ir
=
The space vector of the rotor current in the rotor reference frame
The space vectors of the rotor voltages and rotor flux linkages in the general reference frame can be similarly
expressed.
The motor model voltage equations in the general reference frame can be expressed by utilizing introduced
transformations of the motor quantities from one reference frame to the general reference frame. The PMSM
model is often used in vector control algorithms. The aim of vector control is to implement control schemes
which produce high dynamic performance and are similar to those used to control DC machines. To achieve
this, the reference frames may be aligned with the stator flux-linkage space vector, the rotor flux-linkage space
vector or the magnetizing space vector. The most popular reference frame is the reference frame attached to the
rotor flux linkage space vector, with direct axis (d) and quadrature axis (q).
After transformation into d-q coordinates, the motor model as follows:
u Sd = R S i Sd +
d
Ψ – ω F Ψ Sq
d t Sd
EQ. 3-16
u Sq = R S i Sq +
d
Ψ + ω F Ψ Sd
d t Sq
EQ. 3-17
Ψ Sd = L S i Sd + Ψ M
EQ. 3-18
Ψ Sq = L S i Sq
EQ. 3-19
dω
p 3
= --- --- p ( Ψ Sd i Sq – Ψ Sq i Sd ) – T L
dt
J 2
EQ. 3-20
Below base speed isd=0, EQ. 3-20 can be reduced to the following form:
dω
p 3
= --- --- p ( Ψ M i Sq ) – T L
dt
J 2
EQ. 3-21
From EQ. 3-21, it can be seen that the torque is dependent and can be directly controlled by the current isq
only.
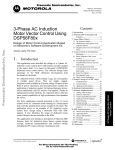
3.3 Digital Control of PM Synchronous Motor
In adjustable-speed applications, the PM synchronous motors are powered by inverters. The inverter converts
DC power to AC power at the required frequency and amplitude. A typical 3-phase inverter is illustrated in
Figure 3-4.
3-Phase PMSM Motor Vector Control, Rev. 3
Freescale Semiconductor
Preliminary
11
Target Motor Theory
U DCB
Q1
PWM_Q1
Q3
PWM_Q3
Q5
PWM_Q5
C1
Q2
PWM_Q2
Q4
PWM_Q4
Q6
PWM_Q6
GND
Phase_A
Phase_B
Phase_C
Figure 3-4 3- Phase Inverter
The inverter consists of three half-bridge units where the upper and lower switches are controlled
complimentarily, meaning when the upper one is turned on, the lower one must be turned off, and vice versa.
Because the power device’s turn-off time is longer than its turn-on time, some dead time must be inserted
between turning off one transistor of the half-bridge, and turning on its complementary device. The output
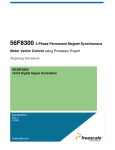
voltage is mostly created by a Pulse Width Modulation (PWM) technique, where an isosceles triangle carrier
wave is compared with a fundamental-frequency sine modulating wave, and the natural points of intersection
determine the switching points of the power devices of a half-bridge inverter. This technique is shown in
Figure 3-5. The 3-phase voltage waves are shifted 120o to one another and, thus, a 3-phase motor can be
supplied.
Generated
Sine Wave
PWM Carrier
Wave
1
0
ωt
-1
1
PWM Output T
1
(Upper Switch)
PWM Output T
2
(Lower Switch)
0
ωt
1
0
ωt
Figure 3-5 Pulse Width Modulation
3-Phase PMSM Motor Vector Control, Rev. 3
12
Freescale Semiconductor
Preliminary
Digital Control of PM Synchronous Motor
The most popular power devices for motor control applications are Power MOSFETs and IGBTs.
A Power MOSFET is a voltage-controlled transistor. It is designed for high-frequency operation and has a low
voltage drop; thus, it has low power losses. However, the saturation temperature sensitivity limits the
MOSFET application in high-power applications.
An Insulated-Gate Bipolar Transistor (IGBT) is a bipolar transistor controlled by a MOSFET on its base. The
IGBT requires low drive current, has fast switching time, and is suitable for high switching frequencies. The
disadvantage is the higher voltage drop of a bipolar transistor, which causes higher conduction losses.
3.3.1 Vector Control of PM Synchronous Motor
Vector control is an elegant method to control a PMSM, where field-oriented theory is used to control space
vectors of magnetic flux, current, and voltage. It is possible to set up the coordinate system to decompose the
vectors into a magnetic field-generating part and a torque-generating part. The structure of the motor controller
(Vector Control Controller) is then almost the same as for a separately-excited DC motor, which simplifies the
control of a PMSM. This vector control technique was developed specifically to achieve a similarly dynamic
performance in PM synchronous motors.
As explained in Section 4.2, a widely used speed control with inner current closed-loop was chosen, where the
rotor flux is controlled by a field-weakening controller.
In this method, the field-generating and torque-generating parts of the stator current must be broken down in
order to be able to separately control the magnetic flux and the torque. In accomplish this, it’s necessary to set
up the rotary coordinate system connected to the rotor magnetic field; this system is generally called a “d-q
coordinate system”. Very high CPU performance is needed to perform the transformation from rotary to
stationary coordinate systems. Therefore, Freescale’s 56F80x or 56F8300 devices are very well suited for use
in a vector control algorithm. All transformations needed for Vector Control will be described in the next
section.
3.3.2 Block Diagram of Vector Control
Figure 3-6 shows the basic structure of PMSM vector control. To perform vector control, follow these steps:
•
•
•
•
•
•
•
•
Measure the motor quantities (phase voltages and currents)
Transform the quantities into a 2-phase system (α,β), using Clarke transformation
Calculate the rotor flux space vector magnitude and position angle
Transform stator currents into the d-q coordinate system using Park transformation
The stator current torque- (isq) and flux- (isd) producing components are separately controlled by the
controllers
The output stator voltage space vector is calculated using the decoupling block
The stator voltage space vector is transformed back from the d-q coordinate system into the two-phase
system and fixed with the stator by inverse Park transformation
Using sinewave modulation, the output 3-phase voltage is generated
3-Phase PMSM Motor Vector Control, Rev. 3
Freescale Semiconductor
Preliminary
13
Target Motor Theory
Speed
Command
Line Input
USq_lin
Decoupling
-
-
USd
USα
USq
USβ
Sinewave
Generation
USd_lin
pwm a
pwm b
3-phase Power Stage
pwm c
USd
USq
ISq
ISd
ISa
ISα
Forward Park
Transformation
ISβ
Forward Clarke
Transformation
ISb
ISc
PMSM
motor
Position
Speed
Position/Speed
sensor
Figure 3-6 Block Diagram of PM Synchronous Motor Vector Control
3.3.3 Vector Control Transformations
Transforming a PMSM into a DC motor is based on selection of coordinates. As shown in Section 3.3.2, a
coordinate transformation is required.
The following transformations are involved in vector control:
•
•
Transformations from a 3-phase to a 2-phase system (Clarke transformation)
Rotation of orthogonal system
— α,β to d-q (Park transformation)
— d-q to α,β (Inverse Park transformation)
3.3.3.1 Clarke Transformation
Figure 3-7 shows how a 3-phase system is transformed into a 2-phase system.
3-Phase PMSM Motor Vector Control, Rev. 3
14
Freescale Semiconductor
Preliminary
Digital Control of PM Synchronous Motor
β
Phase B
is β
iSb - measured
iSa - measured
Phase A
iSc - calculated
Phase C
Figure 3-7 Clarke Transformation
To transfer the graphical representation into mathematical language:
α = K
β
1
0
1
– --2
1
– --2
a
b
3
3
------- – ------- c
2
2
EQ. 3-22
In most cases, the 3-phase system is symmetrical, which means that the sum of the phase quantities is always
zero.
1
1
α = K a – --- b – --- c =
2
2
a+b+c = 0
3
= K --- a
2
EQ. 3-23
The constant “K” can be freely chosen; equalizing the α-quantity and Phase A quantity is recommended. Then:
2
α = a ⇒ K = --3
EQ. 3-24
3-Phase PMSM Motor Vector Control, Rev. 3
Freescale Semiconductor
Preliminary
15
Target Motor Theory
EQ. 3-25 fully defines the Park-Clarke transformation:
2
--3
α =
β
1
1
– --- – --- a
3
3
b =
1
1
------- – ------- c
3
3
0
1
a+b+c = 0
=
0
0
0 a
1
1 b
------- – ------3
3 c
EQ. 3-25
3.3.3.2 Transformation from α, β to d-q Coordinates and Backwards
Vector control is performed entirely in the d-q coordinate system to make the control of PM synchronous
motors elegant and easy; see Section 3.3.2.
This process requires transformation in both directions and the control action must be transformed back to the
motor side.
First, establish the d-q coordinate system:
ΨM =
Ψ
2
Mα
+Ψ
2
Mβ
Ψ Mβ
sin ϑ Field = ----------Ψ Md
cos ϑ Field
Ψ Mα
= ----------Ψ Md
EQ. 3-26
EQ. 3-27
Then transform from α, β to d-q coordinates:
d = cos ϑ Field sin ϑ Field α
q
– sin ϑField cos ϑ Field β
EQ. 3-28
Figure 3-8 illustrates this transformation.
3-Phase PMSM Motor Vector Control, Rev. 3
16
Freescale Semiconductor
Preliminary
Digital Control of PM Synchronous Motor
q
β
ΨM
d
ϑField
ΨMβ
ΨMα
α
Figure 3-8 Establishing the d-q Coordinate System (Park Transformation)
The backward (Inverse Park) transformation (from d-q to α, β) is:
α = cos ϑField – sin ϑ Field d
sin ϑ Field cos ϑ Field q
β
EQ. 3-29
3.3.4 PMSM Vector Control and Field-Weakening Controller
This section describes the control regarding the required stator current vectors isd, isq.
There are two speed ranges (shown in Figure 3-9), which differ by controlled current vector:
•
•
Control in Normal Operating Range, control mode used when a speed is required below nominal motor
speed
Control in Field-Weakening Range, control mode used when a speed is required above nominal motor
speed
3.3.4.1 Control in Normal Operating Range
Assume an ideal PMSM with constant stator reluctance: Ls = constant. EQ. 3-17, EQ. 3-18 and EQ. 3-19 can
then be written as:
d
u Sq = R S i Sq + L S i Sq + ω F ( L S i Sd + Ψ M )
dt
EQ. 3-30
As demonstrated from the PMSM equations, the maximum efficiency of the ideal PMSM is obtained when
maintaining the current flux-producing component, isd, at zero. Therefore, in the drive from Figure 3-6, the
Field-Weakening Controller sets isd = 0 in the normal operating range. The speed regulator controls the current
torque-producing component, isq.
3-Phase PMSM Motor Vector Control, Rev. 3
Freescale Semiconductor
Preliminary
17
Target Motor Theory
A real 3-phase power inverter has voltage and current rating limitations:
1. The absolute value of stator voltage us is physically limited according to DCBus voltage to a limit of
u_sdq_max
2. The absolute value of the stator current is should be maintained below a limit of I_SDQ_MAX, given by the
maximum current rating
In the normal operating range, the current torque-producing component, isq, can be set up to I_SDQ_MAX,
since isd = 0.
Due to the voltage limitation, the maximum speed in the normal motor operating range is limited for isd = 0, to
a nominal motor speed, as shown in Figure 3-9 and EQ. 3-30.
Nominal Speed
Stator Voltage us
0
u_sdq_max
Normal Operating
Range
Field-Weakening
Range
Speed
Stator Current id
Figure 3-9 Normal Operation and Field-Weakening
3.3.4.2 Control in Field-Weakening Range
The field-weakening technique must be used where a higher maximum motor speed is required, which is
provided by maintaining the flux-producing current component, isd, in the field-weakening range, as shown in
Figure 3-9.
Due to the limitation of absolute current value, the current torque-producing component, isq, must be
maintained below a limited value.
2
2
i Sq < I_SDQ_MAX – i Sd
EQ. 3-31
One possibility to maintain the flux-producing current component, isd, for field weakening is to use a look-up
table.
A more-progressive method uses a Field-Weakening Controller, which generates a negative current
flux-producing component, isq, whenever the absolute value of stator voltage exceeds u_S_max_FWLimit. The
field-weakening limit, u_S_max_FWLimit, is set to be close to the maximum voltage limit of the 3-phase
power inverter, u_sdq_max, with some reserve for regulation. Since the DCBus voltage determines the
3-Phase PMSM Motor Vector Control, Rev. 3
18
Freescale Semiconductor
Preliminary
System Specification
u_sdq_max limit, the u_S_max_FWLimit is set according to the DCBus. The u_S_max_FWLimit can be a
constant or it can be calculated from a measured DCBus voltage. The Field-Weakening controller is described
in Section 6.2.5.4.
4.
System Concept
4.1 System Specification
The motor control system is designed to drive a 3-phase PM Synchronous Motor (PMSM) in a speed
closed-loop. The application meets the following performance specifications:
•
•
•
•
Vector control of PMSM using the Quadrature Encoder as a position sensor
Targeted for a 56F80xEVM or 56F83xxEVM plus Legacy Motor Daughter Card (LMDC)
Runs on a 3-phase PMSM control development platform at a variable line voltage, 110 - 230V AC
Control technique incorporates:
— Vector control with speed closed-loop and field-weakening
— Rotation in both directions
— Motoring and generator mode with brake
— Start from any motor position with rotor alignment
— Minimum speed of 50rpm
— Maximum speed of 3000rpm at input power line 230V AC
— Maximum speed of 1500rpm at input power line 115V AC
•
Manual interface
— RUN / STOP switch
— UP / DOWN push button control
— LED indicator)
•
PC master software control interface
— Motor start / stop
— Speed set-up
•
•
•
PC master software remote monitor
Power stage board identification
Fault protection against:
— Overvoltage
— Undervoltage
— Overcurrent
— Overheating
3-Phase PMSM Motor Vector Control, Rev. 3
Freescale Semiconductor
Preliminary
19
System Concept
The PM synchronous drive introduced here is designed to power a high-voltage PM synchronous motor with a
Quadrature Encoder. Specifications are detailed in Table 4-1.
Table 4-1 High Voltage Hardware Set Specifications
Motor Characteristics
Motor Type
Six poles, 3-phase,
star connected, BLDC motor
Speed Range
2500rpm (at 310V DCBus)
Maximum Electrical Power
150W
Phase Voltage
3*220V
Phase Current
0.55A
Speed Range
< 3000rpm
Input Voltage
310V DC
Maximum DCBus Voltage
380V
Control Algorithm
Speed Closed-Loop Control
Optoisolation
Required
Drive Characteristics
4.2 Vector Control Drive Concept
A standard system concept is used with this drive; see Figure 4-1. The system incorporates the following
hardware parts:
•
•
Three-phase PMSM high-voltage development platform
Feedback sensors for:
— Position (Quadrature Encoder)
— DCBus voltage
— Phase currents
— DCBus overcurrent detection
— Temperature
•
Evaluation Modules:
— 56F80xEVM (56800 Core)
— 56F83xxEVM (56800E Core)
The drive can be controlled in two operating modes:
•
•
In the Manual operating mode, the required speed is set by the RUN / STOP switch and the
UP/DOWN push buttons
In the PC master software operating mode, the required speed and RUN / STOP switch are set by the
PC
3-Phase PMSM Motor Vector Control, Rev. 3
20
Freescale Semiconductor
Preliminary
Vector Control Drive Concept
3-phase BLDC Power Stage
U_Dc bus
Line AC
AC
PC Master
Software
UP DOWN
6
PMSM
LOAD
DC
START
STOP
Quadrature
Encoder
Temperature
Faults
Isa Isb Isc
PWM
SCI
SCI
Driver
GPIO
PWM
GPIO
GPIO Driver
PWM Driver
Application
Control
Us_d
Current d
PI
Controller
Decoupling
FieldWeakening
Controller
Us_q
(Back-EMF feedforward)
Speed
Controller
Current q
PI
Controller
Us_d
Is_d
QT Driver
Sector
Us_alpha_comp
Us_beta_comp
Position
&
Speed
Sensing
Us_alpha
Inverse Park
Transformation
d, q -> alpha, beta
DCBus
Ripple
Compensation
Forward Park
Transformation
alpha, beta -> d, q
U_dcb
Us_beta
sin
cos
theta_actual_el
Is_a_comp
Is_beta
Is_q
Us_q
ADC Driver
Is_a
Is_b
Is_c
Sinus
Waveform
Modulation
Is_q_Req
Omega_Req
Quad
Timer
Duty Cycle A
Duty Cycle B
Duty Cycle C
U_dcb
Omega_Req
Omega_actual_mech
PWM Driver
Break
Control
Fault Protection
ADC
PWM
GPIO Driver
Is_alpha
Forward Clark
Transformation
a, b, c -> alpha, beta
Is_b_comp
Is_c_comp
Current
Sensing
Processing
Omega_actual_mech
56F80x / 56F8300 plus LMDC
Figure 4-1 Drive Concept
The control process follows:
When the Start command is accepted (using the RUN / STOP Switch or PC master software command), the
required speed is calculated according to the UP / DOWN push buttons or PC master software commands. The
required speed proceeds through an acceleration / deceleration ramp, and a reference command is put to the
speed controller. The actual speed is calculated from the pulses of the Quadrature Encoder. The comparison
between the required speed command and the actual measured speed generates a speed error. Based on the
error, the speed controller generates a current, Is_qReq, which corresponds to torque. A second part of stator
current Is_dReq, which corresponds to flux, is given by the Field-Weakening Controller. Simultaneously, the
stator currents Is_a, Is_b, and Is_c are measured and transformed from instantaneous values into the stationary
reference frame α, β, and consecutively into the rotary reference frame d-q (Park - Clarke transformation).
Based on the errors between required and actual currents in the rotary reference frame, the current controllers
generate output voltages Us_q and Us_d (in the rotary reference frame d-q). The voltages Us_q and Us_d are
transformed back into the stationary reference frame α, β and, after DCBus ripple elimination, are recalculated
to the 3-phase voltage system, which is applied to the motor.
3-Phase PMSM Motor Vector Control, Rev. 3
Freescale Semiconductor
Preliminary
21
System Concept
In addition to the main control loop, the DCBus voltage, DCBus current and power stage temperature are
measured during the control process. They are used to protect the drive from overvoltage, undervoltage,
overcurrent and overheating. Undervoltage and overheating protection is performed by software, while the
overcurrent and overvoltage fault signals utilize a fault input of the hybrid controller.
If any of the previously mentioned faults occur, the motor control PWM outputs are disabled in order to protect
the drive, and the fault state of the system is displayed by the on-board LED.
4.3 System Blocks Concept
This section explains the system block concept for targeting the 56F83xxEVM.
4.3.1 Position and Speed Sensing
4094
4095
0
1
2
4094
4095
0
1
2
All members of Freescale’s 56F8300 family have a Quadrature Decoder. This peripheral is commonly used for
position and speed sensing. The Quadrature Decoder position counter counts each edge of Phase A and Phase
B signals up or down according to its order. On each revolution, the position counter is cleared by an index
pulse; see Figure 4-2.
Position Counter Values
Phase A
Phase B
Index
One Revolution
Figure 4-2 Quadrature Encoder Signals
Because the position counter is cleared on each revolution by an index pulse, the zero position is linked with
the index pulse, but vector control requires the zero position, where the rotor is aligned to the d axis; see
Section 4.3.1.3. Therefore, using a Quadrature Decoder to decode the encoder’s signal requires either the
calculation of an offset which aligns the Quadrature Decoder position counter with the aligned rotor position
(zero position), or the coupling of the zero rotor position with the index pulse of a Quadrature Encoder. To
avoid the calculation of the rotor position offset, the Quadrature Decoder is not used in this application. The
decoder’s digital processing capabilities are then free to be used by another application.
In addition to the Quadrature Decoder, the input signals (Phase A, Phase B and Index) are connected to Quad
Timer B. The Quad Timer module consists of four Quad Timers. Due to the wide variability of Quad Timer
modules, it is possible to use this module to decode Quadrature Encoder signals, sense position, and speed. A
configuration of the Quad Timer module is shown in Figure 4-3.
3-Phase PMSM Motor Vector Control, Rev. 3
22
Freescale Semiconductor
Preliminary
System Blocks Concept
Index
Primary source
QTimer B0
Secondary source
Position Counter
Cascade mode
Phase B
Quadrature Decoder
Internal digital filter
Phase A
Primary source
QTimer B1
Secondary source
Impulses Counter
Primary source
QTimer B2
Secondary source
System clock / 4
Period Timer
Primary source
QTimer B3
Secondary source
System clock / 4
Time Base
Primary source
QTimer D0
Not used
Secondary source
Figure 4-3 Quad Timer B Configuration
4.3.1.1 Position Sensing
The position and speed sensing algorithm uses all of the timers in module B and an additional timer as a time
base. Timers B0 and B1 are used for position sensing. Timer B0 permits connection of three input signals to
the Quad Timer B1, even if Timer B1 has only two inputs (primary and secondary), accomplished by using
Timer B0 as a Quadrature Decoder only. It is set to count in the quadrature mode, count to zero, and then
reinitialize. This timer setting is used to decode quadrature signals only. Timer B1 is connected to Timer B0 in
cascade mode, in which the information about counting up or down is connected internally to Timer B1,
freeing the secondary input of Timer B1 to be used for the index pulse. Counter B1 is set to count to
+/- ((4*number of pulses per revolution) - 1) and reinitialize after compare. The value of Timer B1 corresponds
to the rotor position.
3-Phase PMSM Motor Vector Control, Rev. 3
Freescale Semiconductor
Preliminary
23
System Concept
The position of the index pulse is sensed to avoid the loss of some pulses under the influence of noise during
extended motor operation, which can result in incorrect rotor position sensing. If some pulses are lost, a
different position of the index pulse is detected, and a position sensing error is signaled. If a check of the index
pulse is not required, Timer B1 can be removed and Timer B0 set as the position counter B1. The resulting
value of Timer B1 is scaled to range <-1; 1), which corresponds to <-π; π).
4.3.1.2 Speed Sensing
There are two common ways to measure speed. The first method measures the time between two following
edges of the Quadrature Encoder, and the second method measures a position difference (a number of pulses)
per constant period. The first method is used at low speed. When the measured period is so short that the speed
calculation is not precise, the speed calculation algorithm switches to the second method.
The proposed algorithm combines both methods. The algorithm simultaneously measures the number of
Quadrature Encoder pulses per constant period, and an accurate time interval between the first and last pulse is
counted during that constant period. The speed can then be expressed as:
k⋅N
speed = ----------T
EQ. 4-1
where:
speed
=
Calculated speed
k
=
Scaling constant
N
=
Number of pulses per constant period
T
=
Accurate period of N pulses
The algorithm requires two timers for counting pulses and measuring their period, and a third timer as a time
base; see Figure 4-3. Timer B2 counts the pulses of the Quadrature Encoder, and Timer B3 counts a system
clock divided by 4 (system clock / 4). The values in both timers can be captured by each edge of the Phase A
signal. The time base is provided by timer D0, which is set to call the speed processing algorithm every 900µs.
An explanation of how the speed processing algorithm works follows.
First, the new captured values of both timers are read. The difference in the number of pulses and their accurate
time interval are calculated from actual and previous values. The new values are then saved for the next period,
and the capture register is enabled. From that moment, the first edge of Phase A signal captures the values of
both Timer B2 and Timer B3, and the capture register is disabled. This process is repeated on each call of the
speed processing algorithm; see Figure 4-4.
3-Phase PMSM Motor Vector Control, Rev. 3
24
Freescale Semiconductor
Preliminary
System Blocks Concept
New values captured
Phase A
Phase B
Timer B2
System Clock / 4
Timer B3
Timer D0
Speed processing
Accurate time period
Figure 4-4 Speed Processing
4.3.1.2.1 Minimum and Maximum Speed Calculation
The minimum speed is calculated with the following equation:
60
4NT calc
ω min = -------------------
EQ. 4-2
Where:
ωmin
=
Minimum obtainable speed [rpm]
N
=
Number of pulses per revolution [1 / rev]
Tcalc
=
Period of speed measurement (calculation period) [s]
In the application, the Quadrature Encoder has 1024 pulses per revolution and a calculation period of 900µs
was chosen on the basis of a motor mechanical constant. Thus, EQ. 4-2 calculates the minimum speed as
16.3rpm.
The maximum speed can be expressed as:
60
4NT clkT3
ω max = ----------------------
EQ. 4-3
Where:
ωmax
=
Maximum obtainable speed [rpm]
N
=
Number of pulses per revolution [1 / rev]
TclkT3
=
Period of input clock to Timer B3 [s]
3-Phase PMSM Motor Vector Control, Rev. 3
Freescale Semiconductor
Preliminary
25
System Concept
Substitution in EQ. 4-3 for N and TclkT3 (Timer B3 input clock = system clock 30MHz / 2) yields a maximum
speed of 219726rpm. As demonstrated, the algorithm can measure speed across a wide range. Because such
high speed is not practical, the maximum speed can be reduced to a required range by the constant k in EQ.
4-1. The constant k can be calculated as:
60
k = ----------------------------------4NT clkT3 ω max
EQ. 4-4
Where:
k
=
Scaling constant in EQ. 4-1
ωmax
=
Maximum of the speed range [rpm]
N
=
Number of pulses per revolution [1 / rev]
TclkT3
=
Period of input clock toTimer B3 [s]
In this application, the maximum measurable speed is limited to 6000rpm.
Notes:
To ensure an accurate speed calculation, you must choose the input clock of Timer B3 so that the
calculation period of speed processing (in this case, 900µs) is represented in Timer B3 as a value lower
than 0x7FFFH (900.10-6/TclkT2<=0x7FFFH).
4.3.1.3 Position Reset with Rotor Alignment
After reset, the rotor position is unknown, because a Quadrature Encoder does not give an absolute position
until the index pulse arrives. As shown in Figure 4-5, the rotor position must be aligned with the d axis of the
d-q coordinate system before a motor begins running. The alignment algorithm is shown in Figure 4-6 First,
the position is set to zero, independent of the actual rotor position. (The value of the Quadrature Encoder does
not affect this setting). Then the Id current is set to alignment current. The rotor is now aligned to the required
position. After rotor stabilization, the encoder is reset to the zero position, then the Id current is set back to zero,
and alignment is finished. The alignment is executed only once during the first transition from the Stop to the
Run state of the RUN / STOP switch.
3-Phase PMSM Motor Vector Control, Rev. 3
26
Freescale Semiconductor
Preliminary
System Blocks Concept
β
q
Unknown Rotor Position
(not aligned)
Zero Rotor Position
(aligned)
ΨM
ϑField = 0
α
d
Figure 4-5 Rotor Alignment
Alignment
Set fixed position (0°)
Reset encoder
position
Iq = 0
Id = IAlignment
Iq = 0
Id = 0
Wait for rotor
stabilization
Set position from
encoder
End
Figure 4-6 Rotor Alignment Flow Chart
4.3.2 Current Sensing
Phase currents are measured by a shunt resistor in each phase. A voltage drop on the shunt resistor is amplified
by an operational amplifier, and shifted up by 1.65V. The resulting voltage is converted by an A/D converter;
see Figure 4-7 and Figure 4-8.
3-Phase PMSM Motor Vector Control, Rev. 3
Freescale Semiconductor
Preliminary
27
System Concept
Q1
SKB04N60
Q3
SKB04N60
Q5
SKB04N60
Gate_AT
Gate_BT
Gate_CT
Phase_A
Phase_B
Phase_C
Q2
SKB04N60
Q4
SKB04N60
Q6
SKB04N60
Gate_AB
Gate_BB
Gate_CB
Source_AB
Source_BB
Source_CB
I_sense_A1
sense
R1
I_sense_B1
sense
0.1 1%
I_sense_A2
sense
R2
I_sense_C1
sense
I_sense_C2
sense
0.1 1%
I_sense_B2
R3
0.1 1%
sense
Figure 4-7 Current Shunt Resistors
R318 75k-1%
R320 10k-1%
I_sense_C2
5
1.65V +/- 1.65V
7
@ +/- Imax
I_sense_C
+
6
-
I_sense_C1
R321 10k-1%
R322
75k-1%
R323 390
U301B
MC33502D
1.65V ref
+3.3V_A
+
C306
3.3uF/10V
R324
100k-1%
8
C307
100nF
5
LM285M
U304
4
GNDA
R325
33k-1%
GNDA
Figure 4-8 Current Amplifier
As shown in Figure 4-7, the currents can only be measured in certain circumstances. For example, the current
flows through Phase A (and shunt resistor R1) only if transistor Q2 is switched on. Likewise, the current in
Phase B can be measured if transistor Q4 is switched on, and the current in Phase C can be measured if
transistor Q6 is switched on. A voltage shape analysis must be performed to get a moment of current sensing.
The voltage shapes of two different PWM periods are shown in Figure 4-11 The voltage shapes correspond to
center-aligned PWM sinewave modulation. As shown, the best moment of current sampling is in the middle of
the PWM period, where all bottom transistors are switched on.
To set the exact moment of sampling, the 56F8300 family offers the ability to synchronize ADC and PWM
modules via the SYNC signal. This exceptional hardware feature, patented by Freescale, is used for current
sensing. The PWM outputs a synchronization pulse, which is connected as an input to the synchronization
module TC3 (Quad Timer C, counter / timer 3). A high-true pulse occurs for each reload of the PWM,
regardless of the state of the LDOK bit. The intended purpose of TC3 is to provide a user-selectable delay
between the PWM SYNC signal and the updating of the ADC values. A conversion process can be initiated by
the SYNC input, which is an output of TC3. The time diagram of the automatic synchronization between PWM
and ADC is shown in Figure 4-9
3-Phase PMSM Motor Vector Control, Rev. 3
28
Freescale Semiconductor
Preliminary
System Blocks Concept
PWM
COUNTER
PWM SYNC
PWM
GENERATOR
OUTPUTS 0, 1
Dead Time / 2
Dead Time / 2
Dead Time
Dead Time
PWM
PINS 0, 1
POWER
STAGE
VOLTAGE
TC3
COUNTER
t1
t1
TC3
OUTPUT
t2
ADC
CONVERSION
t2
ADC ISR
Figure 4-9 Time Diagram of PWM and ADC Synchronization
However, all three currents cannot be measured from one voltage shape. The PWM period II illustrated in
Figure 4-11 shows a moment when the bottom transistor of Phase A is switched on for a very short time. If the
time on is shorter than a critical time, the current can not be accurately measured. The critical time is given by
hardware configuration (transistor commutation times, response delays of the processing electronics, etc.).
Therefore, only two currents are measured and a third current is calculated from the following equation:
0 = iA + iB + i C
EQ. 4-5
3-Phase PMSM Motor Vector Control, Rev. 3
Freescale Semiconductor
Preliminary
29
System Concept
I.
II.
PWM PERIOD
PWM RELOAD
PHASE_A
PHASE_B
PHASE_C
critical pulse width
ADC sampling point
Figure 4-10 Voltage Shapes of Two Different PWM Periods
II.
I.
duty cycle ratios
1
0.8
0.6
0.4
Phase A
Phase B
Phase C
0.2
0
0
60
120
180
240
300
360
angle
Sector 1 Sector 2 Sector 3 Sector 4 Sector 5 Sector 6
Figure 4-11 3-Phase Sinewave Voltages and Corresponding Sector Value
A decision must now be made about which phase current should be calculated. The simplest technique is to
calculate the current of the most positive voltage phase. For example, Phase A generates the most positive
voltage within section 0 to 60°, Phase B within section 60° to 120°, and so on; see Figure 4-11
In this case, the output voltages are divided into six sectors, as shown in Figure 4-11 The current calculation is
then made according to the actual sector value.
Sectors 1 and 6:
iA = – iB – iC
EQ. 4-6
3-Phase PMSM Motor Vector Control, Rev. 3
30
Freescale Semiconductor
Preliminary
System Blocks Concept
Sectors 2 and 3:
iB = – iA – iC
EQ. 4-7
i C = – i B – iA
EQ. 4-8
Sectors 4 and 5:
Notes:
The sector value is used for current calculation only, and has no other meaning in the sinewave
modulation. But if we use any type of space vector modulation, we can get the sector value as part of
space vector calculation.
4.3.3 Voltage Sensing
The DCBus voltage sensor is represented by a simple voltage divider. The DCBus voltage does not change
rapidly. It is nearly constant, with the ripple given by the power supply structure. If a bridge rectifier is used for
rectification of the AC line voltage, the ripple frequency is twice the AC line frequency. If the power stage is
designed correctly, the ripple amplitude should not exceed 10% of the nominal DCBus value.
The measured DCBus voltage must be filtered to eliminate noise. One of the easiest and fastest techniques is
the first order filter, which calculates the average filtered value recursively from the last two samples and
coefficient C:
u DCBusFilt ( n + 1 ) = ( Cu DCBusFilt ( n + 1 ) – CuDCBusFilt ( n ) ) – u DCBusFilt ( n ) EQ. 4-9
To speed up the initialization of the voltage sensing (the filter has exponential dependency with constant of 1/N
samples), the moving average filter, which calculates the average value from the last N samples, can be used
for initialization:
u DCBusFilt =
∑n = 1 uDCBus ( n )
–N
EQ. 4-10
4.3.4 Power Module Temperature Sensing
The power module temperature measured is used for thermal protection The hardware realization is shown in
Figure 4-12. The circuit consists of four diodes connected in series, a bias resistor, and a noise suppression
capacitor. The four diodes have a combined temperature coefficient of 8.8mV/οC. The resulting signal,
Temp_sense, is fed back to an A/D input, where software can be used to set safe operating limits. In this
application, the temperature, in Celsius, is calculated according to the conversion equation:
Temp_sense – b
temp = -------------------------------------a
EQ. 4-11
Where:
temp
=
Power module temperature in centigrade
Temp_sense
=
Voltage drop on the diodes, which is measured by ADC [V]
a
=
Diodes-dependent conversion constant (a = -0.0073738)
b
=
Diodes-dependent conversion constant (b = 2.4596)
3-Phase PMSM Motor Vector Control, Rev. 3
Freescale Semiconductor
Preliminary
31
Hardware Implementation
+3.3V_A
R1
2.2k - 1%
Temp_sense
D1
BAV99LT1
D2
BAV99LT1
C1
100nF
Figure 4-12 Temperature Sensing
5.
Hardware Implementation
5.1 Hardware Set-Up
This section explains the hardware set-up for targeting a 56F83xxEVM.
The application can run on Freescale’s motor control hybrid controllers using the 56F83xxEVM, Freescale’s
3-Phase AC / BLDC high voltage power stage, and the BLDC high voltage motor with a Quadrature Encoder
and integrated brake. All components are an integral part of Freescale’s embedded motion control development
tools. Application hardware set-up is shown in Figure 5-1
The system hardware set-up for a particular hybrid controller varies only by the EVM used. The application
level of the software is identical for all hybrid controllers. The EVM and chip differences are handled by the
off-chip software drivers for the particular hybrid controller EVM.
Detailed application hardware set-up can be found in the Targeting Freescale 56F83xx Platform manual for
the specific device being implemented.
3-Phase PMSM Motor Vector Control, Rev. 3
32
Freescale Semiconductor
Preliminary
Hardware Set-Up
100-240VAC
49-61Hz
40w flat ribbon cable
U3
U2
U1
J3
L
J11.1
N
J11.2
3-phase
AC/BLDC
J14
High-Voltage
Power Stage
J1
P1
J1
P2
J2
LMDC
56F83xxEVM
RS-232
P2
Black
Red
MB1
White
J13.1 J13.2 J13.3
SM40V
Motor Brake
SG40N
ECINLHIVACBLDC
ECMTRHIVBLDC
In-line
Optoisolation Box
RS-232 to PC
JTAG to PC
Black
White
P1
U4
ECOPTINL
Red
JTAG
Figure 5-1 High-Voltage Hardware System Configuration
All system parts are supplied and documented in these references:
•
U1 - Controller Board for 56F83xx
— Supplied as 56F83xxEVM
— Described in the 56F83xx Evaluation Module Hardware User’s Manual for the specific device
being implemented
•
U2 - Legacy Motor Daughter Card (LMDC)
— Supplies limited; please contact your Freescale representative
•
U3 - 3-phase AC / BLDC High-Voltage Power Stage
— Supplied in a kit with the In-Line Optoisolation Box, Freescale Part #ECINLHIVACBLDC
— Described in the 3-Phase AC BLDC High-Voltage Power Stage User’s Manual
•
U4 - In-Line Optoisolation Box
— Supplied in a kit with the 3-Phase AC BLDC High-Voltage Power Stage, Freescale Part
#ECINLHIVACBLDC
Or
— Supplied by itself, Freescale Part #ECOPTINL
— Described in the In-Line Optoisolation Box Manual
WARNING: To avoid potential damage to the development equipment, the use of an In-line Optoisolation
Box is strongly recommended during development.
3-Phase PMSM Motor Vector Control, Rev. 3
Freescale Semiconductor
Preliminary
33
Software Design
•
MB1 Motor-Brake SM40V + SG40N
The application software is targeted for a PM Synchronous Motor with sinewave Back-EMF shape. In
this demonstration application, a BLDC motor is used instead, due to the availability of the BLDC
motor (MB1). Although the Back-EMF shape of this motor is not an ideal sinewave, it can be
controlled by the application software. The drive parameters will be ideal, with a PMSM motor with an
exact sinewave Back-EMF shape.
Notes:
A detailed description of the individual board can be found in the appropriate 56F80x Evaluation Module
User’s Manual or 56F83xx Evaluation Module User Manual, or on the Freescale web site:
www.freescale.com
The Users Manual includes the schematic of the board, description of individual function blocks, and a bill of
materials. The individual boards can be ordered from Freescale as standard products.
6.
Software Design
This section explains the software design for targeting a 56F83xxEVM and describes the design of the drive’s
software blocks. The software description comprises these topics:
•
•
•
Main software flow chart
Data flow
State diagram
For more information on the system blocks used, refer to Section 4.3.
6.1 Main Software Flow Chart
The main software flow chart incorporates the Main routine entered from Reset (see Figure 6-1) and Interrupt
states (see Figure 6-2, and Figure 6-3). The Main routine includes the initialization of the hybrid controller
and the main loop.
The software consist of processes:
•
•
The Application Control process is the highest software level and precedes settings for other software
levels. Inputs for this level are the RUN / STOP switch, UP / DOWN buttons for manual control, and
PC master software (via the registers shown in Section 6.2). This process is handled by Application
Control Processing called from Main; see Figure 6-1.
The PM Synchronous Motor (PMSM) Control process provides most of the motor control
functionality. It is split into:
— Current Processing, which is called from ADC Complete Interrupt (see Figure 6-2) once per two
PWM reloads, with a period 125µs. It can also be set to each PWM reload (62.5µs), but the PC
master software recorder pcmasterdrvRecorder() must be removed from the code.
— Speed Processing, which is called from the Quadrature Timer D0 Interrupt (see Figure 6-3) with
the period PER_TMR_POS_SPEED_US (900µs). The advantage of splitting the current and the
speed control processes is that current control can be executed with a high priority and frequency
of calls, while the execution of the speed control is not that highly prioritized.
•
The Analog Sensing process handles sensing, filtering and correction of analog variables (phase
currents, temperature, DCBus voltage). It is provided by Analog Sensing Processing (see Figure 6-2)
3-Phase PMSM Motor Vector Control, Rev. 3
34
Freescale Semiconductor
Preliminary
Main Software Flow Chart
•
•
•
and Analog Sensing ADC Phase Set, split from Analog Sensing Processing because it sets ADC
according to the svmSector variable, calculated after PMSM Control Current Processing.
Position and Speed Measurement processes are provided by hardware Timer modules and the
functions giving the actual speed and position; see Section 4.3.1
LED Indication processing is called from Quadrature Timer D0 Interrupt, which provides the time
base for the LEDs’ flashing
The Fault Control process is split into:
— Background (see Figure 6-1), which checks the Overheating, Undervoltage and Position Sensing
Faults
— PWM Fault ISR (see Figure 6-2) takes care of Overvoltage and Overcurrent Faults, which cause
a PWM B Fault interrupt
•
•
The Brake Control process is dedicated to the brake transistor control, which maintains the DCBus
voltage level. It is called from Main (see Figure 6-1).
The UP / DOWN Button and Switch Control processes are subprocesses of Application Control and
are described in Section 7.4.
The Up / Down Button processes are split into:
— Button Processing Interrupt, called from Quadrature Timer D0 Interrupt (see Figure 6-3)
— Button Processing Background, called from ApplicationControlProcessing
3-Phase PMSM Motor Vector Control, Rev. 3
Freescale Semiconductor
Preliminary
35
Software Design
Reset
Hybrid Controller Initialization
Fault Control - Background:
if faultCtrlStatus - AnalogFaultEnbl
{check Undervoltage, Overheating
faults}
if Position sensing,Overvoltage,
Overcurrent faults
{set appFaultStatus
trigger beginning of Fault State}
Application Control - Processing:
according to appOpMode:
{control/check switch
set omega_required_mech}
according to appState:
{trigger appState Run/Stop/Init/
set PMSM Control Run/Stop
set Fault Control status
set Brake Control Run/Stop
set LED Indication}
Brake Control - Processing:
if u_dc_bus_filt > U_DCB_ON_BRAKE_SYSU
{Brake On}
if u_dc_bus_filt < U_DCB_OFF_BRAKE_SYSU
{Brake Off}
Figure 6-1 Software Flow Chart - General Overview I
•
The Switch process is split into:
— Switch Filter Processing, called from Quad Timer D0 Interrupt (see Figure 6-3
— Switch Get State, called from Application Control processing, which handles:
— Manual switch control
— Switch Get State: “PC master software” (in PC master application operating mode)
3-Phase PMSM Motor Vector Control, Rev. 3
36
Freescale Semiconductor
Preliminary
Main Software Flow Chart
Interrupt
ADC Complete
Interrupt
PWM B Fault
Analog Sensing- Processing
according to anSensingCtrlStatus
sensing / initialization:
{sense Temperature
calculate Filtered Temperature
sense, correct 2 Phase Currents
calculate 3 Phase Currents
sense Voltage
correct Voltage
calculate Filtered Voltage}
Fault Control - PWM Fault ISR part:
if Overcurrent or Overvoltage:
{set appFaultStatus = Overvoltage /
Overcurrent
triggers beginning of Fault State (disable PWM...)}
Return
PMSM Control
-Current Processing:
proceeds according to pmsmCtrlStatus
sin cos generation:
get position from Position Measurement
sin (theta_actual_el)
cos (theta_actual_el)
Current Control:
Currents Transformation (a,b,c to d-q)
(Field-Weakening Controller)
Current d Regulator
Current q Regulator
Voltages Transformation (d-q to α,β)
DCBus Ripple Compensation
Space Vector Module sets pwmABC
PWM:
set duty cycles to pwmABC
Analog Sensing-ADC Phase Set
set ADC converter phase current
samples - two (easily measured)
phases
Return
Figure 6-2 Software Flow Chart - General Overview II
3-Phase PMSM Motor Vector Control, Rev. 3
Freescale Semiconductor
Preliminary
37
Software Design
Interrupt
D0 QTimer
Speed Measurement Processing
PMSM Control
Speed, Alignment Processing:
proceeds according to its status
get speed from Speed Measurement
pmsmCtrlStatus?
RunFlag
AlignFlag
others
Speed Control:
Software Timer
if Timeout:
{Field-Weakening Controller
Speed Regulator
Speed Ramp}
Alignment:
Software Timer
if Timeout
{PMSM Control - End Alignment}
LED Indication Processing
Switch Filter Processing
Button Processing - Interrupt part
decrements debounceCounterUp(Down)
Return
Figure 6-3 S/W Flow Chart - General Overview III
3-Phase PMSM Motor Vector Control, Rev. 3
38
Freescale Semiconductor
Preliminary
Data Flow
6.2 Data Flow
The PMSM Vector Control Drive Control Algorithm is described in the data flow charts shown in Figure 6-4
and Figure 6-5. The variables and constants described should be clear from their names.
PC
Master Software
UP / DOWN
Buttons
RUN / STOP Switch
omega_reqPCM_mech,
appPcmCtrlStatus
appFaultStatus
appOpMode
appState
LED
Indication
Application
Control
faultCtrlStatus
Green LED
brakeCtrlStatus
pmsmCtrlStatus
omega_required_mech
i_Sa, i_Sb, i_Sc
u_dc_bus
anSensingCtrlStatus
temperature
PHASEA, PHASEB, INDEX
PC
Master
Software
temperature_filt
Analog Sensing
(Temperature, DCBus volt.
Phase Currents a, b, c)
Position, Speed
Measurement
u_dc_bus
i_Sabc_comp
omega_actual_mech
svmSector
theta_actual_el
theta_align_el_C
u_dc_bus_filt
i_Sd_Alignment
PMSM
Control
I_SDQ_MAX
reloadSWtmrSpeedControl
reloadSWtmrAlignment
SVM_INV_INDEX,
u_Reserve_FW
pwmABC
SVM_INV_INDEX,
u_OverMax
PWM Generation
coefBEMF, coefBEMFShift
PWM Outputs
Pwm_AT
Pwm_AB
Pwm_BT
Pwm_BB
Pwm_CT
Pwm_CB
Figure 6-4 Data Flow - Part 1
3-Phase PMSM Motor Vector Control, Rev. 3
Freescale Semiconductor
Preliminary
39
Software Design
PWM Faults
TEMPERATURE_MAX_F16
(Overvoltage/Overcurrent)
temperature_filt
i_Sabc_comp
u_dc_bus_min_fault_C
Check Index
Position
u_dc_bus_filt
faultCtrlStatus
Fault Control
u_dc_bus_on_brake
Brake
Control
appFaultStatus
pmsmCtrlStatus
PWMEN bit
PC
Master
Software
u_dc_bus_off_brake
brakeCtrlStatus
PWM Generation
PWM Outputs
IO_BRAKE
Pwm_AT
Pwm_AB
Pwm_BT
Pwm_BB
Pwm_CT
Pwm_CB
Figure 6-5 Data Flow - Part 2
The data flows consist of the processes described in the following sections.
6.2.1 Application Control Process
The Application Control process is the highest software level, which precedes settings for other software
levels.
The process state is determined by the variable appState.
The application can be controlled either:
•
•
Manually
From PC master software
The Manual or PC master application operating mode is determined by the setting of appOpMode.
For Manual control, the input of this process is the RUN / STOP switch and UP / DOWN buttons.
3-Phase PMSM Motor Vector Control, Rev. 3
40
Freescale Semiconductor
Preliminary
Data Flow
The PC master software communicates via:
•
•
•
•
omega_reqPCM_mech, which is the required angular speed from PC master software
appPcmCtrlStatus, which consists of the flags StartStopCtrl for START / STOP
RequestCtrl for changing the application’s operating mode appOpMode to Manual or PC control
appFaultStatus, which indicates faults
The other processes are controlled by setting:
•
•
•
•
•
pmsmCtrlStatus
omega_required_mech
appPcmCtrlStatus
brakeCtrlStatus
faultCtrlStatus
6.2.2 LED Indication Process
This process controls the LEDs’ flashing according to appState.
6.2.3 Analog Sensing Process
The Analog Sensing process handles:
•
•
•
Sensing
Filtering
Correction of analog variables:
— Phase currents
— Temperature
— DCBus voltage
6.2.4 Position and Speed Measurement Process
The Position and Speed Measurement process gives:
•
•
Mechanical angular speed, omega_actual_mech
Electrical position, theta_actual_el
6.2.5 PM Synchronous Motor (PMSM) Control Process
The PMSM Control process provides most of the motor control functionality.
Figure 6-6 shows the data flow inside the PMSM Control process, including essential subprocesses:
•
•
•
•
•
•
Sine
Cosine Transformations
Current Control
Speed
Alignment Control
Field-Weakening
3-Phase PMSM Motor Vector Control, Rev. 3
Freescale Semiconductor
Preliminary
41
Software Design
The Sine and Cosine Transformations generate sinCos_theta_el with the components sine, cosine according to
electrical position theta_actual_el. It is provided in a look-up table.
omega_required_mech
Speed Ramp
Control
reloadSWtmrAlignment
reloadSWtmrSpeedControl
omega_desired_mech
omega_actual_mech
i_Sd_Alignment
SVM_INV_INDEX,
u_Reserve_FW
PIRegParams_omega_mech.
PositivePILimit
theta_align_el_C
Speed, Align
Control
Field-Weakening
theta_actual_el
Sin, Cos
Transformation
I_SDQ_MAX
u_SDQ
i_SDQ_desired
q_axis
i_SDQ_desired
d_axis
pmsmCtrlStatus
u_dc_bus_filt
sinCos_theta_el
Current
Control
coefBEMF, coefBEMFShift
u_S_max_FWLimit
i_Sabc_comp
SVM_INV_INDEX,
u_OverMax
svmSector
I_SDQ_MAX_F16
pwmABC
Figure 6-6 Data Flow - PMSM Control
6.2.5.1 Current Control Process
The data flow inside the Current Control process is detailed in Figure 6-7 The measured phase currents
i_Sabc_comp are transformed into i_SDQ_lin using sinCos_theta_el; see Section 3.3.3. Both d and q
components are regulated by independent Proportional Integrational (PI) regulators to i_SDQ_desired values.
The outputs of the regulators are u_SDQ_lin.
3-Phase PMSM Motor Vector Control, Rev. 3
42
Freescale Semiconductor
Preliminary
Data Flow
i_Sabc_comp
sinCos_theta_el
Current Transformation
a,b,c -> d-q
i_SDQ_desired.q_axis
i_SDQ.q_axis
i_SDQ_desired.d_axis
i_SDQ.d_axis
u_LimitF16
I_SDQ_MAX_F16
Current q
Regulator
Current d
Regulator
omega_actual_mech
u_SDQ_lin.q_axis
u_SDQ_lin.d_axis
pmsmCtrlStatus
coefBEMF, coefBEMFShift
Feed Forward
u_SDQ
sinCos_theta_el
u_LimitF16
Voltage Transformation
d-q -> alpha, beta
SVM_INV_INDEX/2*
*u_dc_bus_filt +
+u_OverMax
u_SAlphaBeta
Scaling
DCBus Ripple
Compensation
u_dc_bus_filt
SVM_INV_INDEX,
u_OverMax
u_Salpha_RipElim
Space Vector
Modulation
pwmABC
svmSector
Figure 6-7 Data Flow - PMSM Control - Current Control
3-Phase PMSM Motor Vector Control, Rev. 3
Freescale Semiconductor
Preliminary
43
Software Design
The Feed Forward process provides the following calculations:
u_SDQ.q_axis = coefBEMF ⋅ 2
coefBEMFShft
⋅ omega_actual_mech + u_SDQ_lin.q_axis
EQ. 6-1
EQ. 6-2
u_SDQ.d_axis = u_SDQ_lin.d_axis
The u_SDQ voltages are transformed into u_SAlphaBeta (see Section 3.3.3) by the Voltage Transformation
process. The Scaling DCBus Ripple Compensation block scales u_SAlphaBeta (according u_dc_bus_filt) to
u_Salpha_RipElim, described in the svmlimDcBusRip function in the Motor Control Library. The space vector
modulation process generates duty cycle pwmABC and svmSector according to u_Salpha_RipElim.
The u_LimitF16 is a voltage limit for current controllers. The u_OverMax constant is used to increase the
limitation of u_SDQ voltages over maximum SVM_INV_INDEX / 2 * u_dc_bus_filt determined by the DCBus
voltage and space vector modulation. Although the pwmABC will be limited by the space vector modulation
process functions, the reserve is used for field-weakening controller dynamics. In the stable state, the u_SDQ
voltages vector will not exceed u_S_max_FWLimit; see Section 6.2.5.4.
6.2.5.2 Speed Ramp
This process generates angular speed omega_desired_mech from angular speed omega_required_mech with a
linear ramp. The speed ramp is implemented so as not to saturate the speed regulator during acceleration.
6.2.5.3 Speed, Alignment Control Process
The process controls the i_SDQ_desired.q_axis current according to the PMSM Control Process Status.
For Alignment status, it sets i_SDQ_desired.d_axis to i_Sd_Alignment and i_SDQ_desired.q_axis to 0.
For Run status, it controls the omega_actual_mech speed to omega_desired_mech by calculation of the PI
regulator with i_SDQ_desired.q_axis output.
6.2.5.4 Field-Weakening Process
The Field-Weakening process provides control of i_SDQ_desired.d_axis in order to achieve higher motor
speeds by the field-weakening technique. The control algorithm is shown in Figure 6-8 The
u_S_max_FWLimit is computed from u_dc_bus_filt. To maintain voltage reserve, the u_Reserve_FW is
subtracted from the maximum SVM_INV_INDEX / 2 * u_dc_bus_filt, determined by DCBus voltage and space
vector modulation. The reserve is used for field-weakening controller dynamics; in the stable state, the u_SDQ
voltages vector will not exceed u_S_max_FWLimit.
This process also provides voltage limitation i_SDQ_desired.d_axis2 + i_SDQ_desired.q_axis2 <
(I_SDQ_MAX_F16)2 by setting:
PIRegParams_omega_mech.PositivePILimit =
2
2
I_SDQ_MAX_F16 – i_SDQ_desired.d_axis
2
2
PIRegParams_omega_mech.NegativePILimit = – I_SDQ_MAX_F16 – i_SDQ_desired.d_axis
EQ. 6-3
EQ. 6-4
3-Phase PMSM Motor Vector Control, Rev. 3
44
Freescale Semiconductor
Preliminary
Data Flow
u_dc_bus_filt
SVM_INV_INDEX
u_Reserve_FW
SVM_INV_INDEX/2*u_dc_bus_filt-u_Reserve_FW
0
-
I_SDQ_MAX_F16
u_S_max_FWLimit
u_SD.d_axis
u_SD.q_axis
+
(d_axis2+q_axis2)1/2
-
maximum
limit
minimum
limit
i_SDQ_desired.d_axis
PI regulator
Figure 6-8 Field-Weakening Controller
6.2.6 Brake Control Process
The Brake Control process maintains DCBus voltage level via the IO_BRAKE driver, which controls the brake
switch. The voltage comparison levels are:
•
u_dc_bus_on_brake, which is initialized according to mains voltage with either:
— U_DCB_ON_BRAKE_MAINS230_F16
— U_DCB_ON_BRAKE_MAINS115_F16
•
u_dc_bus_off_brake, initialized with either:
— U_DCB_OFF_BRAKE_MAINS230_F16
— U_DCB_OFF_BRAKE_MAINS115_F16
6.2.7 PWM Generation Process
The PWM Generation process controls the generation of PWM signals, driving the 3-phase inverter.
The input is pwmABC, with three PWM components scaled to the range <0,1> of type Frac16. The scaling
(according to PWM module setting) and the PWM module control (on the hybrid controller) is provided by the
PWM driver.
6.2.8 Fault Control Process
The Fault Control process checks these faults:
•
•
•
•
•
Overheating
Undervoltage
Overvoltage
Overcurrent
Position Sensing
3-Phase PMSM Motor Vector Control, Rev. 3
Freescale Semiconductor
Preliminary
45
Software Design
Overheating and Undervoltage are checked by the comparisons:
•
•
temperature_filt < TEMPERATURE_MAX_F16
u_dc_bus_filt < u_dc_bus_min_fault_C, where u_dc_bus_min_fault_C is initialized with
U_DCB_MIN_FAULT_MAINS230_F16 or U_DCB_MIN_FAULT_MAINS115_F16.
The Position Sensing fault is checked with the Check Index Position process.
The Overvoltage and Overcurrent faults are set in the PWMA Fault interrupt.
6.3 State Diagram
The software can be split into the processes shown in Section 6.2.
These processes are described in the following sections:
•
•
•
•
•
Hybrid Controller Initialization
Application Control State Diagram
PMSM Control State Diagram
Fault Control State Diagram
Analog Sensing State Diagram
All processes start with the Hybrid Controller Initialization state after Reset.
6.3.1 Hybrid Controller Initialization
The hybrid controller Initialization state:
•
Initializes:
— PWM
— Application control
— PM Synchronous Motor (PMSM) Control
— Analog sensing
— Brake control
— Fault control
— LED indication
— Button control
•
•
•
Sets manual application operating mode
Enables masked interrupts
Sets “Application Control: Initialization Triggers”, which sets all affected processes to the Begin
Application Initialization state
6.3.2 Application Control State Diagram
The Application Control process is detailed in Figure 6-9
3-Phase PMSM Motor Vector Control, Rev. 3
46
Freescale Semiconductor
Preliminary
State Diagram
Reset
Hybrid Controller
Initialization
done
Application Control:
switchState = Stop &
Fault Control: faults cleared
Init
Initializations proceeding
appState = APP_INIT
Init Fault Control (pcb identification)
set appOpMode
Application Control:
Fault
appPcmCtrlStatus.
RequestCtrl = 1
switchState = Stop &
initializations finished
Fault Control:
Begin Fault
done
Application Control:
Fault Begin
clear pmsmCtrlStatus.RunFlag
clear pmsmCtrlStatus.AlignFlag
set appState = APP_FAULT
switchState = Run
Application Control:
Stop
appState = APP_STOP
done
Application Control:
Begin Stop
set appState = APP_STOP
Fault Control: Begin Fault
Application Control:
Begin Run
set appState = APP_RUN
done
Application Control:
Run
appState = APP_RUN
switchState = Stop
Figure 6-9 State Diagram - Application Control
After reset, the Hybrid Controller Initialization state is entered. The peripherals and variables are initialized in
this state, and the application operating mode appOpMode is set to Manual Control.
When the state is finished, the Application Control Init state follows. As shown in Figure 6-9:
•
•
•
•
appState = APP_INIT
All subprocesses requiring initialization are proceeding
PCB identification is provided
The PWM is disabled, so no voltage is applied on motor phases
If the appPcmCtrlStatus.RequestCtrl flag is set from PC master software, the application operating mode
appOpMode is toggled and the application operating mode can only be changed in this state. If the
switchState = Stop, Application Control enters the Stop state.
The switchState is set according to the manual switch on the EVM or PC master software register
AppPcmCtrlStatus.StartStopCtrl, depending on the application’s operating mode.
3-Phase PMSM Motor Vector Control, Rev. 3
Freescale Semiconductor
Preliminary
47
Software Design
In the Stop state:
•
•
appState = APP_STOP
The PWM is disabled, so no voltage is applied on motor phases
When switchState = Run, the Begin Run state is processed. If there is a request to change application operating
mode, appPcmCtrlStatus.RequestCtrl = 1, the application Init is entered and the application operating mode
request can only be accepted in the Init or Stop state by transition to the Init state.
In the Begin Run state, all the processes provide settings to the Run state.
In the Run state:
•
•
•
The PWM is enabled, so voltage is applied on motor phases
The motor is running according to the state of all subprocesses
If switchState = Stop, the Stop state is entered.
If a fault is detected, the Begin Fault state is entered, which is a subprocess of Fault control.
•
•
•
It sets appState = APP_FAULT
The PWM is disabled
The subprocess PMSM Control is set to Stop
The Fault state can only move onto the Init state when switchState = Stop, and the Fault Control subprocess
has successfully cleared all faults.
6.3.3 PMSM Control State Diagram
A state diagram of the PMSM Control process is illustrated in Figure 6-10.
3-Phase PMSM Motor Vector Control, Rev. 3
48
Freescale Semiconductor
Preliminary
State Diagram
Application Control: Init
PMSM Control:
Initialization
clear AlignInitDoneFlag
Application Control: Begin Running
pmsmCtrlStatus.AlignInitDoneFlag = No
done
done
PMSM Control:
Begin Stop or Fault
clear RunFlag
clear AlignFlag
PMSM Control:
Stop or Fault
Begin Running
AlignInitDoneFlag = 1
PMSM Control:
Begin Alignment
set Alignment current
set Alignment timeout
set AlignFlag
PMSM Control:
Alignment
timeout search
Current ramp
Application Control: Begin Stop/Fault
done
PMSM Control:
Run
done
PMSM Control:
Begin Run
set RunFlag
Alignment Timeout
done
PMSM Control:
End Alignment
Set Zero Position
set AlignInitDoneFlag
clear AlignFlag
Figure 6-10 State Diagram - PMSM Control
When Application Control initializes, the PMSM Control subprocess initialization state is entered.
•
•
•
•
The AlignInitDoneFlag is cleared, which means that alignment can proceed.
The next PMSM Control state is Begin Stop or Fault.
RunFlag and AlignFlag are cleared and the Stop or Fault state is entered.
When “Application Control” equals “Begin Run”, the PMSM Control subprocess enters the Begin
Alignment or Begin Run state, depending on whether or not the alignment initialization has already
proceeded (flagged by AlignInitDoneFlag)
The alignment state is necessary for setting the zero position of position sensing; see Section 4.3.1.3. In the
state Begin Alignment:
The Alignment current and duration are set
The alignment is provided by setting desired current for d_axis to i_Sd_Alignment and for q_axis to 0.
3-Phase PMSM Motor Vector Control, Rev. 3
Freescale Semiconductor
Preliminary
49
Software Design
The alignment state provides current control and time out search. When alignment time out occurs, End
Alignment is entered. In that state, the Position Sensing Zero Position is set, so the position sensor is aligned
with the real vector of the rotor flux. When the End Alignment state ends, the PMSM Control enters a regular
Run state, where the motor is running at the required speed. If the Application Control state is set to Begin Stop
or Begin Fault, the PMSM Control enters the Begin Stop or Fault, then the Stop or Fault state.
6.3.4 Fault Control State Diagram
The state diagram of the Fault Control subprocess is illustrated in Figure 6-11 After the initialization, the fault
conditions are searched. If any fault occurs, the appFaultStatus variable is set according to detected error;
PWM is switched on (PWMEN bit = 0); the Fault state is entered. This state also causes Application Control:
Fault state. If the faults are successfully cleared, this is signaled to the Application Control process. The Fault
state is left when the Application Control Init state is entered.
Reset
Fault Control:
Hybrid Controller Initialization
Application Control: Init
Fault Control:
Application Initialization
clear appFaultStatus
pcb identification
done
Fault Control:
No Fault
searching faults
Fault:
Undervoltage (filtered)
Overheating (filtered)
Overcurrent (fault pin)
Overvoltage (fault pin)
Position Sensing fault
Fault Control:
Begin Fault
Application Control Begin Fault
setting of appFaultStatus
PWMEN bit = 0
done
Fault Control:
Fault
clear/test faults
Figure 6-11 State Diagram Fault Control
3-Phase PMSM Motor Vector Control, Rev. 3
50
Freescale Semiconductor
Preliminary
Scaling of Quantities
6.3.5 Analog Sensing State Diagram
The state diagram of the Analog Sensing subprocess is shown in Figure 6-12 The Hybrid Controller
Initialization state initializes hardware modules such as ADC, synchronization with PWM, etc. In Begin Init,
Initialization is started, so the variables for initialization sum and the InitDoneFlag are cleared. In the Init
Proceed state, the temperature, DCBus voltage and phase current samples are sensed and summed. After
required analog sensing, Init samples are sensed, and the Init Finished state is entered. The samples’ average is
calculated from the sum divided by the number of analog sensing Init samples. According to the phase
currents’ average value, the phase current offsets are initialized.
All variable sensing is initialized and the state Init Done is entered, so the variables from analog sensing are
valid for other processes. In this state, temperature and DCBus voltage are filtered in first order filters.
Reset
Analog Sensing
Hybrid Controller Initialization
Application Control: Begin Init
Analog Sensing:
Begin Init
clear variables
clear InitDoneFlag
done
Application Control: Begin Init
Analog Sensing
Init Done,
normal operation:
done
Analog Sensing
Init. Proceed:
sense and sum samples
count samples
samples counter =
analog sensing init samples
Analog Sensing
Init Finished:
samples average
set current offsets
set InitDoneFlag
Figure 6-12 State Diagram - Analog Sensing
7.
Implementation Notes
This section explains implementation notes for targeting a 56F83xxEVM.
7.1 Scaling of Quantities
The PMSM Vector Control application uses a fractional representation for all real quantities except time.
The N-bit signed fractional format is represented using 1.[N-1] format (1 sign bit, N-1 fractional bits). Signed
fractional numbers (SF) lie in the following range:
– 1.0 ≤ SF ≤ +1.0 -2
–[ N – 1 ]
EQ. 7-1
3-Phase PMSM Motor Vector Control, Rev. 3
Freescale Semiconductor
Preliminary
51
Implementation Notes
For words and long-word signed fractions, the most negative number that can be represented is -1.0, whose
internal representation is $8000 and $80000000, respectively. The most positive word is $7FFF or 1.0 - 2-15,
and the most positive long-word is $7FFFFFFF or 1.0 - 2-31.
The following equation shows the relationship between the real and fractional representations:
Real Value
Fractional Value = -------------------------------------------------------------Real Quantity Range Max
EQ. 7-2
Where:
Fractional Value
=
The fractional representation of the real value [Frac16]
Real Value
=
The real value of the quantity [V, A, RPM, etc.]
Real Quantity
Range Max
=
The maximum of the quantity range, defined in the application [V, A, RPM, etc.]
The C language standard does not have any fractional variable type defined. Therefore, fractional operations
are provided by CodeWarrior intrinsics functions (e.g. mult_r() ). As a substitution for the fractional type
variables, the application uses types Frac16 and Frac32. These are in fact defined as integer 16-bit signed
variables and integer 32-bit signed variables. The difference between Frac16 and pure integer variables is that
Frac16 and Frac32 declared variables should only be used with fractional operations (intrinsics functions).
A recalculation from real to a fractional form and Frac16, Frac32 value is made with the following equations:
Real Value
Frac16 Value = 32768 ⋅ -------------------------------------------------------------Real Quantity Range Max
EQ. 7-3
for Frac16 16-bit signed value and:
Frac32 Value = 2
31
Real Value
⋅ -------------------------------------------------------------Real Quantity Range Max
EQ. 7-4
for Frac32 32-bit signed value:
Real Value
Fractional Value = -------------------------------------------------------------Real Quantity Range Max
EQ. 7-5
Fractional form, a conversion from Fraction Value to Frac16 and Frac32 Value, can be provided by the C
language macro.
7.1.1 Voltage Scaling
Voltage scaling results from the sensing circuits of the hardware used; for details, see the 3-Phase AC BLDC
High-Voltage Power Stage User’s Manual.
3-Phase PMSM Motor Vector Control, Rev. 3
52
Freescale Semiconductor
Preliminary
Scaling of Quantities
Voltage quantities are scaled to the maximum measurable voltage, which is dependent on the hardware. The
relationship between real and fractional representations of voltage quantities is:
u Real
u Frac = -------------------------------------------------------VOLT_RANGE_MAX
EQ. 7-6
Where:
uFrac
=
Fractional representation of voltage quantities [-]
uReal
=
Real voltage quantities in physical units [V]
VOLT_RANGE_MAX
=
Defined voltage range maximum used for scaling in physical units [V]
In the application, the VOLT_RANGE_MAX value is the maximum measurable DCBus voltage:
VOLT_RANGE_MAX = 407V
All application voltage variables (u_dc_bus; u_dc_bus_filt; u_SAlphaBeta; u_SDQ, u_SAlphaBeta; and so on)
are scaled in the same way.
7.1.2 Current Scaling
Current scaling also results from the sensing circuits of the hardware used; for details, see the 3-Phase AC
BLDC High-Voltage Power Stage User’s Manual.
The relationship between real and fractional representation of current quantities is:
i Real
i Frac = -----------------------------------------------------------∫ CURR_RANGE_MAX
EQ. 7-7
Where:
iFrac
=
Fractional representation of current quantities [-]
iReal
=
Real current quantities in physical units [A]
CURR_RANGE_MAX
=
Defined current range maximum used for scaling in physical units [A]
In the application, the CURR_RANGE_MAX value is the maximum measurable current:
CURR_RANGE_MAX = 5.86A
All application current variables (components of i_Sabc_comp; i_SAlphaBeta; i_SDQ; i_SDQ_desired;
i_Sd_Alignment; and so forth) are scaled in the same way.
Notes:
As shown in 3-Phase AC BLDC High-Voltage Power Stage User’s Manual, the current sensing
circuit provides measurement of the current in the range from CURR_MIN = -2.93A to
CURR_MAX = +2.93A, giving the voltage for the ADC input ranges from 0 to 3.3V with 1.65V offset.
The 56F80x’s ADC converter is able to automatically cancel (subtract) the offset. The fractional
representation of the measured current is then in the range <-0.5, 0.5), while the possible
3-Phase PMSM Motor Vector Control, Rev. 3
Freescale Semiconductor
Preliminary
53
Implementation Notes
representation of a fractional value is <-1,1), as shown in EQ. 7-3. Therefore, CURR_RANGE_MAX is
calculated according to the following equation:
CURR_RANGE_MAX = CURR_MAX-CURR_MIN = 2 ⋅ CURR_MAX
EQ. 7-8
7.1.3 Speed Scaling
Speed quantities are scaled to the defined speed range maximum, which should be set lower than all speed
variables in the application, so it was set higher than the maximum mechanical speed of the drive. The
relationship between real and fractional representation of speed quantities is:
ω Real
ω Frac = ------------------------------------------------------------OMEGA_RANGE_MAX
EQ. 7-9
where:
ωFrac
ωReal
=
Fractional representation of speed quantities [-]
=
Real speed quantities in physical units [rpm]
OMEGA_RANGE_MAX
=
Defined speed range maximum used for scaling in physical units [rpm]
In the application, the OMEGA_RANGE_MAX value is defined as:
OMEGA_RANGE_MAX = 6000rpm
Other
speed
variables
(omega_reqPCM_mech;
omega_desired_mech;
omega_required_mech;
omega_reqMAX_mech; omega_reqMIN_mech; omega_actual_mech) are scaled in the same way
The relation between speed scaling and speed measurement with encoder is described in Section 4.3.1.2. In the
final software, the constant OMEGA_SCALE is identical with the scaling constant k in equations EQ. 4-1 and
EQ. 4-4, and OMEGA_RANGE_MAX is ωMax.
7.1.4 Position Scaling
Position Scaling is described in Section 4.3.1.1
7.1.5 Temperature Scaling
As shown in Section 4.3.4, the temperature variable does not have a linear dependency.
7.2 PI Controller Tuning
The application consists of four PI controllers. Two controllers are used for the Id and Iq currents, one for speed
control and the other for field-weakening. The controller’s constants are given by simulation in Matlab and
were experimentally specified. A detailed description of controller tuning is beyond the scope of this
application note.
3-Phase PMSM Motor Vector Control, Rev. 3
54
Freescale Semiconductor
Preliminary
RUN / STOP Switch and Button Control
7.3 Subprocesses Relation and State Transitions
As shown in Section 6.2 and Section 6.3, the software is split into subprocesses according to functionality.
The application code is designed to be able to extract individual processes, such as Analog Sensing, and use
them for customer applications. The C language functions dedicated for each process are located in one place
in the software, so they can be easily used for other applications. Function naming usually starts with the name
of the process, for example, AnalogSensingInitProceed().
As Section 6.3 shows, the processes’ or subprocesses’ state transients have some mutual relations. For
example, “Application Control: Begin Initialization” is a condition for transient of the “Analog Sensing
process: Init Done” to Begin Init state. In the code, the interface between processes is provided via “trigger”
functions. The naming convention for these functions is: <ProcessName><State>Trig().
The functionality is explained in following example:
The “trigger” function, Process1StateTrig(), is called from process1. The transient functions of process2,
process3,etc., which must be triggered by Process1State, are put inside Process1StateTrig().
7.4 RUN / STOP Switch and Button Control
The RUN / STOP switch is connected to the GPIOE5 pin. The state of the RUN / STOP switch can be read
directly from the GPIO Data Register.
User buttons are also connected to GPIO pins. The state of buttons are read periodically from the GPIO Data
Register. The EVM boards do not resolve button contact bouncing, which may occur while pushing and
releasing the button, so this issue must be resolved by software.
The reading of buttons is masked by software methods. The following algorithm is used to check the state of
the desired GPIO pins.
The level of a GPIO may be LOW or HIGH. When the button is pressed, the logical level LOW is applied on
the GPIO pin and the scanning routine detects the low level and sets the corresponding buttonStatus bit; see
Figure 7-1. Due to contact bounces, the routine disables the scanning process and sets the debounce counter to
a predefined value just after the low level is detected. The variable buttonStatus represents the interrupt flag.
Using the 56F83xx’s software timer, the ButtonProcessingInterrupt function is periodically called, as shown in
Figure 7-1. The function ButtonProcessingInterrupt decrements the debounce counter and if the counter is 0,
the reading of GPIO pins is again enabled. The button press is checked by the ButtonEdge function; see
Figure 7-2. When the variable buttonStatus is set, the ButtonEdge function returns “1” and clears buttonStatus.
When the variable buttonStatus is not set, the ButtonEdge function returns “0”.
According to the ButtonProcessing calling period, the value of the debounce counter should be set close to
180ms. This value is sufficient to prevent multiple sets of buttonStatus bits, due to contact bounces.
3-Phase PMSM Motor Vector Control, Rev. 3
Freescale Semiconductor
Preliminary
55
Implementation Notes
ButtonProcessing
Interrupt
ButtonProcessing
Background
No
debouncecounter =
0
debouncecounter >
0
No
Yes
Yes
Decrement debounce
counter
Read data from
GPIO pin
Return
No
Data from GPIO =
Low
Yes
Set buttonStatus
debounceCounter =
DEBOUNCE_VALUE
Return
Figure 7-1 Button Control - ButtonProcessingBackground and ButtonProcessingInterrupt
ButtonEdge
buttonStatus = 1
No
Yes
Clear buttonStatus
Return 1
Return 0
Figure 7-2 Button Control - ButtonEdge
3-Phase PMSM Motor Vector Control, Rev. 3
56
Freescale Semiconductor
Preliminary
Interrupts
8.
Processor Expert (PE) Implementation
PE is a collection of beans; APIs; libraries; services; rules; and guidelines. This software infrastructure is
designed to let a 56F80x or 56F8300 software developer create high-level, efficient, portable code. This
chapter describes how the PMSM Vector Control application is written under PE.
8.1 Beans and Library Functions
The PMSM Vector Control application uses the following beans:
•
•
•
•
•
ADC bean
Quad Timer bean
Quadrature Decoder bean
PWM bean
PC master software bean
The PMSM Vector Control application uses the following motor control functions:
•
•
•
•
•
•
•
cptrfmClarke (Clarke transformation, MC_ClarkePark bean)
cptrfmPark (Park transformation, MC_ClarkePark bean)
cptrfmParkInv (Inverse Park transformation, MC_ClarkePark bean)
mcElimDcBusRip (DC bus ripple elimination, MC_SpaceVectorMod bean)
mcPwmIct (3-phase sinewave modulation, MC_SpaceVectorMod bean)
rampGetValue (ramp generation, MC_Ramp library)
controllerPItype1_asmSc (PI controller, MC_Controller bean)
8.2 Beans Initialization
Each peripheral on the hybrid controller or on the EVM board is accessible through a bean. This section
describes the bean initialization of all peripherals used. For a more detailed description of drivers, see the
Targeting Freescale MC56F83xx Platform manual.
To use a bean, follow these steps:
•
Add the required bean:
— Right click Beans under the Processor Expert tab in the project window and select Add Beans
— When PE’s Bean Selector window opens, select the desired bean
•
•
Configure the added bean
Call the bean’s init function or use PE initialization, by selecting Call init in the CPU init code
Access to individual driver functions is provided from PESL support by the ioctl or PESL function call. To
enable access to these functions, PESL support should be enabled in the CPU bean used.
8.3 Interrupts
When configuring a bean in PE, the user defines the callback functions called during interrupts.
3-Phase PMSM Motor Vector Control, Rev. 3
Freescale Semiconductor
Preliminary
57
Processor Expert (PE) Implementation
8.4 PC Master Software
PC master software was designed to provide a debugging, diagnostic and demonstration tool for development
of algorithms and applications. It consists of components running on PCs and components running on the
target hybrid controller, connected by an RS-232 serial port. A small program is resident in the hybrid
controller that communicates with the PC master software to parse commands, return status information to the
PC, and process control information from the PC. The PC master software executing on a PC uses Microsoft
Internet Explorer as a user interface to the PC.
To enable the PC master software operation on the hybrid controller target board application, add the
PC_Master bean to the application. The PC_Master bean is located under CPU External Devices -> Display in
PE’s Bean Selector.
The PC master bean automatically includes the SCI driver and installs all necessary services. This means there
is no need to install SCI driver because the PC_Master bean encapsulates its own SCI driver.
The default baud rate of the SCI communication is 9600 and is set automatically by the PC master software
driver.
A detailed PC master software description is provided in the PE documentation.
The 3-Phase PMSM Vector Control utilizes PC master software for remote control from a PC. It enables the
user to:
•
•
•
Control the PC master software
Control the motor’s Start / stop
Set motor speed
Variables read by the PC master software as a default and displayed to the user are:
•
•
•
Required motor speed
Actual motor speed
Application status
— Init
— Stop
— Run
— Fault
•
•
•
DCBus voltage level
Identified line voltage
Fault Status
— No_Fault
— Overvoltage
— Overcurrent
— Undervoltage
— Overheating
The profiles of required and actual speeds, together with the desired Id and Iq currents, can be seen in the Speed
Scope window.
3-Phase PMSM Motor Vector Control, Rev. 3
58
Freescale Semiconductor
Preliminary
PC Master Software
The course of quickly-changing variables can be observed in the Recorder windows, displayed by the PC
master’s Speed Scope. The Recorder can only be used when the application is running from External RAM,
due to the limited on-chip memory. The length of the recorded window may be set in Recorder Properties =>
bookmark Main => Recorded Samples. The dedicated memory space is defined in the appconfig.h file of the
ExtRAM target. The recorder samples are taken every 125µsec.
The following records can be captured:
•
•
•
•
Required speed
Actual speed
Desired Id current
Desired Iq current
The PC master software Control Page is illustrated in Figure 8-1 The profiles of the required and actual speeds
can be seen in the Speed Scope window.
Figure 8-1 PC Control Window
3-Phase PMSM Motor Vector Control, Rev. 3
Freescale Semiconductor
Preliminary
59
Hybrid Controller Memory Use
9.
Hybrid Controller Memory Use
Table 9-1 shows how much memory is needed to run the 3-phase PMSM Vector Control drive using the
Quadrature Encoder. A part of the hybrid controller memory is still available for other tasks.
Table 9-1 RAM and FLASH Memory Use by PE 2.94 and CodeWarrior 6.1.2
Memory
(in 16-bit Words)
Available for 56F8300
Hybrid Controller
Application Used + Stack
Application Used without
PC Master Software, SCI
Program Flash
64K
9009
4546
Data Flash
4K
4373
4360
Program RAM
2K
0
0
Data RAM
4K
2580 + 512 stack
396 + 512 stack
10.
References
[1] Design of Brushless Permanent-magnet Motors, J.R. Hendershot JR and T.J.E. Miller, Magna Physics
Publishing and Clarendon Press, 1994
[2] Brushless DC Motor Control using the MC68HC708MC4, AN1702, Freescale Semiconductor, Inc.
[3] 56F80x Evaluation Module Hardware User’s Manual, DSP56F80xEVMUM, Freescale Semiconductor,
Inc.
[4] 3-Phase AC BLDC High-Voltage Power Stage User’s Manual, MEMC3PBLDCPSUM/D, Freescale
Semiconductor, Inc.
[5] 56800 Family Manual, DSP56F800FM, Freescale Semiconductor, Inc.
[6] DSP56F800 User Manual, DSP56F801-7UM, Freescale Semiconductor, Inc.
[7] 56F8300 Peripheral User Manual, MC56F8300UM, Freescale Semiconductor, Inc.
[8] 56F805 Evaluation Module Hardware User’s Manual, DSP56F805EVMUM, Freescale Semiconductor,
Inc.
[9] 56F83xx Evaluation Module Hardware User’s Manual for the specific device being implemented,
MC56F83xxEVMUM, Freescale Semiconductor, Inc.
[10] Evaluation Motor Board User’s Manual, MEMCEVMBUM/D, Freescale
[11] User Manual for PC master software; see PE documentation
[12] Sensorless Vector and Direct Torque Control, P. Vas (1998), Oxford University Press, ISBN
0-19-856465-1, New York.
[13] Elektricke pohony, Caha, Z.; Cerny, M. (1990), SNTL, ISBN 80-03-00417-7, Praha.
[14] Freescale web page: www.freescale.com
3-Phase PMSM Motor Vector Control, Rev. 3
60
Freescale Semiconductor
Preliminary
PC Master Software
3-Phase PMSM Motor Vector Control, Rev. 3
Freescale Semiconductor
Preliminary
61
References
3-Phase PMSM Motor Vector Control, Rev. 3
62
Freescale Semiconductor
Preliminary
PC Master Software
3-Phase PMSM Motor Vector Control, Rev. 3
Freescale Semiconductor
Preliminary
63
How to Reach Us:
Home Page:
www.freescale.com
E-mail:
[email protected]
USA/Europe or Locations Not Listed:
Freescale Semiconductor
Technical Information Center, CH370
1300 N. Alma School Road
Chandler, Arizona 85224
+1-800-521-6274 or +1-480-768-2130
[email protected]
Europe, Middle East, and Africa:
Freescale Halbleiter Deutschland GmbH
Technical Information Center
Schatzbogen 7
81829 Muenchen, Germany
+44 1296 380 456 (English)
+46 8 52200080 (English)
+49 89 92103 559 (German)
+33 1 69 35 48 48 (French)
[email protected]
Japan:
Freescale Semiconductor Japan Ltd.
Headquarters
ARCO Tower 15F
1-8-1, Shimo-Meguro, Meguro-ku,
Tokyo 153-0064, Japan
0120 191014 or +81 3 5437 9125
[email protected]
Asia/Pacific:
Freescale Semiconductor Hong Kong Ltd.
Technical Information Center
2 Dai King Street
Tai Po Industrial Estate
Tai Po, N.T., Hong Kong
+800 2666 8080
[email protected]
For Literature Requests Only:
Freescale Semiconductor Literature Distribution Center
P.O. Box 5405
Denver, Colorado 80217
1-800-441-2447 or 303-675-2140
Fax: 303-675-2150
[email protected]
Information in this document is provided solely to enable system and
software implementers to use Freescale Semiconductor products. There are
no express or implied copyright licenses granted hereunder to design or
fabricate any integrated circuits or integrated circuits based on the
information in this document.
Freescale Semiconductor reserves the right to make changes without further
notice to any products herein. Freescale Semiconductor makes no warranty,
representation or guarantee regarding the suitability of its products for any
particular purpose, nor does Freescale Semiconductor assume any liability
arising out of the application or use of any product or circuit, and specifically
disclaims any and all liability, including without limitation consequential or
incidental damages. “Typical” parameters that may be provided in Freescale
Semiconductor data sheets and/or specifications can and do vary in different
applications and actual performance may vary over time. All operating
parameters, including “Typicals”, must be validated for each customer
application by customer’s technical experts. Freescale Semiconductor does
not convey any license under its patent rights nor the rights of others.
Freescale Semiconductor products are not designed, intended, or authorized
for use as components in systems intended for surgical implant into the body,
or other applications intended to support or sustain life, or for any other
application in which the failure of the Freescale Semiconductor product could
create a situation where personal injury or death may occur. Should Buyer
purchase or use Freescale Semiconductor products for any such unintended
or unauthorized application, Buyer shall indemnify and hold Freescale
Semiconductor and its officers, employees, subsidiaries, affiliates, and
distributors harmless against all claims, costs, damages, and expenses, and
reasonable attorney fees arising out of, directly or indirectly, any claim of
personal injury or death associated with such unintended or unauthorized
use, even if such claim alleges that Freescale Semiconductor was negligent
regarding the design or manufacture of the part.
Freescale™ and the Freescale logo are trademarks of Freescale Semiconductor, Inc.
All other product or service names are the property of their respective owners.
This product incorporates SuperFlash® technology licensed from SST.
© Freescale Semiconductor, Inc. 2005. All rights reserved.
AN1931
Rev. 3
1/2005