1
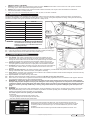
5. Operating instructions 5.1. Starting the Heater NOTE: It is preferable to start the heater outdoors for the first time, to allow any oils left over from the manufacturing process to be burnt off in a safe environment, run it for 10 minutes on this first burn. 5.1.1.Carefully fill the fuel tank with approved fuel until fuel gauge points to 'F'. 5.1.2.Ensure fuel cap is secure. 5.1.3.Plug the power cord into a suitable power socket. If using an extension lead see Section 1.1.11. 5.1.4.Push the Operation switch to either the 'LO' or 'HI' position. The power indicator lamp will light and the heater will start. When switching from one heat level to another during operation, it is normal for the heater to cease operation and go into the misfire sequence. If this happens, simply switch to 'OFF' and immediately to the desired heat level - 'LO' or 'HI'. Note: The electrical components of this heater are protected by a fuse mounted in the PC board. If the heater fails to fire, check this fuse first, and replace if necessary. Also check the power source to ensure that the proper voltage is being provided to the heater. 5.2. Tilting Feature 5.2.1.Loosen the hand screws on the main frame of the heater, position the heater in the desired position, and tighten the hand screws to secure the heater in tilted position. 5.3. To Stop the Heater 5.3.1.Push the Operation switch to 'OFF' position. Combustion will stop, and the Cooling Cycle (approx. 3 minutes in duration) will begin. 5.3.2.When Cooling Cycle is completed (fan stops running), it is safe to unplug the heater. WARNING! Unplugging the heater before the Cooling Cycle has finished may cause overheating, possible damage to the heater and heat plate, and will void the warranty. 5.4. To Restart the Heater 5.4.1.Wait ten seconds after cooling cycle has completed. 5.4.2.Push the Operation Switch to 'LO / HI' position. 5.4.3.Be sure to follow all starting procedure precautions. 6.maintenance Use only original equipment replacement parts. The use of alternate or third party components can cause unsafe operating conditions, and will void the warranty. We suggest following a maintenance schedule as follows. 6.1. Fuel/Fuel Tank - Flush every 200 hours of operation or as needed. Do not use water to flush the tank. Use fresh kerosene/paraffin/diesel only. 6.2. Filters - The Fuel Filter and Oil Filter should be cleaned at least twice per heating season by rinsing them in clean kerosene/paraffin/diesel. This procedure should also be followed if the fuel is found to be contaminated (Fig.4). 6.3. Nozzle - Nozzles should be cleaned or replaced at least once per heating season. This procedure should also be followed if the fuel is found to be contaminated. 6.3.1.To clean dirt from nozzle, blow compressed air through nozzle front. It may be necessary to soak the nozzle in clean kerosene/paraffin/diesel to help loosen any particles (Fig.5). 6.4. Spark Plug - Clean and re-gap every 600 hours of operation, or replace as needed (Fig.6). 6.4.1.After removing the Spark Plug, clean the terminals with a wire brush. 6.5. Photocell - The Photocell should be cleaned at least once per heating season or more depending on conditions. 6.5.1.Use a cotton swab dipped in water or alcohol to clean the lens of the Photocell (Figs.7 and 8). 6.6. Long Term Storage. 6.6.1.Unscrew the Drain Bolt and drain fuel into a suitable container (Fig.9). 6.6.2.Using a small amount of kerosene/paraffin/diesel, rinse and swirl the fuel around the fuel tank. Empty the tank completely. 6.6.3.Never store leftover kerosene/paraffin/diesel over the summer. Using old fuel can damage the heater. 6.6.4.Store heater in a dry, well ventilated area. 6.6.5.Be sure that the storage area is free of dust and corrosive vapours. Repack the heater in the original shipping material. Keep this User’s Manual in an easily accessible place. Fig.4 Fig.5 Fig.6 Fig.7 Fig.8 Fig.9 Original Language Version IR37.V2 Issue: 4 - 19/04/11