1
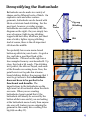
BASICS A Guide to Making Beautiful, Easy Buttonholes Table of Contents Introduction • Demystifying the Buttonhole • Buttonholing Do’s and Don’t’s Pattern Markings • Buttonhole Sizing • Transferring Pattern Markings Stitching • One-step Buttonholing • Four-step Buttonholing • Manual Buttonholing Finishing • Fray Checking • Cutting Tools • Practice Placket Instructions and Template • Buttonhole gauge Resources 3 4 5 6 6 7 10 10 10 11 14 14 15 16 16 18 19 Buttonholing Basics. Copyright © 2008 by Carla Hegeman Crim. All rights reserved. This guide is complimentary, and may be shared freely as long as this copyright statement stays intact. No part of this guide may be resold or redistributed by sites other than http://youcanmakethis.com without permission from the author. I am not affiliated with any doll, pattern, or sewing machine company. Disclaimer: This guide offers instructions and suggestions for normal use of a sewing machine. I am not responsible for any buttonholing-related injuries or damage to garments or equipment. http://www.scientificseamstress.com Introduction Button, button, who’s got the button? I know I personally have thousands of them! Most of them were purchased in bulk at thrift stores and flea markets, some I bought on cards at fabric stores, and one very special tin of them was handed down to me from my Grandma. Face it, buttons are hard to resist. They come in amazing array of shapes, colors, materials and textures. They can add so much to a garment, or just blend in and do their job. But, alas, to actually use buttons as fasteners, one must be willing, ready, and able to make buttonholes. I’ve heard so many talented seamstresses say “I don’t *do* buttonholes.” These are women who make impeccable seams, do amazing applique work, and even rule their ruffler attachment. Why then, are they so adverse to little bitty buttonholes? Well, if you’ve ever had a bad buttonholing experience, you can relate. Tight, tiny zig-zag stitches are not fun to pick out with a seam ripper, and once you make a cut in the fabric, it is forever. For many years, I avoided buttonrequiring styles like the plague. Even though my machine had a buttonholing feature on it, my first attempts were disastrous. And unfortunately, in my bullheaded youth, I insisted on “learning” on nearly-completed creations rather than practice a bit on scrap fabric. After years of trial and error, buttonholes are no longer an obstacle for me, and the ability to make them has opened up so many garment possibilities. In this eBook, I will share some of the tips and tricks I have picked up along the way. I will discuss some of the “basics” that are critical for making accurate, nicely stitched buttonholes. A brief overview of automatic buttonholing is provided, however, the best resource for learning your machine’s features is the user’s manual. I also describe a quick and easy manual method that works very well for me. In addition, I provide some handy gauges and links to great internet resources. Happy Buttonholing! 3 Demystifying the Buttonhole Buttonholes can be made in a variety of shapes and to different levels of finish. On expensive suits and other couture garments, buttonholes can be bound with fabric or intricate hand stitching. For the most part, however, everyday average buttonholes are made essentially like the diagram on the right - they are simply two rows of narrow, tight zig-zag stitching topped with bar tacks, which are just short runs of wider, tighter zig-zag stitching. And of course, there is the all-important slit down the middle. Bar Tacks Zig-zag Stitching Slit You probably have some name-brand button-up shirts in your closets. Go grab a few, and take a good hard look at the buttonholes. Pictured on the right are a few examples from my own household. Up close, they look a bit rough. The stitching isn’t perfect, the slits are frayed, and some of the threads are coming loose. Now, the point here is not to poke fun at namebrand clothing. Rather, the message that I want to get across is that a buttonhole does not have to be perfect to be functional and durable. The imperfections in the buttonholes on the right aren’t at all noticeable when the shirts are worn. When you are creating buttonholes, keep in mind that 1) the buttonhole will mostly be covered by the button while in use and 2) you are looking at the buttonhole more closely than anyone else ever will (unless you are entering the garment in the county fair or selling it for big $$$ on eBay ). 4 Buttonholing Do’s and Don’ts Even though buttonholes DON’T have to be perfect to DO their job, it isn’t that difficult to make great looking buttonholes with even the simplest of sewing machines. Whether you use an automated buttonholing feature, or make the stitches manually, there are a few important points to keep in mind: DON’T make your first attempt at buttonholing on a nearly-finished garment. Rather, try out your technique on scrap fabric (instructions for making a practice placket are provided on the 16). DO use interfacing. In general, most patterns call for interfacing in areas that will be buttonholed. It is usually be sandwiched between two layers of fabric. The interfacing gives support to the stitching and keeps the buttonhole from stretching or collapsing. If you are working with white or light colored fabric, use white interfacing. For dark colored fabrics, use black interfacing. DO make very accurate, visible markings. Eyeballing buttonhole placement is a bad idea, trust me. Even with automatic buttonholing, it important to know where to begin stitching, and it is nice to have a line for a reference for positioning. DO use a thread color that matches your fabric as closely as possible. This will minimize the visibility of any imperfections in the stitching. DO be sure that your needle is in good shape and appropriate for your fabric. Using a needle that is worn out or incompatible with the fabric might result in skipped stitches or holes in the fabric. DON’T keep on stitching if something seems “off” with your buttonhole. For example, sometimes stitching stalls, resulting in a wad of thread in one spot. Even though the temptation is to push on through, stop, get out the seam ripper, and carefully take out the stitching. The sooner you stop, the less stitching there will be to remove. DON’T stretch or pull the fabric during the buttonholing process. This can lead to distortion of the buttonhole. The stitching should proceed fairly effortlessly. With knits or very delicate fabrics, a layer of tear-away stabilizer can be placed under the fabric/interfacing layers for more stability and better control. Finally, DON’T be overly critical of your buttonholes. DO step back, and take a look at them from a distance and keep in mind that they will mostly be covered by your buttons in the finished garment. 5 Pattern Markings Patternmakers have different ways of showing the size and position of the buttonholes on their patterns and/or buttonhole guides. Some give simple straight lines (a), others give “I” shaped markings (b), and others yet give a single straight lines with perpendicular lines delineating the buttonhole ends (c). a b c The nice thing about markings like b and c is that the perpendicular lines make positioning the presser foot so much easier when it comes time to stitch. If the pattern markings are simple straight lines, you can turn them into “I” shapes by drawing short lines at the top and bottom. Buttonhole Sizing A buttonhole should be big enough for the button to fit through easily, but not so big that the button slips out of place. The general rule of thumb for thin, flat buttons is that the length of the buttonhole should be 1/4” larger than the diameter of the button. I’ve found that there is a little leeway there, and that buttonholes that are 1/8” to 3/8” larger than the button work just fine. On page 18, I’ve included a gauge for measuring buttons and determining the appropriate buttonhole size. 1/2” Button 3/4” Buttonhole 6 If you are working with a pattern, the instructions will probably specify a button size and the markings on the pattern will correspond to that button size. If you want to use a different button size, the buttonholes can be lengthened or shortened accordingly. For vertical buttonholes (a), keep in mind that the button will rest near the top of the buttonhole. Therefore, any lengthening or shortening should be done at the bottom of the buttonhole. For horizontal buttonholes (b), the buttonhole will rest near the side closest to the edge of the garment. Therefore, any lengthening or shortening should be at the other edge of the buttonhole a Button position added length b Button position added length Thick and odd shaped buttons like those shown on the right require an even longer buttonhole. For these types of buttons, it is best to make some test buttonholes to be sure of the fit. Transferring Pattern Markings The first step towards beautiful buttonholing is transferring clear and accurate markings onto your fabric. There are many different tools and techniques for marking the position of your buttonholes (see page 19 for resources). The method I find to be quickest and easiest is to mark directly onto the fabric through small holes in the pattern. The steps of this technique are illustrated on pages 8-9 using a practice placket as an example. The same method can be used with any pattern/buttonholing guide. On the practice placket template, small dots indicate where the holes should be made. When working with a pattern, you can use a marker to make small dots at the ends of the short lines and at the intersections of the short and long lines (6 dots total). 7 I’m using a practice placket to illustrate the marking process. The steps will be the same with an actual garment and pattern. Use a thick, sharp needle to pierce through the dots in the template. Lay the practice placket out with the side that will be marked facing up. On an actual garment, this would be the side that is going to be showing on the outside. Place the template on top of the placket. Align the edge of the template the folded side edge. Mark through the fabric onto the holes. For light colors, I like to use a finetipped air or water soluble marking pen. For dark colors, I recommend a sharp chalk pencil. 8 There will be 6 tiny dots for each button hole. Note: If the marks are faint, retouch them with the tip of the pen or pencil. Connect the middle dots. For best results, use a straight edge as a guide. Connect the top and bottom end dots. The piece is marked and ready for buttonholing. 9 Automatic Buttonholing Most modern sewing machines come with some sort of buttonholing feature. Some very high end machines can practically spit out buttonholes with very little user intervention. The majority of machines, however, make either fourstep or one-step buttonholes. Four-step buttonholes - As the name suggests, buttonholes are formed in four steps. The needle position and stitch width are pre-set for each step, so all the user has to do is turn the dial after each step. First, a bar tack is sewn (1). Next, one side of the buttonhole is formed by zig-zag stitching (2). The second bar tack is then sewn (3). Finally, the other side of the button is formed by zig-zag stitching (4). One-step buttonholes - The stitching process is much like that of the fourstep buttonholing, but the change in stitch width and needle position occur automatically when a part of the foot bumps into a sensor. Buttonhole sizing is dependent on the diameter of the button, which may be held in the foot during stitching. One disadvantage is that it does not take button thickness into consideration, so a larger button might have to be used as a “stand-in” to get a big enough buttonhole. Four-step settings 1 2 3 4 One-step settings If you’ve never tried the automatic buttonholing feature on your sewing machine, you should give it a whirl using a practice placket. Although stitch position is pre-set, you can vary stitch density and sometimes stitch width, which can greatly impact your results. Since different machines use different settings, feet, etc., you should consult the user’s manual that came with your machine for detailed instructions. There are also many great articles about automatic buttonholing online (see the resources section for links). 10 Manual Buttonholing If your machine does not have automatic buttonhole settings, you can still make wonderful buttonholes manually. Or, if you are like me and just don’t particularly like the results you get with automatic buttonholing, you might prefer this method. It is fast, easy, and gives great results! The first step is to determine the settings that you are going to use to make the side zig-zag stitches and the bar tacks. Note: Make sure to use a presser foot that is suitable for zig-zag stitching, and work with the needle thread tension a set bit looser than normal. Stitch Width - On most machines, the stitch width settings will correspond to the widths of the stitching in mm. It is a good idea to make some test stitches and be double check them with a ruler, however. The width of the side zig-zag stitching should be between 1 and 3 mm wide. The bar tacks should twice the width of the zig-zag stitching plus 1 mm to account for the center. 1 2 3 4 5 For most buttonholes, I like to make the side zig-zag stitches 2 mm wide and the bar tacks 5 mm wide. 5 2 Stitch Length - This setting controls the stitch density. The lowest stitch length setting will result in a tight, thick satin stitch. This is perfect for the bar tacks, but overkill for the sides of the buttonhole. A bit longer stitch length will make stitching go quicker and easier, but will still give you a nice, close zigzag. Again, test stitches can be made to determine the ideal setting. On my machine, I use the lowest length setting (0.2) for the bar tacks, and a 3 settings up (0.5) for the side stitches. 0.2 0.3 0.4 0.5 0.6 0.3 0.5 11 Stitching Placement - Once you have determined the stitch settings, the next step is to become comfortable with the needle position. The side zig-zag stitching should be right next to the line marking the center of the buttonhole. Use a spot on the presser foot as a reference point for placement. If you’ve ever done applique work, this will be very easy for you. Use the practice placket to perfect your placement. The bar tack should be positioned so that the ends straddle the two lengths of zigzag stitching at the very top and bottom of the buttonhole. Stitching Order - On a single buttonhole, this technique is similar to the four-step automatic method, but with less changing of settings. The sides of the buttonholes are zig-zag stitched first (1 &2), and then the bar tacks are made (3&4). 1 3 2 4 When working with a garment with multiple buttonholes in a row, the sides can stitched one right after the other (see the next page for actual photos). 1 2 3 4 8 7 6 5 Then the bar tacks are made, one right after the other. 9 10 11 12 13 14 15 16 This saves having to rotate the fabric with each buttonhole, and I find it so much easier to focus on one type of stitching at a time. 12 I’m using a practice placket to illustrate the steps of manual buttonholing. The steps will be the same with an actual garment. Start out with the needle in the top line, positioned to sew just to the right of the center line. Zig-zag stitch down to the bottom line. Raise the presser foot, and reposition the needle in the top line of the next buttonhole down. Stitch the right-hand side as described for the first buttonhole. After stitching all the right-hand sides, rotate the piece around so that the other side is now on the right-hand side. Zigzag stitch as described for the first side(s). Rotate the piece around to sew the bar tacks. While stitching the bar tacks, hold the fabric in place so that it does not feed through the foot. Make enough stitches to create a solid bar tack, but not so many that you have a big lump of thread. Sew all the bar tacks one after the other. WOW! That was fast! 13 Finishing After stitching, you will have something that looks like this: The temptation is to trim up those threads and hack out the slits. For best results, put the sharp implements away until the very last step. Fray-Checking Fray-Check is a product by Dritz that in a sense “petrifies” fibers. This is a must-do step to prevent unraveling of the stitching and fraying on inside of the buttonhole. A few precautionary notes: 1) Fray-check is toxic when wet, but perfectly safe when dry. Keep the bottle away from children, and work in a well-ventilated area. 2) Fray-check might leave faint stains on some fabrics. Take care to limit the application to the buttonholes. 3) Depending on the type of marker/pencil you used, you may want to remove the marks before using the fray-check. The marks could bleed beyond the borders of the buttonhole, and leave a permanent stain on your fabric. To apply Fray-Check, flip the buttonholed piece over to the bobbin thread side (the side that was facing down on the sewing machine). Carefully douse the bar tacks and the center of the buttonhole. Set the piece aside and let the Fray-Check dry completely before proceeding to the final step. 14 Cutting Now that the Fray-Check is dry, you can trim away the loose threads on the front and the back of the piece. Trim them as short as possible on the front so that no “tails” are showing. The slits can be made with scissors, a seam ripper, or a specialized buttonhole cutting tool. If you are concerned about clipping the bar tacks, you can protect them with pins. This is especially helpful if you are using a seam ripper. I usually use small, sharp scissors to make my cuts. I find them easy to control, so pinning isn’t really necessary. To start the cut, I fold the buttonhole in half widthwise and make a small snip in the center. Next, I carefully snip up to the bar tacks, taking care to not cut any stitching. The buttonholes are finished and ready for buttoning up! 15 Practice Makes Perfect As mentioned, buttonholing is almost always performed on 2 layers of fabric with a layer of interfacing in between. You can make your practice buttonholes on a simple mock placket. Use a white or light solid colored fabric, if possible. Cut a strip of fabric that is 6” wide by about 12” long. Cut a piece of interfacing that is 3” wide by about 12” long. Fold the fabric in half lengthwise. Press. Open the fabric out again. Place the interfacing on one side of the fabric and align it with the crease. If you are using a fusible interfacing, press to set it into place. Refold at the crease. Give the practice placket a final press. Using the template on the next page, mark the placket according to the instructions on pages 8-9. 16 Buttonhole Template Practice Placket 17 Button Gauge The gauge below can be used to determine the diameter of a button and the corresponding buttonhole size. Place the button directly over the circles to find the closest match. Note: The buttonhole sizes are for standard thickness (about 1/8”), relatively flat buttons. Thicker, odd-shaped buttons will need larger buttonholes. 1/4” 5/8” 3/8” 3/4” 7/16” 7/8” 1/2” 9/16” 1x1 1” The gauge is designed to be printed at 100%. Before printing, make sure that page scaling is set to none in Adobe Acrobat print window. To be sure that the gauge printed at the correct size, measure the box below. It should measure 1 inch by 1 inch. 18 Resources General Buttonholing: http://www.sewing.org/html/el_buttonholes.html - Learn to sew buttonholes http:// sewing.about.com/library/sewnews/library/aatech0703.htm - Buttonholes from the SewNews Library http://cahe.nmsu.edu/pubs/_c/C-231.html - Machine buttonholes made easy http://www.burdastyle.com/howtos/show/95 - Step by step photo guide to making buttonholes http://www.isew.co.uk/sewing_techniques/buttons_and_buttonholes-c-00028.htm Buttons and Buttonholes Marking: http://www.sewnews.com/library/sewnews/library/aamarking0404.htm - Marking techniques from the SewNews Library Buttonhole Sizing: http://www.simplicitynewlook.com/index.php?main_page=page&id=97 - Foolproof buttonhole sizing http://www.habermanfabrics.com/button_guide.htm - Button sizing advice from Lucy the “Buttonhole Queen” Automatic Buttonholing: http://www.singerco.com/resources/4step_buttonholes.html - Singer’s guide to fourstep buttonholing http://www.singerco.com/resources/buttonhole.html- Singer’s guide to one-step buttonholing Other Links of Interest: http://www.fabriclandwest.com/Fleece_Country/Fleecebuttonholes/buttonholesFLE ECE.htm- Buttonholing on Fleece http://sewing.about.com/od/techniques/ss/boundbuttonhole.htm - Making bound buttonholes http://www.essortment.com/hobbies/noveltybuttons_sdyn.htm - Sewing on novelty buttons http://www.taunton.com/threads/pages/t00091.asp - How to fix bungled buttonholes 19 Other Scientific Seamstress Publications...