1
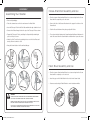
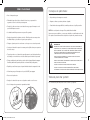
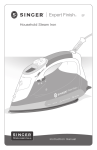
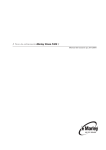
SteamWorks Pro
Garment Steamer
ON
OFF
instruction manual
5738-SVP_InstructionSWP3.indd 1
4/21/10 4:18:51 PM
IMPORTANT SAFETY Instructions
1. Read all instructions before using this product.
2. Use this product only as described in this manual. Other uses not recommended may
cause fire or electrical shock.
3. Do not immerse this product in water or any liquid; electric shock and injury could result.
4. Always unplug this appliance before coming into contact with liquid of any kind. This
includes filling and emptying the water tank.
Thank you for purchasing a SINGER Home Essentials product. For over 150
years, we’ve been in homes around the globe providing expert garment care
with quality, durable tools to keep your garments and fabrics looking fresh.
getting to know your garment steamer
5. Close supervision is necessary when the appliance is used near children.
2
3
6. Do not leave this appliance unattended while it is in operation.
15
4
1
7. This appliance operates using high heat and steam that can cause burns to skin. Use
caution around the Steam Head.
8. Do not touch the hot metal parts, hot water or steam to avoid burns.
14
13
9. Do not operate the steamer without filling the water reservoir. Always check the water
level before and during operation.
10. Do not lay the hose on the ground or wind it.
11. Do not direct steam at people or animals.
16
12. Do not steam clothing while it is being worn.
13. Do not pour water directly into the reservoir. Pour water only into the water tank.
14. Turn the appliance OFF and let cool before changing Steam Head attachments to
avoid burns.
20
5
19
15. The use of accessories or attachments not provided by SINGER Home Essentials may
result in fire, electric shock, or injury.
12
16. Never insert any objects into the tank or hose.
17. Keep the hose and steam head elevated above the tank.
22
21
18. Steam only in a vertical motion. Never use this appliance in a horizontal position.
19. Allow the appliance to cool completely for at least 30 minutes and drain the water tank
and water reservoir before storing.
16
10
20. Move the appliance by grasping the telescopic pole. Do not force the casters if they
are stuck. Turn off the unit, cool completely, drain the water tank and water reservoir
before inspecting the casters.
11
6
21. Unplug the unit from the outlet when not in use, when moving unit from one location
to another, and before cleaning.
23
9
22. Do not place the unit or any parts near an open flame, cooking or other heating appliance.
23. If the cord becomes damaged or the appliance has been dropped or damaged, do not
operate the product.
24. To avoid the risk of electrical shock, do not disassemble the steamer. Ship it to the
nearest authorized SINGER-approved service center for examination and repair.
Incorrect reassembly or repair can cause a risk of fire, electric shock, or injury while
the appliance is in use.
25. No detergent can be added into the water tank or it will cause damage. Distilled or
de-mineralized water is recommended.
26. Use this appliance indoors only.
SPECIAL INSTRUCTIONS:
To avoid a circuit overload, do not operate another high-wattage appliance on the same
circuit. If an extension cord is absolutely necessary, a 15-amp cord should be used. Cords
rated with less amperage may overheat. Use care to arrange the cord so that it cannot be
pulled or tripped over.
SAVE THESE INSTRUCTIONS
FOR HOUSEHOLD USE ONLY
2
5738-SVP_InstructionSWP3.indd 2-3
17
7
18
1. Handle
2. Steam Head
3. Steam Head Hanger
4. Clothes Hanger Hook
5. Flexible Cool Touch Hose
6. Hose Connector 7. On/Off Switch
8. Drain Plug
8
24
9. Hose Base
10. Pole Base
11. Water Tank
12. Telescopic Pole
13. Rotating Hanger
14. Fabric Brush
15. Crease Attachment
16. Garment Clips
Technical Specifications:
17. Water Reservoir
18. Caster Wheel System
19. Pole Clips
20. Valve Cap
21. Garment Clip Bar
22. Handheld Steaming Board
23. Protective Glove
24. Power Indicator Light
Voltage: 120V, 60 Hz
Power: 1500 Watts
3
4/21/10 4:18:52 PM
Assembly
Crease Attachment Assembly and Use
Assembling Your Steamer
• Turn the steamer off and wait until there is no steam coming from the Steam
Head. And it is completely cool to the touch.
• Remove all packaging.
• Place the steamer base on the floor and remove the Water Tank.
• Insert the Telescopic Pole into the Pole Base and twist the ring clockwise to lock.
• Connect the Clothes Hanger Hook to the top of the Telescopic Pole as shown.
• Expand the Telescopic Pole by unlocking the clips and fully extending the
pole. Lock clips to secure.
• Connect the flute of the Crease Attachment to the pegs at the bottom of the
Steam Head.
• Push the Crease Attachment into place gently until it clicks.
• To use, place the fabric between the Steam Head and the Crease Attachment to
create the crease. Move the Steam Head in a vertical motion to press the crease.
• Attach the Cool Touch Hose by pushing the hose onto the Hose Base and
turning 1/4 turn clockwise to lock.
• Hang the Steam Head on the Steam Head Hanger.
Fabric Brush Assembly and Use
• Turn the steamer off and wait until there is no steam coming from the Steam
Head and it is completely cool to the touch.
ON
OFF
• Insert the pegs on the Fabric Brush into the holes in the Steam Head.
• Steam as usual, using the Fabric Brush to smooth stubborn wrinkles.
ON
WARNING:
OFF
Always hang the Steam Head on the Steam Head Hanger when
not in use to prevent injury and surface damage.
Make sure the Telescopic Pole is fully extended during use to
ensure a smooth steam flow through the hose.
Do not pull the hose with excessive force or move it by pulling
on the hose. Damage or injury may result.
4
5738-SVP_InstructionSWP3.indd 4-5
5
4/21/10 4:18:54 PM
Folding Hanger Assembly
Filling the Water Tank
• Secure the Steam Head Hanger assembly to the Telescopic Pole.
• Turn the steamer off and unplug it.
• Tilt the hook of the Rotating Hanger and insert it into the hole on the flat side
of the Steam Head Hanger. Press gently to lock.
• Remove the Water Tank by pulling upward on the handle.
• Pull the arm of the Rotating Hanger up until the sides are completely extended.
• Lock the horizontal bar in place by aligning the dots on the bar.
• Unscrew the Valve Cap from the Water Tank, fill the tank with cool water,
and replace the Valve Cap. Do not use hot water. To prolong the life of your
steamer we recommend using distilled or de-mineralized water.
• The tank holds 2.5 Liters of water.
• Insert the Water Tank into the base, making sure the plug on the bottom of
the tank meets the post on the steamer base and fits securely in the cavity.
NOTE: Do not operate the steamer without water as this could cause damage
to the unit.
Garment Clips Assembly and Use
Never use water with additives, including scents, starches, or fabric conditioners,
as they can cause deposits to form in the steamer that can stain your clothing.
• Snap the Garment Clips into the holes on the horizontal bar of the Folding Hanger.
• Clip the Garment Clip Bar to the bottom of the Telescopic Pole.
• To use, hang the garment from the top clips and secure with the bottom clips,
pulling the garment taut to steam or crease.
WARNING: Always turn off the steamer before attaching
accessories to avoid injury.
6
5738-SVP_InstructionSWP3.indd 6-7
7
4/21/10 4:18:56 PM
HOW TO STEAM
• Fill the Water Tank.
Steaming Tips:
• Do not allow kinks to form in the hose at any time.
• Expand the Telescopic Pole by unlocking the clips and fully extending the
pole. Lock clips to secure.
• Plug in the power cord to a grounded electrical outlet and turn on the power
at the ON/OFF switch. The Power Indicator Light will glow.
• The unit will be ready to use in just 45 seconds.
• Hang the garment on the Rotating Hanger. You may also use a clean, rust-free
clothes hanger, and place the hanger on the Clothes Hanger Hook.
• Place the protective glove on the hand that will be holding the garment.
• Hold the Steam Head with the steam vents pointing away from your body.
• Touch the Steam Head to the garment lightly, moving it in an up and down
vertical motion, beginning at the bottom of the garment and moving upward.
• Steam will rise along the inside and outside of the fabric to remove wrinkles.
Continue to steam the garment, smoothing with your free (gloved) hand.
• Certain draperies can be steamed while hanging.
• To remove stubborn wrinkles, the Fabric Brush may also be used.
NOTE: Do not operate the steamer without water as this could cause damage
to the unit.
Never use water with additives, including scents, starches, or fabric conditioners,
as they can cause deposits to form in the steamer that can stain your clothing.
WARNING:
Operate the garment steamer on the floor at all times.
The hose may make a gurgling noise during use. This is normal
and is caused by condensation in the hose. Hold the hose up
to allow condensation to flow back into the tank.
NEVER steam a garment while it is being worn. Burns and injury
may result.
Pulling on a garment with too much force may cause the
garment steamer to tip.
Do not operate the garment steamer without water in the tank.
• Repeat until fabric is wrinkle free.
• When finished, switch the power off at the On/Off Switch.
Do not operate the garment steamer for more than 3 hours
at a time.
Do not lift the garment steamer by the Water Tank handle.
• Unplug the steamer.
• Hang the Steam Head on the Steam Head Hanger when not in use.
Handheld Steaming Board
• Empty the Water Tank before storing.
Use Steam Board for help with collars, pockets and every corner.
ON
OFF
8
5738-SVP_InstructionSWP3.indd 8-9
9
4/21/10 4:18:58 PM
Cleaning
SINGER recommends cleaning your garment steamer at least once a week.
Remove the Water Tank by pulling upward on the handle.
Accessories and Features:
Steam Power
in Seconds
Ready to steam in just 45 seconds.
Telescopic Hanger Pole
Adjustable height for steaming longer clothing items.
360˚ Rotating Hanger
Built-in 360-degree rotating hanger makes steaming
garments from any angle easy.
Collapsible
Hanger System
Conveniently folds for easy storage.
Heavy Gauge
Fabric Hose
Durable and flexible, stays cool while in use.
• Wrap the hose around the Telescopic Pole once, placing the Steam Head on
the Steam Head Hanger to store.
Auto-Off
Safety feature switches the steamer off automatically if
the tank runs out of water.
Removing Mineral Build-Up
Extra Large Transparent
Water Tank
Delivers 90 minutes of continuous steam.
Easy Fill
Removable Tank
Large 2.5 Liter capacity tank.
Garment Clip System
Convenient clips hold garments in place.
Deluxe 4-Caster
Wheel System
Adds stability and mobility, rolls for easy storage.
Accessory Kit:
Crease Attachment and Fabric Brush.
• Turn the switch to “Off” and unplug the garment steamer.
• Allow the garment steamer to cool for at least 30 minutes.
• Remove the Cool Touch Hose. Collapse and remove the Telescopic Pole.
• Remove and drain the Water Tank. Rinse it with fresh water and let it drain
completely. Place it back on the Water Reservoir.
• Drain the water tank by removing the Drain Plug and emptying the contents.
• Flush the unit by filling the Water Reservoir and the Hose Connector with
fresh water and draining completely. Replace the Drain Plug.
It is common for minerals found in hard water to build up inside the steamer,
causing intermittent or weak steam. Depending on your water quality, SINGER
recommends removing the mineral build-up after the first 1 to 2 weeks of using
this steamer. If you do not use de-mineralized or distilled water in your steamer,
follow these steps monthly.
• Turn the switch to “Off” and unplug the steamer.
• Remove the Cool Touch Hose. Collapse and remove the Telescopic Pole.
• Drain the Water Reservoir, and empty the water from the Water Tank.
• Prepare a solution of 1 cup vinegar and 1 cup water.
• Slowly pour the solution into the Hose Connector until the Water Reservoir is
about half full, near the top of the hose.
Handy Tips:
• Let the solution stand for about 40 minutes.
• Drain the solution by removing the Drain Plug and emptying the solution into a
sink or tub.
• Drain the solution from the Hose Connector by tilting the unit over a sink or tub
and pouring the water out.
• Pour clean water into the Hose Connector and Water Reservoir inlet and drain.
Repeat this step until the vinegar odor dissipates.
• Reassemble the unit.
10
5738-SVP_InstructionSWP3.indd 10-11
• Do not touch the Steam Head to silk, velvet, or other delicate fabrics.
• Especially on delicate fabrics, test the heat setting in an inconspicuous place
(like an inside seam) before steaming the entire garment.
• Always consult the garment care label on a piece of clothing before steaming.
The
symbol indicates that the garment can be steamed, and the
symbol indicates that the garment should not be steamed.
• Heavier fabrics may require more steam.
11
4/21/10 4:18:59 PM
troubleshooting
PROBLEM
REASON & SOLUTION
SINGER® SEWING COMPANY LIMITED WARRANTY
STEAMWORKS PRO GARMENT STEAMER
IMPORTANT: SAVE THIS DOCUMENT AND KEEP IT IN A SAFE PLACE
What Does This Limited Warranty Cover?
The unit fails to steam
• Steamer is not plugged in - plug into electrical outlet.
Two indicating lamps do
not illuminate
• Household circuit breaker/ground fault interrupter is
tripped or fuse is blown - check the power outlet or if
further assistance is needed, call a qualified electrician.
The SINGER SteamWorks Pro Garment Steamer is warranted to be free from
defects in material and workmanship.
How Long Is This Limited Warranty?
The warranty for the GARMENT STEAMER’s wiring and electronic parts is for a
period of two (2) years from the date of purchase.
The warranty for all other parts of the GARMENT STEAMER is for a period of ninety
(90) days from the date of purchase.
What Will SINGER Do?
The unit fails to steam
Two indicating lights
illuminate
• Mineral build-up in the unit - follow the Removing Mineral
Build-up procedure.
• The water tank is empty - refill the water tank.
If the electronic parts and/or the other parts in the GARMENT STEAMER, after
inspection by SINGER, prove to be defective during the applicable warranty
period(s), the electronic parts and/or the other parts will be repaired or replaced at
SINGER’s option, without charge, except for any expense associated with sending
the GARMENT STEAMER to SINGER.
If SINGER sends a replacement GARMENT STEAMER, it will carry the remaining
warranty of the original GARMENT STEAMER.
Who Is Covered By This Limited Warranty?
This warranty may only be used by the original consumer owner of the GARMENT
STEAMER and may not be transferred or assigned.
Excessive gurgling of
hose and steam nozzle
• Condensation in hose - some gurgling is a natural effect of
the steam process.
• For excessive gurgling, extend the hose vertically to allow
water to drain back into the water reservoir.
Steam is intermittent
• Mineral build-up in the unit - it’s normal for the unit to
periodically stop steaming for a few seconds.
• If the steam stays off for longer periods, follow the
Removing Mineral Build-up procedure.
If troubleshooting does not solve the problem, please call SINGER at
1-800-4-SINGER or 1-800-474-6437.
12
5738-SVP_InstructionSWP3.indd 12-13
What Are The Other Exclusions or Limitations?
• Service under this warranty may only be obtained within the 48 contiguous states,
Alaska, Hawaii and Canada.
• The GARMENT STEAMER is warranted only for normal household (noncommercial) use. This warranty does not cover defect(s) caused by abuse, lack of
maintenance or other neglect, failure to follow the care, cleaning or other instructions
for the GARMENT STEAMER, misuse, or events beyond our control.
• ANY IMPLIED WARRANTY APPLICABLE TO THE GARMENT STEAMER,
INCLUDING WITHOUT LIMITATION THE WARRANTIES OF MERCHANTABILITY
AND/OR FITNESS FOR A PARTICULAR PURPOSE, IS LIMITED IN DURATION
TO THE DURATION OF THIS WRITTEN WARRANTY. SINGER SHALL NOT BE
LIABLE FOR CONSEQUENTIAL ECONOMIC DAMAGES RESULTING FROM
BREACH OF THIS WARRANTY OR ANY IMPLIED WARRANTY.
• SINGER does not authorize any person to create for it any obligation or liability in
connection with the GARMENT STEAMER and any of its parts beyond those set
forth in this warranty.
• SINGER disclaims liability under this warranty for any damage or defect resulting
from the use of other than SINGER parts and SINGER approved service in the repair
and maintenance of the GARMENT STEAMER.
13
4/21/10 4:18:59 PM
Does State Law Affect My Rights?
• This warranty gives you specific legal rights, and you may also have other rights
which vary from state to state.
• Some states do not allow limitations on how long an implied warranty lasts,
so the above limitation may not apply to you.
• Some states do not allow the exclusion or limitation of incidental or consequential
damages, so the above limitation or exclusion may not apply to you.
SteamWorks Pro
Plancha a vapor
How Do I Get Service Under The Warranty?
Service under the warranty may be obtained by returning the GARMENT STEAMER with:
1.This original warranty document; and
2.Proof of purchase (such as the purchase receipt) to:
SINGER Sewing Company
ATTN: Service Department
1224 Heil Quaker Boulevard
LaVergne, TN 37068
What If I Have Questions About The Warranty?
If you have any questions regarding these warranties, please contact us:
SINGER Sewing Company 1-800-4-SINGER
E-mail: [email protected]
ATTN: Consumer Affairs (1-800-474-6437)
1224 Heil Quaker Boulevard
LaVergne, TN 37068
or through the Customer Service Area of our web site: www.singerco.com
ON
OFF
SINGER® IS A REGISTERED TRADEMARK OF THE SINGER COMPANY LIMITED.
14
5738-SVP_InstructionSWP3.indd 14-15
Manual de instrucciones
15
4/21/10 4:19:00 PM
INSTRUCCIONES DE SEGURIDAD IMPORTANTES
1. Lea todas las instrucciones antes de usar este producto.
2. Utilice este producto únicamente como se indica en este manual. Otros usos no
recomendados pueden causar incendios o descargas eléctricas.
3. No sumerja este producto en agua ni en ningún otro líquido. Esto podría causar
descargas eléctricas y lesiones.
4. Desconecte siempre este electrodoméstico antes de ponerlo en contacto con líquidos
de cualquier tipo. Esto incluye llenar y vaciar el tanque de agua.
5. La supervisión cuidadosa es indispensable si este electrodoméstico se usa en
presencia de los niños.
6. Nunca deje este electrodoméstico desatendido cuando esté en uso.
7. Este electrodoméstico usa altas temperaturas y vapor que pueden causar
quemaduras en la piel. Tenga mucho cuidado con el cabezal de vapor.
8. Para evitar quemaduras, no toque las partes metálicas calientes, el agua caliente ni el vapor.
9. No use la plancha sin llenar el depósito de agua. Revise siempre el nivel de agua
antes y durante el uso.
10. No ponga la manguera en el suelo ni la enrolle.
11. No dirija el vapor a personas o animales.
12. No planche la ropa si la lleva puesta.
13. Ni vierta agua directamente en el depósito. Vierta agua únicamente en el tanque de agua.
14. Para evitar quemaduras, ponga el electrodoméstico en la posición OFF (apagado) y
deje enfriar antes de cambiar los aditamentos del cabezal de vapor.
15. El uso de accesorios o aditamentos que no sean suministrados por SINGER Home
Essentials puede causar incendios, descargas eléctricas o lesiones.
16. Nunca introduzca objetos al tanque ni a la manguera.
17. Mantenga la manguera y el cabezal de vapor elevados por encima del tanque.
18. Planche únicamente con movimientos verticales. Nunca utilice este electrodoméstico
en posición horizontal.
19. Permita que el electrodoméstico se enfríe completamente durante al menos 30
minutos y drene el tanque y el depósito de agua antes de guardar.
20. Mueva el electrodoméstico asiendo la barra telescópica. No fuerce los rodamientos si
se traban. Apague la unidad, permita que se enfríe completamente, drene el tanque y
el depósito de agua antes de inspeccionar los rodamientos.
21. Desconecte la unidad cuando no esté en uso, cuando la traslade de un lugar a otro y
antes de limpiarla.
22. No ponga la unidad ni sus partes cerca del fuego, la estufa ni ningún otro dispositivo que
genere calor.
23. Si el cable se daña o si el electrodoméstico se ha caído o dañado, no use el producto.
24. Para evitar el riesgo de descarga eléctrica, no desarme la plancha. Envíela al centro
de servicio autorizado aprobado por SINGER para su revisión y reparación. Las
reparaciones o ensambles incorrectos constituyen un riesgo de incendio, descarga
eléctrica o lesión cuando el electrodoméstico esté en uso.
25. Para evitar daños, no agregue detergente al tanque de agua. Se recomienda el uso de
agua destilada o desmineralizada.
26. Utilice el electrodoméstico únicamente en espacios cerrados.
INSTRUCCIONES ESPECIALES:
Para evitar sobrecarga de circuitos, no utilice otro dispositivo de alto vataje en el mismo
circuito. Si el uso de una extensión de cable es indispensable, utilice un cable de 15
amperios. Los cables de amperaje inferior podrían sobrecalentarse. Tenga cuidado al
colocar el cable para que no se pueda tirar y para evitar tropiezos.
GUARDE ESTAS INSTRUCCIONES
PARA USO DOMÉSTICO ÚNICAMENTE
16
5738-SVP_InstructionSWP3.indd 16-17
Gracias por comprar un producto SINGER Home Essentials. Durante más de
150 años, hemos estado en los hogares alrededor del mundo ofreciendo
cuidado experto de sus prendas de vestir con herramientas durables de calidad
para conservar sus prendas y telas con aspecto fresco.
CONOZCA SU PLANCHA A VAPOR
3
2
15
4
1
14
13
16
20
5
19
12
22
21
16
10
11
6
23
9
17
7
18
1. Mango
2. Cabezal de vapor
3. Colgadero del cabezal
de vapor
4. Gancho para perchas
8
24
8. Tapón de desagüe
9. Base de la manguera
10. Base de la barra
11. Tanque de agua
12. Barra telescópica
5. Manguera flexible fría
13. Colgadero rotatorio
al tacto
14. Cepillo para tela
6. Conector de la manguera
15. Aditamento para pliegues
7. Interruptor de encendido
16. Broches para prendas
y apagado (on/off)
17. Depósito de agua
18. Sistema de ruedas con
rodamientos
19. Broches de la barra
20. Tapa de la válvula
21. Varilla para broches
para prendas
22. Tabla de planchar portátil
23. Guante de protección
24. Luz indicadora de encendido
ESPECIFICACIONES TÉCNICAS: Voltaje: 120V, 60 Hz Potencia: 1500 Vatios
17
4/21/10 4:19:01 PM
ENSAMBLE
Ensamble y uso del aditamento para pliegues
Cómo ensamblar su plancha a vapor
• Apague la plancha y espere a que no salga vapor del cabezal. Espere
además que esté fría al tacto.
• Retire todo el material de empaque.
• Ponga la base de la plancha en el suelo y retire el tanque de agua.
• Introduzca la barra telescópica en la base de la barra y gire el anillo en la
dirección de las manecillas del reloj para fijar.
• Conecte el colgadero para perchas a la parte superior de la barra telescópica
como se indica.
• Extienda la barra telescópica soltando los broches y separando los
segmentos. Cierre los broches para asegurar.
• Conecte el surco del aditamento para pliegues a las clavijas de la parte
inferior del cabezal de vapor.
• Empuje el aditamento para pliegues a su lugar suavemente hasta que
escuche un clic.
• Para usar, coloque la tela entre el cabezal de vapor y el aditamento para hacer
el pliegue. Mueva el cabezal de vapor con movimientos verticales para
prensar el pliegue.
• Ajuste la manguera fría al tacto empujándola hacia su base y girando en la
dirección de las manecillas del reloj para fijar.
• Cuelgue el cabezal de vapor del colgadero correspondiente.
Ensamble y uso del cepillo para tela
• Apague la plancha y espere a que no salga vapor del cabezal y este
completamente fría al tacto.
ON
OFF
• Introduzca las clavijas del cepillo para tela en los orificios del cabezal de vapor.
• Planche de manera habitual aprovechando el cepillo para alisar arrugas difíciles.
ON
ADVERTENCIA:
OFF
CUELGUE SIEMPRE EL CABEZAL DE VAPOR EN SU COLGADERO CUANDO
NO ESTÉ EN USO PARA EVITAR LESIONES Y DAÑO DE SUPERFICIES.
ASEGÚRESE DE QUE LA BARRA TELESCÓPICA ESTÉ TOTALMENTE
EXTENDIDA DURANTE EL USO PARA ASEGURAR EL FLUJO CONTINUO
DE VAPOR A TRAVÉS DE LA MANGUERA.
NO TIRE CON DEMASIADA FUERZA DE LA MANGUERA NI LA USE PARA
MOVER LA PLANCHA. ESTO PUEDE CAUSAR DAÑOS O LESIONES.
18
5738-SVP_InstructionSWP3.indd 18-19
19
4/21/10 4:19:01 PM
Ensamble del colgadero plegable
Cómo llenar el tanque de agua
• Asegure el ensamble del colgadero del cabezal de vapor a la barra telescópica.
• Apague la plancha y desconéctela.
• Incline el gancho del colgadero rotatorio e introdúzcalo en el agujero del lado
plano del colgadero del cabezal de vapor. Presione ligeramente para fijar.
• Retire el tanque de agua tirando hacia arriba en el mango.
• Tire del brazo del colgadero rotatorio hacia arriba hasta que los lados estén
completamente extendidos.
• Fije la varilla horizontal en su lugar alineando los puntos de la varilla.
• Desatornille la tapa de la válvula del tanque de agua, llénelo con agua fría y
vuelva a colocar la tapa. No utilice agua caliente. Para prolongar la vida de
su plancha, recomendamos el uso de agua destilada o desmineralizada.
• El tanque tiene capacidad para 2.5 litros de agua.
• Introduzca el tanque de agua en la base, asegurándose de que el conector
de la parte inferior de este se junte con la barra en la base de la plancha y
se ajuste de manera segura a la cavidad.
NOTA: No use la plancha sin agua. Esto podría dañar la unidad.
Ensamble y uso de broches para prendas
Nunca use agua con aditivos, como aromas, almidón o acondicionadores de tela.
Esto puede causar la formación de depósitos en la plancha y manchar su ropa.
• Enganche los broches para prendas en los agujeros de la varilla vertical del
colgadero plegable.
• Abroche la varilla del broche para prendas a la parte inferior de la
barra telescópica.
• Para usar, cuelgue la prenda de los broches superiores y asegure con
los inferiores, de manera que la prenda quede tirante para planchar o
hacer pliegues.
ADVERTENCIA: PARA EVITAR LESIONES, APAGUE SIEMPRE LA PLANCHA
ANTES DE COLOCAR ACCESORIOS.
20
5738-SVP_InstructionSWP3.indd 20-21
21
4/21/10 4:19:01 PM
CÓMO PLANCHAR
• Llene el tanque de agua.
• Extienda la barra telescópica soltando los broches y separando los
segmentos. Cierre los broches para asegurar.
• Enchufe el cable a una toma conectada a tierra y ponga el interruptor en la
posición ON para encender.
Consejos de planchado:
• No permita que la manguera se enrede.
• Algunas cortinas se pueden planchar colgadas.
• Para eliminar las arrugas difíciles, también puede usar el cepillo para tela.
NOTA: No use la plancha sin agua. Esto podría dañar la unidad.
• La unidad estará lista para usar en apenas 45 segundos.
Nunca use agua con aditivos, como aromas, almidón o acondicionadores de tela.
Esto puede causar la formación de depósitos en la plancha y manchar su ropa.
• Cuelgue la prenda del colgadero rotatorio. También puede usar una percha
inoxidable limpia y colocarla en el gancho para perchas.
• Póngase el guante protector en la mano con la que va a sostener la prenda.
• Sostenga el cabezal de vapor de manera que las rejillas de vapor no apunten
hacia su cuerpo.
• Toque la prenda con el cabezal de vapor ligeramente, muévala hacia arriba y
hacia abajo con movimientos verticales desde la parte inferior de la prenda.
• El vapor subirá por la parte interior y exterior de la tela para eliminar las arrugas.
Continúe planchando la prenda y alísela con la mano libre (la del guante).
ADVERTENCIA:
MANTENGA LA PLANCHA DE VAPOR EN EL SUELO EN TODO MOMENTO.
DURANTE EL USO, SE PUEDE ESCUCHAR GORGOTEO EN LA MANGUERA.
ESTO ES NORMAL Y ES CAUSADO POR CONDENSACIÓN EN LA MISMA.
SOSTENGA LA MANGUERA HACIA ARRIBA PARA PERMITIR QUE LA
CONDENSACIÓN FLUYA DE NUEVO HACIA EL TANQUE.
NUNCA PLANCHE UNA PRENDA SI LA LLEVA PUESTA. ESTO PUEDE
CAUSAR QUEMADURAS Y LESIONES.
TIRAR DE UNA PRENDA CON DEMASIADA FUERZA PUEDE HACER QUE LA
PLANCHA A VAPOR SE VOLTEE.
NO USE LA PLANCHA A VAPOR SIN AGUA EN EL TANQUE.
• Repita la operación hasta que se hayan eliminado todas las arrugas de la tela.
• Al terminar, ponga el interruptor en la posición OFF para apagar.
• Desconecte la plancha.
NO USE LA PLANCHA A VAPOR DURANTE MÁS DE TRES HORAS.
NO LEVANTE LA PLANCHA A VAPOR POR EL MANGO DEL TANQUE DE AGUA.
Tabla de planchar portátil
• Cuelgue el cabezal de vapor en su colgadero cuando no esté en uso.
Use la tabla de planchar para cuello, bolsillos y esquinas.
• Vacíe el tanque de agua antes de guardar la unidad.
ON
OFF
22
5738-SVP_InstructionSWP3.indd 22-23
23
4/21/10 4:19:02 PM
LIMPIEZA
SINGER recomienda limpiar su plancha vapor al menos una vez a la semana.
Retire el tanque de agua tirando hacia arriba en el mango.
• Ponga el interruptor en la posición OFF para apagar y luego desconecte la
plancha a vapor.
• Permita que la plancha a vapor se enfríe durante al menos 30 minutos.
• Retire la manguera fría al tacto. Repliegue y retire la barra telescópica.
• Retire y drene el tanque de agua. Enjuáguelo con agua limpia y permita que
toda el agua se escurra. Vuélvalo a colocar en el depósito de agua.
• Drene el tanque de agua retirando el tapón de desagüe y dejando que salga
el contenido.
• Purgue la unidad llenando el depósito de agua y el conector de la manguera
con agua limpia, y luego drenándolo completamente. Vuelva a colocar el
tapón de desagüe.
• Envuelva la manguera alrededor de la barra telescópica una vez y coloque el
cabezal de vapor sobre su colgadero para guardar la unidad.
Eliminación de la acumulación de minerales
Es común que los minerales presentes en el agua dura se acumulen dentro
de la plancha y causen vapor intermitente o débil. Según la calidad del agua
en su localidad, SINGER recomienda eliminar la acumulación de minerales
luego de la primera o la segunda semana de usar la plancha. Si no usa agua
desmineralizada o destilada para su plancha, siga los siguientes pasos una
vez al mes.
• Ponga el interruptor en la posición OFF para apagar y desconecte la plancha.
• Retire la manguera fría al tacto. Repliegue y retire la barra telescópica.
• Drene el depósito de agua y vacíe el contenido del tanque.
• Prepare una solución de una taza de agua y otra de vinagre.
• Vierta lentamente la solución en el conector de la manguera hasta que el
depósito de agua esté lleno más o menos a la mitad, cerca a la parte superior
de la manguera.
• Deje reposar durante unos 40 minutos.
ACCESORIOS Y FUNCIONES:
El poder del vapor
en segundos
Lista para planchar en apenas 45 segundos.
Barra colgante
telescópica
Altura ajustable para planchar prendas más largas.
Colgador rotatorio
en 360˚
El colgador rotatorio a 360° incorporado hace fácil
planchar prendas en cualquier ángulo.
Sistema de colgador
plegable
Se pliega convenientemente para almacenamiento fácil.
Manguera de tela de
gran espesor
Es durable y flexible. Permanece fría durante el uso.
Apagado automático
La plancha tiene una función de seguridad de apagado
automático en caso de que se acabe el agua del tanque.
Tanque de agua
transparente extra
grande
Proporciona 90 minutos de vapor continuo.
Tanque removible de
llenado fácil
Tanque grande con capacidad para 2.5 litros.
Sistema de broches
para prendas
Broches convenientes para sostener las prendas.
Sistema de ruedas con
cuatro rodamientos
Añade estabilidad y movilidad y rueda para
almacenar fácilmente.
Conjunto de
accesorios:
Aditamento para pliegues y cepillo para tela.
Consejos prácticos:
• No toque prendas de seda, terciopelo u otras telas delicadas con la plancha.
• Drene la solución retirando el tapón de desagüe y vaciándola al lavamanos
o la tina.
• Sobre todo con telas delicadas, pruebe la temperatura en un lugar poco
visible, como una costura interior, antes de planchar toda la prenda.
• Drene la solución del conector de la manguera inclinando la unidad sobre el
lavamanos o la tina y dejando salir el agua.
• Siempre consulte la etiqueta de cuidado de la prenda antes de planchar.
El símbolo
indica que la prenda se puede planchar a vapor. El símbolo indica que no se debe planchar a vapor.
• Vierta agua limpia en el conector de la manguera y la entrada del depósito de
agua y drene. Repita este paso hasta que se disipe el olor a vinagre.
• Las telas más pesadas podrían necesitar más vapor.
• Vuelva a ensamblar la unidad.
24
5738-SVP_InstructionSWP3.indd 24-25
25
4/21/10 4:19:02 PM
RESOLUCIÓN DE PROBLEMAS
PROBLEMA
MOTIVO Y SOLUCIÓN
GARANTÍA LIMITADA DE SINGER® SEWING COMPANY PARA LA
PLANCHA A VAPOR STEAMWORKS PRO
IMPORTANTE: CONSERVE ESTE DOCUMENTO EN UN LUGAR SEGURO.
¿Qué cubre esta garantía limitada?
La unidad no
emite vapor
• La plancha no está conectada: Conéctela a una toma
de corriente.
Las dos luces
indicadoras no
se encienden
• El disyuntor o el interruptor de falla a tierra están apagado
o el fusible está quemado: Revise la toma de corriente. Si
necesita más ayuda, llame a un electricista competente.
La plancha a vapor SINGER SteamWorks Pro está garantizada contra defectos de
fabricación y materiales.
¿Cuánto dura esta garantía limitada?
La garantía del cableado y las partes electrónicas de la PLANCHA A VAPOR tiene
una duración de dos (2) años a partir de la fecha de compra.
La garantía para las demás partes de la PLANCHA A VAPOR tiene una duración de
noventa (90) días a partir de la fecha de compra.
¿Qué hará SINGER?
La unidad no
emite vapor
• Acumulación de minerales en la unidad: Siga las
instrucciones para eliminarlos.
Las dos luces
indicadoras se
encienden
• El tanque de agua está vacío: Llénelo.
Si las partes electrónicas y/u otras de la PLANCHA A VAPOR, luego de una
inspección realizada por SINGER, resultan defectuosas dentro del (los) período(s)
de garantía aplicable(s), las partes electrónicas y/u otras serán reparadas o
reemplazadas, a discreción de SINGER, sin costo, con excepción de cualquier gasto
relacionado con el envío de la PLANCHA A VAPOR a SINGER.
Si SINGER envía una PLANCHA A VAPOR de reemplazo, tendrá el mismo tiempo de
garantía restante de la PLANCHA A VAPOR original.
¿Quién está cubierto por esta garantía limitada?
Esta garantía sólo puede ser usada por el consumidor que sea el propietario original
de la PLANCHA DE VAPOR y no podrá ser transferida ni cedida.
Gorgoteo excesivo de la
manguera y la boquilla
de vapor
• Condensación en la manguera: Algo de gorgoteo es un
efecto natural del proceso de formación de vapor.
• Si el gorgoteo es excesivo, extienda la manguera
verticalmente para permitir que el agua drene de regreso
al depósito.
El vapor es intermitente
• Acumulación de minerales en la unidad: Es normal que la
unidad deje de producir vapor durante algunos segundos
periódicamente.
• Si el vapor deja de salir durante períodos más
prolongados, siga el procedimiento para
eliminar la acumulación de minerales.
Si estos procesos de resolución de problemas no funcionan, llame a SINGER at
1-800-4-SINGER o 1-800-474-6437.
26
5738-SVP_InstructionSWP3.indd 26-27
¿Cuáles son las demás exclusiones o limitaciones?
• El servicio cubierto por esta garantía sólo se podrá obtener dentro de los 48
estados contiguos, Alaska, Hawái y Canadá.
• La PLANCHA A VAPOR únicamente está garantizada para uso normal en el
hogar (no comercial). La garantía no cubre defecto(s) causado(s) por abuso,
falta de mantenimiento u otro tipo de descuido, por no seguir las instrucciones
de cuidado, limpieza u otras de la PLANCHA A VAPOR, por uso indebido o por
eventos que se salgan de nuestro control.
• CUALQUIER GARANTÍA IMPLÍCITA APLICABLE A LA PLANCHA A VAPOR,
ENTRE OTRAS LAS GARANTÍAS DE COMERCIABILIDAD Y/O IDOINEIDAD
PARA PROPÓSITOS PARTICULARES, ESTÁ LIMITADA A LA DURACIÓN DE
ESTA GARANTÍA ESCRITA. SINGER NO SERÁ RESPONSABLE DE LOS DAÑOS
ECONÓMICOS QUE RESULTEN DEL INCUMPLIMIENTO DE ESTA GARANTÍA O
DE CUALQUIER GARANTÍA IMPLÍCITA.
• SINGER no autoriza a ninguna persona a crear ninguna obligación ni responsabilidad
relacionadas con la PLANCHA A VAPOR ni ninguna de sus partes, más allá de lo
establecido en esta garantía.
• SINGER no se hace responsable bajo los términos de esta garantía por cualquier
daño o defecto que resulten del uso de partes que no sean originales de SINGER o
por el uso de servicios de reparación y mantenimiento que no estén aprobados para
la PLANCHA A VAPOR.
27
4/21/10 4:19:02 PM
¿La ley estatal afecta mis derechos?
• Esta garantía le otorga derechos legales específicos. Usted también podrá tener
otros que varían según el estado.
• Algunos estados no permiten limitaciones a la duración de una garantía implícita,
por lo que la limitación anterior podría no aplicarse en su caso.
• Algunos estados no permiten la exclusión ni la limitación de los daños incidentales
o consecuentes, por lo que la limitación o exclusión anterior podría no aplicarse
en su caso.
¿Cómo puedo obtener servicio bajo los términos de la garantía?
El servicio bajo los términos de la garantía se podrá obtener devolviendo la PLANCHA A
VAPOR junto con:
1.Este documento de garantía original
2.La prueba de compra (por ejemplo el recibo de compra) a:
SINGER Sewing Company
A la atención de: Service Department
1224 Heil Quaker Boulevard
LaVergne, TN 37068
¿Qué pasa si tengo preguntas sobre la garantía?
Si tiene alguna pregunta sobre estas garantías, comuníquese con nosotros:
SINGER Sewing Company 1-800-4-SINGER
Dirección de correo electrónico: [email protected]
A la atención de: Consumer Affairs (1-800-474-6437)
1224 Heil Quaker Boulevard
LaVergne, TN 37068
o en el área de Servicio al Cliente de nuestro sitio en Internet. www.singerco.com
SINGER® ES UNA MARCA COMERCIAL REGISTRADA DE THE SINGER COMPANY LIMITED.
5738-SVP_InstructionSWP3.indd 28
4/21/10 4:19:02 PM