1
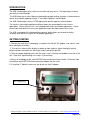
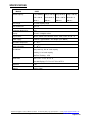
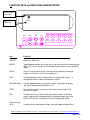
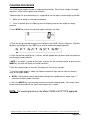
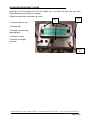
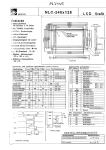
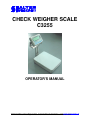
CHECK WEIGHER SCALE
C3255
OPERATOR’S MANUAL
1000 Armstrong Drive. Fairmont, Minnesota 56031 Tel: 507-238-8702 Fax: 507-238-8271 e-mail: [email protected]
For technical support contact us at 1-800- 458-7062 or fax us at 1-800-368-2042
INTRODUCTION
The 3255 Checkweigher series scales are versatile and easy to use. The large display is allows
you to easily view the weight.
The 3255 allows you to store 10 preset checkweighing target settings, provides a simple counting
feature and is battery operated using 6 “C” cell alkaline batteries (not included).
The 3255 Checkweigher series is NTEP approved at specific capacities and resolutions.
The stainless steel weighing platform and base allows you to wipe down the unit in moist
applications. Please note this unit is not intended to be used in wash down applications. Please
contact your local dealer to to see if your application meets the requirements of this scale.
The 3255 is equipped with a foldable display bracket, which allows you to lower to display
assembly when you are using the unit in portable applications.
GETTING STARTED
1. Remove the scale from it’s packaging. Included is the 120 Volt AC adapter, user manual, scale
base and display assembly.
2. To install the scale raise the display assembly up from the base, adjust the display locking
button into place and make sure the display head is locked into position.
3. To ensure proper weighing make sure the scale is level, using the level bubble on the rear of the
unit. Once level, tighten locking nuts using a 13 mm wrench.
4. Always fit the Adaptor to the scale BEFORE connecting to an electrical outlet. Disconnect from
the electrical outlet BEFORE disconnecting the adaptor from the scale.
5. If installing “C” batteries make sure you do not use the AC adapter.
AC adapter plug
1000 Armstrong Drive. Fairmont, Minnesota 56031 Tel: 507-238-8702 Fax: 507-238-8271 e-mail: [email protected]
For technical support contact us at 1-800- 458-7062 or fax us at 1-800-368-2042
Page 2 of 18
SPECIFICATIONS
Model #
Default Capacity
C3255
15 kg x 0.005kg 30 kg x 0.01 kg 60 kg x 0.02 kg 150 kg x 0.05 kg
30 lb x 0.01 lb
60 lb x 0.02 lb 150 lb x 0.05 lb 300 lb x 0.1 lb
480 oz x
960 oz x
2400 oz x
4800 oz x
Tare Range
Full scale capacity range
Units of Measure
Kg, lb, oz
Calibration Weight Units
Kg, lb
Display
1.2 inch 5 1/2 digital actives
Key functions
ON/OFF, MODE, NET/GROSS, ZERO, TARE, CALL, SET, 0 ~ 9
Power supply
6 alkaline C-type batteries / AC adapter (15V 300mA)
Operation Temperature
10 ~ 35 F
Relative Humidity
25 ~ 95 F
Zero Widow
Upon power up, 10% of scale capacity
0
0
0
0
Zero Key, 2% of scale capacity
Auto Zero Tracking - 2.5d
Dimensions
Base: 17.4” L x 13.5” W x 4” H
Base with Display: 17.4” L x 13.5” W x 19.75” H
Approvals
NTEP
Material
Stainless Steel
1000 Armstrong Drive. Fairmont, Minnesota 56031 Tel: 507-238-8702 Fax: 507-238-8271 e-mail: [email protected]
For technical support contact us at 1-800- 458-7062 or fax us at 1-800-368-2042
Page 3 of 18
BATTERY INSTALLATION
1. Remove Battery Cover Screws.
2. Insert 6 “C” cell Alkaline batteries into
compartment, and replace cover.
*** WARNING ***
When using the C3255 as a battery operated scale, do not use the AC adapter!
LOW BATTERY POWER
The 3255 battery life is estimated at 250 hours of continuous use. To conserve battery life, make
sure you have configured the scale for Auto Shutdown, see configuration section.
1.
(Low battery indication) will display on LCD display when battery’s power is insufficient to
power the scale.
is displayed, remove old batteries and plug in the AC adapter or replace with new
2. When
batteries.
1000 Armstrong Drive. Fairmont, Minnesota 56031 Tel: 507-238-8702 Fax: 507-238-8271 e-mail: [email protected]
For technical support contact us at 1-800- 458-7062 or fax us at 1-800-368-2042
Page 4 of 18
FUNCTION KEYS and DISPLAYED ANNUNCIATORS
Stable weight
enunciator
Net
Zero
enunciator
υO τ
Gross
ON/OFF
MODE
ZERO
I
GROSS/NET
TARE
CALL
0
1
2
3
4
SET
5
6
7
8
9
0
B/G
T
Key
Function
ON/OFF:
Switch on / Switch off
MODE:
Toggle between weight units mode (lb, oz, kg) and activate the counting mode
(pcs). Key is also used to exit check weighing and return to normal weighing
mode.
ZERO:
Press this key to return to zero. Zero key will only operate if displayed
weight is less than 2 % of full scale capacity 2%
CALL:
In checking weight mode, used to activate a saved target settings. In
configuration mode, used to scroll between setting.
B/G (Gross/Net):
Used to toggle between net and gross weight. A bullet on the display
will light to indicate what mode you are in
TARE:
Put a container on the scale, press this key to tare the weight. The
tare value is stored.
SET:
Used to enter into set-up for check point target settings. In counting
mode, used to select sampling quantity. In weighing mode, press and
hold the SET key for 3 seconds to enter into configuration mode.
Numerical keys
(0~9)
Used to call out saved target settings, and enter upper and lower limits.
1000 Armstrong Drive. Fairmont, Minnesota 56031 Tel: 507-238-8702 Fax: 507-238-8271 e-mail: [email protected]
For technical support contact us at 1-800- 458-7062 or fax us at 1-800-368-2042
Page 5 of 18
COUNTING PROCEDURE
The C3255 check weigher includes a simple counting function. The minimum sample size weight
required is 1/5d of scales capacity and resolution.
*Important note, for accurate counting it is suggested to use the largest sample weight as possible.
1.
Make sure all weight is removed from platform.
2. If tare is required, press the Tare key prior to sampling to tare out the weight of a empty
container.
3. Press MODE key to enter into counting mode, the display will show:
4. There are four pre-defined samples sizes available in the C3255. They are 10 pieces, 25 pieces,
50 pieces and 100 pieces. Press SET key to scroll to the desired sampling quantity.
5. Once the desired sampling size is chosen, add the appropriate # of pieces onto the platform or
into the empty (tared) container.
* NOTE: If no weight is placed on the scale, and you exit the counting function by pressing the
MODE key, the scale will display an invalid # of pieces.
6. With the sample weight on the scale, the display will flash for 3-5 seconds.
7. Once the sample weight is stable, the stable enunciator will light and the scale will show the
value of the sample weight.
•
NOTE: If the displayed value of pieces does not equal the sample chosen, repeat steps 1-7
and chose a higher sample size value.
8. Press the MODE key to exit counting and return to normal weighing mode. Your sample value
will be saved and stored until you store a new sample size is stored.
NOTE: The counting feature on the Model C3255 is NON TYPE approved.
1000 Armstrong Drive. Fairmont, Minnesota 56031 Tel: 507-238-8702 Fax: 507-238-8271 e-mail: [email protected]
For technical support contact us at 1-800- 458-7062 or fax us at 1-800-368-2042
Page 6 of 18
STORING CHECK WEIGHING TARGET SETTINGS
The C3255 allows you to store up to 10 target settings, using numbers 1-10. The keyboard is used
to enter in you upper and lower check weight limits. Prior to setting up your target settings, use the
mode key to scroll to the correct units of measure.
1. In normal weighing mode, press numerical key, and then press SET key to enter into a check
weighing setup mode. The display will show as below:
2. Using the numeric keypad, enter in the desired lower check weight, and press SET key. The
display will show as below:
3. Using the numeric keypad, enter in desired upper check weight, and press SET key. The
check weighing setup process is finished.
The display will briefly flash the lower and upper limits for you to make sure the setting were stored
correctly. The scale will now exit from the set-up mode and return to normal check weighing mode.
“03” Indicates you have stored a check weighing limits for key 3.
4. To set up additional check weight target setting, repeat steps 1-3.
5. To exit check weighing mode, press the MODE key to exit and return to normal weighing mode.
* Note: If you do not enter a check weight limit within 10 seconds the scale will exit target settings
and return to normal weighing mode.
If the upper limit is lower than the lower limit, the buzzer will beep-beep-beep to remind the
operator the setup is incorrect. The device will auto clear the upper check weight and return to the
last step – upper check weight setup.
1000 Armstrong Drive. Fairmont, Minnesota 56031 Tel: 507-238-8702 Fax: 507-238-8271 e-mail: [email protected]
For technical support contact us at 1-800- 458-7062 or fax us at 1-800-368-2042
Page 7 of 18
USING STORED CHECK WEIGHING TARGET SETTINGS
The Check weighing function can be used both in normal weighing mode and counting mode.
Under normal mode, it stands for weight. While in counting mode, it stands for quantity.
To use a stored check weighing target setting:
1. In normal weighing mode, press the desired numeric key and then press CALL key to enter into
check weighing mode. The scale will briefly show upper and lower check weights, for you to
validate the correct key has been chosen and activate the check weighing function. The following
is displayed if you press the 3 key, then CALL.
2. Load weight on platform.
3. If loaded weight is in the setting weighing range, LCD will show
continually beep until the item is removed from the platform
and the buzzer will
.
4. If loaded weight under lower limit, LCD will show
to remind the operator the loaded
weight is not within the setting range. The low bar graph segment will change to indicate how
close you are to achieving the acceptable weight.
5. If loaded weight over upper limit, LCD will show
to remind the operator the loaded
weight is not within the setting range. The high bar graph segment will change to indicate how
close you are to achieving the acceptable weight.
To exit the check weighing mode, please press 0 key and then press CALL key or press the
MODE key.
Note:
Under check weighing mode, press CALL key to call out the existed upper and lower check limit.
1000 Armstrong Drive. Fairmont, Minnesota 56031 Tel: 507-238-8702 Fax: 507-238-8271 e-mail: [email protected]
For technical support contact us at 1-800- 458-7062 or fax us at 1-800-368-2042
Page 8 of 18
CONFIGURATION MODE DEFINTIONS
Below is the definition of the configuration setting and the scale operations they affect
Mode -
Select the capacity of the scale
Mode
CS_ _6
CS_15
CS_30
CS_60
CS_150
CS_300
Capacity
KG
(6KG)
(15KG)
(30KG)
(60KG)
(150KG)
(300KG)
Capacity
LB
12 LB
30 LB
60 LB
150 LB
300 LB
600 LB
** Shaded areas indicate C3255 capacities available
Units –
Configure each units of measure; LB, KG, oz, to On or Off. When selected units of measure is
turned off, the selection will not appear when pressing the mode key. The default setting is ON
for all units of measure.
DivS –
Select the displayed resolution of the scale for the selected capacity chosen. The default setting
is the NTEP approved capacity and resolution.
A.OFF –
To help save battery life, configure the scale to automatically shutoff after 120, 180, 240, 300
seconds or turns the setting OFF if you have the unit plugged into an AC outlet at all times. The
default setting is ON.
CaL_U –
Select the calibration weight used when calibrating your scale. The default setting is Full.
CAL_uSelect the units of measure for calibration, KG or LB. The default setting is LB
Count –
Shows raw counts of load cell and enters into calibration mode
trAd –
Configure the scale for OFF (Non-TYPE approved or sealed) or ON (Select this feature when
calibration the unit for weights and measures sealing. With the Selection ON, only A.OFF
is configurable through the keyboard configuration menu. Press the sealing switch located
under the battery compartment to enter into all other configuration modes.
End –
Exits the configuration mode and returns to normal weighing mode.
.
1000 Armstrong Drive. Fairmont, Minnesota 56031 Tel: 507-238-8702 Fax: 507-238-8271 e-mail: [email protected]
For technical support contact us at 1-800- 458-7062 or fax us at 1-800-368-2042
Page 9 of 18
CONFIGURATION MODE MENU
The scale can be set as desired for the user. Press SET key for 3 seconds to enter setting function
mode. The scale will go into the following configuration mode.
ModE
Unit
diviS
A. OFF
Cal_ U
Cal_u
Count
Use CALL key to scroll
Use SET key to scroll
setting
TrAd
End
OFF
ON
Displays raw counts
or accept
120
kg
Lb
Full
1/2
¼
180
240
300
CS_60
CS_150
CS_300
OFF
See Table 2 for appropriate diviS
CS_ _ 6
oz
On
Off
Lb
On
Off
Oz
On
Off
CS_15
CS_30
CS_60
See Table 1 for
Mode settings
* Bold and gray Highlighted areas define factory default settings.
Table 1 – Mode Setting
Choose the appropriate mode setting for the capacity of your scale. The capacity sticker is located
on the disdlay.
Mode
CS_ _6
CS_15
CS_30
CS_60
CS_150
CS_300
Capacity
KG
(6KG)
(15KG)
(30KG)
(60KG)
(150KG)
(300KG)
Capacity
LB
12 LB
30 LB
60 LB
150 LB
300 LB
600 LB
1000 Armstrong Drive. Fairmont, Minnesota 56031 Tel: 507-238-8702 Fax: 507-238-8271 e-mail: [email protected]
For technical support contact us at 1-800- 458-7062 or fax us at 1-800-368-2042
Page 10 of 18
Table 2 - Division Setting Table
When setting up the Mode selection, each mode (example CS_15) has 4 separate division setting
which will give you the selection capacity and resolution for KG and LBS. Choose the correct
setting below for your needs.
Selectable
Division
Setting
6.0020 kg
6.0010 kg
6.0005 kg
6.0002 kg
Capacity and
Resolution KG
# of divisions
Capacity and
Resolution LB
# of divisions
Accuracy
6 x 0.002 kg
6 x 0.001 kg
6 x 0.0005 kg
6 x 0.0002 kg
3,000 d
6,000 d
12,000 d
30,000 d
N/A
N/A
N/A
N/A
N/A
N/A
N/A
N/A
N/A
N/A
N/A
N/A
CS_15
15.0050 kg
12.0020 kg
15.0010 kg
15.0005kg
15 x 0.005 kg
15 x 0.002 kg
15 x 0.001 kg
15 x 0.0005 kg
3,000 d
7,500 d
15,000 d
30,000 d
30 x 0.01 lb
30 x 0.005lb
N/A
N/A
3,000 d
6,000 d
+/-1d
N/A
N/A
N/A
CS_30
30.010 kg
30.005 kg
30.002 kg
30.001kg
30 x 0.01 kg
30 x 0.005 kg
30 x 0.002 kg
30 x 0.001 kb
3,000 d
6,000 d
15,000 d
30,000 d
60 x 0.02 lb
60 x 0.01 lb
N/A
N/A
3,000 d
+/-1d
N/A
N/A
N/A
CS_60
60.020 kg
60.010 kg
60.005 kg
60.002 kg
60 x 0.02 kg
60 x 0.01 kg
60 x 0.005 kg
60 x 0.002 kg
3,000 d
6,000 d
12,000 d
30,000d
150 x 0.05 lb
150 x 0.02 lb
N/A
N/A
3,000 d
N/A
N/A
+/-1d
N/A
N/A
N/A
CS_150
150.050 kg
120.020 kg
150.010 kg
150.005 kg
150 x 0.05 kg
120 x 0.02 kg
150 x 0.01 kg
150 x 0.005 kg
3000 d
6,000 d
15,000 d
30,000 d
300 x 0.1 lb
300 x 0.05 lb
N/A
N/A
3,000 d
6,000 d
N/A
N/A
+/-1d
N/A
N/A
N/A
CS_300
300.10 kg
300.05 kg
300.02 kg
300.01 kg
N/A
N/A
N/A
N/A
Mode
CS_6
N/A
N/A
N/A
N/A
* Grey Shaded areas indicate capacities only available for Model 3255.
** Bold and shaded areas indicate NTEP approved capacities and resolutions only
1000 Armstrong Drive. Fairmont, Minnesota 56031 Tel: 507-238-8702 Fax: 507-238-8271 e-mail: [email protected]
For technical support contact us at 1-800- 458-7062 or fax us at 1-800-368-2042
Page 11 of 18
CALIBRATION PROCEDURE – NON- SEALED
There are two methods of calibrating the scale. Non –sealed, when the TrAd configuration is set
to off and Sealed, when the TrAd configuration setting is to on. These instructions help you
calibrate the scale, when it is in the non-sealed mode.
Periodically your scale may require calibration to ensure proper weighing. You will need a precalibrated or accurate weight to calibrate the scale. If calibration is performed with a weight other
than a pre-calibrated or accurate weight, it will cause your scale to weigh inaccurately. Scale
calibration is accomplished, when needed, by the following instructions
FUNCTION
1. Remove all weight from the platform, and
make sure the scale is in a level and stable
environment.
2. Press and hold the SET key for three
seconds to enter into the configuration mode.
3. Press the CALL key 4 times to “CAL_U”,
press the Set key. The “CAL_U” function
allows you to set the capacity of the calibration
weight .
4. Press the CALL key to scroll through to
choose 1 / 2 and 1 / 4.
5. Once you have selected the calibration
weight, press the SET key once.
6. Press the CALL key once
SCALE RESPONSE
Scale displays “Mode”
Scale displays “FULL”.
See Table 3 for valid calibration
weights required
Scale displays “CAL_U”.
Scale displays “CAL_u”.
The “CAL_u” configuration setting allows you to configure the scale to calibrate in pounds or
kilograms.
7. Press the SET key once
8. Press the CALL key to scroll through to
choose lb and kg. Once you have selected
the calibration weight, press the SET key once.
9. Press the CALL key once to scroll to
“Count”. Press the SET key once.
Scale displays “lb”
Scale displays “CAL_u”.
Scale displays “ XXXXXX” (Raw counts
At zero weight)
10. Press the TARE key once to zero the scale.
1000 Armstrong Drive. Fairmont, Minnesota 56031 Tel: 507-238-8702 Fax: 507-238-8271 e-mail: [email protected]
For technical support contact us at 1-800- 458-7062 or fax us at 1-800-368-2042
Page 12 of 18
CALIBRATION PROCEDURE – NON- SEALED- Conitnued
FUNCTION
SCALE RESPONSE
11. Load the appropriate calibration weight.
“XXXXXX”
See Table 3 for valid calibration
weights used, verify weight placed
on platform is with acceptable span
range.
12. Press the TARE key to begin calibration
“-CAL-“
13. The scale will exit out of calibration mode
and return to normal weighing mode.
“Scale will display weight used for
calibration “
If calibration process does not correct any weighing issues, contact the service department for
technical support at 1-800-458-7062.
Table 3 - Calibration Weight Table
“FULL” – Full capacity
Mode (Capacity
KG)
CS_ _6 (6KG)
CS_15 (15KG)
CS_30 (30KG)
CS_60 (60KG)
CS_150
(150KG)
CS_300
(300KG)
Capacity LB
12
30
60
150
300
Calibration
Weight KG
N/A
10 KG
20 KG
50 KG
100 KG
Calibration
Weight LB
N/A
20 LB
40 LB
100 LB
200 LB
Acceptable
Span Range
N/A
80000-120000
80000-120000
100000-150000
80000-120000
600
N/A
N/A
N/A
* Grey Shaded areas indicate capacities only available for Model 3255.
“1 / 2” – 1 / 2 Capacity
Mode (Capacity
KG)
CS_ _6 (6KG)
CS_15 (15KG)
CS_30 (30KG)
CS_60 (60KG)
CS_150
(150KG)
CS_300
(300KG)
Capacity LB
12
30
60
150
300
Calibration
Weight KG
N/A
5 KG
10 KG
20 KG
50 KG
Calibration
Weight LB
N/A
10 LB
20 LB
50 LB
100 LB
Acceptable
Span Range
N/A
40000-60000
40000-60000
320000-60000
40000-60000
600
N/A
N/A
N/A
* Grey Shaded areas indicate capacities only available for Model 3255.
1000 Armstrong Drive. Fairmont, Minnesota 56031 Tel: 507-238-8702 Fax: 507-238-8271 e-mail: [email protected]
For technical support contact us at 1-800- 458-7062 or fax us at 1-800-368-2042
Page 13 of 18
Table 3 - Calibration Weight Table - Conitnued
“1 / 4” - 1 / 4 Capacity
Mode (Capacity
KG)
CS_ _6 (6KG)
CS_15 (15KG)
CS_30 (30KG)
CS_60 (60KG)
CS_150
(150KG)
CS_300
(300KG)
Capacity LB
12
30
60
150
300
Calibration
Weight KG
N/A
2 KG
5 KG
10 KG
20 KG
Calibration
Weight LB
N/A
5 LB
10 LB
20 LB
50 LB
Acceptable
Span Range
N/A
16000-24000
20000-30000
16000-30000
16000-24000
600
N/A
N/A
N/A
* Grey Shaded areas indicate capacities only available for Model 3255.
SEALING YOUR SCALE FOR WEIGHTS AND MEASURES APPROVAL
If your scales requires sealing by your local weights and measures authorities, please follow the
instructions shown below to seal your scale.
* IMPORTANT NOTE: Once you have set the scale to the SEALED mode, access to the
configuration menu is limited to changing the “A.OFF” settings only. To enter into the
configuration menu for the other features or to calibrate your scale, you will be required to follow
the steps shown on page X, “Calibration Procedure Sealed”.
FUNCTION
SCALE RESPONSE
1. Follow step 1-13 of the “Calibration Procedure Non-Sealed”.
2. Press and hold the SET key for three
seconds to enter into the configuration mode.
3. Press the CALL key 7 times to “trad”,
press the Set key.
Scale displays “Mode”
Scale displays “OFF”.
4. Press the CALL key once
Scale displays “ON”.
5. Press the SET key to active the sealing mode
Scale displays “trAd”
6. Press the CALL key once
Scale displays “_END_”.
7. Press the SET key to exit and return to normal weighing mode.
Once you have set the scale to the SEALED mode, access to the configuration menu is limited to
changing the “A.OFF” settings only. To enter into the configuration menu for the other features or
to calibrate your scale, you will be required to follow the steps shown on page X, “Calibration
Procedure Sealed”.
1000 Armstrong Drive. Fairmont, Minnesota 56031 Tel: 507-238-8702 Fax: 507-238-8271 e-mail: [email protected]
For technical support contact us at 1-800- 458-7062 or fax us at 1-800-368-2042
Page 14 of 18
SEALING YOUR SCALE FOR WEIGHTS AND MEASURES APPROVAL
The C3255 requires a lead wire seal to seal the scale. Place sealing mechanism here.
1000 Armstrong Drive. Fairmont, Minnesota 56031 Tel: 507-238-8702 Fax: 507-238-8271 e-mail: [email protected]
For technical support contact us at 1-800- 458-7062 or fax us at 1-800-368-2042
Page 15 of 18
CALIBRATION PROCEDURE –SEALED
Breaking the seal to calibrate the scale will require you to re-certify the scale with your local
authorized weights and measures inspector.
Follow the steps below to calibrate your scale:
1. Remove lead wire seal.
Step
4
Step
3
2. Remove bolts
3. Remove the two Display
Mounting locks
4. Remove 4 screws
5. Remove rear display
enclosure
Steps
1&2
1000 Armstrong Drive. Fairmont, Minnesota 56031 Tel: 507-238-8702 Fax: 507-238-8271 e-mail: [email protected]
For technical support contact us at 1-800- 458-7062 or fax us at 1-800-368-2042
Page 16 of 18
CALIBRATION PROCEDURE –SEALED - Continued
The calibration button is located on
the display main PDB, underneath
the battery compartment.
A sealing label covers the access
hole. Remove the label and press the
calibration button.
The scale will now be in the
configuration mode. The display will
prompt “ModE”.
You are now able to configure and
calibrate the scale. Review
Configuration and calibration sections
to procede.
1000 Armstrong Drive. Fairmont, Minnesota 56031 Tel: 507-238-8702 Fax: 507-238-8271 e-mail: [email protected]
For technical support contact us at 1-800- 458-7062 or fax us at 1-800-368-2042
Page 17 of 18
ERROR MESSAGES
1. Low Battery If this message is displayed, it indicates that
the battery needs to be replaced.
Solution: Replace the battery or plug in the
AC adaptor for operations.
2. Below Zero The scale senses a weight value that is less
than the allowable limit.
Solution: Re-power on the scale again. If
the message continues, the operator should
ask the maintenance men to check the
scale.
3. Over Zero This message indicates that operator have
too much weight on the scale when operator
turned the scale on.
Solution: Remove the excess weight from
the scale platform and turn the scale off and
then back on. If the scale continues to
display this message, call for service.
4. Overload If the weighting capacity exceeds the
maximum capacity of scale, the display will
show the right message.
Solution: Remove the weight from scale
platform right away.
5. Power on zero count over calibration zero
+10%.
Solution: Turn the scale off and then back
on.
6. Power on zero count under calibration zero 10%.
Solution: Turn the scale off and then back
on.
1000 Armstrong Drive. Fairmont, Minnesota 56031 Tel: 507-238-8702 Fax: 507-238-8271 e-mail: [email protected]
For technical support contact us at 1-800- 458-7062 or fax us at 1-800-368-2042
Page 18 of 18