1
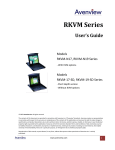
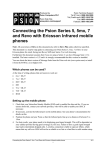
Spyder™ with PhotoCAL™
User Guide
Edition: November 2001
1
Edition: November 2001
All efforts have been made to ensure the accuracy of this guide. However, should any errors be
detected, we would appreciate being informed of them. Changes are periodically made to the
information and will be incorporated in new editions of this guide. ColorVision Inc. reserves the right
to make improvements and/or changes in the product(s) and/or program(s) in this guide at any time.
© 2001 ColorVision Inc. All rights reserved.
COLORVISION™ and other ColorVision Inc. trademarks are the property of ColorVision Inc.
PANTONE ® and other Pantone, Inc. trademarks are the property of Pantone, Inc. All rights reserved.
Adobe and Photoshop are either registered trademarks or trademarks of Adobe Systems
Incorporated in the United States and/or other countries. Microsoft, Windows and Windows NT are
either a registered trademarks or trademarks of Microsoft Corporation in the United States and/or
other countries. Macintosh, Mac and ColorSync are trademarks of Apple Computer, Inc., registered in
the U.S. and other countries. All other product names and trademarks are the property of their
respective owners. Any omission of such marks from any product is regretted and is not intended as
an infringement on such trademarks.
2
Using the Spyder with PhotoCAL
Monitor Calibration Made Easy
Overview
The goal of color management is to define correct color for monitors, printers and other devices. This
is done by checking how your devices reproduce color, and then building a color correction profile for
each. These profiles work as translators, determining how color on that device relates to a universal
color standard. These color profiles are then placed in a special folder within your operating system.
Any time color data is sent from one device to another, from your application as displayed by your
monitor to a printer for instance, the application or operating system’s Color Management Module
(CMM) translates the color data from the profile of the source, to a universal color standard, then on
to the profile of the destination device.
Color management is needed because all digital color devices reproduce color differently, even when
each is responding to the same RGB numbers in an image. In computing, this fact is referred to as
device dependent color; the color depends on the device, and varies between devices. The
manufacturers of monitors and printers often provide generic profiles with the installation software
that accompanies the product. In addition Apple and Microsoft® include generic profiles for many
common peripherals that are installed with the operating system. Of these devices, your monitor is
the most variable component for two reasons. The first is that monitors typically include user controls
for adjusting the brightness, contrast, and color balance which may be set so the monitor’s actual
performance is not accurately described by a generic profile for the monitor. A second reason is that
the phosphor screen coatings on CRT monitors and the fluorescent lights and dyes in LCD monitors
change over time.
Because digital images are color corrected and adjusted on screen, the accuracy of the monitor is
key to balancing the entire color management system. For example: when scanning an image, the
preview used to make adjustments is based on the monitor profile, if this profile is inaccurate, the
resulting scan will be incorrect. At the other end of the workflow, a color image you are editing in an
application such as Adobe® PhotoShop® will not dependably match your printout unless an accurate
monitor profile is being used to display and proof the image.
The seven sensors of the Spyder accurately read the color, brightness and other characteristics of
your monitor, allowing the PhotoCAL software to first adjust your monitor to an optimal state, then
precisely define that state as a color profile. The instructions that follow cover both the process of
calibrating your monitor and examples of using the resulting profile.
Installation
For the Mac: Install PhotoCAL software by inserting the PhotoCAL CD into your CD-ROM drive.
Double-click on the PhotoCAL Installer icon. Attach the USB connector of the Spyder to your
computer, either directly or via a powered USB hub. Direct connections offer more reliable
communication. After restarting, launch PhotoCAL through the Apple menu’s Monitors Control Panel.
In the Monitors dialog select the Color icon. Choose the Calibrate button, and select PhotoCAL from
the dialog window that opens. This will launch the PhotoCAL introductory screen. If you have
deactivated the default calibrator in the Extensions Manager, then selecting the calibrate button will
launch PhotoCAL automatically. After reading the instructions, click on the Next button in the bottom
right corner of the window to proceed screen by screen.
3
For Windows®: Install the PhotoCAL CD into your CD-ROM drive. Double-click on the PhotoCAL
Setup icon. Attach the Spyder USB connector to your computer. (Note PhotoCAL will not function
unless the Spyder is properly attached.) The New Hardware Wizard will open automatically. Follow onscreen instructions to successfully load your Spyder Driver. Launch PhotoCAL by clicking on the Start
Bar or double clicking on the PhotoCAL icon. Select the PhotoCAL application in: PANTONE®
COLORVISION/PhotoCAL/PhotoCAL.exe. Follow the Step-by-Step procedures on screen.
The Calibration and Profiling Process
The Select Monitor Type window allows you to choose your monitor type, so that the software can
make appropriate adjustments for your LCD or CRT.
4
If you are calibrating a CRT monitor, the Spyder uses suction cups to adhere to the glass of the CRT
monitor. If you are calibrating a LCD monitor, please attach the LCD attachment to the Spyder as
outlined in the diagram below.
The LCD Spyder attachment ensures that the suction cups will not touch the LCD display. It also
provides an easy way to adjust to the dimensions of most any LCD from large 22” desktops to
notebook computers.
IMPORTANT NOTE
DO NOT ATTACH THE SUCTION CUPS OF THE SPYDER TO A LCD MONITOR. THIS COULD
POTENTIALLY CAUSE DAMAGE TO YOUR DISPLAY.
5
The Select Gamma screen offers two Gamma choices: 1.8 and 2.2. On Windows, the choice is easy:
2.2 is consistently preferred. The on-screen tips suggest that 1.8 should be selected by Apple
Macintosh users. Keep in mind that on the Mac, either choice will offer excellent image color in
Photoshop and other applications with application level color management; so the choice of a
monitor Gamma will only affect how non-color managed applications display colors. Its easy to
confuse the Gamma and white point settings of your monitor with the similarly named attributes of
Photoshop working spaces like Adobe RGB, ColorMatch RGB and sRGB. It is not necessary to
match your monitor settings to your Photoshop working space’s attributes (in fact, with Photoshop 6,
where images in differing spaces may be open at the same time, it is not even possible). If you work
®
with non-color-managed applications like Corel Painter™, which functions in monitor space, choosing
a Gamma and white point for your monitor that matches those of your Photoshop working space will
allow a closer match on screen between the brightness and contrast of an image in the non-colormanaged application and in Photoshop.
6
Another advantage of using a Gamma of 2.2 on the Mac would be to allow non-color-managed
images on the Internet to be viewed similarly to how they appear on a PC, where the assumed
Gamma is 2.2.
For traditional Mac users, particularly those who are outputting CMYK for offset printing, the Apple
standard 1.8 Gamma may still be preferred.
The next screen, Select Color Temperature, also has possible exceptions to the on-screen
definitions, particularly the term “print” in the 50000K selection notes; this use of “print” refers to
CMYK output for an offset press, not to the use of an RGB color device, such as a color inkjet printer.
Again, if you are using the full version of Adobe PhotoShop 5 or above and Adobe RGB (1998) or
sRGB as your working space, using Adobe PhotoShop Elements with full color management
selected, using Corel PHOTOPAINT® with the Adobe Photoshop space selected, or using some other
color-managed application, then a color temperature of 65000K (also known as D65) is being used by
the application, and selecting 6500K as your monitor color temperature will simplify matching with
non-color-managed applications. 6500K also offers a bit brighter screen, for locations where glare
and bright lighting interfere with monitor viewing. The selection of 50000K (also known as D50) has
been traditional in some pre-press workflows, originally to match the standard 50000K transparency
viewing light boxes and lighting booths used for color matching. However, even some pre-press users
0
0
now find 6500 K a better perceptual match between 5000 K original illumination viewing and onscreen image appearance.
7
If you have set your CRT monitor’s contrast control to maximum (100%) as previously instructed, and
the brightness is set at the lowest level available, initially the Set Brightness screen will appear to
have a single black bar at its center. Adjusting your monitor’s brightness adjustment control will bring
four distinct gray steps into view; when these squares are barely visible, the monitor’s blackpoint is
properly adjusted. LCD monitors will generally not require this step.
Room illumination. If the distinction between these four dark squares is difficult to see, it is may be
necessary to review your room’s lighting for conflicts. Lighting or windows opposite the monitor,
causing screen reflections, are problematic; and high light levels in general reduce the user’s ability to
perceive the image on the monitor effectively. Some work light is necessary, but for color critical work,
it should be kept to a minimum. The area immediately behind your monitor should be illuminated at a
level a little less bright than the monitor’s screen, as your eyes will adjust to the overall illumination
level within your range of vision. If windows are large or nearby, then blinds of some type may be
necessary. Ideally, the color quality of the room illumination should not be appreciably different from
the visual perception of the color of your monitor image. This is problematic, as common
incandescent lights are far too warm in tone, and standard fluorescent lighting is too cool. A mix of
the two is an improvement, while “daylight” fluorescent lighting is the ideal solution. Keep in mind that
a coral pink room, with the red sun setting over your shoulder, will have nearly the same effect as a
pair of rose colored glasses on your color perception.
8
PhotoCAL Identify Display Controls screen next asks that you choose between three options. The
first option allows the balancing of the monitor’s color guns, if the necessary front panel controls are
available. This is desirable, as it pre-calibrates the monitor’s color, leaving far less work for the color
profile to do later. The trick here is to determine if your monitor has such controls. Generally they are
listed in the controls menu, and may be called “R, G and B,” “Gain,” or “User Color.” If such controls
are found, then select the upper button and follow the directions to balance the guns. Most monitors
that do not offer RGB gun controls offer color presets. These allow the monitor to be brought into the
general ballpark of the required gun settings and reduce the severity of the adjustments the profile
must apply later. These too show in the monitor’s on-screen menu, generally as 50000K, 65000K and
93000K. Select the number closest to the white point you will be calibrating to, most often 65000K.
For those few monitors offering neither gun controls or presets, the final button is chosen and the
monitor profile is used to apply all corrections.
9
If your monitor has separate controls for R, G and B color levels, as well as presets to adjust the color
temperature to a standard color temperature, when you begin measuring your monitor’s color
characteristics with the Spyder, two consecutive “Adjust Monitor Color Temperature” screens will
appear. The first will provide instructional information as follows:
Setting the color temperature requires that incremental changes of the red, green and blue levels be
made while measurements of the monitor are taken with the sensor.
The monitor’s On-Screen Display needs to be hidden before each measurement is taken.
For best results please follow the steps below:
• Bring up the On Screen Display with the front panel controls.
• Adjust the R, G and B levels by approximation.
• Hide the On Screen Display.
• Re-measure the monitor.
• Repeat these steps until done.
Some monitors allow the On Screen Display to be moved. If this is possible, then move the On
Screen Display so it is easy to view.
If you have not previously used the separate RGB level controls that are part of your monitor’s
adjustment capability and cannot access the function, please refer to your monitor’s user manual.
10
By following the written directions in the second Adjust Monitor Color Temperature screen and
adjusting the R, G and B levels so the color bars in the graph are within the rectangle and at the
same level, the monitor is set to the color temperature aim point you have already selected in the
Select Color Temperature dialog window. Check that in adjusting the individual guns you have not
adjusted the overall luminance to an unintended level. If so, adjust all three guns in the appropriate
direction to correct this and rebalance.
The Measuring Display Characteristics screen requests that you attach the Spyder over the graphic in
the window dialog. The text to the right of the window suggests your monitor screen surface should
be clean. If you have not cleaned your screen thoroughly, do so at this point to completely remove
any dust, dirt or film of atmospheric deposits completely. Anything on the surface of the glass can act
like a filter, and could skew the reading made by the Spyder.
After the Spyder with PhotoCAL have completed reading and characterizing your monitor, the Save
Profile screen will appear. There is a dialog space in which “PhotoCALProfile” will appear as a
suggested file name. By leaving this default profile name, future calibrations will overwrite this profile,
avoiding a backlog of outdated profiles in your profile folder.
Next, the profile is saved to the appropriate folder for your operating system.
s
11
12
WINDOWS 2000 NOTE!
The Drive path to the folder that is used to store .ICC/.ICM profile files was changed in Windows 2000
to Drive/WinNT/System32/Spool/Drivers/Color/, from the Windows 98X location at:
Drive/Windows/System/Color/. However, when many graphics applications, as well as device drivers
for scanners and printers for Windows are installed, the installation does not differentiate between
Windows 98 and Windows 2000, resulting in the creation of a new /Color folder immediately in the
System32 folder, and adds any .ICC/.ICM profile files for the application or device in this new Color
folder.
Unless you are a very technically knowledgeable Windows NT/2000 user and familiar with using
Registry editing to direct all of these applications and device drivers to use the default Windows 2000
path to the Color folder, then the only way to be sure the system, applications and drivers access the
needed .ICC/.ICM files, is to be sure all the files are duplicated in both /Color folders.
When you reach this last screen, PhotoCAL has completed its work. The Final Words are important
and should be reviewed. Selecting the final arrow button will close PhotoCAL.
You have completed monitor calibration and creating a custom profile for your monitor, but it is
important to be sure that your new profile is utilized to provide managed proper color for your various
uses.
13
Your Color Management Set-up
For Windows 98, ME and 2000 (how about XP): The first and most critical step you need to take to
assure that your new PhotoCAL profile accomplishes its purpose of providing precise color
management is to confirm that the profile is “associated” with your monitor hardware by Windows.
Go to Windows Start button and click once. From the menu dialogue that opens, select Settings.
From the Settings dialogue, select Display and double-click on the icon. In the Display properties
window there will be tabs at the top. Select the Settings tab, and then at the lower right, select
Advanced. In this next window that opens, you will again have several tabs to choose from; select
Color Management. The information at the top of the tab will identify your Current monitor (if it is a
plug and play VESA monitor), and below that the Default monitor profile will also be identified. If that
profile is not the PhotoCAL profile you just created, and some other profile is named in the dialogue
below as profiles associated with this monitor, highlight that profile and click on the Remove button
below the dialogue window. Then click on the Add button, which will open the Color folder where your
new PhotoCAL profile is stored. Select the PhotoCAL profile. Once it is placed in the dialogue
window of associated profile, highlight it and click on the Set As Default button. You may now click on
the OK button and your new PhotoCAL profile will be the one referenced by color management
functions performed by Windows ICM2.
14
When you create a PhotoCAL profile for the first time, the software generates an executable file
placing a monitor adjustment utility in the Windows/Startup folder. The PhotoCAL on-screen wizard
instructions specifically advise that no other monitor adjustment utilities should be run except
PhotoCAL Startup. If you have Adobe PhotoShop full version 5 or above loaded previous to
installing and using PhotoCAL, it is likely the AdobeGamma.exe file will be in your Windows/Startup
folder. You can confirm this as well as check for any other monitor adjustment utilities, by first clicking
on the Start button and then the Programs menu items. From the list of programs on your system,
click on Startup, and a menu selection will pop out listing all of the items that are loaded when you
boot Windows.
If Adobe Gamma appears, or if any utility that you have used to adjust your monitor, like those
sometimes supplied with Matrox graphics cards, also appears in the menu list, you’ll need to remove
them. To remove these executable files, you will need to open the Startup folder containing the
executable file. The location of this folder and file may vary depending on which Windows version you
are using, as Windows NT® and 2000 for instance, may contain more than one Startup folder. So, if
you aren’t sure, click on Start and then click on Find to locate all of the Startup folders. Once located
you can check the contents. Then you may want to create a new folder called OldStartup, and drag
the startup files like AdobeGamma.exe you need to remove to this new folder.
WARNING: IF THERE IS A MONITOR ADJUSTMENT UTILITY IN ADDITION TO PHOTOCAL
STARTUP PRESENT WHEN YOU BOOT YOUR SYSTEM, TWO OR MORE ADJUSTMENTS WILL BE
MADE TO YOUR MONITOR’S COLOR AND ON-SCREEN COLOR WILL BE AFFECTED
ADVERSELY; THE ENTIRE COLOR MANAGEMENT SYSTEM, INCLUDING PRINTER COLOR
OUTPUT, WILL BE AFFECTED.
15
Adobe Photoshop Color Management: With the release of Version 5, Adobe established a new
precedent in managing color from within a graphics application. Until this change, applications almost
invariably functioned in monitor color space. The result was that image files exported to other
computers would appear differently on each computer due to the monitor used and how it was
adjusted. With Photoshop 5 and higher, and most recently Adobe Photoshop Elements, the
workspace for the application is one of several standard ICC/ICM profile described color spaces. Now,
rather than working in monitor color space, which is unique to a particular computer, the profile of the
monitor is used by Photoshop to display the image from the device independent Photoshop working
space. Then when the image is saved, the Photoshop working space profile (such as Adobe RGB)
can be embedded in the file. Then any computer running Photoshop 5 or later, or another colormanaged application such as Photoshop Elements, can open the file and the image will be
®
converted if necessary to appear as it was intended. For applications such as Paint Shop PRO 7.0
utilizing Windows ICM2 for their only color management, a somewhat simpler method based on all
files being in the sRGB space can also be used to manage color.
From the File menu in Photoshop 5.x, click on Color Settings, then RGB Setup, bringing up a dialog
box with a window at the top that indicates the current Photoshop color space the application is
using. Below there are three interactive dialogue buttons that display the Gamma, White Point (color
temperature) and Primaries for the color space. These settings are characteristics of the chosen
working space and should not be altered. At the bottom is an area titled Monitor that displays the
currently selected monitor profile. Also in this area is the “Display Using Monitor Compensation”
checkbox. It is important to have this box checked, so that the monitor profile is used when displaying
images within Photoshop. Use the RGB Setup window to change RGB working spaces, and to check
on the currently selected space, as well as verifying that the proper monitor profile is active. Monitor
profiles cannot be changed from this location. That is done from the ColorSync control panel in the
Apple Menu, prior to OS 9, and the monitors control panel with OS 9. This change of locations allows
OS 9 users to select different monitor profiles for multiple displays used with the same computer, a
function supported with Photoshop 6 and above.
The newest version of Adobe PhotoShop Elements, with its appeal to digital camera users, has a
simpler color management setup. It is accessed in Photoshop Elements from the Edit menu list, again
clicking on the Color Settings item. This opens a three choice dialog. In addition to “no color
management,” there is a choice of “limited color management – optimized for Web graphics” that uses
the sRGB color space for Elements work space. This choice could be used in conjunction with
16
Windows-based color systems and sRGB-based scanners and digital cameras. The selection of “Full
color management –“ installs the Adobe RGB (1998) color space as Elements working space. This
choice would be preferred for photographic work, where a larger color space could preserve colors
that would be lost in sRGB. Other than a simpler control with limited color space options, Photoshop
Elements color management functions using the same engine as the full Version 6.0 of Photoshop.
The Photoshop 6.0 upgrade includes a revised color management control including all of the
functions and options in one interactive Color Settings dialogue window. The dialogue window is
essentially the same in the Macintosh version as in the Windows version shown in the next
illustration.
For the Apple Macintosh OS 9.x and ColorSync 3.0: PhotoCAL on a Mac is accessed through the
Monitors Control Panel in the Apple menu. When you select the Color icon in the Monitors dialog
window the window that is opened includes a list of ColorSync monitor profiles with the active profile
highlighted. Once you have created your custom monitor profile using PhotoCAL, check the
Monitors/ColorSync profile dialogs to be sure the PhotoCAL profile is selected.
17
With the Macintosh OS 9 and ColorSync 3.0 the selection of profiles, other than the monitor profile,
are made using the Profiles for Standard Devices dialog window that is opened from the Apple menu
and ColorSync Control Panel, though applications seldom call on these other settings. In addition to
dropdown dialogs for Input, Display, Output and Proofer, there is a second tab for the selection of
CMMs. Any of the listed CMMs should provide the necessary conversion capabilities; specific ones
are chosen for advanced purposes when needed.
Adobe Photoshop 6.0 combined all of the internal color management options into a single Color
Settings window and did away with the color management Wizard accessed from the Help menu
introduced with version 5.02.
18
In this new single dialog box, the working space for RGB, CMYK, Gray and Spot are at the top,
followed by a dialog of Photoshop settings for embedding profiles and opening files. This is followed
by choices for Conversion Options and Advanced Controls. Each of the selections within the dialog is
explained in an interactive Description section at the bottom of the Color Setting window.
With Version 6.0, the access to Adobe Gamma is through the Apple menu and Control Panel. To
turn Adobe Gamma off, to avoid conflict with PhotoCAL, go to the Apple menu, Control Panel and
select the Extensions Manager. Find the Adobe Gamma extension and uncheck the “active” box.
After restarting, Adobe Gamma will no longer show in the list of Control Panels, verifying that it is
inactive.
19