1
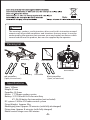
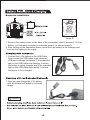
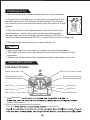
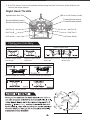
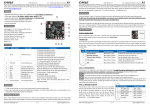
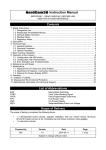
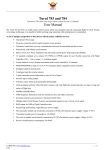
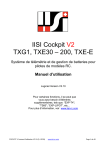
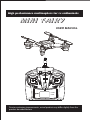
High performance multicopters for rc enthusiasts
mini FAIRY
USER MANUAL
ON
2.4G
6-AXIS
GYRO
Due to continuing improvements, actual product may differ slightly from the
product described herein
Preamble
Thank you for purchasing a mini fairy . It is important that you read the entire manual
to become familiar with the unit befor you begin to fly. Save the receipt, warranty and
these instructions.
The Meaning Of Symbols And Signal Words
WARNING
Mishandling Due To Failure To Follow These Instructions
May Result In Severe Injury Or Death.
CAUTION
Mishandling Due To Failure To Follow These Instructions
May Result In Serious Harm.
FORBIDDEN
Do Not Attempt Under Any Circumstances.
IMPORTANT NOTES
This copter is suitable for people of 8 years and older, it is not a toy! Please read this
manual thoroughly before using and make sure to be conscious of your own personal safety
and the safety of others and your environment when operation or the use of this copter.
Manufacturer and seller assume no liability for the operation or the use of this model.
Intended for use only by adults with experience flying remote control helicopters at a legal
flying field. After the sale of this product we can not maintain any control over its operation
or usage.
Safety notes
Before Flyign Your copter
CAUTION
Check for damaged parts and assembly
Before using any product, any part that appears damaged should be carefully checked to
determine that it will operate properly and perform its intended function. Check for any
broken or damaged parts and any other conditions that may affect its operation. Replace
or repair damaged or worn parts immediately.
Do not trim the copter’s antenna. Trimming the antenna will affect radio range.
It is mandatory to check all control systems and mechanical linkages for proper operation
before every flight.
-1-
FORBIDDEN
Consider The Circumstances Of The Surrounding Area
Select a flying field where there are not too much debris.
Do not fly the copter in strong winds, rain.
Do not fly near crowd, high voltage cables, railways to ensure the safety.
WARNING
Flyer
Do not let children use the copter without adult supervision. Failure to do so could result
in personal injury and/or property damage.
Do not let menstruating or pregnant wonen fly this copter
Do not fly under tired condiction and improper operation may cause in danger.
If you are a novice pilot we strongly suggest that you should find an experienced pilot in
R/C model to assist you.(Recommend you to practice with computer-based flight simmulator.)
While In Flight
Keep Away From The Rotating Blades
CAUTION
Do not touch the copter when the propellers were running, keep it away from other things
to avoid danger and damage.
When operating, do not get too much close to the copter.
Operate the model within the limits of your ability. Operating the modle improperly increase
the risk of accidents or injury.
After a Flight
WARNING
Conduct a thorough inspection
Wipe away any dirt, or water.
Remove batteries if the copter is not used for a long period of time.
Maintain products with care. Keep the copter in a dry location. Do not expose it to
prolonged moisture.
Generally, R/C models are mainly made up of PVC or polythene, please put it away from
the heat source to avoid distortion and melting caused by high emperature.
Batteries
Use only batteries of the type recommended and do not mix old and new batteries.
Do not incinerate batteries. Batteries may burst, causing personal injury and/or property
damage.
Do not recharge non-rechargeable batteries.
-2-
WARNING
The warnings, cautions, and instructions discussed in this instruction manual
cannot cover all possible conditions and situations that may occur. It must be
understood by the operator that common sense and caution are factors which
cannot be built into this product, but must be supplied by the operator.
Packing list
mini fairy
ON
user manual
2.4G
6-AXIS
GYRO
transmitter
Li-Po battery
red propellers
(1pair, cw and ccw)
USB cable
black propellers
(1pair, cw and ccw)
Specifications
Span: 149mm
Height: 31mm
Propeller: 55.5mm
Motor: ¢7*20mm coreless motor
Battery: 3.7V-250mAH Li-Po for mini fairy
4*1.5V AA battry for transmitter( not included)
RC system: 2.4GHz 4CH radio control system
Flying Weight: Approx. 35g
Recharging time: Approx. 30 minutes (with fully discharged)
Flying time: Approx. 8 minutes (with fully charged)
Radio control range: over 200 meters
-3-
Batteries installation
image A
image B
1. Remove the battery cover on the back of the transmitter, insert 4 pieces of 1.5V AA
battery (not included) according to indicated polarity, as shown image A.
2. After turning on the transmitter power, install the li-po battery to the fuselage and
connect the battery to the copter.
1. Connect the Li-Po battery to the USB Cable,
then connect the USB cable to an computer
USB port to charge the battery. If the indecator
light on the USB cable stop flashing, it means
the battery is being charged, and if the indecator
light on the USB cable flash rapidly, it means
the battery is fully charged.
1. Also, you can charge the Li-Po battery
with an optional wall adaptor as shown
image.
WARNING
-4-
Preparing to fly
1. Put the throttle in the lowest position and turn on the transmitter.
2. Connect the li-po battery to your mini fairy as image shown, the
indicator lights on the circult board will flash rapidly, this indicate
the receiver go into auto detection mode, place the copter at a level
position.
3. Push the throttle to the highest position then put it back to the
lowest position, a beep will sound from the transmitter and the
indicator lights on hte circult board will stop flashing (LED ON) or
flash about once per second(LED OFF), it means the mini fairy is ready to fly.
4. Push the trottle forward slowly, the copter will take off.
WARNING
1. Keep small parts out of the reach of children to avoid choking hazard.
2. After flight, disconnect the li-po battery from the copter first, then turn off the
transmitter.
3. Always turn off the power of the transmitter and the copter when not in use.
Transmitter Fuctions
Left Hand Throttle
Speed select/ Auto-Trim
LED on or off/ Control model
Throttle/Rudder(mode1)
Throttle/Aileron(mode2)
Elevator/Aileron(mode1)
Elevator/Rudder(mode2)
Sub-Trim A
Sub-Trim D
Sub-Trim B
2.4G
LCD screen
1.
Sub-Trim C
6-AXIS
GYRO
Power Switch
transmitter
mode1 and mode 2.
2. Action sensitivity selectable/Speed selectable
There are
can be selected
-5-
3. Auto-Trim fuction:Turn on the trasmitter while pushing the Auto-Trim button, all the Sub-trim will
come to the center position.
Right Hand Throttle
Speed select/ Auto-Trim
LED on or off/ Control model
Elevator/Rudder(mode1)
Elevator/Aileron(mode2)
Throttle/Aileron(mode1)
Throttle/Rudder(mode2)
Sub-Trim A
Sub-Trim D
Sub-Trim B
2.4G
LCD screen
Sub-Trim C
6-AXIS
GYRO
Power Switch
Flying your mini fairy
Rudder control stick
Push the rudder control
stick to right
Aileron control stick
Push the rudder control
stick to left
Push the aileron control
stick to left
Throttle control stick
Push the throttle stick forward
Push the Elevator stick forward
Push the throttle stick downward
Push the Elevator stick downward
flying
mini fairy
-6-
Push the aileron control
stick to right
(black)
(red)
Two of the nini fairy rotors turn clockwise in
flight(A), and two turn counter clockwise(B).
The spair parts includ 1pair red color rotors and
1 pair black rotors, same as black color rotors,
one of the red color rotor turns clockwise and
the other one turns counter clockwise.
If one of the rotor blades is damaged, please
replace wiht suitable type rotor(color and turning
direction)
(red)
mini fairy
mini fairy
8
mini fairy
CAUTION
A
-7-
(black)