1
QBridge
I2C, SPI, CAN Control Software
User’s Manual
Date: 9-10-2005
Rev 1.3
1.
2.
3.
4.
5.
Introduction..................................................................................................1
1.1.
What QBridge can do? ................................................................................................ 1
1.2.
Disclaimer ..................................................................................................................... 1
1.3.
Operational Format ...................................................................................................... 1
1.4.
QBridge-V2.................................................................................................................... 1
How to use QBridge ....................................................................................1
2.1.
Power up the QBridge ................................................................................................. 1
2.2.
Pins layout .................................................................................................................... 1
2.3.
Diagram to connect to SPI or I2C device................................................................... 2
2.4.
Diagram to connect to CAN device ............................................................................ 2
2.5.
ASCII mode and Binary mode..................................................................................... 2
Main Menu ....................................................................................................5
3.1.
Command I (if I2C feature is purchased) ................................................................... 5
3.2.
Command C (if CAN feature is purchased) ............................................................... 5
3.3.
Command S (if SPI feature is purchased) ................................................................. 5
3.4.
Command B .................................................................................................................. 6
3.5.
Command ‘?’................................................................................................................. 6
3.6.
Reset Status.................................................................................................................. 6
I2C Application Menu ..................................................................................8
4.1.
Command S .................................................................................................................. 8
4.2.
Command P .................................................................................................................. 8
4.3.
Command T................................................................................................................... 9
4.4.
Command B .................................................................................................................. 9
4.5.
Command W ................................................................................................................. 9
4.6.
Command G ................................................................................................................ 10
4.7.
Command Q ................................................................................................................ 10
4.8.
Command R ................................................................................................................ 10
4.9.
Command D ................................................................................................................ 11
4.10.
Command I.................................................................................................................. 11
4.11.
Command L................................................................................................................. 11
4.12.
Command M................................................................................................................ 12
4.13.
Command ‘?’............................................................................................................... 12
4.14.
Error code listing for ASCII mode ............................................................................ 12
CAN (controller area network) Application Menu ...................................13
5.1.
Command C ................................................................................................................ 13
5.2.
Command W ............................................................................................................... 14
6.
7.
5.3.
Command B ................................................................................................................ 14
5.4.
Command O ................................................................................................................ 15
5.5.
Command T................................................................................................................. 16
5.6.
Command D ................................................................................................................ 16
5.7.
Command S ................................................................................................................ 17
5.8.
Command A ................................................................................................................ 18
5.9.
Command M................................................................................................................ 18
5.10.
Command N ................................................................................................................ 19
5.11.
Command L................................................................................................................. 19
5.12.
Command ‘?’............................................................................................................... 19
5.13.
CAN message receiving ............................................................................................ 19
SPI application menu ................................................................................21
6.1.
Command P ................................................................................................................ 21
6.2.
Command B ................................................................................................................ 22
6.3.
Command G ................................................................................................................ 22
6.4.
Command W ............................................................................................................... 23
6.5.
Command N ................................................................................................................ 23
6.6.
Command S ................................................................................................................ 23
6.7.
Command A ................................................................................................................ 24
6.8.
Command D ................................................................................................................ 25
6.9.
Command T................................................................................................................. 26
6.10.
Command Q ................................................................................................................ 26
6.11.
Command M................................................................................................................ 26
6.12.
Command L................................................................................................................. 26
6.13.
Command ‘?’............................................................................................................... 27
6.14.
Command X ................................................................................................................ 27
Revision History ........................................................................................28
1. Introduction
1.1. What QBridge can do?
QBridge is a single board computer provides an efficient and economical way to connect I2C, SPI or CAN
(optional feature) to the PC RS232 port. It quickly turns any PC into an I2C, SPI mater or CAN node.
1.2. Disclaimer
While every effort has been made to ensure that the information contained in this manual is accurate and complete, no
liability can be accepted for any error and omission. Q-Proto system reserves the right to change the specification of the
hardware and software described herein at any time prior notice.
Q-Proto System shall not be liable for direct, indirect, incidental, general or consequential damage from the use
of the products from Q-Proto system. If you do not agree with these terms, do not buy the products.
1.3. Operational Format
All the QBridge operation is based on HEX format.
1.4. QBridge-V2
QBridge V2 is the enhanced version of QBridge that supports Binary mode. Software Version 1.5 or higher is
required to support the Binary mode.
2. How to use QBridge
2.1. Power up the QBridge
An external +9 V shall be applied to QBridge for its normal operation.
2.2. Pins layout
QBridge purchased after April 2005 has pins layout slightly different from previous version.
•
Pins layout for QBridge purchased before April 2005
HOST
A female DB9 is for Host RS232 connection and a 9-pins header for external target.
TO External
Target
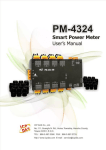
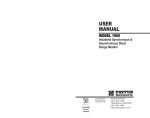
Pins layout for QBridge purchased after May 2005
HOST
•
+9V
Boot
GND
SS
SCK
SDI/SDA
SDO
CANH
CANL
1
A female DB9 is for Host RS232 connection and a male DB9 connecter is used to connect external
target. Pins layout for external target (male DB9) is shown below:
5: +9V
4: GND
3:SCK
4:SDO
1: CANL
9: Boot
8:SS
7: SDI/SDA
6:CANH
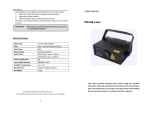
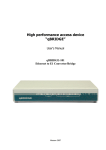
2.3. Diagram to connect to SPI or I2C device
QBridge
SPI or I2C device
Power
supply
+9 V
SS
SCK
SDI/SDA
SDO
PC with
Hyper
terminal
SS (SPI only)
SCK
SDO
SDI (SPI only)
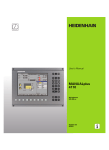
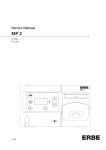
2.4. Diagram to connect to CAN device
QBridge
CAN device
Power
supply
+9 V
CANH
CANL
CANH
CANL
PC with
Hyper
terminal
2.5. ASCII mode and Binary mode
QBridge V2 supports both ASCII and Binary mode. The ASCII mode allows user to utilize the Windows Hyper
Terminal to control the device while the Binary mode allows user to write his own application to interface with
QBridge.
The Mode selection can only be done once after the device is powered up. The Binary mode is automatically
selected if there is no character (any character) sent to the device within five seconds after the power up.
Character ‘m’ (indicates the current state is Main Menu) is sent out from QBridge to the Host once the Binary
mode is entered. The ASCII mode is selected if there is any character sent to the QBridge from host within 5
seconds after the device is powered up. Traditional ASCII main menu will be shown once the ASCII mode is
entered.
For software version 1.6 or later, a banner “QBridge by Q-Proto System” is always sent out from the device to
the host when power up regardless of the mode.
2.5.1.
ASCII mode
The ASCII mode is the legacy mode that QBridge supports. It uses the Windows Hyper Terminal to control the
device.
•
Connect to Hyper terminal
QBridge connects to PC via RS232 port. It uses Windows Hyper Terminal program to send commands
and receive data. The setting for Hyper Terminal is 9600-baud rate, 8 data bits, 1 stop bit, no parity bit,
Xon/Xoff flow control, and also check ‘echo typed character locally’ and set ’30 milliseconds’ to line delay.
2
Example setup is shown below:
2.5.2.
Binary mode
The Binary mode extends the flexibility to allow user to develop his application. The Binary mode is only
supported in QBridge V2 hardware with software version 1.5 or higher. Software version can be found from the
main menu in the ASCII mode.
The application shall wait for character ‘m’ from QBridge to ensure Binary mode is entered when power up. No
data shall be sent to the device within the five seconds after the power up, otherwise ASCII mode is selected.
•
Connect to QBridge
The QBridge connects to the host application in the same way to Hyper Terminal. The default baud rate is
9600 bps.
3
•
Command format from Host to QBridge
@
Command
length
All commands are lower case.
Command identifier
Data if any
Example: Once the device is entering the Binary mode after the power up, user likes to send a command ‘I’ to
enter the I2C application.
Packet 0x40 0x3 0x69 shall be sent to the device.
‘@’
0x3
0x69
(‘I’)
•
Response from QBridge to host
The reply from QBridge is the original command identifier followed by data, if any, when the operation
succeeds. If an error is encountered, an error identifier ‘e’ followed by error code is returned to the host.
Example: navigate the QBridge from main menu to SPI application after the Binary mode is selected.
Packet: 0x40 0x3 0x73(‘s’) is sent to the host
0x73 (‘s’) is returned to the host is SPI application is active
0x65 (‘e’) xx is returned to the host, where xx is the error code.
Error codes
Error response
0x01
0x03
Description
Invalid parameter
Invalid command
0x50
0x51
0x52
0x53
0x54
0x55
Unknown SPI speed
SPI write timeout
Error when enable write command
SPI read timeout
SPI read status register timeout
SPI write status register timeout
0x30
0x31
0x32
0x33
0x34
0x35
0x36
0x37
0x38
0x3F
I2C set speed error
I2C send data or START bit failure
I2C send STOP bit failure
I2C salve no ACK
I2C receiver buffer overflow
I2C read data timeout
I2C ACK slave time out
I2C bus collision
I2C send data error
I2C unknown error
0x40
0x41
0x42
0x43
0x44
0x45
0x46
0x47
0x48
0x49
0x4A
0x4B
0x4D
0x4E
Unknown CAN operation mode
Invalid CAN register
Invalid frame bit
Invalid character
No CAN data
Invalid CAN data length
Invalid nibble count
Invalid Baud rate
TX failure
Invalid TX buffer
Initialization failure
No CAN data
Invalid Tx buffer length
Unable to set CAN operation mode
4
3. Main Menu
3.1. Command I (if I2C feature is purchased)
I command will transfer the main menu to I2C sub menu.
•
ASCII Mode:
•
Binary Mode format:
@
3
‘i’
Response:
Success: ‘I’
Failure: ‘e’ followed by an error code listed in Section 2.5.2
3.2. Command C (if CAN feature is purchased)
C command will transfer the main menu to CAN (controller area network) sub menu.
Binary Mode format:
@
3
‘c’
Response:
Success: ‘c’
Failure: ‘e’ followed by an error code listed in Section 2.5.2
3.3. Command S (if SPI feature is purchased)
S command will transfer the main menu to SPI sub menu.
Binary Mode format:
@
3
‘s’
Response:
Success: ‘s’ is returned
5
Failure: ‘e’ followed by an error code listed in Section 2.5.2
3.4. Command B
ASCII mode:
B command will configure QBridge to different Baud rate.
•
B0
Set Baud rate to 9600 bps. This is the default setting.
•
B1
Set Baud rate to 19200 bps.
•
B2
Set Baud rate to 57600 bps.
•
B3
Set Baud rate to 125K bps.
Binary Mode format:
•
@
Get Baud rate
3
‘b’
Response:
Success: ‘b’ is returned followed by the baud rate
@
3
‘b’
{0~3}
Failure: ‘e’ followed by an error code listed in Section 2.5.2
•
@
Set Baud rate
4
‘b’
0~3 (same as ASCII mode)
Response:
Success: ‘b’ is returned
Failure: ‘e’ followed by an error code listed in Section 2.5.2
Note:
Power must be cycled in order for the new Baud rate to take effect.
3.5. Command ‘?’
Command ‘?’ will display the main menu again.
ASCII mode:
Format: >?
Binary mode format:
@
3
‘?’
Response:
Success: ‘m’ is returned.
Failure: ‘e’ followed by an error code listed in Section 2.5.2.
3.6. Reset Status
At main menu, it will show the current status of the reset register value, reset source and the software checksum.
The reset register and reset source values are only for debug purpose when report problem to Q-proto system.
6
7
4. I2C Application Menu
•
ASCII mode:
•
Binary Mode:
‘i’ is sent to the Host.
4.1. Command S
Command S will send the I2C start bit
Binary Mode format:
@
3
‘s’
Response:
Success: ‘s’ is returned
Failure: ‘e’ followed by an error code listed in Section 2.5.2
4.2. Command P
Command P will send the I2C repeated start bit.
Binary Mode format:
@
3
‘p’
8
Response:
Success: ‘p’ is returned
Failure: ‘e’ followed by an error code listed in Section 2.5.2
4.3. Command T
Command T will send the I2C Stop bit that terminates communication.
Binary Mode format:
@
3
‘t’
Response:
Success: ‘t’
Failure: ‘e’ followed by an error code listed in Section 2.5.2
4.4. Command B
Command B will set the I2C clock speed
ASCII Mode:
Format:
•
B
Show the current I2C clock speed
•
B0
Set I2C clock speed to 100K
•
B1
Set I2C clock speed to 400K
Binary Mode format:
@
4
‘b’
{0,1}
Response:
Success: ‘b’ is returned
Failure: ‘e’ followed by an error code listed in Section 2.5.2
4.5. Command W
Command W writes one byte to the I2C bus. No Start will be sent in this command. User shall send Start bit
(command S) if it is needed.
ASCII Mode:
Format:
•
>W xx, where XX is the Hex format of data.
Example: W ef
If command is failed to send, error code can found in Section 4.14:
Binary Mode format:
@
4
‘w’
data
Response:
Success: ‘w’
Failure: ‘e’ followed by an error code listed in Section 2.5.2
9
4.6. Command G
Command G will read multiple bytes from I2C slave. Start bit is NOT used in this command due to varied device
architecture. User shall send the Start bit and address bytes properly before this command is used. There is no
ACK for the last read and Stop bit is sent at the end of this command.
ASCII Mode:
Format:
•
>G xx Where xx is number of bytes to read. xx is in Hex format
Restriction:
This command allows only 64 bytes (hex 0x40) of data to read at a time
Example: >S
>W A0
>W 0
>P
>W A1
>G 12
<- Send Start bit
<- Send Control byte with W bit set (Device address is 0 in this example)
<- Word Address
<- Repeated Start
<- Send Control byte with R bit set
<- Get 0x12 byte of data from salve word address 0x0. Stop bit is inserted.
If command is failed to execute, error code can be one of the following:
Binary Mode format:
@
3
‘g’
Response:
Success: ‘g’
Failure: ‘e’ followed by an error code listed in Section 2.5.2
4.7. Command Q
Command Q writes multiple bytes (up to 32 bytes) to I2C slave. Both start bit and stop bit are used in this command.
A preset interval will be inserted between each data byte. This interval may be set with command L. Most of the
time, the first byte is control byte and the second or third byte is address byte followed by data bytes.
ASCII Mode:
Format:
•
>Q xx, yy, zz. Start bit will be sent before xx,yy,zz are sent, and Stop bit is set at the end.
Restriction:
Only up to 32 bytes of data is allowed to write at a time.
Binary Mode format:
@
length
‘q’
Data0
~
Data31
Length is depending on the number of data to write.
Example:
@
7
‘q’
0x11
0x4d
0x57
0x68
Response:
Success: ‘w’ is returned
Failure: ‘e’ followed by an error code listed in Section 2.5.2
4.8. Command R
Command R reads one byte from slave with acknowledge bit at the end. User shall use command W to specify
slave and word address if a particular location is accessed.
ASCII Mode:
Format:
>R
10
Binary Mode format:
@
3
‘r’
Response:
Success: ‘r’ followed by the read data.
Failure: ‘e’ followed by an error code listed in Section 2.5.2
4.9. Command D
Command D reads one byte from slave without acknowledge bit at the end. User shall use command W to specify
slave and word address if a particular location is accessed.
ASCII mode:
Format:
>D
Binary Mode format:
@
3
‘d’
Response:
Success: ‘d’ followed by the read data.
Failure: ‘e’ followed by an error code listed in Section 2.5.2
4.10. Command I
Command I reset I2C controller to the known state.
I2C write delay is set to 0xA ms.
I2C clock speed will be first fetched from NVRAM or set to 100K if NVRAM value is corrupted.
ASCII mode:
>i
Binary Mode format:
@
3
‘i’
Response:
Success: ‘i’
Failure: ‘e’ followed by an error code listed in Section 2.5.2
4.11. Command L
Command L will set the interval between each data byte sent to salve. Because I2C is used often in EEPROM
application, an internal write delay is needed for EEPROM programming.
ASCII mode:
Format:
>L
> L xx
show the current delay value
Set the delay, where xx is number of millisecond delay in hex format.
Example: L 10
Set write delay to 16 ms
Binary Mode format:
@
3 or 4 delay
value is set
‘l’
Delay if needed
11
Response:
Success: ‘l’
Failure: ‘e’ followed by an error code listed in Section 2.5.2
4.12. Command M
Command M will transfer the current I2C sub menu to main menu.
ASCII mode:
Format: >M
Binary Mode format:
@
3
‘m’
Response:
Success: ‘m’
Failure: ‘e’ followed by an error code listed in Section 2.5.2
4.13.
Command ‘?’
Command ‘?’ will display the entire I2C sub menu again.
ASCII mode:
Format: >?
Binary mode format:
@
3
‘?’
Response:
Success: ‘i’ is returned.
Failure: ‘e’ followed by an error code listed in Section 2.5.2.
4.14.
Error code listing for ASCII mode
One of the following error codes will be returned if command is failed to execute.
Error code
1
2
4
8
0x10
0x20
0x40
Description
Time out when sending data or start bit
Timeout when sending STOP bit
No ACK from slave
Receive overflow
Timeout when reading data
Timeout when acking to slave (ACKDT)
Bus collision
12
5. CAN (controller area network) Application Menu
•
ASCII mode:
•
Binary mode:
A character ‘c’ is sent to the host.
5.1. Command C
Command C will let you configure the Baud rate registers for PIC18F258. Please refer to the PIC18F258 datasheet
for details.
ASCII Mode:
Format:
•
> C aa,bb,cc,dd,ee
Set baud rate registers.
•
>C
show baud rate registers
C BRGCON1 BRGCON2 BRGCON3 will be echoed to host.
Where aa is Baud rate prescaler bits, bb is Synchronized jump width bit, cc is propagation time select bits, dd is
phase segment 1 bit, ee is phase segment 2 bit.
Binary Mode format:
Configure the all baud rate registers
@
8
‘c’
aa
bb
cc
dd
ee
13
Response:
Success: ‘c’ is returned
Failure: ‘e’ followed by an error code listed in Section 2.5.2
Read the Baud rate register
‘@’
3
‘c’
Response
Success:
‘c’
BRGCON1
BRGCON2
BRGCON3
Failure: ‘e’ followed by an error code listed in Section 2.5.2
5.2. Command W
Command W will allow you write value to CAN receive filter and mask registers. In the ASCII mode, the QBridge
CAN receiver module is always active. Once a matched CAN message is received, it will be shown on terminal. In
the Binary mode, the command ‘r’ shall be issued to retrieve data. Refer to section 5.13 for details.
ASCII mode:
Format:
>W r {m0, m1, f0, f1, f2}, nnnn,f{s,x,r,t}
Where r is register to write, nnnn is the value in hex format, f is the framing format bit.
Register r definition:
m0: receive buffer 0 mask register
m1: receive buffer 1 mask register
f0: receive buffer 0 filter 0 register
f1: receive buffer 0 filter 1 register
f2: receive buffer 1 filter 2 register
f3: receive buffer 1 filter 3 register
f4: receive buffer 1 filter 4 register
f5: receive buffer 1 filter 5 register
Framing bit definition:
S: Standard frame
X: Extended frame
R: Remote standard frame
T: Remote extended frame
Example: w m0, 34ef,x
Configure mask 0 register to extended frame with value 0x34e.
Binary Mode format:
@
0xA
‘w’
{m,f}
{0~5}
Byte3
Byte2
Byte1
Byte0
{s,x,r,t}
Response
Success: ‘w’
Failure: ‘e’ followed by error code
5.3. Command B
Command B will configure the baud rate. Power on default is 125K
ASCII Mode:
Format:
•
B
Display the current baud rate. Note that baud rate will not be shown properly if command C is used to set to
customized baud rate prior.
•
B0
Set baud rate to 1M bits
14
•
B1
Set baud rate to 800 K bits
•
B2
Set baud rate to 500 K bits
•
B3
Set baud rate to 250 K bits
•
B4
Set baud rate to 125 K bits
•
B5
Set baud rate to 100 K bits
•
B6
Set baud rate to 50 K bits
Binary Mode format:
• Get current Baud rate
@
3
‘b’
Response:
Success:
‘b’
nn
nn=0
nn=1
nn=2
nn=3
nn=4
nn=5
1MBits
800KBits
500KBits
250KBits
125KBits
50KBits
• Set to predefined Baud rate
@
4
‘b’
nn
Success: ‘b’ is returned
Failure: ‘e’ followed by an error code listed in Section 2.5.2
5.4. Command O
Command O will change the CAN operation mode
ASCII Mode:
Format: O n{0,1,2,3,4} Where n is the mode to change to
•
O
Show the current CAN operation mode
•
O0
Set to configuration mode
•
O1
Set to disable mode
•
O2
Set to operation mode
•
O3
Set to listen mode
•
O4
15
Set to loop back mode
Binary Mode format:
• Get current operation mode
@
3
‘o’
Response:
Success:
‘o’
nn=0
nn=1
nn=2
nn=3
nn=4
nn
configuration mode
CAN is disabled
operation mode
listen mode
loopback mode-
• Set to predefined Baud rate
@
4
‘o’
nn
Success: ‘o’ is returned
Failure: ‘e’ followed by an error code listed in Section 2.5.2
5.5. Command T
Command T is loop back test mode.
ASCII mode:
Format: >T
Binary mode format:
‘@’
0x3
‘t’
Response:
Success: ‘t’
Failure: ‘e’ followed by an error code listed in Section 2.5.2
5.6. Command D
Command D will show CAN filter, mask, transmit and error register values.
ASCII mode:
Format: >D
Example:
>M0:X-0x1FFFFFFE S-0x000007FF F0:X-0x12345678 F1:S-0x00000678
>M1:X-0x1FFFFFFF S-0x000007FF
>F2:X-0x000001BC F3:S-0x000001BC F4:X-0x00000000 F5:X-0x00000000
>T0:S-0x00000678 FF EE DD 05 04 03 02 01
>T1:X-0x12345678 A5 34 31 88 77 99 EF 5A
>T2:XR-0x000001BC
>TxErr:00 RxErr:00 Invalid Msg. cntr:00 Bus Err. Cntr:00
>
Mask 0 is 0x1FFFFFFE for extended frame or 0x000007FF for standard frame
Filter 0 is extended frame 0x12345678
Filter 1 is standard frame 0x00000678
Mask 1 is 0x1FFFFFFE for extended frame or 0x000007FF for standard frame
Filter 2 is extended frame 0x000001BC
Filter 3 is extended frame 0x000001BC
Filter 4 and 5 are extended frame 0x00000000
16
Transmit buffer 0 is standard frame, id 0x00000678, data FF EE DD 05 04 03 02 01
Transmit buffer 1 is extended frame, id 0x12345678, data A5 34 31 88 77 99 EF 5A
Transmit buffer 3 is remote standard frame, id 0x000001BC
Note: CAN message framing format: X– standard frame, R- remote frame, S- standard frame.
Binary mode format:
‘@’
0x3
‘d’
Response:
Success:
‘d’
Mx11
F12
F43
‘x’
Mx10
F11
F42
Mx03
‘s’
F10
F41
Mx02
Ms13
[x,s]
F40
Mx01
Ms12
F23
{x,s}
Mx00
Ms11
F22
F53
‘s’
Ms10
F21
F52
Ms03
{x,s}
F20
F51
Ms02
F03
{x,s}
F50
TX0
length
TX1
length
TX2
length
Tx0
D0
Tx1
D0
Tx2
D0
Tx0
D1
Tx1
D1
Tx2
D1
Tx0
D2
Tx1
D2
Tx2
D2
Tx0
D3
Tx1
D3
Tx2
D3
Tx0
D4
Tx1
D4
Tx2
D4
Tx0
D5
Tx1
D5
Tx2
D5
Tx0
D6
Tx1
D6
Tx2
D6
Tx0
D7
Tx1
D7
Tx2
D7
Where
Mx03~Mx00:
Ms03~Ms00:
Mx13~Mx10:
Ms13~Ms10:
F03~F00:
F13~F10:
F23~F20:
F33~F30:
F43~F40:
F53~F50:
Tx0 ID3~ID0:
{x,s,r,t}:
TX0 length:
Tx0 D0~D8:
Tx1 ID3~ID0:
{x,s,r,t}:
TX1 length:
Tx1 D0~D8:
Tx2 ID3~ID0:
{x,s,r,t}:
TX2 length:
Tx2 D0~D8:
Filter 0.
Filter 1.
Filter 2.
Filter 3.
Filter 4.
Filter 5.
Ms01
F02
F33
TX0
ID 3
TX1
ID 3
TX2
ID 3
Ms00
F01
F32
TX0
ID 2
TX1
ID 2
TX2
ID 2
‘x’
F00
F31
TX0
ID 1
TX1
ID 1
TX2
ID 1
Mx13
{x,s}
F30
TX0
ID 0
TX1
ID 0
TX2
ID 0
Mx12
F13
{x,s}
{x,s,r,t}
{x,s,r,t}
{x,s,r,t}
Mask 0 in extended frame format
Mask 0 in standard frame format
Mask 1 in extended frame format
Mask 1 in standard frame format
The {x,s} preceding to this data is the frame bit
The {x,s} preceding to this data is the frame bit
The {x,s} preceding to this data is the frame bit
The {x,s} preceding to this data is the frame bit
The {x,s} preceding to this data is the frame bit
The {x,s} preceding to this data is the frame bit
Tx buufer0 CAN ID
x is extended frame, s is standard frame, r is remote standard frame, r is remote extended
frame.
Length of Tx buffer0
Tx buffer 0 data
Tx buufer1 CAN ID
x is extended frame, s is standard frame, r is remote standard frame, r is remote extended
frame.
Length of Tx buffer 1
Tx buffer 1 data
Tx buufer 2 CAN ID
x is extended frame, s is standard frame, r is remote standard frame, r is remote extended
frame.
Length of Tx buffer 2
Tx buffer 2 data
All values shown above are already adjusted according to the frame bit.
Failure: ‘e’ followed by an error code listed in Section 2.5.2
5.7. Command S
Command S will transmit the CAN message to a specified buffer.
ASCII mode:
Format:
S x{0,1,2}, nnnn, f{x, s, r, t}, aa, bb, cc, dd
17
Where x is the buffer number, nnnn is the CAN id in hex format, f is the CAN message format bit, aa – dd are
CAN data up to 8 bytes
Message format: {x, s, r, t} where x is extended frame, s is standard frame, r is remote standard frame, t is
extended frame. Note that when remote frame is sent, user should still send dummy data byte even receiver
ignores it , because some CAN application will expect remote frame data length is the same as returned data
length.
Example:
S 0, 1234edf, x, 11,22, 3e, 4d
Sending extended frame 0x1234edf with data packet 11,22,3e,4d to transmit buffer 0.
S1, 3ef, t, 00,00,00
Sending extended remote frame, id: 0x3ef, data length is 3.
Binary mode format:
‘@’
Length
‘s’
{0,1,2}
CAN ID byte 3
CAN ID byte 2
CAN ID byte 1
{x,s,r,t}
Byte7
Byte 0
Byte 1
Byte2
Byte3
Byte4
Byte5
CAN ID byte
0
Byte6
Where ‘Length’ varies with size of the data
Example:
Send CAN message ID 0x2345, extended frame, data 0x1, 0x2, 0x3, 0x4 to TX buffer 1
‘@’
0x2
0xD
0x3
‘s’
0x4
1
00
00
23
45
‘x’
0x1
5.8. Command A
Command A aborts all current transmission actives.
ASCII mode:
Format: >a
Binary mode format:
‘@’
0x3
‘a’
Response:
Success: ‘a’
Failure: ‘e’ followed by an error code listed in Section 2.5.2
5.9. Command M
Command M transfers from CAN application to Main menu.
ASCII mode:
Format: >m
Binary mode format:
‘@’
0x3
‘m’
Response:
Success: ‘m’
Failure: ‘e’ followed by an error code listed in Section 2.5.2
18
5.10. Command N
Command N will continuously send a preset CAN message for a specified number of times. A delay is also inserted
between messages sent and delay can be set with command L.
ASCII Mode:
Format: N x, nn
Where x is the CAN transmit buffer number between 0 and 2, nn is number of times to repeat this message,
which is up to 255 times.
Example: N 2, 20
send TX buffer 2 for 32 (hex 0x20) times.
Binary mode format:
‘@’
5
‘n’
Buffer number {0,1,2}
Number of times to send
Response:
Success: ‘n’
Failure: ‘e’ followed by an error code listed in Section 2.5.2
5.11. Command L
Command L will set the interval between each sent message when messages are sent with command N. Power on
default value is 0xA ms.
ASCII mode:
Format: > L 20
Set interval to 32 (0x20) milliseconds.
Binary mode format:
• Get current delay
@
3
‘l’
Response:
Success:
‘l’
nn
Where nn is the delay in milliseconds
• Set delay
@
4
‘l’
nn
Success: ‘l’ is returned
Failure: ‘e’ followed by an error code listed in Section 2.5.2
5.12. Command ‘?’
ASCII mode:
Command ‘?’ will display the entire CAN application menu again.
Binary mode format:
@
3
‘?’
Response:
Success: ‘c’ is returned.
Failure: ‘e’ followed by an error code listed in Section 2.5.2.
5.13. CAN message receiving
19
ASCII mode:
Once CAN application is entered, CAN message receiver module is automatically enabled. Whenever a matched
message is received, it will be displayed on the console. Message is shown in the following format:
<ID>-<Type>-<Filter> <Data0~Data8> <Timestamp> <Dropped packet counter>
•
•
•
•
•
ID is the CAN message ID in hex format
Type is the CAN message type. R is remote frame, X is extended frame, S is standard frame.
Filter is the received hit filter ranges from 0-5
Data0~Data8 is the CAN data packet
Timestamp is the received CAN message timestamp in 2 microsecond resolution.
Note: The total of bits for standard CAN message is calculated as of following:
SOF+11bit ID+RTR+6 Control bits + number of data*8 =16 bits CRC + 2 ACK + 7 EOF bits. Extended
frame will have 29 bits ID instead of 11 bits.
•
Dropped packet counter is the counter for all the dropped packets when received buffers are overrun.
Example1:
>Recv:12345678-X-F00 A5 34 31 88 77 99 EF 5A T:131F D:00
Received message: ID is 0x12345678, X is extended frame, from filter 0, packet is A5 34 31 88 77 99 EF 5A,
timestamp is 0x131F, dropped packet counter is 0.
Example2:
>Recv:000001BC-RX-F02 T:17A2 D:00
Received message: remote extended frame, ID is 0x1BC, timestamp is 0x17A2, no dropped packet.
Binary Mode format:
In Binary mode, message receiving is not automatic as in ASCII mode. A command ‘r’ must be issued to get
the messages in the buffer. One message can be retrieved at a time. Application shall continue issue ‘r’
command until an error code 0x4B is returned.
Command:
@
3
‘r’
Response:
Success
‘r’
length
Data 6
CAN ID byte 3
Data 0
Data 7
CAN ID byte 2
Data 1
Timestamp high
CAN ID byte 1
Data 3
Timestamp low
CAN ID byte 0
Data 4
Counter of
dropped
packets
Bit 3
RX
overflow
Bit 2
Bit 1
RX filter number
000: filer 0
001: filter 1
010: filter 2
and so on.
Flag
Data 5
RX error
counter
TX error
counter
Where Flag is define as flowing:
Bit 7
Bit 6
Bit 5
Received Remote Extended
Double
frame
frame
buffer
Bit 4
Invalid
message
Bit 0
Failure: ‘e’ followed by an error code listed in Section 2.5.2
20
6. SPI application menu
•
ASCII mode:
•
Binary mode:
‘s’ is returned
6.1. Command P
Command P sets SPI clock edge and polarity.
ASCII Mode:
Format:
•
P
gets the current SPI clock edge and polarity.
•
P0
SPI clock edge is idle low, data transmitted in falling edge.
•
P1
SPI clock edge is idle low, data transmitted in rising edge. This setting is power on default.
•
P2
SPI clock edge is idle high, data transmitted in rising edge.
•
P3
SPI clock edge is idle high, data transmitted in falling edge.
Binary Mode format:
21
•
Get current operation mode
@
3
‘p’
Response:
Success:
‘p’
nn
nn=0
nn=1
nn=2
nn=3
SPI clock edge is idle low, data transmitted in falling edge.
SPI clock edge is idle low, data transmitted in rising edge.
SPI clock edge is idle high, data transmitted in rising edge.
SPI clock edge is idle high, data transmitted in falling edge.
•
Set to predefined Baud rate
@
4
‘p’
nn
Success: ‘p’
Failure: ‘e’ followed by an error code listed in Section 2.5.2
6.2. Command B
Command B sets the SPI clock speed rate.
ASCII mode:
Format:
•
B
Show the current speed. Power on default is 250 K
•
B0
Set clock speed to 4 MHz
•
B1
Set clock speed to 1 MHz
•
B2
Set clock speed to 250 KHz
Binary Mode format:
•
Get current operation mode
@
3
‘b’
Response:
Success:
‘b’
nn=0
nn=1
nn=2
nn
4Mhz.
1Mhz.
250Khz.
Failure: ‘e’ followed by an error code listed in Section 2.5.2
6.3. Command G
Command G gets numbers of data from SPI slave device. Default address may be set using command A.
ASCII mode:
Format: > g 10
gets 16 (0x10) bytes from device
Binary mode format:
22
@
3
‘g’
Response:
‘g’
Address mode
Number of bytes (up to 32 bytes)
Address high
Address low
Data (up to 32 bytes)
Where address mode is 16 bits when value is 0xff or 8 bits when value is 0x0
Failure: ‘e’ followed by an error code listed in Section 2.5.2
6.4. Command W
Command W writes user input data to SPI slave device. This command will automatically enable the Write Enable
Latch before each write to slave. An interval will be inserted between write cycles, which can be set with command
D. Default address may be set with command A. Slave Address will be incremented after this operation.
ASCII mode:
Format: > w 12,34,56
If slave address is 0x0 before the operation, it will be set to 0x3 after the operation.
Binary mode format:
‘w’
length
Data0
…
Data n
Where length depends on the size of the packet
Response:
Success:
‘w’
Address mode:
16 bits when value is 0xff; 8
bits mode when value is 0
Address
high
Address
low
Failure: ‘e’ followed by an error code listed in Section 2.5.2
6.5. Command N
Command N is similar to command W except it won’t issue the Enable Write Latch command between write cycles.
ASCII mode:
Format: > n 12,34,56
If slave address is 0x0 before the operation, it will be set to 0x3 after the operation.
Binary mode format:
Command:
‘n’
length
Data0
…
Data n
Response:
Success:
‘n’
Address mode
Address high
Address low
Data (up to 32 bytes)
Where address mode is 16 bits when value is 0xff or 8 bits when value is 0x0
Failure: ‘e’ followed by an error code listed in Section 2.5.2
6.6. Command S
Command S sets the control command format.
ASCII mode:
Format:
•
S
23
This command gets the current control commands.
Power on default value:
Read command
Write command
Write disable command
Write enable command
Read status register command
Write status register command
0x3
0x2
0x4
0x6
0x5
0x1
Example:
>s
>RD:34 WR:02 WRDI:04 WREN:06
>RDSR:05 WRSR:01
RD is read command, WR is write command, WREN is write enable command, RDSR is read status register
command and WRSR is write status register command.
•
SR nn
Sets the read command, where nn is the data in hex format.
Example: > SR 34 Sets read command to 0x34.
•
SW nn
Sets the write command, where nn is the data in hex format
•
SS nn
Sets the read status register command, where nn is the data in hex format.
•
ST nn
Sets the write status register command, where nn is the data in hex format.
•
SE nn
Sets the enable write command, where nn is the data in hex format.
•
SD nn
Sets the disable write command, where nn is the data in hex format.
Binary mode format:
•
Get the current control commands
@
3
‘s’
Response:
Success:
‘s’
Read
command
Write
command
Write disable
command
Write enable
command
Read status
register
command
Write status register
command
Failure: ‘e’ followed by an error code listed in Section 2.5.2
•
Set the command register
@
5
‘s’
{r,w,s,d,e,t}
value
Where r is read command, w is write command, s is read status register command, t is write status
register command, e is enable write command and d is disable write command.
Response:
Success: ‘s’ is returned.
Failure: ‘e’ followed by an error code listed in Section 2.5.2.
6.7. Command A
Command A sets the SPI slave address. Power on default is 0x0
ASCII mode:
Format:
•
A
24
Shows the current slave address
•
AH nn
Sets the high byte of the slave address, where nn is the high address in hex format.
•
AL nn
Sets the low byte of the slave address, where nn is the low address in hex format.
Example:
>a
>Slave Address: 0x0003
>ah 12
>al 4f
>a
>Slave Address: 0x124F
Binary mode format:
• Gets the current address
@
3
‘a’
Response:
Success: ‘a’ is returned followed by address high and address low
‘a’
Address high
Address low
Failure: ‘e’ followed by an error code listed in Section 2.5.2.
• Sets address
@
5
‘a’
{h,l}
Address value
Response:
Success: ‘a’ is returned.
Failure: ‘e’ followed by an error code listed in Section 2.5.2.
6.8. Command D
Command D sets an interval that is inserted between write cycles when command W or N is issued.
ASCII mode:
Format:
•
D
Show current interval.
•
D nn
Sets the interval to nn, where nn is in hex format.
Example:
>d
>SPI write-delay: 0x0A
>d 34
>d
>SPI write-delay: 0x34
Binary mode format:
• Gets the current delay
@
3
‘d’
Response:
Success: ‘a’ is returned followed by delay value
‘d’
delay
25
Failure: ‘e’ followed by an error code listed in Section 2.5.2.
• Sets delay
@
4
‘d’
New delay
Response:
Success: ‘d’ is returned.
Failure: ‘e’ followed by an error code listed in Section 2.5.2.
6.9. Command T
Command E enables the SPI write latch.
ASCII mode:
Format: > t
Binary mode format:
@
3
‘t’
Response:
Success: ‘t’ is returned.
Failure: ‘e’ followed by an error code listed in Section 2.5.2.
6.10.
Command Q
Command Q writes to the status register if any.
ASCII mode:
Format:
Q nn, where nn is the new status register value, which is in hex format.
Binary mode format:
@
4
‘q’
value
Response:
Success: ‘q’ is returned.
Failure: ‘e’ followed by an error code listed in Section 2.5.2.
6.11.
Command M
Command M transfers the SPI application menu to Main menu.
ASCII mode:
Format: > m
Binary mode format:
@
3
‘m’
Response:
Success: ‘m’ is returned.
Failure: ‘e’ followed by an error code listed in Section 2.5.2.
6.12.
Command L
Command L toggles the address mode between 16 bit and 8 bits. This setting determines whether 16-bit address
or 8-bit address is used when write and get date from SPI device. Please read your SPI device datasheet to decide
which mode should be used. 16-bit address mode is used by default.
26
ASCII mode:
Format: >L
Binary mode format:
• Gets the current address mode
@
3
‘l’
Response:
Success: ‘l’ is returned followed by address mode
‘d’
value
Where
Address mode is 16 bits when value is 0xff
8 bits when value is 0x0
Failure: ‘e’ followed by an error code listed in Section 2.5.2.
• Sets address mode
@
4
‘l’
value
Value = 0xff, set to 16 bits mode
Value = 0x0, set to 8 bits mode
Response:
Success: ‘l’ is returned.
Failure: ‘e’ followed by an error code listed in Section 2.5.2.
6.13.
Command ‘?’
Command ‘?’ will display the entire SPI application menu.
ASCII mode format:
Format: > ?
Binary mode format:
@
3
‘?’
Response:
Success: ‘s’ is returned.
Failure: ‘e’ followed by an error code listed in Section 2.5.2.
6.14.
Command X
Command x writes all user input data to the SPI salve. There is NO Write enable latch command inserted between
data.
Address bytes are not affected by this command.
ASCII mode:
Format: > x 12, 4d
Hex data 0x12 and 0x4d will be sent to SPI bus.
Binary mode format:
Command:
‘x’
length
Data0
…
Data n
Where length depends on the size of the packet
27
Response:
Success: ‘x’ is returned
Failure: ‘e’ followed by an error code listed in Section 2.5.2
7. Revision History
Revision
Software
Version
1.0
1.1
Date
Description
3-2004
5-2005
Initial release
Added description for new pins layout to external target
Removed command A in the I2C menu and add the list for the error
codes.
Added command x in the SPI menu for raw data write.
Update the manual to support QBridgeV2
Command ‘e’ (enable write latch) of the SPI commands is changed to
‘t’ to support Binary mode.
Add section for Binary mode. Add command ‘r’ for Binary mode
1.2
1.5
7-2005
1.3
1.6
9-2005
Default baud rate is 9600 bps instead of 57Kbps.
28