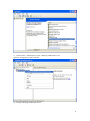
1
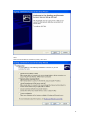
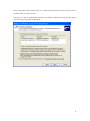
VPN-X User Manual (For VPN-X Version 2.2/2.4) Manual version 1.0.5 BirdsSoft BirdsSoft Reserves All Rights 2010-12 1. 2. 3. 4. 5. 6. 7. 8. 9 Overview ........................................................................................................................... 4 Understand VPN-X ........................................................................................................... 4 Install VPN-X Server/Client ............................................................................................. 5 3.1. System Requirements ............................................................................................ 5 3.2. Install on Windows ............................................................................................... 5 3.3. Install On Linux/FreeBSD .................................................................................... 6 3.4. Install On Mac OS X ............................................................................................. 7 Configure VPN Server ...................................................................................................... 7 4.1. Create VPN Account ............................................................................................. 7 4.2. Setup network for internet access.......................................................................... 9 4.2.1. Gather the VPN-X Server local information ................................................ 9 4.2.2. Firewall settings ......................................................................................... 12 4.2.3. Port Mapping/Forwarding .......................................................................... 14 4.3 Set DNS or DDNS for your public IP ................................................................. 15 Connect to VPN with VPN-X Client .............................................................................. 15 Security suggestions ........................................................................................................ 17 Performance .................................................................................................................... 17 User Interface .................................................................................................................. 18 8.1 VPN-X Server ..................................................................................................... 18 8.1.1 VPN-X menus on start ................................................................................ 18 8.1.2 VPN-X Server Toolbar ................................................................................ 18 8.1.3 VPN-X Status Tab ....................................................................................... 18 8.1.4 VPN-X Server Configuration Tab ............................................................... 18 8.1.5 User Management Tab................................................................................. 22 8.1.6 VPN Chat Room Tab................................................................................... 23 8.1.7 Access Control Tab ..................................................................................... 23 8.1.8 Log Tab ....................................................................................................... 23 8.1.9 Software Update Tab ................................................................................... 23 8.2 VPN-X Client ...................................................................................................... 24 8.2.1 VPN-X menus on start ................................................................................ 24 8.2.2 Login Dialog ............................................................................................... 25 8.2.3 Register new VPN Account online .............................................................. 26 8.2.4 VPN-X Client Title and Tray Icon .............................................................. 27 8.2.5 VPN-X Client Toolbar................................................................................. 28 8.2.6 VPN-X Status Tab ....................................................................................... 28 8.2.7 VPN-X Client Configuration Tab................................................................ 31 8.2.8 VPN Chat Room Tab................................................................................... 34 8.2.9 Access Control Tab ..................................................................................... 35 8.2.10 Log Tab ..................................................................................................... 35 8.2.11 Software Update Tab ................................................................................. 36 Advanced Topic .............................................................................................................. 37 9.1 Tune VPN-X performance .................................................................................. 37 2 9.2 Tune VPN-X security .......................................................................................... 38 10 Examples/How to ............................................................................................................ 38 10.1 NAT configuration (For advanced VPN system administrator).......................... 39 10.1.1 How to configure VPN-X server act as a NAT server on Mac OS X Tiger/Leopard .......................................................................................................... 40 10.1.2 How to configure VPN-X server act as a NAT server on Windows .......... 41 10.1.3 Test your NAT server from VPN-X client ................................................. 47 10.2 Bridge (For advanced VPN system administrator) ............................................. 48 10.3 Proxy server ........................................................................................................ 53 10.4 Route (gateway) .................................................................................................. 53 11 Self Diagnoses................................................................................................................. 54 11.1 Open Virtual Network Device Error! .................................................................. 54 11.2 VPN-X client always reports “Can't connect to VPN-X server, and report time out error! ......................................................................................................................... 55 12 Technical Support............................................................................................................ 56 12.1 FAQ(Frequently Asked Questions) ..................................................................... 56 12.2 Contact Us ........................................................................................................... 56 3 Manual Version history Version Date Changes 1.0.5 2010-12-16 1)Fix document errors. 1.0.4 2010-8-2 1)Fix document errors. 2)Simplify description 1.0.3 2010-3-7 Fix document errors. Thank John Metten 1.0.2 2010-2-23 Fix document errors 1.01 2009-12-21 1) Add some new screenshots 2) Add content about some features: import/export… 3) Add content about self diagnoses 1.00 (0.97,0.98,0.99 are internal versions) 2009-1-23 1) Add content for Mac OS X users 2) Update some VPN-X 2.4 screenshots 3) Remove useless content 0.96 2008-9-18 0.95 2008-6-6 1) Add examples 2) Add forum address 0.94 2008-5-14 1) Add proxy feature 2) Change some screenshot and description 3) Add NAT and bridge example 0.93 2008-3-6 Add server configuration parameters instruction 0.92 2008-2-27 Change VPN-X Mac OS X version instruction 0.91 2008-1-12 Initialization Add more screenshots 1. Overview This User Manual tells you how to install, use, and manage the VPN-X Server/Client. 2. Understand VPN-X VPN-X is a cross-platform VPN solution which can help you make a secure LAN/intranet with peers over the internet. 4 VPN-X supports following platforms: 1. Windows: Windows 2000 sp4/XP /2003/Vista (32bit or 64bit), Windows 7(32bit or 64bit) 2. Linux: needs TUN/TAP kernel module. For example: Debian 3 or above, Ubuntu 6 or above … 3. Mac OS X: Mac OS X 10.4.* or above (Tiger, Leopard and Snow Leopard). 4. FreeBSD/PC-BSD: 5. Solaris 10(x86) 3. Install VPN-X Server/Client This manual only describes Windows/Mac OS X install process. 3.1. System Requirements Before you install VPN-X, you should verify VPN-X System Requirements: CPU main frequency: >= 600MHZ. Memory size : >=512M Disk space: >= 512M OS: Please refer to platforms which VPN-X supports. Network (only for VPN-X server): You should have a public IP address for VPN-X server setup, dynamic public IP also works. 3.2. Install on Windows 1) Get VPN-X installer package. You can download the latest VPN-X version on http://www.birdssoft.com . 2) Click Next and Next 3) Installer will help create a virtual VPN device. Please click “Continue Anyway”. Notes: Sometimes the “hardware installation” dialog is hidden by another window, you can minimize other window/dialog to find the “hardware installation” dialog. 5 4) Click next until the install process is finished. 3.3. Install On Linux/FreeBSD Preparation/Precheck: Run the following commands in a command terminal modprobe tun lsmod | grep tun If you can get a reply like this (Don't care about the number) debian:~# lsmod | grep tun tun 10208 3 Congratulations! Your Linux kernel is ready for installing our VPN-X . Download our VPN-X tar package and uncompress the package in some path. debian:~#tar -xzvf vpn-x*.tar.gz start VPN-X Client by input command "sudo runclient.sh" start VPN-X Server by input command "sudo runserver.sh" For other configurations, please refer to the Windows configuration description If you are using PC-BSD, please just download the VPN-X-*.PBI, and install PBI, clicking “next” will always work. 6 3.4. Install On Mac OS X VPN-X supports Mac OS X Tiger, Leopard, Snow Leopard or above.. Install VPN-X Client: Just click the “VPN-X_client.app.zip”. Install VPN-X Server: Just click the “VPN-X_server.app.zip” Note: When you launch VPN-X first time, Mac OS X will ask you input your password, please input correctly. 4. Configure VPN Server Tips: VPN-X has the same GUI on Windows, Mac OS X, Linux, and FreeBSD/PC-BSD . So we just describe the Windows platform. Make sure you have basic knowledge about network, or you should ask somebody to help you finish the setup. It’s not complex. For our customers, we can provide free technical support and test services when you encounter setup problems, please see the Technical Support section. Warning: You should not run VPN-X client/server on the same machine. 4.1. Create VPN Account If you don’t want to setup a VPN server, please skip this section and read “Connect to VPN with VPN-X Client” directly. 1) Click Desktop VPN-X Server Shortcut to start VPN-X server. Vista (or above such as Windows 7) user should use administrator role to run VPN-X (just click the right button on the VPN-X shortcut link, and you will see the menu). Linux should also use administrator/root to run VPN-X. VPN-X Server will take 10~30 seconds to prepare the first run environment on a Windows platform. For other platforms, the time is a little shorter. The waiting flower will glitter during the preparation process. 7 2) When the preparation is finished, you can see the VPN-X server is online. 3) Create VPN account for VPN-X client Click “User Management” Tab, and Click “Add” button. Fill the new user name and other fields. 8 4) When finished, fill new account information and click “Ok” 4.2. Setup network for internet access If the VPN-X server is run on a machine which has a public address, please skip this section. If the VPN-X server is run behind a (A)DSL modem/route or other route, you should configure the (A)DSL modem/router and setup “Port Mapping”/”Port Forwarding”. 4.2.1. Gather the VPN-X Server local information By default, VPN-X listens on 25000 UDP/TCP, and 25443 TCP(SSL/TLS). 9 If your VPN-X server is behind a router, you need to get real local/LAN IP address of VPN-X server machine. Because port-forwarding need this information. 1) Please see “Local Area Connection” properties 2) Select “Internet Protocol (TCP/IP)” 10 3) Click the “Properties” button 11 4) Remember these settings in your mind. We recommend you write them down. For the professional user, you can use Windows commands, Linux or FreeBSD or Mac OS X commands. Windows command: ipconfig /all Linux/BSD/OSX command: ifconfig 4.2.2. Firewall settings VPN-X can help you set Windows built-in firewall automatically. If you are using a third-party firewall, we recommend reading this section first then read the third-party user manual. Almost all firewall has the same mechanism. Windows XP or above versions have a built-in firewall. You should let the VPN-X listening ports be excluded, so an outside user can access the VPN-X server running on Windows. For other platforms, there may be other firewalls as well, so you should check the firewall setting on your OS platform. Click the “Windows Firewall” to manage the security settings. 12 Click “Add Port…” to add VPN-X listening ports. 13 4.2.3. Port Mapping/Forwarding Each type of (A)DSL modem has a different operation/administration webpage. Please read your (A)DSL modem manual for more information. If you can’t understand the port forwarding or port mapping, here are some references: 1) http://en.wikipedia.org/wiki/Port_forwarding 2) http://www.portforward.com/help/pfprogression.htm Maybe you can find your route in this list: http://portforward.com/routers.htm In this manual, we will use SMC (A)DSL modem to explain how to configure port mapping. Open page: “NAT->Virtual Server”. 14 4.3 Set DNS or DDNS for your public IP This manual just gives a brief way to setup your own DNS or DDNS. If you have a static public IP address, you can setup DNS for the IP. If the public IP address is dynamic, you should setup DDNS, and install DDNS client for updating the public IP. If you don’t have the DNS or DDNS, the client can only use the long, hard to remember public IP address to access the VPN-X server. It’s just inconvenient, and not a fatal problem to setup a VPN. 5. Connect to VPN with VPN-X Client Warning: You should not run VPN-X client/server on the same machine. 1) Click Desktop VPN-X Click Shortcut to start VPN-X client. Vista (or above, such as Windows 7) user should use the administrator role to run VPN-X (just click the right button on the VPN-X shortcut link, and you will see the menu). Linux should also use administrator/root to run VPN-X.. 15 2) Fill in the VPN server host and port, user name and password and select the proper protocol. You can obtain all of this information from your VPN-X server administrator. 3) After inputting the correct information, you can login to the VPN. 16 You can ping 192.168.240.1(or your Server VPN virtual IP) to verify whether the VPN works properly. 4) Enjoy the secure LAN/Intranet powered by VPN-X. 6. Security suggestions 1) If you don’t want to let anyone can register a VPN account on your VPN server,please disable “Allow Register VPN Account from Network”. By default, the feature is diabled. 2) If you don’t care about the VPN network speed, please use SSL/TLS protocol to connect VPN-X server. 3) Change the VPN-X server listening port to some other unpopular port number. By default, VPN-X server listen on following ports: 25000(UDP/TCP) 25443(TCP). 4) Generate your own SSL certification or key. BirdsSoft can provide this generation certification service for customers. Because this is a very special requirement, this service is not free. Most users need not care about how to generate SSL certification, because the built-in certification is safe until you think you are doing business with the FBI. You can read this section to know some VPN-X parameters for security. 7. Performance This section just want to tell you, VPN-X is a high performance VPN solution. Better hardware machine(new PC, for example dual-core CPU) or network environment will get better performance. The following data is our test result. Test environment: Windows XP * 2 CPU AMD 1700+ * 1 CPU AMD 3000+ * 1 Memory 1G * 2 LAN speed:100Mbit/s, the real transfer speed is 64Mbit/s VPN-X: 2.2.1.26 Speed UDP 56Mbps or higher TCP 40Mbps or higher TCP(JSSE SSL/TLS) 32Mbps or higher In a LAN environment, the speed ranks: UDP>TCP>SSL If you have a better machine and network, the test data should be better. On the Internet, the VPN transfer speed should be 92%~500% or higher of the WAN speed, because the VPN will compress the network data before transfer on the Internet. After the data 17 reaches the target machine, the data will be uncompressed automatically. UDP is preferred and default, if you care about VPN speed, but sometimes if your internet connection is not stable, TCP or TCP (SSL) is a better choice for VPN speed. 8. User Interface Tips: VPN-X has the same GUI on Windows, Mac OS X, and Linux, so we just describe the Windows platform. 8.1 VPN-X Server 8.1.1 VPN-X menus on start Please refer to client menus section. 8.1.2 VPN-X Server Toolbar 8.1.3 VPN-X Status Tab Please refer to VPN-X client interface description. 8.1.4 VPN-X Server Configuration Tab General Configuration 18 (1) Start with Windows: When Windows starts up and login is successful, it will bring up VPN-X server automatically. (2) Register as Windows service: VPN-X server can be installed as a Windows service on a Windows platform. When Windows starts up, it will bring up the VPN-X server. The VPN-X tray icon will show on your local console. If you are using Windows Remote Desktop service, you should connect to your local console or you will not see the VPN-X tray icon. On Windows Vista/7 the tray icon can’t be shown, this is normal, please read this document “VPN-X Vista and Windows 7 Special Document”. If you run VPN-X server on the Windows 2003, you can use local monitor to view VPN server status. You can also use Windows Remote Desktop to view the server status, but you should use special option to view the remote windows internal session, or you can’t see the tray icon of VPN-X server. For example, your windows 2003 server is running on 192.168.240.1, you can use following command to connect the local screen/monitor/console For windows xp sp2 client: mstsc -v 192.168.240.1 /F -console For windows xp sp3 or vista/7 client: mstsc /admin (3) Language: VPN-X supports many languages. Chinese (Simplified or Traditional) Dutch English 19 German Italian Malay Norwegian Polish Russian Vietnamese but only the English and Chinese languages are provided by the official . The other languages are contributed by our warmhearted customers. If you find some translation errors, please tell us ASAP. (4) Apply: After you change something in this panel, you should apply to make it take effect. VPN Server Setting These settings are very important for VPN-X server. You should read this section carefully. (1) VPN server virtual address: It’s virtual IP address, not real IP address. The virtual address is valid in the VPN (Virtual Private Network). If you are administrator, you should not let your client peers fill in the virtual address on his/her login dialog. You should tell them to input your public real IP address. After the VPN client is logged in, he/she can use this virtual address to access the VPN service. 20 This virtual address is the beginning of the virtual IP address pool. All client peers’ virtual addresses will be auto-generated from this address. For example: The server virtual address is 192.168.240.1, and the first VPN account virtual address will be 192.168.240.2. The second VPN account virtual address will be 192.168.240.3, and so on.. The VPN-X Server administrator has the right to change the VPN account to any other virtual address, even if the virtual address is not in the same network. For more information, please refer to the “User Management” section. (2) Virtual Network mask: 255.255.255.0 is preferred. (3) Bridge: This is an advanced setting. If you are a beginner, we suggest you don’t use it. (4) Bridge IP: This is an advanced setting. If you are a beginner, we suggest you don’t use it. (5) User (Virtual) DNS: VPN-X can provide DNS service or redirection. By default VPN-X disables this feature. (6) (Virtual) DNS IP: the default IP is the VPN-X server virtual address. You can change it to a real DNS server and let all clients use the DNS server. (7) Allow Register VPN account from network: This feature can help VPN client peers register his/her new VPN account on this VPN server. For security purposes, we recommend you disable this feature. By default, VPN-X server disables this feature. (8) Add listening port and protocol: VPN-X has a powerful feature that can allow VPN-X to listen on many ports with different or same protocols at the same time. You can click this button to add your desired port and protocol. If you are administrator, you should choose the proper protocol and port to let client peers login. For security purposes, we recommend you select TCP(SSL) protocol. For network speed or you just want to use VPN-X to play games etc. , you can select UDP protocol. (9) Delete listening port: delete your selected records. (10) Listening ports table: VPN-X provides an easy way to see the listening ports on this VPN-X server. 21 8.1.5 User Management Tab This panel will provide an easy way to create a VPN account for client peers. Clicking “Add” will pop up the new account information dialog. You should fill them in properly. All the fields labeled “*” are required. You can tell your clients to modify other fields themselves after they login successfully. VPN-X server allocates a default virtual IP address for client peers automatically. You can check these virtual addresses on the VPN account list table. If you want to change a peer’s virtual address, just double click the peer record or select the peer record and click the “Modify” button. Tips: VPN-X client’s virtual address can be allocated any virtual address, even if the address 22 is not in the same network. For example: VPN-X server virtual address is 192.168.240.1 Client Peer 1 (CP1): 192.168.240.2 Client Peer 2 (CP2): 192.168.240.3 Client Peer 3 (CP3): 10.10.0.2 Client Peer 4 (CP4): 10.10.0.3 Server, CP1 and CP2 are in the same network. CP3 and CP4 are in another network. CP3 or CP4 can’t access the Server, CP1, and CP2, CP3 and CP4 can access each other. 8.1.6 VPN Chat Room Tab Please refer to VPN-X client interface description. 8.1.7 Access Control Tab Please refer to VPN-X client interface description. 8.1.8 Log Tab This tab will print all important log messages on the screen. If you want to figure out problem, you should check the log tab first and watch to see if there is something wrong with VPN-X. This entire message will be logged in one file named “run_server.log” located in VPN-X installed directory. 8.1.9 Software Update Tab Please refer to VPN-X client interface description. 23 8.2 VPN-X Client 8.2.1 VPN-X menus on start (1) VPN-X Client: start VPN-X client program (2) VPN-X Server: start VPN-X server program (Only VPN-X server has this menu) (3) Add VPN-X virtual device: If you want to run multiple virtual network devices, it is possible to do this on a Windows platform. (4) Remove all VPN-X virtual device: Remove all virtual network devices. Generally, VPN-X uninstaller will remove all VPN-X virtual devices automatically. Disregard this menu until you know you can deal with the result. 24 8.2.2 Login Dialog Figure 6.2.1: Login Dialog (1) VPN server host: You should input the real server public IP address or VPN server DNS name. (2) VPN server port: Input VPN server listening port. Our demo server port is 25000. (3) User name: Input VPN account name created by VPN-X server or register online. (4) Password: Input VPN account password created by VPN-X server or register online. (5) Protocol: VPN-X supports many protocols (UDP, TCP or SSL…). You should get the server listening protocol from the VPN-X server administrator. Our demo server port is UDP. (6) Encryption: VPN-X has the intelligence to encrypt your network data automatically. (7) Compression: support two types: Auto (default), No compression. Auto (default and recommend): VPN-X will judge whether the network data should be compressed or not automatically. This feature can help save your network bandwidth significantly. No compression: VPN-X will not compress network data at all. (8) Save password: Save the login information for next login convenience. Login password has been encrypted and stored in the history file. If you think it’s not safe for your environment, please uncheck this checkbox. VPN-X will not save the password. (9) Register new VPN account: VPN-X can allow you to register a new account on VPN-X server. Before you register, you should make sure the online register feature is enabled on VPN-X server. For security purposes, VPN-X server should close this feature at daily running. 25 (10) Network Proxy: If you are behind a proxy server to access the Internet, you can use this feature to let VPN-X client use the proxy server to access the VPN-X server on the Internet. VPN-X supports almost all proxy server types. (http<only TCP>,socks 4/5<UDP or TCP>). (11) Login: Clicking this button will send a login request to VPN-X server. Client user should wait for VPN-X server’s reply result. Before clicking this button, the client user should check the data filled in this login dialog and make sure it is correct. (12) Cancel: Just close the login dialog without any extra action. (13) Extend panel: click the up arrow and you will see the following panel. Then you can use the Import/Export feature (14) Import: Import client configuration (the export file you saved before). The postfix of the exported file is “.cfg”. Please use “Export” to backup your client settings before you use the “Import” feature. (15) Export: Export the current client configuration for backup purposes, or quick switching client settings. For example; If you want to login to different VPN-X servers at a different time or place, you can export each login configuration to exported files and import them the next time. You need not input the long VPN IP host number, user name and password. 8.2.3 Register new VPN Account online Before you register, you should make sure VPN-X server has enabled the online register feature. For security purposes, VPN-X server should close this feature at daily running. 26 a. b. c. d. e. f. g. h. 8.2.4 VPN server host: This field can’t be edited. If you want to change it, you should fill in your desired value in “Login Dialog”. User name: Client can choose his /her VPN account user name. Password: Password for this account. Confirm password: Should be same as password. Full name: Input your real name. Email: Input your email address. Address: Input your home or company address. Click Ok to send the registration request. If the server enabled the online feature, VPN-X server will process the request. VPN-X Client Title and Tray Icon VPN-X client title: VPN-X client tray icon: After logging into the VPN, the VPN-X title and tray icon will tell the VPN user which account and protocol he/she is using. “Title” can also tell you which VPN-X version you are using. You should move the mouse to the VPN-X tray icon, and the tray icon will show a message. Double clicking the tray icon will show the VPN-X main frame/window. 27 8.2.5 VPN-X Client Toolbar 8.2.6 VPN-X Status Tab (1) Peer: Peer VPN account name (2) VPN Virtual IP: Peer VPN virtual IP. 28 VPN users can use this IP to access the peer machine. (3) Public IP: Peer public IP address. You can use this information to know where the peer comes from. (4) Protocol: This information indicates which protocol the peer is using to connect to the VPN-X server. VPN-X supports UDP, TCP, JSSE SSL, TLS and (OpenSSL) protocols. (5) Traverse NAT Status: VPN-X supports UDP traverse NAT. VPN-X does not support TCP traverse NAT. In other words, with TCP or TCP (SSL) protocol logins, client peers can’t traverse other peer’s NAT device. That is not an error, it’s normal. : Traverse NAT successfully. All network data will be sent to this peer directly. : Traverse NAT unsuccessfully. All network data will be relayed by VPN-X server. So you should not worry about this status. : You deny the peer access to your computer. Traverse NAT success will help VPN-X server save the server bandwidth. For example; Richard and Tony are two client peers. If the peers can traverse NAT successfully, Richard can send share files to Tony without the server in an active state, even if the server now is not online or down. 29 Figure 6.2.3.2: VPN-X UDP P2P work mode. Traverse NAT fail doesn’t mean the connection between two peers is bad. All network data can be relayed by the server. It’s also a good status for VPN communication. There are many reasons that can cause the status to become yellow. 1) The peer forbids access to his/her computer. 2) You and your peers should use UDP to connect VPN-X server for traversing NAT, or the status will always be yellow. 3) Wait two minutes, then check the status to see if it turns green. 4) Both you and your peer have un-traversable NAT devices. Disregard this, because VPN-X server will transfer/relay the network data for you and your peer. (6) Private chat: Chat with somebody. Only your chatting peer can see the chat messages. Other peers can’t see them. All chat messages are encrypted automatically. Don’t worry about some monitor detecting it. This chat feature can be named secure chat. (7) View share file: For Windows peers, you can click this button to view the peer’s Windows share folder. Of course, you should know the peer’s Windows share user name and password. For Linux, MAC OS X and BSD peers, the share is “SAMBA”. All Unix-like OS’s call Windows shares as “SAMBA”. 30 (8) Refresh peer list: This button can help you retrieve a peer list from VPN-X server. Tips: Double clicking the table records will show the peer’s detail information. 8.2.7 VPN-X Client Configuration Tab General Configuration Panel: (1) Start with Windows: If the checkbox is checked, VPN-X client will start with Windows. (2) Login automatically: If the checkbox is checked, VPN-X client can login automatically. The precondition is that you should set “save password” in “Login Dialog”. (3) Language: VPN-X supports many languages. Chinese (Simplified or Traditional) Dutch English German Italian Malay Norwegian Polish Russian 31 Vietnamese but only the English and Chinese languages are provided by the official . The other languages are contributed by our warmhearted customers. If you find some translation errors, please tell us ASAP. (4) Hide Blocked Peers: This will help you hide your denied peers. They will not be shown on the status panel. (5) Flash Main Frame: Only for Windows users. (6) Flash Private Chat Frame: Only for Windows users. (4) Apply: After you change something in this panel, you should apply to make it take effect. Proxy Configuration Panel: You can configure the client side proxy setting here. You can also change client proxy setting on the Login Dialog. VPN-X supports Socks. VPN-X has the intelligence to select socks type. Just input what you know and don’t care about the socks type. VPN-X supports HTTP proxy, and supports the following authentication methods: Digest, BAISC, NTLM and NONE VPN-X also has the intelligence to select authentication method automatically. If you don’t want to use a Proxy server just select “None“ proxy type. 32 After your configuration, don’t forget to click “Apply”. Personal Information Panel: You can change your personal information stored on the VPN-X server. 33 8.2.8 VPN Chat Room Tab (1) Message display area: Display public chat messages. (2) Message input area: Input message and press “Enter” key to send the message. (3) Split bar: You can drag this bar to make two areas more comfortable for you. 34 8.2.9 Access Control Tab (1) Add access control rule: Clicking this button will pop up an input dialog for the peer user name. After inputting or selecting a peer user name, you should click ok. Then you will see he/she are listed on the Access Control list table. If you don’t want to add another peer, click “Cancel”. (2) Delete access control rule: Delete your selected rule. (3) Work mode: VPN-X supports two Access Control work modes. Blacklist (default): This mode will deny all peers listed in the Access Control table. They will not be able to access your computer at all from the VPN. Whitelist: This mode will allow all peers listed in the Access Control table. Only the listed peers can access your computer from the VPN. (4) Peer column: VPN account user name (5) Action column: You should always check whether the action is proper for the peer. 8.2.10 Log Tab This tab will print all important log messages on the screen. If you want to figure out problem, you should check the log tab first and watch to see if there is something wrong with VPN-X. This entire message will be logged in one file named “run_client.log” located in VPN-X installed 35 directory. 8.2.11 Software Update Tab If you installed a latest VPN-X version, the panel will look like this. If the VPN-X detected a higher VPN-X version, VPN-X will tell you the latest version information which includes: 1) Version number; 2) Where to download the latest update package. The update process is automatic, so you don’t need to worry about this. 36 (5) Announcement area: BirdsSoft will post announcements here. (6) Download site selection list: You can check the radio box to start the update process with the web site. (7) Progress bar: In the process of an update, this bar will show the download progress. (8) Update progress information output area. After an update is finished, you should restart VPN-X to make the new version take effect. 9 Advanced Topic Warning: This section is not for the VPN-X beginner. 9.1 Tune VPN-X performance There are some parameters that can help VPN-X work in your way. Important: All parameters are case sensitive. You should stop the VPN-X program before setting these advanced parameters in the configuration file. VPN-X client configuration file: config_client.properties VPN-X server configuration file: config_server.properties Heartbeat (Server Side): heartbeat interval. Default value is 10 seconds. This parameter was 37 introduced in version 2.2.1.25. For a small scale VPN, 10 is the best choice, but for a large scale (supports 20 concurrent clients or more), the value should be 20 or more. Notes: Server side: The parameter can only be configured on server. Both sides: The parameter must be configured on server and client side. Parameters Default Value Table Windows heartbeat 9.2 10 Linux 10 Mac OS X 10 (Comments) >=10, supports from 2.2.1.25 Tune VPN-X security There are some security parameters to tune and make VPN more secure. Example: javassl.keyStore=default/serverkeystore javassl.keyStorePassword=ENC\:e7OtWalJVcg\= javassl.needClientAuth=false javassl.sslName=SSLv3 javassl.trustStore=default/clienttruststore javassl.trustStorePassword=ENC\:e7OtWalJVcg\= If you generated your own SSL certification or key, you should change those parameters. Tips: javassl.keyStorePassword and javassl.trustStorePassword can be inputted plain-text word. VPN-X will encrypt the password automatically. 10 Examples/How to Here are some examples for special cases. You can use these examples to understand VPN-X better. Keep in mind, VPN-X is a SSL/P2P VPN solution with ease of use in mind. If you just want to let your VPN-X server and VPN-X clients communicate with each other just as they are in the same LAN (virtual), please use the default setting in VPN-X server and create VPN accounts in the VPN-X user management panel, you need not touch any unknown setting on VPN-X server. Disregard the NAT, Bridge or Route configurations or other advanced settings until you know you have to use these features and has basic network knowledge. Please 38 read “Section 4” carefully first before you study the following advanced examples. 10.1 NAT configuration (For advanced VPN system administrator) Notes: Please use VPN-X 2.2.126 or above version, 2.4 version is preferred. Purpose: Use the VPN-X server IP address to access the Internet or remote LAN. Typical cases: 1) I live in the USA and work in Australia, but I want to use a USA IP address to surf the Internet, because some USA websites only accept native customers. 2) Our employees want to access a company LAN resource from home or other places. Network assumed topology: The LAN network: 192.168.1.0 (192.168.1.1 ~ 254) Network mask: 255.255.255.0 LAN/WAN gateway: 192.168.1.1 VPN-X Server LAN IP: 192.168.1.28 VPN-X Server Virtual IP address: 192.168.240.1 The public IP address for this LAN is: 61.173.25.162 (assumed) Run VPN-X server on your platform Setup Port Mapping (Forwarding) on your route: No LAN IP LAN Port Public Port Protocol 1 192.168.1.28 25000 25000 UDP 2 192.168.1.28 25000 25000 TCP 3 192.168.1.28 25443 25443 TCP You can use commands to test whether your PORT Forwarding/MAP operation is successful. You should run the following Test commands on the client side telnet 192.168.1.28 25000 telnet 61.173.25.162 25000 The first command should be run on another machine in your LAN. That command will check whether VPN-X is working properly in your LAN. The second command should be run in another place (not in same LAN with VPN-X server), The second command will check whether the VPN-X is working properly on the Internet. If it fails, you should check your firewall settings (both your router or hardware firewall or other type network device, your Server Operation System), and port mapping/forwarding on the router. If all of these ports work, it’s time to configure your VPN-X NAT server. We prepared two platforms examples for you. 39 10.1.1 How to configure VPN-X server act as a NAT server on Mac OS X Tiger/Leopard VPN-X provides a friendly GUI for Mac OS X and FreeBSD users to make a NAT server more easily. If you encounter any problem, please contact us. VPN-X on Mac OS X Tiger screenshot Open VPN-X "route configuration" panel and do the following configuration. Act as gateway: checked Act as NAT server: checked NAT interface: en0 Notes: Since VPN-X 2.4.1.35,VPN-X can help you get the default NAT interface automatically. You need not run the command to check. The NAT interface should be your LAN interface name on your Mac OS X (Tiger/Leopard). You can use the command "ifconfig" to check. ifconfig For example: In our Test Mac OS X, we get the following information apple-computer:~ root# ifconfig lo0: flags=8049<UP,LOOPBACK,RUNNING,MULTICAST> mtu 16384 40 inet6 ::1 prefixlen 128 inet6 fe80::1%lo0 prefixlen 64 scopeid 0x1 inet 127.0.0.1 netmask 0xff000000 gif0: flags=8010<POINTOPOINT,MULTICAST> mtu 1280 stf0: flags=0<> mtu 1280 en0: flags=8863<UP,BROADCAST,SMART,RUNNING,SIMPLEX,MULTICAST> mtu 1500 inet 192.168.1.28 netmask 0xffffff00 broadcast 192.168.1.255 ether 00:0c:29:18:9d:70 media: 10baseT/UTP <full-duplex> status: active supported media: 10baseT/UTP <half-duplex> 10baseT/UTP <full-duplex> tap0: flags=8843<UP,BROADCAST,RUNNING,SIMPLEX,MULTICAST> mtu 1400 inet 192.168.240.1 netmask 0xffffff00 broadcast 192.168.240.255 ether d2:63:3a:d9:22:4f open (pid 217) NAT interface name is very important,or your VPN-X server will not work properly. Add a route rule on “Client Route Table” for your VPN clients. network: 192.168.1.0 netmask: 255.255.255.0 gateway: 192.168.240.1 metric: 5 if you want to access internet with server side IP, you should add route rule like this: network: 0.0.0.0 netmask: 0.0.0.0 gateway: 192.168.240.1 metric: 1 Don't forget to click "Apply". After change route setting, you’d better tell your clients to restart VPN-X client to make sure the new route rule is working. 10.1.2 How to configure VPN-X server act as a NAT server on Windows Windows 2003, Mac OS X , FreeBSD and Linux supports acting as a NAT server. Unfortunately Windows XP does not support this method. If you are using Windows 2003, please follow these steps: 1) Stop Windows Firewall/Internet Connection Sharing (ICS), and disable it. 41 3) Control Panel-> Administrative Tools-> Routing and Remote Access Open the configuration window like this. 4) Configure Routing and Remote Access 42 Next Select network address translation (NAT), then Next 43 Keep in mind, the VPN-X virtual device is a virtual Network interface connection (NIC), but you can deal with it just like a real NIC. Choose the real NIC to be the public interface to the Internet. Windows will use the VPN-X NIC to be the private connection automatically. 44 45 Next, finish the Windows NAT configuration. You can disable the NAT firewall or write an exception rule to make your NAT work properly. Note: The NAT firewall is not the same thing as Windows built-in general ICS firewall. The client does not know how to access the remote LAN through the VPN server, so you should add a route configuration for clients, and click “Apply” 46 Add a route rule on “Client Route Table” for your VPN clients. network: 192.168.1.0 netmask: 255.255.255.0 gateway: 192.168.240.1 metric: 20 if you want to surf internet with server side IP, you should add route rule like this: network: 0.0.0.0 netmask: 0.0.0.0 gateway: 192.168.240.1 metric: 1 Don't forget to click "Apply". After change route setting, you’d better tell your clients to restart VPN-X client to make sure the new route rule is working. 10.1.3 Test your NAT server from VPN-X client Run VPN-X client. Assumed your VPN-X server public/Internet IP is 61.173.25.162 For SSL VPN: VPN Server host: 61.173.25.162 VPN Server port: 25443 protocol: TCP(SSL/TLS) 47 user name and password For P2P VPN: VPN Server host: 61.173.25.162 VPN Server port: 25000 protocol: UDP user name and password After your VPN-X clients logon VPN-X server, they will access your remote LAN easily. ping 192.168.240.1 ping 192.168.1.1 10.2 Bridge (For advanced VPN system administrator) Purpose: Lets you use a remote LAN IP address, and you can use that IP to communicate with other machines in the remote LAN directly. Typical cases: I need to access our office LAN from an airport or other place, and also let remote LAN computers access my laptop. VPN-X server on the Windows platform supports Bridge operation. Network topology: Note: You should have a very special LAN ip address to avoid conflicting with another local network. It’s a bad idea to use bridge mode with 192.168.1.0 or 192.168.0.0 network, because your coffee bar or airport local wireless network may also be using this network address. The office LAN ip range: 192.168.100.1~254. 192.168.100.1~199 for real machine IPs 192.168.100.200~254 for VPN users. The VPN-X Server LAN IP : 192.168.100.50 Gateway: 192.168.100.1 The public IP address for this LAN is : 61.173.25.162 (assumed) After the network interface cards (NIC keep in mind, VPN-X is a Virtual NIC) are installed and connected, go to the bridging computer and open Control Panel, click Network and Internet Connections, and then click Network Connections. 48 Note: To create a network bridge you must select at least two network connections that are not being used by Internet Connection Sharing (ICS) or the Internet Connection Firewall (ICF). Next click both network connections (if you have several segments, hold down the Ctrl key and click all the connections that correspond to all the LAN segments you want to bridge), right-click one, and then click Bridge Connections. 49 After the bridge configuration is complete, you'll end up with a Network Connections window that looks like the one below. We should set the Network Bridge manually. Because we want to use the same IP address as the Local area connection setting: 192.168.100.50. Right-Click the Network bridge and select the “Properties”, then select “Internet Protocol (TCP/IP)”, and change the IP address and gateway… click “Ok” and close all configuration windows. 50 Startup VPN-X server and change the VPN server setting as follows: You should use the same network address to the VPN virtual Address as the LAN IP. 51 Click “Apply” to make your VPN server use the new settings. Create a new VPN account in User Management Panel. The first account IP should be 192.168.100.201. The second account IP should be 192.168.100.202, and so on. You can change the IPs as needed, but you should make sure all VPN accounts’ addresses are in the same network, for example: 192.168.100.0 netmask 255.255.255.0 You can use the VPN account to login VPN-X from the remote VPN-X client. Run this command on your client after client login: Ping 192.168.100.1 If you receive a response, your VPN-X server with a Bridge office network is configured successfully. Note: In this example, you should use 192.168.100.50 to access the VPN-X server. Don’t use 192.168.100.200, because the “192.168.100.200” is a dummy address for starting the VPN account IP pool. 52 10.3 Proxy server Purpose: Let you access remote LAN computers with the special ports for example FTP, Web Server and Remote Desktop... Note: With this method, you can only access some special applications. Typical cases: 1) I just want to access the web server in our office LAN. When need to configure a proxy server before accessing that resource. You can use third-party software to do that. VPN-X just helps you create a VPN for you and your proxy server. There is a great software to do that, but not easy to configure: Squid (http://www.squid-cache.org/) BirdsSoft can provide a Proxy solution for customers. Proxy server provided by BirdsSoft supports: HTTP Proxy, FTP Proxy, Socks 4/5, Telnet, Proxy,SMTP Proxy POP3 Proxy,TCP Map and UDP Map… If you need this solution please contact us. 10.4 Route (gateway) Note: The Gateway feature should always be worked in conjunction with a NAT server, or you will have to configure a route rule for each computer, and tell them where to send the Ethernet packages. We don’t recommend using this method to make a network. VPN-X gives a GUI for all platforms about this. VPN-X can help OS act as a Gateway easily. 53 Click “Apply”, Linux, FreeBSD and Mac OS X will take effect without rebooting the machine, but Windows needs to reboot to take effect. 11 Self Diagnoses 11.1 Open Virtual Network Device Error! Basic knowledge: Each VPN-X program should use one virtual network device (named “vpn-x”) with administrator role. 54 Ask yourself following questions before report us this is a bug: 1) Are you the administrator user or user with administrator/root role on this platform/OS? Tips: Windows Vista (or above, such as Windows 7) user should use administrator role to run VPN-X (just click the right button on the VPN-X shortcut link, and you will see the menu). Mac OS X users should not care about it, because VPN-X can help you to detect the user role. Linux users should use command “sudo” or root role to launch the VPN-X server or client. 2) Do you have enough virtual devices for each VPN-X program. Windows users: By default, VPN-X Windows installer will help you install a virtual network device on Windows. Mac OS X users: Please refer to “Understand VPN-X” section. Linux users: Please refer to “Understand VPN-X” section. 11.2 VPN-X client always reports “Can't connect to VPN-X server, and report time out error! There are two methods to check whether your VPN-X server is on the Internet, or can be accessed by clients. Method 1: Using Telnet to check Please run the following command from a remote machine (Please don't run this command in the same network of VPN-X server. You should run it at another place or network ): telnet <your vpn-x server public/internet IP> 25000 You can find the public IP from the VPN-X server status panel or visit this page http://checkip.dyndns.com from VPN-X server machine. For example: telnet 74.125.127.100 25000 If you got a response from the VPN server side, then you can access your VPN-X from 55 anywhere. In other words, your VPN-X server is on the Internet. This method can’t detect UDP protocol. If you want to check UDP, please use method 2. Method 2: Using VPN-X client to check the network status Input public IP of VPN-X and port, corresponding protocol, and random user name and password. You can find the public IP from VPN-X server status panel or visit this page http://checkip.dyndns.com from VPN-X server machine. By default: Port 25000, the protocol can be UDP or TCP Port 25443, the protocol should be TCP(TLS/SSL) After filling in all of these with a random password and user name, please click the login button. If you receive a password or user name error dialog, congratulations! Your VPN-X server is on the Internet/public. You can use the correct user name and password to login. If you receive a timeout error dialog, the VPN-X server is not on the Internet/public. 12 Technical Support 12.1 FAQ(Frequently Asked Questions) Please read section 11 first. That can cover 90% of potential problems. You can find more here: FAQ from BirdsSoft Website 12.2 Contact Us We would like to kindly remind you that we are not birdsoft. We are BirdsSoft! To save your time, please contact us with Email. Email: [email protected] (Recommended) SKYPE: birdssoft QQ: 184058240 Official VPN-X club Forum: http://forum.birdssoft.com/forum/ 56